| CATEGORII DOCUMENTE |
| Asp | Autocad | C | Dot net | Excel | Fox pro | Html | Java |
| Linux | Mathcad | Photoshop | Php | Sql | Visual studio | Windows | Xml |
About masks (Photoshop)
Masks let you isolate and protect areas of an image as you apply color changes filters,
or other effects to the rest of the image. When you select part of an image the area that is not selected is masked or protected from editing. You can also use masks for complex image editing such as gradually applying color or filter effects to an image.
In addition masks let you save and reuse time-consuming selections as alpha channels.
(Alpha channels can be converted to selections and then used for image editing.) Because masks are stored as 8-bit grayscale channels you can refine and edit them using the full array of painting and editing tools.
When a mask channel is selected in the Channels palette foreground and background colors appear as grayscale values (See "Creating temporary masks in Quick Mask mode
(Photoshop) on section 278


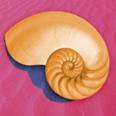
A B C


Examples of masks:
A Opaque mask used to protect the background and color the shell B Opaque mask used to protect the shell and color the background C. Semitransparent mask used to color the background and part of the shell
In Photoshop you can create masks all stored at least temporarily as grayscale channels, in the following ways:
Quick Mask mode lets you create and view a temporary mask for an image. Temporary masks are useful when you don t want to save the mask for later use (See "Creating temporary masks in Quick Mask mode (Photoshop) on section 278
Alpha channels let you save and load a selection to be used as a mask (See "Storing masks in alpha channels on section 280
Layer masks and vector masks let you produce a mix of soft and hard masking edges on the same layer By making changes to the layer mask or the vector masks you can apply a variety of special effects (See "Masking layers on section 314
Creating temporary masks in Quick Mask mode
(Photoshop)
Quick Mask mode lets you edit any selection as a mask without using the Channels palette and while viewing your image. The advantage of editing your selection as a mask is that you can use almost any Photoshop tool or filter to modify the mask For example if you create a rectangular selection with the marquee tool you can enter Quick Mask mode and use the paintbrush to extend or contract the selection or you can use a filter to distort the edges of the selection. You can also use selection tools because the quick mask is not a selection.
Start with a selected area and use Quick Mask mode to add to or subtract from it to make the mask Alternatively create the mask entirely in Quick Mask mode Color differentiates the protected and unprotected areas. When you leave Quick Mask mode the unprotected areas become a selection.
A temporary Quick Mask channel appears in the Channels palette while you work in Quick
Mask mode However you do all mask editing in the image window.
To create
a temporary mask:
Using any selection tool select the part of the image you want to change.
Click the
Quick Mask mode button ![]() in the toolbox.
in the toolbox.

Selected area and Quick Mask mode applied
A color overlay (similar to a rubylith) covers and protects the area outside the selection. The original selection is left unprotected by this mask By default Quick Mask mode colors the protected area using a red 50% opaque overlay.
To edit the mask select a painting or editing tool from the toolbox or select a filter or adjustment command from the menu bar By default painting with black adds to the mask shrinking the selection Painting with white removes areas from the mask, expanding the selection Painting with gray or another color creates a semitransparent area useful for feathering or anti-aliased effects.
Click the
Standard mode button ![]() in the toolbox to turn off the quick mask and return to
your original image
A selection border now surrounds
the unprotected area of the quick mask.
in the toolbox to turn off the quick mask and return to
your original image
A selection border now surrounds
the unprotected area of the quick mask.
If a feathered mask is converted to a selection the boundary line runs halfway between the black pixels and the white pixels of the mask gradient. The selection boundary indicates the pixels transition from being less than 50% selected to more than 50% selected.
Apply the desired changes to the image Changes affect only the selected area.
Choose Select > Deselect to deselect the selection or save the selection.
To change the Quick Mask options:
Double-click
the Quick Mask mode button ![]() in the toolbox.
in the toolbox.
Choose from the following display options:
Masked Areas to have masked areas appear black (opaque) and to have selected areas appear white (transparent) Painting with black increases the masked area painting with white increases the selected area.
With this option
the Quick Mask button in the toolbox
appears as a white circle on a gray background .
![]()
Selected Areas to have masked areas appear white (transparent) and to have selected areas appear black (opaque) Painting with white increases the masked area painting with black increases the selected area.
With this option
the Quick Mask button in the toolbox
appears as a gray circle
on a white background .
![]()
To toggle between the Masked Areas and Selected Areas options for quick masks, Alt-click ( Windows) or Option-click (Mac OS) the Quick Mask mode button.
To choose a new mask color click the color box and choose a new color (See "Using the
Adobe Color Picker on section 261
To change the opacity enter a value between 0% and 100%.
Both the color and opacity settings affect only the appearance of the mask and have no effect on how underlying areas are protected Changing these settings may make the mask more easily visible against the colors in the image.
You can convert this temporary mask to a permanent alpha channel by switching to standard mode and choosing Select > Save Selection.
Storing masks in alpha channels
In addition to the temporary masks of Quick Mask mode you can create more permanent masks by storing them in alpha channels. This allows you to use the masks again in the same image or in a different image.
You can create an alpha channel in Photoshop and then add a mask to it. You can also save an existing selection in a Photoshop or ImageReady image as an alpha channel that will appear in the Channels palette in Photoshop.
About alpha channels (Photoshop)
An alpha channel has these properties:
Each image (except 16-bit images) can contain up to 24 channels including all color and alpha channels.
All channels are 8-bit grayscale images capable of displaying 256 levels of gray.
You can specify a name color mask option and opacity for each channel ( The opacity affects the preview of the channel not the image.)
All new channels have the same dimensions and number of pixels as the original image.
You can edit the mask in an alpha channel using painting tools editing tools and filters.
You can convert alpha channels to spot color channels.
Creating alpha channels (Photoshop)
You can create a new alpha channel and then use painting tools editing tools and filters to add the mask to it.
To create an alpha channel using current options:
Click
the New Channel button at the bottom
of the Channels palette. The new channel is named according
to the sequence in which it was created.
![]()
Use a painting or editing tool to paint in the image Paint with black to add to the channel paint with white to remove from the channel paint with a lower opacity or a color to add to the channel with lower opacities.
To create an alpha channel and specify options:
Do one of the following:
Alt-click ( Windows) or Option-click (Mac OS) the New
Channel button at the bottom
of the palette.
![]()
Choose New Channel from the Channels palette menu.
Type a name for the channel.
Select display options for the channel as described in steps 2 through 4 of the procedure for changing Quick Mask options in "Creating temporary masks in Quick Mask mode (Photoshop) on section 278 Alpha channel options are identical to Quick Mask options.
Click OK A new channel appears at the bottom of the Channels palette and is the only channel visible in the image window.
Click
the eye icon next to
a color channel or the composite
color channel to display the image
with a color overlay.
![]()
Use a painting or editing tool to paint in the image Paint with black to add to the new channel paint with white to remove from the new channel or paint with a lower opacity or a color to add to the new channel with lower opacities.
Saving a mask selection
You can save any selection as a mask in a new or existing alpha channel.
To save a selection to a new channel with default options (Photoshop):
Select the area or areas of the image that you want to isolate.
Click
the Save Selection button at the bottom
of the Channels palette
A new channel appears named according to
the sequence in which it was created.
![]()
To save a selection to a new or existing channel:
Select the area or areas of the image that you want to isolate.
Choose Select > Save Selection.
Do the following in the Save Selection dialog box and click OK:
(Photoshop) Choose a destination image for the selection in the Document menu.
By default the selection is placed in a channel in your active image. You can choose to save the selection to a channel in another open image with the same pixel dimensions or to a new image.
Choose a destination channel for the selection from the Channel pop-up menu.
By default the selection is saved in a new channel. You can choose to save the selection to any existing channel in the selected image or to a layer mask if the image contains layers.
If you re saving the selection as a new channel enter a name for the channel in the
Name text box In ImageReady you can change the default channel name if desired.
If you re saving the selection to an existing channel select how to combine the selec- tions Replace Channel to replace the current selection in the channel Add to Channel to add the selection to the current channel contents Subtract from Channel to delete
the selection from the channel contents Intersect with Channel to keep the areas of the new selection that intersect with the channel contents.
In Photoshop you can select the channel in the Channels palette to see the saved selection displayed in grayscale A selection saved in ImageReady will appear in a new or existing channel in the Photoshop Channels palette.
Modifying alpha channels (Photoshop)
You can edit an alpha channel to add or remove color in it and you can specify settings for the masking colors and opacity.
See "Managing channels (Photoshop) on section 268 for information on rearranging dupli- cating or deleting alpha channels.
To edit an alpha channel:
Use a painting or editing tool to paint in the image Paint with black to add to the channel, paint with white to remove from the channel or paint with a lower opacity or a color to add to the channel with lower opacities.
To change an alpha channel's options:
Do one of the following:
Select the channel in the Channels palette and choose Channel Options from the palette menu.
Double-click the channel thumbnail in the Channels palette.
Enter a new name for the channel.
Choose display options as described in steps 2 through 4 of the procedure on Quick
Mask options in "Creating temporary masks in Quick Mask mode (Photoshop) on section 278
See "Modifying spot channels on section 273 for information on changing Spot Color channel options.
Note: You cannot modify options for the default color channels.
Loading a selection into an image
You can reuse a previously saved selection by loading it into an image In Photoshop,
you can also load the selection into an image when you have finished modifying an alpha channel.
To load a saved selection using shortcuts (Photoshop):
Do one of the following in the Channels palette:
Select the alpha channel
click the Load Selection button at the bottom
of the palette and then click the composite
color channel near the top of the palette.
![]()
Drag the channel containing the selection you want to load onto the Load Selection button.
Ctrl-click ( Windows) or Command-click (Mac OS) the channel containing the selection you want to load.
To add the mask to an existing selection press Ctrl+Shift ( Windows) or Command+Shift
(Mac OS) and click the channel.
To subtract the mask from an existing selection press Ctrl+Alt ( Windows) or
Command+Option (Mac OS) and click the channel.
To load the intersection of the saved selection and an existing selection press
Ctrl+Alt+Shift ( Windows) or Command+Option+Shift (Mac OS) and select the channel.
To load a saved selection into an image (Photoshop):
Choose Select > Load Selection For Document the active filename is selected.
For Channel choose the channel containing the selection you want to load.
Click Invert to make the nonselected areas selected and vice versa.
If the destination image already has a selection indicate how to combine the selec- tions (For information on these options see "Saving a mask selection on section 281.) To load a saved selection into an image (ImageReady):
Choose Select > Load Selection then choose an option from the submenu.
To load a selection from another image (Photoshop):
Open the two images you want to use.
Note: The images must have identical pixel dimensions. (See "Changing the pixel dimen- sions of an image" on section 67
Make the destination image active and choose Select > Load Selection.
For Document choose the source image.
For Channel choose the channel containing the selection you want to use as a mask.
Click Invert if you want to make the nonselected areas selected and vice versa.
If the destination image already has a selection indicate how to combine the selec- tions (For information on these options see "Saving a mask selection on section 281
|
Politica de confidentialitate | Termeni si conditii de utilizare |

Vizualizari: 934
Importanta: ![]()
Termeni si conditii de utilizare | Contact
© SCRIGROUP 2025 . All rights reserved