| CATEGORII DOCUMENTE |
| Asp | Autocad | C | Dot net | Excel | Fox pro | Html | Java |
| Linux | Mathcad | Photoshop | Php | Sql | Visual studio | Windows | Xml |

Easy Start Guide for Windows Media Player 10
Easy Start Guide for Windows Media Player 10
Selecting music to sync to your portable music player
Adding music to the library by searching your computer
Adding music to the library by ripping a CD
Creating a playlist of songs to sync to your portable music player
Connecting your portable music player to your computer
Synchronizing music to your portable music player
With Microsoft Windows Media Player, you can easily and quickly add just the songs you want to your new portable music player.
There are three main tasks to learn before you can play your music on your portable music player. First learn how to find and select music on your computer that you want to sync (copy) to your portable player. Second, learn how to connect to your portable player, and third, sync the songs on your computer that you want to listen to on the portable player.
Watch the accompanying video to get started quickly, and then refer to these steps to do the tasks yourself.
This article has the following sections:
Selecting music to sync to your portable music player
Adding music to the library by searching your computer
Adding music to the library by ripping a CD
Creating a playlist of songs to sync to your portable music player
Connecting your portable music player to your computer
Synchronizing music to your portable music player
You have a number of options for adding content to your library. You can add digital media files that are already on your computer, or rip (copy) music from your music CDs to your computer, or download files from online stores. This section covers how to find and add music that is already on your computer to the library and rip a CD.
To add music to the library, you must have your computer turned on and connected to the Internet. You must also have Windows Media Player 10 running on your computer, and the music CD that has songs that you would like to sync to your portable music player should be with you.
You may already have some music on your computer that you want to add to your portable music player. Use Windows Media Player to find and add it to the library. Note that once music is added to the library, you can play it on your computer and sync it to your portable player.
To add music on your computer to the library
In the Player, click Library, and then do one of the following:
If this is the first time that you have used your library, the Player gives you the option to search your computer for media files to add to the library, as shown in the following screen shot.
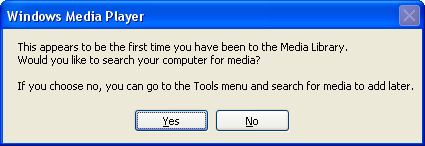
If you don't want to search your computer for media files at this time, click No, and skip the rest of these steps; otherwise click Yes, and then follow these steps.
If you did not see the screen that asked if you wanted to search your computer for media, and you want to search now, below the Contents pane click Add to Library, and then click By Searching Computer
The Add to Library by Searching Computer dialog box appears, as shown in the following screenshot.
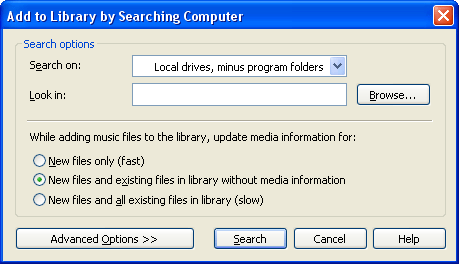
To continue searching for media files to add to the library, do the following:
In the Search on list, click the drive you want to search.
To search one folder on your computer, to the right of the Look in box, click Browse, and then navigate to the folder that you want. After you click your desired folder, click OK. Using the Browse option in this step makes for a faster search if your music files are all in one folder, for example in the My Music folder.
You can select your preferences for updating media information, or accept the defaults.
Click Search.
The Player searches your computer and adds media files on your computer to the library. Depending on the size of your digital media collection and the speed of your computer processor, this process may take some time.
Now that you have added music on your computer to the library, you are ready to rip (copy) a CD to the library.
You may also want to add music to your library that is not already on your computer. You can do this by ripping (copying) music from a CD.
Note To rip a CD, you must eject this Easy Start CD before you insert a music CD. Also, note that you can follow these steps at times other than when you are learning from the Easy Start CD.
To rip music from a CD to your computer
If Windows Media Player is not open, click Start, point to All Programs, and then click Windows Media Player.
If you are connected to the Internet, media information about the songs being ripped will be displayed in the Library.
Insert a music CD into the CD-ROM drive that has songs that you would like to sync to your portable music player, and then click the Rip tab, as shown in the following screen shot.
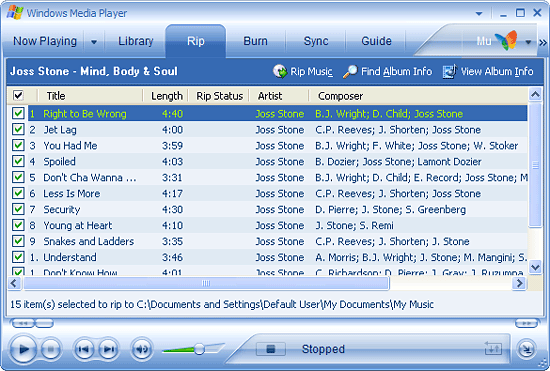
The CD may begin to play when you insert it. If it does, click the Stop button. All songs are selected to be ripped if you have not previously ripped them.
If there are any songs that you do not want to rip, clear the check box next to each.
Note To select or clear all the songs at once, use the check box at the top of the list.
Click Rip Music.
The first time that you rip music, you are prompted about your preferences. The first page of the Rip Options dialog box asks about copy protecting the music that you rip, as shown in the following screen shot.
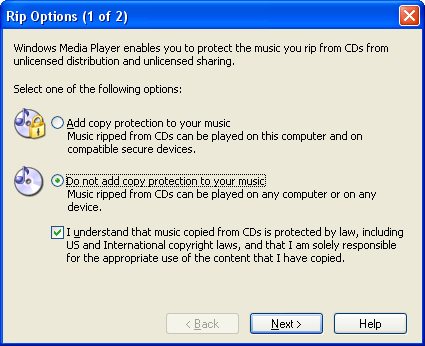
You may want to investigate copy protecting your music later, but for now just click Do not add copy protection to your music. By selecting this option, the songs that you copy to your computer can be played on your portable music player.
Read the copyright agreement, select the check box if you agree, and then click Next.
The second Rip Options page allows you to set the format for the files being copied, as shown in the following screen shot.
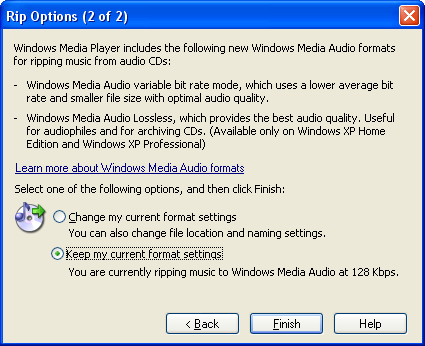
Click Keep my current format settings Selecting this option enables you to use the Windows Media Audio format for your music files, which optimizes the balance between file size and sound quality.
After you select an option for your format settings, click Finish.
The Player begins to rip your songs. After the songs have been ripped, you can find and play them in your library, as well as sync them to your portable player.
Now that you have added music to the library by ripping a CD, you are ready to create a playlist to sync to your portable music player.
An easy way to organize a group of songs that you want to sync to a portable music player is to create a playlist of the songs. You can use the album that you just ripped in the previous section to create a playlist.
To create a playlist
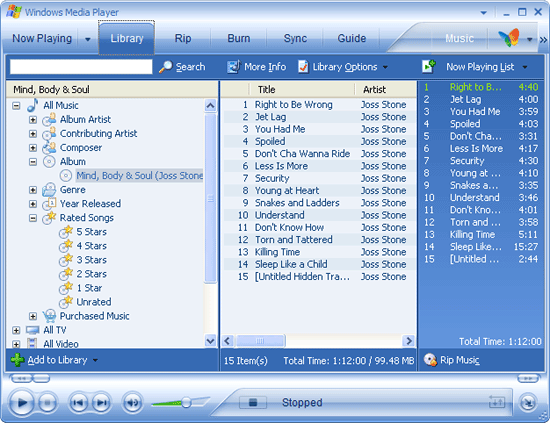
In Windows Media Player, click Library. The album that you just ripped is selected on the left in the Contents pane, and details about the individual songs like their titles and artists are displayed in the Details pane, as shown in the following screen shot. (In this case, the album that was just ripped is Mind, Body, and Soul.)
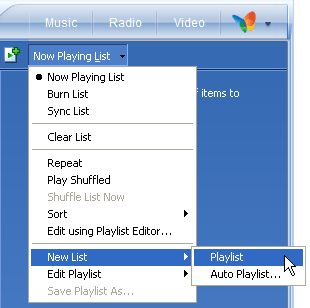
In the upper right portion of the Player, click Now Playing List, point to New List, and then click Playlist, as shown in the following screen shot.
Drag the album that you just ripped from the Contents pane on the left of your library to the List pane on the right of your library to add the songs on the album to the new playlist, as shown in the following screen shot.

To save the list, click Now Playing List, and then click Save Playlist As, as shown in the following screen shot.
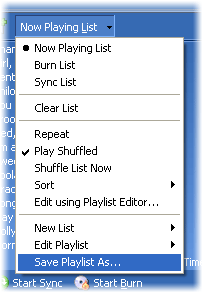
In the File Name box, type Practice Sync List, and then click Save.
Once you save the playlist, it is added to the My Playlists category in the library.
Now that you have music in the library and a playlist to sync, you are ready to connect your computer to your portable music player.
To connect your portable music player to your computer, you must have Windows Media Player open on your computer. Also, your portable music player and the cables that came with it should be with you.
To connect your portable music player to your computer
In the Player, click the Sync tab.
Turn your portable music player on.
Use the connection cables that came with your portable music player to connect your computer to your portable player.
One end of the connection cable is a standard USB connector, as shown on the right in the following screen shot.
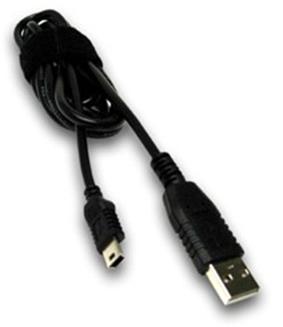
Plug this end into a USB connector on your computer. The other end of the cable has a connector that fits into your portable player, as shown on the left in the previous screen shot. Plug this end into your portable player.
Note Your cable may not look exactly like the one in the screen shot. If you need more information or help, consult the documentation that came with your portable music player.
You are now ready to sync (copy) music to your portable music player.
To sync music to your portable music player, you must have Windows Media Player running on your computer, your computer and portable player connected as mentioned in the previous section, and the playlist that you created earlier available in the library. If you did not create the playlist, you can practice synchronizing with any other music in your library, including the sample tracks that come with the Player.
Make sure that your portable music player is on.
When you connect your portable player to your computer for the first time, the Device Setup Wizard starts. This wizard helps you set up a sync relationship between the library on your computer and your portable player.
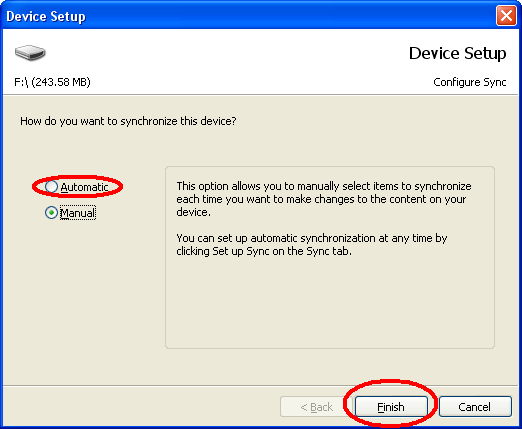
To automatically sync all the music in your library, on the Device Setup Wizard, click Automatic, and then click Finish, as shown in the following screen shot.
To put a particular playlist on your portable music player every time the portable player is connected to your computer, click Automatic and then select the Customize the playlists that will be synchronized check box, as shown in the following screen shot.
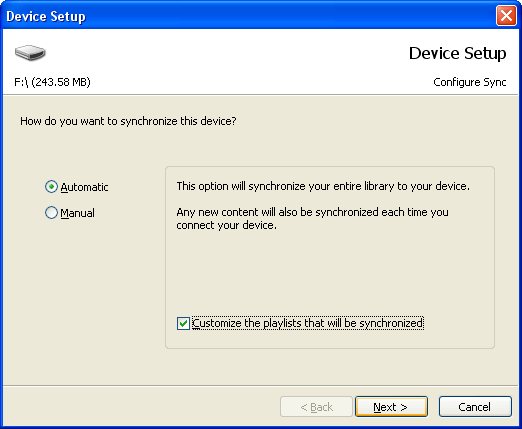
Click Next.
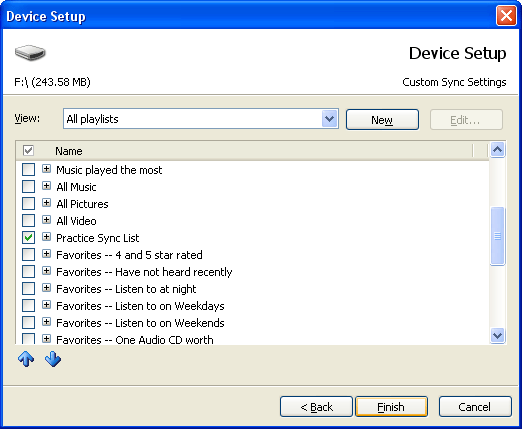
Select the check box next to the Practice Sync List (the playlist that you created earlier), as shown in the following screen shot.
Click Finish to begin synchronizing your music to your portable music player.
A Copying progress bar appears to the right of each song as it is copied to your portable player. When all the music is copied, you can disconnect your portable player and can now enjoy playing music on it.
|
Politica de confidentialitate | Termeni si conditii de utilizare |

Vizualizari: 1160
Importanta: ![]()
Termeni si conditii de utilizare | Contact
© SCRIGROUP 2025 . All rights reserved