| CATEGORII DOCUMENTE |
| Asp | Autocad | C | Dot net | Excel | Fox pro | Html | Java |
| Linux | Mathcad | Photoshop | Php | Sql | Visual studio | Windows | Xml |
When you install Exchange, you can join an existing organization or create a new organization, if one does not already exist. An Exchange organization defines your messaging environment. An organization includes all of the Exchange servers, domain controllers, global catalog servers, users, and other Microsoft Active Directory directory service objects that function together as a single entity. Exchange organizations can include multiple Active Directory domains, but they cannot span multiple Active Directory forests.
Note
You cannot change the organization name after it is created.
The configuration settings that you apply to an Exchange organization have the potential to affect all components within the organization. This chapter explains the basic administrative tasks that you use to manage your Exchange organization. Use this chapter to understand what it means to promote an Exchange organization to native mode, how to apply global settings to control message formatting and Simple Mail Transfer Protocol (SMTP) message filtering, how to manage your organization and servers using administrative groups and system policies, and how permissions and standardized security roles work in Exchange.
Microsoft Exchange Server 2003 and Exchange 2000 Server both take advantage of Active Directory, and therefore coexist in what is called a native mode organization. However, Exchange Server version 5.5 (and earlier) does not rely on Active Directory. This difference means that, when servers running either Exchange 2003 or Exchange 2000 coexist with servers running Exchange 5.5 (or earlier), the organization must run in what is called mixed mode. Some newer features and functionality in Exchange are unavailable when running in mixed mode. For example, routing groups function differently in mixed and native modes.
Note
For more information about routing groups, see Chapter 5,
'Understanding and Configuring Message Routing and Transport.'
By default, a new Exchange 2003 organization runs in mixed mode until it is promoted to native mode. You can only promote an Exchange organization to native mode if there are no servers running Exchange 5.5 (or earlier), and if no instances of Site Replication Service (SRS) are running. Ensure that you have properly upgraded all servers and any connectors before you switch to native mode. After you switch an organization to native mode, it can never return to mixed mode. This means you cannot add an Exchange 5.5 server to a native mode topology.
To switch from mixed mode to native mode
In Exchange System Manager, right-click your Exchange organization, and then click Properties.
On the General tab (see Figure 2.1), click Change Mode.

Figure 2.1 Change Mode option on the General tab
For more information about native and mixed modes, see the books Exchange Server 2003 Deployment Guide and Planning an Exchange 2003 Messaging System ( https://www.microsoft.com/exchange/library
Using global settings, you can configure system-wide settings in your Exchange organization. These settings can apply to all servers and recipients in an Exchange organization.
This section focuses on using global settings to configure the following:
How SMTP converts MAPI messages to Multipurpose Internet Mail Extensions (MIME).
How policies for SMTP domains control the formatting of messages that are destined for a domain and the types of automatic responses that can be sent to the domains.
How Exchange delivers messages organization-wide.
Global settings are also available for Exchange ActiveSync and Microsoft Outlook Mobile Access. For more information about Mobile Services and Outlook Mobile Access, see Chapter 6, 'Managing Client Access to Exchange.'
Internet message formats are used when messages are sent to or received from an Internet client. When a user sends mail from a MAPI client, such as Microsoft Outlook, to an Internet client, such as Outlook Express, SMTP converts the message from Microsoft rich text format (RTF) to MIME. The file name extensions that you define for each MIME type enable clients to recognize mail attachments and open them. By default, several content types are associated with file name extensions. Generally, the default associations are sufficient for content conversion.
To manage associations for file name extensions
In Exchange System Manager, expand Global Settings, right-click Internet Message Formats, and then click Properties.
On the General tab (see Figure 2.2), use the following options:
To associate a new file name extension with a MIME type, click Add.
To prioritize the associated extension that Exchange uses with each MIME type, click Move Up to move the extension up the list or Move Down to move the extension down the list. If two associated extensions exist for a single MIME type, Exchange uses the extension that appears higher on the list.
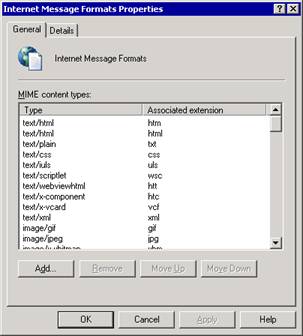
Figure 2.2 List of MIME content types on the General tab
You can use Internet message formats to define SMTP policies that control the format of messages that are sent to the Internet, or to specific external SMTP domains. These policies also control what types of automatic responses, such as out-of-office notifications, can be sent to Internet domains from users in your organization.
For each domain that is defined in Internet Message Formats, you can set the following properties:
Message formatting options that determine how messages sent to this domain are encoded, and which language character set is used to display these messages.
Advanced options that determine when messages are sent in Exchange RTF, how text is formatted, and what types of automatic responses, such as non-delivery reports (NDRs) or out-of-office notifications, are sent to this domain.
Important
Do not send mail exclusively in RTF because many non-Microsoft
mail servers cannot read rich-text messages. Servers that cannot read rich-text
messages provide their users with e-mail messages that include a Winmail.dat
file attachment. To avoid this problem, ensure that your message settings do
not use Exchange RTF exclusively.
The following sections explain the default policy, and how to create new policies for specific domains.
By default, an SMTP policy exists for the domain *, which encompasses all messages that are destined for the Internet. All messages that Exchange sends to the Internet use the settings on this policy. You can view this policy in the details pane when you select Internet Message Formats in Exchange System Manager, as shown in Figure 2.3.
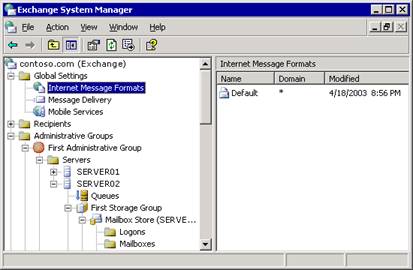
Figure 2.3 Default SMTP policy for all Internet domains
A policy must exist for the * domain. This policy controls how messages are sent to all external domains. If necessary, you can modify the properties on this policy.
In addition to modifying the policy for the * domain, you can create other policies for specific SMTP domains. For example, you want to communicate with a business partner who has an SMTP domain named contoso.com, and you want to allow out-of-office replies to be sent to this domain, but not to other external domains. You can create a new policy for the contoso.com domain that does exactly that. Because Exchange uses the SMTP policy that most closely matches the SMTP domain, all messages sent to Contoso users use the policy for the Contoso domain, but messages sent to any other SMTP domain use the default policy for the * domain.
To create a new policy
In Exchange System Manager, expand Global Settings, right-click Internet Message Formats, point to New, and then click Domain.
On the General tab (see Figure 2.4), enter a policy name and the SMTP domain.
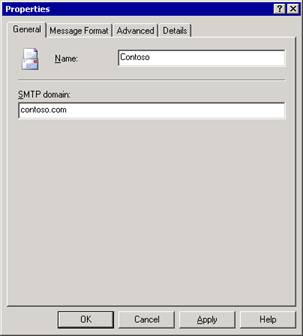
Figure 2.4 Entering a policy name and an associated SMTP domain
You can control how Exchange formats the messages that are sent to the domain or domains on a particular policy. You can have Exchange format these messages in either MIME or uuencode, so that non-MAPI clients can read these messages. Additionally, you can specify the character set that Exchange uses for outgoing messages. By default, all messages use the Western European (ISO-8859-1) character set.
To set the message formats for a policy
In Exchange System Manager, right-click the policy, and then click Properties.
On the Message Format tab (see Figure 2.5), select the message encoding and character sets that you want to use with this policy.
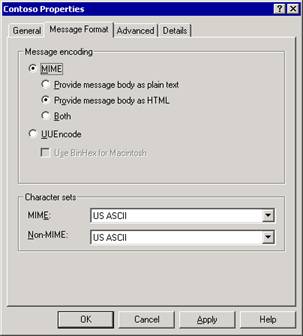
Figure 2.5 Message Format tab for the Contoso policy
Beyond specifying the message encoding and character sets to be used with a policy, you can also specify the following options:
When the policy uses Exchange rich-text format.
Whether messages sent using the policy allow message text wordwrapping.
What types of auto-responses can be sent to users in the domain or domains on the policy. For security purposes, you can prevent automatic responses to external domains. For example, you may want to prevent out-of-office responses.
To set advanced properties for a policy
In Exchange System Manager, right-click the policy, and then click Properties.
On the Advanced tab (see Figure 2.6), select the appropriate options.
Note
As stated earlier, do not select Always use
under Exchange rich-text format, unless you are
configuring a policy for a domain whose users always use MAPI clients.
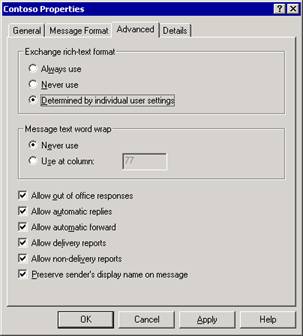
Figure 2.6 Advanced tab for the Contoso policy
You can use the Message Delivery Properties dialog box to configure the following message delivery options:
Default message delivery options, including message size restrictions for sending and receiving messages, and the maximum number of recipients that a message can have.
SMTP message filtering to control unsolicited commercial e-mail (also known as spam), using sender, connection, and recipient filtering.
To access the Message Delivery Properties dialog box
In Exchange System Manager, expand Global Settings, right-click Message Delivery, and then click Properties.
The Defaults tab in the Message Delivery Properties dialog box (see Figure 2.7) is where you configure the default restrictions for the following message delivery options:
The maximum message size that can be sent by users This is the Sending message size option, and it defaults to No limit users can send a message of any size). Based on your available network bandwidth and your user requirements, you may want to limit the maximum message size that is allowed in your organization. If a user attempts to send a message that exceeds the specified size limit, the user receives a non-delivery report (NDR) and Exchange will not send the message.
The maximum message size that can be received by users This is the Receiving message size option, and it defaults to No limit (users can receive a message of any size). Again, based on network bandwidth and user requirements, you may want to limit the message size. Senders within your organization receive an NDR if they attempt to send a message to a user that exceeds the specified size limit. Depending on the NDR settings that you configure in Internet Message Formats, external senders may or may not receive an NDR.
Note
For more information about Internet Message Formats, see
'Using SMTP Policies to Control Outbound Mail Formatting and Automatic
Responses' earlier in this chapter.
The maximum number of recipients to which a single message can be sent This is the Recipient limits option, and it defaults to recipients. Recipients include all users on the To, Cc, and Bcc lines, as well as expanded distribution lists. Select No limit to allow users to send and receive messages regardless of how many recipients to which the messages are addressed.
Exchange applies the settings for these options globally to all users. However, you can override these settings on a per-user basis in Active Directory Users and Computers. For information about how to override these settings, see Chapter 4, 'Managing Recipients and Recipient Policies.'
To change the default message delivery options
In the Message Delivery Properties dialog box, on the Defaults tab (see Figure 2.7), select the appropriate options.
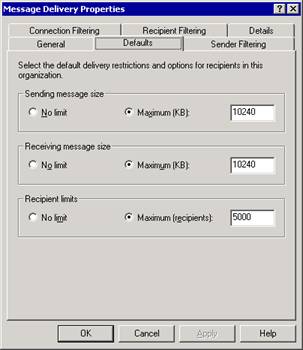
Figure 2.7 Defaults tab in the Message Delivery Properties dialog box
Although you configure SMTP message filtering options in the Message Delivery Properties dialog box, you must enable the filtering options on the individual SMTP virtual servers where you want to apply the filtering. Exchange applies these filters during the SMTP session when a remote SMTP server connects to the SMTP virtual server.
In Exchange 2003, you can configure sender filtering, connection filtering, and recipient filtering. Enabling filtering on an SMTP virtual server results in the virtual server checking the enabled filters when another SMTP server attempts to send mail into the organization.
Note
Exchange applies SMTP message filters only to messages sent from
external SMTP servers. Exchange does not apply SMTP message filters when
servers send messages between themselves within an Exchange organization. This
is because Exchange servers automatically authenticate with each other and
filter only mail that is submitted anonymously.
Sender filtering allows you to block messages sent by specific senders. This is useful if you receive unsolicited commercial e-mail from particular domains or sender addresses. You can block these messages by enabling sender filtering.
To enable sender filtering
On the Sender Filtering tab of the Message Delivery Properties dialog box (see Figure 2.8), click Add to add the SMTP address of a user or a particular domain from whom you want to block messages.
You can block an individual sender, an entire domain, or a display name (by entering the display name in quotes).
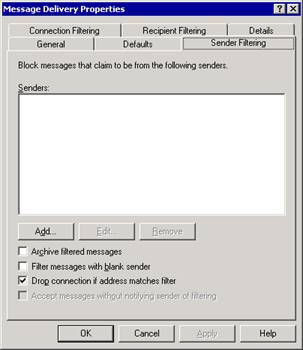
Figure 2.8 Sender Filtering tab in the Message Delivery Properties dialog box
To have Exchange save any messages that sender filtering blocks to an archive folder (instead of automatically deleting these filtered messages), select Archive filtered messages.
The archive folder is in the <drive>: Program FilesExchsrvrMailrootvsi narchive folder, where n is the virtual server instance of the SMTP virtual server where sender filtering is enabled.
To block messages with a blank sender address (a technique that some senders of unsolicited commercial e-mail messages use), select Filter messages with blank sender.
To end the SMTP session when a sender matches an address on the sender filter, select Drop connection if address matches filter.
To accept messages from senders on the block list without sending notification to the sender that mail was not delivered, select Accept messages without notifying sender of filtering.
Connection filtering blocks messages based on the Internet Protocol (IP) address of the connecting SMTP server. With regard to connection filtering, you can configure connection filtering rules, configure exceptions, and configure global accept and deny lists.
Note
For detailed information about connection filtering and how it
works, see 'Connection Filtering,' in Chapter 6, 'Transport
and Message Flow Features,' in the book What's New in
Exchange Server 2003 ( https://www.microsoft.com/exchange/library
Configuring Connection Filtering Rules
You can subscribe to a third-party block list provider and configure a connection filtering rule that checks against the provider's list of specific IP addresses.
Note
Specific configuration of connection filtering rules is dependent
upon the block list provider.
To configure a connection filtering rule
On the Connection Filtering tab (see Figure 2.9) of the Message Delivery Properties dialog box, under Block List Service Configuration, click Add.
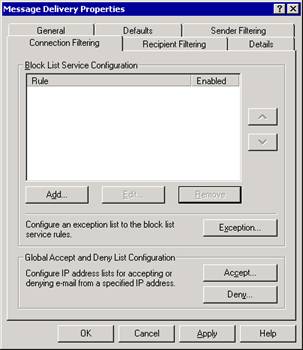
Figure 2.9 Connection Filtering tab in the Message Delivery Properties dialog box
Configuring Exceptions
You can specify whether specific SMTP addresses within your organization are allowed to receive messages from blocked IP addresses. For example, a connection filtering rule blocks a legitimate organization from sending mail to your organization. By entering your postmaster address as an exception to this connection filtering rule, an administrator from the legitimate organization can send an e-mail message to the postmaster in your organization to find out why his or her organization is blocked from sending mail.
To create a list of exceptions to connection filtering rules
On the Connection Filtering tab (see Figure 2.9) of the Message Delivery Properties dialog box, click Exception.
Configuring Global Accept and Deny Lists
If there are IP addresses from which you either always want to accept mail or reject mail, you can configure a global accept or deny list.
Global accept list
This list contains all of the IP addresses from which you always want to accept mail. Exchange checks this list before checking any other filters. If the connecting server's IP address appears on the global accept list, Exchange automatically accepts the mail and does not check any additional filters.
Global deny list
This list contains all of the IP addresses from which you always want to reject mail. Exchange checks this list immediately after checking the global accept list. If an IP address appears on the global deny list, Exchange automatically rejects the mail and does not check any additional filters.
To create either a global accept or deny list
On the Connection Filtering tab (see Figure 2.9) of the Message Delivery Properties dialog box, click Accept to add an IP address to the global accept list or click Deny to add an IP address to the global deny list.
Exchange 2003 also supports recipient filtering, so you can filter e-mail messages that are addressed to users who are not in Active Directory, or e-mail messages that are addressed to recipients who are commonly targeted by distributors of unsolicited commercial e-mail messages.
You can use recipient filtering to filter messages that a sender sends to any e-mail address, valid or invalid, within your organization. If a message is sent to any of the specified recipients, Exchange returns a 500-level error during the SMTP session.
By default, Exchange accepts mail addressed to any recipient (invalid or valid), and then Exchange sends NDRs for all invalid recipients. Usually, unsolicited commercial e-mail is sent from invalid addresses, so Exchange retries delivery of NDRs to non-existent senders and thereby wastes more resources. Enabling recipient filtering prevents Exchange from wasting resources in this way because you can filter e-mail that is sent to invalid recipients.
You can use recipient filtering to reject mail that a sender sends to invalid recipients (recipients that do not exist in Active Directory). However, doing so potentially allows malicious senders to discover valid e-mail addresses. The SMTP virtual server issues different responses for valid and invalid recipients. By comparing the responses issued by the SMTP virtual server for valid and invalid recipients, malicious users can identify valid e-mail addresses in your organization.
Note
Recipient
filtering rules apply only to anonymous connections. Authenticated users and
Exchange servers bypass these validations.
For more information about configuring and enabling filtering, see 'Connection Filtering' in Chapter 6, 'Transport and Message Flow Features,' in the book What's New in Exchange Server 2003 ( https://www.microsoft.com/exchange/library
To add a recipient to the recipient filtering list
On the Recipient Filtering tab (see Figure 2.10) of the Message Delivery Properties dialog box, click Add.
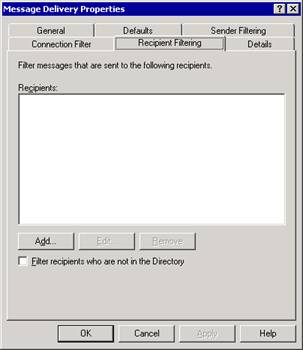
Figure 2.10 Recipient Filtering tab in the Message Delivery Properties dialog box
In Exchange 5.5 (and earlier), a site defined both the administrative boundary and the physical routing topology for a group of servers. Exchange 2000 (and later) split the concept of a site into physical and logical components, as follows:
Routing groups define the physical network topology of your Exchange servers.
Administrative groups define a logical grouping of servers and other objects for the purpose of administration.
For more information about routing groups, see Chapter 5, 'Understanding and Configuring Message Routing and Transport.' This section focuses solely on administrative groups.
An administrative group can contain any of the following Exchange objects:
Servers
Policies
Routing groups
Public folder trees
Administrative groups allow you to delegate specific administrative permissions, and define system policies for the administrative groups and the objects within the group. You can create system policies that control the administration of servers, mailbox stores, and public folder stores within an administrative group. Permissions and system policies are discussed in more detail later in this chapter.
The remainder of this section focuses on the following topics:
Understanding the types of administrative models
Displaying administrative groups
Creating administrative groups
Creating a system policy
Moving objects between administrative groups
Deleting administrative groups
Note
You should use the Exchange Administration Delegation Wizard to
assign a specific group permission to manage an administrative group. For more
information about the Exchange Administration Delegation Wizard, see
'Managing Permissions' later in this chapter.
Because administrative groups are logical, you can create administrative groups based on locations, departments, or functions. For example, a global company with branches in different countries could create administrative groups to delegate functional tasks. In a native-mode organization, you could create a single administrative group that contains servers only and use this specialized server administration group to create policies for all of the servers in your organization. You could then create another administrative group solely for the purpose of public folder administration, and then have a specialized team administer all public folders trees using this administrative group.
However, before creating these various functional administrative groups, you should understand your organization's administrative model, as dictated by your organizational structure and your security policy. When you understand your organization's administrative model, you can then implement administrative groups to accurately reflect this model.
This section presents the types of administrative models, and how these models affect your implementation of administrative groups. The administrative models discussed in this section are:
Decentralized administrative model
Centralized administrative model
Mixed administrative model
To illustrate these
administrative models, the following sections show how to apply each of these
models to a fictitious company called Contoso, Ltd. This fictitious company has
global branches in North America, Europe, and
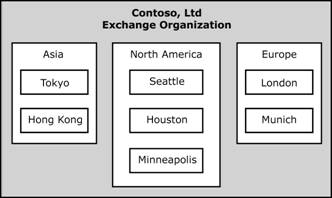
Figure 2.11 Branches in Contoso, Ltd
Note
In a mixed-mode organization, each site becomes a single
administrative group, and you cannot use the administrative models discussed in
this section.
In a decentralized administrative model, complete control over management of the Exchange system is distributed among the company's geographical regions or divisions. In this type of model, each region or division controls its own assets and performs its own system administration.
This type of organization probably has at least one administrative group in each division or group. Each location has its own team of Exchange administrators, who have full administrative control over objects within its administrative group.
Many companies implement a decentralized model to enable each company branch to function autonomously. For example, Contoso's global branches in the United States, Europe, and Asia each have control over an administrative group, a routing group, policies, servers, public folder trees, and other objects that are specific to that branch (see Figure 2.12).
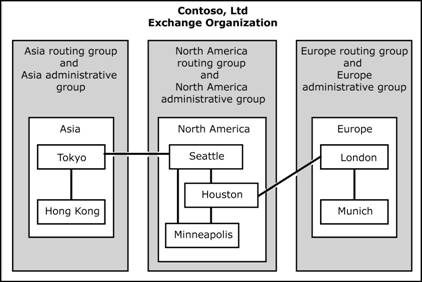
Figure 2.12 Decentralized administrative model
In a centralized model,
one or a few controlled administrative groups maintain complete control of the
Exchange system. For example, Figure 2.13 shows how Contoso's
administrative group in
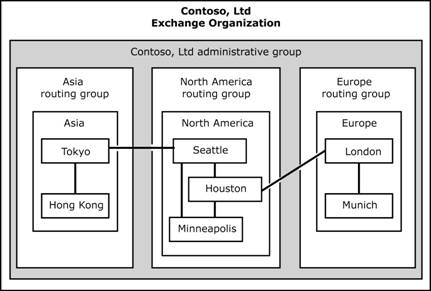
Figure 2.13 Centralized administrative model
This administrative model is similar to a data center where all administration tasks are performed by a single information technology group. This administrative model is typical in small-sized or medium-sized organizations, but can also be used in larger organizations that have high-bandwidth connectivity to all regional offices.
In a mixed model, administrative groups reflect both functional and geographic distribution. You create specialized administrative groups to restrict the management of certain functions to specific people, and create other groups to delegate administration along geographical lines. To illustrate this type of model, here are some sample administrative groups that you might want to create:
To restrict who can create and maintain policies, you can create an administrative group solely for the purpose of managing policies, which is a functional task.
To manage public folders in a specific region, you can create an administrative group solely for the purpose of managing a region's public folders, which is a geographical consideration.
You typically use the mixed administrative model in larger organizations that have many divisions or offices in many geographical locations. The mixed model can also apply when one company acquires another company.
Figure 2.14 shows how Contoso applies a mixed administrative model to its organization. To centrally administer public folders and policies, Contoso created one central administrative group for administering public folders and another for administering policies. The remaining administrative groups are regional and allow regional control of other functions, such as routing groups.
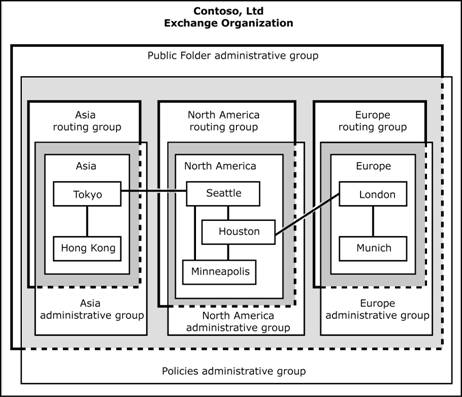
Figure 2.14 Mixed administrative model
After installing Exchange in an Exchange 2003 or Exchange 2000 organization, Exchange System Manager does not automatically display administrative groups and routing groups. You must configure your Exchange organization to display administrative groups. After you have configured this setting, you can view the Administrative Groups container and create additional administrative groups for your organization.
Note
If you install Exchange 2000 (or later) in an
Exchange 5.5 site, Exchange enables administrative and routing groups by
default. In this case, every Exchange 5.5 site appears as an
administrative group.
To display administrative groups
In Exchange System Manager, right-click your Exchange organization, and then click Properties.
On the General tab (see Figure 2.15), select Display Administrative groups.
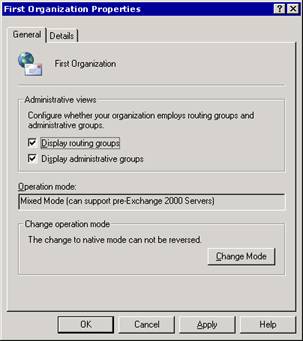
Figure 2.15 Displaying administrative groups
Restart Exchange System Manager for the changes to apply.
In the default configuration of an Exchange organization, only one administrative group exists. You can either install all servers into this single administrative group, which is useful in a centralized administrative model, or you can create additional administrative groups and install servers into the appropriate administrative groups, based on your administrative model.
By default, Exchange installs all servers into the First Administrative Group in the Server container. You can rename First Administrative Group, and add new system containers, but you cannot remove servers from the Server container in this group.
Note
In a mixed-mode organization, each Exchange 5.5 site becomes
its own administrative group, and the administrative group name matches the
site name.
You can add servers to an administrative group only during installation. Ideally, you should create the necessary administrative groups on the first Exchange server in your organization, and then install additional servers into the appropriate administrative groups. You can never move servers between administrative groups.
To create a new administrative group
In Exchange System Manager, right-click Administrative Groups, point to New, and then click Administrative Group.
You can move some of the objects in an administrative group to a different group. However, there are other objects that cannot be moved.
Objects that you can move between administrative groups are as follows:
System policies
Public folders
Routing group member servers (native mode only)
Objects that you cannot move between administrative groups are as follows:
Servers
Containers
You can move objects only between containers of the same type. For example, you can move a system policy from one system policy container to another system policy container in a different administrative group, but you cannot move a system policy into a public folder container. This type of action is blocked by default.
To move system policies or public folders between administrative groups
Cut the system policy or public folder from the source container, and paste it into the target container.
-or-
Drag the system policy or public folder from the source container to the target container.
Note
When you are moving or copying objects between administrative
groups, click Refresh to see the object in the new
container.
You can delete only administrative groups that contain no objects. After you have removed all of the objects within an administrative group, you can delete it.
To delete an administrative group
In Exchange System Manager, expand Administrative Groups, right-click the administrative group that you want to delete, and then click Delete.
The system policies that you create for an administrative group typically apply to objects within that group. However, a system policy can apply to objects outside of its own administrative group. For example, you can implement consistent message tracking options for all servers by creating a server policy in a central administrative group and applying it to all servers in your organization.
Policies appear in the System Policies container under an administrative group (see Figure 2.16).
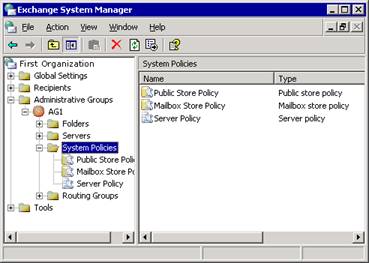
Figure 2.16 System Policies container
There are three types of system policies:
Public folder store policies Allow you to configure settings across public folder stores.
Mailbox store policies Allow you to configure settings across mailbox stores.
Server policies Allow you to enable message tracking options on servers.
Of the three types of system policies, this section discusses only server policies in more detail. For information about configuring public folder store policies or mailbox store policies, see Chapter 7, 'Managing Mailbox Stores and Public Folder Stores.'
System policies use an apply-time implementation to affect configuration changes. You can create a policy, define settings for that policy, associate that policy with one or more servers or public folder stores, and then apply the policy. After you apply the policy, the corresponding settings that are specific to that individual object become unavailable and appear dimmed. This is because the policy, not the individual object, now controls those settings. For example, if you create a policy that enables message tracking and apply the policy to an Exchange server, the message tracking options for the server are unavailable (see Figure 2.17). This configuration enables administrators to prevent further changes from being made to settings on individual objects that a policy controls.
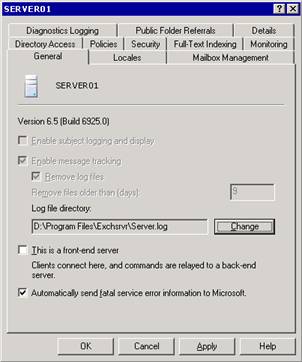
Figure 2.17 Message tracking options disabled on a server
You use a server policy for message tracking and maintenance
settings for message tracking log files. When you enable message tracking to
track messages, Exchange stores messages in the message tracking log file. By
enabling subject logging and display, you store message subjects in
Before you can create a server policy (or, for that matter, any other system policy) within an administrative group, you must add a system policy container. After you have created the system policy container, you can then create a server policy.
To create a system policy container
In Exchange System Manager, expand Administrative Groups, right-click the administrative group, point to New, and then click System Policy Container.
To create a server policy
In Exchange System Manager, expand Administrative Groups, expand the appropriate administrative group, right-click System Policies, point to New, and then click Server policy.
On the General (Policy) tab (see Figure 2.18), select the following options:
To log the message subject and make this subject visible when messages are tracked, select Enable subject logging and display.
To track all messages that flow to and from the server, select Enable message tracking.
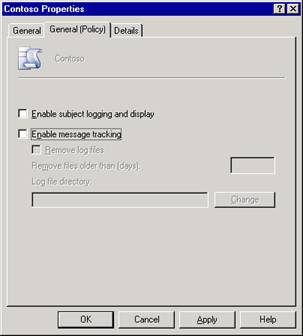
Figure 2.18 Message tracking options on a server policy
If you create a new policy that conflicts with settings in an existing policy, Exchange displays a dialog box that notifies you of the conflict. By default, the newer policy replaces an older policy. For example, you create a server policy with specified configurations, and you want to add the policy to a particular server. However, if the server is already under the control of another policy, a dialog box prompts you to verify whether you want to remove the server from the control of the other policy. You can choose to remove the server from the control of the previous policy, or apply the new policy you just created. If you do not resolve the policy conflict, the following message appears:
The objectname (for example, Server1) could not be associated with policy policyname (ServerPolicy) because you refused to remove the object from the control of conflicting policies.
After you create a server policy, you need to add servers to the policy.
To add servers to a server policy
In Exchange System Manager, expand Administrative Groups, expand the administrative group that contains the server policy to which you want to add servers, expand System Policies, right-click the server policy, and then click Add server.
In the Select the items to place under the control of this policy dialog box (see Figure 2.19), type the server name, and then click OK
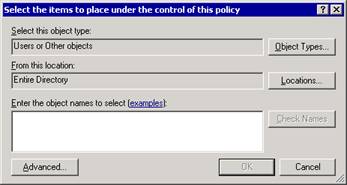
Figure 2.19 Selecting items for a server policy
Note
Figure 2.19 shows the dialog box that appears when you run
Exchange 2003 on Microsoft Windows ServerT 2003. If you run
Exchange on Windows 2000 Server, this dialog box offers the same
functionality but appears slightly different.
Using Exchange System Manager, you can view either the objects that the system policy controls or the policies that Exchange applies to an object:
To view the objects that a policy controls, click a policy in the System Policies container. The objects appear in the details pane under Policy Applied To.
To view the policies that Exchange applies to a particular object, click the Policies tab in the server's Properties dialog box.
In Exchange 2003, policies can be copied or moved between policy containers that are in different administrative groups. Copying policies allows you to delegate administrative control while maintaining consistent or similar settings in policies across various administrative groups. For example, you could create the server policy once, and then copy it to the system policy container in each of the other desired administrative groups. Then, the administrator of each individual administrative group could customize policies (from this template) to manage objects that are associated with his or her administrative group.
Note
Remember that you can copy only individual policies between
administrative groups. You cannot copy the system policy container from one
administrative group to another.
To copy policy objects between administrative groups
In Exchange System Manager, right-click the policy, click Copy, and then paste the policy in your target container.
Right-click the target container, and then click Refresh to view the policy in the container.
After you copy a policy, you need to apply it to the individual servers, mailbox stores, or public folder stores in the administrative group where you copied the policy.
You can modify a policy that is applied to one or more objects to change the properties on all of the objects.
To modify a policy
In Exchange System Manager, right-click the policy that you want to modify, click Properties, and then use the tabs to modify the policy.
After you have made the necessary modifications, right-click the policy, and then click Apply now to apply the changes.
To change the properties on all of the objects individually, you can also remove an object from the control of a policy or delete the policy itself.
To remove an object from the control of a policy
In Exchange System Manager, expand System Policies, and then click the appropriate system policy.
In the Policy Applied To column, right-click the object, point to All Tasks, and then click Remove from policy.
To delete a policy
In Exchange System Manager, right-click the policy that you want to delete, and then click Delete.
After a policy has been applied, settings associated with that policy remain intact on associated objects, even after an object has been removed from policy control or a policy itself has been deleted. If you want to change the settings that a policy applies, you must change them on the individual server, mailbox store, or public folder store.
As you manage your Exchange organization, some of your most important security tasks will involve permissions. The correct management of permissions in Exchange 2003 ensures that users and administrators can successfully complete those tasks that they need to perform, while preventing users and administrators from intentionally or inadvertently performing inappropriate tasks.
In Exchange 2003, there are three sets of permissions that you can manage:
Permissions for Exchange objects. These settings are stored in Active Directory and the Microsoft Internet Information Services (IIS) metabase.
Store permissions.
File permissions on NTFS volumes.
Together, these permissions provide the means to implement security on all elements in an Exchange 2003 installation.
This section focuses on using Exchange System Manager to manage permissions on Exchange objects in Active Directory and the IIS metabase. For detailed information about managing store permissions, see Chapter 7, 'Managing Mailbox Stores and Public Folder Stores.' For detailed information about understanding and managing NTFS permissions, see the Windows documentation and resource kits.
Important
You should only use Exchange System Manager to set permissions on
Exchange objects.
Almost every element in an Exchange installation is represented by an object. For example, the server itself, an SMTP virtual server, and a mailbox store are all represented as objects. Controlling each of these objects is a set of security permissions. Permissions on objects in Exchange 2003 build on permissions that the Windows operating system makes available through Active Directory and IIS. Exchange 2003 uses both Active Directory and the IIS metabase to store permissions information about Exchange objects.
To accommodate the fact that information regarding Exchange objects is in two places, you manage these objects using Exchange System Manager. This tool seamlessly presents objects that are stored in Active Directory and the IIS metabase. Thus, you are able to administer objects stored in two places through a single interface.
The permissions model that Exchange System Manager exposes builds on the Windows security model-an object-oriented security model, based on the concept of discretionary access control. This means that each Exchange object has its own discrete permissions that govern access to the object, and that these permissions can be administered by anyone who has the appropriate permission level. This security model makes it possible to implement delegated security models in which certain roles are assigned varying permissions based on the functional tasks performed by these roles in those environments whose security policy requires that capability.
However, the profusion of objects and permissions that enables Exchange to support complex security requirements can also make it seem complex to administer. Fortunately, Exchange System Manager simplifies managing permissions with the following:
Support for inheritance
Standardized security roles
Exchange Administration Delegation Wizard
Together, these features simplify the management of permissions so that most Exchange implementations can implement their security requirements without having to set permissions on individual attributes on individual objects.
In Windows, inheritance describes the process by which the creation of an object results in the object assuming, by default, the permissions of its parent object.
Inheritance simplifies the task of managing permissions in your Exchange system as follows:
It eliminates the need to manually apply permissions to child objects as they are created.
It ensures that the permissions attached to a parent object are applied consistently to all child objects.
When permissions on all objects within a container must be modified, you change the permissions on the container only once. The objects inside the container inherit the changes automatically.
For some Exchange objects, you can customize this inheritance. These objects are public folder trees, address lists, and mailbox stores. For these objects, you can specify that the child does not inherit permissions. Or, you can specify that only the following containers or subcontainers inherit permissions:
This container only
This container and all subcontainers
Subcontainers only
Inheritance makes it possible for permissions to be applied consistently within an object hierarchy. In itself, inheritance is an important tool for simplifying the application of permissions.
To help simplify the process of managing permissions, Exchange 2003 provides three predefined security roles that are available in the Exchange Administrative Delegation Wizard. These roles are a collection of standardized permissions that can be applied at either the organization or the administrative group level.
Note
For information about administrative groups, see 'Creating
and Managing Administrative Groups' earlier in this chapter.
When these roles are applied, the accounts or groups against which they are applied are immediately granted a set of standardized permissions on the object in question. Roles rely strongly on permission inheritance to ensure that permissions are applied consistently. When a role is applied, the standard permissions associated with that role are applied down the object hierarchy using inheritance.
Because the roles have been designed to meet the security requirements that are commonly found in an Exchange deployment, you should try to use these roles as much as possible.
The standard security roles that Exchange 2003 provides are:
Exchange Full Administrator This role can fully administer Exchange system information and modify permissions. This role is appropriate for those who need to be able to modify permissions, and view and administer Exchange configuration information.
Exchange Administrator This role can fully administer Exchange system information. This role differs from the Exchange Full Administrator primarily in that it cannot modify permissions. This role is appropriate for those who need to be able to view and administer Exchange configuration information without being able to modify permissions.
Exchange View Only Administrator This role can view but cannot administer Exchange configuration information. This role is appropriate for those who need to be able to view Exchange configuration information without being able to change that configuration information. As with the Exchange Administrator role, this role cannot modify permissions.
Note
The Exchange security roles should not be confused with security
groups in Active Directory. The roles are a collection of standardized
permissions that are applied to users or groups within Active Directory. The
roles can best be thought of as a template, rather than as a security group.
Because these roles are a set of standardized permissions, unlike security groups, roles inherently supersede one other. Therefore it is not necessary to apply both a higher and a lower privileged role. It is enough to apply the higher privileged role. Roles differ slightly, depending on whether they are applied to an organization or an administrative group. Consequently, the effective permissions that result when a role is applied can differ slightly.
Tables 2.1 to 2.3 list the effective permissions, based on the role applied and where it has been applied. These tables help explain how roles supersede each other, and the impact of differences at the organization level and administrative level.
Note
There is no table that shows the effective role at the
organization level from roles applied at the administrative group level. This
is because roles applied at the administrative group level apply only to the
local administrative group. Because administrative groups are underneath the
organization level in the hierarchy, the administrative group can inherit
permissions from the organization, but not vice versa.
Table 2.1 Effective roles at the administrative group level from roles applied at the administrative group level
|
Granted Exchange Administrator role |
Effective Exchange Administrator role |
||
|
View Only |
Administrator |
Full Administrator |
|
|
Exchange View Only Administrator |
Yes |
No |
No |
|
Exchange Administrator |
Yes |
Yes |
No |
|
Exchange Full Administrator |
Yes |
Yes |
Yes |
Table 2.2 Effective roles at the administrative group level from roles applied at the organization level
|
Granted Exchange Administrator role |
Effective Exchange Administrator role |
||
|
View Only |
Administrator |
Full Administrator |
|
|
Exchange View Only Administrator |
Yes |
No |
No |
|
Exchange Administrator |
Yes |
Yes |
No |
|
Exchange Full Administrator |
Yes |
Yes |
Yes |
Table 2.3 Effective roles at the organization level from roles applied at the organization level
|
Granted Exchange Administrator role |
Effective Exchange Administrator role |
||
|
View Only |
Administrator |
Full Administrator |
|
|
Exchange View Only Administrator |
Yes |
No |
No |
|
Exchange Administrator |
Yes |
Yes |
No |
|
Exchange Full Administrator |
Yes |
Yes |
Yes |
The Exchange Administration Delegation Wizard applies the standardized security roles at either the organization level or the administrative group level within Exchange System Manager.
It is important to remember that the Exchange Administration Delegation Wizard applies well-tested permissions in a consistent manner against objects in the Exchange hierarchy. Because of this consistency in application of permissions, the wizard is the recommended and preferred method of managing permissions in your Exchange environment. You should only apply customized permissions to individual objects when it is required by your security policy, and after thorough testing. Manually creating customized permissions increases the likelihood of problems, due to human error. It also increases the likelihood of creating inappropriate permissions, due to a misunderstanding of how permissions work. In addition, customized security settings will require increased maintenance because they must be documented, and the customized settings must be verified. Although there are instances where customized security is appropriate, the risks and costs should be weighed carefully.
You can launch the Exchange Administration Delegation Wizard from either the organization level or the administrative group level. As noted in 'Benefiting from Standardized Security Roles in Exchange' earlier in this chapter, the permissions associated with the role will then be applied down the hierarchy from the object from which you started the wizard. For example, if you start the wizard at the organization level, the permissions associated with the role will be applied to all objects underneath the organization in the hierarchy, including all administrative groups. Alternately, if you start the wizard at an administrative group, the permissions associated with the role will be applied only to the objects within the administrative group.
When you start the Exchange Administration Delegation Wizard, it prompts you to specify the users and groups to which you want to apply the security role. Generally, it is recommended that you place your users into security groups, and then use the wizard to apply roles against those groups. Applying permissions to individual users can quickly become difficult to manage.
After the wizard is finished, Exchange System Manager applies permissions to the group or the user selected within the hierarchy that the wizard was started from. The permissions are propagated down the hierarchy through inheritance. By using the wizard, it is possible to set all of the permissions on the Exchange objects in both Active Directory and the IIS metabase with only a few clicks.
Note
For more information about managing store permissions, see
Chapter 7, 'Managing Mailbox Stores and Public Folder Stores.'
|
Politica de confidentialitate | Termeni si conditii de utilizare |

Vizualizari: 1207
Importanta: ![]()
Termeni si conditii de utilizare | Contact
© SCRIGROUP 2025 . All rights reserved