| CATEGORII DOCUMENTE |
| Asp | Autocad | C | Dot net | Excel | Fox pro | Html | Java |
| Linux | Mathcad | Photoshop | Php | Sql | Visual studio | Windows | Xml |
XP is the most network-savvy of Microsoft's operating systems. Not only does it automatically recognize your network when you first install it, but it also includes a variety of wizards and other features that make it easy to connect to new networks and devices. Probably the biggest networking advance is built-in support for the wireless WiFi standard. Also, high on the list is a built-in firewall for protection.
In this chapter, you'll get over 20 networking hacks, including how to get the most out of wireless networking, command-line tools for troubleshooting networks, hacking firewalls, and how to optimize a home network, among many others.
WiFi networks are everywhere, it seems; you can get free Internet access on wireless community FreeNets armed with your laptop, a car, and software called Network Stumbler.
One of the coolest technological advances in popular use today is the wireless network. Wireless networks based on the WiFi standard (802.11x) are becoming increasingly common across the country-not only in people's homes, but also in universities, corporations, coffee shops, airports and other public places. Now you can bring your email to Starbucks.
There are frequently dozens near one another, particularly in
certain urban neighborhoods and suburban office parks that house high-tech
companies. Where I live-in
The widespread availability of these
inexpensive WiFi networks has led to a grassroots community wireless networking
movement. The idea is simple: allow people passing by to use your WiFi network
to hop onto the Internet and they in turn let you and
others use their WiFi networks for Internet access when you pass near their
homes or places of business. These wireless grassroots organizations are often
called FreeNets. You'll find them in cities including
How do you find these wireless networks? The best way is by doing what has become known as war driving-driving through neighborhoods with your laptop, special software, and, if you want to pick up more networks, an antenna hooked up to your WiFi card.
|
Run the software, and it not only locates the network, but also provides a variety of information about it that you can use to connect to it, such as its SSID (network name), whether it uses encryption, and the wireless channel it's on. Armed with that information, you should be able to connect to it if it's a FreeNet-for example, if it is set to allow anyone to connect to it, or if it uses a commonly agreed-upon security scheme that everyone in the FreeNet uses for their WiFi networks.
|
![]()
To go war driving, download the free Network Stumbler program (https://www.netstumbler.com), which shows you detailed information about any nearby wireless network. Figure 5-2 shows what happens when I run the software on my back porch. I can detect signals from four nearby WiFi networks in addition to my own.
For each WiFi network it uncovers, Network Stumbler tells you the network's SSID, name, manufacturer, channel, type, signal strength, signal-to-noise ratio, and whether the network's encryption is enabled, among other details. Armed with that information, you can try to connect to the network.
|
Once you've found a network, exit Network Stumbler. Then, to connect to the network, double-click on the small network icon in the System Tray (officially known as the XP Notification Area-the area of the Taskbar where XP corrals little icons). The Wireless Network Connection Status screen appears. (To see what it looks like, flip ahead to Figure 5-26.) From this screen, choose Properties >Wireless Networks, and you'll see the screen shown in Figure 5-3.
If this screen doesn't show you the network uncovered by Network Stumbler, click Refresh. If the network still doesn't show up, that's because the signal is too weak for you to connect to it. To connect to a network shown on this screen, click Configure and fill out the information required in the screen. You'll then get into the network.
Not everyone will be able to use Network Stumbler, because it won't work with all wireless network cards. As of this writing, it worked with the following cards (and possibly some others not listed here as well): Lucent Technologies WaveLAN/IEEE (Agere ORiNOCO); Dell TrueMobile 1150 Series (PCMCIA and mini-PCI); Avaya Wireless PC Card; Toshiba Wireless LAN Card (PCMCIA and built-in); Compaq WL110; Cabletron/Enterasys Roamabout; Elsa Airlancer MC-11; ARtem ComCard 11Mbps; IBM High Rate Wireless LAN PC Card; and 1stWave 1ST-PC-DSS11IS, DSS11IG, DSS11ES, and DSS11EG. For more information, go to C:Program FilesNetwork Stumblerreadme.html, assuming you've installed the program in C:Program FilesNetwork Stumbler.
Network Stumbler will find all wireless networks near you, not just those that are part of FreeNets. So, you may well find the wireless networks of people who don't realize that others outside of their homes or businesses can tap into their network. Some law enforcement officials will tell you that tapping into those people's networks is illegal, so be forewarned.
Network Stumbler lets you save your war-driving information in a file, and you can then upload that information to a web site (such as https://wifimaps.com) that uses your information and information provided by many other war-drivers to create maps of WiFi networks across the country. You can zoom in and out on these maps, so you can get a view of the concentration of WiFi networks in a metropolitan area, or you can see individual WiFi networks on individual streets, as shown in Figure 5-4.
Go to https://wifimaps.com to view the maps or to upload your Network Stumbler information. Be aware that the site is a volunteer effort, and, not uncommonly, you'll find that the maps aren't working. If that happens, check back again in a few days; it usually gets up and running after a while.
One way to increase the range of your war driving and the strength of the signal when you connect to WiFi networks is to build your own wireless antenna. You can build them for a few dollars using a tin can and other stray parts, as long as you're willing to do a little bit of soldering. Because they're built out of tin cans, they're frequently called cantennas.
My 13-year-old son Gabe built several for his seventh-grade science fair project and compared the effectiveness of each. The results were clear: the giant 34.5-ounce coffee cans were far superior to normal-sized coffee cans and Pringle's cans.
If you haven't bought a WiFi card yet and are considering
building one of these cantennas, I suggest buying an
There are many places online where you can find good directions for making cantennas. Three good places to start are www.oreillynet.com/cs/weblog/view/wlg/448, www.netscum.com/~clapp/wireless.html, and www.turnpoint.net/wireless/cantennahowto.html. Just so you get the idea of what you'll do, though, you first empty and wash the can. Next, you build the small antenna that will go inside the coffee can by soldering a short piece of thick copper wire to a small piece of hardware called an N connector. Then, drill a hole in the can and insert the small antenna you just soldered. Attach the antenna to the can by securing it with small screws and bolts. Attach one end of the pigtail to your wireless card, attach the other end to the N connector, and voila! You have a cantenna.
[Hack #57]; [Hack #53]
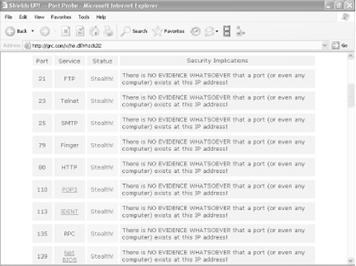
Head to this web site for a thorough, free check of your PC's vulnerabilities.
Do you really know how secure your PC is from intruders? Probably not. But there's a free online tool that will probe your PC for online security vulnerabilities and report to you on the results.
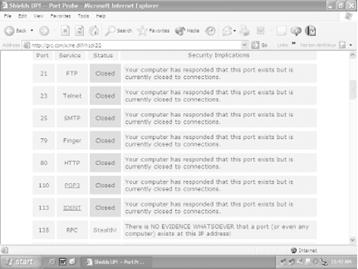
The site is run by the Gibson Research Corporation, and it tests your machine, trying to make connections to a handful of the most well-known and vulnerable Internet ports on your PC. The site runs two tests, reports to you on the results, and then explains what the reports mean-where you're vulnerable and how serious those vulnerabilities are. It also has a great deal of useful information about Internet security, as well as free and for-pay security software you can download. Visit the site at https://www.grc.com. You may have to do some clicking around to find the tests, but keep clicking on Shields Up! and you'll eventually get there.
The best use for the site is to test your PC's vulnerabilities, then install a firewall [Hack #46] and [Hack #48] and see the results of what you've done. It'll tell you whether there are any remaining vulnerabilities you need to fix. Figure 5-5 shows the results of a probe of a PC without a firewall. It's relatively secure, but could be more secure, because the site has found ports, even though they're closed. Figure 5-6 shows that the PC is operating in 'stealth mode' after the installation of the firewall-the PC doesn't even appear to exist.
A handful of DNS hacks for speeding up access to web sites.
You use the Web by typing in hostnames such as www.oreilly.com, but web servers and Internet routers can't understand plain English words, so they need those letters translated into numeric IP addresses. Whenever you type in a hostname, such as www.oreilly.com, it needs to be resolved to its IP address, such as 208.201.239.37. DNS servers provide that name resolution automatically and behind the scenes as you surf the Web.
There are several ways you can hack your DNS settings so that you can get faster web access.
It takes time to send your request to a DNS server, have the server look up the proper IP address to resolve the name, and then send the IP address back to your PC. You can eliminate that delay by creating or editing a local HOSTS file on your own PC that contains hostnames and their corresponding IP addresses. When you create one, XP will first look into the HOSTS file to see if there's an entry for the hostname, and, if it finds it, it will resolve the address itself. That way, you won't have to go out to a DNS server and wait for the response before visiting a web site. The HOSTS file is a plain text file you can create or edit with a text editor like Notepad.
You'll find an existing HOSTS file in C:System32DriversEtcHOSTS. The file has no extension; it is named only HOSTS. Open it in Notepad and enter the IP addresses and hostnames of your commonly visited web sites, like this:
oreilly.comEach entry in the file should be on one line. The IP address should be in the first column, and the corresponding hostname in the next column. At least one space should separate the two columns. You can add comments to the file by preceding the line with a #, in which case the entire line will be ignored by the file, or by putting a # after the hostname, in which case only the comment after will be ignored. You might want to comment on individual entries-for example:
gralla.com #still in betaWhen you're finished editing the file, save it to its existing location.
|
As a way of speeding up DNS, when you visit a site, XP puts the DNS information into a local DNS cache on your PC. So, when you want to go to a site, XP first looks in its local DNS cache, called the resolve cache, to see whether the DNS information is contained there. That way, if it finds the information locally, it doesn't have to query a remote DNS server to find IP information. The cache is made up of recently queried names and entries taken from your HOSTS file.
The cache contains both negative and positive entries. Positive entries are those in which the DNS lookup succeeded, and you were able to connect to the web site. When XP looks in the cache, if it finds a positive entry, it immediately uses that DNS information and sends you to the requested web site.
Negative entries are those in which no match was found, and you end up getting a 'Cannot find server or DNS Error' in your browser. Similarly, when XP looks in the cache and finds a negative entry, it gives you the error message without bothering to go out to the site.
Negative entries can lead to problems. When you try to make a connection to a site that has a negative entry in your cache, you'll get an error message, even if the site's problems have been resolved and it's now reachable.
You can solve this problem, though, using a Registry hack. By default, XP caches negative entries for five minutes. After five minutes, they're cleared from your cache. But if you'd like, you can force XP not to cache these negative entries, so that you'll never run into this problem. Run the Registry Editor [Hack #68] and go to HKEY_LOCAL_MACHINESYSTEMCurrentControlSetServicesDnscacheParameters. Create a new DWORD value with the name NegativeCacheTime and give it a value of . (The value may already exist. If it does, edit its value to .) The DWORD determines how much time, in seconds, to keep negative entries in the DNS cache. If you like, you can have the entries stay alive for one second by giving it a value of .
After you're done editing, exit the Registry. To make the change take effect, restart your computer, or flush your cache by issuing the command ipconfig /flushdns at a command prompt.
|
That command will flush your DNS cache-all the entries, both positive and negative, will be flushed, and it will be empty until you start visiting web sites. Negative entries, however, will not be added to the cache if you've given the DWORD a value of .
You can also use the Registry to control the amount of time that positive entries are kept in the DNS cache. By default, they are kept for 24 hours. To change the default, go to HKEY_LOCAL_MACHINESYSTEMCurrentControlSetServicesDnscacheParameters again and create a DWORD value called MaxCacheEntryTtlLimit. (If it's already present, just edit the value.) For the value, enter the amount of time you want the entry to remain, in seconds, making sure to use Decimal as the base.
Sometimes when you can't connect to a web site, the cause is a DNS problem. There are things you can do to solve these problems, though. If you're having trouble connecting, to find out if DNS is a potential culprit first ping [Hack #52] the site to which you can't connect, by issuing the ping command like this at the command prompt or Run box, like this:
ping www.zdnet.comIf the site is live, you'll get an answer like this:
Pinging www.zdnet.com [206.16.6.252] with 32 bytes of data:If it's not, you'll get a response like this:
If you ping a site and it's live, but you can't connect to it with your browser, a DNS problem might be the reason. If you suspect you're having a DNS problem, take the following actions:
Check your HOSTS file. If your HOSTS file contains an incorrect or outdated listing, you won't be able to connect. Even if you don't recall adding listings to a HOSTS file, it still may contain listings, because some Internet accelerator utilities edit them without telling you. Open your HOSTS file with Notepad and see if the site you can't connect to is listed there. If it is, delete the entry, and you should be able to connect.
Check
your DNS settings. Make sure your DNS settings are correct for your ISP
or network. Find out from your ISP or network administrator what yours are
supposed to be. Then, to find out your current DNS settings, double-click on
the problem connection in the Network Connections folder, choose Support ![]() Details,
look at the bottom of the tab to find your DNS
servers. If they don't match what they're supposed to be, right-click on the
problem connection and choose Properties. Then, highlight Internet Protocol
(TCP/IP) and choose Properties. Change the DNS servers to the proper ones, or
choose 'Obtain DNS server address automatically' if your ISP or
network administrator tells you to.
Details,
look at the bottom of the tab to find your DNS
servers. If they don't match what they're supposed to be, right-click on the
problem connection and choose Properties. Then, highlight Internet Protocol
(TCP/IP) and choose Properties. Change the DNS servers to the proper ones, or
choose 'Obtain DNS server address automatically' if your ISP or
network administrator tells you to.
Flush your DNS cache. The problem may be related to your DNS cache, so flush it out. To flush the cache, type ipconfig /flushdns at a command prompt.
Find out if your ISP is having DNS problems. The cause may be your ISP. One possibility is that one of its DNS servers is down, and you're trying to access the down server. Ping each of your ISP's DNS servers and, if any of them don't respond, remove them from your DNS list, as outlined earlier in this hack.
Lurking beneath Windows Media Player's slick exterior are potential invasions of your privacy. Here's how to fix them.
XP's Windows Media Player Version 8 poses potentially serious privacy problems that, theoretically, could allow Microsoft to track what DVDs you play and could allow for the creation of a supercookie on your PC that would let web sites exchange information about you. There are things you can do, however, to protect your privacy when you use Windows Media Player.
If you use Windows Media Player to play DVD movies, whenever a new DVD is played, Media Player contacts a Microsoft server and gets the DVD's title and chapter information. The server, in turn, identifies your specific version of Media Player, uses a cookie to identify the DVD you're watching, and then records information about the DVDs you watch on to a database on your hard disk in C:Documents and SettingsAll UsersApplication DataMicrosoftMedia Index.
Microsoft claims that the cookie used is an anonymous one that can't personally identify you. The company also says that it does not keep track of what DVDs individuals watch, and that the database created on your PC is never accessed from the Internet. Instead, the company says, it's used only by your own computer; the next time you put a DVD in your drive that you've played before, Media Player will get information from that database instead of getting it from a Microsoft web server.
Still, Microsoft has had its share of problems with privacy before, so you may or may not trust them to keep the information private. There are two solutions to the problem. You can change your cookie controls to the highest level [Hack #34] so that your PC will reject all cookies. That carries with it its own set of problems, however, because then you won't be able to use customization and other features of many web sites. A better solution is to open Media Player and choose File >Work Offline. That way, Media Player won't contact a Microsoft server.
As for the so-called supercookie that Windows Media Player creates, it's a unique ID number in the form of a 128-bit GUID (Globally Unique Identifier) assigned to your player and stored in the Registry. You can find it in HKEY_CURRENT_USERSoftwareMicrosoftWindowsMediaWMSDKGeneralUniqueID. This ID number can be retrieved by any web site through the use of JavaScript. The ID number is called a supercookie because it can be retrieved by any web site. Normally, web sites can retrieve only cookies that they create and put on your PC, so it becomes difficult for web sites to share information about you. However, this supercookie can be retrieved by any site to track you, and web sites can share this information with each other, allowing them to create a sophisticated profile about your Internet usage. Additionally, cookie blockers can't block its use.
There's an easy way to fix the problem and protect your privacy, though. From Windows Media Player, choose Tools >Options >Player. In the 'Internet settings' section, uncheck the box next to 'Allow Internet sites to uniquely identify your Player.' That's all it takes; the problem will be fixed.
If you download and install Windows Media Player 9, you can stop these privacy problems before they begin if you pay attention to the installation questions. During the installation, look for the screen asking you for your privacy preferences, as shown in Figure 5-7.
The Enhanced Content Provider and Customer Experience Improvement Program options are the ones that can be problematic. When you check boxes in those areas, Windows Media Player will report on your music and movie use to Microsoft and will also put the supercookie on your PC. So, if privacy is a concern of yours, just say no.
For more information about Windows Media Player privacy issues, read articles about it by privacy expert Richard Smith at www.computerbytesman.com/privacy/supercookie.htm and www.computerbytesman.com/privacy/wmp8dvd.htm.
XP's built-in firewall can do more than just provide basic protection. You can also use it to log potential attacks and send information about the intruders to your ISP.
Any time you're connected to the Internet, you're in some danger of intrusion, especially if you have a broadband connection. PCs with broadband connections are tempting targets, because their high-speed connections are ideal springboards for attacking other networks or web sites.
Whenever you're connected, your system is among many constantly being scanned for weaknesses by crackers (malicious hackers) and wannabes (often called script kiddies) sending automated probes looking for vulnerable PCs. In fact, these kinds of probes are so common and incessant, you can think of them as the background radiation of the Internet.
One of the best ways to protect yourself against these probes and more targeted attacks is to use a firewall. Firewall software sits between you and the Internet and acts as a gatekeeper of sorts, only allowing nonmalicious traffic through.
In this hack, we'll look at how to get the most out of the Internet Connection Firewall (ICF), the firewall built into XP.
|
The ICF offers basic Internet security by stopping all unsolicited inbound traffic and connections to your PC and network, unless your PC or another PC on the network initially makes the request for the connection. It will not, however, block outgoing requests and connections, so you can continue to use the Internet as your normally would for browsing the Web, getting email, using FTP, or similar services.
|
If you're sharing an Internet connection through a PC, only the PC that directly accesses the Internet should run ICF. All the other PCs will be protected. Don't run the ICF on any of those other PCs, because you'll cause connection problems. And don't use the ICF with a Virtual Private Network (VPN) connection, because it will interfere with various VPN functions, including file sharing. To set up a VPN, see [Hack #62].
The ICF has one very serious drawback: it won't protect you against Trojans, such as the Back Orifice Trojan. Trojans let other users take complete control of your PC and its resources. For example, someone could use your PC as a launch pad for attacking web sites and it would appear you were the culprit, or he could copy all your files and find out personal information about you, such as your credit card numbers if you store them on your PC.
The ICF won't stop them, because it blocks only incoming traffic and Trojans work by making outbound connections from your PC. To stop Trojans, get a third-party firewall. The best is ZoneAlarm [Hack #48].
Turn on the ICF by right-clicking on My Network Places and choosing Properties. From the Network Connections folder that appears, right-click on the connection you want to use ICF and choose Properties >Advanced. In the Advanced tab of the Local Area Connection Properties dialog box, shown in Figure 5-8, check the box next to 'Protect my computer and network by limiting and preventing access to this computer from the Internet.' Click OK. The firewall is now in place.
The ICF can do more than just protect you from intruders; it can also keep track of all intrusion attempts, so that you can know whether your PC has been targeted, and what kind of attacks the ICF has turned back. You can then send that information to your ISP, so that it can track down the intruders.
First, create a log of ICF activity. Right-click on My Network Places and choose Properties. In the Network Connections folder, right-click on the connection for which you want to set up an ICF log and choose Properties >Advanced >Settings >Security Logging. The dialog box shown in Figure 5-9 appears.
Choose whether to log dropped packets, successful connections, or both. A dropped packet is a packet that the ICF has blocked. A successful connection doesn't mean that an intruder has successfully connected to your PC; it refers to any connection you have made over the Internet, such as to web sites. Because of this, there's usually no reason for you to log successful connections. If you do log them, your log will become large very quickly, and it will be more difficult to track only potentially dangerous activity. So, your best bet is to log only dropped packets.
After you've made your choices, choose a location for the log, set its maximum size, and click OK. I don't let my log get larger than 1MB, but depending on how much you care about disk space and how much you plan to use the log, you may want yours larger or smaller.
The log will be created in a W3C Extended Log format (.log) that you can examine with Notepad or another text editor, or using a log analysis program such as the free AWStats (https://awstats.sourceforge.net). Figure 5-10 shows a log generated by the ICF, examined in NotePad.
Each log entry has a total of up to 16 pieces of information associated with each event, but the most important columns for each entry are the first 8. (In a text editor, the names of the columns don't align over the data, but they will align in a log analyzer.) Table 5-1 describes the most important columns.
Table 5-1. The columns in the ICF log |
|
|
Name |
Decription |
|
Date |
Date of occurrence, in year-month-date format. |
|
Time |
Time of occurrence, in hour:minute:second format. |
|
Action |
The operation that was logged by the firewall, such as DROP for dropping a connection, OPEN for opening a connection, and CLOSE for closing a connection. |
|
Protocol |
The protocol used, such as TCP, UDP, or ICMP. |
|
Source IP (src-ip) |
The IP address of the computer that started the connection. |
|
Destination IP (dst-ip) |
The IP address of the computer to which the connection was attempted. |
|
|
The port number on the sending computer from which the connection was attempted. |
|
|
The port to which the sending computer was trying to make a connection. |
|
size |
The packet size. |
|
tcpflags |
Information about TCP control flags in TCP headers. |
|
tcpsyn |
The TCP sequence of a packet. |
|
tcpack |
The TCP acknowledgement number in the packet. |
|
tcpwin |
The TCP window size of the packet. |
|
icmtype |
Information about the ICMP messages. |
|
icmcode |
Information about ICMP messages. |
|
info |
Information about an entry in the log. |
The source IP address is the source of the attack. You may notice the same source IP address continually cropping up; if so, you may be targeted by an intruder. It's also possible that the intruder is sending out automated probes to thousands of PCs across the Internet and your PC is not under direct attack. In either case, you can send the log information to your ISP and ask them to follow up by tracking down the source of the attempts. Either forward the entire log or cut and paste the relevant sections to a new file.
Depending on the email program you use and how it gets notification of new email, the ICF could interfere with the way you retrieve your email. It won't stop you from getting your email, but it could disable your email program's notification feature.
The ICF won't interfere with the normal notification feature of Outlook Express, because the initial request asking for notification of new email comes from Outlook Express, inside the firewall. When the server responds to the request, the firewall recognizes that the server is responding to the request from Outlook Express, so it lets the communication pass through.
However, if you use Outlook and connect to a Microsoft Exchange server using a remote procedure call (RPC) to send email notifications (which is usually the case with Exchange), you'll run into problems. That's because the RPC initially comes from the server, not from Outlook, so the firewall doesn't allow the notification to pass to you. In this case, you can still retrieve your email, but you'll have to check for new email manually; you won't be able to get automatic notification from the server. So, if you don't get new mail notifications after you install the ICF, it's not that coworkers, friends, and spammers are suddenly ignoring you; you'll just have to check for new mail manually.
[Hack #51]
[Hack #43]
Many private businesses protect their networks with proxy servers. But you can get the same kind of protection at home-for free-without buying any new hardware.
Proxy servers protect your PC by offering a kind of relay protection. When you use a proxy server, Internet Explorer contacts the proxy instead of the Web site. The proxy delivers the page to you if the page is in its cache. If the page is not in its cache, it contacts the site, grabs the page, and then delivers the page to you. In this way, you never directly contact a web site or other Internet location; instead, the proxy server does, so it, rather than you, will be the target of attack or privacy invasion by the site. Proxy servers can be configured for any kind of Internet access, not just web browsing.
Some businesses use proxy servers as part of corporate-wide security precautions, and if you work at such a business your work PC has been specifically set up to use those servers. But even if you are not at a business with a proxy server you can still use one to protect your PC. You won't have to set up and run the proxy server yourself; instead, you can use one of the many free ones available on the Internet.
Setting up a proxy server in this way is a two-step process. First, find a free, public proxy server. Then, set up your PC to use it. To find a free, public proxy server, go to Stay Invisible (https://www.stayinvisible.com) and click on View Proxies. The site lists hundreds of free, public proxies from around the world and updates the list daily, as shown in Figure 5-11.
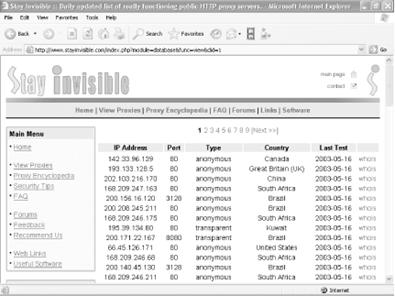
Choose a proxy server from the list, and copy down its IP address and port number. If you want to double-check that the server is functioning, go to the Check Your Proxy section on the left side of the web page, type its IP address and port number, and click on Check. If the server is functioning, a page will pop up with the server's IP address and name (often, the name is the same as the IP address). If the server is not functioning, you'll get a message telling you the connection can't be made.
Once you've
confirmed a working proxy server and copied down its IP address and port
number, it's time to configure Internet
Explorer to use it. Open Internet Explorer, choose Tools ![]() Internet
Options
Internet
Options ![]() Connections,
and click on Settings if you use a dial-up connection and LAN Settings if you
access the Internet using an always-on connection, such as over a LAN or via a
cable modem or DSL modem. The options will be the same for both ways of access.
Figure 5-12 shows the LAN Settings dialog
box for configuring a proxy server.
Connections,
and click on Settings if you use a dial-up connection and LAN Settings if you
access the Internet using an always-on connection, such as over a LAN or via a
cable modem or DSL modem. The options will be the same for both ways of access.
Figure 5-12 shows the LAN Settings dialog
box for configuring a proxy server.
Type in the address of the proxy server and its port number. For local domains, you need to use a proxy server because they will be secure. Check the 'Bypass proxy server for local addresses' box if you know your local domain is secure.
If you're at work and the company uses separate proxy servers for different Internet services, such as FTP and Gopher, click on the Advanced button. From there, you'll be able to fill in the specific information about proxy servers for each Internet service.
If you have a reason for wanting to limit your PC to visiting only certain web sites and banning it from visiting any others-such as for a child's computer, which you want to have only very limited Internet access-you can hack the proxy server settings to accomplish that.
Go to the LAN Settings dialog box (shown in Figure 5-12), and enable use of a proxy server. Then, click on the Advanced button and the Proxy Settings dialog screen appears, as shown in Figure 5-13.
For the HTTP: entry, type in a word, such as nowhere, or type in an Internet address that doesn't exist. When you do this, you're telling Internet Explorer to use a proxy server that isn't there. This effectively blocks access to the Internet, because instead of going to a web site, Internet Explorer will go to a proxy server. But because the proxy server doesn't exist, your browser won't be able to visit any site.
Next, check the box next to 'Use the same proxy server for all protocols.' This will ensure that you're blocking Internet access for other services, such as FTP, not just for the Web.
You've now effectively blocked access to the Internet for the PC. Now you can enable a setting that will let the PC visit only specific web sites. In the Exceptions section, type the locations of the web sites you want to allow to be visited, separated by a semicolon. This Exceptions box tells Internet Explorer to bypass the proxy server for the listed sites, so it will go straight to those sites, bypassing the not-there proxy.
Once you put those settings into effect, whenever your PC tries to access the Web it will look for a proxy server that doesn't exist, so it won't be able to get onto the Internet. However, it will let you go to the web sites that you've put in the Exceptions section.
[Hack #51]
[Hack #43]
[Hack #39]
For the best protection, get this firewall that's far superior to XP's Internet Connection Firewall, and keeps you safe from Trojan horses and other dangers.
The Internet Connection Firewall (ICF) that ships with XP has one very serious deficiency: it can't monitor and block outbound traffic from your PC to the Internet. Many Trojan horses do their damage by installing themselves on your system and then allowing others to take control of your PC, or using your PC to attack web sites, servers, and other computers. The ICF won't offer you protection against these types of Trojans; it won't be able to tell when a Trojan is making an outbound connection, so the Trojan will be able to do its damage without your knowledge.
Other firewalls, however, will offer that protection. The best of them is ZoneAlarm (https://www.zonealarm.com). There are three versions of the program, a free version and two for-pay versions with differing levels of protection. The free version offers excellent protection against inbound threats as well as against Trojans. It also tells you whenever someone is probing your computer for security holes and gives information about the prober, often including his IP address, and the nature of the probe.
ZoneAlarm Plus, which sells for $39.95, also protects you against email-borne worms and viruses and does better tracking and reporting about those who may have tried to attack your PC. ZoneAlarm Pro, which sells for $49.95, does all that and gives you control over cookies, stops pop-up ads, and controls rogue ActiveX Controls and JavaScript applets. At a minimum, try ZoneAlarm, because, well, because it's free. If you feel you need more protection, you can go with a for-pay version. I've been using the free version for several years and have never felt the need to go to the paid version. Figure 5-14 shows a record of activity that ZoneAlarm Pro has monitored and blocked.
The most important feature of ZoneAlarm is its ability to block outgoing traffic from your PC. That way, you can be sure that a Trojan hasn't infected your PC and can't 'call out' to make contact with someone malicious, or be used to attack others from your PC. All versions of ZoneAlarm, the free as well as the for-pay, offer this protection. Since that's the most important feature, that's what's covered in most of this hack.
After you install ZoneAlarm, click on Firewall in the left panel, and you'll get to choose the level of protection (from Low to High) you want for the Internet Zone and the Trusted Security Zone (for computers on your network, or that you trust for some other reason). The settings are self-explanatory.
When you start using ZoneAlarm, alerts (such as the one shown in Figure 5-15) will start popping up every time a program attempts to make a connection to the Internet. It will most likely be a program you are familiar with, such as Internet Explorer, Outlook Express, or a similar program. If it's a program you're familiar with and you want the program to always be able to access the Internet, click on the box that reads 'Remember this answer the next time I use this program,' and then click Yes to let the program access the Internet.
If it's a program you're unfamiliar with or a program that you don't know why it would be connecting to the Internet, click on More Info. You may be asked whether to allow your browser to access the Internet. Click Yes, and you'll be sent to ZoneAlarm's site, which will offer some basic information about the alert. The general rule, though, is to allow only programs you are familiar with to access the Internet. If you've just launched a program that requires Internet access and you get the alert, let the program access the Internet. Or, you might want to let a program you've just installed contact the maker's web site for automatic updates and patches, if you like that sort of thing. But if the alert pops up for no reason at a random time and you're unfamiliar with the program, you should deny it access. You should also immediately run an antivirus program to see whether it can detect a Trojan.
If you allow the program to access the Internet, and check the box so that you're not alerted next time, it will always be able to access the Internet. If you want to always be alerted when the program tries to access the Internet, don't check the box.
After you designate a program as always being allowed to access the Internet, it will be put into a list that ZoneAlarm maintains about trusted programs. You can customize any program on that list, take programs off the list, or customize their security settings: click on Program Control in ZoneAlarm's left panel, and click on the Programs tab. You'll see a screen similar to Figure 5-16.
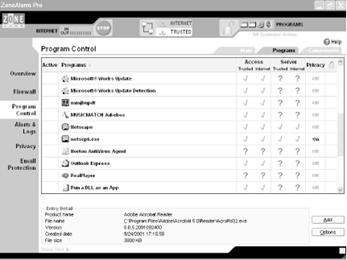
Use this screen to customize how you'll allow each program to access the Internet. By inserting a check mark in the appropriate column, you can choose whether to allow the program to access the Internet or Trusted Zone, whether you want it to act as a server in the Internet or Trusted Zone, and similar features. A check mark means that the program is allowed to access the Internet; an X means that it's not allowed to access the Internet; and a ? means that it should ask before being allowed to access the Internet.
[Hack #33]
[Hack #34]
[Hack #39]
[Hack #50]
Residential gateways let you share broadband Internet access and build a home network. Here's how to get the most out of your residential gateway.
Encrypting File SystemIt's quite easy to set up inexpensive hubs/routers, usually called residential gateways, for setting up a network at home and sharing Internet access. But the default settings aren't always optimal, because no network is one-size-fits-all. And, frequently, the documentation for the gateways is so poor that it's hard to tell even what the settings are and what options you have.
Residential gateway options differ somewhat from model to model. Here's advice for how to customize the most common and most important settings:
Connect on Demand and Maximum Idle Time settings
Depending on your Internet service provider (ISP), you may become disconnected from the Net after a certain amount of time of not using the Internet. To solve the problem, if your residential gateway has a Connect on Demand setting, enable it; that will automatically re-establish your Internet connection when you use an Internet service, even if your ISP has cut you off. If there is a Maximum Idle Time setting, set it to 0 so that your gateway will always maintain an Internet connection, no matter how long you haven't used the Internet. As a practical matter, you should need to use only one of these two settings; either one will maintain a constant Internet connection for you.
Keep Alive setting
Use this setting to maintain a constant Internet connection, even if your PC is idle. It's similar to Connect on Demand and Maximum Idle Time settings, except that it doesn't let your connection disconnect, so it is an even better setting to enable, if your gateway has it.
Router Password
Your router requires a password for you to use its administrator account. It comes with a default password. For example, Linksys routers come with a default password of admin. Change the password for maximum security.
Enable Logging
For security reasons, it's a good idea to enable logging so that you can view logs of all outgoing and incoming traffic. Depending on your gateway, it may save permanent logs to your hard disk or allow only the viewing of temporary logs. You may also be able to download extra software from the manufacturer to help keep logs. For example, Linksys routers use temporary logs, but if you want to save permanent logs, you can download the Linksys Logviewer software from https://www.linksys.com. You can view logs using a text editor, like Notepad, or a log analysis program, such as the free AWStats (https://awstats.sourceforge.net).
If you have DSL access, you may need to customize your gateway's settings in order to provide your network with Internet access; sometimes the gateway's settings block Internet access. Here are the settings you'll need to change so you can get onto the Internet:
PPPoE (Point to Point Protocol over Ethernet)
Some DSL ISPs use this protocol when offering Internet access. By default, this protocol is disabled on gateways, because it's normally not required for Internet access. However, if you have DSL access, you may need to enable it in your gateway.
Keep Alive setting
Some DSL ISPs will automatically disconnect your connection if you haven't used it for a certain amount of time. If your gateway has a Keep Alive setting, enable it by clicking on the radio button next to it; this will ensure that you are never disconnected.
MTU (Maximum Transmission Unit)
As a general rule, DSL users should use a value of 1492 for their MTU. The MTU sets the maximum size of packets that a network can transmit. Any packets larger than the MTU setting will be broken into smaller packets. DSL ISPs often set the MTU to 1492, so if you set a packet size larger or smaller than that, you may slow down Internet access.
|
If you use a Virtual Private Network (VPN) [Hack #62] to connect to your corporate network from home and you use a residential gateway, you may run into difficulties and not be able to connect to the VPN. Some gateways, such as those from Linksys, are specifically designed to work with VPNs and have specific setup screens for them; if you have one of those, you shouldn't have any problems. Make sure to get the proper encryption, authentication, and similar information about the VPN from your network administrator, and then use those settings for the VPN setup screen in your gateway.
However, you may run
into problems running a VPN with a gateway that doesn't have specific VPN
settings, even if the device claims that it will work with VPNs. In particular,
one default setting, hidden fairly deeply in most gateway setup screens, may
disable VPN access; some gateways, such as those made by Linksys, include an
option called Block WAN Request. By default, this option is enabled and
blocks requests into the network from the Internet; for example, it stops ping
requests into the network. However, enabling this option also blocks VPN
access. VPN access requires that requests get into the network from the
Internet, so if you block those requests the VPN won't work. If you have a
Linksys router, disable this setting by logging into your administrator's
screen, choosing Advanced ![]() Filters,
selecting Disable Block WAN Request, and clicking Apply. For other routers,
check the documentation.
Filters,
selecting Disable Block WAN Request, and clicking Apply. For other routers,
check the documentation.
VPNs use a variety of protocols for tunneling through the Internet, such as IPSec and the Point-to-Point Tunneling Protocol (PPTP). Make sure that these settings are enabled on your gateway if you want to use it in concert with a VPN.
Residential gateways often use Network Address Translation (NAT), in which the gateway's single, external IP address is shared among all the computers on the network, but each computer has its own internal IP address, invisible to the Internet. For example, to the Internet each computer looks as if it has the address of 66.32.43.98, but internally they have different addresses, such as 192.168.1.100, 192.168.1.101, and so on. The gateways have built-in DHCP servers that assign the internal IP address. These internal IP addresses allow each PC to communicate with each other and to connect to the Internet, and they also offer protection to PCs on the network. To the rest of the Internet, each PC has the IP address of the gateway, so each PC's resources can't be attacked or hijacked-they're invisible. The gateway itself doesn't have resources that can be used to attack you PCs, so you're safe.
But if you have servers on your network that need to provide Internet-related services (perhaps you have an FTP or web server), or if you need to allow certain PCs to be connected to from the Internet for specific purposes (such as for playing multiplayer games), you'll run into trouble because they don't have IP addresses that can be seen by the rest of the Internet.
However, with this trick, you can use your router to forward incoming requests to the right device on your network. For example, if you have a web server, FTP server, or mail server and want people to be able to connect to them, you'll be able to route incoming requests directly to those servers. PCs on the Internet will use your gateway's IP address, and your gateway will then route the requests to the proper device on your network. Normally, the devices would not be able to be connected to, because the IP addresses they are assigned by the gateway are internal LAN addresses, unreachable from the Internet.
Not all gateways include this capability. To use this feature in a Linksys gateway, log into to your administrator's screen and choose Advanced >Forwarding to get to the screen shown in Figure 5-17.
When this feature is enabled, the gateway examines incoming requests, sees what port they're directed to (for example, port 80 for HTTP), and then routes the request to the proper device.
Fill in each device's IP address, the protocol used to connect to it, and the port or port range that you want forwarded to it. It's also a good idea to disable DHCP (Dynamic Host Configuration Protocol) on each device to which you want to forward requests, and instead give them static internal IP addresses. If you continue to use DHCP instead of assigning them a static IP address, the IP addresses of the servers or devices may change and would therefore become unreachable. Check your gateway's documentation on how to force it to assign static IP addresses to specific devices.
Table 5-2 lists port addresses for common Internet services. For a complete list of ports, go to https://www.iana.org/assignments/port-numbers.
Table 5-2. Common Internet TCP ports |
|
|
Port number |
Service |
|
7 |
Echo |
|
21 |
FTP |
|
22 |
PCAnywhere |
|
23 |
Telnet |
|
25 |
SMTP |
|
42 |
Nameserv, WINS |
|
43 |
Whois, nickname |
|
53 |
DNS |
|
70 |
Gopher |
|
79 |
Finger |
|
80 |
HTTP |
|
81 |
Kerberos |
|
101 |
HOSTNAME |
|
110 |
POP3 |
|
119 |
NNTP |
|
143 |
IMAP |
|
161 |
SNMP |
|
162 |
SNMP trap |
|
1352 |
Lotus Notes |
|
3389 |
XP's Remote Desktop |
|
5010 |
Yahoo! Messenger |
|
5190 |
|
|
5631 |
PCAnywhere data |
|
5632 |
PCAnywhere |
|
7648 |
CU-SeeMe |
|
7649 |
CU-SeeMe |
This hack can help you avoid an extra charge from the cable company for your broadband service, or at least avoid having to call them with new information. Many broadband ISPs-cable modem ISPs in particular-require that you provide them with the MAC (Media Access Control) address of your network adapter in order for your connection to work. If when you began your broadband service you had a single PC, but you've since installed a gateway at home in order to set up a network and share Internet access among several PCs, you'll have to provide the ISP with your new gateway's MAC address.
Some ISPs might charge you a higher rate for cable access if you're sharing several PCs in this way. (Because of increasing competition among broadband providers, though, this has become far less common than it was previously.) There is a way, however, to use your existing MAC address with your new gateway by cloning the address. To your ISP, it looks as if your MAC address hasn't changed. You might want to do this even if your cable provider doesn't charge extra for several PCs, because it will save you having to call up the cable company's tech support line to provide a new MAC address.
Note that not all gateways have this capability, so yours may not be able to do it. Most Linksys gateways let you do this, so if you have a Linksys, do the following to clone your MAC address. Depending on your model, the exact steps may vary:
Find out your current network adapter's MAC address (the MAC address your broadband provider already has) by opening a command prompt, typing ipconfig /all, and looking under the entry for Ethernet adapter Local Area Connection. You'll see an entry like this:
Physical Address. . . . . . . . . : 00-08-A1-00-9F-32That's your MAC address.
Log into your administrator's screen for the Linksys router and choose Advanced >MAC Addr. Clone. A screen similar to Figure 5-18 appears.
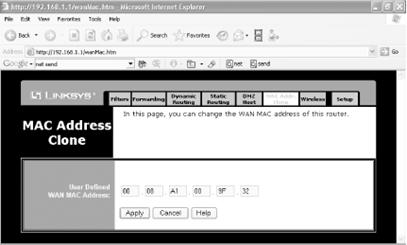
Type in the name of the MAC address you've obtained from your network adapter and click Apply. Your gateway will now be recognized by your ISP. Note that you may have to power down and power back up your cable modem in order for the gateway to be recognized.
|
Sometimes firewalls offer too much protection; they block unsolicited incoming traffic that you want to receive, such as if you're hosting a web site. Here's how to open a hole in your firewall to let only specific incoming traffic through.
Most firewalls block all unsolicited inbound traffic and connections, which can be a problem if you're running a web site, email or FTP server, or other service that requires you to accept unsolicited inbound packets. But you can punch a hole through your firewall, to let only that traffic in, while still keeping potentially dangerous intruders out.
First, decide what kind of unsolicited inbound traffic and connections you want to let through, and then find out which ports they use. For example, if you have a web server, you'll have to allow traffic through that's bound for port 80. Table 5-2 [Hack #49] lists common ports; for a complete list, go to https://www.iana.org/assignments/port-numbers.
How you allow traffic through a firewall varies from firewall
to firewall. To do it for XP's built-in Internet
Connection Firewall (ICF), first right-click on My Network Places to open the
Network Connections folder. Then, right-click on the connection for which you
want to enable the incoming services and choose Properties ![]() Advanced
Advanced
![]() Settings.
The Advanced Settings dialog box appears, as shown in Figure 5-19. To enable a
service and allow its incoming traffic through the firewall, put a check next
to it and click OK.
Settings.
The Advanced Settings dialog box appears, as shown in Figure 5-19. To enable a
service and allow its incoming traffic through the firewall, put a check next
to it and click OK.
|
For this screen, you won't have to know the port numbers for the services whose incoming traffic you want to let through; you just need to know which service you want to allow. XP will know to block or unblock the proper port.
If the default settings for the service you want to allow don't work properly, you can edit them. Depending on the service, you can change the service's name or IP address, its description, the internal and external port numbers the service uses, and whether it uses the TCP or UDP protocol. For example, if your business uses a VPN [Hack #62] with a different port number than the one used by ICF, you can change the port number ICF uses, so that your VPN will work. Some services include hardcoded properties that you can't change, while others will let you edit them. For example the Remote Desktop [Hack #58] can use only 3389 for external and internal ports and TCP as its protocol, and those can't be edited. But a few of the services, notably the VPN connections, let you edit the ports and protocol.
To edit the properties for one of the services, select it, choose Edit, and you'll see the Service Settings screen, as shown in Figure 5-20.
ICF allows you to let in about half-a-dozen services. Table 5-3 describes what each of the default services does. Note that the entry msmsgs might or might not show up in your system; Windows Messenger appears if you've used Windows Messenger or Outlook Express (which uses some Messenger components). Unlike all the other services listed, it is enabled by default, so it can already bypass the ICF. By default, though, all the other services listed in Table 5-3 are disabled.
Table 5-3. Services that can be allowed to bypass the ICF |
|
|
Service |
What it does |
|
FTP Server |
Allows others to connect to an FTP server on your PC. |
|
Incoming Connection VPN (L2TP) |
Allows for the use of a Virtual Private Network using the L2TP tunneling technology. |
|
Incoming Connection VPN (PPTP) |
Allows for the use of a Virtual Private Network using the PPTP tunneling technology. |
|
Internet Mail Access Protocol Version 3 (IMAP3) |
Allows others to connect to an IMAP3 email server on your PC to retrieve email. |
|
Internet Mail Access Protocol Version 3 (IMAP4) |
Allows others to connect to an IMAP4 email server on your PC to retrieve email. |
|
Internet Mail Server (SMTP) |
Allows others to use a Simple Mail Transfer Protocol (SMTP) server on your PC for sending email. |
|
IP Security (IKE) |
Allows for the use of the Internet Key Exchange (IKE) security technology. |
|
msmsgs |
Allows for the use of Windows Messenger, plus any software that uses its components, such as Outlook Express. |
|
Post-Office Protocol Version 3 (POP3) |
Allows others to connect to a POP3 email server on your PC to retrieve email. |
|
Remote Desktop |
Allows others to connect to your PC and take control of your desktop using XP Professional's Remote Desktop feature. (Available in XP Professional only.) |
|
Secure Web Server (HTTPS) |
Allows other to connect to a web server on your PC that uses the HTTPS security protocol |
|
Telnet Server |
Allows others to use a Telnet server on your PC to use your PC's resources. |
|
Web Server (HTTP) |
Allows other to connect to a Web server on your PC. |
Just because a service isn't listed in Table 5-3 doesn't mean that you can't allow its incoming traffic to bypass the ICF. You can add any service if you know its port information and the name or IP address of the PC on your network where you want the traffic routed. For example, to play some instant messenger games you'll need to allow port 1077 to get through. To add a new service, get to the Advanced Settings dialog box shown in Figure 5-19. Then click on the Add button and fill out the dialog box shown in Figure 5-21.
When you use the ICF and try to browse to another computer on your network to share its files, you may get an error message and you won't be able to connect to those files. That's because the ICF closes the ports used for file sharing and server message block (SMB) communications. (SMB is used by the network to allow file and printer access.) You also may not be able to browse the Internet through My Network Places.
To allow file sharing to work across the network and to allow browsing the Internet through My Network Places, open UDP ports 135 through 139, TCP ports 135 through 139, and TCP and UDP port 445 in the ICF.
The Internet Control Message Protocol (ICMP) enables troubleshooting and diagnostic services, such as ping [Hack #52]. By default, though, the ICF won't allow incoming ICMP traffic. You can allow various ICMP-enabled services to pass through your firewall by clicking on the ICMP tab on the Advanced Settings dialog box shown in Figure 5-19. From the screen that appears, shown in Figure 5-22, check the boxes next to the services you want to allow. To get a description of each service, highlight it and read about it in the Description area.
If you use the ZoneAlarm firewall [Hack #48], you can also allow specific unsolicited incoming traffic through. Click on the Firewall button on the left side of the screen, and then click on Custom for each of your security zones. The Custom Firewall Settings dialog box appears, as shown in Figure 5-23. Click on the service you want to allow through, click OK, and you'll be done.
[Hack #48]
[Hack #46]
You don't need a firewall to protect your PC; you can manually close down ports and block certain protocols.
As noted in [Hack #46] and [Hack #48], firewalls can protect your PC and your network from intruders. But if you don't want to install a firewall and you still want protection, you can manually close down ports and block protocols.
Some of these ports and protocols are more dangerous than others. For example, leaving open the port commonly used by Telnet (port 23) means that someone could use that service to take control of your PC. And the infamous Back Orifice Trojan, which also can give malicious users complete control of your PC, uses a variety of ports, including 31337 and 31338 among others. For a list of which ports are used by Trojans, go to https://www.sans.org/resources/idfaq/oddports.php.
In this hack, you'll need to know which ports you want to be open on your PC, such as port 80 for web browsing, and you'll close down all others. For a list of common ports, see Table 5-2 [Hack #49]. For a complete list of ports, go to https://www.iana.org/assignments/port-numbers.
To close down ports and protocols manually, right-click on My Network Places and choose Properties to open the Network Connections folder. Right-click on the connection for which you want to close ports and choose Properties. Highlight the Internet Protocol (TCP/IP) listing and choose Properties. On the General tab, click the Advanced button. From the Advanced TCP/IP Settings dialog box that appears, choose Options, highlight TCP/IP filtering, and choose Properties. The TCP/IP filtering dialog box appears. To block TCP ports, UDP ports, and IP protocols, choose the Permit Only option for each. Doing this will effectively block all TCP ports, UDP ports, and IP protocols.
You don't want to block all ports, though, so you have to add the ports that you want to allow to pass-such as port 80 for web access. You need to keep port 80 open if you want to browse the web. Click Add to add the ports or protocols that you will allow to be used, as shown in Figure 5-24. Keep adding as many ports and protocols as you wish to be enabled, and click OK when you're done. Only the ports and protocols that are listed will be allowed to be used.
When you need help tracking down network connection problems, the command line is the place to go.
If you're having problems with your network and network connections and you need troubleshooting help, forget XP's GUI; it doesn't offer you enough help. To get to the root of the problems, you're going to have to get down and dirty with command-line tools. ping and tracert are familiar tools that you might have used on occasion, but you might not know the depth of their power or the switches available to use with them. And you probably haven't heard of pathping, a kind of combination of the two commands.
The quickest, most commonly used, and, frequently most helpful TCP/IP troubleshooting tool is the command-line tool ping. Use ping to find out whether the resource or server you're trying to connect to on your network or the Internet is active, and to see if there are any problems with the hops along the way to that resource or server. ping sends Internet Control Message Protocol (ICMP) Echo Request messages to the destination you're checking on, receives responses in return, and reports to you information about the connection path between you and the destination and how quickly the packets made their trip. For example, if you are having trouble getting email from a server, your first step in troubleshooting should be to ping the server to see whether the server is live, and to see how responsive it is. To use ping, get to a command prompt and type:
ping targetwhere target is either a hostname or an IP address-for example, pop3.catalog.com, zdnet.com, or 209.217.46.121. In response, you'll get information in this format:
Pinging zdnet.com [206.16.6.208] with 32 bytes of data:If the host isn't active, instead of getting this report, you'll get the message 'Request timed out.'
If you enter a hostname, ping reports back with its IP address and then gives details about its four attempts to contact the host, a measurement of how long (in milliseconds) the packet took to make the round trip between your PC and the host, the Time To Live (TTL) information about each packet, and a summary of its findings.
The TTL field can tell you how many hops the packets took to get from your PC to its destination. TTL initially specified the amount of time a packet could live, in seconds, before it expires, as a way to make sure that packets didn't simply bounce around the Internet forever and create traffic jams. However, it has been reinterpreted to mean the maximum number of hops that a packet will be allowed to take before its destination. The default number is 25 Each time a packet takes another hop, its TTL is reduced by one. The TTL number that ping reports is the packet's final TTL when it reaches its destination. To find out the number of hops a packet takes, subtract its initial TTL (by default 255) from the TTL reported by ping. In our example, the packets took 13 hops to get to their destination.
You can use ping with switches, like so:
ping -a -l 45 208.201.239.237This command changes the packet size sent from its default size of 32 bytes to 45 bites, and resolves the IP address to a hostname-in other words, it lists the IP address's hostname.
ping has a wide variety of useful switches that you can use for all kinds of troubleshooting. You use the basic ping command to check whether an Internet or network resource is live and to see if there are any delays in reaching it. But, as Table 5-4 shows, you can use ping and its switches for many other purposes as well-for example, to find out the IP address of a hostname and vice versa.
Table 5-4. Useful ping switches |
|
|
Switch |
What it does |
| -a |
Resolves an IP address to a hostname. |
| -f |
Turns on the 'Don't Fragment' flag for a packet. This lets you send packets that don't get broken up and can be useful for when you want to test whether packets of a certain size are getting through. |
| -i value |
Sets the value of the TTL field, using a number from to When you use this field, even though the field will be set to the number you specify, note that the ping report will report back as if it were set to For example, if you set a TTL of and the packet takes 15 hops, the TTL value that ping reports will be . |
| -l value |
|
| -n count |
Specifies the number of ICMP Echo Request messages sent, instead of the default number of . |
| -r count |
Displays the IP addresses of the hops taken along the route to the destination. Specify a number between and . If the number of actual hops exceeds the number you specify, you will get a 'Request timed out' message. |
| -s count |
Displays a timestamp for the Echo Request and the Echo Reply Request for hops along the route. Specify a number between and . If the number of actual hops exceeds the number you specify, you will get a 'Request timed out' message. |
| -t |
Keeps sending the Echo Request message continually until stopped by pressing Ctrl-Break, Pause, or Ctrl-C. |
| -w value |
The maximum amount of time (in milliseconds) to wait for an Echo Reply message for each Echo Request message before issuing a timeout message. The default is (4 seconds |
Frequently, you have a connection problem over your network or the Internet not because your final destination is down, but because there's a problem with a router somewhere between you and your final destination. For troubleshooting those kinds of problems, use tracert. It displays the path that data takes en route to the server or service that you're trying to reach, either on your network or across the Internet. As with ping, it does this by sending ICMP Echo Request messages to the destination you're checking on. To use it, type tracert destination at a command prompt, where destination can be either an IP address or a hostname. Following is a typical response from a tracert command:
Tracing route to redir-zdnet.zdnet.com [206.16.6.208]If the destination can't be reached, you will get the message 'Destination unreachable.'
As you can see, tracert shows the IP address and hostname address of each hop, along with timing data for each hop. If you're having problems on your network, this can help you locate the source of the problem; if a hop has a particularly long delay, you know that's the cause.
You can use several switches with tracert, like this:
Tracert -d -h 45 zdnet.comThis command traces to zdnet.com, displaying only the IP addresses of each router and specifying a maximum number of 45 hops en route to the destination. Table 5-5 shows the most useful tracert switches.
Table 5- Useful tracert switches |
|
|
Switch |
What it does |
| -d |
Does not display the hostname of each router. |
| -h value |
Sets a maximum number of hops for the trace to the destination. |
| -w value |
Sets the maximum amount of time in milliseconds to wait for a reply. |
The pathping command works like a combination of ping and tracert. Type pathping from the command line, like this:
pathping targetwhere target is either a hostname or an IP address-pop3.catalog.com or 209.217.46.121, for example. You then get a two-part report: first a list of every hop along the route to the destination, and then statistics about each hop, including the number of packets lost at each hop. It uses switches-for example:
pathping -n -w 1000 oreilly.comThis command tells pathping not to resolve the IP addresses of routers, and to wait one second (1,000 milliseconds) for an Echo Replay message. Table 5-6 lists the most important pathping switches.
Table 5-6. Useful pathping switches |
|
|
Switch |
What it does |
| -n |
Does not display the hostname of each router. |
| -h value |
Sets a maximum number of hops for the trace to the destination. The default is hops. |
| -w value |
Sets the maximum amount of time (in milliseconds) to wait for a reply. |
| -p |
Sets the amount of time (in milliseconds) to wait before a new ping is issued. The default is . |
| -q value |
Sets the number of ICMP Echo Request messages to transmit. The default is . |
[Hack #53]
More command-line tools for tracking down problems with your network connection.
In addition to well-known command-line network utilities such as ping, tracert, and pathping, there are several other all-purpose utilities that can help you troubleshoot network connections: netsh, netstat, and ipconfig.
netsh is a wide-ranging command-line diagnostic tool that has an exceedingly large number of commands available. (For a complete list of available commands, use Windows XP Help and Support and search for netsh.) Here you'll learn the most interesting.
Perhaps the most useful of the netsh commands are the netsh diag commands. Use them to find out information about your PC's network setup, such as finding the IP address of its mail server, newsgroup server, DNS server, and similar resources.
There are two ways to use netsh: directly from the command line with all its switches, or first getting to the netsh console by typing netsh at the command line and then typing the command from the netsh> prompt that appears. For example, you could type netsh diag show adapter at the command line, which lists every network adapter on your PC, or you could get to the netsh> prompt and type diag show adapter.
Use the netsh command to connect to the resources and then get information about them. For example, to find out the IP address of your DNS servers, type netsh diag show dns; to find out the IP address of your mail server, type netsh diag connect mail.
Table 5-7 list the most useful of the netsh diag commands. Precede each of them with netsh diag. Note that they each have many switches associated with them. For more details, use Windows XP Help and Support and search for netsh.
Table 5-7. Useful netsh diag commands |
|
|
Command |
What it does |
|
connect ieproxy |
Establishes a connection to Internet Explorer's proxy server, if one exists. |
|
connect mail |
Establishes a connection to the default Outlook Express mail server. |
|
connect news |
Establishes a connection to the default Outlook Express newsgroup server. |
|
ping adapter |
Establishes a connection with the named adapter. |
|
ping dhcp |
Establishes a connection with a DHCP server. |
|
show adapter |
Lists all the adapters on the PC. |
|
show all |
Lists all the network objects defined for the local PC, such as adapters, network clients, servers, modems, and other objects. |
|
show dhcp |
Lists all the DHCP servers for the specified adapter. |
|
show dns |
Lists all the DNS servers for the specified adapter. |
|
show gateway |
Lists all the gateways for the specified adapter. |
If you want to get a snapshot of all incoming and outgoing network connections, use the netstat command. At a command prompt, type netstat. It lists all connections, including the protocol being used, the local and Internet addresses, and the current state of the connection, like this:
Active ConnectionsIt will help you know whether connections are live, the network or Internet device to which they're connected, and which local resource is making the connection. It's best suited for when you're troubleshooting network problems and want to find out whether certain ports are open, why certain computers on the network are having connection problems, and similar issues. You can use command-line switches with netstat. For example, display open ports and open connections with this syntax: netstat -a. Table 5-8 lists netstat switches.
Table 5-8. Netstat switches |
|
|
Switch |
What it does |
| -a |
Displays all open connections and ports. |
| -e |
Displays Ethernet statistics about packets transmitted and received. Can be combined with the -s switch. |
| -n |
Displays the addresses and ports in numeric, IP address form. |
| -o |
Displays the process identifier (PID) that owns each connection. |
| -p proto |
Displays the connections used by the protocol, which can be IP, IPv6, ICMP, ICMPv6, TCP, TCPv6, UDP, or UDPv6. |
| -r |
Displays the network's routing table. |
| -s |
Displays statistics for each protocol. It lists all statistics for all protocols, but you can list only those for a specified protocol if you combine it with the -p switch. |
| interval value |
Run netstat repeatedly, pausing value seconds between each new display. To stop the display, press Ctrl-C. |
One of the most powerful tools for analyzing and troubleshooting TCP/IP problems is the ipconfig command-line utility. It provides information about each of your adapters, including the assigned IP address, subnet mask, default gateway, MAC address, DNS servers, whether DHCP is enabled, and a variety of other data. To see basic information about your adapters, type ipconfig at a command prompt, and you'll see information like this:
Windows IP ConfigurationAs you can see, ipconfig provides basic information about your IP address, subnet mask, default gateway, and a connection-specific DNS suffix, if any. However, you can get much more detailed information by using the /all switch, like this: ipconfig /all. For most troubleshooting purposes, use the /all switch. You get a much more comprehensive listing, as shown here:
Windows IP ConfigurationYou can also use ipconfig to release and renew IP addresses, and perform other troubleshooting functions as well. For example, to renew an adapter's IP address, use this command:
ipconfig /renew 'adapter name'where adapter name is the name of the adapter whose IP address you want to renew. Make sure to put quotes around the adapter name and use spaces if there is more than one word in the adapter name. Table 5-9 lists other switches you can use with ipconfig.
Table 5-9. Command-line switches for ipconfig |
|
|
Switch |
What it does |
| /all |
Displays complete TCP/IP configuration information. |
| /displaydns |
Displays information from the DNS resolver cache (for more information [Hack #44] |
| /flushdns |
Clears the DNS resolver cache [Hack #44] |
| /registerdns |
Refreshes all DHCP leases and reregisters DNS names. |
| /release 'adapter' |
Released the IP address for the specified adapter. |
| /renew 'adapter' |
Renews the IP address for the specified adapter. |
| /setclassid 'adapter' newclassid |
Resets the DHCP Class ID for the specified adapter. |
| /showclassid 'adapter' |
Displays the DHCP Class ID for the specified adapter. |
Speed up your network browsing by tweaking your registry.
When you use My Network Places to browse for other machines on your network, it usually takes a long time to display the list of shared resources for the target machine. This is because Windows XP first checks for the scheduled tasks on the target machine before listing the shared resources present on the computer.
|
This unnecessary checking can easily add 30 seconds of delay. You can decrease the time browsing takes by modifying the Registry to turn off this checking:
Invoke the Registry Editor by typing regedit [Hack #68] at the command line.
Open the Registry key:
HKEY_LOCAL_MACHINESOFTWAREMicrosoftWindowsCurrentVersionExplorerDelete the following key (the value for it is the Scheduled Tasks, as shown in Figure 5-25):
Close the Registry and reboot.
That's it! You should now be able to browse to another computer on the network without much delay.
The efficiency and throughput of WiFi networks can vary dramatically. Make sure you get maximum throughput from your wireless network.
If you have more than one PC at home, the best way to hook them together and share a high-speed Internet connection is via a wireless network-in particular, one based on the WiFi standard, which is actually a family of standards known under the umbrella term of 802.11x.
The biggest problem in setting up a home network usually involves running the wires between PCs and a residential gateway. If your PCs are on different floors of the house, you may have to drill holes in your walls, ceiling, and floors and run wire through. Even when PCs are on the same floor, you have to deal with the problem of wires snaking along the floor.
That's the problem I've had in my 150-year-old home in
So, for me, a wireless network was a no-brainer. I now have got half-a-dozen PCs and laptops and three printers in remote parts of the house from each other, all connected via a combination wired/wireless network and sharing a single broadband Internet connection. And when the weather is nice here (twice a year, by my last calculation), I take my laptop out on my back porch and work from there while still connected to the Internet and other PCs and printers in the house.
But there's a catch with all wireless networks, including mine. Wireless networks rarely deliver data at their rated bandwidth speed. One factor affecting bandwidth speed is the distance between the access point and the wirelessly equipped PC. Compaq, for example, notes that at a distance of 150 feet the throughput of its wireless access point drops from 11 Mbps to 5 Mbps, and at a distance of 300 feet it drops to 2 Mbps. Even that significantly understates the drop-off in speed, and most people find that the drop-off is much more dramatic than that, most commonly by a factor of two.
WiFi and Buying New EquipmentThere are several versions of the 802.11x WiFi standard, and unfortunately, they don't all work with one another. So, when you're buying WiFi equipment such as hubs/routers, make sure they're compatible. The 802.11b standard was the first one to be ratified, is the most common type of WiFi network, and its equipment is the least expensive. (This is the standard commonly used by public wireless 'hot spots' in coffee shops, airports, hotels, and other locations.) It operates in the 2.4 GHz part of the spectrum and its maximum throughput is 11 Mbps. Increasingly popular, though, is the 802.11g standard, which also operates in the 2.4 GHz part of the spectrum but has a much higher maximum throughput: 54 Mpbs. 802.11b cards will connect to a 802.11g access point, but only at a maximum of 11 Mpbs. However, 802.11g cards can't connect to an 802.11b access point. As of this writing, problems have been reported using 802.11b hardware on an 802.11g network, however. There have been reports of incompatibilities and of the 802.11b hardware slowing the entire 802.11g network down to its slower speed. However, that's because the 802.11g hardware was built when the standard was only a draft and not a final standard. The standard has since been finalized, so if you buy new equipment, you should be safe. Be wary of buying older, used equipment, though. |
Distance is only one factor affecting performance. Interference from other devices and the exact layout of the house or office can also affect it dramatically. However, there are things you can do to extend the range of your network and get more throughput throughout your home:
Centrally locate your wireless access point. This way, it's most likely that all of your wirelessly equipped PCs will get reasonable throughput. If you put it in one corner of the house, nearby PCs may get high throughput, but throughput for others may drop significantly.
Orient your access point's antennas vertically. As a general rule, transmission will be better when antennas are vertical rather than horizontal. Keep in mind, though, that this is only a starting point for positioning its antenna. The exact layout of your house may alter the best positioning of the antenna.
Point the antennas of your wireless PCs toward the access point. Although 802.11 technology does not require a direct line of sight, pointing them in this way tends to increase signal strength. USB wireless cards generally have small antennas that can be positioned, but frequently wireless PC cards don't, so you may have trouble figuring out the antenna orientation in a wireless PC card. If you have a wireless PC card that doesn't have what appears to be an antenna, the antenna is generally located at the periphery of the card itself, so point that at the access point.
Don't place your access point next to an outside wall. If you do that, you'll be broadcasting signals to the outside, not the inside, of the house. That's nice if you want to give your neighbors access to your network, but not great if you want to reach all the PCs in your house.
Avoid putting your access point or PCs near microwave ovens or cordless phones. Many microwave ovens and cordless phones operate in the same 2.4 GHz part of the spectrum as 802.11b WiFi equipment. So, microwave ovens and cordless phones can cause significant interference. Cordless phones tend to be the bigger problem.
Avoid placing the antennas of access points or PCs near filing cabinets and other large metal objects. They can both cause significant interference and dramatically reduce throughput.
Consider
using external and booster antennas. Some PC cards, notably
|
Try and try again. The ultimate way to find the best placement for your access point and wireless PCs is to continuously experiment and see what kind of throughput you get. Each house and office is so different that no single configuration can suit them all.
Carefully monitor your throughput as you make these changes, so that you determine the best positioning for your access point and PCs. To determine your true throughput, use the free network analysis program QCheck [Hack #57].
[Hack #42]
[Hack #57]
If you run into problems when networking PCs with different versions of Windows, the NetBEUI protocol should solve your problems. But beware: don't use the XP-specific version. Instead, follow this hack.
The Holy Grail of Windows peer-to-peer networking is the absolute reliability of network connections between computers. When you open My Network Places and try to access the shared resources of any other computer on your network, you shouldn't have to wait a long time or be faced with mysterious error messages.
Unfortunately, Windows XP is surprisingly prone to these sorts of peer network problems in mixed-Windows-version networks, especially when you network NT/2000/XP with 9x/Me computers. Most experienced Windows network administrators believe you get the best network browsing reliability by using Microsoft's NetBEUI network transport protocol and TCP/IP. But there's a problem. With the release of Windows XP, Microsoft officially stopped supporting NetBEUI. The network protocol is included in a legacy folder on the Windows XP CD. But the XP version of NetBEUI is considered to be inferior to the Windows 2000 version, and Microsoft has even admitted that possibility.
The solution is fairly simple, then. Install the Windows 2000 version of NetBEUI on your XP PCs instead of using the XP version. Caveats? Yes, two. Some people have problems with NetBEUI in wireless networking environments (my belief is that this is a broadband-router-specific issue). The second caveat is that NetBEUI does not support hibernation or standby power-management operations properly. (For more details on why, as well as alternatives to NetBEUI-such as IPX/SPX with NetBIOS-please see 'NetBEUI Power Down' from Scot's Newsletter: https://www.scotsnewsletter.com/42.htm#pwrprob.)
|
First, get a copy of the Windows 2000 version of NetBEUI. It consists of two files, Nbf.sys and Netnbf.inf. If you don't have the Windows 2000 CD, you can download the files from a more detailed and periodically updated website version of this hack, which originally appeared in Scot's Newsletter in January 2003 under the title 'How to Install Win2K's NetBEUI in XP' (https://www.scotsnewsletter.com/38.htm#tipadaweek).
If you have the Windows 2000 CD, go to the CD's i386 directory and find the compressed files Nbf.sy_ and Netnbf.in_. Use WinZip to open and extract them to a folder called something like NetBEUI for Win2K. Once the files are extracted, copy your destination folder to all XP computers on your network. Detailed extraction instructions are available at https://www.scotsnewsletter.com/38.htm#tipadaweek (including how to do this without WinZip).
Once you have the files, begin the NetBEUI installation by copying Nbf.sys to C:WindowsSystem32Drivers, and Netnbf.inf to C:WindowsInf. Then restart Windows XP.
|
After you've restarted, open the Network Connections folder by choosing Control Panel >Network Connections. Right-click the network connection icon to which you want to add NetBEUI (the default name of the primary connection is Local Area Connection) and choose Properties >General >Install >Protocol >Add. Select the NetBEUI protocol from the list and click OK. Restart your computer if you receive a prompt to complete the installation.
Next, unbind TCP/IP from sharing. For security reasons, TCP/IP file and printer sharing should be disabled on all computers on your network to separate the Internet from the LAN. Open the Control Panel called Network Connections. There are several ways to do that, only some of which may apply to you, depending on interface settings you chose in past. You can right-click either My Network Places (if it's visible on your desktop) or the Network icon (if it's visible on the system tray) and then choose Properties. If neither of those methods work, click Start and open the Control Panel. Find and double-click the Network Connections or Network and Dial-Up Connections icon.
Once Network Connections is open, choose the Advanced menu and select Advanced Settings. On the Adapters and Bindings tab, under 'Bindings for [your network connection name],' remove the check mark beside Internet Protocol (TCP/IP) and click OK.
Finally, test your NetBEUI installation. Reboot all your PCs and check that they're able to connect to all shared drives, folders, and other resources. Either the Guest account will need to be turned on or the workstation names of the other PCs on your network must be added to Users and Groups. In tests, I've found freshly installed NetBEUI to be a little sticky (and this may affect any computer on your network). After opening My Network Places, you'll sometimes see an error message the first two or three times you attempt to connect to another PC. Once it connects the first time, it usually connects reliably after that.
[Hack #54]
XP can't tell you the true throughput or your wired or wireless network. For that, you'll need free, third-party software that can help you improve throughput.
When you buy network hardware, including a hub/router and network cards, you're told that hardware's rated speed-for example, 100 Mbps for an Ethernet network, or 11 Mpbs for a an 802.11b WiFi network.
But those numbers only tell you how your network may perform in ideal conditions; as the saying goes, 'your mileage may vary,' and usually does. WiFi networks are particularly finicky and are especially prone to being affected by interference and other factors. Where you place your wireless access point and PCs and how you position their antennas [Hack #55] can make a dramatic difference in the actual speed of your network. So, you'll want to know the true connection speed of your network, WiFi networks in particular, so that you can optimize their performance when you troubleshoot them.
But how can you find out your true network performance? If you have a WiFi card, you can find information about your connection by double-clicking on the small network icon in the Notification Area (also called the system tray). When you do that, the Wireless Network Connection Status screen appears, as shown in Figure 5-26.
There's only one problem with that screen: it's highly inaccurate. True, its little green bars and Signal Strength indication give you a broad picture of the relative strength of your network connection. But the Speed indication isn't an actual measurement as far as I can tell; it appears to tell you only your maximum theoretical connection speed, given the nature of your hardware, and doesn't reflect your true current connection speed. When I use my WiFi network, it always tells me the speed is 11 Mbps, even when actual, real-time measurement shows my true throughput is less than half of that.
So, how do you measure the true speed of a network in your real-world conditions? Get NetIQ's free QCheck (https://www.netiq.com/qcheck/). It performs a series of tests, including throughput and response time, and gives you a good snapshot of your network's real performance. When trying to optimize a WiFi network, run QCheck on each PC on the network to get baseline performance results for each. Then run the test for each PC after you move the base station and PCs, change the positioning of the antennas, and so forth, as outlined in [Hack #55]. That way, you'll be able to fine-tune your network for optimum efficiency.
Once installed on every machine in your network, QCheck measures the performance of the network between any two of your PCs. QCheck is made up of two components: the console where you run your tests, shown in Figure 5-27, and an endpoint, which runs invisibly in the background on each PC on which you've installed QCheck. While the exact metrics vary from test to test, the program works by sending data from one PC to another on your network. The data is then sent from the receiving PC back to the originating PC, and QCheck measures the round-trip time, calculates throughput, and displays the results.
Note the throughput in Figure 5-27; it's 128 Mbps. I was measuring the speed of my WiFi network whie seated on my backyard porch, which is about 30 feet and a wall away from my access point. Just to show you how much more accurate QCheck is, the Wireless Network Connection Status screen reported my speed as 11 Mbps-the exact connection speed my laptop would have if I were inches away from the wireless access point. (And in actuality, the connection speed of a WiFi network, even when devices are next to one another, is well under 11 Mbps.)
To run the QCheck tests, run the console and then choose the two PCs between which you want to measure speed on your network. Only one must be the PC with the console on it, but each PC does have to have QCheck on it. You don't need to run the console on each machine, because the endpoints are running on them invisibly in the background; during QCheck's installation the endpoints launch on startup.
You'll need to know the IP addresses of the PCs you want to test. If one of the PCs you're testing is the one running the console, choose localhost for that endpoint. To find the IP address of other PCs on your network, first go to that PC, right-click on My Network places, then double-click on your network connection (it might read Local Area Connection, for example, or Wireless Network Connection). Click on the Support tab, and you'll see your IP address.
Once you choose the PCs you want to test, choose the specific test to run. The best overall benchmark will be the Throughput test using either the TCP or UDP protocols. If you happen to use IPX or SPX on your network (some people still use these older protocols rather than TCP/IP), you can do benchmark throughput tests using them as well, though few home networks use those protocols. If you run any kind of streaming media across your network-for example, if you will be using your network to play MP3 files or other digital music on a PC and then stream it to another location in your house-choose the UDP streaming test. Streaming media use the UDP protocol, so the only way to test how they will perform on your network is to use the test for that protocol.
Make sure to run your test multiple times, and, to be safe, run them a half-hour or more apart. Because of the fickle nature of wireless transmissions, you can find dramatic differences in throughput from one moment to the next. For example, a few minutes after running the throughput test shown in Figure 5-27, I ran it again and was shown a throughput of 1.602 Mbps. That one test was an anomaly, and other tests were more in keeping with my initial ones.
[Hack #42]
You can control a computer-virtually moving its mouse and typing on its keyboard-over the Internet, using either Windows XP's built-in features or a third-party program.
When you are at work, wouldn't it be nice if you could log onto your home computer to check your email or find a file you took home? How about using your home or office desktop computer from your laptop on the road? You can use a remote control program to use another computer over the Internet, viewing its screen on your screen and giving commands via your mouse and keyboard. Windows XP comes with a feature called Remote Desktop, or you can use a third-party program. Windows Messenger [Hack #78] also enables people who are chatting to share control of each other's computers.
The computer you will control is called the remote server , and the computer you are actually sitting in front of is the remote client. Windows XP comes with a remote client program (Remote Desktop Connection), and Windows XP Professional comes with a remote server (Remote Desktop) that works with one client at a time-that is, one computer can 'take over' your computer remotely (with luck, it'll be you doing the takeover!).
|
Windows XP Home Edition can't act as a remote server; if you need to be able to access a Home Edition system remotely, you need to upgrade to Windows XP Professional or use a third-party program. We recommend VNC, the small, free, open source program from the University of Cambridge Department of Engineering (information and free downloads are available at https://www.uk.research.att.com/vnc).
If you want to be able to control your Windows XP Professional system remotely, set it up as a remote server. Using an administrator user account, choose Start >Control Panel >Performance and Maintenance >System (or press the Windows-Break key), click the Remote tab, select the checkbox in the Remote Desktop section of the tab to enable incoming connections ('Allow users to connect remotely to this computer'), and click the Select Remote Users if you want to control which user accounts can be used by remote clients. (Windows automatically allows connections from the current user, along with all user accounts in the local Administrators and Remote Desktop Users groups.)
Normally, remote clients connect to the server via a local area network or a permanent Internet connection. However, you can also configure the remote server to accept incoming phone calls if you have a dial-up modem. Create a dial-up connection that accepts incoming calls by running the New Connection Wizard (click 'Create a new connection' from the task pane in the Network Connections window). Choose 'Set up an advanced connection' as the Network Connection Type, choose 'Accept incoming connections,' choose your modem, choose whether to accept VPN connections [Hack #49], and choose which user accounts the incoming connection can connect to.
Firewalls usually refuse remote access connections [Hack #46] and [Hack #48], so if you want your remote server to be accessible from the Internet, you need to open a port in your computer's firewall [Hack #50]. Remote Desktop uses port 3389. If you use Windows XP's built-in firewall, display the Network Connections window, right-click the Internet connection, choose properties from the shortcut menu, click the Advanced tab, and click Settings to display the Advanced Settings dialog box. Click the Remote Desktop checkbox; if the Service Settings dialog box appears, just click OK.
|
When you connect from your remote client (described later in this hack), you need to provide a domain name or IP address. If your computer connects via a dial-up, DSL, or cable connection, its IP address changes each time you connect, and the computer doesn't have a domain name. One solution is to have someone at the remote server display the Network Connections window, right-click the Internet connection, choose Status from the shortcut menu, click the Support tab, and call, IM, or email you with the IP address that appears. However, this solution is no good if no one is available to do this. Instead, you can sign up for a dynamic DNS service [Hack #59] at https://www.dyndns.org or https://www.tzo.com. The dynamic DNS service at DynDNS.org gives you a free domain name in the form <yourname>.dyndns.org (they offer several dozen domain names to which you can add your name). TZO.com provides a subdomain at <yourname>.tzo.com for $25 per year. You install a small utility on your computer that automatically tells the dynamic DNS whenever your computer's IP address changes.
One final configuration note: when a client connects to your server via Remote Desktop, the user logs into one of the Windows XP user accounts. You can't log into accounts that have no password. Choose which account you plan for remote user(s) to log in with, and give it a password.
To set up the remote client software that comes with Windows XP, connect to the Internet and then choose Start >All Programs >Accessories >Communications >Remote Desktop Connection. (If it's not there, you need to install it from your Windows CD.) In the Remote Desktop Connection window, type the domain name or IP address of the server computer and click Connect. Log on with the Windows XP user account and password for the remote server. Your computer screen now shows what's on the screen of the server computer. A connection bar appears as a button on the screen, showing the IP address of the remote server, along with Minimize, Restore, and Maximize buttons you can use to resize the remote client window.
Once you're connected, you can cut and paste information from the remote client window to other windows. You can also use local files in your remote session; your local disk drives appear in My Computer (Windows Explorer). When you print from the remote client, the print job goes to your default local printer, not the printer on the server.
-Margaret Levine Young
Make sure that the web site or other kind of Internet server you run at home is always available to the world.
If you run your own web server, mail server, or other kind of server at home and are connected to the Internet via a cable modem or DSL modem, people frequently may not be able to connect to your server. That's because, typically, broadband ISPs assign you a dynamic IP address that changes regularly, even if you don't turn off your PC. Because your IP address constantly changes, there is no way for people to connect to you. One day its IP address might be 66.31.42.96, the next it might be 66.41.42.136, and if people don't know your server's current IP address they won't be able to find it. You won't be able to solve the problem by getting your own domain (such as www.gralla.com) and publishing that, because DNS servers won't be able to keep track of your changing IP address either. If people type in your domain name, the servers won't be able to report on your IP address-and again, your server won't be able to be reached.
There is a way to solve the problem, however: you can map your server's hostname to a dynamic IP address. When you do this, it doesn't matter that your IP address changes; when people type in your web site's URL, they will be forwarded to your new IP address automatically.
You can do this for free by signing up with a service that provides automatic mapping. A number of services will do it for free, such as No-IP.com (https://www.no-ip.com). When you sign up for the service, you choose a hostname for your server and give that hostname out to people who want to connect to the server. Whatever name you choose will end in .no-ip.com-for example, grallasite.no-ip.com.
After you get your hostname, you download client software that continually monitors your IP address. It reports on your server's current IP address to the No-IP.com site. Whenever the IP address changes, it reports that new IP address to the site. The client checks your IP address every three seconds.
Whenever a PC tries to connect to your server, it first goes to a No-IP.com server, which looks up your server's current address and then redirects the PC to your server, based on your current IP address. The person contacting your site will not have to do anything different than he normally does; he just types in your URL and is connected to your site.
If you own a domain and want to map that hostname to a dynamic IP address instead of using a No-IP.com address, you'll have to sign up for No-IP.com's No-IP Plus service for $24.95 a month.
If you're using a residential gateway at home to share Internet access among several PCs, you may run into problems using the service. Many gateways use Network Address Translation (NAT), in which all PCs on the network share a single external Internet address but are assigned internal network addresses. The No-IP.com client will track your external address, but because that single address is used by all PCs on the network, not just the server, incoming traffic won't be routed to your server. You can fix the problem by using the port forwarding feature of your route to send the incoming traffic to the server [Hack #49].
You may run into another problem as well: when you try to test your server by connecting to it from a PC inside your network, you might not be able to connect to it. That's because you might not be able to connect to the external IP address from inside the network. If this happens, the only solution is to connect to the site from a PC outside of your network or ask a friend to connect to it.
One more thing to watch out for: if you're behind a firewall, the No-IP.com client may have trouble connecting back to the No-IP.com site to report on your changing IP address. If you're using a firewall like ZoneAlarm [Hack #48] or a similar one that blocks outbound connections, tell it to allow the client to make outbound connections. Also, depending on the firewall you use, you may need to configure it to open TCP port because that's the port the client uses to contact No-IP.com with your new IP address.
[Hack #40]
Sometimes, while assigned an IP address by a DHCP server, your PC doesn't appear to be on the network and you can't get Internet or network access. Renewing your IP address often solves the problem.
If you're on a network but you can't send or receive data, use any network resources, or visit the Internet, the culprit may be a problem with your DHCP-assigned IP address. The simplest way to fix it is to renew the IP address-get rid of the old one, and ask the DHCP server to send along a new one.
Before trying this, first make sure you're using a DHCP-assigned IP address rather than a static one. Right-click on My Network places and choose Properties to get to the Network Connections folder. Right-click on your current network connection and choose Properties. On the General tab, select Internet Protocol (TCP/IP) and choose Properties. On the General tab, the radio button next to 'Obtain an IP address automatically' will be selected if you're using DHCP.
After you've confirmed you're using DHCP, release your current IP address by typing ipconfig /release at a command prompt. The ipconfig command is an all-purpose command that lets you solve many network-related problems, as detailed in [Hack #53]. To renew the address and get a new IP address from the DHCP server, type ipconfig /renew at a command prompt. Your new IP address should fix the problem.
To find your new IP address, type ipconfig at a command prompt. You can also select your connection in the Network Connections folder, click on 'View status of this connection,' and click on the Support tab. You'll see the screen shown in Figure 5-28, which shows your new IP address and confirms that it was assigned by a DHCP server.
Get back onto the Internet fast if you have TCP/IP woes.
TCP/IP problems can be exceedingly difficult to troubleshoot, and at times they appear to break for no apparent reason. Everything looks like it should be working, but you're not able to connect using the protocols. If you have a broken connection, try the following:
Try automated repair. Right-click on the broken connection in the Network Connections folder and choose Repair.
Run the Network Setup Wizard. It walks you step by step through TCP/IP and network configuration and will correct any errors you may have introduced inadvertently.
Reset your router. If you have a home network, the problem may lie with the router or in the connection between the router and your broadband provider. Follow the directions for resetting the router.
Reset your cable modem or DSL modem. If you have a broadband connection, the problem may lie in the assignment of your IP address by your ISP. Power off your cable modem or DSL modem, unplug its Ethernet cable, and leave it powered off for five minutes. Then restart it. This is also a good time to reset your router. You can also try releasing and renewing after you've turned the connection back on.
Reset TCP/IP to its original configuration. If all else fails, you can try to reset your TCP/IP stack to the same state that it was in when XP was first installed on the computer. Use the NetShell utility [Hack #53]. Issue this command: netsh int ip reset [log_file_name], where log_file_name is the name of a file where the actions taken by NetShell will be recorded.
Sometimes you would like to connect to your home machine from work or while traveling. Making your home machine a virtual private network (VPN) server is a secure way to accomplish this.
If you've ever taken files home to work on your personal computer you've probably had the experience of arriving to work the next day only to realize you've forgotten to bring the files back with you. If the work was important enough, you probably had to drive all the way back home get it or make a lame excuse to your boss as to why you don't have the TPS report ready yet. Perhaps you're a road warrior who has found himself stranded in a hotel room on a Monday morning, just hours before a big meeting without that copy of the presentation you thought you had copied from your home machine. If either of these sound like a situation you've been in, this is the hack for you.
It is well known that Windows XP has a VPN client built into it, which allows you to make secure connections to your company's network. Less well known is that Windows XP also has the ability to act as a VPN server, allowing you, or others you designate, to make secure connections into your home network. While you have an established VPN session with your home machine, you can access files from its hard drive or other machines on the network that have file sharing enabled. All you need is a local Internet connection and a VPN client that supports the Point to Point Tunneling Protocol (PPTP), which the client for all versions of Windows does.
Preparing your home machine to accept VPN connections is fairly straightforward. Click Start >Settings >Control Panel >Network and Internet Connections >Network Connections >Create a New Connection. This will launch the New Connection Wizard. While advancing through this wizard, the options you want to enable are 'Set up an advanced connection,' 'Accept Incoming Connections,' and 'Allow virtual private connections.' The sixth screen of the wizard allows you to specify the users that can use the VPN; make sure you enable at least one account. If you haven't created a password for your user, now is the time to do so. You are essentially opening up a part of your machine to the Internet, so make sure you choose a good password. After the wizard is complete, nothing further needs to be done; the VPN is ready to accept incoming connections. You can test this by using a VPN client to connect to the IP address of the VPN server machine.
Most home users use a router that provides Network Address Translation (NAT), which obscures the actual IP address of the machine they want to make a VPN connection to. This means you won't be able to make a VPN connection to your machine until you configure your router to allow the VPN traffic to pass through to your VPN server. See [Hack #47].
|
Politica de confidentialitate | Termeni si conditii de utilizare |

Vizualizari: 2366
Importanta: ![]()
Termeni si conditii de utilizare | Contact
© SCRIGROUP 2025 . All rights reserved