|
Fun Effects - Camera Filters, Soft Focus, Zooming And Panning
I promised all of you back in lesson two that it might get a bit boring and
technical for a couple of lessons, but that if you hung in there with me,
we would get to the fun stuff. Well, here we are! You should now have a
good grasp on all of the basics of your camera to the point where now you
can move into some of the really cool areas of photography and creative
ways to use your camera.
|
|
|

|
|
Camera Filters
There are numerous filters you can buy for your camera lens and they all
create different and fun effects. Let's discuss a few of the more common
filters:
Polarizing
Filters
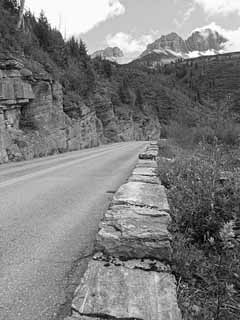
The most common filter for use in landscape photography is a polarizer. If
landscapes are what you want to use your camera for, I have two words for
you: Get One. A polarizer will make your colors super saturated and eliminate
reflections from water, so you can see rocky lake and riverbeds and add
foreground depth to your images. They'll make your skies beautifully dark
blue and the clouds will really stand out. A polarizer will also reduce ugly
glares and reflections from windows. The only reflections they won't change
are ones in metallic surfaces.
 Natural
light - UNpolarized light, that is - moves in waves that vibrate in all
different directions. Some might travel in sort of an up-and-down motion, but
there are a million other light rays all traveling from side to side, in
diagonal waves or any other number of directions. Imagine standing with a
partner who is about twenty feet away from you. Each of you is holding one end
of a long jump rope. Both of you begin to shake the rope wildly in all
different directions. What happens? People will probably cross the street to
walk around you because of your weird behavior, for one. But what happens to
the rope? It will move around in all kinds of various directions, just like
you are. Natural
light - UNpolarized light, that is - moves in waves that vibrate in all
different directions. Some might travel in sort of an up-and-down motion, but
there are a million other light rays all traveling from side to side, in
diagonal waves or any other number of directions. Imagine standing with a
partner who is about twenty feet away from you. Each of you is holding one end
of a long jump rope. Both of you begin to shake the rope wildly in all
different directions. What happens? People will probably cross the street to
walk around you because of your weird behavior, for one. But what happens to
the rope? It will move around in all kinds of various directions, just like
you are.
|
|

|
|
 BUT
if you take your rope and run it through a picket fence and stand on either
side of the fence and do the same thing, the holes that run up and down in
the picket fence will then only let waves move through that are vertically
oriented, no matter how much you flail around with the rope in all
directions. BUT
if you take your rope and run it through a picket fence and stand on either
side of the fence and do the same thing, the holes that run up and down in
the picket fence will then only let waves move through that are vertically
oriented, no matter how much you flail around with the rope in all
directions.
|
|

|
|
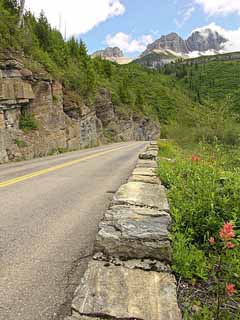
A polarizer basically does the same thing. By letting in light
that is moving in only one direction, it eliminates a lot of haze in the sky
caused by light being reflected off of water vapor and other particles in the
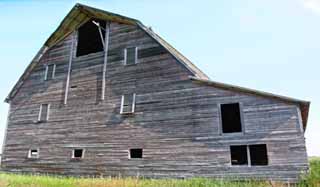
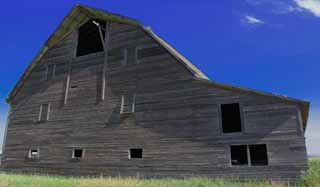
air. The following photos were taken on a hazy day this summer, one with a
polarizer and one without. When I took the picture, I remember thinking how
there really weren't any clouds to speak of, but after putting the polarizing
filter on, what a difference! Notice how the clouds stand out. The specular
highlights that were on the barn without the polarizer are also gone, making
for much more saturated colors and overall a more eye-catching photograph.
Polarizers also work well for photographing framed artwork or anything else
under glass to cut down on any distracting reflections.
One note - all polarizers are not created equal. I've bought cheap ones in
the past thinking that a polarizer is just a polarizer and any one would do.
A good polarizer will be more expensive, but it will be well worth it. Also,
the wider lens you want a polarizer for, the more your polarizer will cost.
If you're planning on buying one, go down to your local camera store and talk
to them about their selection of circular polarizers and what the differences
are. There are even polarizers that will change the colors in your
photograph, which can be a fun effect sometimes.
|
|
|
|
 Soft Focus Filters Soft Focus Filters
The use of soft focus is one of my favorite photography techniques. One very
important thing to understand about soft focus photography is that it does
not mean 'out of focus'. Soft focus generally gives a soft feeling
especially to the highlights in the picture, while leaving the details of the
image very sharp. They are very useful if you're interested in portrait
photography for adding a peaceful feeling to an image and helping make skin
tones to be more attractive.
Note in the photograph above, the details come out quite clearly, but the
highlights of the image have an almost magical glow. Scenes with moody lighting
like this are an ideal use of soft-focus photography.
|
|
|
|
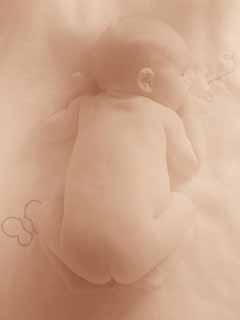 Most
photo filter manufacturers make soft focus filters for your lenses in varying
intensities so you can control how soft you want the image to be. Some lens
manufacturers even make soft focus lenses that are of fantastic quality, but
expect to pay much more for those. If you go into wedding photography or
something where soft focus is an effect you'll be using a lot, it can be
worth it to invest the money in one of these lenses. You can also create
soft-focus effects yourself without spending a dime, just by stretching a
nylon stocking over your camera lens. This baby photograph was taken with
that technique. Most
photo filter manufacturers make soft focus filters for your lenses in varying
intensities so you can control how soft you want the image to be. Some lens
manufacturers even make soft focus lenses that are of fantastic quality, but
expect to pay much more for those. If you go into wedding photography or
something where soft focus is an effect you'll be using a lot, it can be
worth it to invest the money in one of these lenses. You can also create
soft-focus effects yourself without spending a dime, just by stretching a
nylon stocking over your camera lens. This baby photograph was taken with
that technique.
I know of other photographers who use optically clear filters and smear a dab
of petroleum jelly around the edges for a soft-focus 'framing'
effect that can be beautiful.
|
|
|
|
 If
you're shooting with a film SLR that has the capability of making
multiple-exposure images, you can also create a beautiful soft-focus effect
by taking two exposures on the same frame of film. You need a tripod for
this. Simply take one image that is tack sharp, then without advancing the
film in your camera, play with your focus until the entire image is out of
focus and create a second exposure. The following image was created in this
manner, and it's fun because you have unlimited control of how much soft
focus you wind up with. If
you're shooting with a film SLR that has the capability of making
multiple-exposure images, you can also create a beautiful soft-focus effect
by taking two exposures on the same frame of film. You need a tripod for
this. Simply take one image that is tack sharp, then without advancing the
film in your camera, play with your focus until the entire image is out of
focus and create a second exposure. The following image was created in this
manner, and it's fun because you have unlimited control of how much soft
focus you wind up with.
Note that when you do this, you'll have to take into account that you will
need to change the exposure on your camera. Taking two exposures on one frame
of film with the correct exposure settings will actually overexpose your
photograph by letting in twice the required amount of light. Cutting your
shutter speed in half for each exposure for stopping down your lens to let in
half the light will fix this.
|
|
|
|
If you have a digital camera, you can also use this technique
by layering two shots over one another. I don't want to turn this into a
lesson in digital photo editing, so I won't go into specific software
programs or techniques, but the following image was taken digitally.
|
Then I made a copy of the photograph and blurred it
extensively.
|
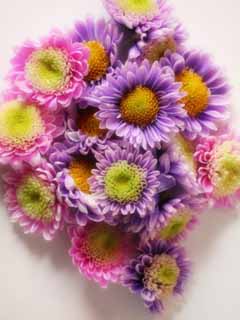
Then I layered the two together using the computer with the
sharp version on top, yet transparent to let the blurred image show through
for a soft-focus effect. Vivid green foliage is another subject that also
makes a lovely choice for soft focus photography.
|
|

|

|

|
|
|
|
|
More Filters To Know About The
Star Filter
Star filters were especially popular in the 1980's in advertising. Their
overuse at the time has given them sort of a 'cheesy' feel today,
but they can still be used for a nice effect in the right situations. They're
most often used to add sparkle to bright water scenics, candle flames,
stadium or stage lighting, jewelry photography, night scenes, and many other
situations where you want to add a dramatic effect to bright lights. They
make them on both optically clear filters and soft focus filters. You can get
them to add little 'stars' to the highlights of your image with any
different number of points - four, six on up to sixteen.
The
Fog Filter
The fog filter is different from a soft focus filter. Rather than creating an
even, soft focus, a fog filter mimics natural fog, creating a soft glow with
a bit of flare and producing a warm romantic tone. They have different
grades, some that create a very light effect that can be beautiful on water
scenes and other, heavier grades that create a far more unnatural effect which
can be used in fantasy scenes, etc.
|
|
|
|
Filters For Black And White Photography
We've talked a lot about color photography, but up until this point we
haven't discussed black and white photography much. Some of the real magic of
creating black and white photography is the hands-on process you get when
you're working in the darkroom and it's almost impossible to translate that
magic to text. I can tell you that you should give it a try, but without
actually being able to drag you into a darkroom and show you how to develop
and print your own photographs, you won't know the incredible feeling you get
when you see those beautiful prints that you've made yourself.
I will, however, talk about filters for use in black and white work, as
they're extremely important for good results in black and white photography.
But I'll leave it up to you to go find a camera club or hands-on photography
class where they'll then teach you how to take your pictures further by
working in a darkroom. Black and white photography can be incredibly powerful
when care and knowledge are put into the making of prints - if that weren't
true, Ansel Adams would not be (arguably) one of the most famous household
names in photography history.
 To
make an object appear darker on film than it does to the eye, select a filter
that has a color that is complementary to the color of the object. To
make an object appear darker on film than it does to the eye, select a filter
that has a color that is complementary to the color of the object.
This color wheel is a simple way to figure out complementary colors if you
are unfamiliar with them. Our color spectrum is made up from red, yellow and
blue. When you mix red and yellow, you get orange. When you mix blue and yellow
you get green, etc. If you look at this diagram, the color located across
from red is green. That means that green, yellow and blue have absolutely no
red in them.
In black and white photography, everything is rendered in shades of grey,
black and white. To assure that all of the objects in your image don't come
out as very similar shades of grey, making a boring image, a filter can
darken tones in your image while lightening other tones. A dark red filter on
a bright day with puffy clouds, really define those clouds while darkening
the blue sky, adding drama to your image. An orange filter will do the same
thing - to a lesser degree - and a yellow filter to an even lesser degree.
|
|
|
|
|
|
|
Let's take a look at the above image,
taken without a filter. I'm also including a color shot of the same scene
so you can see how the color tones came out in shades of grey.
|
|
Now let's look at the image taken with a red filter:
Notice how the clouds stand out with contrast against the sky. Also notice
how the red flower in the lower right has turned a very light color, as
opposed to the black and white filter taken without any filter above. The
trees that in life are green have turned a very dark color.
|
Now let's look at the same image taken with a green filter.
Notice how all of the dark green foliage has lightened up? The green filter
has also taken some of the impact out of the sky.
|
|
|
|
In black and white photography, these filters will not really affect subjects
with very little color. One interesting way to get an idea of how filters
will work in black and white photography is to pick up some of those cheap
sunglasses with colored lenses. If you put them on, go outdoors and really
pay attention, you'll get a good feeling for what tones will lighten and
darken when you use photographic filters in black and white photography. You
can try this as a mini-assignment if you want, but don't blame me if people
look at you funny because of your glasses.
|
|
|
|
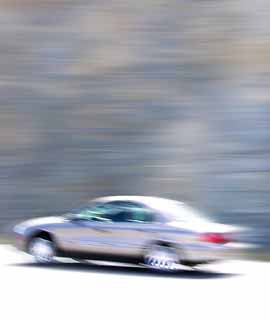
Panning
Remember in lesson two when we talked about shutter speed and I showed you
shots of how by setting your camera on a tripod and using a long shutter
speed, you can get a dramatic motion blur of a moving object. By
'panning' your camera, you can keep the moving object in focus
while blurring the entire background. This is also an impressive effect. It's
not at all difficult once you've practiced a little. You need to have your
camera focused on the subject, moving along at the same speed as the subject,
and continue moving along with it as you press the shutter, all through the
exposure. It takes practice to keep the motion smooth and not be jerky, but
when you get it right, you'll be please with the result. It's a great way to
get rid of an ugly background when your subject is moving in a way you can
predict if the circumstances don't permit you to use a small depth of field.
I've seen great shots using this technique with a creative variety of
subjects, from fashion models on a catwalk to sporting events to wild deer
running through the forest, giving the trees an ethereal effect. When
combined with a particularly interesting camera angle, you can achieve a very
visually interesting final image that looks highly professional.
|
|
|
|
|
|
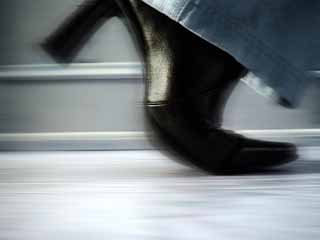
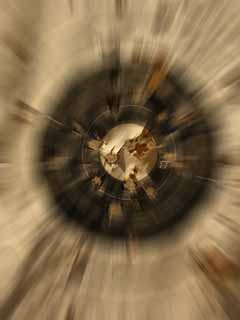 Zooming Zooming
Zoom blur is another fun technique that can add a visual punch to your
photographs. For this you need a zoom lens on an SLR camera.
Upon depressing the shutter, you can move your lens barrel either in or out
to produce this effect. You need to have the camera on a tripod in order to
keep the center of the image in focus and clear while creating a streaky-zoom
effect. One interesting thing to note is that whether you zoom in or out, the
final effect is the same. This technique can really make a boring, static
image a very powerful final photograph. This can be really fun to try and
night with streetlights to add a feeling of motion and business to a city
street scene. I've also seen it used in a crowd of marathon runners to add a
jumbled, crazy feeling to the image.
|
|
Okay Assignments!
Assignment
1:
I don't expect people to go out and buy a bunch of new equipment. If your
budget allows it or you already have any of the above filters in your
inventory, go out and take some shots with and without the filters to
compare the difference. Even if you don't have access to the filters listed
in the assignment, try the nylon stocking stretched over the lens for a
soft-focus effect and let me see what you come up with. Try and find a
subject that will be particularly fitting for soft-focus and see what
happens.
Assignment
2:
Practice panning to capture a moving object and blur the background. It's
fun! Once you get the hang of it you'll be impressed with yourself. Post
your best results for us all to see.
|
|