|
For The Beginner - Light
Photography is all about light. Literally translated, it means 'painting
with light'. Having the right light can make or break your photos. When
people are starting out with photography, I always suggest that they start
out by learning to control the available light (also called ambient light)
that they have in the atmosphere to work with. Using flashes and studio
lighting can really only be done effectively when you've got a good handle on
what shadows do and how they affect your final photo. I almost always, to
this day, still prefer available light for my portraiture. However, when
you're working inside, and because people as subjects tend to move, studio
lighting is sometimes necessary in order to get the fast shutter speeds
needed for successful portraits. But before we get into that, let's talk
about natural light.
 Natural (Ambient) Lighting Natural (Ambient) Lighting
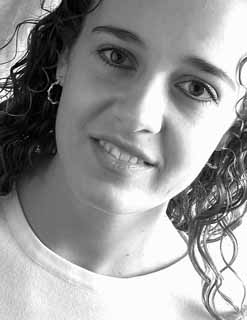
The portrait above was taken outdoors, using the available light in the
atmosphere. We were in the shade, so there are no harsh shadows on the
model's face, and the overall even lighting makes for a nice fashion
portrait.
It was a sunny day when we did this shoot, so having the model in the shade
was a big help. If there hadn't been any shade to work with, I would have
used the photographer's greatest friend, the reflector card. A reflector card
is used to bounce light that's shining down back up onto a subject to add
light to the shadowed areas, making for a much more even overall appearance.
A reflector card can be made of any number of things. You can buy them in
photo equipment stores, but I generally use either white poster board, a
white umbrella or aluminum foil (first crinkle it all up, then uncrinkle it,
then tape several pieces together until you've got a large piece of several
thicknesses that you can work with easily) to reflect light back onto my
subjects and fill in dark spots. One 16x20-inch sheet of white cardboard (or
whatever material you choose) is perfect. For maximum versatility, use a
sheet of cardboard and then tape or glue the crinkled and uncrinkled piece of
aluminum foil to the other side.
As a side note, aluminum foil can be especially fun if you can find it in
gold color. It will cast a very nice, warm light onto your subject. Think of
it this way - a reflector is a cheap, easy to obtain piece of equipment that
makes your light work twice as hard and can really make your portraits look
professional.
If it's not a sunny day and you have a high, overcast, cloudy sky,
congratulations! You've been blessed with the world's biggest softbox. A
softbox is a piece of studio lighting equipment that nobody should be
without. As its name suggests, it spreads a diffuse light out over your
subject so as to avoid harsh shadows. Overcast skies do the same thing. If
you get skies like this, grab your subject and head outdoors to snap as many
portraits as you can. I actually have my deck set up outdoors so that I can
hang backgrounds and move my tripod all around so that I can take advantage
of this kind of light. It makes for the absolute best working conditions!
As you can maybe tell from my previous diatribe, for standard portraiture,
you don't want shadows across your subject's face. The more even the lighting,
the better.
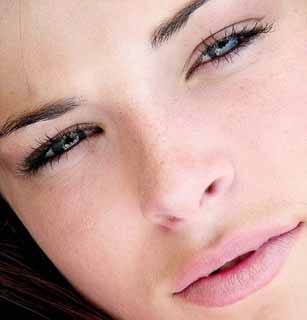
 Rembrandt Lighting Rembrandt Lighting
Of course, as with all rules, there are exceptions. Rembrandt lighting will
spread shadows onto your subject, but given the dramatic, beautiful effects
you can create like this, you'll see why it's a popular method of
portraiture.
What is Rembrandt lighting?
I'm sure you're all familiar with Rembrandt, the great painter and artist,
often referred to as one of the 'Masters' of his time. Rembrandt
used a technique of setting his subjects near a large north-facing window (so
no direct sunlight would hit the subject) and turning them in relation to the
window to create flattering lighting effects that really emphasized the high
spots and depths of his subject's face. To achieve such lighting, light is
generally higher than the subject, placed to the side of the subject, and
keeps half of the subject's face lit (the side that's turned away from the
camera), while allowing only part of the other side to be lit. If you have a
large window that faces away from the sun you can easily achieve very
professional-looking Rembrandt lighting.
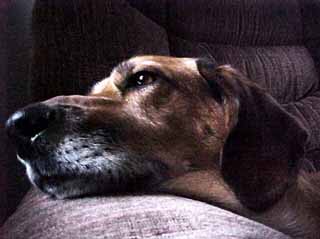
Let's not forget, portraits can be of animals, too!
Flash
Flash - on camera flash, that is - is one thing I NEVER use. There is just
about no light less flattering than a bright light aimed straight at your
subject that causes harsh shadows. There are studio strobe units that you set
off to the side of your camera and flash as you press the shutter and those
are a completely different thing. Unless you are going to be in a dark
situation where you absolutely have no choice but to use your camera's flash,
I don't recommend using it. If you need to and your camera has a hot shoe
where you can use interchangeable flash units, I suggest buying one that
stands as high up and far away from your camera's lens as possible. This will
at least produce a more flattering light and eliminate the 'red
eye' effect we've all seen too many times. Several manufacturers make
white plastic diffusers that go on the front of the flash - this can be a
real help and I highly recommend them.
A studio flash (also called a strobe) is an extremely bright light that comes
on momentarily when you hit your shutter. Due to the light intensity, these
lights can be extremely hot and uncomfortable for a subject, which is why
they are used as a brief strobe instead of left on all the time. We'll talk
about placements of studio lights in a little bit, and if you choose to use
strobes, you can place them exactly the same way as what we'll talk about.
Environmental
Portraits
There is also the environmental portrait. This can be really great for
capturing the personality of a person that you're shooting. If you pick up a
magazine like 'People', you'll see a lot of examples of
environmental portraits. Same with a lot of corporate brochures that like to
show a picture of their president, maybe at his desk, surrounded by whatever
product they make or sell, or wearing a hard hat and out with the blue collar
workers if they're an industrial company. The trick is to make the subject of
the portrait comfortably blend into their environment, not just stand there
as if they're posing haphazardly wherever you caught them. A librarian
amongst stacks and stacks of books might be a creative environmental
portrait. In these cases, you're going to be using available light - the
subjects won't be coming to an environment where you control what lights are
where - so be prepared for a little longer shutter speed or a diffused flash,
and come equipped with your light reflectors to really make good use of what
light there is.
Setting
Up Your Own Studio At Home
So how do we do this at home without spending enough money to open up our own
full-time photography studio? Besides your key and fill lights, other light
sources can be added - background lights, accent lights, all kinds of things
- but for now we'll stick with the basics and an economical way to achieve
them.
Step one in setting up your home studio begins by finding a suitable area to
take photographs. If you have a room you don't use or you can con your spouse
out of letting you use the garage, you're all set. You need a good chunk of
empty space for adequate room. Ideally, you want about five feet of space
between your subject and the background, so you can use depth of field to
make the background blur a bit while keeping the subject sharply in focus.
Then you want at least seven feet between the subject and your camera lens so
that you can make good use out of the portrait lens that we talked about in
lesson three. Add in room for you and the tripod, some lights, and you're
talking about a good amount of space. You'll want at least ten feet of width
to the area you choose. Once you've found a spot, you can continue to the
next step.
Step two begins in my husband's favorite place, the hardware store. Buy some
of those clip-on work lights. They're really cheap, like five, ten bucks or
so. (That's US dollars I'm referring to.) About 250W lights will be perfect.
How many you buy will be dependent on which lighting setup you want to try. I
recommend three for good versatility, four if you want to add something
called a 'hair light' that we'll discuss later and five if you also
want to add a 'background light' that we'll also discuss later.
Hair lights and background lights won't be necessary to really flatter your
subject's features, but they can push your photography 'over the
top' into a really professional level.
Okay, now buy a piece of white foamcore board for each clip-on light. It's
sort of like poster board, but the middle is stuffed full of a Styrofoam-like
substance. You can also get it at art supply or office supply stores.
You want a large piece, 8
feet by 4
feet. (You metric system people are going to have to
adapt for this one.) If you can't find one that large, two pieces that you
can cut into 4 foot
by 4 foot
will work fine. You can also make these half-size by using 4 feet by 2 feet sheets of foamcore.
Very handy for smaller tabletop photography projects. I use these extensively
for a lot of my projects. If you choose to make the smaller ones, just cut
all of the following measurements in half. Smaller ones are also great if you
don't have a huge amount of room to work with.
Make lines down it, dividing it up into four 2-foot sections. Then on these
lines, make marks where all the little circles are indicated in the diagram.
They're 18 inches
in from the outside of the foamcore. Now play connect-the-dots by drawing in
all of the other lines that are noted on the diagram. Then use a razor blade
or X-acto knife to cut the foamcore along these lines.
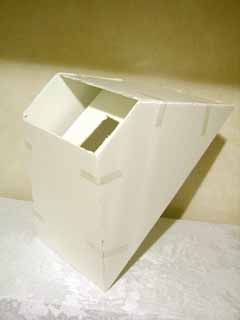 Now,
put it together. You'll need duct tape, packing tape or some other kind of
wide, heavy-duty tape. If you match up the squares, triangles, x's and z's in
the diagram, you'll get a little pyramid thing. Now,
put it together. You'll need duct tape, packing tape or some other kind of
wide, heavy-duty tape. If you match up the squares, triangles, x's and z's in
the diagram, you'll get a little pyramid thing.
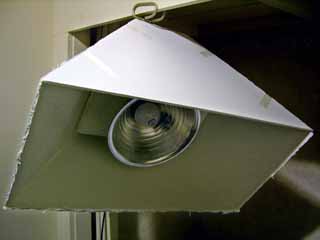
Take the one I called a 'light piece' and a hole in the middle of
it large enough that your light's clip/handle will
fit through, as well as the cord and the neck of the lamp. You don't want the
hot sides of the lamp to touch your foamcore, so the hole should be thin.
Measure both the clip and the plastic neck of the lamp and make this hole
just big enough that it fits through without the metal part of the lamp
touching it. It will depend on the measurements of your lamp, but mine is
about two inches by five inches. This piece will get taped inside of the
small hole, as you can see in the pictures.
|
|
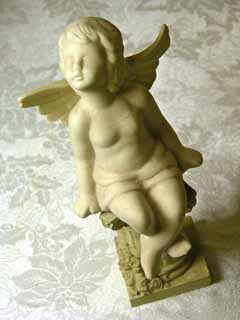
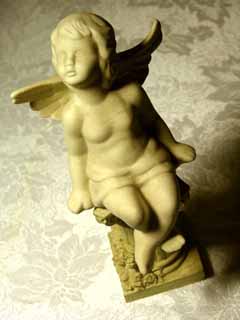
Now that we've gone through this process
(easier than the directions make it sound, though, right?), let's have a look
at what a difference the diffuser makes.
|
|
|
|
Diffuser
|
No Diffuser
|
Notice how much of a harsh shadow there is without the diffuser. You'll find
for portrait photography, this will really make all of the difference. Skin
will look softer and you'll still get enough shadow that the lighting won't
appear flat.
Now is the best time for me to mention that if you have no interest in going
to all of this trouble, nor do you want to spend the money on commercial soft
boxes, you've got a second-best alternative.
You're still going to have to buy a white lighting umbrella for each light,
but they're reasonably priced. These may not cut harsh shadows as well as a
softbox, but they'll do an admirable job, regardless.
Okay! Now you just need to find stands for your lights to and you're ready to
go. One for each light, depending on how many lights you've decided you want.
You can either buy them from a photographic supply store, OR since we're
being super-creative and frugal here, you can opt for other choices.
Since the lights we bought have those fantastic, sturdy clips, they'll clip
to darn near anything and stay put fairly well. If you have ladders, stools
or chairs, they'll all make good (if rather makeshift) stands onto which you
can clip your lights. I want to emphasize that you want to make sure whatever
you use is very sturdy for safety reasons.
You can also buy lengths of PVC pipe at the hardware store and all kinds of
joints to fashion it into whatever shape you choose. This can make a nice,
sturdy light stand as well. If you look at professional light stands, you can
create the same design with PVC pretty easily. My husband made one for me that
is sort of an upside-down horseshoe, so I can clip my lights above my subject
and/or on either side. I also have separate individual light stands so I can
vary the distance between my key lights and fill lights. If you want to spend
the money, the professional light stands are ideal - they telescope into
different lengths and have sturdy tripod bases. They also fold up
conveniently so you can put them away in the corner when you're done with
them. So keep any and all of those options in mind when you're wondering how
to set up your lights. Just because you don't want to spend an arm and a leg
on equipment doesn't mean that you can't make your own equipment that will
function just as well as the professional stuff!
How do you set your lights up in the most flattering way for your subject?
This is as easy as it gets!
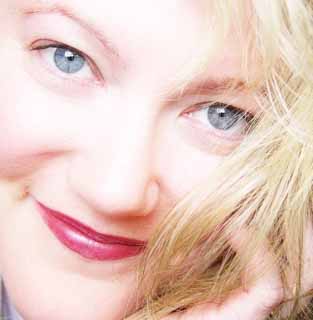
This will do okay when you're starting out, especially if you use something
to bounce the light back onto the subject to help with any shadows. Give it a
whirl if you're just starting out with portrait photography. It will help you
when you try more complicated lighting setups. When I say 'more
complicated', I truly don't want to scare anyone off from trying other
things. Maybe 'complicated' or 'advanced' aren't the
right words, because lighting is pretty easy - it's all about trying new things,
experimenting and just moving light stands around. The picture of the girl
used the key light a bit off to the side and a diffuser card on the other
side. Dramatic shadows but still a nice effect.
Okay, a little more 'complicated' setup follows, but first, let's
talk about different ways you can place your lights and why.
A portrait lighting system usually includes at least two light sources, the
main light (called the key light) and the fill light - which is usually a
less intense light, a light of the same intensity placed further away
(equating to a less intense light) or a reflector. There are two main
portrait lighting styles - broad lighting and short lighting. These terms are
used to imply where the lights are placed in reference to your subject.
Broad
Lighting:
To create a broad light, you'll need to pose your subject so that 2/3 to 3/4
of their face is facing you and your camera and then direct the key light
toward the side of the face that is closest to the camera. This is a
flattering technique if your subject has a long or thin face, as it will add
weight and width to the overall face.
Short
Lighting:
For short lighting, you would pose your subject the same way as above, but
direct your key light toward the side of the face that is furthest away from
the camera. This type of light will slim a heavier face.
This is the next most 'advanced' lighting setup. You second light
(the fill light) should be further away from the subject than the key light,
or a light bulb of lesser intensity. It will be quite flattering to your
subject's features. Notice the lack of shadows compared to the photo made
with the first lighting setup.
Adding a background light to the second lighting setup, you'll really notice
a beautiful effect. It will make your subject stand out from the background
and really give the appearance of a professional portrait.
Finally, the last light you might add is called a 'hair light'.
This works as a backlight and sits behind the subject, focusing on their
hair. It will give the edges of their head a nice, attractive glow.
|
Glossary of Lighting Terms
|
|
Following are some general lighting terms. We've gone over a
few in this lesson, but you may get creative ideas from others, and we'll
use yet others in our next lesson on studio lighting for commercial and
product shots.
|
|
Bounce
|
A reflector, usually white, silver or gold, used to bounce
light back from the main light onto the subject.
|
|
Diffuser
|
Thin, translucent material used to diffuse light. Can be
tracing paper, umbrellas, translucent plastic or even a bedsheet, as
discussed in this lesson.
|
|
Effects Light
|
A light that is neither the key light or
fill light. These are usually used as back lights to bright out a vivid
'halo' around a subject's hair, or sometimes a 'background
light' used to create interesting patterns on the background.
|
|
Fill
|
Lights which fill in the shadows on the subject, usually not
as high in intensity as the key light or further away from the subject than
the key light.
|
|
Flag
|
The opposite of a reflector, these are sometimes used in
studio lighting. They are dark and absorb extra light in order to maximize
shadows. Not generally used in portraiture but very common in studio
product shots where dramatic lighting is needed. Oftentimes a white
reflector card will be painted black on the other side so it can fill this
purpose.
|
|
Gel
|
Translucent or transparent colored material used to modify the
color of light.
|
|
Gobo
|
A sheet with cut-outs on it that creates interesting shadows
when placed in front of your light source. Again, not generally used in
portraiture (unless used as a background light), these are common in
product and stock photography. Imagine a metal sheet with squares cut into
it resembling those of a Belgian waffle. If you angle your light at 45
degrees to a background and put this piece of metal in front of it, you'll
get dramatic trapezoidal or rhomboidal effects. You can make your own and
they can be quite fun to play with!
|
|
Key Light
|
The main light source, casting the dominant light and shadows
in an image.
|
|
Reflector
|
A 'bounce' as mentioned above or a dish-shaped item
that surrounds the back of a light source, ensuring no light
'escapes' and it is all directed at the subject.
|
|
Scrim
|
Heat-resistant fabric diffuser for softening lighting.
|
|
Snoot
|
A cone-shaped item you can place over the front of your light.
It intensifies the light and gives you the ability to direct your light
source in very specific places. Again, not used in portraiture very much,
but you can produce amazing results with these in still life photography.
|
|
Soft Box
|
Large, diffuse light source made by shining light through a
diffuser. These offer the same soft, flattering lighting as a north-facing
window in Rembrandt lighting. A REALLY large soft box is often referred to
in the industry as a 'swimming pool'.
|
|
Umbrella
|
One of the photographer's best friends, the umbrella can
either be used by shining light directly at it and then using it to bounce
that light onto the subject, or by shining light directly through it,
creating a soft box, of sorts. Photographic umbrellas are usually made of a
white, translucent material, and the larger the
better.
|
|

 Now,
you can choose what you'd like to cover the large opening that will diffuse
the light. This is referred to in the lighting side of photography as a
'scrim'. A piece of white bedsheet will work fine - kids bedding is
best as you can get it in heat-resistant fabric. You can also go to the fabric
store and get all different kinds of fabrics. The thicker it is, the more
diffuse your light will be. If you plan on always using the same cover, you
can just cut the fabric to fit and tape it over the large hole. If you think
you might want to change it, you can either sew elastic around the edges so
it fits over the hole like a shower cap or use clips to hold it on. I go for
the shower cap idea, personally. Besides diffusing your light this way, you
can also get sheer colored fabrics that will actually color your light for
interesting effects you can experiment with later. I know I mentioned the
idea of heat-resistant fabric, and make SURE that is what you use, and don't
leave your lights on unattended.
Now,
you can choose what you'd like to cover the large opening that will diffuse
the light. This is referred to in the lighting side of photography as a
'scrim'. A piece of white bedsheet will work fine - kids bedding is
best as you can get it in heat-resistant fabric. You can also go to the fabric
store and get all different kinds of fabrics. The thicker it is, the more
diffuse your light will be. If you plan on always using the same cover, you
can just cut the fabric to fit and tape it over the large hole. If you think
you might want to change it, you can either sew elastic around the edges so
it fits over the hole like a shower cap or use clips to hold it on. I go for
the shower cap idea, personally. Besides diffusing your light this way, you
can also get sheer colored fabrics that will actually color your light for
interesting effects you can experiment with later. I know I mentioned the
idea of heat-resistant fabric, and make SURE that is what you use, and don't
leave your lights on unattended.