| CATEGORII DOCUMENTE |
| Bulgara | Ceha slovaca | Croata | Engleza | Estona | Finlandeza | Franceza |
| Germana | Italiana | Letona | Lituaniana | Maghiara | Olandeza | Poloneza |
| Sarba | Slovena | Spaniola | Suedeza | Turca | Ucraineana |
Experiment Design
Experiment design is the primary task you would want to accomplish by using QT4. The design task can only begin when you have completed the planning session and you have identified the factors and their levels and interactions. The size of your experiment will depend on the number of factors and levels you have. QT4 allows you to accomplish the experiment design two ways. The first option is for you to be in charge(Manual Design). Here you select the array for the experiment and also decide which factor goes to which column. The alternative way is to let QT4 prescribe the smallest design for your situation(Automatic Design).
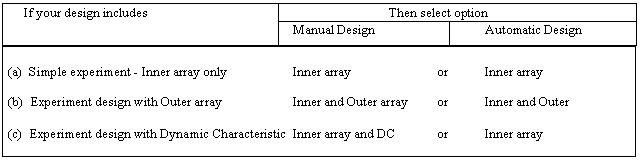
Depending on your project your experiment design can have only and (a) Inner array, (b) Inner and Outer array, and (c) inner array and (c) Inner array and Dynamic characteristic. You can let QT4 design your experiments with Inner array only or experiments with outer array. But if you are studying Dynamic systems, you must add that to your inner array design manually.
(a) Simple Experiments
Simple experiments are those that are designed using only an inner array. Your experiment may indeed have noise factors, no formal outer array is utilized to define the noise conditions. You can design such experiments using the Manual or Automatic DESIGN options.
Manual design
|
|
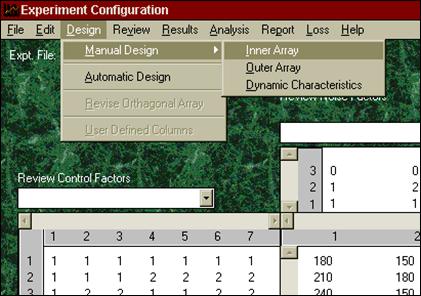
1. Select Menu option
From the main screen, click on the DESIGN menu option and then select Manual and Inner array. You need not close the exiting experiment file on the screen. It will be closed automatically and data in memory will be erased.
Click the YES button when the message about the current data appears next.
|
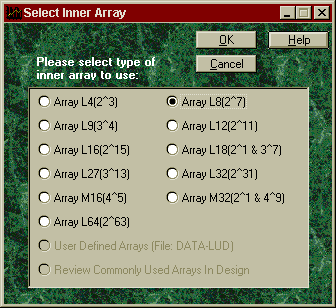
2. Select Array
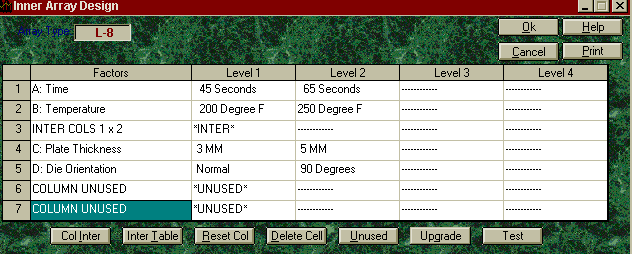
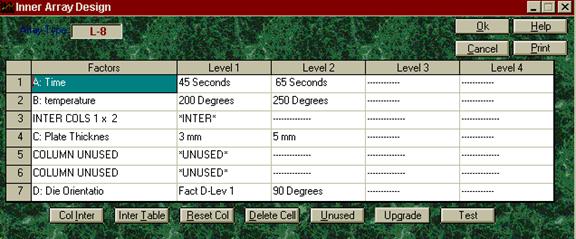
From the Inner array slection screen, check the array you want to use for your design. You have choice of selecting any array from the list of L-4 through L-64. Suppose that you select the L-8 array for your design.
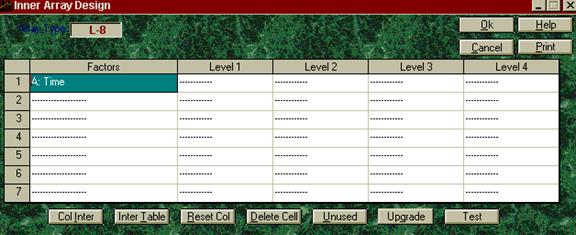
3. Describe Factors and levels
Experiment design is accomplished in the Inner Array Design screen. Before start entering the description, you need to have a piece of paper where you have written the names of your factors and levels, and also identify which columns these factors are assigned.
Suppose that the factor you want to assign in column 1 is TIME. Highlight the CELL under Factor and row number 1(rows in this table are columns of the Orthogonal array) by clicking with the right mouse button. Then type the description of the factor. For analysis reference purposes, it is a good idea to use a leader character designation like A, B, etc. So instead of typing TIME, type A: Time.
|
|
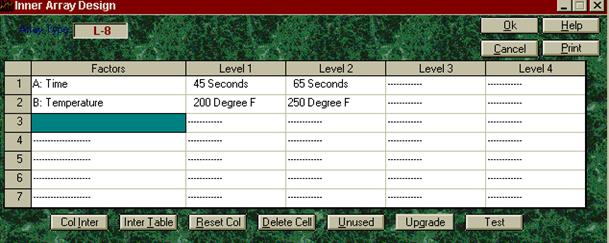
To describe the levels, click the CELL under Level 1 in the same row as the factor or press Shift+Right Arrow Key, then type the description of the level. Of course you have to have at least two levels for each factor. Also, while describing the level, if your level is 45 Seconds, type in 45 Seconds, not just 45. If you entered only 45, QT4 will not complain, but it is a good idea to include characters and numbers both for description.
4. Reserve columns for Interaction studies
When your design includes interaction studies, you will need to reserve the appropriate columns for interaction. Suppose that you wish to reserve a column for interaction between factors (QT4 capabilities limited to interaction between 2-level factors only) A & B, you can do this two ways. If you already know the column for the interaction, from the Triangular Table, you can highlight the CELL under the Factor in the row number then click the COL.INT button at the bottom of the screen.
|
|
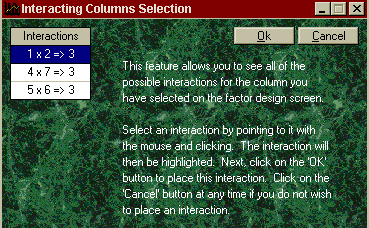
Interaction (Contd.)
The screen will indicate a number of possible pairs of columns which will mix their interaction effect with the selected column(col. 3 in this case). To select the pair of interest, simply click on the column numbers, 1x2 in this case. Note that you can only select one pair of column at one time.
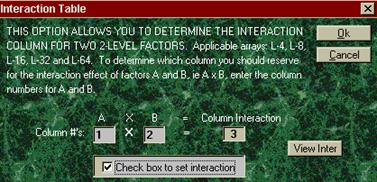
If on the other hand, you are not sure which column you should reserve to study the interaction between factors in columns 1 and 2, in other words you do not have the Triangular Table information, you need not highlight any column, simply click the INT.TABLE button from the bottom of the Inner array design screen. When in the Interaction Table screen, key in the number 1 under A and 2 under B, the click on Check box to set interaction. This will indicate the column which should be reserved for interaction. If you want QT4 to set this interaction automatically, click OK.
When interaction is set, QT4 will insert the appropriate description in the column, and indicate *INTER* in place of the first level in the same line. NEVER TYPE THESE DESCRIPTION YOURSELF.
|
|
|
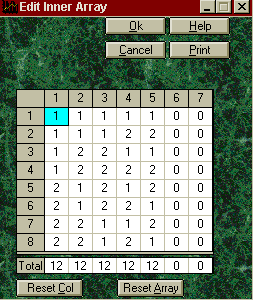
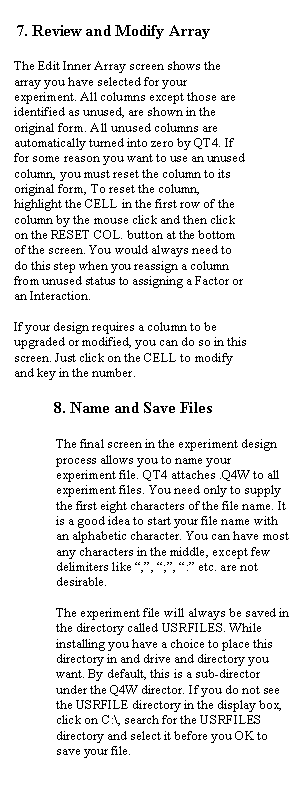
5. Identify Unused columns
The columns that have no factors or interactions assigned, are referred as unused columns. QT4 needs to know which columns, if any are determined by you as unused. To set a column as unused, highlight the CELL under Factor description in the line number corresponding the column by the mouse click, then click on the button UNUSED at the bottom of the Inner array design screen.
|
|
Your experiment design description is complete when you have addressed each and every column of the array, which are the rows identified by the number. For completeness, all columns must have a factor, an interaction, or be unused. In case of factors, there must be at least two levels described. QT4 will not allow you to proceed unless the description is complete. When ready, click OK to proceed.
6. Enter Project Descriptions
|
|
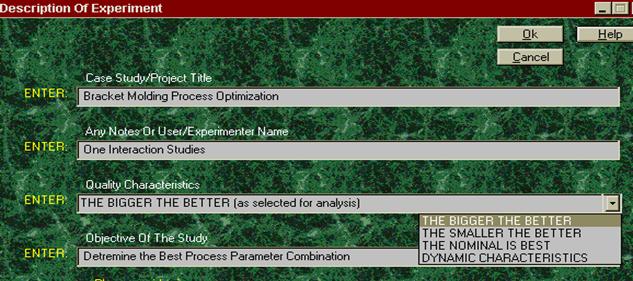
This screen allows you to attach four lines of description about your project. These items are optional and used only in printing reports when available. To set the Quality Characteristic appropriate for your experiment, click the pointer at the end of the line and make your selection. QT4 automatically puts the selected description.
|
|
|
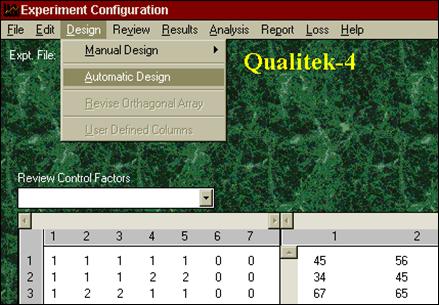
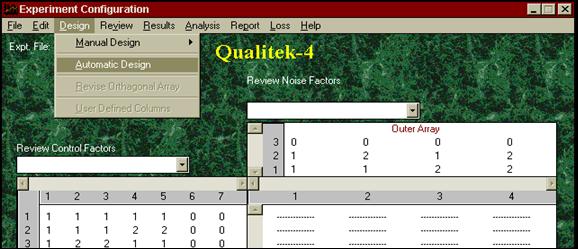
Automatic Design
In automatic design, QT4 designs the experiment for you automatically. Given your experimental parameters such as number of factors at various levels and their descriptions, QT4 selects the most suitable array and assigns factors to the most desirable columns. Once the design is displayed, you can then modify the description, reassign the factors, and modify columns if necessary.
1.
Selection Menu Option To let QT4 design your
experiment, click DESIGN option from the main screen(Experiment
Configuration) and select Automatic Design. In the next screen QT4 alerts
you about the fact that all existing experiment data will be erased. Click
OK to proceed.
|
2.
Set Requirements This screen allows you to set
the experiment size by indicating the number of factors at two, three, and
four levels, and also the interaction between two 2-level factors. Considering
the same experiment designed earlier (four 2-level factors and one
interaction), click the box left of Number of 2-level factors.., then set
the counter to 4. Check the Interaction box next and set the counter number
to 1. Since in this experiment there are no three or four level factors and
no noise factors, nothing else needed to be checked. Note: QT4 can design most
common experimental situations requiring Inner and Outer arrays. If QT4
cannot design your experiment, it will prompt you so. Should you want QT4
to design your experiment anyway, modify your requirements slightly and try
again. You will then have the opportunity to alter your design manually.
|
|
|
3. Review
Proposed Experiment Design Based on the requirements, QT4
selects the most economical array for the experiment. If the information
displayed, which is what QT4 used to determine the design, is not correct,
click No. This will allow you to redefine the requirements. Otherwise click
OK to proceed.
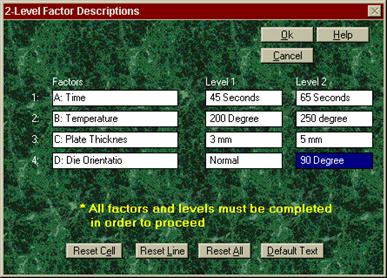
4.
Describe Factors and Levels Factors and levels are
described using separate screens for 2-level, 3-level and 4-level factors. The 2-level factors are defined
first. To describe factors and
levels, click the appropriate box and type in the descriptions. The numbers left of the factor
description boxes indicate the sequence number of the factor and are not
the column number
|
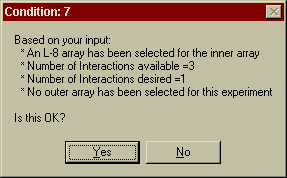
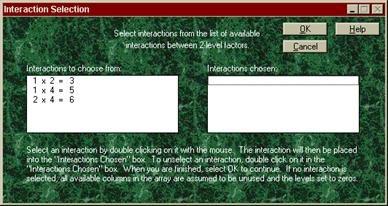
4. Select
Interaction(s) This screen allows you to
select the interaction you desire from the list of available column
interactions. QT4 always shows you the interaction applicable and available
based on the number of factors and the array used for the design. In this
example, since there are only four 2-level factors and the array has seven
columns, there are three dependent(common column numbers) interactions are
possible. You may select select one or more interaction or none at all. In
the example, interaction between factors in colums 1 and 2 (AxB) is
desired. Follow the screen promt to select the interaction you want.
|
5.
Review Experiment Design This screen is the same as in
the manual design. You will notice that all factors, their level
descriptions, and the interaction are placed in the appropriate column
locations and the unused columns are identified. This design may or may not
look like the one you would design using the manual option. QT4 has certain
fixed rules it follows to assign the factors to the column. These rules
follows design that minimizes mixing of unwanted interactions with the
factor effects. If you created an error in
typing descriptions or you want to alter assignment of a column, you can
highlight the CELL and retype the description. From this point onward, the
screens are the same as in the Manual Design option. Click OK when you are ready to proceed.
|
6. Review
Orthogonal Array Examine the Orthogonal array
and click OK to proceed. (Same as the Manual Design
option) 7. Save
Experiment File Find the USRFILES directory
and name the experiment file with extension .Q4W (Bracket2.Q4W) and click
OK when ready. Your file is now saved and you are ready to describe the
Trial conditions and carry out the experiments. (Same as the Manual Design
option)
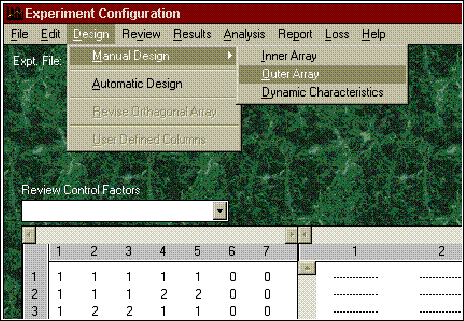
(b) Experiments with Outer Arrays
Outer arrays are used to formally incorporate the Noise factors into the experiment. Of course before an outer array is added to the experiment, the inner array must be designed first. Before proceeding to design the outer array, make sure that your Inner array is designed and that the desired experiment file is opened. If the file is not already opened, open the desired file by selecting the FILE menu from the main screen(Experiment Configuration).
|
|
Manual design
1. Select
menu item From the main screen DESIGN
menu, select manual design then click on Outer Array.
|
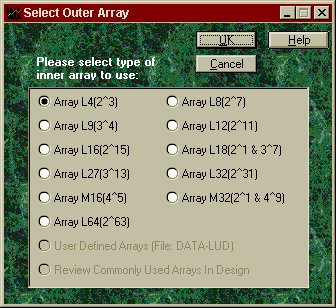
2. Select
Outer Array The same number of arrays as
available for the Inner Array design is also available for the Outer Array
design. Of course the Outer Array you need depends on the number of Noise
factors you want to include in your experiment. The rules for selection of
the array is, as for the control factors, dependent upon the number of
Noise factors and their levels. In the example experiment, two
2-level Noise factors are to be included and thus, an L-4 array is checked.
3.
Describe Noise Factors and Levels The descriptions of Noise Factors and their Levels are
entered just the same way as the
Control Factors and their Levels. This screen has all the same features as
the Inner Array Design screen. To enter a factor or level
description, click the appropriate box and type the description. Be sure to
use the the command buttons to set the column for Interaction or to set it
as Unused. When all rows(which are columns with respect to the orthogonal
array) are described, click OK to proceed to the Outer array screen.

|
Automatic design
1. Select
menu item In the Automatic design option,
both the Inner Array and the Outer Array design are accomplished at the
same time. When you ready to design your experiment, from the main screen
DESIGN menu, select Automatic design. You need not close the current design
displayed as it will be closed as you proceed.
|
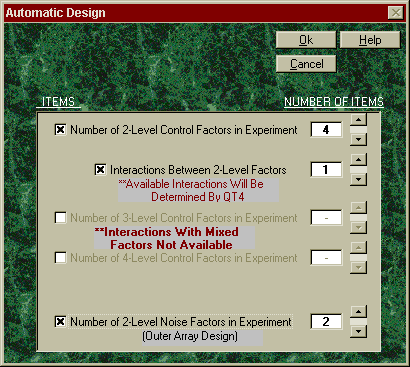
2.
Select Design Options The parameters for experiment
design are set in this screen. The example design(BRACKET1), used earlier,
there are four 2-level factors, one Interaction, and two 2-level Noise
factors. To set the numbers, first click on the box left of the
description, then click on the up or down arrow to adjust the number. Since in Automatic design the complete
experiment, starting with the Inner array design, is accomplished, screens
that are applicable for the Outer array portion are shown here. For Inner
array design refer to the section described earlier.
|
3.
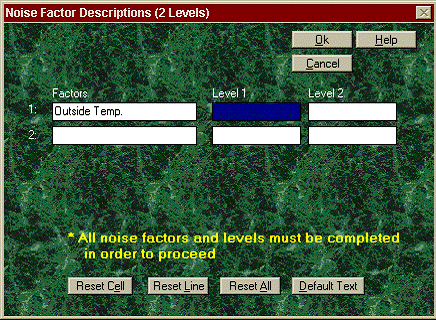
Describe Noise Factors and Levels This screen will come after
control factors are described. Click on the appropriate space and enter the
description. Click OK when finished.
QT4 automatically selects the smallest Outer array you need for the design
and proceed to display the descriptions of both Inner and Outer Arrays.
Follow the screen prompt and proceed.
4.
Complete Automatic Design Process Once the descriptions of
factors and levels are entered, QT4 puts you back on the same set of
screens that are used for the Manual design. Screens and action required to
complete the design is the same as those shown under Manual Design earlier
and should be refered when necessary.
|
Aftter
the Inner array design screen, QT4 will display the Outer design screens for
your review, and when finished, you will have option to save the data under a
file of your choice. The subsequent screens are the same as those shown in the
previous section.
Description of Trial and Noise Conditions
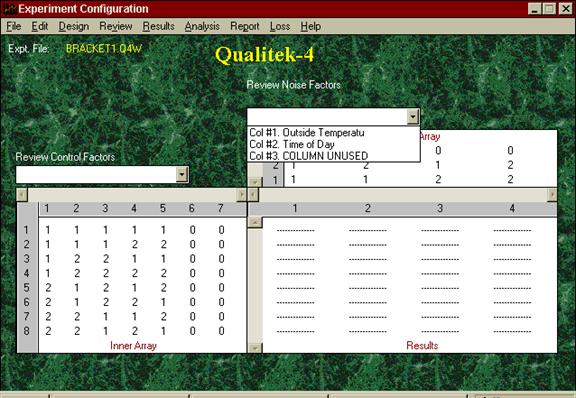
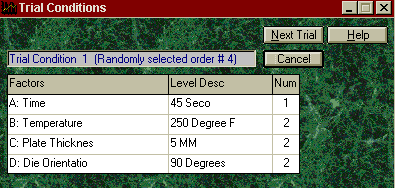
After the experiment is designed, the trial condition can be described using the Factors and the array. The term TRIAL CONDITION is used to the combinations of contro factor levels which are the prescriptions for different test conditions necessary to accomplish the experiment(all trial conditions). The term NOISE CONDITION, on the otherhand referes to the combinations of the Noise factor levels which created the condition to which the trial conditions are exposed to. In the example experiment an L-8 is used for the Inner array and an L-4 is used for the Outer array. Thus there will be eight Trial conditions and four Noise conditions. Experimenter should combine the Trial conditions and the Noise conditions as per the combinations required by the Outer array.
|
|
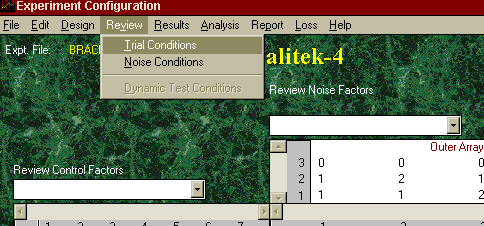
1. Select
menu item From the main screen REVIEW
menu, select Trial Conditions or Noise Conditions as desired.
1. Review
and Print Conditions While in Trial Condition
screen, click Next Trial to display the next condition. Click Print button
if you want to print one or all the conditions. The Randomly selected number
indicates the order in which eperimenter should conduct the experiment when
possible. Click Cancel button when finished reviewing the conditions. Repeat the same steps for Noise
Conditions starting with the REVIEW menu option.
|
(c) Experiments with Dynamic Characteristics
Just as Outer arrays are used to formally incorporate the Noise factors, effect of Signal and Noise factors applicable to a Dynamic System is included in the experiment by this special design. There is no orthogonal array used for the outer array. Instead the levels of the Signal and the Noise factors are combined to form all the possible combinations are described. While conducting the experiment, each trial condition is exposed to these combinations of the Signal and the noise factors.
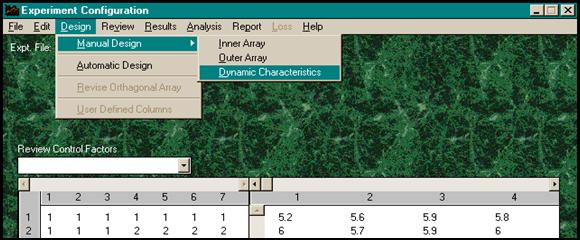
The Dynamic Characteristic can be added to the experiment only after the inner array is designed first. Before proceeding to design the outer array, make sure that your Inner array is designed and that the desired experiment file is opened. If the file is not already opened, open the desired file by selecting the FILE menu from the main screen(Experiment Configuration). To describe the Dynamic Characteristic(DC) design capabilities, the experiment DC-AS400.Q4W will be used. If you wish to redesign the DC for an existing experiment, you can work with a copy of the experiment file and proceed to redesign by first removing the existing DC design. To remove current DC, click on the EDIT menu item and select Remove Dynamic Characteristic option.
1. Select
Menu Option From the main screen DESIGN
menu, select manual design then click on Dynamic Characteristic.
|
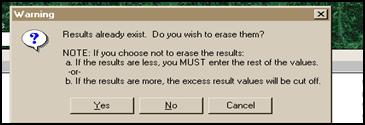
If you are working with an existing file which has results, QT4 will prompt you about the fact that the results will be erased. Click OK to proceed if you get this message. If you chose to keep the results, its size will be adjusted to suit the new DC design you are adout to define.
|
|
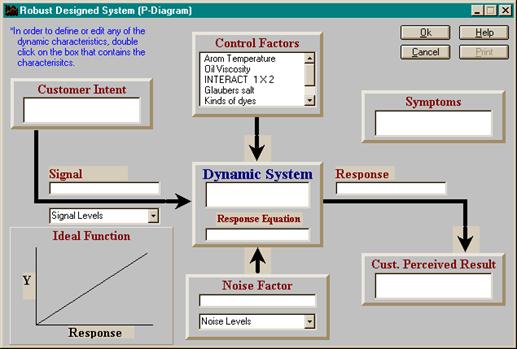
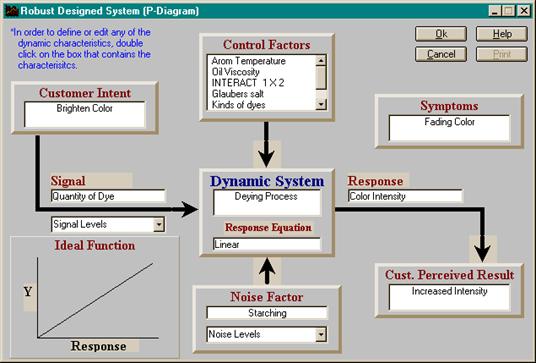
2. Review
P-diagram (before input) The dynamic system function is
schematically displayed in this screen. The control factors, which is
already designed as part of the Inner Array, are only known parameters at
this point. The factors which will be necessary are Signal factor(1 to 12
levels) and the Noise factor(2 to 10 levels). In addition, there are five
system parameter descriptions such as Customer Intent, Symptomps, Perceived
Results, etc. will have to be furnished in order to complete the system
definition. Double click on the box/text for Signal to
describe the Signal and Noise factors and levels. Once you complete the
description, you will return to this screen. Now proceed and describe the
five system parameters by double clicking on the box for Dynamic System or
any of the five locations.
|
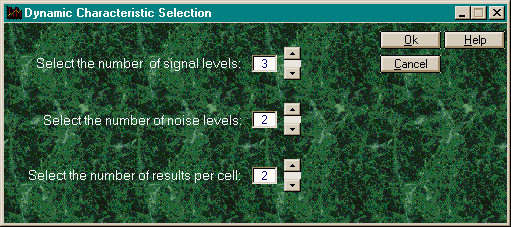
3. Specify
Number of Signal and Noise Factor
Levels QT4 allows you to incorporate
one Signal factor which may have up to 12 levels(or 12 signals at one level
each at 1 level) and one Noise factor with up to 10 levels(or 10 separate
noise factors). The number of levels of the Signal and the Noise factors,
along with the number of repetitions in each of the Signal & Noise
factor combination(called a CELL), determines the size of the experiment. QT4 requires that each trial
condition will have equal number of Cells. The number of cell equals the
number of Signal levels x number of Noise levels. The total number of
samples/results, however, is number
of Cell x number of samples in each Cell. Click the up or down arrow for
each box to adjust the levels you desire. Click OK to proceed to describe
the factors.
Before any system information
|
|
Note:
How can you include multiple Signal factors?
Suppose you have 3 Signal factors at two levels. Treat them like 3 x 2 = 6 levels of Signal factor. While describing the levels of the Signal factor, keep note and describe the levels to reflect your description.
You can treat multiple Noise factors in the same manner.
Cell represets a unique condition defined by combining Signal and Noise levels. There must be at least one sample tested in each cell. Depending on the levels of the Signal and Noise, the number of samples per Cell could be very large. QT4 is limited to 120 samples per trial condition. Which means that:
# Signal levels x # Noise levels x # samples/Cell = 120
Thus if # Signal levels = 3 and # Noise levels = 2, the number of samples per Cell could be as high as 120/(3x2) = 20.
Size of Experiment Calculation
In the example considered, total number of samples required is 3 x 2 x 2 x 8 Trials = 96.
4.
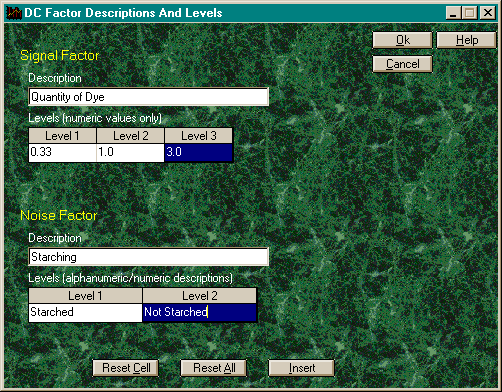
Describe Signal and Noise factors Use the mouse to click on the
box for description and type in the description of the Signal factor with
alphabetic or numeric characters. Enter the numeric values of the Signal
factor levels. The levels of the Signal factor MUST BE in terms of numeric
quantities in the ascending order of magnitudes. Similarly, key in the description of the
Noise factor. Unlike the Signal levels, the Noise levels may be described
using alphabetic and numeric terms. They need not be numeric quantities.
|
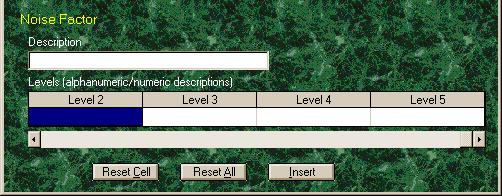
In case the number of levels of the Signal or Noise factors is larger than what the screen can accomodate, like other screens, a scroll bar will appear below the level description box. Scroll it to the right and complete descriptions of all levels before exiting the screen.
|
|
|
|
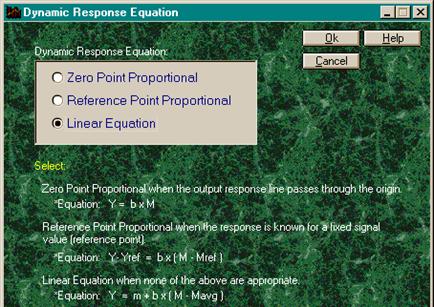
5.
Indicate Response Equation Type Depending of the nature of the
dynamic behavior of the system, the response equation can be best described
on of the three types of straight line equations. Prior knowledge or an
assumption as to which one is most likely behavior is needed for the
purposes of analysis of results. Click the item that best suits your
system, then click OK to proceed.
When you are done with describing Signal and noise factors, QT4 will return you to the P-diagram. Double click on Dynamic System to enter descriptions of the system. When available, clearly describe Symptom, Response, etc. for the Dynamic System under investigation.
6. Define
System Parameters Symptom - It is the reason for the experimental study. Things
that are causes for concern about the system performance. Response - It is what the result/performance will be judged by.
Customer Intent - This is what customer does to obtain the
desired results. Customer Perceived Results - It is what the customer sees as
the effect of improvement. System Description - A word or two description of the system
function.
|
Description of Signal and Noise Conditions
After experiment is designed, the combination of the Signal and the Noise levels to which the trial conditions are to be exposed, can be described using REVIEW menu option from the main screen. These conditions are different from the description of the TRIAL CONDITIONS which are the combinations of control factor levels. The term NOISE CONDITION, on the otherhand referes to the combinations of the Noise factor levels in case of OUTER ARRAY design, which represent the conditions under which the experiments are carried out. In the example experiment with Dynamic Characteristic, an L-8 is used for the Inner array and the three levels of Signal and the two levels of Noise creates six separate combinations(CELL). Since there are two samples tested in each cell, for each trial condition, two samples are exposed to each of the Signal and Noise combinations.
To review the Signal/Noise combination for experiment, click on the REVIEW menu item from the main screen and select Dynamic Characteristic. Review and Print descriptions using the screen buttons as desired. Note that the descriptions shown are applicable to all Trial conditions for the experiment.
|
|
|
Politica de confidentialitate | Termeni si conditii de utilizare |

Vizualizari: 1034
Importanta: ![]()
Termeni si conditii de utilizare | Contact
© SCRIGROUP 2026 . All rights reserved