| CATEGORII DOCUMENTE |
| Bulgara | Ceha slovaca | Croata | Engleza | Estona | Finlandeza | Franceza |
| Germana | Italiana | Letona | Lituaniana | Maghiara | Olandeza | Poloneza |
| Sarba | Slovena | Spaniola | Suedeza | Turca | Ucraineana |
Camtasia Getting Started Guide
Table of Contents
1. Introduction
What is Camtasia?
Record: Camtasia Recorder
Edit: Camtasia Producer
Share: Distribution Options, TSCC Codec, Pack and Show
Play: Camtasia Player, Windows Media, RealPlayer, QuickTime
About this Document
2. Installing Camtasia
System Requirements
Installing Camtasia from CD-ROM
Follow the instructions given by the setup wizard for correct installation of the product.
Installing Camtasia from www.techsmith.com
Installing DubIt
3. Using Camtasia
Record:
Using Camtasia Recorder
Edit:
Using Camtasia Producer
Share:
Distribute anywhere with industry standard output, TSCC Codec and Pack and Show
TSCCWhat is it?
Play:
Camtasia Player, Windows Media, RealPlayer, QuickTime
Using Camtasia Player
Using DubIt
Viewing Camtasia Demos
4. Video Performance
Configuring Camtasia Recorder
Recorder Performance
Camtasia Producer Performance
Distributing Your Videos
5. Features
Camtasia Special Effects
Benefits
Features
Camtasia Special Effects
Benefits
Features
Support
Contacting TechSmith Technical Support
Using Help
Product Upgrades
Most Frequently Asked Questions (FAQ)
Copyright 2002 TechSmith Corporation
NOTE: Screen captures made with SnagIt; annotations made with SnagIt Studio.
Camtasia is an on-screen recorder and video production tool. It is actually a suite of three separate programs - each designed to aid in the creation (recording), production (editing) and distributing (sharing and playing) of desktop video and audio. These desktop videos are capture sessions that show all of the movements that occur on your computer screen for a defined time. Camtasia allows you to show others what actions you took or what actions they should take -ideal for training or sharing procedures. You control all the action and prepare the results to help get across the points you need to make.
Camtasia is perfect for:
Corporate Trainers: create professional videos for computer-based instruction.
Marketers: create broadcast-quality product demos and sales videos.
Presenters: produce educational, trade show and informational presentations.
Software Developers: document use of custom and commercial software.
Conferencing: record, share and archive conference content.
CAD and Simulation Professionals: record and share animation, CAD designs, and annotation.
Legal Professionals: document evidence and monitor desktop activities, process control and live content.
Help Authors and Documentation Specialists: enhance online documentation.
Technical Support Personnel: document computer errors and provide video-based troubleshooting.
Web Designers: create narrated tours of web site designs.
With Camtasia Recorder, you can capture cursor movements, menu selections, pop-up windows, layered windows, typing and everything else you see on your screen. Use ScreenDraw to draw on your desktop while you record a movie - just like television sportscasters! Use Camtasias powerful ScreenPad annotation feature to add callout boxes, logos and graphics as you record your movie. Apply real-time effects like cursor and object highlighting, graphic and image annotations, watermarks, time stamps, captioning and audible mouse clicks. Move in for a closer look with Zoom. Pan the capture frame across the screen to show more detail. At any point during production, you can use DubIt as your sound editor, which is a simple program that gives you powerful audio dubbing capabilities.
Camtasia Producer is an easy-to-use video editor that lets you quickly edit, trim and join AVI clips. Add transition and watermark effects to any video. Include AVIs you have created with Camtasia Recorder or incorporate an AVI file from another source. Use frame-by-frame preview and editing. Quickly assemble a complete production from a collection of video, narration and audio clips. Customize your movie using various options such as color depth, watermarking, frame size, compression and copyright information.
Enjoy industry standard support for distribution. The final product may be saved as a standard AVI, animated GIF, Microsoft Advanced Streaming Format (ASF), Microsoft Windows Media Video (WMV) format, Apple QuickTime video (MOV), RealNetworks RealMedia (RM) format or Camtasia RealPlayer Plugin (CAMV).
Finished videos can be distributed via CD-ROM or located on a file server, and streaming formats can be accessed via Intranet or Internet.
Use industry standard codec or TechSmith's own Screen Capture Codec (TSCC). The TSCC codec provides lossless image quality coupled with excellent compression ratios. The TSCC codec preserves 100% of the image quality, even through multiple decompression/recompression cycles that are typical during the production process. Its optimized for screen capture so that the resulting files are small and highly compressed.
Even codecs that are more widely distributed do not perform as well as the TechSmith codec to deliver the highest quality, smallest file size and fastest compression speed. TSCC is the default method of compressing/decompressing video, but the default codec can easily be changed to any of the standard Windows codecs.
Share your video with the Pack and Show feature. Pack and Show makes your movies easily accessible to your viewers - it converts a Camtasia movie into an executable file so users can easily install the TechSmith codec to view the movie at the same high resolution you saw when recording the video.
You can play your Camtasia AVI video productions with Camtasia Player, Windows Media Player, RealNetworks RealPlayer and QuickTime. No plug-ins or additional software is required.
Try Camtasia Player - it not only guarantees high quality playback of AVI movies, but it is designed to be as easy to use as possible. This standalone movie player also plays movies back at 100% of their original size so they always remain readable. The Player is a single .EXE file that needs no setup, and it runs on any 32-bit Windows platform. The small, lightweight Camtasia Player plays only AVIs and is useful in any environment.
Use this document as a guide to install Camtasia, to get the most from the many features and to obtain help if you need it. Take a few seconds to find the sections you need:
Chapter 1: Introduction describes the basic product capabilities and applications.
Chapter 2: Installing Camtasia shows how to install the product from CD-ROM or from TechSmiths web site.
Chapter 3: Using Camtasia tells how to use the product:
Record, Edit, Share and Play!
Chapter 4: Video Performance tells you what you need to know about system performance. Youll also learn how to achieve the best results by using innovative features.
Chapter 5: Features tells you about some of Camtasias quality features and special effects.
Chapter 6: Support describes the technical support resources you can access should the need arise. A handy Frequently Asked Questions (FAQ) section addresses the common questions you may encounter.
To run Camtasia Recorder and Producer, your system must meet these specifications:
Microsoft Windows 95 OSR2, 98, Me, NT 4.0, 2000, XP or later version
90 MHz processor (400 MHz recommended)
16 MB RAM (64 MB recommended)
Windows-compatible sound card and microphone (recommended)
12 MB of hard-disk space for program installation
Windows Media support requires Windows 98SE, 2000, XP or later
Apple's QuickTime for Windows v4.1 or later must be installed to produce QuickTime files
For special requirements such as large screen area captures or high frame rates, you should review the suggestions in Chapter 4, Video Performance.
The installation program setup.exe installs both Camtasia Recorder and Camtasia Producer, two related programs you will be using together. You must have Microsoft Windows 95 OSR2, 98, Me, NT 4.0, 2000, XP or later version installed before installing Camtasia.
1. Start Windows, if you haven't already done so.
2. Insert the Camtasia CD-ROM into the CD-ROM drive. Camtasia Setup should start automatically when you close the drive.
3. If the setup program does not automatically start, or if you have Camtasia on a diskette, perform the remaining steps.
4. Find the program named setup.exe, on the CD. Double-click it. Camtasia Setup starts.
You can purchase additional copies of Camtasia from our web site. Go to www.techsmith.com and follow the directions there for downloading an evaluation copy of the software. Then, when you use the software, use menu choices Help > Register Camtasia to go through purchase and registration. Its quick and easy!
After installing Camtasia, and when the Installation Complete dialog box appears, note the DubIt installation prompt in the lower right corner. DubIt is included free of charge with Camtasia. If you want to install DubIt, you can do so right after installing Camtasia, or you can install from the CD-ROM later.
If you decide to install DubIt later, procedures to install it are the same as for Camtasia. If you are installing from CD-ROM, look for <drive:>DubItsetup.exe and double-click it. If you are installing from our web site, download the program first, then go to the temp directory in which you stored the download file and double-click dubit.exe to begin installation.
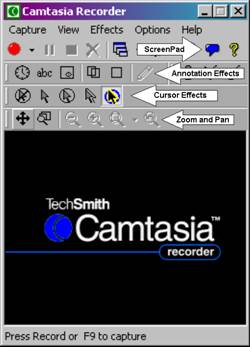
Use Camtasia Recorder to capture screen activity and apply real-time effects.
1. Start Camtasia Recorder. If Camtasia is reduced to an icon in the system tray, double-click it to make it full-sized.
(D) Toggle Window Size (C) (B) (A)![]()
![]()
![]()

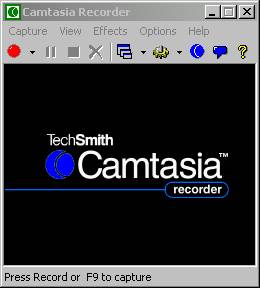
2. Set Capture > Input (A) to the type of recording you want to make: Screen , Window , Region , or Fixed Region .
3. Complete capture controls are available on the toolbar and menus. Click Capture > Record (A) or the toolbar red button (B) to begin. Or, use the record hotkey <F9> to start and pause the capture.
4. During recording, use the Effects menu (C) to pan the capture window, zoom, apply annotations and apply many other effects.
5. Click Capture > Stop (A) or the toolbar black button to finish and save your capture. Or, use the stop hotkey <F10> to stop the capture.
Note: Toggle Window Size (D): You can position Camtasia Recorder to the side, away from the area of the screen you intend to record. You can also hide parts of the recorder screen using View menu toolbar to show only the toolbar. Recorder also works while minimized, but active in the System Tray. Place Camtasia in the System Tray by clicking the minimize [ _ ] button in the upper-right corner of the window title bar. Use the close box [ X ] to exit Camtasia.
Make as many takes and clips as needed for your project. When you are done recording, you can use Camtasia Producer to trim them, add audio, and export to the movie file type you want (AVI, ASF, Microsoft Windows Media, QuickTime, RealNetworks RealMedia, Camtasia RealPlayer Plugin or animated GIF).
Use Camtasia Producer to edit your desktop videos (AVI files). Producer uses a storyboard interface to assemble AVI video clips. In addition, you can incorporate transition effects between clips on the Producer storyboard or add a watermark to your entire production. Producer also has an Explorer-like file browser, a thumbnail viewer of available video clips and an editor window for previewing the clips and setting trim points.
(F)
![]()
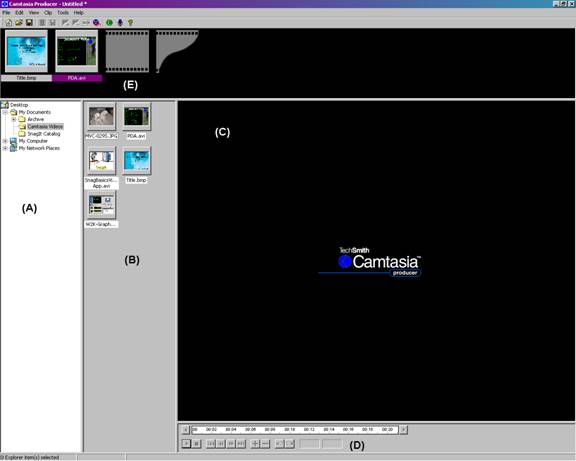
1. Drag movie clips from the File Explorer (A) or Thumbnail Viewer (B) to the Editor Preview (C) and trim movie clips in the Editor (D).
2. Drag movie clips to the Storyboard (E) from the Editor, or directly from the File Explorer. Reposition clips on the Storyboard and apply optional Transition Effects (File > Transition Effect) (F).
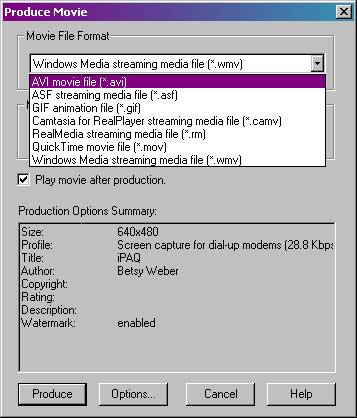
3. File > Produce Movie (F) creates a movie (AVI, ASF, Microsoft Windows Media (WMV), RealNetworks RealMedia (RM), Apple QuickTime (MOV), Camtasia RealPlayer Plugin (CAMV), and animated GIF) from the current Storyboard contents. Click Produce to continue.
4. Important: The project and Storyboard are not yet saved! Save the current Storyboard and all effects as a new project using File > Save Project As (F).
Save your movie with Camtasia Producer as a standard AVI, animated GIF, Microsoft Advanced Streaming Format (ASF), Microsoft Windows Media Video (WMV) format, Apple QuickTime Movie (MOV), RealNetworks RealMedia (RM) format or Camtasia RealPlayer Plugin (CAMV).
TechSmith's own Screen Capture Codec (TSCC) provides lossless image quality coupled with excellent compression ratios. Camtasia also supports all standard video for Windows audio and video codecs. Pack and Show makes your movies easily accessible to your viewers by converting Camtasia movies into executable (.exe) files so users can easily install the TechSmith codec to view the movie at the same high resolution you saw when recording the video.
TechSmith Screen Capture Codec (TSCC)
When talking about codecs, it's helpful to understand three terms:
Codec is the abbreviation for compressor/decompressor. Codecs are applied to audio, video and image files to compress their size. The benefit is that the files don't use as much disk space when stored or as much network bandwidth when streamed. To open a compressed file, the same codec must be used to decompress the file.
Compression is the coding of data to reduce file size or the bit rate of a stream.
Lossy is a compression technique that decreases image, audio, or video quality in order to reduce the file size.
The video codec is responsible for compressing the video frames during recording and for reconstructing the video frames during playback. Often, the makers of a codec will sacrifice image quality in order to achieve higher compression and smaller file sizes. These codecs are termed 'lossy' and are incapable of reconstructing the video at its original fidelity. Most commonly available codecs for recording screen videos are lossy, resulting in screen capture videos with reduced image quality and a 'fuzzy' appearance.
Camtasia includes TechSmith's own Screen Capture Codec (TSCC), providing lossless image quality coupled with excellent compression ratios. Since the TSCC is lossless, it preserves 100% of the image quality, even through multiple decompression/recompression cycles that are typical during the production process. The TSCC is optimized for screen capture so that the resulting files are small and highly compressed.
The compression codec also affects the capture frame rate or speed of compression. The high frame rates required for smooth video increase the need for high compression speed. High color screens also impact compression speed. The TechSmith codec offers exceptional compression speed at all color depths - unlike, for example, some codecs that only support 8-bit color. (The Microsoft RLE codec is lossless but is restricted to 8-bit color.) TSCC is the default method of compressing/decompressing video in Camtasia Recorder.
This means you benefit from TSCC features:
Even codecs that are more widely distributed do not perform as well as the
TechSmith codec to deliver the highest quality, smallest file size and fastest
compression speed.
|
TSCC Feature |
TSCC Benefit |
|
Lossless compression |
100% quality is required for screen recordings to be readable. Survives an endless editing cycle. |
|
Optimized for compressing screen recordings of office-style applications |
High compression ratios. Small file sizes. |
|
Fast compression speed |
High capture frame rates. Smooth high quality videos in terms of motion (like cursor movement). |
While the default codec can easily be changed to any of the standard Windows codecs, we recommend that you use TSCC when recording your videos with Camtasia. You can still change the codec later, in Camtasia Producer.
When a video is compressed with TSCC, anyone wishing to view the movie must have TSCC installed on his or her computer. There are no charges, royalties or licensing requirements for distributing movies encoded with TSCC or with distributing the codec to others for viewing.
Use one of the following methods to share the TechSmith Screen Capture Codec:
Use Pack and Show to package your video with TSCC to create a single executable.
Distribute a copy of the codec installer, TSCC.exe, which is available on the Camtasia CD-ROM and on our Web site. Copy TSCC.EXE onto the same media where your movie distribution resides and either have your installer run it at installation time or instruct the user to do so.
For TSCC compressed content delivered on the Internet, an ActiveX control is available that can be embedded in a Web page to automatically install the TSCC codec when a user lands on the page using Microsoft Internet Explorer web browser. This very small control checks if TSCC needs to be installed or updated and if so, downloads and installs it.
Play your Camtasia AVI video productions with Camtasia Player, Windows Media Player, RealNetworks RealPlayer and QuickTime Player. No plug-ins or additional software is required.
Media Players have become large complicated applications that depend on the
latest Windows features (e.g. the current version of DirectX). The common Media
Players have also become a battleground for streaming formats, entertainment
portals, advertising, etc. These players tend to be optimized for entertainment
content and are often simply inappropriate for playing screen recordings.
Camtasia Player, bundled with Camtasia 2.2 and higher versions, is designed to
guarantee simple high quality playback of your Camtasia movies.

Camtasia Player is a simple, standalone movie player, optimized for playing screen recordings. Camtasia Player always plays back movies at 100% of their original size so that they remain readable. It runs on any 32-bit Windows platform, with no dependencies on runtime libraries, OS version, or DirectX. The Player is a single .EXE file that does not need any setup, nor does it use the registry or any configuration files. Camtasia Player is designed to be as easy to use as possible. Command line options are provided which allow Camtasia Player to be invoked in various ways from CD-ROMs, multimedia authoring tools, and scripting languages or batch files.
Camtasia Player only plays AVI movie files. Any audio or video codecs required by the AVI file must be installed before Camtasia Player can play the movie. The basic Windows multimedia support for playing AVI files must be installed. Camtasia Player does not setup any shell associations to become the default AVI player. However, this could be setup by an install program that you provide or by the end user.
System Requirements for the Camtasia Player:
In order to run Camtasia Player, your system must meet these specifications:
Microsoft Windows 95, 98, Me, NT 4.0, 2000, XP or later version
Windows-compatible sound card and speakers (recommended)
~300 KB of hard-disk space for program installation
The TechSmith Screen Capture Codec (TSCC) must be installed to play movies encoded with the TSCC video codec. The TSCC video codec is not installed by default with Windows. However, you can freely distribute and install the TSCC video codec using the TSCC.EXE codec installer included with Camtasia.
Basic Windows multimedia and AVI file support must be installed.
The standard Windows MCI Motion Video Device (95/98/ME) or standard Windows Microsoft Video for Windows (NT/2000/XP). This is normally installed by default with Windows.
You can record audio either during video recording (using the audio record capabilities of Camtasia Recorder) or afterward using the DubIt audio editor tool. DubIt can add audio to the AVI file from the microphone or from existing audio (WAV) files.
(C) (B) (A)
![]()
![]()
![]()
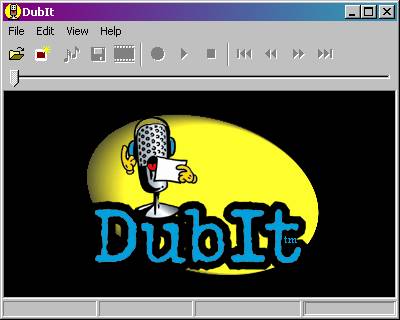
1. Use File > Open (A) to open a movie or image file. DubIt can add audio to AVI, BMP, GIF and JPG files.
2. Add audio from a microphone using Edit > Record Audio (B). Or, insert audio from a WAV file with Edit > Insert Audio File (B).
3. Use the Toolbar Controls (C) to review your movie and see how it sounds. Add/modify/delete the audio anywhere in the movie.
4. Save your movie using File > Save (A) or File > Save As (A). DubIt saves your movie as a standard AVI file.
The Camtasia installation CD-ROM contains feature-descriptive sample videos that were created using Camtasia. They are located in the <drive:>CamtasiaSamples directory on the Camtasia CD-ROM. Look for the files CamtasiaBasics.AVI and ProducerBasics.AVI. We recommend you copy them to your hard drive for viewing.
To set the video recorder preferences, select Options > Preferences and the AVI tab. Experiment with different settings to improve quality or performance of the video capture. For most captures, leaving the default selection under AVI Preferences (Auto Configure) will most likely achieve the best results.
Performance during recording is affected by many factors outside the control of the software. For example, CPU speed, hard drive performance, and graphic card capabilities are among the most important factors impacting Camtasia Recorder performance.
If you experience problems recording, such as screen action not keeping up with the program you are recording or the application seems sluggish, try adjusting some of these factors.
Disabling the hardware acceleration gives Camtasia tremendous performance improvements in the Microsoft Windows 2000 and XP environment. With one point-and-click modification to Windows 2000 and XP settings, you will realize as much as a 10-fold increase in the frame-capture rate, making recordings more fluid than previously possible. No other product is able to leverage Windows 2000 to improve its frame capture to this extent. Experience the performance improvement for yourself by disabling the hardware acceleration in the Control Panel.
Use the TSCC video codec during capture. The only exception is at 256 colors, for which you might try the MS-RLE codec which may be slightly faster. By default, Camtasia Recorder has the Auto Configure option enabled in Options > Preferences > AVI. Auto Configure tries to determine automatically the highest frame rate that can be captured given the desktop color depth and movie dimensions that will use 75-95% of the CPU. First, try disabling Auto Configure and manually raise the capture frame rate. Try frame rates between 8 and 15 frames per second (fps).
To get the best capture performance, disable Auto Configure as described above. Then, click the [Configure] and [Video Setup] buttons to configure the TSCC codec. Move the Compression Control slider all the way to the left (Faster Compression). This setting will hold whether you use Auto Configure or not. It tells the TSCC codec to compress as fast as possible rather than make as small an AVI file as possible.
Desktop color depth. Lower color depths result in improved performance. Of course, some applications require at least 16-bit color. Note that some graphics cards perform better at 32-bit color than at 16-bit color. So, you may need to experiment capturing at various color depths on any particular system.
Use the Quick Capture option located on the Camtasia Recorder toolbar under the Capture Menu to reduce the system load, obtain higher capture frame rates and improve the smoothness of mouse movements.
Size of the capture area. The smaller the capture area, the better Recorders performance will be.
CPU speed. The faster the computer, the better Recorders performance will be. This is the most important factor in capture performance when all of the other parameters are fixed.
Hard disk speed. Always use the fastest local hard drive available for the Temporary File Folder set in Options > Preferences >Program.
Reduce the system load during capture. Do not run any applications that you don't have to during capture.
If you have tried every option and still have problems with capture performance, we suggest you contact technical support. See Chapter 6 for contact information.
You should not have any performance problems using Camtasia Producer with movies captured successfully on the same computer on which they were recorded. Since Producer builds the final output movie by rendering it frame-by-frame, a very complex movie with a large number of transitions may take longer to create than simpler movies. This should not be a show stopper, however.
Distributing your video can be a simple task of just sending the AVI file to another user or burning files on a CD-R. Or it may involve creating the movie in a special streaming media format for distribution from specialized streaming web servers. The output choices (AVI, ASF, WMV, CAMV, QT, RM, animated GIF) are made in Camtasia Producer when you choose File > Produce Movie.
You may also want to use the Pack and Show feature in Camtasia Producer to convert your movies to an EXE file that automatically installs the TSCC video codec if needed. In Camtasia Producer, select File > Pack and Show to use this feature.
Camtasia Producer offers several file format output options. Choose a file format based upon how you intend to distribute the recording.
Camtasia Producer Output Options:
File Type |
Distribution |
Strengths |
Weaknesses |
|
Audio Video Interleave (AVI) |
CD-ROM, network directory or downloaded from web site. |
Common and easy to view. Editable and easily converted to other formats. A great vendor neutral format for your stock footage or for distribution on CD-ROM. |
Files can be large. Entire file must load to a persons computer before loading. Audio compression not as good as with streaming formats. TSCC encoded AVI requires TSCC video codec for playback. |
|
Windows Media (WMV - Streaming Format) |
Streamed from web site or attached to e-mail. |
Small file size media is not downloaded to the computer. Plays in recent Microsoft Windows Media Player and browser. |
Requires streaming server for Internet access to stream from a web site. Limited editing options. Cannot be converted to another format. |
|
Windows Media with TechSmith Screen Capture Codec (ASF) |
Streamed from web site or attached to e-mail. |
Lossless video compression. Small file size. Streaming. Plays in older Microsoft Windows Media Player. |
Audio compression not as good as with other streaming formats. Being replaced by Windows Media Video. Requires TSCC video codec for playback. |
|
Real (RM - Real Media streaming file format) |
Streamed from web site. |
Small file size media is not downloaded to the computer. Plays in RealPlayer and browser with plugin. Great audio compression. |
Requires streaming server to stream from a web site. Lossy video compression. Limited editing options. Cannot be converted to another format. |
|
Camtasia for RealPlayer (CAMV RealPlayer Plugin) |
Streamed from web site. |
Lossless compression and lossless streaming video. Stream files over low bandwidth. |
Difficult to send as an e-mail attachment, since audio and video are joined via a SMIL file. |
|
QuickTime (MOV) |
Streamed from web site or attached to e-mail. |
Wide selection of video and audio compressors. Will play while downloading. Multi-platform, industry-standard, multimedia software architecture. |
Viewing may appear 'jerky' if download is slow. Entire file will download to the viewer's computer. |
|
Animated GIF |
Embed in web page. Plays in any browser. |
Supported by nearly all Web browsers. Tend to be smaller than other animation files |
Video only. Limited to 256 colors. Less range and flexibility. |
|
Pack and Show (EXE) |
E-mail or embed in web page. |
Makes movies easily accessible to your viewers. Converts Camtasia video into an executable file (EXE) so users can install TSCC codec to view videos. Retains high resolution and quality. No special software required. |
Some people may not be able to receive e-mail executable file attachments. |
Please visit the Camtasia Feature of the Week section of our web site for a complete description of various features, tips and tricks, step-by-step guides and instructional videos. Visit https://www.techsmith.com/products/camtasia/featuresarchive.asp
Camtasia Recorder:
Camtasia's VCR-style interface makes it incredibly easy to use. Simply access Camtasia's Quick Help under the Help menu item and you are 'walked through' the process, eliminating any perceived learning curve.
To make a video using Camtasia Recorder, first you select what you would like to Input defining the area of the desktop Camtasia will record. Camtasia allows you to capture exactly the part of the screen you want to include in your video.
Camtasia Recorder Features:
|
Features |
Description and Benefits |
|
Capture Inputs: |
Four options allow you to capture exactly the part of the screen you want to include in your video. |
|
Screen |
Captures the entire computer desktop area. |
|
Window |
Captures a selected window. Changes the cursor to a finger used to point to the window to be captured. |
|
Region |
Captures selected region. Changes the cursor to a crosshair pointer to define a region of your desktop. |
|
Fixed Region |
Captures a fixed region. Sets a specific region in pixels. |
|
Capture Outputs: | |
|
File |
The captured video will be stored in an AVI (video) file. |
|
Live |
Instead of saving your screen capture video to a file you can send what you capture, as you're capturing it, in real-time sending out a live broadcast of desktop activity. Camtasia simulates a hardware PC camera and works with streaming media encoders (Microsoft's Windows Media Encoder and RealNetworks' RealProducer), video conferencing and webcam applications. Camtasia looks like a standard Video for Windows video capture device to these applications. |
Camtasia Recorder Features (continued):
|
Features |
Description and Benefits |
|
Single Frame Capture |
Single Frame capture mode grabs one frame at a time. Use the record button like a camera shutter button to capture frame-by-frame. Single Frame capture is useful to create a slideshow style movie. |
|
Quick Capture |
Quick Capture speeds up the frame rate for capture, making cursor movements smoother on slower systems. This setting is ideal for situations where you have a lot of cursor movement without much background change. Capture frame rates are increased by as much as 2 to 7 times using Quick Capture. |
|
Layered Windows Capture |
Camtasia can handle your special screen cam capture needs by capturing translucent and irregularly shaped layered windows. Allows users to simultaneously capture both your screen activity plus a window that rests on a layer above the action. Layered windows capture is increasingly important with Windows XP. |
|
Camtasia Recovery Tool |
Camtasia Recovery Tool helps you retrieve the audio and video stream from a failed capture session. For example, if you run out of disk space or the system or application crashes during a capture session, the tool helps you recover your work. The audio and video streams are saved in temporary files in a temporary folder during a capture. The tool can recover just the audio stream from the temporary WAV file, just the video stream from the temporary AVI file, or both the audio and video stream. |
|
Hot Keys |
Allows user to quickly activate an action by keyboard without selecting menus or clicking on-screen buttons. Customizable hotkeys. Record/Pause Hotkey (Default -- F9) Stop Hotkey (Default -- F10) ScreenDraw Hotkey (Default -- F11) Pressing the Advanced button also allows you to design hotkey commands for AutoPan, Hide, Zoom In and Zoom Out. |
Camtasia Special Effects:
[CA1][CA2]Camtasia's unique familiarity with the Windows desktop results in a variety of special effects to ensure high-end video productions. Unlike other video editors, Camtasia allows you to show cursor movement as well as perform sophisticated moves like highlighting, drawing, zooming and panning. You also have the flexibility to choose the fonts, colors, size and appearance that enhance the professional quality of your videos. Effects are easily toggled on and off in Camtasia Recorder and most allow you to preview changes before you proceed with your movie making.
Camtasia Special Effects |
Benefits |
Features |
|
ScreenDraw |
Make your movies lively and easier to understand by underlining, pointing and illustrating with this freehand drawing tool. |
Draw on your desktop while you record a movie. Various pen options: Frame, highlight, ellipse, pen, line and arrow. |
|
ScreenPad |
Annotate your videos with graphic shapes and images like arrows and callout boxes to emphasize specific areas and add content in your recordings. Add and change text in ScreenPad shapes. |
Drag-and-drop objects from ScreenPad to desktop. Create unlimited amount of custom object and layout libraries. Option to save a layout, making it easy to place multiple ScreenPad objects in one quick step. Ability to cycle through a sequence of ScreenPad layouts using Hotkeys, which allows you to script your annotation. |
|
Cursor Highlight |
Makes the cursor easier to follow in videos for viewers. Also makes videos lively and interesting. |
Adds effects such as circles, stars, rings, etc. that will shadow the cursor as it moves across the video and/or appear when you click the right or left mouse button. |
|
Highlight/Auto Highlight |
Draw viewers attention to specific area. Makes videos lively and interesting. |
Highlight allows you to select a window or portion of a window prior to recording. A colored highlight box will appear around this area in the video. Auto Highlight follows the cursor as it moves across the screen while you're recording. Adjust the color and width of the highlight. |
|
Time/Date and/or Caption Stamp |
Useful feature for archiving content like net meetings and learning content. |
The caption will display for the entire duration of your movie or for a length of time you specify. Length of time Camtasia will display the Time/Date Stamp (e.g., 5 seconds) is defined by video creator. |
|
Watermark |
Customize your content with a corporate logo or symbol. |
Overlay, underlay or emboss the watermark and control its size and position on the screen. |
Camtasia Special Effects |
Benefits |
Features |
|
Zoom |
Shows viewers more screen detail or covers more screen area. |
The plus and minus zoom options zoom the capture area in and out in increments, always maintaining the aspect ratio. The ZoomTo button will zoom directly to a certain size, or to a specific region, window or the full screen. The Zoom Undo button reverts back to the last zoom size and toggles between the last two zoom sizes. Use hotkeys to quickly zoom in and out. AutoZoom allows you to zoom between two windows, regions etc., with a smooth, professional appearance. |
|
Pan |
Panning captures a smaller area of the screen where the action is and ignores the inactive areas. This reduces file size and helps focus the viewer's attention. |
To manually Pan, point to the frame of the defined capture area and drag it across the screen. AutoPan keeps your cursor in the center of the capture region and follows the pointer across the desktop. |
|
Audio |
Makes actions in your videos easier to follow and understand. Makes videos lively and interesting. |
Audio sound effects for mouse and keyboard clicks. Narrate your video - speak into the microphone while you record your screen capture video, or use DubIt (included free with purchase of Camtasia) a multimedia tool that lets you easily add audio to movie clips and images. With DubIt, it is easy to narrate a video clip and synchronize your voice with the video. Add audio in real-time as you watch the movie or image. |
|
Hot Keys |
Allows user to quickly activate an action by using the keyboard without selecting menus or clicking on-screen buttons. |
Customizable hotkey settings. Hotkey settings for: Record/Pause (Default F9) Stop (Default F10) ScreenDraw (Default F11) AutoPan Hide Zoom In/Zoom Out |
Camtasia Producer:
Camtasia Producer offers significant advantages over other video editors. First, it features the TechSmith codec, ensuring crisp, clear imagery. Second, it was designed especially for files created with Camtasia Recorder with the needs of TechSmith's target audience in mind. Developers of documentation and desktop-based presentations can use both tools to quickly create AVI or streaming formats from a collection of video clips, narration and audio clips.
Camtasia Producer is especially helpful when creating longer productions consisting of many video clips captured by the Recorder then edited and assembled with the Producer. To get started, select Produce Movie from the file menu or use the Production Wizard, which walks you through the basic steps involved in creating a movie from the items sitting in your storyboard. It even shows you how to customize your movie using various options such as color depth, watermarking, frame size, compression and copyright information and will then prompt you to save the video.
Camtasia Producer Features:
|
Features |
Description |
|
Video Outputs (AVI, ASF, WMV, RM, MOV, animated GIF, CAMV) |
Industry standard outputs. Easily publish and share videos. |
|
Storyboard Editor |
Quickly review, cut and join video clips (AVI) and still images (BMP, JPG, GIF). |
|
Thumbnail Browser |
Allows user to easily find your media. File Explorer style browser. Easily drag and drop items to the storyboard. |
|
Timeline Edit Bar |
Allows precise frame-by-frame editing for professional results. Delete single or several frames. Unlimited undo and redo. |
|
Transition Effects |
Offers smooth transition effects from one video clip to the next clip. 78 different transition effects. |
|
Production Wizard |
Guides user through production process. Helps user customize video. |
|
Save Frames as still images |
Easily save single frame from a Camtasia video as BMP, JPG, or GIF. |
|
Audio Editing |
Add narration and edit audio using TechSmiths DubIt audio editor companion tool. |
If at any time you experience problems with Camtasia we encourage you to e-mail our world-class technical support at support@techsmith.com. Technical support is offered free of charge to customers and evaluators of our software.
Camtasia Product Manager: Betsy Weber
E-mail: b.weber@techsmith.com
Phone: +1 517.333.2100 ext. 166
Fax: +1 517.333.1888
Sales: sales@techsmith.com
Phone: +1 800.517.3001
TechSmith Technical Support:support@techsmith.com
TechSmith Community Forums
Our Community Forums give you the opportunity to communicate with other TechSmith users and our experienced staff. Ask questions, give responses and get ideas.
For the Technical Support Community
Forums:
https://www.techsmith.com/forums/default.asp
For the Camtasia Community Forums:
https://www.techsmith.com/products/camtasia/forums/default.asp
For the SnagIt Community Forums:
https://www.techsmith.com/products/snagit/forums/default.asp
For the User Group Community
Forums:
https://www.techsmith.com/usergroups/forums/default.asp
Another alternative is to use the extensive online help system included with all Camtasia products. These help systems are located under the Help menu of the main screen for Camtasia Recorder, Producer, and DubIt. Select Contents and Index for the best place to start.
If you are looking for a subject, you can use the handy search tools within the help system to find the information you need. When you are on any help topic, click the [Help Topics] button. This reveals the three tabbed help contents:
1. On the Contents tab, click on books or topics to get more information about a subject.
2. Under the Index tab, you can type a word or two about what you seek and the topic finder will help you locate it. You can also scroll the list of all topics on the lower portion of the tab.
3. On the Find tab, type the single word you want to find and the topic finder will search all topics for occurrences of that word.
For more information about TechSmith's generous upgrade policy, please visit www.camtasia.com and check out the Single User, Multi User and Evaluation upgrading options.
Your
registration of Camtasia entitles you to upgrade to the next two major (tenth)
releases without additional payment. Free upgrades are only available to the version posted on TechSmith's
ftp site.
For the most up to date FAQs, visit https://www.techsmith.com/products/camtasia/toptenfaqs.asp.
Here are some examples of recent FAQs:
Why are my videos blurry?
There are two causes of blurry videos:
Scaling the video in the application that is playing it, or scaling it in Camtasia Producer.
Producing the video using a 'lossy' codec.
Scaling while playing and Media Player 7 problems:
If you use the default setup of Camtasia Recorder and produce videos with the TSCC codec, the playback should be lossless, of perfect quality and it should look exactly like the screen that you recorded.
The problem is probably that the video is not being played back at 100% the original size at which it was recorded. Normally in Media Player all that was needed was to select View > Options > Playback and set Zoom=100%.
In its default 'skins' mode, Media Player 7 has problems playing files at 100% their original size. Most of the time it scales them to a smaller size resulting in image quality degradation. Many times selecting View > Zoom = 100% has no effect.
The fix is to use Media Player 7 in 6.4 mode, to use Media Player 6.4, or to distribute your movies with Camtasia Player.
To use Media Player 7 in v6.4 mode:
Locate and run the file MPLAYER2.EXE that is located in Program FilesWindows Media Player. This will run MP7 in v6.4 mode.
When v6.4 is running select View > Options > Formats, press Select All > Apply > OK. This will set the Windows shell associations to use Media Player 6.4 when you double click on a video in Windows Explorer, or other applications that use the Windows shell associations to launch a player.
Select View > Options > Playback and set the Zoom level to 100%.
Another option is to use the TechSmith Camtasia AVI Player. It is free to download and distribute with your Camtasia videos. It will always play AVI files correctly with no scaling. It is available on our web site: https://www.techsmith.com/products/camtasia/player.asp
It is necessary to take into consideration the resolution of the desktop that the video is going to be played on. If a video is 1024x768 and it is played back on an 800x600 desktop, the video will be too big dimensionally to fit on the screen. If the video is scaled to fit the smaller desktop, image quality degradation will occur because of the scaling.
If an 800x600 video is played back on an 800x600 screen, then the video must be played back in full screen mode because there won't be room for the title bar, border, etc. of the application that is playing the video. Therefore it is always better to create videos that are smaller than the resolution of the screen that they will be viewed on.
Scaling in Camtasia Producer:
By default the Camtasia Producer will not scale the video. To produce a video without scaling select Produce Movie > Options. In the Size tab be sure that Largest Movie Size is selected.
Lossy Codec:
Use the TSCC or RLE video codec because they are lossless codecs and won't degrade the quality of your videos.
Both TSCC and Microsoft RLE are lossless codecs. TSCC is lossless at any color depth, while RLE is limited to 256 colors. RLE will also produce video file sizes that are up to 6 times larger than TSCC encoded videos.
Computer videos are compressed using various compression algorithms. These compression algorithms are implemented using codecs. Some codecs sacrifice image quality when they compress the video.
By default Camtasia uses the TechSmith TSCC video codec. TSCC is called a lossless codec because it will not degrade image quality when it compresses the video.
Most other codecs, Microsoft Video 1 for example, are lossy codecs and will degrade the quality of the video.
I tried to record Media Player, Real Player (etc.), but my video is blank? What's
wrong?
This is caused because the player that is being recorded is using hardware acceleration. The solution is to disable hardware acceleration in the player before recording it.
To disable acceleration in:
Media Player: In Media Player 7, Select Tools > Options > Performance. In Media Player v6.4 and earlier, select View > Options > Playback. In both cases slide the Hardware Acceleration slider to None.
RealPlayer G2: Select Options/Preferences from the RealPlayer menu. Go to the 'Performance' tab and disable (uncheck) the 'Use optimized video display' setting. You may need to close and restart RealPlayer G2 to have the change take effect.
For the Apple QuickTime, Edit > Preferences > Streaming Transport. In the dropdown box select Video Settings and uncheck all of the DirectDraw options.
Another option is to disable hardware acceleration system-wide. Because this affects all applications on the system, it may cause performance problems for some applications and others may not run at all.
To disable graphics hardware acceleration globally for all applications on Windows 2000, select Control Panel > Display > Properties > Settings > Advanced > Troubleshooting, on other versions of Windows select Control Panel > System > Performance tab > Graphics > Advanced settings. In both cases slide the Hardware Acceleration slider to None.
Why are my videos blank when I try to record my DVD player?
You may not be able to record the DVD player because DVD players require hardware acceleration. You can try turning off hardware acceleration system-wide, but then the DVD player probably will not work.
To disable graphics hardware acceleration globally for all applications on Windows 2000, select Control Panel > Display > Properties > Settings > Advanced > Troubleshooting, on other versions of Windows select Control Panel > System > Performance tab > Graphics > Advanced settings. In both cases slide the Hardware Acceleration slider to None.
The video I recorded is okay, but why is the audio I recorded missing?
Camtasia and SnagIt only record audio from the microphone. If you need to record audio that is generated by applications, the workarounds are:
Get a Sound Blaster Live video card. It places an input into the Recording section of the Windows Volume Control called 'What You Hear' that maps the audio internally in the sound card to the microphone. This allows direct recording of audio generated by applications simply by enabling audio recording in SnagIt or Camtasia. Check your sound card. Some sound cards may also have a mixer control that allows you to map the audio to the microphone input.
Place a microphone in front of the speakers.
Place a jumper wire between Line Out and Mic In on the sound card. If you do this, you may wish to disable the Windows Volume Control > Options > Advanced Controls > Mic Gain or the audio may sound slightly over amped.
Why do my movies have a slow frame rate and/or jerky mouse movements? Why are my background apps so slow?
Windows 2000 / XP:
The real solution is to use Windows 2000 or XP as your multimedia authoring OS. By turning off hardware acceleration system-wide, frame rates may be increased by a factor of 10. If the frame rate is manually configured in the Recorder to a reasonable rate such as 5-10 fps, drastic reductions in CPU utilization can be achieved. This is only true for Windows 2000 and XP.
Camtasia results on a Win2K system (NVIDIA GeForce graphics card, 750MHz PIII, TSCC video codec) are:
At 32-bit color 1280x1024:
9 fps with hardware acceleration, 12 fps without hardware acceleration (fps
means frames per second)
At 16-bit color 1280x1024:
2 fps with hardware acceleration, 20 fps without hardware acceleration
At 16-bit color 800x600:
6 fps with hardware acceleration, 50 fps without hardware acceleration
For most software demos and / or training videos, 5-10 fps is perfectly adequate. Faster frame rates will only result in larger video file size, increased bandwidth requirements and can cause slower computers to have playback problems.
If the Recorder has Auto Configure enabled, it will attempt to record at the fastest frame rate possible. Many times this results in ridiculously high frame rates, such as the aforementioned 50 fps. This will cause CPU utilization to reach 100% that can cause both background applications to run very slowly and/or jerky mouse movement.
By manually configuring the Recorder for a lower frame rate, CPU utilization is reduced.
To manually configure the frame rate in the Recorder select Options > Preferences > AVI tab. In the Video Options section enter the desired frame rate.
Windows 95/98/ME/NT:
There are some steps to improve recording performance on non Windows 2000 machines. They are:
Reduce the screen color depth to 256 colors.
Reduce the size of the area of the screen being recorded.
Don't record audio while recording video.
Reduce the recording frame rate.
Make sure that no unnecessary background applications are running.
Use a faster computer.
Why won't my Camtasia videos play on other computers?
Although Camtasia can produce videos using any standard Windows codec, by default it uses the supplied TechSmith TSCC codec. While Camtasia can use other codecs that are installed with the standard installation of Windows such as Microsoft Video 1 or RLE, TSCC will produce much smaller files, and it also produces perfect quality, 'lossless' videos unlike Video 1 that is a 'lossy' codec. A lossy codec sacrifices video quality when it compresses the video, much like JPG compression for image files degrades the quality of the image.
You may select a codec in the Recorder: Options >Preferences >AVI. Uncheck Auto Configure and press the Video Setup button. In the Producer: Produce Movie > Options > AVI > Video Setup.
When you produce a video using any particular codec, that codec must be installed on any workstation that is going to view the videos.
The file TSCC.EXE, that is located in the directory that Camtasia is installed in, is the installation program for the TSCC codec. It's also available at our web site https://www.techsmith.com/download.asp for download.
You may freely distribute TSCC.EXE. Simply have your users run TSCC.EXE and it will install the TSCC codec on their system. This only needs to be done once.
TSCC.EXE may be run in silent mode using the /s command line switch.
Another option is to use the Pack and Show feature in the Camtasia Producer. Pack and Show wraps your video and TSCC.EXE in an EXE file that automatically installs the TSCC codec and plays the video when the user runs the EXE file. To produce a Pack and Show EXE file in the Camtasia Producer select File > Pack and Show.
Camtasia also includes an ActiveX control that may be embedded in a web page to automate the download and installation of the TSCC codec for IE users. It will not work for Netscape. The HTML syntax for embedding the control in a web page is detailed in the file TSCCINST.TXT located in the Camtasia installation directory.
For Windows NT/2000/XP users must have administrator rights to install codecs.
The application I am capturing has large windows. When I try to capture, the whole computer slows down. How can I capture these large windows in real-time?
This is a symptom of asking your computer to do too much work. Try reducing the size of the capture area, the number of colors you screen is set for, the frame rate at which you are recording, or the compression settings for the TSCC codec. Some combination of these remedies should allow you to capture a reasonably-sized window.
Are there any distribution licensing restrictions on TSCC or Camtasia videos?
You may freely distribute TSCC.EXE. You may freely distribute the Camtasia videos that you create.
You do not have to have Camtasia installed to view videos created with Camtasia. If the video is compressed with the TSCC codec, only the TSCC codec needs to be installed on the computer viewing the videos. The TSCC codec does not have to be installed if the video is produced with a video codec other than TSCC.
What is the difference between Camtasia and SnagIt?
Camtasia is designed specifically for making movies of your screen. Camtasia produces video file types AVI, ASF, WMV, RM, MOV, CAMV, and animated GIF files.
While SnagIt has very minimal video capture functionality, it is primarily for static image file screen capture and produces BMP, GIF, PCX, PNG, TGA, JPG and TIF files.
What is the difference between Camtasia and the Camtasia Screen Recorder SDK?
Camtasia is an end user application, much like a word processor is an end user application. The Camtasia Screen Recorder SDK is a software development kit for software developers that wish to add screen capture functionality to their own applications.
If you choose Window, the cursor changes to a finger for the user to point to the parts of the window to be captured. Click over the window title bar to capture the whole window.
|
Politica de confidentialitate | Termeni si conditii de utilizare |

Vizualizari: 1674
Importanta: ![]()
Termeni si conditii de utilizare | Contact
© SCRIGROUP 2025 . All rights reserved