| CATEGORII DOCUMENTE |
| Bulgara | Ceha slovaca | Croata | Engleza | Estona | Finlandeza | Franceza |
| Germana | Italiana | Letona | Lituaniana | Maghiara | Olandeza | Poloneza |
| Sarba | Slovena | Spaniola | Suedeza | Turca | Ucraineana |
Introduction to Timeline Effects and Behaviors
Every new version of Flash seems to offer something new and exciting for us Flash geeks, and Flash MX 2004 is no exception! In this article I am going to take you through a couple of the coolest features of this latest version of Flash MX, Timeline Effects and Behaviors, and I'll show you some simple examples to help you get started with these features quickly.
Before we start on the tutorial, make sure you download the source files and unzip them into your working directory. Now let's dig into these new features
Before we start creating anything, I want to give you a brief low down on where these new features come from. In Flash MX 2004, Macromedia has built a JavaScript interpreter. Yes, you read that correctly. JavaScript, or Flash JavaScript to be more precise (also known as JSAPI), can now be used to do all sorts of fun things while authoring in Flash MX 2004. Aside from enabling you to write some pretty advanced macros to control nearly all of the features of the Flash authoring environment, Macromedia has created several specific uses for Flash JavaScript to make common tasks and effects easier to apply while you create that next great Flash movie; Timeline Effects and Behaviors. Timeline Effects are used to automate animation and other types of visual effects for movie clips on the stage like adding a drop shadow to a movie clip or applying a transition animation to it. Behaviors are used to apply ActionScript functionality to clips on the stage without the need to deal with the ActionScript panel. Behaviors essentially replace the need for the Novice Mode in the Actions Panel from the previous version of Flash MX and give you some pretty advance functionality that can be applied and adjusted by simply pointing and clicking.
OK, enough dilly-dallying, lets start playing
Flash MX 2004 comes with several very useful Timeline Effects and I'm sure within the next few months there will be many more available from 3rd party developers helping to make automating Timeline tasks way easier. The ones that ship with Flash MX 2004 are grouped into three categories: Assistants, Effects, and Transform/Transition, and they can really offer some help if you need to quickly animate a symbol's attributes.

03. Timeline Effects: Assistants
In this section, I'll go through each of the included Timeline Effects and show you how to use them. We'll start with the Assistants:
To start, open Flash MX 2004 and create a new Flash Document.
Select the Circle Tool and draw a small circle on the Stage.
Select the circle you just made and right-click on it (or Control-click on the Mac) to bring up the context menu. You can also get to the Timeline Effects for the Insert menu on the Menu Bar. Roll your mouse cursor down to Timeline Effects -> Assistants -> Copy To Grid. This will open the Copy To Grid dialog box.
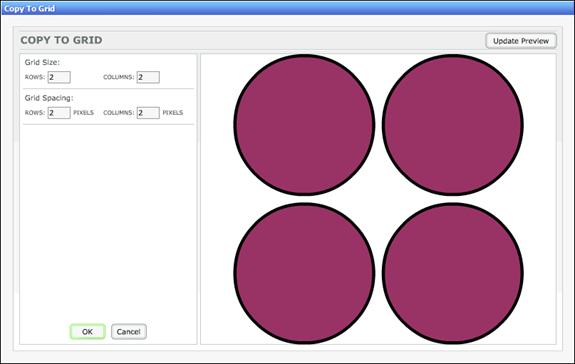
The Copy To Grid effect is used to copy the selected item in a matrix formation based on the settings you choose. Most of the included Timeline Effects will function like this one in providing a preview panel on the right and settings to adjust the effect on the left.
Incidentally, one thing you might notice is that this dialog box is actually a window containing a Flash movie. That's right! Many Timeline Effects are actually Flash movies that communicate with the JSAPI to allow you to create the effects. The possibilities are endless!
Now let's change the parameters in the dialog and see what results we get. In my test, I made 4 rows of 6 circles and removed the spacing between them by setting the Grid Spacing options to 0.
Press the 'Update Preview' button in the upper right of the dialog box.
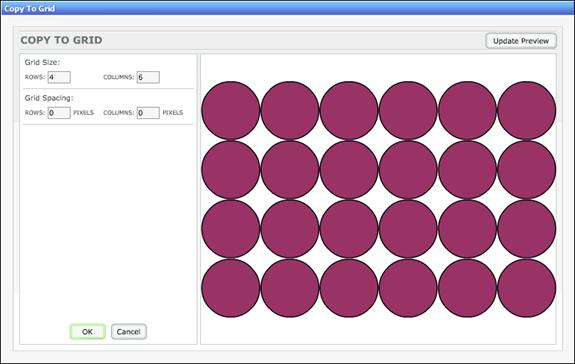
The dialog box will update the preview version on the right. As you can se, this tool may be useful for quickly generating repeating patterns for backgrounds in a movie.
Finally, click the 'OK' button to apply the affect. You should now have your circle duplicated in a grid pattern on the stage.
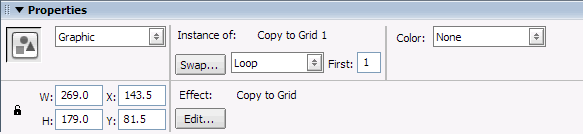
Now, let's see what Flash actually did to our shape. If you select your shape on the Stage, you will notice that Flash has turned it into a symbol. You will also notice that you cannot double-click on the symbol to edit it. That's because this is now a symbol with an effect applied to it. If you look at your Properties panel when you have the symbol selected, you will notice that Flash now displays the name of the Timeline Effect you applied and an 'Edit' button. Clicking on the 'Edit' button will open the Copy To Grid dialog box with your settings intact and allow you to adjust them if need be.
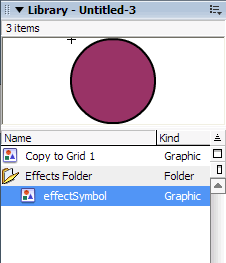
So, as you can see, Flash has turned your original shape into a symbol and given it special properties so that the original effect can continue to be adjusted if you see fit. That's pretty handy! Looking in your Library, you will notice a few new things. The first thing you will notice is that inside the Effects Folder, there is a new symbol which is the original shape you had selected and applied the effect to on the stage. There is another symbol, Copy to Grid 1, which contains the circle symbol copied multiple times based on your settings in the effects dialog box.
Double-clicking on the 'Copy to Grid 1' symbol will present you with a warning. Basically, if you decide to proceed with editing the clip, it will no longer offer you the ability to adjust the effect you applied earlier.
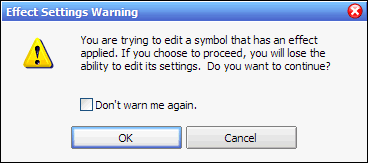
This is an important note to remember as you're developing. For the purposes of our first test, lets proceed with editing the symbol so you can see what Flash does to create the effect. Click the 'OK' button in the warning dialog box to edit the symbol.
The Copy to Grid effect created two layers; the first layer contains your original shape which has been turned into a symbol, and the second layer contains the symbol duplicated several times in the grid formation you specified in the Copy to Grid dialog box.
That's all there is to it: Flash basically does the work in the Timeline that you would have had to do on your own, and packages that up into a symbol for you in the Library.
Now that you understand the inner-workings of the way Timeline Effects work, let's go through and see how the others work.
Open a new Flash Document.
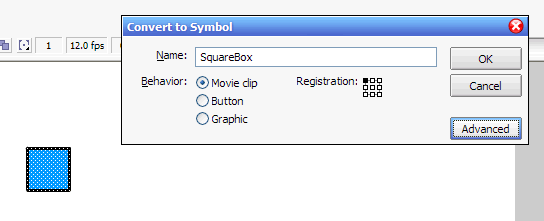
Create a shape on the stage and turn it into a Movie Clip symbol. I've made a square and called it SquareBox.
Right-click (Control-click on the Mac) on the Movie Clip on the Stage and select the Distributed Duplicate effect under Timeline Effects -> Assistants .
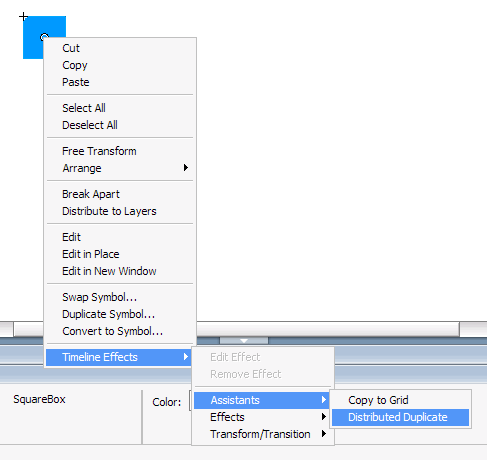
Right-click (Control-click on the Mac) on the Movie Clip on the Stage and select the Distributed Duplicate effect under Timeline Effects -> Assistants .
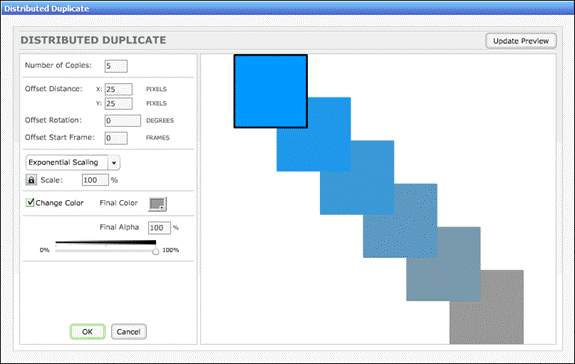
The Distributed Duplicate dialog box should now be open. it should look much like the Copy to Grid dialog box, but with different parameters. This effect essentially let's you quickly duplicate a symbol on the stage. It will also let you change the scale, color, rotation, and alpha transparency of the symbol and animate it over a specified number of frames.
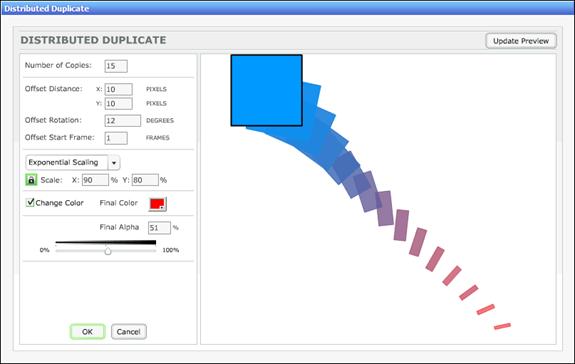
I've adjusted my settings to result in the Movie Clip instance animating over 15 frames into a semi-transparent red rectangle. You can play with the settings to see how the different parameters affect the final outcome. One thing I quickly discovered was that the parameters in this dialog are actually applied to each copy of the symbol for the number of symbols you specify. So, in my example, each copy of the square is offset 10 pixels Horizontally (X) and Vertically (Y) from the previous square. Each square is rotated 12 degrees more than the previous square. Offset Start Frame specifies the number of frames to play before the next square appears. With this effect, you can quickly create animated clips and never touch the Timeline!
04. Timeline Effects: Effects
Now let's look at the Timeline Effects grouped in the Effects category.
In a new Flash Document, create a static text field and type in a word using your favorite font.
Select Insert->Timeline Effects->Effects->Blur.
Adjust the settings to your liking and click the 'OK' button.
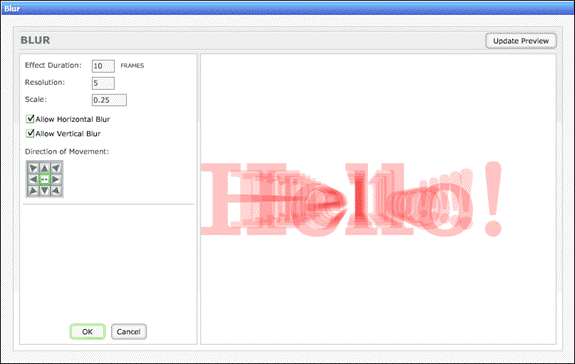
Test your movie ( Control->Test Movie ) to see the results of your Blur settings. That was quick! That used to take way longer to produce by hand using the Timeline alone!
Now I'll show you a simple little trick you can do with your text that will save you time when you are using this in a project.
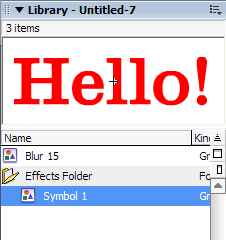
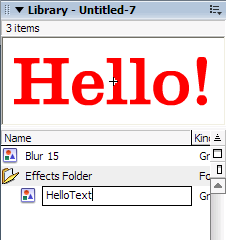
If you haven't already done so, close your Test Movie window.
In your Library panel, open the Effects Folder symbol folder and select the symbol that Flash created from your text field. I like to rename my symbol at this point to something more meaningful than 'Symbol 1' so I can easily find it later. In this case, let's call it 'HelloText'.
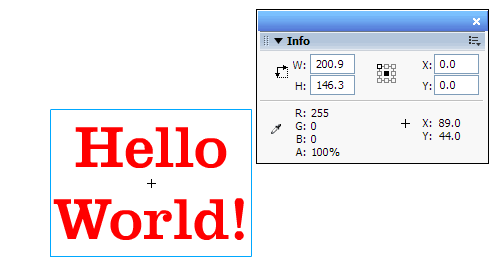
Now, double-click the icon of the symbol to open the symbol in edit mode. Here, you can edit the text. If you change the text to something else, you'll want to make sure the text is centered in the symbol so the Blur effect still looks the same. The easiest way to do this is to select the field on the Stage, open the Info panel, set the Registration Gird to center, and adjust the clip's position to 0 x and 0 y.
Test your movie now to see the results of your changes, the effect should still look the same but now with your adjusted text.
The next Effect we'll look at is the Shadow effect.
In a new Flash Document, create a text field and enter some text i it.
Select Insert->Timeline Effects->Effects->Drop Shadow.
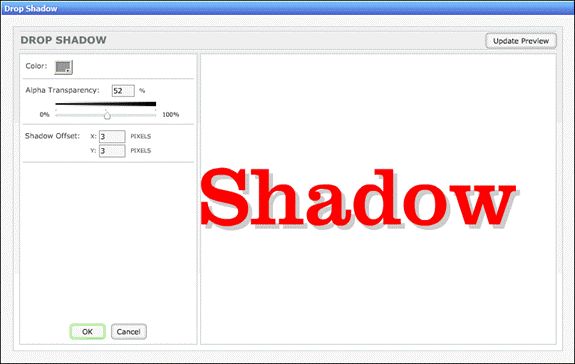
Adjust the settings in the dialog box. I tend to keep the Shadow Offset numbers pretty low when applying this effect to text, it creates an easier to read result.
Click the 'OK' button to apply the effect. That's it! If you need to edit the text you applied the Shadow Effect to, just use the same method we used in the Blue segment previously.
On to the Expand Effect.
In a new Flash Document, create a Static Text Field and type in some text.
Select Insert->Timeline Effects->Effects->Expand. Note that the Expand Effect only really works correctly when applied to a Static Text Field. You will notice that if you attempt to apply it to a shape, the option will be grayed out, and if you apply it to an existing Symbol, the Effect will have undesirable results. Also note that this effect is a destructive effect; after applying it to your Text Field, you will no longer have the ability to edit the text of the field. If you need to edit the text after you have applied the effect, you must remove the effect ( Modify->Timeline Effects->Remove Effect).
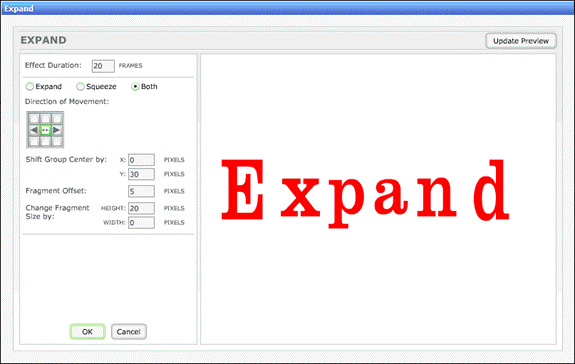
Click the 'OK' button to apply the effect and Test your Movie.
The last Effect type Timeline Effect, Explode.
In a new Flash Document, create a static test field and enter some text in it.
Select Insert->Timeline Effects->Effects->Explode. This Effect works much like Expand in that it is destructive and you will not be able to edit your text without first removing the effect from the text symbol.
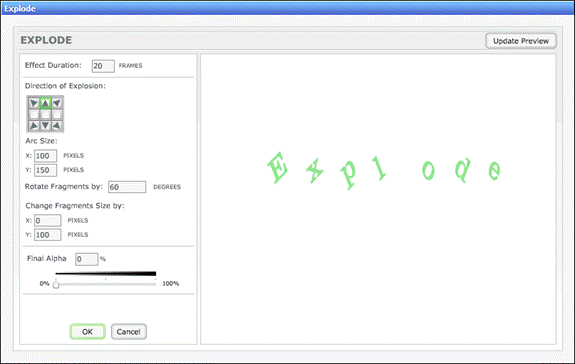
Click the 'OK' button to apply the effect and Test your Movie.
You'll notice that each letter of the text field becomes a separate particle in the explosion. Unlike the Expand Effect, Explode can be applied to shapes and symbols. Here are the results of the Explode Effect applied to both a Text Field and a Shape:
That rounds off the Timeline Effects under the Effects submenu. Now onto the Transform/Transition Timeline Effects.
05. Timeline Effects: Transform/Transition
To me, the Transform/Transition Timeline Effects seem as though they might be the most useful for a broad range of uses. These Effects allow you to quickly animate several properties of a Symbol at one time and give you the added benefit of being able to go back and adjust those properties after the fact as the need arises.
Lets start with the Transform Effect.
Create a new Flash Document.
Select the Text Tool and create a Text Field on the Stage. Type some text into the text field.
With the Text Field Selected, apply the Transform Effect ( Insert->Timeline Effects->Transform/Transition-> Transform )
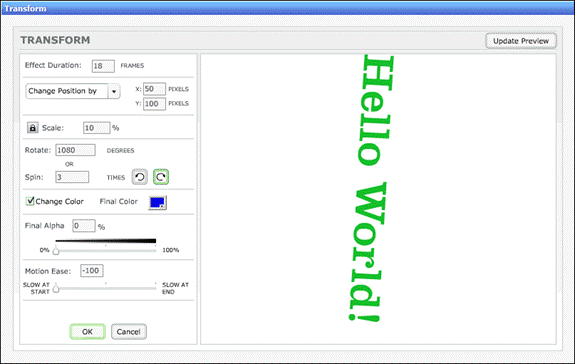
The Transform Effect dialog box offers many options: you can choose the duration, in frames, for the transformation, the distance to move by or destination to move to, the scale of the Symbol, the rotation direction and frequency, the color tint, the alpha, and the easing applied to the tween. Essentially, it offers many of the properties that you might usually be clicking around to find in many different areas of the Flash authoring environment, right in one simple dialog box.
The great thing about most of these effects is that they are instantly viewable without needing to actually test the movie using (Control->Test Movie
Now onto our last Effect, Transition.
Create a new Flash Document.
On the stage, create a solid circle shape.
On top of the circle shape, create a Text Field and enter some text into it.

With both objects on the Stage selected, apply the Transition Effect ( Insert->Timeline Effects->Transform/Transition-> Transition )
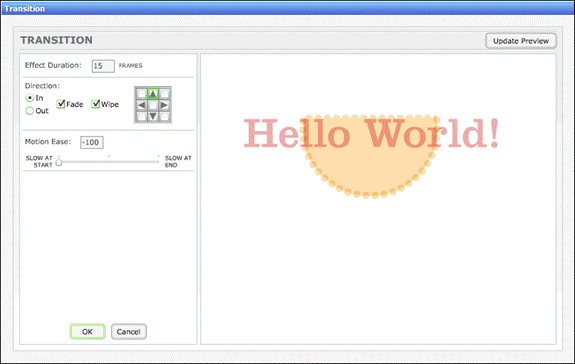
In the Transition dialog box, experiment with the settings until you find one that suits you. One thing I found when testing out any of the Timeline Effects is that initially setting the duration to a smaller number like 10 frames made updating the preview much quicker. then when you have the desired effect, you can extend the duration and press the 'OK' button to commit the change.
When you are ready, click the 'OK' button to apply your Transition settings and test your movie ( Control->Test Movie )
That's it! If you close your test movie and select the object on the Stage, you will notice that Flash automatically groups multiple items into one Symbol for you. You can edit the parameters of the effect at any point, but if you need to make individual adjustments to the separate items in the Symbol, you either have to remove the effect or poke around in your Library to find the individual Symbol that might exist for you to edit without permanently losing the option to change the effect parameters.
Those are all the Timeline Effects that ship with Flash MX 2004. Hopefully this gives you a good starting point for experimenting with them. As you can see, the Timeline Effects ease the task of creating those effects you might find yourself doing over and over for a project or across projects. Beyond the effects themselves, one useful way to use Timeline Effects is to apply them and then edit the Symbol ( Edit->Edit In Place ). After agreeing to the fact that you will no longer be able to adjust the Effect parameters, you will now have had Flash do the work of, perhaps, duplicating a symbol 40 times in a grid, or doing a fading and shrinking tween, on which you can now continue to build. This may open the door for you to create some interesting and unique results than just with the Timeline Effects alone.
Before moving on, I wanted to go over a couple of tricks that might help you out when you are using these effects.
06. Effects Tip: Applying Multiple Effects
One of the limitations you will notice when using these effects is that it is not immediately clear how you can apply multiple effects to one object. For example, if you create some text and apply a Shadow Effect to it, you can no longer apply other Effects to it. Here is the work-around I found:
Create a new Flash Document.
Create a Text Field and enter some text in it. Turn that field into a Movie Clip symbol by selecting the field and selecting Modify->Convert to Symbol Name the Symbol 'Shadow&Blur'.
Edit the Symbol you just made and select the text field. Apply the Drop Shadow Effect to it ( Insert->Timeline Effects->Effects->Drop Shadow )
Return to the main timeline and select the Shadow&Blur symbol on your stage. Select Insert->Timeline Effects->Effects->Blur and click the 'OK' button after you've adjusted the settings to your liking.
Now Test your movie.
You should have something very similar to the SWF you see above. What's more, you can adjust the Blur effect parameters by selecting the symbol on the Stage. to adjust the Shadow Effect parameters, edit the Shadow&Blur symbol you created in the Library and select the symbol contained inside it.
Although this somewhat solves the problem of applying multiple Effects to one object, this work-around requires some pre-planning because if you apply the first Effect to a symbol and THEN convert it to another Symbol to apply the second effect, you can no longer edit the first effect you applied. If editing the parameters of the first effect is not consideration for you, then you can try this method:
Create a new Flash Document.
Create a Text Field and enter some text in it. Apply the Drop Shadow Effect to it ( Insert->Timeline Effects->Effects->Drop Shadow )
Select the symbol on your stage and Convert it to a Symbol ( Modify->Convert to Symbol ).
Select Insert->Timeline Effects->Effects->Blur and click the 'OK' button after you've adjusted the settings to your liking.
Now Test your movie.
You should see virtually the same output as the previous work-around, however, you can no longer adjust the parameters of the Drop Shadow Effect.
Here's one last work-around: to have exploding text with a drop shadow under each letter, do this:
Create a new Flash Document.
Create a Text Field and enter some text in it. Apply the Explode Effect to it ( Insert->Timeline Effects->Effects->Explode )
Select the symbol on your Stage and change its Symbol Behavior drop down from Graphic to Movie Clip.

With the Symbol selected, convert it to a Symbol ( Modify->Convert to Symbol
Select Insert->Timeline Effects->Effects->Drop Shadow and click the 'OK' button after you've adjusted the settings to your liking.
Now Test your movie.
Hopefully these work-arounds come in handy for you as you experiment with the Effects. You should be able to mix all the different Timeline Effects using similar work-arounds.
Now that we've covered Macromedia's new helpers for the Timeline, lets dive into Behaviors, which will focus more on ActionScript functionality for items on the Stage.
I must confess, I'm a big code head. I have been writing so much code lately that I've forgotten what Timeline animation looks like. One of the things that seems to happen to some of us Flash developers as we transition into full-time ActionScripters is that our ActionScript starts to appear in less places in the Flash movies we build. Many ActionScripters don't even use the Timeline for animation anymore and rely solely on ActionScript to handle their animation needs. In many cases, this type of advanced ActionScript is written and placed in one frame in the main Timeline and it is often considered bad practice to place code on or inside Symbols directly by way of onClipEvents or button handlers. So, as we coders try and help the novice and non-coders in the Flash community learn the 'right' practices for coding to help further the movement away from attaching ActionScript to Movie Clips on the Stage, what does Macromedia do?
They release Flash MX 2004 featuring Behaviors, which are essentially code snippets that are placed - yup, you guessed it - as onClipEvents and attached to Movie Clips on the Stage. Now I know there are going to be a lot of coders out there that may see this as going against commonly held best practices, but, after spending some time with Behaviors, I think its not such a bad solution.
Now, for the non-code-heads reading this and wondering what the heck I'm yappin' about, don't worry about it, it's just me being over-dramatic. So let's take a closer look at Behaviors, shall we?
Behaviors
exist to make it easy for Flash developers not familiar or comfortable with ActionScript to attach simple to complex functionality to
items on the Stage and even Frames in the Timeline. Those of you who were
familiar with the '
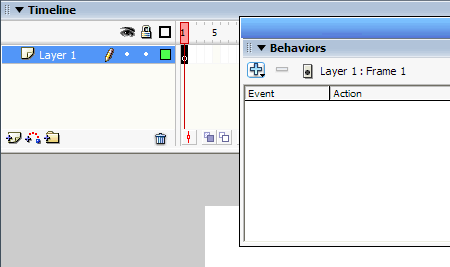
Let's examine the Behaviors Panel. If it's not already open, open your Behaviors Panel by selecting Window->Developer Panels->Behaviors or pressing Shift+F3.
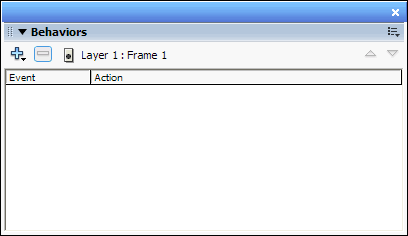
The Behaviors Panel is really pretty simple. Under the Behaviors Panel title bar, there is a plus button, which adds behaviors to the selected item, a minus button, which removes a selected behavior from the selected item, an icon and label describing the currently selected item, and up and down arrow buttons on the very right that allow you to control the stacking order of behaviors in the list. If you have nothing selected on the Stage, the Behaviors Panel assumes you want to add Behaviors to the currently selected Keyframe.
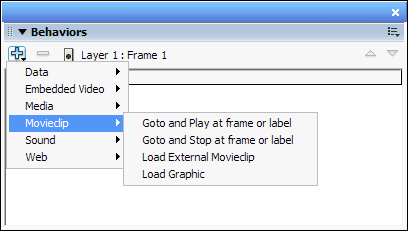
Clicking on the Plus button drops down a menu of Behavior categories each of which contain Behaviors related to that category. For example, the Movieclip category contains Behaviors that affect Movie Clips in some way.
There are many Behaviors that ship with Flash MX 2004. They range from the very simple to the very complex. Let's start off by adding a couple of simple behaviors to a new movie.
Create a new Flash Document.
With your Behaviors Panel open, select the first Frame in the only Layer in your Timeline. The Behaviors Panel should indicate that you have the first frame on Layer 1 selected.
Click on the Plus button in the Behaviors Panel and select Load External Movieclip from under the Movieclip sub menu. A dialog box should appear.
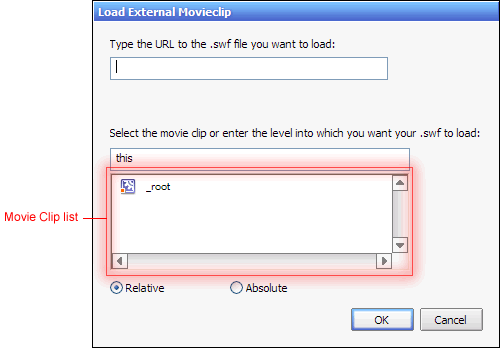
This Behavior loads an external Flash Movie into the Movie Clip you specify. The first thing you want to do is specify the location of the Flash Movie (the SWF file) you want to load. Type in ' test_movie.swf ', this is one of the SWFs that was included in the source files package you unzipped into your working directory at the beginning of this article.
Since we have no Movie Clips on the Stage, we will tell the Behavior to load the SWF file into the _root Timeline. To do this, select the _root Movie Clip from the Movie Clip list. The field text field right above the Movie Clip list should indicate that you have selected ' this._parent '.
Select the Absolute Radio Button. The text field above the Movie Clip list should now read ' _root '.
Now click the 'OK' button to apply the Behavior.
Save your movie now into your working directory and call it 'behaviors_frame.fla'.
Test your movie ( Control->Test Movie )

You should see the test_movie.swf load successfully in your test movie. Let's add another Behavior to the Frame.
Close your test movie and select Frame 1 of Layer 1 again and have your Behaviors Panel open.
Click the Plus button in your Behaviors Panel and add the Go To Web Page Behavior under the Web category.
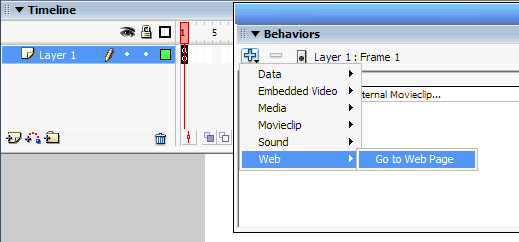
In the Go to Web Page dialog box, change the URL field to the web site address of your choice, and tell it to open in a new browser window by selecting ' _blank ' from the Open in drop down list.

Now test your movie again. This time the test_movie.swf Movie should load and a browser window should appear loading the URL you specified in the Behavior.
You can see that by adding multiple Behaviors to one element, yo can start to achieve more complex functionality, and all without having to write a line of ActionScript. Now close your test movie and let's take a look at what is happening behind the scenes.
Select Frame 1 of Layer 1 and open your Actions Panel ( Window->Development Tools->Actions or F9).
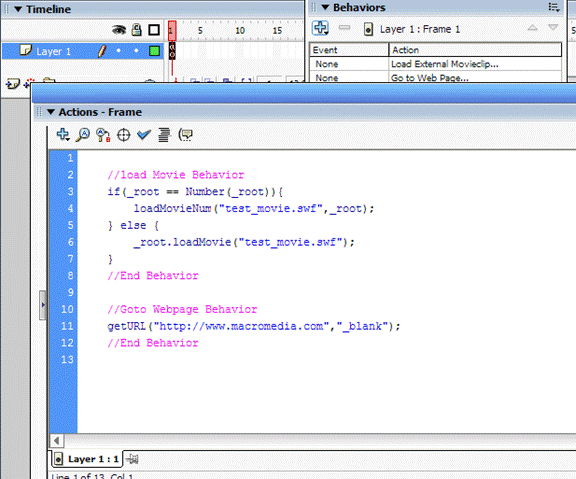
You will notice that the Behaviors you added to the frame were simple snippets of ActionScript that Flash wrote out for you. If you select all the ActionScript in the Actions Panel and erase it, the Behaviors panel will then be empty, Thus proving the point that Behaviors are a simple and helpful interface to the potentially complex ActionScript you might have needed to write yourself.
Along with being helpful, the Behaviors Panel can be pretty smart too. Follow along while I demonstrate:
Create a New Flash Document.
Using the Rectangle Tool, create a shape on the Stage and select it.
Open your Behaviors Panel ( Windows->Developer Tools->Behaviors or Shift+F3) and click on the Plus button
Roll your mouse cursor down to the Movieclip category of Behaviors.

Take note that there are two Behaviors in the Movieclip category. Now:
Select your red rectangle and convert it into a Symbol ( Modify->Convert to Symbol or F8)
In the Convert to Symbol dialog box, select Graphic and click the 'OK' button.
Now, with the new symbol selected on the Stage, click the Plus button in your Behaviors Panel and roll your mouse cursor down to the Movieclip category.
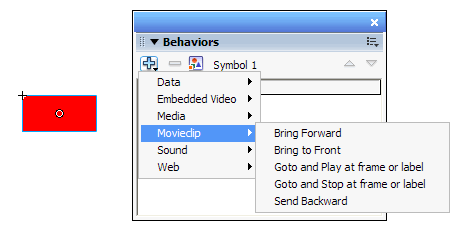
Notice now that there are three more Behaviors available in the Movieclip category. Now:
Select your red square Graphic symbol on the Stage and convert it to a Symbol again ( Modify->Convert to Symbol or F8)
This time, in the Convert to Symbol dialog box, select Movie Clip and click the 'OK' button.
Again, click the Plus button in your Behaviors Panel and roll your mouse cursor down to the Movieclip category.
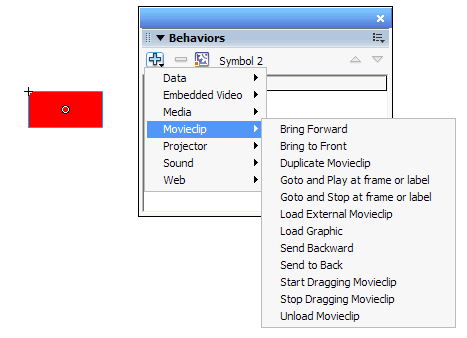
This time , you'll see that the Movieclip sub category of the Behaviors Menu is filled with many more Behaviors that pertain to Movie Clips. The Behaviors Panel knows the type of item you have selected on the Stage and will show you only Behaviors that have been designated to work with those types of items.
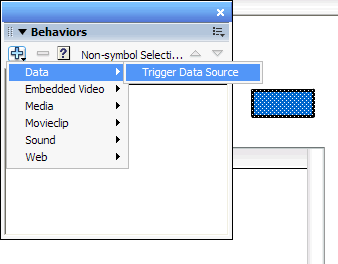
Now that you have a good overview of the way Behaviors work behind the scenes, I'll take you through the different Behaviors that ship with Flash MX 2004 and show you how to quickly put them to work. We'll start at the top of the list with the Data category in the Behaviors list. To use a Data behavior, you need to have Data components available on the Stage. In this case, I have included a movie with the necessary parts already present on the Stage and wired together. All we need to make it work is a button with the Data Behavior attached.
Open the Flash Document called behaviors_data_trigger.fla It should have been included in the source files that you unzipped earlier to your working directory. On the Stage you will see to components that are included with Macromedia MX Professional 2004; the XMLConnector and the DataGrid. The XMLConnector retrieves XML data from a source, in our case, a news feed found on the Web. The DataGrid is bound to the XMLConnector and will display the data found in the XML. For the XMLConnector component to actually retrieve the XML, it needs to be triggered.
Using the Rectangle Tool, draw a rectangle on the stage. This will act as a button to trigger the XMLConnector to start retrieving XML from the Web.
Select the rectangle on the Stage, open your Behaviors Panel, and select the Trigger Data Source Behavior from the Data category. It should prompt you to convert the rectangle to a Symbol. You should agree by clicking 'OK'.
The Trigger Data Source dialog displays any items on the Stage that can triggered to download data. In this case, you will want to select the XMLConnector component called XMLConn, and then click the 'OK' button.
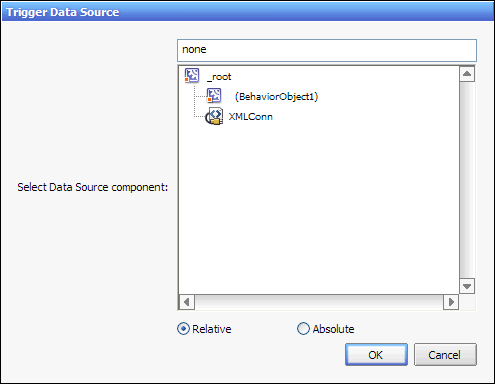
Test your movie. If you click on the rectangle, you should see the DataGRid populate with news items from onRelease.org.
That covers the only Data type Behavior. The Trigger Data Source Behavior will be helpful to you when you are needing to notify different Data components to retrieve data from different sources depending on the specific components you are using. This Behavior can be used on either a Symbol on the Stage, or applied to a frame.
Let's now move onto the next category of Behaviors, the Embedded Video Behaviors. These Behaviors are really helpful when applied to Button Symbols to help you control the playback of Embedded Video objects you might have on the Stage.
Create a new Flash Document.
Select File->Import->Import to Stage (or Control+R) and import the Flash Video called spin.flv Flash should notify you that the video file requires 100 frames to be added to your movie. Click the 'OK' button to have Flash automatically added the frames needed.
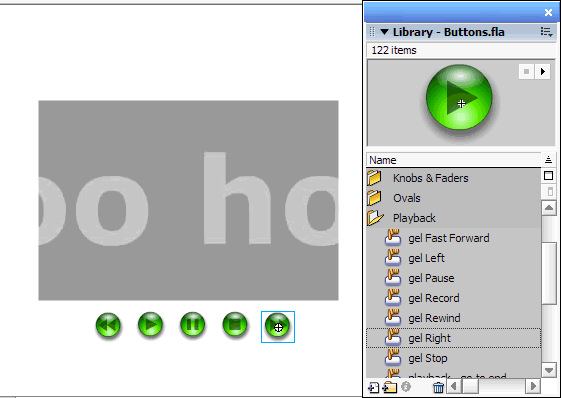
Now we will add some buttons on the Stage onto which you will be attaching behaviors. We will use some buttons from the Buttons Common Library included with Flash MX 2004. Select Window->Other Tools->Common Libraries->Buttons .

The Buttons library contains many useful buttons. The ones we are going to use are located in the Playback folder in the Library. Click and drag the gel FastForward, gel Pause, gell Rewind, gel Right, and gel Stop Button Symbols to your stage and arrange them neatly under the Embedded Video on the Stage.
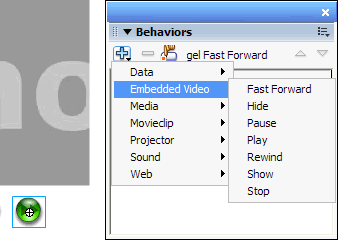
Select the button you have designated as the Fast Forward button and open the Behaviors Panel. Assign the Fast Forward Behavior to the button.
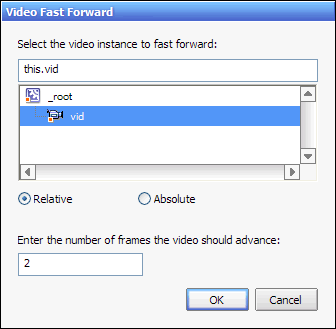
When the Video Fast Forward dialog box appears, select the target video instance from the list. When you select the video, the Behavior will alert you that the instance must have a name for the Behavior to work, click the 'OK' button and give the video the name of 'vid'. Once you name the video, Flash will no longer prompt you to supply a name for that instance.
Repeat the last step for each of the other buttons; assigning them each their respective behavior from the Embedded Video list of behaviors.
Now, return to the Buttons Common Library and select the gel Record button from the Playback folder and drag it to the Stage twice, then resize the two new buttons slightly smaller than the others..
Select one of the two newer buttons and assign the Hide Behavior found under the Embedded Video category of the Behavior Menu. Assign the Show Behavior to the other button.
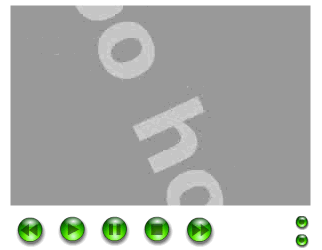
Test your movie. You should be able to control the video with the playback buttons as well as hide and show the video with the 2 buttons you added later.
If you are building a movie that contains Embedded Video, then the Embedded Video Behaviors offer a real efficient way to create controls for that video.
Next, we are going to tackle the Media Behaviors. These Behaviors are specifically designed to facilitate using the new Media Components available in Flash MX 2004 which allow you to play external Flash Video and MP3 audio files. In this next exercise, you will be incorporating these components and controlling them with the Media Behaviors.
Open the movie called 'behaviors_media.fla' which should be located in your working directory. This file makes use of the new Slide Presentation features available in Flash MX Professional 2004.
Select the slide titled 'presentation'.
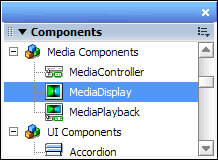
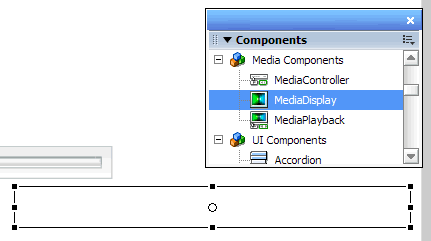
From your Components Panel, drag the MediaDisplay component to the Stage.
With the Component still selected on the Stage, open your Properties Panel and give the Component the instance name of 'display'.
With the MediaDisplay instance selected, open the Component Inspector Panel ( Window->Development Panels->Component Inspector or Alt+F7). Click on the Parameters tab to view the parameters for the MediaDisplay component. Here is where you will assign the video to play and the duration of the video.
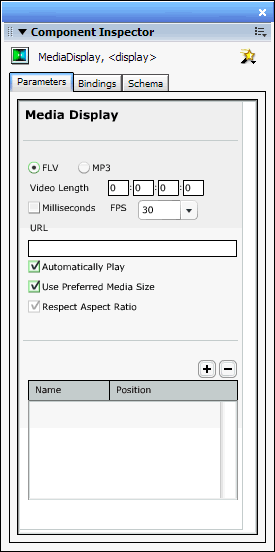
The video you will be testing with is 4 seconds in duration, so you will want to set the Video Length parameter to 0:0:4:0. Set the FPS drop-down field to 24 and in the URL field enter 'spin.flv'. Finally, uncheck the Automatically Play check box.
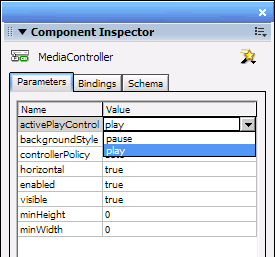
Next, drag the MediaController component to the Stage and position it below the existing MediaDisplay component. The MediaController component does just what its name implies, it is used to control the play back of a MediaDisplay component. In the Component Inspector Panel, change this component's acticvePlayControl setting to 'play', this will ensure that it starts off showing the play button rather than the pause button.
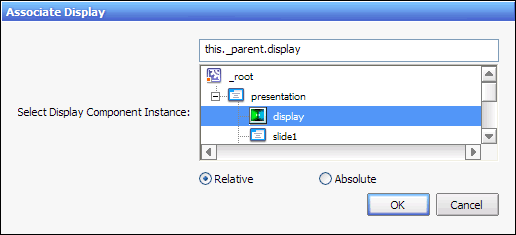
With the MediaController component selected on the Stage, open your Behaviors Panel and select the Associate Display Behavior from the Media category. This Behavior binds a MediaController to the MediaDisplay instance you specify.
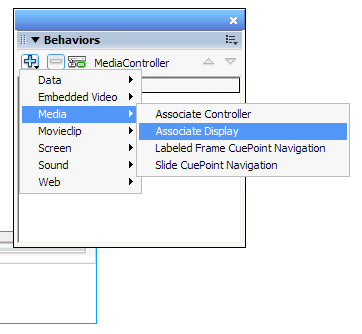
In the Associate Display dialog box, select the MediaDisplay component that you placed on the Stage earlier. It is called 'display'.
Now test your movie. You should be able to control the video playing in the MediaDisplay component with the MediaControls below component below it.
In the next exercise, we will build off of this movie by adding a second set of MediaDisplay and MediaController components. This time, however, we will not be playing a video, but rather an MP3 file.
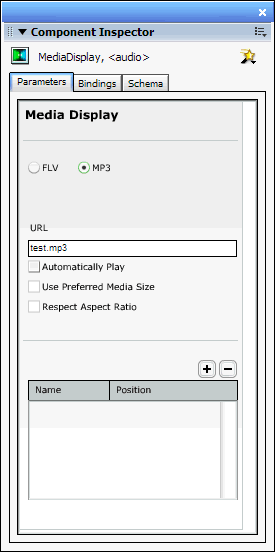
Drag a MediaDisplay component from your Components Panel to the Stage. You can resize it since it will not be displaying anything. Give this component the instance name of 'audio' in the Properties Panel.
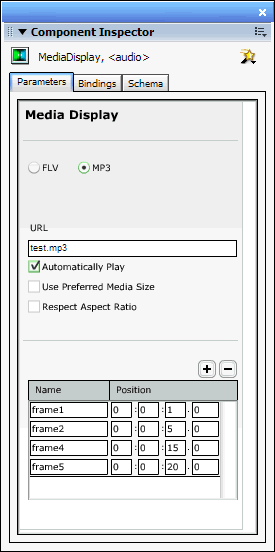
While the component is still selected on the Stage, open the Component Inspector Panel and select the MP3 radio button. Also, check the Automatically Play checkbox so that the MP3 starts to play immediately.
Drag another instance of the MediaController component to the Stage. Give it the instance name of 'audioControls' in the Properties Panel.
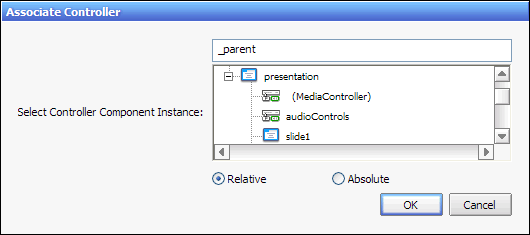
Now, select the MediaDisplay instance you called 'audio' and assign the Associate Controller Behavior to it. This does the same thing as the Associate Display Behavior you assigned earlier, except from the display component to the controller rather than the other way around. You will only ever use either Associate Controller or Associate Display but never both for the same component.
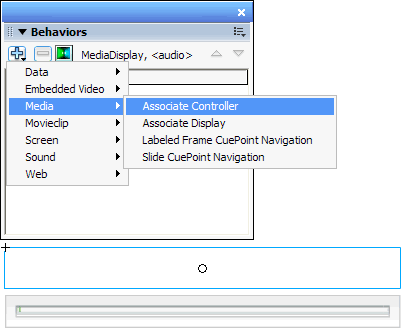
In the Associate Controller dialog box, select the MediaController instance called 'audioControls'.
Test your movie again. You should hear the test MP3 file start to play and you should be able to control it with the second MediaController on the Stage.
In this next part of the exercise, you will be adding cue points to the MediaDisplay that is playing the MP3 file. Cue points are designated times in the MP3 file when you might want certain events to occur in other parts of your movie. With the help of the last 2 Media-related Behaviors, we are able to easily use cue points to control a movie clip or slide show.
Select the MediaDisplay instance called 'audio' on your Stage and open the Component Inspector to view its properties.
Near the
bottom of the Component Parameters there is an are
where you can add cue points. Clicking the Plus button adds a cue point, and
clicking the minus button removes them. In the Name column is the cue point
name and the second column indicates the position in the time of the MP3 file
when that cue point should be triggered. Create four cue points:
frame1 at 1 second
frame2 at 5 seconds
frame4 at 15 seconds
frame5 at 20 seconds
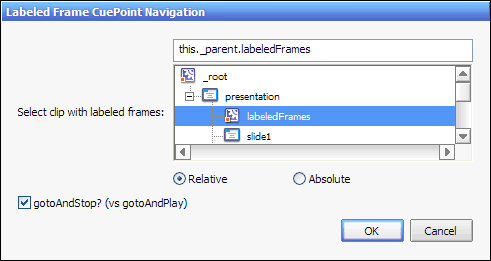
With the MediaDisplay instance still selected, choose the Labeled Frame Cuepoint Navigation Behavior from the Media category in the Behaviors list.
In the Labeled Frame CuePoint Navigation dialog box, select the MovieClip named 'labeldFrames' and check the box next to 'gotoAndStop?'Then click the 'OK' button. This Movie Clip is going to be controlled by the cue points. If you were to look inside the labeldFrames MovieClip, you would notice that there are frame labels that correspond to the cue point names.
Test your movie. You should see 'labeldFrames' MovieClip change to the frame labels corresponding directly to the cue points you designated in the MediaDisplay component
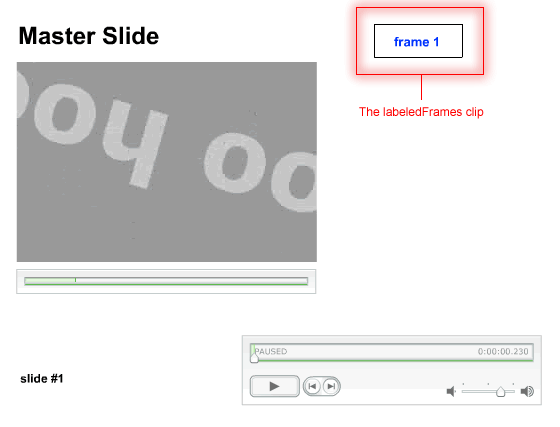
You can see that the Labeled Frame CuePoint Behavior is quite simple yet powerful in its capabilities. It gives you the ability to control a movie or even multiple movies with sound and/or video with the precision of a millisecond. Now, we are going to make a few last adjustments to your movie to see how you can control the slide presentation itself with cue points.
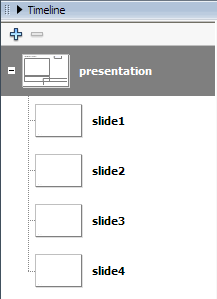
You will notice that I've set up the movie you are currently using with four child slides. Each of the slides has a small label in the bottom-left corner of the stage indicating which slide it is. If you test your movie and use the right and left arrow keys on your keyboard, you can cycle through the slides.
The Screen Outline Pane should be visible in Flash as well and should display the four child slides located beneath the master slide called 'presentation'.
On the Master slide called 'presentation' which you have been working on, select the MediaDisplay instance called'audio'. Open the Component Inspector to view the Parameters for this instance of the component.
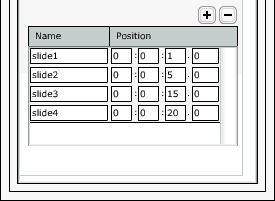
Now you are going to change the cue point names you assigned earlier. Remember how for the Labeled Frame CuePoint Navigation Behavior, the cue points had the same names as the frames in the target Movie Clip? Well, the Slide CuePoint Navigation Behavior works very much the same, with the difference being that the cue point names will need to match the names of the slides you wish to switch to at the specific time indicated in the cue point. Change the names of the existing cue points to: slide1, slide2, slide3 and slide4.
With the audio instance of the MediaDisplay component still selected, open the Behaviors Panel. Select the Labeled Frame CuePoint Navigation Behavior and click the Minus button to remove it from the Behavior list.
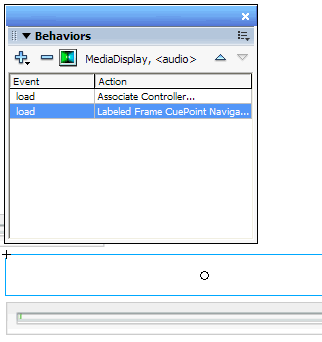
Click the Plus button and select the Slide CuePoint Navigation Behavior located in the Media category.
In the Slide CuePoint Navigation dialog box, you are prompted to select the slide that contains children slides named the same as the cue points you designated. Select the slide called 'presentation' and click the 'OK' button.
Test your movie and let the audio play. You should see that the slides change when the audio reaches the cue points you specified.
That rounds out the Media Behaviors. These behaviors really will make it easier for you to control audio and video assets as well as allowing those assets to control your movie. The CuePoint Navigation Behaviors seem especially useful for presentation purposes where you want to sync audio and video content with other content on the screen.
The next set of Behaviors we will look at are the Movieclip Behaviors. Flash MX 2004 ships with 12 Movieclip behaviors to help make your life easier when yo are building a project that requires, perhaps the ability to drag MovieClips around the Stage or maybe load and external SWF file into a MovieClip. The Movieclip Behaviors present some of the best examples of how helpful Behaviors can be. To demonstrate, I'll walk you through combining several of the Behaviors together on one Movie Clip to generate a pretty complex movie without the need for you to type a single line of ActionScript. Let's put those Behaviors to work
Create a new Flash Document.
Using the Oval Tool, draw a small circle on the Stage.
Select the circle and convert it to a Movie Clip Symbol ( Modify->Convert to Symbol or F8). Name the Symbol to your liking and click the 'OK' button.
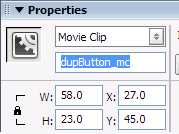
Give your new Symbol the instance name of 'circle_mc'.
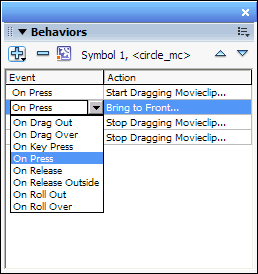
With your circle_mc Movie Clip selected on the Stage, open your Behaviors Panel and select the Start Dragging Movieclip Behavior.
In the Start Dragging Movieclip dialog box, select your Movie Clip instance should already be selected, so just click the 'OK' button.
In the Behaviors list, you will want to assign the Start Dragging Behavior to the On Press event. This will cause the Behavior to be activated when you click on the circle_mc Movie Clip at run time.
Now click the Plus button in your Behaviors Panel and add the Stop Dragging Movieclip Behavior to your circle_mc Movie Clip. This Behavior doesn't have any properties to change, so it will just show you a dialog box indicating its functionality. You can click 'OK' to dismiss the dialog box'.
Test your
movie now. You should find that clicking and dragging the circle_mc
Movie Clip allows you to actually drag it around the screen, and when you
release your mouse button, it should stop. That was easy!
One thing i noticed with this arrangement of the Behaviors
for the circle_mc Movie Clip is that if you click and
drag the circle shape and quickly move around the screen while releasing the
mouse button, the circle shape tends to get 'stuck' to the mouse
cursor. Well, that can be remedied right in the Behaviors Panel.
Close your test movie if you haven't already and select your circle_mc Movie CLip on the Stage. In your Behaviors Panel, add another Stop Dragging Movieclip Behavior, but this time set its event to On Release Outside. This should then stop the Movie Clip from being dragged around regardless of if the mouse cursor is over the clip being dragged or not.
Test your movie. Now, your circle_mc Movie Clip stops following the mouse cursor the moment you release the mouse button.
Let's continue exploring the Movieclip Behaviors. We'll continue to use the current Flash Document, but we'll add another Movie Clip that will be used as a button to make duplicates of the circle Movie Clip. Sound complicated? It could be if you had to write out all the ActionScript for it, but Behaviors will make it way easier
Using the Rectangle Tool, draw a small rectangle on the screen and convert it into a Movie Clip Symbol.
Give this new Movie Clip the instance name 'dupButton_mc'
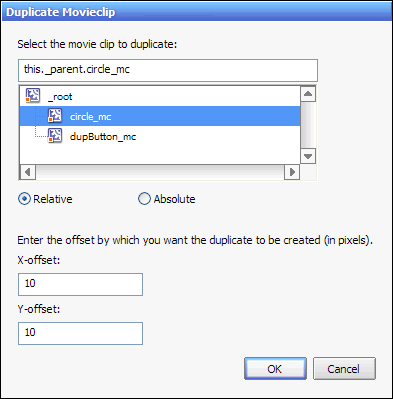
With your rectangle selected, apply the Duplicate Movieclip Behavior from the Movieclip category of the Behaviors Panel.
In the Duplicate Movieclip dialog box, select the circle_mc Movie Clip as the clip you want the Behavior to duplicate. Click 'OK' when you are done.
Test your movie. Clicking on the dupButton_mc Movie Clip should create duplicate circle_mc clips on the Stage. What's more, each of the circle_mc duplicates can be dragged and dropped just like the original!
You may notice that the bottom-most circle remains at the bottom even when it is being dragged, which may not be ideal. Lets fix that next.
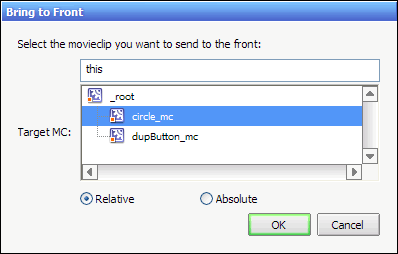
Close your test movie and return to your Stage. Select the circle_mc Movie Clip and add the Bring To Front Behavior located in the Movieclip category of the Behaviors Menu.
In the Bring to Front dialog box, select the circle_mc Movie Clip as the clip you want to send to the front. Click the 'OK' button when you are finished.
In the Behaviors Panel, you will want to change the event for the Bring to Front Behavior to On Press. This will bring the circle Movie Clip to the top of all the other clips whenever you click on it.
Once again, test your movie. Now you will see that no matter how many circles you duplicate, the one you click to drag will always rise to the top of the stack of clips.
As you can see, the Movie Clip Behaviors are very effective in quickly throwing together what would typically require some quiet coding time to do right. One of the really nice features of the Behaviors Panel is the simple fact that it allows you to add many Behaviors to one instance on the Stage while letting you customize the events that trigger each of those Behaviors. This allows you to develop very customized interaction for your project and save a little tome doing it! Next, we will look at the Movie Clip Behaviors that control the Timeline.
Open the
move called behaviors_movieclip_01.fla from your working directory. This file
was included the package of source files you downloaded at the beginning of the
article.
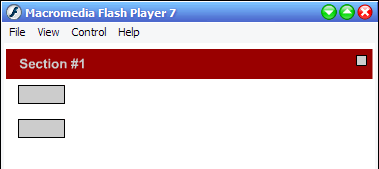
This is a simple movie that contains three frame labels. If you move the Play
head down the Timeline, you will see that for each label, there is a text field
on the Stage that indicates what label you are on.
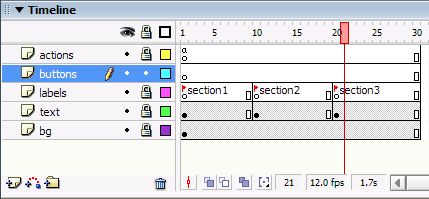
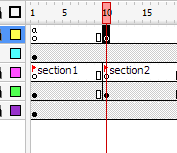
Using the Rectangle Tool, draw a rectangle on the Stage. Make sure that you are currently on the layer called 'buttons'. Select the rectangle and convert it into a Movie Clip.
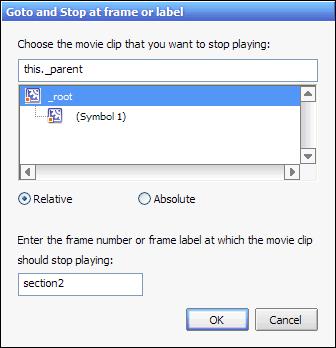
With the rectangle Movie Clip selected, apply the Goto and Stop at frame or label Behavior from the Movieclip category.
In the Goto and Stop at frame or label dialog box, select the _root movie from the Movie Clip List and specify 'section2' as the frame label to go to. Click the 'OK' button when you are finished.
Test your movie. You will notice that when clicking on the rectangle, the play head moves to the frames labeled 'section2'. This is indicated by the text field that changes in the upper left of the Stage.
The Goto and Stop on frame or label and the Goto and Play on frame or label Behaviors are nearly identical except that one stops on the destination frame and the other plays from the point on in the movie. These two Behaviors will most likely become the most common ones for many designers and developers and allows you to control the playback of your movie without needing to even look at the Actions Panel.
Let's keep using this movie for the next couple of excesses that involve the rest of the Movieclip Behaviors.
Close your test movie and return to the Stage. Open your Library and drag another copy of the rectangle Movie Clip you created earlier to the Stage.
Give the Movie Clip the instance name, graphicHolder_mc.
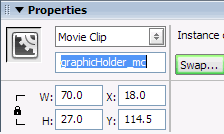
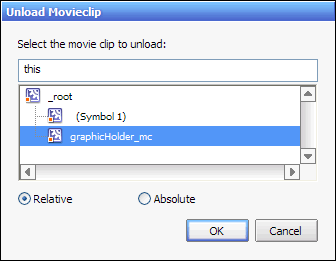
With the new rectangle selected, apply the Unload Movieclip Behavior to it. In the Movie Clip list, select the graphicHolder_mc clip itself, as the clip to unload.
Now on the layer named 'actions', make a Keyframe at frame 10.
With frame 10 still selected, open your Behaviors Panel and select the Load Graphic Behavior from the Movieclip category.
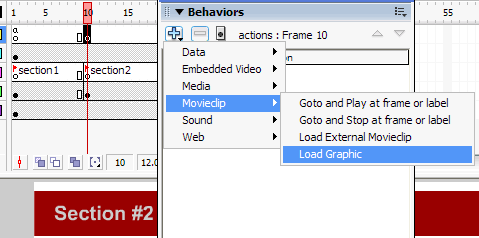
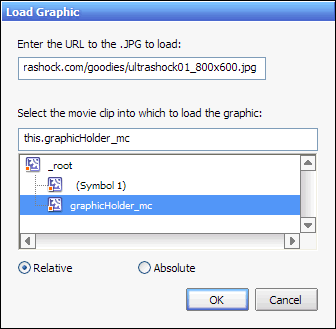
In the Load Graphic dialog box, enter the URL of a JPEG file. I entered the URL to one of my favorite desktops on the Ultrashock site. Select the graphicHolder_mc Movie Clip from the Movie Clip list. This will be the clip that the graphic will be loaded into. When you are finished, click the 'OK' button.
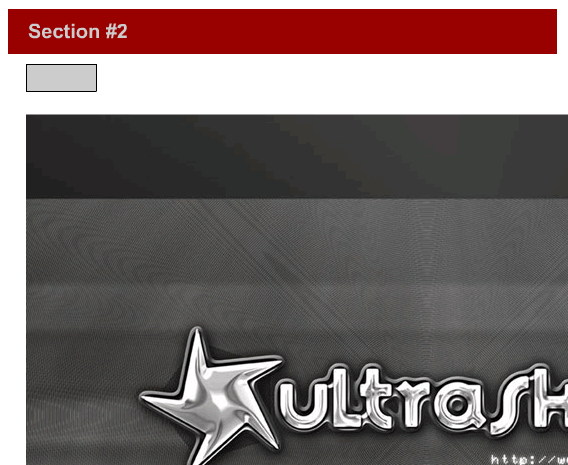
Now test your movie again. You will notice now when you click on the first rectangle you placed on the Stage, it not only takes you to the second frame label, but that frame, in turn, fires off the Load Graphic Behavior which loads the JPEG file you specified into the second rectangle. Clicking on the image after it has loaded, unloads it using the Unload Movieclip Behavior.
That is the end of the Movieclip-related Behaviors. You can see that these are some of the most powerful Behaviors in the bunch because of the fact that they simplify the ActionScript that some of us have had to write too many times; tasks like loading images, loading other SWF files, creating drag and drop elements, controlling the movie playback with frame labels; and reduced them into simple point and click dialog boxes.
Continuing to use this current movie, lets look into the Projector Behavior included in Flash MX 2004:
Drag another copy of your rectangle Movie Clip from your Library to the Stage of your movie. Give it the instance name of zoomButton_mc.
Scale the clip and move it into the upper-right corner of your movie.
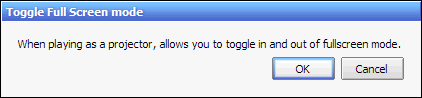
With the rectangle still selected, assign the Toggle Full Screen Mode Behavior.
Since this Behavior doesn't have any parameters to change, it just displays a simple dialog. Click 'OK' to proceed
Test your movie. You won't see any activity if you click the zoomButton_mc clip now, but if you close the test movie and open the SWF that was just created by the test movie (it should be in your working directory) you will be able to toggle the full-screen state of the projector.
That's it for the Projector Category of Behaviors. Next up, we're going to go through the Sound Behaviors. These Behaviors allow you to play audio that you may have in your movie's library or external MP3 files.
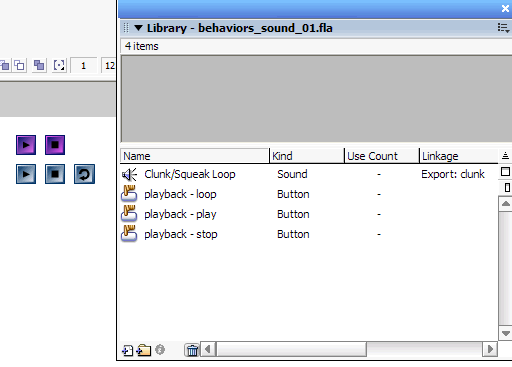
Open the
Flash document called behaviors_sound_01.fla located in your working directory.
This file should have been included in the source files you downloaded at the
beginning of this article.
I have placed a slew of buttons on the Stage and included one sound in the
movie's Library, with its linkage properties set so its exported name is
'clunk'.
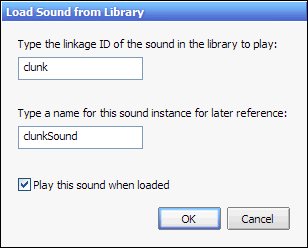
Select the top most Play button on the left side of the Stage and assign the Load Sound from Library Behavior located in the Sound category of the Behaviors Panel.
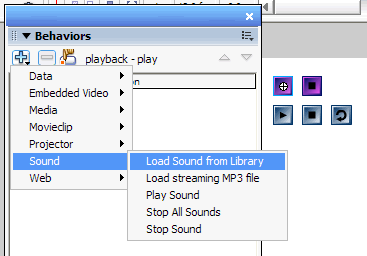
In the Load Sound from Library dialog box, fill in the linkage ID of the sound that is included in the Library, clunk. Give the sound a name so that other Behaviors can reference this sound later. The name cannot contain any spaces. This name is simply an identifier that the different Behaviors can use to control the sound.
Now select the Stop button directly to the right of the Play button you have been dealing with. Assign the Stop All Sounds Behavior to the button. This Behavior has no parameters and it essentially stops any sound playing in the movie.
Test your movie. You should hear a clunky sound play when you press the play button, and you should be able to stop it with the stop button.
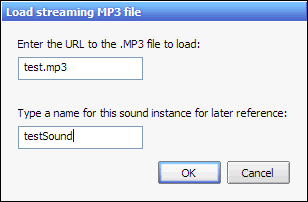
Now close your test movie and return to the Stage. Select the blue Play button on the left side of the Stage and assign it the Load Streaming MP3 File Behavior.
The Load streaming MP3 file dialog box looks very similar to the Load Sound from library dialog box, but the first field requires the location of an MP3 file. Type in 'test.mp3'. That should be located in your working directory and was packaged with the source files you downloaded at the beginning of this article. For the reference name, enter testSound. Again, this reference name will be used by other sound Behaviors to control the sound.
Select the blue stop button directly to the right of the play button that is playing the MP3 file. Assign the Stop Sound Behavior to the button. The Stop Sound Behavior stops the playing of a sound previously played by either the Load Streaming MP3 file Behavior or the Load from Library Behavior.
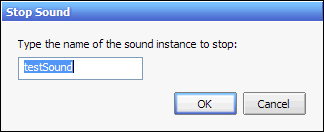
In the Stop Sound dialog box, enter the reference name you gave the test.mp3 player earlier. This will allow the Stop button to control the MP3 player
Test your movie. You should now be able to play both snippets of audio simultaneously. The purple stop button still stops all the sound, but the blue stop button only stops the test.mp3 file.
Finally, for the last Behavior, close your test movie. Select the reload button on the in the cluster of button on the left of the Stage, and assign the
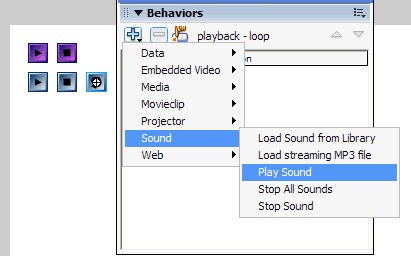
The Play Sound Behavior is an interesting one. It takes one parameter, that is the reference name of the sound you want to control.
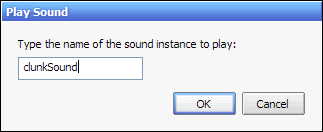
Test your movie. Click the play buttons and then click the upper right stop button to stop all currently playing sounds. Now click the reload button. You should hear the clunkSound audio playing again.
Those are all the Sound Behaviors that ship with Flash MX 2004. They make it very easy to point and click your way to controlling library sounds and streaming MP3 files.
And with that, this article comes to an end. You can see that Macromedia put a lot of work in it's implementation of Timeline Effects and Behaviors. Now, with these tools, designers can start to throw together projects without needing to know a lot of advanced ActionScript to fancy Timeline Tricks. In fact, we didn't write a single line of code for this article, yet we were able to achieve some really powerful effects and interaction techniques.
One of the really exciting things about both Timeline Effects and Behaviors is that they both utilize Flash JavaScript which means that any developer versed in either JavaScript or ActionScript can develop edge-pushing effects and really complex ActionScript wrapped up into a nice clean Behavior. This not only allows the non-coder to do much more involved ActionScript-based interaction and animation in their movies, but it will also make the lives of the hard-core ActionScripters easier because now they can package up that script they use over and over again into an easy to apply behavior.
Timeline effects also present an interesting approach to finding and creating new effects. Once you have applied a Timeline Effect, you can dig right into that clip and continue to tweak the tweens and keyframes until you have turned the original effect into something new and different.
Hopefully, this run through gives you a good foundation to start using Timeline Effects and Behaviors.
|
Politica de confidentialitate | Termeni si conditii de utilizare |

Vizualizari: 2081
Importanta: ![]()
Termeni si conditii de utilizare | Contact
© SCRIGROUP 2025 . All rights reserved