Do you have a collection of old photos in need of
restoration or an image with a blemish or flaw? In the past, you probably
used the clone stamp tool to correct imperfections, but the new healing
brush and patch tools in Adobe Photoshop
7.0 provide seamless photo repair, blending your sampled color to match
the texture and tone of the retouched area.
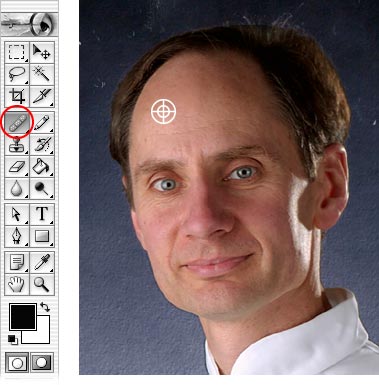
Sample an undamaged area.
Select the healing brush tool. Alt-click (Windows) or
Option-click (Mac OS) to sample an area with the texture you wish to paint
with. We sampled a smooth area of a man's forehead.
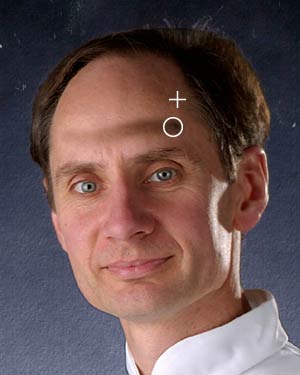
Paint the blemishes.
Paint over the blemished area using the healing brush
tool. Don't worry about the shadowy preview you'll see as you paint. The
healing brush blends the stroke to the repaired area.
It's a good idea to use the History palette to take
snapshots during the retouching process, so you can review your progress or
revert to a previous state of the image if necessary.
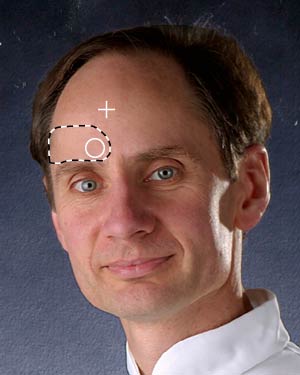
Use a selection to protect the healing area.
When there is a strong contrast at the edges of the
area you want to heal, make a selection before applying the healing brush
tool. The selection prevents any color from bleeding into the healed area
as the healing brush does its blending.
Our selection prevented the man's dark eyebrow color
from bleeding into the smooth forehead.
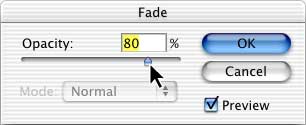
Blend the effects of the healing brush.
If the painted effect of the healing brush looks too
smooth to be realistic, you can adjust the opacity of the effect. After
painting a stroke with the healing brush tool, choose Edit > Fade
Healing Brush. In the Fade dialog box, select Preview and drag the Opacity
slider to see the fading effect.
While the healing brush tool is perfect for correcting
small imperfections, the patch tool is ideal for restoring areas that can
be easily selected. Like the healing brush, the patch tool also matches the
texture, lighting, and shading of the sampled pixels to the area you're
repairing.
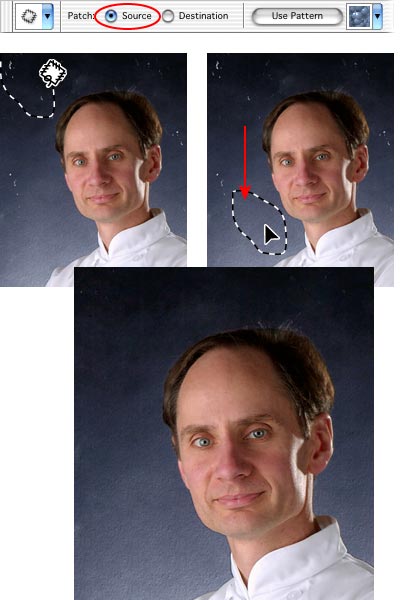
Repair a selected area.
Select the patch tool and make sure the Source option
is selected in the tool options bar. Draw a selection around the blemished
area. Then drag the selection to the area you want to sample. The blemished
area is instantly restored.
As an alternative, select Destination in the tool
options bar. Then use the patch tool to select an undamaged area and drag
the selection to a blemished area.
Create
a natural-media brush
Adobe Photoshop
7.0 opens up a whole new range of possibilities for creating
artistic effects. With the new painting engine, you can create imagery
that looks as if it was painted using natural media. Follow along and learn
a few of the ways you can customize the brush tool.
Choose a brush tip.
Select the brush tool and choose Window > Brushes to
display the Brushes palette. Select Brush Tip Shape on the left side of the
palette, and then select a brush tip.
When you're exploring the options in the Brushes
palette, it's best to choose a simple tip, such as Hard Round or Soft
Round, so you can clearly see the effects.
Fade the size of the brush.
Select Shape Dynamics on the left side of the Brushes
palette. (Click on the words, rather than the check box, to view the Shape
Dynamics options.) Choose Fade from the Control pop-up menu below the Size
Jitter slider; then enter a number of steps. The more steps you enter, the
longer the stroke. You can view results at the bottom of the Brushes
palette.
Now try adjusting some of the other shape dynamics.
Drag the sliders to add randomness to brush elements. (At 0%, an element
does not change over the course of a stroke; at 100%, an element has the
maximum amount of randomness.) Choose options from the Control pop-up menus
to control the variance of brush elements.
Add scattering to the brush.
Select Scattering on the left side of the Brushes
palette. The options in this section of the Brushes palette determine the
number and placement of marks in a stroke. Adjust the Scatter percentage to
specify the maximum percentage of scattering in a stroke. Adjust the Count
value to specify the number of brush marks applied at each spacing
interval. Adjust the Count Jitter percentage to add variance to the number
of brush marks applied at each spacing interval.
Add texture to the brush.
Select Texture on the left side of the Brushes palette.
The options in this section of the Brushes palette let you make
strokes look like they are painted on textured canvas. First, click on the
pattern sample at the top of the palette, and choose a pattern from the
pop-up palette. (You can load additional patterns by clicking the triangle
at the top right of the pop-up palette, and choosing a pattern library from
the bottom of the palette menu.) Use the Scale slider to adjust the size of
the pattern.
Now you're ready to use your brush.
Paint in the image.
Choose a color and paint freehand in an image.
Alternately, you can apply the brush stroke to a path. (For more
information on creating paths and using the Paths palette, see Photoshop
online Help.) We used a work path to create brush strokes on a new layer.
We then used the same method to create additional fireworks in
different colors.
Experiment with other brush options.
Now that you know the basics, you can experiment
with some of the other brush options. For example, we added color
dynamics to our brush and painted freehand to create particle streaks
falling from the fireworks.
New
dimensions in optimization
Have you ever been frustrated by fuzzy type in a Web
graphic? When optimizing an image, you need to reduce the file size-but
compression can cause type quality to deteriorate. Adobe Photoshop
7.0 helps you achieve the perfect balance between image quality and file size with weighted optimization.
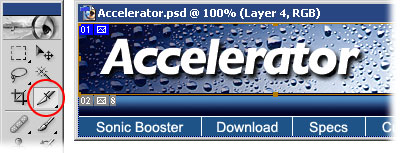
Create a slice for the type.
Select the slice tool, and drag in the image to create
a slice. You'll use the slice to apply optimization settings, so make sure
it encompasses the entire area you want to optimize.
Select the slice in the Save For Web dialog box.
Choose File > Save for Web, and click the slice that
contains the type with the slice select tool.
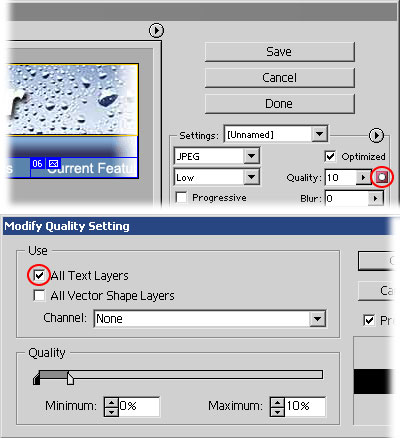
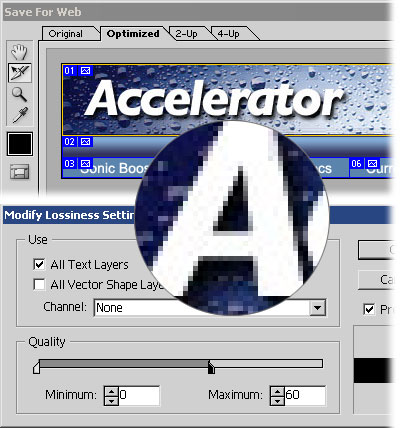
Apply the weighted optimization.
Set the format for the slice. (Since this is a
photo-quality image, we chose JPEG as the format.) To apply weighted
optimization, click the mask button next to the Quality text box. This
opens the Modify Quality Setting dialog box, where you can select the All
Text Layers option to let Photoshop generate a mask to protect your type.
In addition to text layers, you can also select alpha
channels and vector shape layers in the Modify Quality Setting dialog box
to generate masks for weighted optimization.
Preview the optimization.
To set the level of dithering for the text, select the
Preview option in the Modify Quality Setting dialog box, and then set the
Minimum and Maximum settings you want.
It may take a bit of experimenting to settle on the
dither settings. We set the Minimum quality to 0 and the Maximum quality to
60. With this quality range, the type stays crisp, and the background image
gets stronger optimization.