| CATEGORII DOCUMENTE |
| Asp | Autocad | C | Dot net | Excel | Fox pro | Html | Java |
| Linux | Mathcad | Photoshop | Php | Sql | Visual studio | Windows | Xml |
Booting XP From
First, if you haven't already, grab a free copy of BartPE. You'll find all the
information you need on getting and using this tool in 'A Must-Have Repair
And Recovery Tool.' and at Bart's site.
Next, you need new versions of two files from Microsoft (NSDQ: MSFT): 'setupldr.bin' and 'ramdisk.sys'. These new files are part of the Windows Server 2003 SP1 pack, which you can download from Microsoft no matter what operating system you're running. So, if you're not running Server 2003, it's not a problem.
Here's what to do: Start with the page called 'How to obtain the latest service pack for Windows Server 2003' and follow the appropriate links under the subheading 'To obtain Windows Server 2003 SP1 from the Microsoft Download Center.' (As I write this, the standard 32-bit version is here, and you're free to try that link. But the name or location of the file may change, so going through the 'How to obtain the latest service pack for Windows Server 2003' page is the safest, surest route. When you get to the download page, click the 'Download' button to save the complete SP1 file to your PC. (It's a large file; 329-Mbytes.)
The SP1 File is an executable that will try to self-extract and install if you run it. If you're currently using Windows Server 2003 and wish to fully install SP1, it's fine to do just that -- click on the file and run it. But if you're using any other operating system, use the '-x' (for 'extract') switch instead. This will pull all the files from SP1, but won't try to install them.
Extracting The Files You Need
Here's how, using my system as an example:
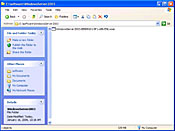
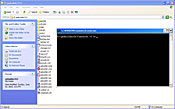
Screen One shows the executable SP1 file -- currently named 'WindowsServer2003-KB889101-SP1-x86-ENU.exe' although the name could be different when you download it -- in an otherwise-empty folder I created as a temporary workspace.
|
|
Screen One |
|
|
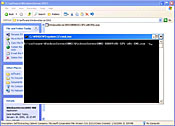
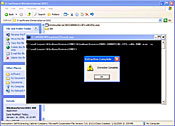
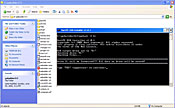
I opened a command window in that folder, and then ran the SP1 executable file with the '-x' switch: In other words, I entered the command 'WindowsServer2003-KB889101-SP1-x86-ENU.exe -x' (without the quotes) as shown in Screen Two.
|
|
|
Screen Two |
|
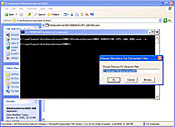
Screen Three shows the extraction process beginning; asking for a destination for the unpacked files. You can accept the default location (that's what I did), or specify another.
|
|
Screen Three |
|
|
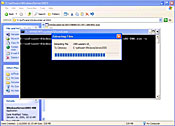
Once you accept or specify a destination, the actual unpacking of the files then begins, as shown in Screen Four.
|
|
|
Screen Four |
|
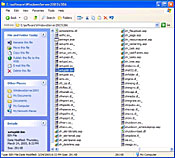
Screen Five shows both the final 'extraction complete' message, and the automatically-created 'i386' folder that contains all the newly extracted SP1 files.
|
|
Screen Five |
|
|
Moving The Files To
PEbuilder
The two files we need from SP1 are setupldr.bin and ramdisk.sys. Bart
Lagerweij's boot-from-USB script will look for those files in a specific
location; namely, a folder named 'srsp1' off the home directory of
your PEbuilder installation.
In my example case, my PEbuilder folder is at E:pebuilder; so I created a new folder called E:pebuildersrsp1. I then simply copied and pasted the setupldr.bin file from the i386 folder (shown in Screen Six) to the E:pebuildersrsp1 folder.
|
|
|
Screen Six |
|
If you try to do the same copy and paste with ramdisk.sys, it won't work; instead you'll find a file called 'ramdisk.sy_' in the i386 folder. The trailing underscore is Microsoft (NSDQ: MSFT)'s way of telling you it's a compressed version of the file, which must be expanded before use.
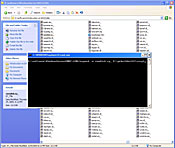
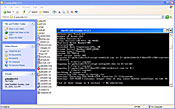
Screen Seven shows how: I opened a command window in the i386 folder, and used the command 'expand -r ramdisk.sy_ E:pebuilder313srsp1' (without the quotes) to decompress the ramdisk file, and write it to the E:pebuildersrsp1 folder.
|
|
Screen Seven |
|
|
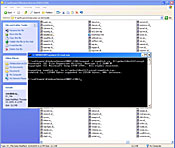
The successful completion of the expand/move command is shown in Screen Eight.
|
|
|
Screen Eight |
|
Once you have the setupldr.bin and ramdisk.sys in your pebuildersrsp1 folder, you can then delete the other SP1 files, if you wish; including all the files in the i386 unpacking directory, and the original download file (e.g., 'WindowsServer2003-KB889101-SP1-x86-ENU.exe,' or whatever it was called when you downloaded it.)
Build The Custom Version Of XP
Use PEbuilder normally, following the directions that came with the software;
or the illustrated, step-by-step directions in 'A Must-Have Repair And
Recovery Tool.'
Note that the PEbuilder 'output folder' should remain the default 'BartPE' called for in the PEbuilder instructions. But because these files will soon be copied to your USB drive, you don't need to create or burn an ISO image for now. Just leave those options unchecked, when they're offered to you.
Prepare The
The USB installer script 'pe2usb' included in your PEbuilder folder
is the key to formatting your USB drive and setting up the XP files there. It's
easy to use -- you just need to know what drive letter your USB device is
using. In my case, I had a USB drive installed as drive K: on my system, so,
following Bart's instructions, I entered the command 'pe2usb -f K:'
(without the quotes) from my PEbuilder folder, as shown in Screen Nine.
(The '-f' ensures that the USB drive is formatted before the files
are copied to the device.)
|
|
Screen Nine |
|
|
Once the USB installer is running, it checks to make sure you really want to reformat the USB drive (as shown in Screen Ten); if you concur, it runs to completion as shown in Screen Eleven.
|
|
|
|
|
Screens Ten and Eleven |
||
Making Sure The PC
Is Ready
Before trying to boot from the USB drive, take a moment to ensure that your PC
will do its part by checking the BIOS. Different PCs use different
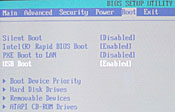
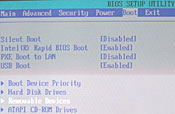
nomenclatures, but the BIOS setup tool on my PC had three areas to check. The
first and most obvious was to make sure that 'USB Boot' was set to
'Enable,' as shown in Screen Twelve.
|
|
|
Screen Twelve |
|
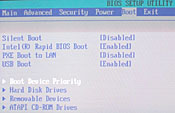
Next, under 'Removable devices' (Screen Thirteen), I set the USB drive as the first drive, with the standard floppy drive second.
|
|
Screen Thirteen |
|
|
Then, under 'Boot Device Priority' (Screen Fourteen), I set the USB drive as first. I saved the changes (Screen Fifteen) and I was ready to go!
|
|
|
|
|
Screens Fourteen and Fifteen |
||
Or so I thought. But it didn't work. My PC wouldn't boot from the USB drive.
One Final Detail
In the BIOS settings under 'Removable devices,' my PC had lumped the USB drive in with a standard floppy drive; and
that was a clue I'd missed. The output of the USB installer, shown in Screen
Eleven, showed that the software set up the USB drive as if it were a hard
drive. That can be fine in many PCs, but mine -- only a couple years old, and hardly ancient -- wasn't able to handle the
mismatch.
This is apparently an extremely common cause for USB boot failures, so much so that other software developers have produced fixes. For example, 'Flashboot,' a tool from Prime Expert, is able to make many types of bootable USB setups on its own, but also has a special feature for processing a BartPE bootable CD image to USB; and to do so in either hard drive emulation format or floppy drive emulation. Flashboot is a commercial tool costing 19.95Euros (about US$24 as I write this), but has a free trial so you can be sure it will work for you before you pay.
I tried it, and Flashboot did as it promised, getting around my PC's limitations, and letting me boot from the USB drive.
Lots Of Help Available
As with so many tech step-by-steps, spelling out all the details can make
things seem harder than they really are. Of course, that's not our intent here
-- we're trying to lay out the details to make the process as clear as
possible.
But in the event things don't work for you, don't worry: There's lots of additional help available, including these excellent resources:
Well Worth Doing
Having BartPE -- in fact, an entire, lightweight installation of XP -- on a
self-contained, zero-footprint, USB drive is a wonderful thing that opens a
whole world of easier, more-portable computing, troubleshooting, and
maintenance. Sooner or later, you'll have a USB drive -- and now you have the
means to take XP with you, in your pocket
|
Politica de confidentialitate | Termeni si conditii de utilizare |

Vizualizari: 1015
Importanta: ![]()
Termeni si conditii de utilizare | Contact
© SCRIGROUP 2025 . All rights reserved