| CATEGORII DOCUMENTE |
| Asp | Autocad | C | Dot net | Excel | Fox pro | Html | Java |
| Linux | Mathcad | Photoshop | Php | Sql | Visual studio | Windows | Xml |
This chapter shifts the focus from the organization-specific settings to server-specific settings. It provides you with information about how to configure settings on individual Exchange servers in your organization. Individual server settings that you can configure include enabling message tracking, configuring language support for clients, scheduling Mailbox Management processes, troubleshooting specific issues with diagnostic logging, using public folder referrals and Directory Access options, and other settings that are important to managing your Exchange server.
Although this chapter does not cover them, you can also manage protocol settings, services, and backup and restore processes on an individual server basis. For more information about:
Configuring protocols, see Chapter 5, 'Understanding and Configuring Message Routing and Transport,' and Chapter 6, 'Managing Client Access to Exchange.'
Exchange services, see Appendix B, 'Services Used by Exchange.'
Backup and restore practices, see Chapter 7, 'Managing Mailbox Stores and Public Folder Stores.'
When you configure server-specific settings, you use the Properties dialog box (see Figure 3.1) that is associated with each server.
To open a server's Properties dialog box
In Exchange System Manager, right-click an Exchange server, and then select Properties.
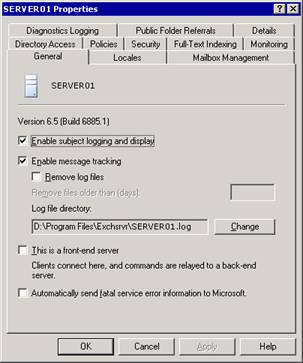
Figure 3.1 The Properties dialog box for SERVER01
Of the eleven tabs in the Properties dialog box, this chapter focuses on those tasks associated with the following tabs: General, Locales, Mailbox Management, Directory Access, Policies, Security, Full-Text Indexing, Diagnostic Logging, and Public Folder Referrals.
Note
To search for a specific system message in
Before enabling a
server's messages to appear in
To enable a server's messages to appear in
On the General tab in the server's Properties dialog box, select the Enable subject logging and display check box.
Note
If the Enable subject logging and display check box is
unavailable (or appears dimmed), there is a server policy object applied to
this server. You must either enable subject logging and display on the policy,
or remove the server from this policy. To view which policies are applied to
this server, look at the Policies tab. For more information about server
policies, see Chapter 2, 'Managing an Exchange Organization.'
You can create a server policy to control the message tracking options of a group of servers in an administrative group. However, you can also enable message tracking on an individual server basis. For example, if you do not track messages on all of your servers, but users on a specific Exchange server are experiencing mail flow problems, you may want to enable message tracking on the server that is experiencing mail flow problems. Alternatively, you may want to track messages only on your Internet gateway servers.
When you enable message tracking on an individual server, messages routed through the server are added to the message tracking logs. These logs are text files that you can review to monitor and troubleshoot message flow. The Exchange System Attendant service on each server maintains these log files.
To enable message tracking
On the General tab in the server's Properties dialog box, select the Enable message tracking check box.
Note
If the Enable message tracking check box is unavailable
(or appears dimmed), there is a server policy object applied to this server.
You must either enable message tracking on the policy, or remove the server
from this policy. To view which policies are applied to this server, look at
the Policies tab. For more information about server policies, see
Chapter 2, 'Managing an Exchange Organization.'
If you enable message tracking, you may want to customize how Exchange manages the resulting log files. By default, Exchange stores the message tracking log files in the C:Program FilesExchsrvr folder and removes these log files on a seven-day interval. These default settings may or may not fit the needs of your Exchange environment.
Selecting a Location for the Log Files
To specify a path and folder for message tracking log files, you use the Log file directory text box on the General tab of the server's Properties dialog box. When you change the path of the log file directory, Exchange saves future log files to the new path. However, Exchange does not move existing log files to the new location. You must do this manually.
Removing Log Files
If you allow log files to accumulate on the server, they can consume a large portion of disk space and may affect performance. You should review and remove log files periodically. However, make sure to leave log files on the server long enough for you to review files if a problem occurs with the message flow. As an additional step, you can move log files to another disk that has the bandwidth to accommodate larger log files.
To specify how often log files are removed
On the General tab in the server's Properties dialog box, select Remove log files.
In the Remove files older than (days) text box, type the number of days that you want the files to remain on the server before being deleted.
When you configure a server to be a front-end server, you are usually dedicating the server to receive requests from messaging clients, such as HTTP, Internet Message Access Protocol version 4 (IMAP4), and Post Office Protocol version 3 (POP3), and to relay client requests to the appropriate back-end server.
The services that an Exchange front-end server requires depend on the protocols that you use on the server, and whether you will be making configuration changes after the initial setup. Table 3.1 lists which Exchange services are required for each protocol or tool that an Exchange front-end server uses.
Table 3.1 Services required on an Exchange front-end server
|
Protocol/tool on server |
Services required |
|
POP3 |
Exchange POP3 (POP3Svc) Microsoft Exchange System Attendant (MSExchangeSA) |
|
IMAP4 |
Exchange IMAP4 (IMAP4Svc) MSExchangeSA |
|
SMTP |
Microsoft Exchange Information Store (MSExchangeIS) MSExchangeSA |
|
Exchange System Manager |
MSExchangeSA |
|
Routing Engine |
Microsoft Exchange Routing Engine (RESvc) Note |
|
NNTP |
Network News Transfer Protocol NNTP) must be enabled on a server during upgrades. Note |
To designate a front-end server
On the General tab in the server's Properties dialog box, select the This is a front-end server check box.
After designating a server as a front-end server, you should remove any unnecessary components or disable any unnecessary services on the server. Removing these components or disabling these services allows the front-end server to relay client requests more efficiently and improves security by reducing the number of services or components that are vulnerable to attack. In particular, you can remove public folder stores and storage groups from an Exchange front-end server. Also, if your front-end users are not sending mail using SMTP, you can remove mailbox stores from the front-end server.
Important
To stop or disable services, use the Services snap-in in
Microsoft Management Console (MMC).
For more information about using a front-end and back-end topology, see Chapter 6, 'Managing Client Access to Exchange.'
Microsoft personnel monitor error reports to identify and correct common problems that customers encounter. If you do not enable the automatic error reporting option, a dialog box appears that prompts you to manually send the fatal error report.
Important
It is recommended that you send fatal error reports to Microsoft.
When you send these reports, Microsoft personnel can respond to you with any
available fixes for your reported issue. However, before sending information
regarding any fatal service error to Microsoft, you should confirm that sending
this information is permitted under your organization's security policy.
To send error information to Microsoft
On the General tab in the server's Properties dialog box, select the Automatically send fatal service error information to Microsoft check box.
When you send error reports to Microsoft, they are sent over Secure HTTP (HTTPS), which is a more secure connection than HTTP.
Note
To send reports, the server must have HTTP access to the
Internet.
For more information about automatic error reporting, see the 'Microsoft Online Crash Analysis' Web site ( https://go.microsoft.com/fwlink/?LinkId=18428
Different countries and regions have differing conventions regarding the formatting and presentation of information such as date, time, and currency. To accommodate these differences, you use the Locales tab to define how to display date, currency, and time values, and to define how to control other international settings, such as sorting order.
For each locale listed on the Locales tab, the server is able to supply clients with data sorted and formatted according to the conventions used in that locale. For example, if Hindi appears in the list, Hindi language clients that connect to the server see information sorted and formatted in Hindi.
To add a locale to the server
On the Locales tab in the server's Properties dialog box, click Add (see Figure 3.2).
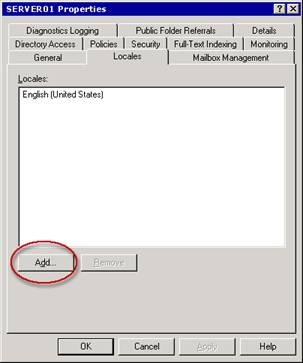
Figure 3.2 Locales tab
In the Add Locale dialog box (see Figure 3.3), select a language, and then click OK.
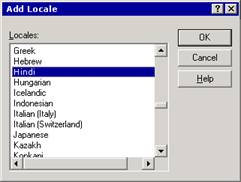
Figure 3.3 Add Locale dialog box
Note
You can also remove locales by selecting a locale on the Locales tab and then clicking Remove.
Exchange Mailbox Manager policies set age and size limits for messages. After you create and configure a recipient policy for Mailbox Manager settings, you must schedule when the Mailbox Manager process runs on a server and whether the process generates a report. When a policy runs, the policy processes messages that exceed its defined limits. For more information about Mailbox Manager and recipient policies, see Chapter 4, 'Managing Recipients and Recipient Policies.'
Important
Mailbox Manager works only on local mailboxes on an individual
Exchange server. You cannot configure Mailbox Manager on one server to process
mailboxes on a different server.
To schedule when the Mailbox Manager process runs and whether the process generates a report, you use the Mailbox Management tab (see Figure 3.4) in the server's Properties dialog box.
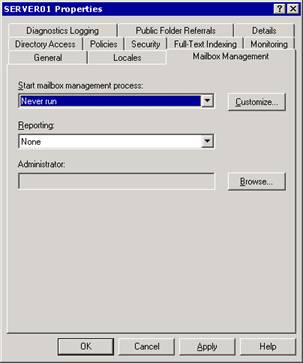
Figure 3.4 Mailbox Management tab
In the Start mailbox management process drop-down list, you select when you want the Mailbox Management process to start (on that particular server) according to the rules defined by associated recipient policies. The recipient policies that are associated with the server determine which mailbox or mailboxes that Mailbox Manager cleans.
To define a schedule
On the Mailbox Management tab in the server's Properties dialog box, in the Start mailbox management process list, select a schedule, and then click OK.
Tip
You can manually start Mailbox Manager at any time by
right-clicking the server object and then selecting Start Mailbox Management
Process. If you use this command, Mailbox Manager still runs at its next
scheduled interval.
You can also customize the mailbox management schedule to suit your organizational needs. For example, you could create a custom schedule that runs Mailbox Manager on Saturday at midnight.
To define a custom schedule
On the Mailbox Management tab in the server's Properties dialog box, in the Start mailbox management process list, select Use custom schedule, click Customize, and then enter the schedule information.
When you schedule Mailbox Manager, you can designate a mailbox that receives Mailbox Manager reports. You can also select the type of report to be generated. The report can include different types of information, such as when Mailbox Manager ran, which mailbox recipient policies were applied, which mailboxes were processed, which folders were processed, the number of messages that were moved or deleted, and the size of messages that were moved or deleted.
To set reporting options
On the Mailbox Management tab in the server's Properties dialog box, in the Reporting drop-down list, select the type of report that you want created whenever mailboxes are processed:
A summary report that contains basic information, including the total size of all messages that Mailbox Manager moved or deleted.
A detailed report that includes the specific policies that Mailbox Manager ran, the specific mailboxes that were processed, and the specific folders within each mailbox that were processed each time Mailbox Manager runs.
In the Administrator text box, click Browse, and then select a mailbox in your organization to receive these reports.
Diagnostics logging levels determine which additional Exchange events are written to the Application event log in Event Viewer, a Microsoft Windows ServerT 2003 component that you can use to monitor hardware and software activities. You can use diagnostics logging to record significant events that are related to authentication, connections, and user actions.
The first step in configuring diagnostics logging is to decide which services on an Exchange server should be enabled for diagnostics logging (see Table 3.2).
Note
You configure diagnostics logging separately for each service on
each server. For example, if you enable protocol logging on an individual
virtual server, it is the setting on the Exchange server on which the virtual
server runs that determines the logging capabilities for the protocol.
Table 3.2 Diagnostics logging services
|
Service |
Description |
|
IMAP4Svc |
Allows users to access mailboxes and public folders through Internet Message Access Protocol version 4 (IMAP4). |
|
MSADC |
Runs connection agreements if Active Directory Connector is installed. |
|
MSExchangeAL |
Logs events when the Recipient Update Service updates address lists and e-mail addresses in the Microsoft Active Directory directory service. |
|
MSExchangeDSAccess |
Allows Exchange access to Active Directory. |
|
MSExchangeIS |
Allows access to the Exchange store. |
|
MSExchangeMTA |
Allows X.400 connectors to verify whether the message transfer agent (MTA) is being used. |
|
MSExchangeMU |
Replicates Exchange configuration information changes to the Internet Information Services (IIS) metabase. |
|
MSExchangeSA |
Handles many core Exchange tasks, such as mailbox management, e-mail proxy generation, offline address list generation, and monitoring. Note |
|
MSExchangeSRS |
Replicates computers running Microsoft Exchange 2000 Server (or later) with computers running Microsoft Exchange Server version 5.5. Note |
|
MSExchangeTransport |
Controls message routing and transport functions in Exchange. If you experience mail flow problems, set diagnostics logging for this service. |
|
POP3Svc |
Controls the operation of POP3. |
After selecting a service, the next step is to set the logging levels for those services. There are four logging levels of detail (see Table 3.3). When Exchange generates an event less than or equal to the logging level, the event is logged. Events range from significant events (such as application failures) to moderately important events (such as the receipt of messages across a gateway) to events that are relevant only to debugging. Usually, you log only critical events. However, when problems occur, diagnostics logging enables you to change the logging levels to capture more events in greater detail.
Table 3.3 Logging levels
|
Logging levels |
Description |
|
None |
Only critical events, error events, and events with a logging level of zero are logged. Note |
|
Minimum |
Events with a logging level of 1 or lower are logged. |
|
Medium |
Events with a logging level of 3 or lower are logged. |
|
Maximum |
Events with a logging level of 5 or lower are logged. |
After selecting a logging level, logging begins automatically whenever you start Exchange. You can view the log entries in Event Viewer.
To configure diagnostics logging
On the Diagnostics Logging tab in the server's Properties dialog box, in the Services list, select an Exchange 2003 service (see Table 3.2) on which you want to set category logging levels.
In the Categories list, select the categories and logging levels (see Table 3.3) that you want to configure.
When a user connects to a public folder store that does not contain a copy of the public folder content that the user is looking for, Exchange redirects or refers the user to another public folder store that does have a copy of the content. By default, Exchange attempts to redirect the user to a server within the local routing group. If those servers do not have the required content, Exchange follows the organization's routing group topology to find an appropriate server. Exchange finds an appropriate server based on the most efficient routing path, using costs of connectors between routing groups.
Note
For additional information about public folder referrals, see
Chapter 7, 'Managing Mailbox Stores and Public Folder Stores.'
For more information about routing in Exchange, see Chapter 5,
'Understanding and Configuring Message Routing and Transport.'
Because Exchange keeps track of available connections between routing groups and uses the most efficient route possible, it is recommended that you use routing groups (the default) to determine how Exchange refers a user to another public folder. However, if you need to troubleshoot a specific server, or if you are performing maintenance on part of your network and want to designate specific servers that are available during this maintenance, you can create a custom list of servers for public folder referrals.
Note
A custom list for public folder referrals is new in
Exchange 2003. In Exchange 2000, you could only specify whether or
not to allow public folder referrals among routing groups.
To create a custom list of servers for public folder referrals, you use the Public Folder Referrals tab (see Figure 3.5). When you create a custom list of servers, you also assign costs to prioritize the servers in your referral list.
To specify a custom list for public folder referrals
On the Public Folder Referrals tab in the server's Properties dialog box (see Figure 3.5), in the Public folder referral options list, select Use Custom List.
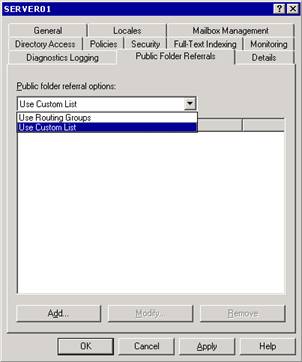
Figure 3.5 Public Folder Referrals tab
Click Add to add the appropriate servers.
Costs are a method of prioritizing servers in the public folder referral list. You define costs for each connector within your organization using network connectivity and available bandwidth as criteria. You then assign the lowest cost to the connectors that have the best network connectivity and the most available bandwidth. Exchange uses higher-cost servers only if lower-cost servers are not available.
When you select the Use Custom List option and create a list of servers that are available for referrals, the Public Folder Referrals tab displays both the name of each server in the list and any costs that are associated with those servers. If you want to prioritize the order in which Exchange uses the listed servers, you need to change the costs associated with each server, assigning lower costs to those servers that you want Exchange to use first.
To change a server's priority in a custom public folder referrals list
On the Public Folder Referrals tab in the server's Properties dialog box, select a server in the list, and then click Modify.
In the Modify Referral Cost dialog box (see Figure 3.6), specify a cost for that server.
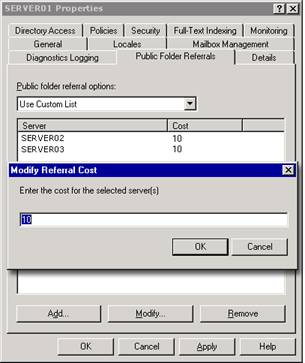
Figure 3.6 Modify Referral Cost dialog box
As discussed in Chapter 1, 'Preparing to Administer Exchange Server 2003,' and Chapter 2, 'Managing an Exchange Organization,' Exchange is tightly integrated with Active Directory. This integration requires that the core components of Exchange 2003 access directory information in Active Directory. The shared component called Directory Access (DSAccess) controls how most components (see Table 3.4) in Exchange interact with Active Directory.
Table 3.4 Exchange components dependent on DSAccess
|
Component |
Dependency on DSAccess |
|
Exchange Metabase Update (DS2MB) |
Directory changes tracked by update sequence number (USN) |
|
Exchange Routing Engine (RESVC) |
User and configuration lookups |
|
SMTP Categorizer (SMTP CAT) |
List of global catalog servers in the topology |
|
Directory Service Proxy (DSProxy) |
List of global catalog servers in the topology |
|
Exchange Information Store |
User and configuration lookups |
|
WebDAV |
User and configuration lookups |
|
Message transfer agent (MTA) |
User and configuration lookups |
In Exchange 2003, DSAccess is the centralized mechanism that determines the Active Directory topology, opens the appropriate Lightweight Directory Access Protocol (LDAP) connections, and works around server failures. DSAccess is responsible for the following functions:
Retrieving and writing information from Active Directory, such as configuration data and recipients.
Caching information from Active Directory for better performance when querying Active Directory. DSAccess caches configuration and recipient data locally so that this information is available for subsequent queries from other Exchange servers. Caching information locally has the additional benefit of preventing the network traffic that is caused by additional queries to Active Directory.
Constructing a list of available domain controllers and global catalog servers that other Exchange components can query. For example:
The MTA routes LDAP queries through the DSAccess layer to Active Directory.
To connect to databases, the store process uses DSAccess to obtain configuration information from Active Directory.
To route messages, the transport process uses DSAccess to obtain information about the connector arrangement.
Of the previously listed functions, the only function that you can control on a server is the one that deals with constructing a list of available domain controllers and global catalog servers. You can have this list constructed automatically by DSAccess, or you can manually create this list for DSAccess to use.
By default, on each Exchange server, DSAccess automatically detects the appropriate domain controllers and global catalog servers in Active Directory for the Exchange server to query. The setting that controls this default behavior is the Automatically discover servers check box near the bottom of the Directory Access tab in the server's Properties dialog box (see Figure 3.7).
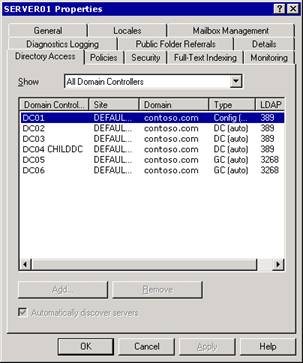
Figure 3.7 Directory Access tab
Selecting the Automatically discover servers check box enables DSAccess components to automatically discover the following servers in an Exchange organization:
Configuration domain controller The single domain controller that reads and writes information in the configuration naming context in Active Directory. DSAccess chooses a domain controller or global catalog server to act as the configuration domain controller. All configuration data is written and read by this configuration domain controller.
Working domain controllers As many as ten domain controllers that perform Active Directory lookups for objects in the local domain. These domain controllers are primarily used to update objects within the local domain or read non-configuration data that is not replicated to global catalog servers.
Working global catalog servers As many as ten global catalog servers that perform forest-wide queries. All user data is looked up on the global catalog servers.
To discover these servers, Directory Access locates domain controllers and global catalog servers that run Microsoft Windows Server 2003, or Microsoft Windows 2000 Server Service Pack 3 (SP3) or higher. Directory Access then tests these servers and chooses suitable servers for Exchange services to use to perform Active Directory queries.
Note
Because manually constructed topologies do not update
automatically, it is strongly recommended that you use the Automatically
discover servers setting.
To troubleshoot problems with a specific global catalog server or domain controller, you may want to override the automatic discovery of servers by clearing the Automatically discover servers check box. For example, to determine whether queries to a global catalog server are working correctly, you can manually set this server as the only available global catalog server.
When you manually create a topology for DSAccess, you no longer have the advantages of automatic failover and load balancing that you have when DSAccess automatically discovers the topology. If a server that you set manually becomes unavailable, the list does not update and Exchange still attempts to use the unavailable server, thereby causing Exchange to fail.
If you manually set a domain controller or global catalog server on the Directory Access tab in the Properties dialog box of a server that is not running Windows 2000 Server SP3 or later, Exchange will not use the domain controller or global catalog server, and Exchange logs an Event 2116.
To manually create a topology for Directory Access
On the Directory Access tab in the server's Properties dialog box, in the Show list, select the type of servers that you want to view.
Note
You cannot clear the Automatically discover
servers check box if you select All Domain Controllers
in the Show list.
Clear the Automatically discover servers check box.
This clears the current list of servers.
Warning
By default, DSAccess automatically discovers servers. It is
strongly recommended that you keep this setting.
Click Add to add servers to or click Remove to remove servers from the topology.
System policies facilitate flexible administration of large numbers of Exchange services. A system policy defines settings that you apply to one or more Exchange servers. For example, you can use a system policy to create a consistent method of tracking messages across a group of servers.
Because policies affect a group of servers, you can only view the policies that have been applied to a server on the Policies tab (see Figure 3.8) in the server's Properties dialog box. You cannot modify or remove those policies using this tab. To modify or remove a system policy that has been applied to a particular server, you must change the policy itself. For more information about system policies, see Chapter 2, 'Managing an Exchange Organization.'
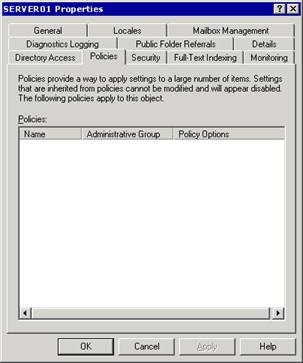
Figure 3.8 Policies tab
Permissions control access to Exchange objects. You can set permissions on some Exchange objects individually. These objects include public folder trees, address lists, mailbox stores, protocols, and servers. For these objects, Exchange uses and extends Active Directory permissions. Examples of Active Directory permissions are Read, Write, and List contents. Examples of extended Exchange permissions are Create public folder and View Information Store status. When you look at an object's permissions, Active Directory permissions appear first in the list, followed by Exchange extended permissions.
Permissions in Exchange are inherited by default. For example, the permissions that you apply to a particular server are inherited by the objects that the server contains, such as the public folder and mailbox stores on that server. Inherited permissions are convenient because you do not have to set the permissions for every object in your Exchange organization manually.
Important
When setting permissions on Exchange objects, use Exchange System
Manager. Do not set permissions on Exchange objects using Windows
Server 2003 MMC snap-ins, such as the Active Directory Sites and Services
or Active Directory Users and Computers.
You can set permissions using the Exchange Delegation Wizard and apply these settings to an entire Exchange organization or to a specific administrative group. Because permissions are inherited, these permissions control who can view or modify settings at the server level. By default, these permissions are configured to support the standard Exchange administrator types (Exchange View Only Administrator, Exchange Administrator, and Exchange Full Administrator). You are strongly advised to use the standard Exchange administrator types and only change the settings if more granular settings are required by your organization's security policy.
Note
For more information about the Exchange Delegation Wizard, see
Chapter 2, 'Managing an Exchange Organization.'
To modify permissions on a specific server
On the Security tab (see Figure 3.9) in the server's Properties dialog box, in the Group or user names list, select the group or user name for which you want to modify permissions.
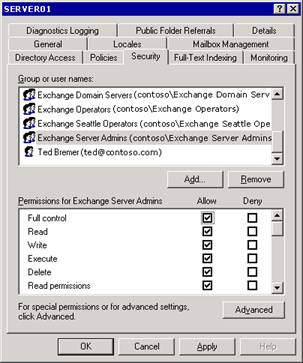
Figure 3.9 Security tab
In the Permissions for <selected entry> list, select the appropriate permissions.
Exchange can create and manage indexes for fast searches and lookups. With full-text indexing, Exchange indexes every word in a database, making faster searching possible. Full-text indexing is a feature that you can configure for individual stores on a server, and optimize on a server-by-server basis across your Exchange organization. For more information about how to configure full-text indexing to support your Exchange organization, see Chapter 4, 'Managing Recipients and Recipient Policies' and Appendix F, 'Using Full-Text Indexing.'
Full-text indexing allows IMAP4 clients and MAPI clients, such as Microsoft Office Outlook, to conduct full-text searches. For Outlook users, the version of Outlook determines what search options the user has:
In Outlook 2002, both the Find and Advanced Find options on the Tools menu initiate a full-text search.
In Outlook 2000, only the Advanced Find option initiates a full-text search. The Find option initiates a character-based search.
Indexing is a resource-intensive feature that requires considerable CPU cycles. Indexing gigabytes of data can take hours or days. You should schedule indexing at times when the server is not under usage load.
To control server performance during indexing
On the Full-Text Indexing tab (see Figure 3.10) in the server's Properties dialog box, in the System resource usage list, select a usage level: Minimum, Low, High, or Maximum.
Note
To limit the CPU resources that the indexing service occupies,
set the server usage level to a lower value (Minimum or
Low).
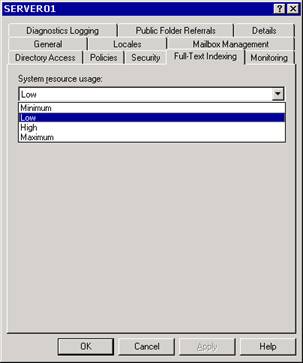
Figure 3.10 Full-Text Indexing tab
|
Politica de confidentialitate | Termeni si conditii de utilizare |

Vizualizari: 1334
Importanta: ![]()
Termeni si conditii de utilizare | Contact
© SCRIGROUP 2025 . All rights reserved