| CATEGORII DOCUMENTE |
| Asp | Autocad | C | Dot net | Excel | Fox pro | Html | Java |
| Linux | Mathcad | Photoshop | Php | Sql | Visual studio | Windows | Xml |
NET HASP SERVER INSTALLATION FOR VERSION VERSION 8.20
TABLE OF CONTENTS
INSTALLING A NETHASP SERVER
Overview:
General information
Installing
Type of server
Installing the server
Launching the server automatically
USING THE MONITOR (OPTIONAL)
Monitor installation: To do while logged in Administrator mode
Starting the monitor
Execute aksmon32.exe
Programming a network protection key
CLIENT SETUP FOR NETHASP
Overview:
Installing the HASP driver (version 4.96 or +)
Information
The server installation changed from version 8.07 to version 8.20 so a new procedure has been implemented.
The main modification is that the SRVNAME option is specified in the file windowssystem32nhsrv.ini.
The protection.ini file has a new parameter: bMergeLicense
The HASP server can be installed on any computer linked to the same network than the computer under which See Electrical Expert is installed. This computer does not have to be necessarily a network server.
The computer needs to run with Windows NT (Pack 6 and above), Windows 2000 or Windows XP and has to have TCP/IP settings configured with a fixed IP address.
Copy the file cdromtoolsHasp_LMnhsrv.ini under C:WINDOWSSYSTEM32.
Or C:WINNTSYSTEM32. (for Windows NT or Windows 2000)
In order to check where the nhsrv.ini file should be copied, execute the following operations: Menu Start/ Run cmd
Cd /D %SystemRoot%SYSTEM32
You are now in the subdirectory where the nhsrv.ini file has to be copied.
See below the configuration of the nhsrv.ini file.
The version 8.07 installator defines the server type using the SRVNAME option.
Now it is defined in the nhsrv.ini file using the NHS_SERVERNAMES option.
- For SEE, SEE ELECTRICAL EXPERT
[NHS_SERVER]
NHS_SERVERNAMES = ige+xao
- For a higher or equal to XELEC6.5 version
[NHS_SERVER]
NHS_SERVERNAMES = ige+xao
- For a lower or equal to XELEC6.4.1D version
[NHS_SERVER]
NHS_SERVERNAMES = xelec
Note:
See2000 does not work with a network protection key.
For customers computers
Copy the cdromtoolsHasp_LMnethasp.ini file under C:WINDOWS. Or C:WINNT. (for Windows NT or Windows 2000)
In order to check where the nethasp.ini file should be copied, execute the following operations: Menu Start/ Run cmd
Cd /D %SystemRoot%
You are now in the subdirectory where the nethasp.ini file has to be copied.
See below the configuration of the nethasp.ini file.
Open the nethasp.ini file
In the field NH_SERVER_ADDR type the address of the network server or the name of the server computer.
See the example below:
nethasp.ini file
[NH_COMMON]
NH_TCPIP=Enabled
[NH_TCPIP]
NH_TCPIP_METHOD=UDP
NH_USE_BROADCAST=Disabled
NH_SERVER_ADDR = 10.0.0.124 ; IP address of all NetHASP
See below the configuration of the protection.ini file:
In the protection.ini file we added the parameter bMergeLicense,
Open the protection.ini file
folder C:Program FilesSee Electrical Expert 2005See_SoftExe
or
Xelec7exec
Protection.ini
Protection.ini For version Xelec7.11I or higher
[BEGINFILE]
[TYPE]
bMergineLicense=0
bHardLock=1
bNetSearch=1
[TYPESERVER_INFO]
aServerName='10.1.1.21'
flexlm server address ^^^^^
[ENDFILE]
Nota: dans le cas d'un serveur flexlm, vrifier que tous les ordinateurs clients sont la mme date et la mme heure que l'ordinateur serveur flexlm =
Nota: In the case of flexlm server, verify that all the clients computers have the same date and hour than the server flexlm computer =
Examples of conifurations of the protection.ini file with explanations
Note: the ACTIKEY keys do not function with xelec
1. bMergeLicense=0
bHardLock=1
bNetSearch=0
The application connects only to the local keys (HASP or ACTIKEY).
2. bMergeLicense=0
bHardLock=1
bNetSearch=1
First the application tries to connect to the local keys (HASP
or ACTIKEY), if it does not find any key or if the key is not
accessible,
the application browses for the net key (HASP net server only)
3. bMergeLicense=0
bHardLock=0
bNetSearch=0
The application tries to connect only to the local software key
(FLEX LM - see.lic).
4. bMergeLicense=0
bHardLock=0
bNetSearch=1
First the application tries to connect only to the local software key
(FLEX LM - see.lic),
If nothing is found or the key is not correct, the application browses
the net (FLEX LM server only)
5. bMergeLicense=1
bHardLock=1
bNetSearch=0
The application uses all types of keys (hardware and software), starting
by the hardware keys
you can take any licence type for a different type of key
6. bMergeLicense=1
bHardLock=0
bNetSearch=0
The application uses all types of keys (hardware et software), starting
By the software keys
you can take any licence type for a different type of key
7. bMergeLicense=1
bHardLock=1
bNetSearch=1
First the application tries to connect only to the local software key
(FLEX LM - see.lic),
If nothing is found or the key is not correct or the key doesn't find
the required module
the application browses for the net key (HASP net server only)
Important:
If a previous version has been installed on your computer, you must uninstall it.
First, make sure you are logged in with an Administrator user account
Run the server install program from the CD-Rom under 'toolsHasp_LMlmsetup.exe'.
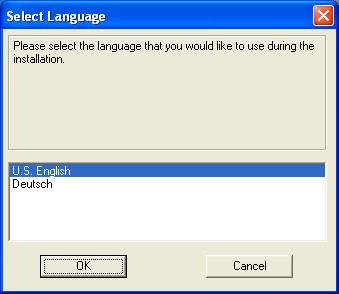
Select the language
Click OK
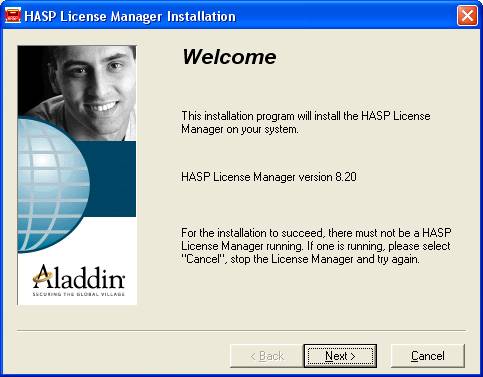
Click on 'Next >'
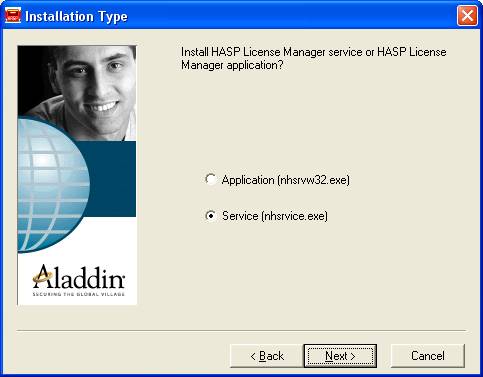
Select the 'Service (nhsrvice.exe)' option
Click on 'Next >'
Click on 'Next >'
Click on 'Yes'
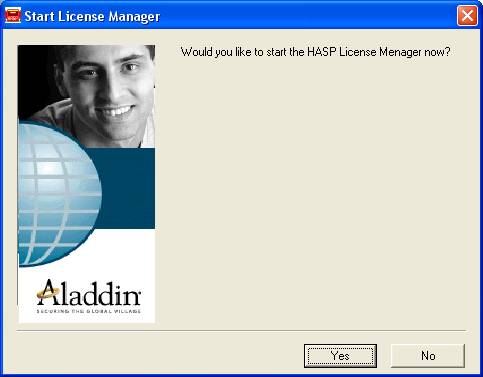
Click on 'Yes'
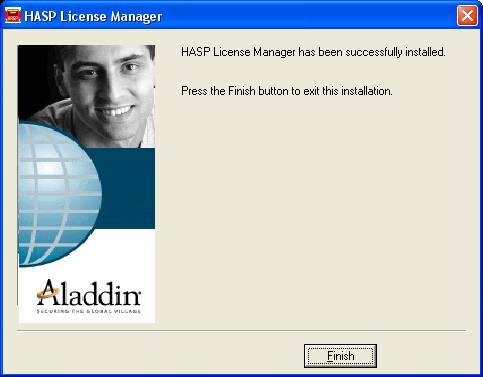
Click on 'Finish'
Click OK.
In the Windows control panel (Services icon), check that the NT LM Security Support Provider is set to automatic start-up (otherwise else set it so)
In the Windows control panel (Services icon), check that the HASP loader is set to automatic start-up (otherwise else set it so)
Under Windows 2000 and Windows XP
Click on 'Start/Settings/Control panel/Administration tools'
Double click on Services
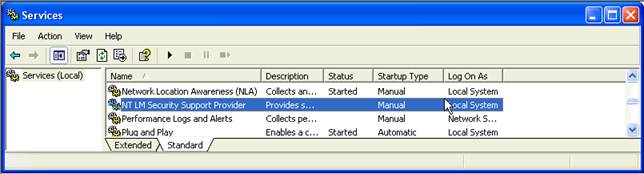
Double click on NT LM Security Support Provider'
The following window appears:
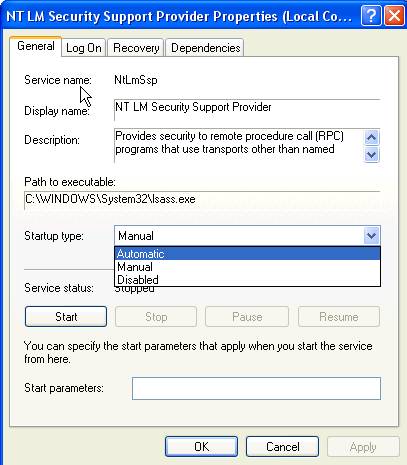
Click the 'General' tab.
In the 'Startup type' field, select 'Automatic'
Click OK.
Double click on 'HASP Loader'
Click the 'General' tab.
In the 'Startup type' field, select 'Automatic'
Click OK.
Installing in Window NT
Click on 'Start/Settings/ Services icon'
Click on 'NT LM Security Support Provider' and 'Hasp Loader'
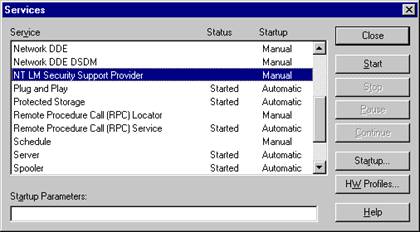
Click 'Start'
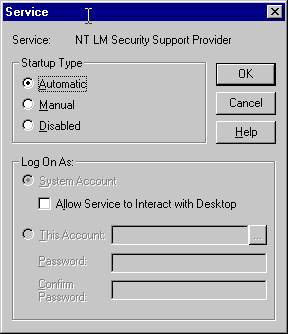
Select 'Automatic' (Startup type)
Click OK.
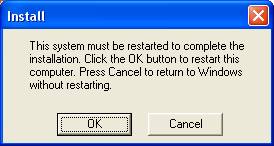
Reboot (or manually start this service)
If you want the NetHASP service to start, place the protection key on the computer's parallel port or the USB port.
In this case, the service will start even if there is no user "logged" on the server
When the 'Hasp lm server' service is enabled, an icon is added to the task bar.
To verify the status of that service, right-click on the icon and select Show. The following window is displayed:
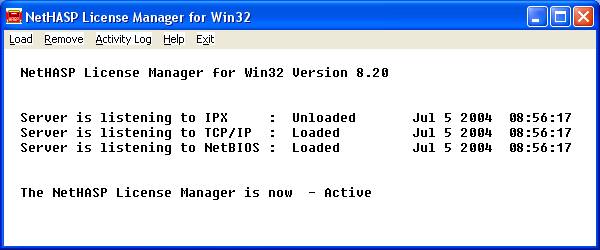
This tool gives control over the activities of the protection keys server.
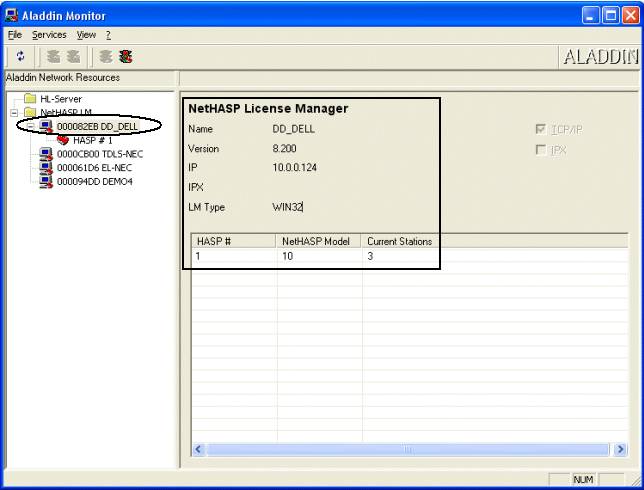
Install from the CD-Rom, launching 'ToolsHasp_LMmonitoraksmon32.exe
This tool may be installed on the server like any other network workstation.
In the left pane, select the server workstation
The name of the server workstation appears
In the right area, the information of the server appears: the NetHasp License Manager version, IP address .
The information about customer workstations
appears: Select the workstation server key![]()
![]()
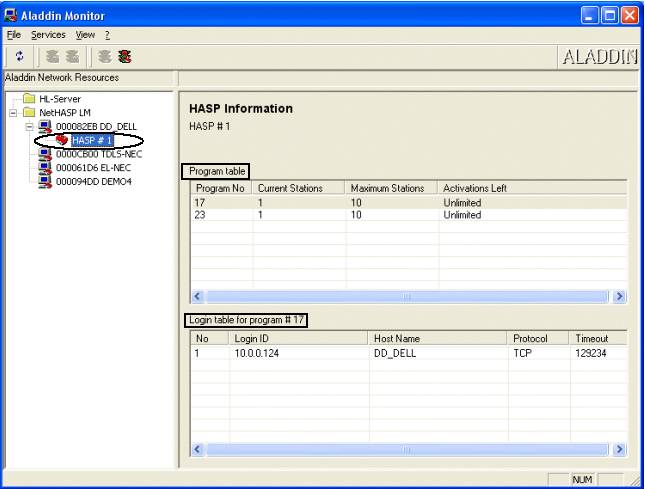
This information appears only if token are used.
In the 'Program table' field, you find the number of possible users on this key (here 10), the number of used module(s) (here Kernel N 17).
Here is the list of numbers corresponding to the different modules:
Program No 17: Kernel, Signal, CrossRef, Labeling,
PLC, Panel, Translate, Develloper
Program No 20: Terminal
Program No 23: Part List
Program No 26: DXF.
In the 'Login table for program' field, you find the list of users with their IP addresses
- For Xelec7, launch the Progdis.exe program
See the directory of D:xelec7xelec7.1installProgdis.exe ( progdis5)
- For See launch the Progdis5.exe program
See the directory of D:SeeXXXXToolsProgdis5.exe ( progdis5)
This program allows you to program the protection key.
ATTENTION:
For a Hasp protection key
Click on the Protection key button so that the number of the key appears in hexadecimal.
ATTENTION:
For an artickey
Click on the Select file button so that the number of the key appears in decimal
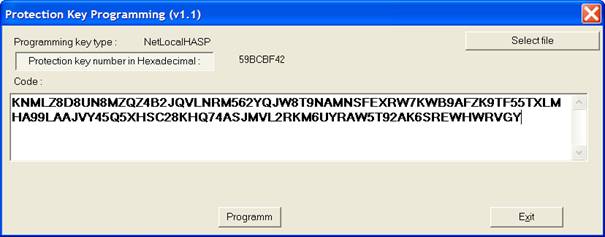
In order to program the key, the delivery service of provides a *.key file or a letter containing the programming code.
For the protection key programming you have two options:
Manually: type the code in the field and click on the Programm button.
Click OK
By selecting the code file
Click on thr Select file button. Select the file that has been sent to you.
Click Open.
Click on the Programm button.
Click OK
Xelec7 works equally well with a local or a network protection key or a flexlm server.
See Electrical Expert works equally well with a local protection key or a network protection key or a flexlm server.
Depending on what is specified in the protection.ini file configuration:
Xelec version 7.10A to 7.11B and Xelec7.11I or higher first look for a valid local protection key (Mnemo HASP), if it does not find any, it will browse the network to find a network key HASP or a flexlm key server.
Note:
-Xelec version 7.11C to 7.11G, if there is no license on the local key, it will not search a net key server
See Electrical Expert first look for a valid local protection key (Mnemo HASP or ActiKey), if it does not find any, it will not browse the network to find a network key HASP ot flexlm key server.
Note:
Depending on what is specified in the protection.ini file configuration
- From SEE Electrical expert 2005 patch O, if there is no license on the local key, it will browse the network to find a net key server HASP or a flexlm key server.
You have to be logged as Administrator.
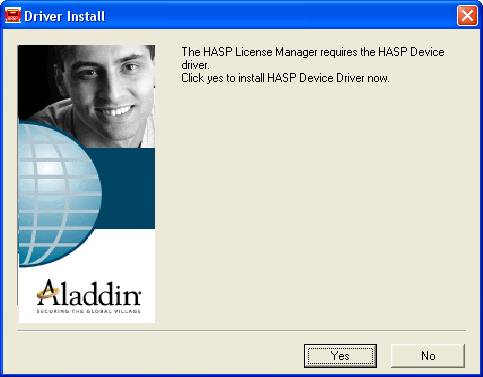
Only install: 'Hasp Device Driver'
This operation is normally realized while installing See Electrical Expert and Xelec.
However it is possible to install it from the CD-Rom.
The procedure is as follows:
Uninstall the current version, if needed.
Install the new version.
You must be logged in administrator mode.
Launch the install.bat file situated on: cdromtoolsHasp_LM
Or
Launch the installator from cdromD:ToolsHasp_LMhinstall.exe
Click on the 'Start/Run.' menu in order to select the hinstall.exe file form the CD-Rom
(See below)
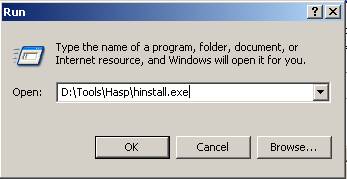
Click OK
Options for hinstall.exe:
-i (i) = Install the HASP Device Driver.
-info (info) = Display installation status.
-remove (r) = Remove the Aladdin Device Driver.
To know the IP address of a computer:
Click on 'Start/Run.':
Cmd
Ipconfig
|
Politica de confidentialitate | Termeni si conditii de utilizare |

Vizualizari: 3614
Importanta: ![]()
Termeni si conditii de utilizare | Contact
© SCRIGROUP 2025 . All rights reserved