| CATEGORII DOCUMENTE |
| Asp | Autocad | C | Dot net | Excel | Fox pro | Html | Java |
| Linux | Mathcad | Photoshop | Php | Sql | Visual studio | Windows | Xml |
This chapter reviews basic client access concepts, and how you manage the protocols used by the individual clients that access Exchange and the front-end and back-end server architecture.
This chapter also explains how to administer Microsoft Exchange Server 2003 for client access in the context of a front-end/back-end server architecture. If you use more than one server, it is recommended that you use the front-end and back-end server architecture to handle the various messaging needs for the clients that you support.
The first part of this chapter provides an overview of the front-end and back-end server architecture. The second part of this chapter explains the configuration settings for the individual clients for Exchange. Use this chapter to configure your Exchange server for client access.
Note
To properly manage client access to Exchange Server 2003,
you must first understand how Microsoft Windows technologies, such as Internet
Information Services (IIS) and the Microsoft Active Directory directory
service, interact with Exchange. You must also understand protocols such as
HTTP and MAPI, and how client applications such as Exchange ActiveSync and
Microsoft Office Outlook 2003 use these respective protocols to interact
with Exchange.
Before you configure the settings on your Exchange server for the protocols and clients that you will support, make sure that you have properly configured Exchange for your particular client access needs.
In general, to configure Exchange for client access, you must complete the following steps:
Choose your topology.
Secure your messaging infrastructure.
Choose your client access model and protocols.
Enable protocols that you will support. (optional)
Configure clients and devices.
The following sections briefly discuss each of these steps, giving you an overview of what each step involves and what to consider in making decisions related to that step. For more detailed information regarding the first three steps-topology, messaging infrastructure, and client access model, refer to the cross-references located in each of the following overview sections. For more detailed information about enabling protocols and configuring clients, see the appropriate sections later in this chapter.
If you have more than one Exchange server, and if you plan to allow external access to Exchange from the Internet, you must understand the recommended Exchange front-end and back-end server architecture. This server architecture simplifies the client access model for organizations with multiple Exchange servers by using a single Exchange server to handle all requests from clients. The front-end server is responsible for proxying requests from clients and passing these requests to the Exchange back-end servers that have mailboxes on them. Front-end and back-end server architectures vary from simple to complex. Figure 6.1 shows the recommended front-end and back-end server architecture with the various clients that Exchange supports.

Figure 6.1 The recommended Exchange front-end and back-end server architecture
Understanding this server architecture helps you to better manage the types of clients that you plan to support in your messaging infrastructure. For more information about the front-end and back-end server architecture and choosing a topology for your Exchange deployment, see the book Planning an Exchange Server 2003 Messaging System ( https://www.microsoft.com/exchange/library ). For the complete steps related to configuring the Exchange front-end and back-end server architecture, see 'Post Installation Procedures,' in the book Exchange Server 2003 Deployment Guide ( https://www.microsoft.com/exchange/library
Note
You are no longer required to use Enterprise Server 2003
Enterprise Edition as your front-end server. You can run Exchange
Server 2003 Standard Edition on your front-end server.
Before you deploy Exchange, prepare your organization for the client access methods that you will support by securing your messaging infrastructure. This involves the following steps:
Updating your server software.
Securing the Exchange messaging environment.
Securing communications.
For complete details about securing your messaging infrastructure, see the book Exchange Server 2003 Deployment Guide ( https://www.microsoft.com/exchange/library
Although Simple Mail Transfer Protocol (SMTP) is the primary messaging protocol of Exchange, clients that communicate with Exchange often use protocols other than SMTP. Clients communicate using Post Office Protocol version 3 (POP3), Internet Message Access Protocol version 4 (IMAP4), HTTP, or Network News Transfer Protocol (NNTP). Some clients support all of these protocols; others do not. To accommodate these differences in protocol usage, Exchange supports all of these protocols. This comprehensive support means that you do not have to limit yourself when choosing a client access model. You decide what client access model best fits your users' needs, and then you select the protocols in Exchange that support this model.
Note
These services, as well as SMTP, are part of the Microsoft
Windows ServerT 2003 operating system and run in IIS under the
Inetinfo.exe process.
For more information about choosing a client access model and protocols, see the book Planning an Exchange Server 2003 Messaging System ( https://www.microsoft.com/exchange/library After you select your client access model and supported protocols, you then enable and manage those protocols as described in 'Managing Protocols' later in this chapter.
Part of planning an Exchange deployment involves determining which clients are necessary for the users in your organization. Exchange 2003 provides support for clients that use MAPI, IMAP4, POP3, HTTP, SMTP, and NNTP.
Clients often are able to support multiple protocols. For instance, client applications, such as Outlook 2003, can use MAPI, IMAP4, POP3, and SMTP. However, Microsoft Outlook Web Access, Outlook Mobile Access, and Exchange ActiveSync clients use HTTP.
Note
Depending on the clients that you choose to support, you use
Exchange System Manager or the IIS Microsoft Management Console (MMC) snap-in
to manage the protocols used by the client applications.
If your users use any of the client applications that are included with Exchange-Outlook Web Access, Outlook Mobile Access, and Exchange ActiveSync-there are specific requirements related to each of these clients:
Outlook Web Access requires a supported Web browser on the users' computers. For complete details about which Web browsers are supported for Exchange, see Chapter 2, 'Client Connection Features,' in the book What's New in Exchange Server 2003 ( https://www.microsoft.com/exchange/library
Outlook Mobile Access requires a compatible mobile device such as a cHTML (Compact HTML) device.
Exchange ActiveSync requires a Microsoft Windows MobileT-based device.
After you select your clients and configure Exchange for client access, Exchange provides a high level of flexibility for how you administer access to your messaging infrastructure. Later in this chapter are sections that describe the client applications that Microsoft supports for client access, and how to manage these applications. Read these sections to learn how to administer the clients that you use with Exchange.
In your Exchange messaging deployment configuration, you use Exchange System Manager to manage the protocols that you have decided to support. When you use Exchange System Manager to manage protocols, you manipulate settings on the individual virtual servers for the protocol that is to be configured. The virtual servers that are associated with the various protocols, such as the Exchange Virtual Server and the IMAP4 virtual server, contain settings based on the capabilities and use of the specific protocol. For example, the Exchange Virtual Server, which manages HTTP access to Exchange, provides settings for Outlook Web Access, such as gzip compression support.
For the most part, managing the virtual server for one protocol is identical to managing a virtual server for a different protocol. The common management tasks include enabling a virtual server, assigning ports, setting connection limits, starting or stopping a virtual server, and terminating connected users. However, there are some server-specific management tasks. The following sections describe both the common tasks for all virtual servers associated with protocols and the server-specific tasks for the Exchange Virtual Server, IMAP4 virtual server, and the NNTP virtual server.
Note
To manage individual Exchange client access settings, use Active
Directory Users and Computers.
When you install Exchange, the services that are necessary to support clients such as Outlook 2003, Outlook Web Access, and Exchange ActiveSync are enabled by default. For example, Exchange enables the SMTP service because it is the underlying protocol used to route messages both internally within an Exchange organization and externally to messaging systems outside of an Exchange organization. Similarly, Exchange enables HTTP because it is the underlying protocol for all Internet communication.
Note
Although Outlook Mobile Access uses the HTTP protocol, Outlook
Mobile Access is disabled by default and must be enabled using Exchange System
Manager.
However, Exchange installs, but does not enable services for POP3, IMAP4, and NNTP. If your client access model relies on communications that use POP3, IMAP4, or NTTP, then you must manually enable them.
To enable either the POP3 or IMAP4 service, you use the Services snap-in to set the service to automatically start. Then, you start the service using Exchange System Manager. To enable NNTP, you first use the Services snap-in to set the Network News Transfer Protocol service to start automatically, and then use Exchange System Manager to start the service.
To enable a POP3 or IMAP4 virtual server to start automatically
In the Services snap-in, in the console tree, click Services (Local).
In the details pane, right-click Microsoft Exchange POP3 or Microsoft Exchange IMAP4, and then click Properties.
On the General tab, under Startup type, select Automatic, and then click Apply.
Under Service status, click Start, and then click OK.
Repeat this procedure on all nodes that will be running the POP3 or IMAP4 virtual server.
To enable an NNTP virtual server
In the Services snap-in, in the console tree, click Services (Local).
In the details pane, right-click Network News Transfer Protocol (NNTP), and then click Properties.
On the General tab in Startup type, select Automatic. Click OK.
To start a POP3, IMAP4, or NTTP virtual server
In Exchange System Manager, expand Protocols, expand the appropriate protocol (POP3, IMAP4, or NNTP), right-click the appropriate default virtual server (Default POP3 Virtual Server, , and Default NTTP Virtual Server) and then click Start.
When you create a virtual server for a protocol, you have the option of using the default port assignments and Internet Protocol (IP) address for the server. Table 6.1 shows the default port assignments associated with the various protocols. The default IP address is (All Unassigned), which means that a specific IP address has not been assigned and the virtual server will use the IP address of the Exchange server that is currently hosting the virtual server. These default values provide a virtual server with automatic discovery-the server is able to immediately receive incoming connections using the default IP address and ports.
Table 6.1 Default port assignments
|
Protocols |
TCP port |
Secure Sockets Layer (SSL) port |
|
SMTP |
Not available |
|
|
IMAP4 | ||
|
POP3 | ||
|
NNTP |
Important
If you do not use the recommended port assignments, some clients
may be unable to connect. You may also have to reconfigure your client software
manually to connect to the new port assignments.
Note
To fully enable SSL on the POP3 virtual server, you need to
request and install a certificate. You need to do this even if you leave the
default SSL port set at 995 on the POP3 virtual server. For more information
about installing certificates, see 'Securing Communications' in
Chapter 7, 'Configuring Exchange Server 2003 for Client Access'
in the book Exchange Server 2003 Deployment Guide
(https://www.microsoft.com/exchange/library).
Although it is highly recommended that you use the default port assignments, you do not have to use the default IP address. You can use the IP address from any available network card as the IP address for the virtual server.
If you plan to create multiple virtual servers, each virtual server must have a unique combination of ports and IP address. Because the port settings are standard and should not be changed, you will need to provide each virtual server with its own unique IP address.
Besides creating a unique combination of ports and IP address for each virtual server, you can also configure multiple identities for your virtual server. Multiple identities enable you to associate multiple host or domain names with a single virtual server.
Use the following procedure to either assign a unique IP address to a virtual server or to assign multiple identities to a virtual server.
To assign an IP address or an identity to a virtual server
On your Exchange server on which the virtual server is running, log on with the Exchange administrator account that has local administrative rights and Exchange full administrator permissions.
In Exchange System Manager, expand Protocols, right-click the protocol that is to be assigned a new IP address or to which you want to add a new identity, and then click Properties.
On the General tab, click Advanced.
In the Advanced dialog box, click Edit to change the IP address to a unique value, or click Add to add a new identity (that is, a new IP address and port combination).
A virtual server can accept an unlimited number of inbound connections and is limited only by the resources of the computer on which the virtual server is running. To prevent a computer from becoming overloaded, you can limit the number of connections that can be made to the virtual server at one time. By default, Exchange does not limit the number of incoming connections.
After users are connected, you can also limit the length of time that idle connections remain logged on to the server. By default, Exchange disconnects idle sessions after 10 minutes.
In topologies that contain Exchange front-end and back-end servers, the connection time-out setting varies based on server role. On back-end servers, the connection time-out setting limits the length of time clients can be connected to the server without performing any activity. However, on front-end servers, the connection time-out setting limits the total length of the client session, regardless of client activity. Therefore, in front-end and back-end server environments, you should configure the time-out value on your front-end servers high enough so that users can download the maximum message size that is permitted over the slowest connection speed that you want to support. Setting this value high enough ensures that clients are not disconnected while they are downloading messages. For details about configuring your Exchange front-end and back-end server architecture, see the book Exchange Server 2003 Deployment Guide (https://www.microsoft.com/exchange/library).
Warning
Setting the connection time-out setting too low can cause clients
to be unexpectedly disconnected from the server and possibly receive error
messages. Thirty minutes is the lowest recommended connection time-out setting.
To set connection limits
On your Exchange server that is running the virtual server, log on with the Exchange administrator account that has local administrative rights and Exchange full administrator permissions.
In Exchange System Manager, expand Protocols, right-click the protocol for which you want to change connection limits, and then click Properties.
On the General tab, set the appropriate connection limits.
Managing virtual servers often requires you to start, stop, or pause Exchange services. You manage Exchange services through the Computer Management console and Exchange System Manager.
To start, stop, or pause a virtual server
In Exchange System Manager, right-click the virtual directory that you want to manage, and do one of the following:
To start the service, click Start.
To either change the server status to paused, or to restart a server that has previously been paused, click Pause.
Note
When a server is paused, an icon indicating that the server is
paused appears next to the server name in the console tree.
To change the server status to stopped, click Stop.
Note
When a server is stopped, an icon indicating that the server is
stopped appears next to the server name in the console tree.
You can immediately disconnect a single user or all users if they are accessing the virtual server without permission.
To terminate connected users
In Exchange System Manager, expand SMTP, IMAP4, or POP3, and then double-click the virtual server on which you want to terminate connected users.
To terminate users from the Current Sessions node under the virtual server, do one of the following:
To disconnect a single user, click Terminate.
To disconnect all users, click Terminate all.
You can configure a URL for access to calendaring information for your POP3 and IMAP4 messaging clients. This functionality allows you to use a POP3 or IMAP4 messaging client and Outlook Web Access to manage your calendar. The options that you select for this feature control the format of the URL.
Note
In topologies that contain Exchange front-end and back-end
servers, you configure the URL that is used to access calendaring information
on the back-end server. Exchange does not recognize any URL settings that you
configure on the front-end servers.
When downloading meeting requests through POP3 and IMAP4, a URL to the meeting request in Outlook Web Access is added to the plain text/HTML portion of the message. Users click the URL to access the meeting request, and then accept or decline the request. (Some IMAP4 and POP3 messaging clients include a graphical user interface that allows those clients to accept or decline meetings without having to click the URL.) If users accept the request, Exchange automatically adds it to their calendar.
Note
The URL to the meeting request does not work for POP3 clients
that are configured to download messages from the server. This situation occurs
because the message is downloaded to the client. As a result, the URL points to
a message that is no longer on the server.
To configure the calendaring options for a POP3 or IMAP4 virtual server
In Exchange System Manager, expand the First Administrative Group, expand the Servers node, and then expand the Exchange server for which you want to manage POP3 or IMAP4 calendaring options.
Expand the Protocols node, and then right-click the POP3 or IMAP4 protocol and select Properties.
On the Calendaring tab, select the server from which recipients download meeting requests:
To designate the recipient's home server as the server from which the recipient download meeting requests, select Use recipient's server.
This is the default setting. If you select this option, the URL has the following format:
https://<HomeServerName>/Exchange/Username/Inbox/Team%20Meeting.eml
To designate a front-end server as the server from which recipients download meeting requests, select Use front-end server.
This option is useful if you have configured your Outlook Web Access users to access their mailboxes through a front-end server. If you select this option, the URL has the following format:
https://<FQDomainName>/Exchange/Username/Inbox/Team%20Meeting.eml
To use SSL to connect to the Exchange servers, select Use SSL connections.
Note
If you select this option, the URL syntax includes https://
instead of https://.
Click OK to save your settings.
Outlook Web Access, Outlook Mobile Access, and Exchange ActiveSync rely on the HTTP protocol to access Exchange information. These clients also use the WebDAV protocol, a set of rules that enable computers to exchange information, to execute instructions through the Exchange front-end server, as well as retrieve and manipulate information in the Exchange store. By supporting both HTTP and WebDAV, Exchange 2003 is able to provide more data access functionality to users. For example, users of Outlook Web Access are able to perform calendar request operations and can store Microsoft Office files, such as Word Documents, in the Exchange store.
Exchange provides support for both HTTP and WebDAV through the HTTP virtual server. When you install Exchange, Exchange automatically installs and configures an HTTP virtual server. You administer this default server only from IIS.
However, to provide for a number of different collaboration scenarios and to supplement the access to folders that is provided by the default Web site in IIS, you can create new HTTP virtual servers in Exchange System Manager. As with any virtual server, each new HTTP virtual server that you create requires a unique combination of IP address, TCP port, SSL port, and host name. Furthermore, for each virtual server that you create, you must define one virtual directory as the root directory of the server for publishing content.
Note
The folder contents displayed by the HTTP virtual server are
converted to Web pages and sent to a user's browser by IIS.
To create a new HTTP virtual server
In Exchange System Manager, expand the First Administrative Group, expand the Servers node, and then expand the Exchange server on which you want to create a new HTTP virtual directory.
Expand the Protocols node, and then right-click the HTTP protocol and select New HTTP Virtual Server.
In the Properties dialog box for the new HTTP virtual server, configure the settings for your new Exchange virtual directory.
The Exchange Virtual Server contains the virtual directories that provide access to Exchange for the various HTTP clients that Exchange supports, such as Outlook Web Access, Outlook Mobile Access, and Exchange ActiveSync. Although you enable settings for Outlook Web Access, including forms-based authentication and gzip compression, using the Exchange Virtual Server, you manage most settings for the Exchange virtual directories in the IIS snap-in.
Specifically, in Exchange 2003, if you need to configure authentication settings to your Exchange virtual directories, use the IIS snap-in. If you need to configure access control for the Exchange, Public, and Exadmin virtual directories, use Exchange System Manager instead.
The IMAP4 virtual server has two protocol-specific settings:
Include all public folders when a folder is requested Unlike POP3, which allows clients to access only mail messages, IMAP4 clients have access to folders other than the Inbox folder. However, this ability to access other folders needs to be enabled on the virtual server.
Enable fast message retrieval Fast message retrieval improves performance by approximating message size, as opposed to actually calculating the message size. Performance improves because less processor work is needed.
You select these settings on the General tab for the Default IMAP4 Virtual Server Properties dialog box (see Figure 6.2).
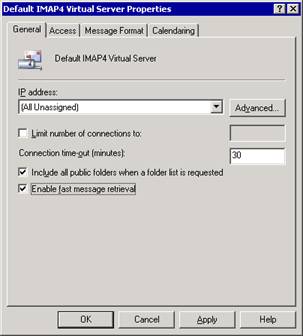
Figure 6.2 General tab in the Default IMAP Virtual Server Properties dialog box
Exchange Server 2003 uses NNTP to enable users to participate in newsgroup discussions. Exchange also enables users who are running client applications that support NNTP to access newsgroup public folders on computers running Exchange. Users can read and post items, such as messages and documents, to NNTP newsgroups that are represented in Exchange as public folders. For example, users can share information by posting messages to a newsgroup public folder in their area of interest. Other users can read and respond to items in the newsgroup. Items in newsgroups can be replicated to Usenet host computers through newsfeeds.
A newsfeed is the flow of items from one Usenet site to another. Newsfeeds enable users of different news sites to read and post articles to newsgroups as though they are using one news site. A news site is a collection of related newsgroups. An article posted to one news site is sent to other news sites where it can be read. You need to create a newsfeed to each remote server to which you want to distribute news articles.
Because the reason for using newsgroups is to post and share information, you will likely need to manage the size of these postings in relation to the resources available on the NNTP virtual server. Accepting articles that are too large or accepting too much data during one connection can cause increased traffic, overload your network, and quickly fill your hard disk. Be sure to set a size limit that matches your server's capabilities.
To configure posting limits and moderation settings for an NNTP virtual server
On your Exchange server that is running the virtual server, log on with the Exchange administrator account that has local administrative rights and Exchange full administrator permissions.
In Exchange System Manager, expand Protocols, right-click the protocol for which you want to change connection limits, and then click Properties.
On the Settings tab (see Figure 6.3), select from the following options:
To allow clients to post articles to newsgroups on this NNTP virtual server, select Allow client posting. This option permits users to post and read articles in newsgroups that they can access, unless the newsgroup is set to read-only. You can also limit the size of the article that clients post as well as the size of the connection.
To allow clients to post articles to newsfeeds on the NNTP virtual server, select Allow feed posting. You can limit the size of articles that are posted by using the Limit post size check box. You can limit the amount of data that is sent to a newsfeed during a single connection by using the Limit connection size check box.
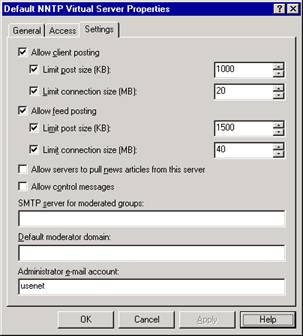
Figure 6.3 Settings tab of the Default NNTP Virtual Server Properties dialog box
Note
For more information about configuring NTTP, see the Exchange
Server 2003 Help.
Exchange Server 2003 and Outlook 2003 build on previous versions of Exchange and Outlook and include several improvements for client messaging:
Exchange and Outlook now require less information to be passed from the client to the server, resulting in increased performance and a better end-user experience on slow networks.
Exchange and Outlook now support the use of the Windows RPC over HTTP feature, allowing Outlook 2003 clients to connect directly to the internal network using HTTPS or HTTP. For more information about configuring RPC over HTTP, see 'Configuring Exchange Server 2003 for Client Access,' in the book Exchange Server 2003 Deployment Guide ( https://www.microsoft.com/exchange/library
Exchange and Outlook now include the Cached Exchange Mode feature, allowing for true offline access using Outlook.
Note
For more information about the other new features in
Outlook 2003, see Chapter 2, 'Client Features,' in the book
What's New in Exchange Server 2003 ( https://www.microsoft.com/exchange/library/
Of all the new features in Outlook 2003, Cached Exchange Mode is one of great interest to many organizations, and it is discussed in detail in this section.
Cached Exchange Mode makes it possible for users to use a local copy of their mailbox on their computer to allow for a true offline experience with Outlook 2003. This means that, if network connectivity is lost between the Outlook 2003 client and Exchange 2003, users are able to continue working with the cached information and do not see a pop-up message stating that Outlook is requesting information from the Exchange server.
By default, new installations of Outlook 2003 use Cached Exchange Mode. If you are upgrading from previous versions of Outlook to Outlook 2003 and you want your users to be able to use Cached Exchange Mode, you must manually configure the Outlook client to use Cached Exchange Mode. To do this, you modify a user's profile to use the local copy of the user's Exchange mailbox.
To manually enable Cached Exchange Mode for Outlook 2003 upgrades
In Control Panel on the computer running Outlook 2003, perform one of the following tasks:
If you are using Category View, in the left pane, under See Also, click Other Control Panel Options, and then click Mail.
If you are using Classic View, double-click Mail.
In Mail Setup, click E-mail Accounts.
In the E-mail Accounts Wizard, click View or change existing e-mail accounts, and then click Next.
On the E-mail Accounts page, highlight the account that you want to modify, and then click Change.
On the Exchange Server Settings page, select the Use Cached Exchange Mode check box.
Click Next, and then click Finish to save the changes to your local profile.
Outlook Web Access for Exchange Server 2003 includes significant improvements related to both the user interface and administration. For information about the user experience improvements in Outlook Web Access, see Chapter 2, 'Client Features,' in the book What's New in Exchange Server 2003 ( https://www.microsoft.com/exchange/library/
When it comes to managing Outlook Web Access, you use both Exchange System Manager and the IIS snap-in. Use:
Exchange System Manager to modify settings for access control to Outlook Web Access.
The IIS snap-in to control the Authentication settings for the virtual directories for Outlook Web Access, including Exchange, Exchweb, and Public.
The IIS snap-in to enable SSL for Outlook Web Access. For information about using SSL with Outlook Web Access, see 'Configuring Exchange Server 2003 for Client Access' in the book Exchange Server 2003 Deployment Guide ( https://www.microsoft.com/exchange/library .
The following sections show how to use Exchange System Manager and the IIS snap-in to perform a variety of management tasks associated with Outlook Web Access.
You can enable users within your corporate network to access Outlook Web Access, while at the same time denying access to external clients. The key to this approach is a combination of a recipient policy and a special HTTP virtual server. The steps for this approach are as follows:
Create a recipient policy with an SMTP domain name. Users who are connecting to an HTTP virtual server must have an e-mail address with the same SMTP domain as the virtual server. Creation of a recipient policy is an efficient way to apply the same SMTP domain to multiple users.
Note
Outlook Web Access users do not need to know the name of the SMTP
domain.
Apply the recipient policy to the user accounts for which you want to enable access.
Then, on the front-end server, create a new HTTP virtual server that specifies the domain that is used in the recipient policy.
After you have completed these steps, users whose e-mail addresses do not have the same SMTP domain as the HTTP virtual server will not be able to log on and access Outlook Web Access. Also, as long as you do not use the SMTP domain as the default domain, external users cannot determine what the SMTP domain is because the domain does not appear in the From field when users send e-mail messages outside the organization.
Note
For more information about users with mailboxes that have an SMTP
address that is not related to the address specified in the default recipient
policy, see Microsoft Knowledge Base Article 257891, 'XWEB: 'The Page
Could Not Be Found' Error Message When You Use OWA' ( https://support.microsoft.com/?kbid=257891
Besides enabling Outlook Web Access for users within your corporate network, you can also prevent specific internal users from accessing Outlook Web Access. You do this by disabling the HTTP and NNTP protocols for those users.
To prevent an internal user from accessing Outlook Web Access
In Active Directory Users and Computers, open the user's Properties dialog box.
On the Exchange Features tab, clear the settings for HTTP and NNTP.
When using Microsoft Internet Explorer 5 or later to access Outlook Web Access, new installations of and upgrades to Exchange 2003 use the browser's language settings to determine the character set to use to encode information, such as e-mail messages and meeting requests.
If you upgrade a server running Exchange 2000 Server that was modified to use a browser's language setting, Exchange 2003 continues to function in the same manner. Table 6.2 lists the language groups and respective character sets.
Table 6.2 Outlook Web Access language group and character sets
|
Language group |
Character set |
|
Arabic |
Windows 1256 |
|
Baltic |
iso-8859-4 |
|
Chinese (Simplified) |
Gb2131 |
|
Chinese (Traditional) |
Big5 |
|
Cyrillic |
koi8-r |
|
Eastern European |
iso-8859-2 |
|
Greek |
iso-8859-7 |
|
Hebrew |
windows-1255 |
|
Japanese |
iso-2022-jp |
|
Korean |
ks_c_5601-1987 |
|
Thai |
windows-874 |
|
Turkish |
iso-8859-9 |
|
Vietnamese |
windows-1258 |
|
Western European |
iso-8859-1 |
If you expect Outlook Web Access users in your organization to send mail frequently, you can modify registry settings so that users who are running Internet Explorer 5 or later can use UTF-8 encoded Unicode characters to send mail.
Warning
Incorrectly editing the registry can cause serious problems that
may require you to reinstall your operating system. Problems resulting from
editing the registry incorrectly may not be able to be resolved. Before editing
the registry, back up any valuable data.
To modify the default language setting for Outlook Web Access
On the Exchange server, log on with the Exchange administrator account, and start Registry Editor (regedit).
In Registry Editor, locate the following registry key:
HKEY_LOCAL_MACHINESYSTEMCurrentControlSetServices
MSExchangeWEBOWAUseRegionalCharset
Create a DWORD value called UseRegionalCharset.
Right-click the UseRegionalCharset DWORD value, and then click Modify.
In Edit DWORD Value, in the Value data box, type 1, and then click OK.
Close Registry Editor to save your changes.
You can enable a new logon page for Outlook Web Access that stores the user's name and password in a cookie instead of in the browser. When a user closes a browser, the cookie is cleared. Additionally, after a period of inactivity, the cookie is cleared automatically. The new logon page requires the user to enter a domain, user name, and password, or a full user principal name (UPN) e-mail address and password, to access e-mail.
To enable this logon page, you must first enable forms-based authentication on the server, and then secure the logon page by setting the cookie time-out period and adjusting client-side security settings.
To enable the Outlook Web Access logon page, you must enable forms-based authentication on the server.
To enable forms-based authentication
On the Exchange server, log on with the Exchange administrator account, and then start Exchange System Manager.
In the console tree, expand Servers.
Expand the server for which you want to enable forms-based authentication, and then expand Protocols.
Expand HTTP, right-click Exchange Virtual Server, and then click Properties.
In the Exchange Virtual Server Properties dialog box, on the Settings tab, in the Outlook Web Access pane, select the Enable Forms Based Authentication option.
Click Apply, and then click OK.
In Exchange 2003, Outlook Web Access user credentials are stored in a cookie. When the user logs off from Outlook Web Access, the cookie is cleared and it is no longer valid for authentication. Additionally, by default, if your user is using a public computer, and selects the Public or shared computer option on the Outlook Web Access logon screen, the cookie on this computer expires automatically after 15 minutes of user inactivity.
The automatic time-out is valuable because it helps to protect a user's account from unauthorized access. However, although the automatic time-out greatly reduces the risk of unauthorized access, it does not completely eliminate the possibility that an unauthorized user could access an Outlook Web Access account if a session is left running on a public computer. Therefore, it is important that you educate users about precautions to take to avoid risks.
To match the security needs of your organization, an administrator can configure the inactivity time-out values on the Exchange front-end server. To configure the time-out value, you must modify the registry settings on the server.
Warning
Incorrectly editing the registry can cause serious problems that
may require you to reinstall your operating system. Problems resulting from
editing the registry incorrectly may not be able to be resolved. Before editing
the registry, back up any valuable data.
To set the Outlook Web Access forms-based authentication public computer cookie time-out value
On the Exchange front-end server, log on with the Exchange administrator account, and then start Registry Editor (regedit).
In Registry Editor, locate the following registry key:
HKEY_LOCAL_MACHINESYSTEMCurrentControlSetServices
MSExchangeWebOWA
From the Edit menu, point to New, and then click DWORD Value.
In the details pane, name the new value PublicClientTimeout.
Right-click the PublicClientTimeout DWORD value, and then click Modify.
In Edit DWORD Value, under Base, click Decimal.
In the Value Data box, type a value (in minutes) between 1 and 432000.
Click OK.
To set the Outlook Web Access forms-based authentication trusted computer cookie time-out value
On the Exchange front-end server, log on with the Exchange administrator account, and then start Registry Editor (regedit).
In Registry Editor, locate the following registry key:
HKEY_LOCAL_MACHINESYSTEMCurrentControlSetServices
MSExchangeWebOWA
From the Edit menu, point to New, and then click DWORD Value.
In the details pane, name the new value TrustedClientTimeout.
Right-click the TrustedClientTimeout DWORD value, and then click Modify.
In Edit DWORD Value, under Base, click Decimal.
In the Value Data box, type a value (in minutes) between 1 and 432000.
Click OK.
For your Outlook Web Access logon page, you can allow two types of security options for authentication. Depending on their needs, users can select either of these security options on the Outlook Web Access logon page:
Public or shared computer Inform your users to select this option when they access Outlook Web Access from a computer that does not conform to the security setting for your organization (for example, an Internet kiosk computer). This is the default option and provides a short default time-out option of 15 minutes.
Private computer Inform your users to select this option when they are the sole operator of the computer, and the computer adheres to the security settings for your organization. When selected, this option allows for a much longer period of inactivity before automatically ending the session-its internal default value is 24 hours. This option is intended to benefit Outlook Web Access users who are using personal computers in their office or home.
Outlook Web Access supports data compression, which is optimal for slow network connections. Depending on the compression setting that you use, Outlook Web Access compression works by compressing static or dynamic Web pages.
Table 6.3 lists the available compression settings in Exchange Server 2003 for Outlook Web Access.
Table 6.3 Available compression settings for Outlook Web Access
|
Compression setting |
Description |
|
High |
Compresses both static and dynamic pages. |
|
Low |
Compresses only static pages. |
|
None |
No compression is used. |
Using data compression, users can experience performance increases of up to 50 percent when they are using slower network connections, such as traditional dial-up access.
To use data compression for Outlook Web Access in Exchange 2003, the following prerequisites must be fulfilled:
The Exchange server that users authenticate against for Outlook Web Access is running Windows Server 2003.
Your users' mailboxes are on Exchange 2003 servers. (If you have a mixed deployment of Exchange mailboxes, you can create a separate virtual server on your Exchange server just for Exchange 2003 users and enable compression on it.)
Client computers are running Internet Explorer version 6.0 or later. The computers must also be running Windows XP or Windows 2000, with the security update discussed in Microsoft Knowledge Base Article 328970, 'Cumulative Patch for Internet Explorer' (https://support.microsoft.com/?kbid=328970 ), installed.
Note
If a user does not have a supported browser for compression, the
client will still perform normally.
In addition to the previous prerequisites, you may also need to enable HTTP 1.1 support through proxy servers for some dial-up connections. (HTTP 1.1 support is required for compression to function properly.)
To enable data compression
On the Exchange server, log on with the Exchange administrator account, and then start Exchange System Manager.
In the details pane, expand Servers, expand the server on which you want to enable data compression, and then expand Protocols.
Expand HTTP, right-click Exchange Virtual Server, and then click Properties.
In Exchange Virtual Server Properties, on the Settings tab, under Outlook Web Access, use the Compression list to select the compression level that you want (None, Low, or High).
Click Apply, and then click OK.
In Exchange 2003, Outlook Web Access makes it more difficult for people who send junk e-mail messages to use beacons to retrieve e-mail addresses. Beacons often come in the form of images that are downloaded onto a user's computer when the user opens a junk e-mail item. After the images download, a beacon notification is sent to the sender of the junk e-mail informing the sender that the e-mail address of your user is valid. The end result is that the user will receive junk e-mail more frequently because the junk e-mail sender now knows that the e-mail address is valid.
In Outlook Web Access, an incoming message with any content that could be used as a beacon, regardless of whether the message actually contains a beacon, prompts Outlook Web Access to display the following warning message:
To help protect your privacy, links to images, sounds, or other external content in this message have been blocked. Click here to unblock content.
If users know that a message is legitimate, they can click the Click here to unblock content link in the warning message and unblock the content. If your users do not recognize the sender or the message, they can open the message without unblocking the content and then delete the message without triggering beacons. If your organization does not want to use this feature, you can disable the blocking option for Outlook Web Access.
To disable the blocking option
On the user's Outlook Web Access Options page, under Privacy and Junk E-mail Prevention, clear the Block external content in HTML e-mail messages check box.
With Outlook Web Access, you can block users from opening, sending, or receiving specified attachment types. In particular, you can:
Prevent users from accessing certain file type attachments By default, all new Exchange 2003 installations block attachments of Levels 1 and 2 file types, and Levels 1 and 2 MIME types. This feature is particularly useful in stopping Outlook Web Access users from opening attachments at public Internet terminals, which could potentially compromise corporate security. If an attachment is blocked, a warning message indicating that the user cannot open the attachment appears in the InfoBar of the e-mail message.
Outlook Web Access users who are working in their offices or connected to the corporate network from home can open and read attachments. You can enable full intranet access to attachments by providing the URL to the back-end servers and allowing attachments on the Exchange back-end servers.
Prevent users from sending or receiving attachments with specific file extensions that could contain viruses This feature in Outlook Web Access matches the attachment blocking functionality in Outlook. For received messages, a warning message indicating that an attachment is blocked appears in the InfoBar of the e-mail message. For sent messages, users cannot upload any files with extensions that appear on the block list.
To change the attachment blocking settings, you must modify the registry settings on the server.
Warning
Incorrectly editing the registry can cause serious problems that
may require you to reinstall your operating system. Problems resulting from
editing the registry incorrectly may not be able to be resolved. Before editing
the registry, back up any valuable data.
To modify the attachment blocking settings on an Exchange server
On the Exchange server, log on with the Exchange administrator account, and then start Registry Editor (regedit).
In Registry Editor, locate the following registry key:
HKEY_LOCAL_MACHINESYSTEMCurrentControlSetServices
MSExchangeWebOWA
From the Edit menu, point to New, and then click DWORD Value.
In the details pane, name the new value DisableAttachments.
Right-click DisableAttachments, and then click Modify.
In Edit DWORD Value, under Base, click Decimal.
In the Value data box, type one of the following numbers:
To allow all attachments, type 0.
To disallow all attachments, type 1.
To allow attachments from back-end servers only, type 2.
Click OK.
You can control how Exchange 2003 manages junk e-mail for your organization. To do this, you need to enable filtering, and then configure sender, recipient, and connection filtering. For more information about controlling junk e-mail with Exchange 2003, see 'Enabling Filtering to Control Junk E-mail Messages' in Chapter 5, 'Understanding and Configuring Message Routing and Transport.'
The HTTP virtual server that is created by Exchange during installation has the following URLs for user access:
https://server_name/public This URL provides access to public folders.
https://server_name/exchange/mailbox_name This URL provides access to mailboxes.
However, users often request that a URL that is simpler than the default URL be made available for accessing their mailboxes. Creating this simple URL makes the URL both easier to remember and easier to enter into a Web browser. For example, https://www.contoso1.com is an easier URL for users to remember than https://contosoexchange01/exchange
The following procedure provides a method for simplifying the URL that is used to access Outlook Web Access. This procedure configures a request sent to the root directory of the Web server (https://server_name/) to redirect to the Exchange virtual directory. For example, a request to https://server_name/ is directed to https://server_name/exchange/, which then triggers implicit logon.
To simplify the Outlook Web Access URL
Using Internet Services Manager, open the properties for the Default Web Site.
Click the Home Directory tab, and then select A redirection to a URL.
In Redirect to, type /directory name, and then click A directory below URL entered.
For example, if you want to redirect https://mail/ requests to https://mail/exchange, in Redirect to, you would type /exchange.
To require users to use SSL, in Redirect to, type https://mail/directory name, and then click The exact URL above option.
This setting hard codes the name of the server. Therefore, if you redirect client requests to https://mail, the client must be able to resolve the name 'mail.'
For information about another method for redirecting clients to SSL, see Microsoft Knowledge Base Article 279681, 'How to Force SSL Encryption for an Outlook Web Access 2000 Client' ( https://support.microsoft.com/?kbid=279681
Using Exchange ActiveSync, users with a Windows-powered mobile device with the desktop ActiveSync software can synchronize their devices with their Exchange servers over the Internet. Users connect across the Internet to their Exchange front-end server and request information from their Exchange mailbox server. When you enable access to Exchange using Exchange ActiveSync, you should perform the following steps.
Use the front-end and back-end server architecture to provide a single namespace for users to connect to your network (recommended). For more information, see the book Planning an Exchange Server 2003 Messaging System (https://www.microsoft.com/exchange/library).
Install an SSL certificate on the front-end server. For more information, see the book Exchange Server 2003 Deployment Guide (https://www.microsoft.com/exchange/library).
Inform users how to connect to the Internet from their device and use ActiveSync on their device to connect to their Exchange server. For more information, see the book Exchange Server 2003 Deployment Guide (https://www.microsoft.com/exchange/library).
The following sections provide information about how to manage Exchange ActiveSync for your organization, including how to enable and disable the Exchange ActiveSync application, and how to enable ActiveSync for your users.
By default, Exchange ActiveSync is enabled for all of the users in your organization. If your users have Windows-powered mobile devices, you can inform them how to configure their devices to use Exchange ActiveSync. For information about informing your users how to use Exchange ActiveSync, see 'Configuring Exchange Server 2003 for Client Access' in the book Exchange Server 2003 Deployment Guide (https://www.microsoft.com/exchange/library).
To enable and disable Exchange ActiveSync for your organization, you use Exchange System Manager. However, when you add new users to your organization and you want to enable them to use Exchange ActiveSync to access Exchange with a Windows-powered mobile device, you use Active Directory Users and Computers to modify the settings for a user or groups of users. The following procedures describe how to enable or disable the Exchange ActiveSync application for your organization, and how to modify Exchange ActiveSync settings to accommodate new users.
To enable or disable Exchange ActiveSync for your organization
On the Exchange front-end server that is running Exchange ActiveSync, log on with the Exchange administrator account, and then start Exchange System Manager.
Expand Global Settings, right-click Mobile Services, and then click Properties.
On the Mobile Services Properties page, in the Exchange ActiveSync pane, select or clear the check box next to Enable user initiated synchronization.
Click OK.
To modify Exchange ActiveSync settings
On the Exchange server with the user's mailbox, log on with the Exchange administrator account, and then start Active Directory Users and Computers.
Expand the domain, and then open the location for the users that you want to manage.
Right-click the user or users whose Exchange ActiveSync settings you want to modify, and then select Exchange Tasks.
In Exchange Task Wizard, on the Available Tasks page, select Configure Exchange Features, and then click Next.
On the Configure Exchange Features page, select User initiated synchronization, and then select one of the following:
To permit users to use Exchange ActiveSync to synchronize their Exchange mailbox with their mobile devices, select Enable.
To prevent users from using Exchange ActiveSync, select Disable.
To prevent the users' settings from being modified when you have selected more than one user, select Do not modify.
Click Next to apply your changes.
Click Finish.
Note
If you want to view a detailed report of the settings and the
changes you made to users, select View
detailed report when this wizard closes.
After you configure your organization to use Exchange ActiveSync, you can configure your Exchange 2003 servers so that users can receive up-to-date notifications to keep their devices up-to-date with the changes that occur when a new item arrives in their Exchange mailbox.
Up-to-date notifications are notifications that are sent to a user's device when a new item arrives in their Exchange mailbox. This notification prompts the user's device to synchronize the device with the Exchange mailbox automatically.
To enable up-to-date notifications for your organization
On the Exchange front-end server running Exchange ActiveSync, log on with the Exchange administrator account, and then start Exchange System Manager.
Expand Global Settings, right-click Mobile Services, and then click Properties.
On the Mobile Services Properties page, in the Exchange ActiveSync pane, select Enable up-to-date notifications.
Click OK.
To modify up-to-date notifications settings for your users
On the Exchange server with the user's mailbox, log on with the Exchange administrator account, and then start Active Directory Users and Computers.
Expand the domain, and then open the location for the users whose settings that you want to modify.
Right-click the user or users whose up-to-date notifications settings you want to modify, and then select Exchange Tasks.
In Exchange Task Wizard, on the Available Tasks page, select Configure Exchange Features, and then click Next.
On the Configure Exchange Features page, select Up-to-date notifications, and then select one of the following:
To allow users to use up-to-date notifications, select Enable.
To prevent users from using up-to-date notifications, select Disable.
To prevent the users' settings from being modified when you have selected more than one user, select Do not modify.
If you enable the Exchange ActiveSync up-to-date notifications feature, your users use a mobile operator to deliver messages from the corporate network to their devices. There are two ways in which you can allow your users to receive notifications:
Option 1: Specify a mobile operator for your users
If you want to specify a mobile operator for your users, you disable the Enable notifications to user specified SMTP addresses on the Exchange server that has the mailboxes for these users. If you choose this option, you need to inform your users how to set their devices to use the mobile operator that you specify for up-to-date notifications.
Option 2: Allow users to use their own mobile operators
If your users have their own Windows-powered mobile devices, you can allow them to use their own mobile operators to deliver notifications to their devices. If you choose this option, you need to inform your users how to set their devices to use the mobile operators that they want to use for up-to-date notifications.
The following two procedures describe how to configure these options. The first procedure describes how to set the Enable notifications to user specified SMTP address option, and the second procedure describes how to set the mobile operator on a user's device.
To set the Enable notifications to user specified SMTP address option for your organization
On the Exchange front-end server that is running Exchange ActiveSync, log on with the Exchange administrator account, and then start Exchange System Manager.
Expand Global Settings, right-click Mobile Services, and then click Properties.
On the Mobile Services Properties page, in the Exchange ActiveSync pane, set the Enable notifications to user specified SMTP address option as follows:
If you want to specify a mobile operator for your user, clear Enable notifications to user specified SMTP address.
If you want to allow your users to specify their own mobile operators, select Enable notifications to user specified SMTP address.
Click OK.
To specify a mobile operator for up-to-date notifications on a device
In ActiveSync, on a Windows-powered mobile device, tap Tools, and then tap Options.
On the Server tab, tap Options.
On the Server Synchronization Options screen, tap Device Address.
On the Device Address screen, do one of the following:
If your users are using a mobile operator that you specify, select Corporate Service Provider, and then enter the Device Phone Number and Service Provider Name in the fields that are provided.
If your users are using their own mobile operators, select Device SMS Address, and then enter the device address in the field provided.
Using Outlook Mobile Access, users can browse their Exchange mailbox using a device such as a Microsoft Windows-powered Smartphone or a cHTML-capable device. You can also enable users to use devices that are not officially supported by Microsoft, but which are likely to function properly with only minor compatibility issues by enabling unsupported devices to use Outlook Mobile Access.
The following sections provide information about how to manage Outlook Mobile Access for your organization, including how to enable the Outlook Mobile Access application for your organization and how to enable users for Outlook Mobile Access.
By default, Outlook Mobile Access is disabled when you install Exchange Server 2003. For users to use Outlook Mobile Access, you must first enable it. When you enable access to Exchange using Outlook Mobile Access, you should do the following:
Use the front-end and back-end server architecture to provide a single namespace for users to connect to your network. For more information, see the book Planning an Exchange Server 2003 Messaging System (https://www.microsoft.com/exchange/library).
Install an SSL certificate on the front-end server. For more information, see the book Exchange Server 2003 Deployment Guide (https://www.microsoft.com/exchange/library).
Inform users how to connect to the Internet from their devices, and how to use Outlook Mobile Access to access their Exchange information. For more information, see the book Exchange Server 2003 Deployment Guide (https://www.microsoft.com/exchange/library).
To enable Outlook Mobile Access for your organization, you use Exchange System Manager. After you enable Outlook Mobile Access, you can use Active Directory Users and Computers to modify the Outlook Mobile Access settings for users or groups of users.
To enable Outlook Mobile Access for your organization
Log on as an Exchange administrator to the Exchange server with the user's mailbox, and then start Exchange System Manager.
Expand Global Settings, right-click Mobile Services, and then click Properties.
On the Mobile Services Properties page, in the Outlook Mobile Access pane, select Enable Outlook Mobile Access.
To enable users to use unsupported devices, select Enable unsupported devices.
Note
For information about supported devices for Exchange and planning
for mobile device support with Exchange, see the book Planning
an Exchange Server 2003 Messaging System (https://www.microsoft.com/exchange/library/).
Click OK.
To modify Outlook Mobile Access settings
Log on as an Exchange administrator to the Exchange server with the user's mailbox, and then start Active Directory Users and Computers.
Expand the domain, and then open the location for the users whose settings that you want to modify.
Right-click the user or users whose Outlook Mobile Access settings you want to modify, and then select Exchange Tasks.
In Exchange Task Wizard, on the Available Tasks page, select Configure Exchange Features, and then click Next.
On the Configure Exchange Features page, select Outlook Mobile Access, and then select one of the following:
To allow users to use Outlook Mobile Access, select Enable.
To prevent users from using Outlook Mobile Access, select Disable.
To prevent the users' settings from being modified when you have selected more than one user, select Do not Modify.
Click Next to apply your changes.
Click Finish.
|
Politica de confidentialitate | Termeni si conditii de utilizare |

Vizualizari: 1515
Importanta: ![]()
Termeni si conditii de utilizare | Contact
© SCRIGROUP 2025 . All rights reserved