| CATEGORII DOCUMENTE |
| Asp | Autocad | C | Dot net | Excel | Fox pro | Html | Java |
| Linux | Mathcad | Photoshop | Php | Sql | Visual studio | Windows | Xml |
Applications
![]()
An operating system by itself is a paltry thing; applications do the real work. So, if you want to get the most out of XP, you need to hack the applications that run on top of it.
Some old programs have a hard time running under XP, so you'll see in this chapter how to get apparently incompatible programs to run under the operating system. You'll also find out how to remove applications and uninstall entries that you can't seem to get rid of, even when you thought you'd uninstalled the application. And we'll cover shortcuts for launching applications quickly and customizing them to the way you like them. There's more as well, including how to create and open Microsoft documents without having to spend hundreds of dollars for Office.
Uninstalling programs is sometimes tougher than you'd expect; even when you use built-in uninstallers, programs leave bits of themselves all over your hard disk and Registry. Here's how to remove them.
Uninstalling applications can be a tricky business. At a glance, it seems simple: choose Start >Control Panel >Add or Remove Programs, then choose the program you want to remove in the Add or Remove Programs dialog box, and click Remove.
But uninstall routines are generally only as good as the programmer that made them. And that means that unruly programs commonly leave bits of themselves behind, even after you uninstall them. They might leave behind DLLs that load every time you start Windows, as well as Registry entries, even though the original program is gone. In both instances, your system performance takes a hit loading resources for programs that no longer exist. The programs also might leave behind unnecessary files and folders, which take up hard disk space.
There's a good deal you can do to clean up after these unruly applications, though. Follow this advice:
After you've run the uninstallation routine, run the Registry Editor [Hack #68], search through the Registry for any keys and values the program left behind, and then delete them. Frequently, you can find the settings for the program at HKEY_LOCAL_MACHINESOFTWAREPublisherProgram Name where Publisher is the name of the software company that made the program and Program Name is the name of the software package (in the case of companies with multiple products like Symantec or Adobe). For safety's sake, make a backup of Registry keys [Hack #71] before deleting them.
Before uninstalling the application, look through your hard disk to see where the program stores its files and folders. Then, after you run the uninstallation routine, look for those files and folders and delete them if they haven't been deleted. Often, you'll find them in C:Program Files<Publisher><Program Name>.
After uninstalling the program, make sure that no parts of the program are still being run at startup. To do that, delete their entries from HKEY_LOCAL_MACHINESOFTWAREMicrosoftWindowsCurrentVersionRun and HKEY_CURRENT_USERSoftwareMicrosoftWindowsCurrentVersionRun.
Create a restore point so that you can restore your system to the state it was in before you installed the program. Choose Control Panel >Performance and Maintenance >System Restore and follow the wizard for creating a restore point. If you're testing out an application and aren't sure that you're going to keep using it, create a restore point before you install it. Then, after you've installed the application and decided not to use it, revert to that restore point instead of using the uninstallation routine; it's more thorough.
Use RegSpy [Hack #72]. This downloadable program lets you watch and track changes made to the Registry whenever a program installs and runs, and it lets you roll back changes the program made.
Inexplicably, even after you've uninstalled some programs, their entries still remain listed in the Add or Remove Programs dialog box. As time goes on, it's easy for you to forget what programs you've uninstalled, so when you see their entries there you'll assume the programs are still on your hard disk, but when you try to uninstall them you'll receive an error message. There's an easy way to remove those entries. First, try to uninstall the program from the Add or Remove Programs dialog box. If it doesn't uninstall, run the Registry Editor and open HKEY_LOCAL_MACHINESOFTWAREMicrosoftWindowsCurrentVersionUninstall. Look for the entry of the uninstalled program (it will be the program name) and delete it. In some instances, instead of the program name, you'll see an entry like this: . In that case, open the DispayName subkey in that entry; it should have the name of the program-in this instance, Norton Antivirus 2002. When you find the proper entry, delete it. For safety's sake, make a backup of Registry keys [Hack #71] before deleting them.
As part of a settlement in a federal antitrust case, Microsoft was forced to allow non-Microsoft programs to be the default applications for certain uses, such as email, web browsing, and digital entertainment. Users also had to be allowed to remove access to Microsoft programs that accomplished those tasks. That ruling came well after Windows XP was shipped, though, so many copies of XP don't allow you to do that. However, if you have a later version of XP, or if you have installed the Windows XP Service Pack 1 (also called SP-1), your copy of the operating system has those capabilities.
|
To remove access to Microsoft programs, first find out if your system has the capabilities. Choose Start >Control Panel >Add or Remove Programs and see whether the Add or Remove Programs dialog box contains a button in the left pane titled Set Program Access and Default. If it does, you can remove access to Microsoft programs. Click that button. You'll find three choices: Microsoft Windows, Non-Microsoft, and Custom. Click on the double-down arrow next to any choice to see more details.
If you choose Microsoft Windows, then your default programs for web browsing, email, instant messaging, digital entertainment, and accessing Java applications will all be Microsoft programs. If you choose Non-Microsoft, the defaults will be the non-Microsoft programs that your computer manufacturer installed on your PC. If you choose Custom, you can pick and choose between Microsoft and non-Microsoft applications, as shown in Figure 9-1.
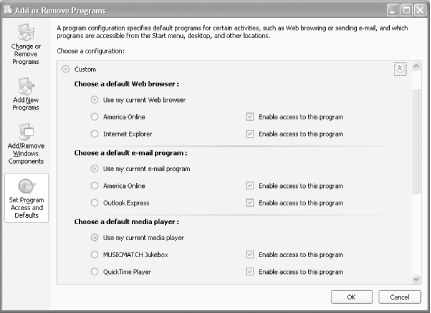
Keep in mind that 'Remove access' doesn't mean the same as deleting the program. It only means that the icon for the program will be removed. For example, if you remove access to Internet Explorer, it won't actually be deleted from your hard disk; you merely won't be able to see its icon. Also, be aware that not all email, instant messaging, digital entertainment, and web browsing programs will show up on the non-Microsoft or Custom lists, so you won't necessarily be able to use this screen to set them as your defaults.
All this means that the best use for the Set Program Access and Default dialog box is to remove the icons of some Microsoft programs; it doesn't offer a lot of functionality beyond that.
[Hack #17]
Don't throw away your old programs that can't run under XP. Use these hacks to force them to work.
Some older applications, including old games and programs written specifically for an earlier version of Windows, might not run properly or run at all under XP. But there's a lot you can do to make sure they run, including running an automated Compatibility Wizard and using a little-known Microsoft tool to solve compatibility problems.
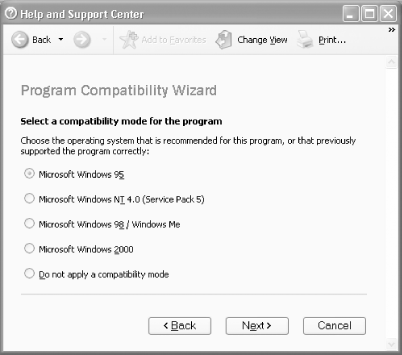
If you find a program that won't run under XP, start with the easiest step. Run the Compatibility Wizard: choose Start >Help and Support >Fixing a Problem >'Application and software problems' >'Fix a problem' >'Getting older programs to run on XP,' then scroll down and click on Program Compatibility Wizard.
You'll be prompted to choose the software you want to fix and then asked a series of questions, including the operating system for which the software was written, or on which it last ran properly, and the screen resolutions recommended for the program. Figure 9-2 shows the wizard in action. The wizard then applies those settings and tries to run the program. If the settings work, the wizard will let you specify to always run the program using them. If they don't, try different settings until you get it working properly.
There may be some instances in which a program won't even install on your system. In those instances, run the Compatibility Wizard on the installation or setup program, commonly called Setup.exe or a similar filename. Then, after it installs, see if it works properly. If it doesn't, run the wizard again, this time on the installed program.
If you're not a fan of wizards, there's another way to set the program's compatibility settings. Right-click the program's shortcut icon and choose Properties >Compatibility. You can then manually configure compatibility settings, as shown in Figure 9-3. You can change the same settings as you can using the wizard. You may have to try several different settings before you find one that works.
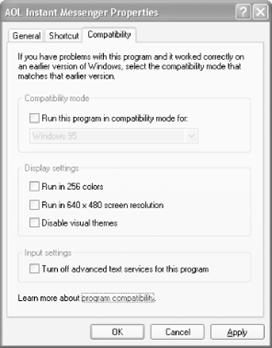
At the bottom of the Compatibility dialog box shown in Figure 9-3, you'll notice a setting that lets you turn off 'advanced text services.' That setting is applicable if you use speech recognition and text services, so if you use them in the application that won't run, try turning them off for this application to see whether it helps. If the program doesn't use these services, don't bother using the setting.
If the Compatibility Wizard doesn't work, try these steps:
Check the software manufacturer's web site to see if an update, patch, or fix is available.
Use Windows Update to see if a fix is available, by choosing Start >Control Panel >Windows Update.
Update your sound card and video card drivers by checking the manufacturer sites and downloading new drivers.
If the problem program is a game that uses DirectX, upgrade to the newest version of DirectX by going to https://www.microsoft.com/downloads/ and clicking on the DirectX link or searching for DirectX.
If the wizard doesn't work, turn to a more powerful tool, a little-known free program, the Application Compatibility Toolkit from Microsoft. It will automatically apply fixes to hundreds of programs to enable them to run under XP. You can find it in the SupportTools directory of the XP CD, though a much better bet is to download it from https://www.microsoft.com/windows/appcompatibility/default.mspx because newer versions are always being made available online.
Turn off your antivirus program before installing the Application Compatibility. The program makes many changes to numerous Registry entries, and antivirus software often interprets those changes as a malicious script.
After you install it, you don't have to do anything to fix the programs; the analyzer does it for you. It won't fix every program, though. To see if it fixed yours, go to C:Program FilesMicrosoft Windows Application Compatibility ToolkitApplicationsCompatibility Administrator, run Compatadmin.exe, and go to System DatabaseApplications. You'll see a list of hundreds of programs that the toolkit has fixed. Scroll to see whether your problem application is on the list and, if it is, to see what fixes were applied. Figure 9-4 shows the fixes it applied to the MusicMatch Jukebox music software.

[Hack #82]
Older Windows programs look ancient and outdated in XP, because they don't use the newer-style buttons and check boxes. Here's how to make them use XP common controls.
When you run an older program in XP, the operating system applies an XP-type frame around it, with rounded title bars. But the older program itself still uses its older style interface. You can, however, force older programs to use XP-type common controls for things such as checkboxes and buttons. You'll have to create a manifest file (a specifically formatted XML file) and place it in the same directory as the older file.
Example 9-1 shows the code to put in your manifest file. For Description of Program, enter a description for the program, and for Program Name, enter the name of the program.
To create the file, open Notepad, copy the text into it, and save it to the same folder as the executable file of the program you want to force to use XP common controls. Give it the same name as the program's executable file, but with an extension of .manifest. For example, if the program's executable file is named oldprogram.exe, give the manifest file the name oldprogram.exe.manifest.
[Hack #81]
![]()
Launch applications quickly and customize what they do when they run, by using command-line shortcuts, parameters, and switches.
Windows is a graphical operating system, but a lot of times all these pretty icons, menus, and clicking get in the way of getting work done. That's particularly true when you want to launch applications.
I started computing in the days of DOS, when real men and women didn't use mice and icons. (Sometimes because it wasn't an option.) So, I look for any chance I can get to use the command line, particularly when doing so saves me time and lets me take more control of my computer.
That's why I frequently launch applications using command-line shortcuts, along with parameters and switches. Parameters and switches let you customize the way programs launch. They're usually specific to each individual program, though some work on many or all programs.
An even bigger time-saver is to use the command line along with keyboard shortcuts. That way, you can press a key combination-such as Ctrl-Alt-W, for example-and launch Microsoft Word with a new document open, based on a specific template.
You'll
first, create a desktop shortcut to the application, and then you'll customize
the shortcut so that it launches when you use a specific key combination.
Right-click on the Desktop and choose New ![]() Shortcut.
Enter or browse to the filename of the application for which you want to create
a shortcut, including its path and surrounding it by quotation marks, such as 'C:Program FilesMicrosoft OfficeOffice10WINWORD.EXE'.
Click Next; then, in the 'Select a name for the shortcut box,' type
the name of your new shortcut (such as Basic
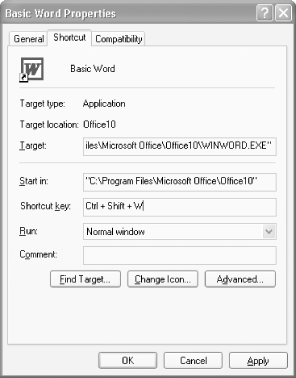
Word), and click Finish. Right-click on the shortcut you just
created and choose Properties. In the Shortcut Tab, shown in Figure 9-5, put
your cursor in the 'Shortcut key' box and press the key combination
you want to use to start the program. It has to be a combination of Ctrl-Alt,
Shift-Alt, or Shift-Ctrl, plus a letter key, such as Ctrl-Alt-A, Shift-Alt-A,
or Shift-Ctrl-A. In our instance, we're using Ctrl-Shift-W. Click OK. The
program will now launch whenever you press the shortcut key combination.
Shortcut.
Enter or browse to the filename of the application for which you want to create
a shortcut, including its path and surrounding it by quotation marks, such as 'C:Program FilesMicrosoft OfficeOffice10WINWORD.EXE'.
Click Next; then, in the 'Select a name for the shortcut box,' type
the name of your new shortcut (such as Basic
Word), and click Finish. Right-click on the shortcut you just
created and choose Properties. In the Shortcut Tab, shown in Figure 9-5, put
your cursor in the 'Shortcut key' box and press the key combination
you want to use to start the program. It has to be a combination of Ctrl-Alt,
Shift-Alt, or Shift-Ctrl, plus a letter key, such as Ctrl-Alt-A, Shift-Alt-A,
or Shift-Ctrl-A. In our instance, we're using Ctrl-Shift-W. Click OK. The
program will now launch whenever you press the shortcut key combination.
There are a variety of entries on the Shortcut tab that let you customize how the program launches when you use the shortcut. The Run drop-down list lets you start the program minimized, maximized, or in a normal window. The 'Start in' box lets you determine the start location for the application. You can even customize the ScreenTip that appears when you hover the mouse over the shortcut. In the Comment box, type the text you want to appear as a ScreenTip. Figure 9-6 shows how such a customized ScreenTip looks like when a mouse hovers over it.

Launching applications with a keyboard shortcut is a time-saver, but there's still a lot you can do to customize those shortcuts. For example, you can set up a number of separate keyboard shortcuts for Word-for example, to launch Word with new documents based on a different templates, or to open Word to specific already-created documents.
For example, let's say you want to launch Word and have it automatically open a specific document, one called chapter doc in the C:Hacks directory. Type this (all on one line) in the Target box displayed in Figure 9-5:
'C:Program FilesMicrosoft OfficeOffice10WINWORD.EXE' 'C:Hackschapter doc'Doing this gives you much more control that double-clicking on the document or creating a shortcut to the document, because, in addition to launching individual files, you can use a variety of switches to customize how you launch those files. For example, let's say you want to launch Word without the splash screen. Use the /q switch, like this:
'C:Program FilesMicrosoft OfficeOffice10WINWORD.EXE' /qYou can then combine switches with opening individual files, like this:
'C:Program FilesMicrosoft OfficeOffice10WINWORD.EXE' /q 'C:Hackschapter doc'This command opens the file and bypasses the splash screen. Use keyboard shortcuts along with these switches and syntax to create as many customized versions of Office applications as you like. Tables Table 9-1, Table 9-2, and Table 9-3 list switches for Microsoft applications Word, Excel, and PowerPoint, respectively.
Table 9-1. Switches for starting Word |
|
|
Switch |
What it does |
| /a |
Stops add-ins and global templates, including the |
| /l addinpath |
Loads a specific Word add-in. |
| /m |
Starts a new instance of Word without running AutoExec macros. |
| /m filen |
Opens the file specified by number on the File menu's Most Recently Used list. |
| /m macroname |
Runs a specific macro and prevents Word from running any AutoExec macros. |
| /n |
Starts a new instance of Word without opening a document. Documents opened will not appear as choices in the Window menu of other Word instances. |
| /t templatename |
Starts Word with a new document based on the specified template. |
| /w |
Starts a new instance of Word with a blank document. Documents opened will not appear as choices in the Window menu of other Word instances. |
| /r |
Opens Word, reregisters it in the Registry, and then quits. Use this switch if there have been problems with Word's settings and you want to reregister it. At times, certain Registry keys associated with Word can get corrupted. If you use this switch, you'll delete the corrupt Registry keys and recreate them from scratch. Your problems should then go away. |
| /q |
Starts Word without the splash screen. |
Table 9-2. Switches for starting Excel |
|
|
Switch |
What it does |
| /r workbook path/file name |
Opens the specified workbook as read-only. |
| /e |
Opens Excel without a startup screen and without a new blank workbook. |
| /m |
Opens Excel with a new workbook that contains a single macro sheet. |
| /p workbook path |
Opens Excel and uses the specified path as the active path instead of the default path |
| /o |
Opens Excel and then reregisters it in the Registry. Use this switch if there have been problems with Excel's settings and you want to reregister it. |
| /regserver |
Opens Excel, reregisters it, and then quits. |
| /unregserver |
Opens Excel, unregisters it, and then quits. |
Table 9-3. Switches for starting PowerPoint |
|
|
Switch |
What it does |
|
/s |
Opens a presentation into the slide show window. |
|
/p |
Prints the presentation. |
|
/n template_name.pot. |
Creates a new presentation based on the specified template. |
[Hack #22]
When it comes to word processing and spreadsheets, it's an all-Microsoft world. But you don't have to pay hundreds of dollars for Office to create and read Microsoft files; you can instead download a free office suite.
For better or worse, the Windows world has settled on Word and Excel as the word processing and spreadsheet standards. But as anyone who has recently bought a new computer can tell you, buying an office suite that includes them can push up the cost of your computer by several hundred dollars.
If you want to play well with others, you need to be able to create and read Word and Excel files. That doesn't mean, however, that you need to buy Microsoft Office. In fact, you can download a free office suite that includes a Word-compatible word processor, an Excel-compatible spreadsheet, as well as image-editing and photo album software. It's called the 602Pro PC SUITE, and it is available from 602 Software (https://www.software602.com).
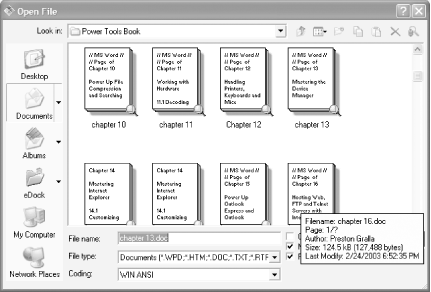
The word processor, 602Text, reads Word documents, including all formatting, and can format and save Word documents as well. The spreadsheet, 602Tab, reads and writes Excel files. You won't get a number of Office extras, such as being able to use macros, but at least one feature of the program is superior to Word. When you open or save a document, you're shown file thumbnails that have the first several lines of the document, as shown in Figure 9-7. Look closely, and you'll see a small magnifying glass in the lower right of each document. Click on it, and you'll see even more of the text. It's a great way to preview information in files so that you know you'll be opening the right file.
The OpenOffice.org office suite (https://www.openoffice.org) is a free, open source software suite that includes a word processor, spreadsheet, drawing program, equation editor, and presentation software. It opens and saves Microsoft Office formats as well as many other formats. Versions are available for Windows, Macintosh, Linux, and Solaris.
Hidden fields in your Word documents can be used to peer into your PC and even grab your files. Here's how to prevent that from happening.
A little-known trick in Word can let malicious users steal your private information and can even allow someone to get access to the files on your PC. It does this by using Word Fields, which are used to insert self-updating information into Word documents, such as page numbers in a header or footer. Some fields, though, can be hidden, and, because you can't see them, you can't tell what they're doing.
One of these hidden fields, IncludeText, is generally useful; it can insert Word documents or Excel spreadsheets into other Word documents. However, the field can also be used maliciously. For example, let's say someone sends you a document, you edit it, and then send it back to the person who sent it to you. If it included a hidden IncludeText field with specific files and their locations on your hard disk, those files on your hard disk could be sent back to the document originator without your knowing it.
There are several ways to solve the problem. One is to install a Microsoft patch that fixes the vulnerability. For more information and to download it, go to https://support.microsoft.com/default.aspx?scid=kb;en-us;329748.
Another way to solve the problem is to download the free Hidden File Detector from https://www.wordsite.com/HiddenFileDetector.html. It adds a new menu item, Detect Hidden Files, to Word's Tools menu. When you choose it from the menu, a dialog box alerts you to any documents that have been inserted into the file by a Word Field that could be functioning as spyware.
You can also try to
solve the problem yourself by choosing Edit ![]() Links
to see if there are links in your document to files. (If there are none, the
Links option will be grayed out.) If you find them, delete them, and the
problem should be fixed.
Links
to see if there are links in your document to files. (If there are none, the
Links option will be grayed out.) If you find them, delete them, and the
problem should be fixed.
[Hack #33]
[Hack #89]
|
Politica de confidentialitate | Termeni si conditii de utilizare |

Vizualizari: 1158
Importanta: ![]()
Termeni si conditii de utilizare | Contact
© SCRIGROUP 2025 . All rights reserved