| CATEGORII DOCUMENTE |
| Asp | Autocad | C | Dot net | Excel | Fox pro | Html | Java |
| Linux | Mathcad | Photoshop | Php | Sql | Visual studio | Windows | Xml |
![]()
All of us live on the Web these days, and the demarcation between the operating system and the Web has gotten fuzzier with each iteration of Windows. XP has even more web-based tools built into it than its predecessors.
While Internet Explorer 6 betters all previous versions of the browser, it could still use some help. It doesn't give you much help when you want to protect your privacy or fight against annoyances like pop-up ads, for example. And its searching capabilities and offline display of web pages leaves much to be desired.
In this chapter, you'll find hacks to fix all that and more, including a great grab-bag of Registry hacks for Internet Explorer, a way to speed up file downloads, shortcuts for starting and running Internet Explorer, and more..
You don't have to be victimized by obnoxious applications and behavior on the Internet. Fight back with these tips and tools.
Surfing the Web used to be such as simple, enjoyable experience. Go to the web site of your choice, enjoy the page, and head somewhere else.
No longer. At times, it now seems like a sleazy carnival midway, complete with flashing lights and loud music, barkers pleading at you to venture into the sideshows, scamsters promising you big payoffs if you try three-card monte, and no-goodniks lurking in the shadows.
For that, we have pop ups, spyware, and web bugs to thank. Pop ups are ads that, as the name implies, pop up over your browser, usually in a smaller window, and frequently contain flashing messages and other kinds of obnoxious come-ons. The infamous X.10 surveillance camera pioneered this insufferable form of advertising, and now it's everywhere.
Web bugs are invisible bits of data, frequently a single pixel in size (sometimes called 'clear GIFs'), that can track all your activities on a web site and report them back to a server. Spyware is software that piggybacks onto your hard disk on the backs of other pieces of software, reports on your activities to ad servers, and then delivers ads to you based on what sites you visit. There's typically no way to know offhand that spyware has been installed on your system, because it lurks invisibly-hence the name. Even after you uninstall the program upon which it piggybacked, it could remain on your PC, reporting on your activities.
You don't have to be victimized, though. As you'll see in the rest of this hack, there are things you can do to keep your PC from resembling a virtual midway.
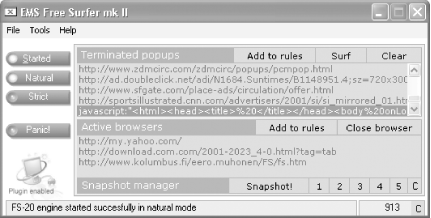
Internet Explorer has no built-in way to stop pop ups, but you can still kill them with downloadable software. There are many for-pay pop-up killers, but if you don't want to spend the cash, you can get an excellent one for free: EMS Free Surfer mk II, shown in Figure 4-1. It lets you set several levels of pop-up protection-you can block all pop ups or only those that appear to be unwanted-and you can turn it on and off with a click. It has other helpful tools as well, such as letting you shut every open instance of Internet Explorer with a single click, and it includes an add-in that will clean out your system cache and list of recently visited sites. Get it at https://www.kolumbus.fi/eero.muhonen/FS/fs.htm. (Don't confuse it with a related product, EMS Free Surfer Companion, which offers more features than the free versions and costs $20.)
Here's one way to get rid of pop-up annoyances: skip Internet Explorer altogether! IE can't kill pop ups, but other browsers can. Both Opera and Mozilla include a built-in pop-up killer as a menu option.
Download Opera from https://www.opera.com. To enable its pop-up
killer, choose File >Preferences ![]() 'Refuse
pop-up windows'. You can also have the program open pop-up windows in the
background instead of on top of your browser.
'Refuse
pop-up windows'. You can also have the program open pop-up windows in the
background instead of on top of your browser.
Download Mozilla from https://www.mozilla.org. To enable its pop-up killer, choose Edit >Preferences >Privacy & Security >Pop-ups >and check 'Reject pop-up windows.'
In recent months, the most obnoxious pop ups of all have started to appear on computer users' screens-popups that aren't connected to a browser, appear even when you're not surfing the Web, and show up in a text-message window for no apparent reason. You've taken no conceivable action that could have caused them to appear, such as visiting a web site. And yet there they are.
These text pop ups use XP's Messenger service, which was designed for sending notifications over internal local area networks-for example, when a network administrator wants to notify network users that a server is about to go down, or when you're notified that a printer has completed a job of yours.
|
But spammers took hold of the technology, and now blast out text pop ups to IP addresses across the Internet. How ubiquitous are these pop ups becoming? I recently bought a new laptop, and within 10 minutes of turning it on for the first time I had received my first Messenger service pop up.
To kill these pop ups, disable the Messenger service. Run the Services Microsoft Management Console by typing services.msc at a command prompt or the Run box and pressing Enter. Double-click on the entry for Messenger, choose Disabled as the Startup type from the screen that appears, and click OK. Pop ups will no longer get through. Unfortunately, neither will any network messages from administrators if you're on a LAN.
If you're running a router
at home that allows you to block ports, you can kill these messages by
disabling port 135. How you do this varies according to your router. To do it on a Linksys router, go to the router administrator screen
and choose Advanced >Filters. In
Web bugs are one of the more pernicious ways your online activities can be tracked, no matter which browser you're using. Sometimes, the web site the bugs send information to isn't the one that contains the web bug; for example, they may send information back to an online advertising network.
Web bugs are surprisingly common. The Cyveillance technology and analysis company found that their use grew nearly 500% between 1998 and 2001. Web bugs can send the following information back to a server:
The IP address of your computer
The URL of the page on which the web bug is located, so they know that you visited the page
The time the web bug was viewed, so they know exactly when you visited the page
The URL of the web bug image
The type of browser that you have
Your cookie values
A free piece of software called Bugnosis (https://www.bugnosis.org) will alert you whenever it comes across web bugs on pages you visit. It reports on the URL that the bug reports to, and, for some bugs, it will let you click on a link it creates so that you can send an email of complaint to the web site that runs the bug. It runs inside Internet Explorer.
|
The software can't actually protect you against web bugs, but it can alert you when you visit pages that use them. If you want your privacy protected when you surf the Web, your best bet is to surf anonymously [Hack #39].
Spyware has become increasingly controversial and increasingly popular, as developers of free software struggle to find a way to support themselves. Of late, spyware has been getting increasingly intrusive; some people call these more aggressive programs scumware. Scumware may change your default home page without telling you, or may even intervene when you're making a purchase online and redirect you to a different site.
There are several ways to protect yourself against spyware:
Be vigilant about what you download. Ad-supported programs may include spyware, though not all do. Check out the ' Index of Known Spyware' page run by Gibson Research at https://grc.com/oo/spyware.htm for a list of spyware programs. The only problem with that site is that it lists only the spyware components, and it's difficult to find out their names. A better bet is https://www.spychecker.com, which lets you type in the name of a program you downloaded and then tells you whether spyware piggybacks onto it.
Use a personal firewall like ZoneAlarm [Hack #48]. A personal firewall will let you block any program on your system from contacting the Internet without your approval, so you can use it to block spyware. XP's Internet Connection Firewall doesn't have this capability, so you can't use it to block spyware.
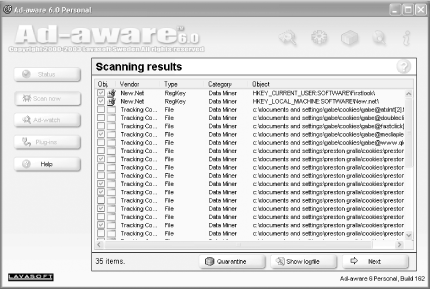
Get a spyware detector and eradicator. My favorite and the most popular is Ad-Aware, available for free from https://www.lavasoft.de. It does a thorough check of your system for spyware, finding not only program files, but also Registry entries and cookies, as shown in Figure 4-2. After it does a check, you can choose which of the spyware problems you want the program to fix, and it'll go about its work, deleting files, folders, and cookies, and fixing Registry entries. If you use file-sharing software, I highly recommend running Ad-Aware; many of these applications include spyware.
|
[Hack #85]
[Hack #89]
Protect your privacy and keep your surfing habits to yourself with proper cookie handling.
Cookies are small text files that web sites put on your hard disk to personalize the site for you or to track and then record your activities on the site. Cookies have gotten a lot of press-most of it bad-but the truth is, not all cookie use is bad. As a means of site customization, they're a great way of helping you get the most out of the Web. They can also carry information about log-in names and passwords, which is a time-saver, since you won't have to log into each site every time you visit. If you delete all your cookies, you won't automatically get your Amazon wish list the next time you visit their site.
|
But cookies can also be used to track your online activities and identify you. Information about you, based on what cookies gather, can be put in a database, and profiles of you and your surfing habits can be created.
Because cookies can be privacy-invaders, XP gives you a number of ways to restrict how web sites place and use cookies on your PC. To understand how to restrict the ways cookies are used on your PC, you first need to understand three cookie-related terms:
First-party cookie
A cookie created by the site you're currently visiting. These cookies are often used by sites to let you log on automatically-without having to type in your username and password-and customize how you use the site. Typically, these kinds of cookies are not invasive.
Third-party cookie
A cookie created by a site other than the one you're currently visiting. Frequently, third-party cookies are used by advertisers or advertising networks. Some people (including me) consider these kinds of cookies invasive.
Compact privacy statement
A publicly posted policy that describes the details of how cookies are used on a site-for example, detailing the purpose of cookies, how they're used, their source, and how long they will stay on your PC. (Some cookies are automatically deleted when you leave a web site, while others stay valid until a specified date.)
To protect your privacy, you also need to know the difference between implicit consent and explicit consent. Explicit consent means that you have specifically told a site that it can use personally identifiable information about you. It's the same as opting in. Implicit consent means that you haven't specifically told a site not to use personally identifiable information. It's the same as not having opted out, or specifically requesting to be taken off a list.
Internet Explorer lets you customize how it handles cookies. You can choose from six levels of privacy settings, from Accept All Cookies to Block All Cookies. When choosing, keep in mind that some sites won't function well or at all at the higher privacy settings, particularly if you choose to reject all cookies. I generally find that Medium High is a good compromise between protecting privacy and still being able to personalize web sites.
To customize your cookie settings in Internet Explorer, choose Tools >Internet Options >Privacy. Move the slider (shown in Figure 4-3) to your desired level.
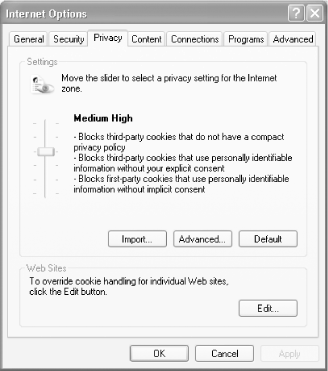
Table 4-1 shows how each setting affects Internet Explorer's cookie handling.
Table 4-1. Internet Explorer's privacy settings and your privacy |
|
|
Setting |
How the setting affects your privacy |
|
Block All Cookies |
Blocks all cookies, without exception. Does not allow web sites to read existing cookies. |
|
High |
Blocks cookies from all web sites that don't have a compact privacy policy. Blocks all cookies that use personally identifiable information without your explicit consent. |
|
Medium High |
Blocks third-party cookies from sites that don't have a compact privacy policy. Blocks third-party cookies that use personally identifiable information without your explicit consent. Blocks first-party cookies that use personally identifiable information without your implicit consent. |
|
Medium (Default) |
Blocks third-party cookies from sites that don't have a compact privacy policy. Blocks third-party cookies that use personally identifiable information without your implicit consent. Accepts first-party cookies that use personally identifiable information without your implicit consent, but deletes them when you close Internet Explorer. |
|
Low |
Blocks third-party cookies from sites that don't have a compact privacy policy. Accepts third-party cookies that use personally identifiable information without your implicit consent, but deletes them when you close Internet Explorer. |
|
Accept All Cookies |
Accepts all cookies, without exception. Allows web sites read existing cookies. |
|
You're not locked into IE's preset levels of cookie handling. If you like, you can customize how it handles cookies so that you could, for example, accept or reject cookies from individual sites, or accept or reject all first-party and third-party cookies.
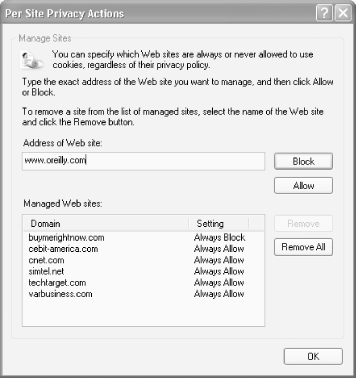
To accept or reject all cookies from a specific site, choose Tools >Internet Options >Privacy >Edit. You'll see the Per Site Privacy Actions dialog box, as shown in Figure 4- Type in the name of the site you want to accept or block cookies from, and click on either Block or Allow.
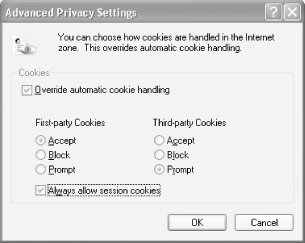
To customize how you handle first-party and third-party cookies, choose Tools >Internet Options >Privacy >Advanced. Check the 'Override automatic cookie handling' box, as shown in Figure 4-5. You can accept or reject all first-party or third-party cookies, or be prompted whether to accept them. You can also decide to always allow 'session cookies'-cookies that last only as long as you're on a specific web site and are deleted once you leave the site.
Although some cookies can be intrusive, some can also be helpful as well. They can log you into web sites automatically and customize the way you use and view the site. So, when you buy a new PC, you might want to export cookies from an older computer to it. If you have more than one PC, you might want all of them to have the same cookies. And you might want to back up your cookies for safe-keeping in case you accidentally delete the wrong ones.
To export or back up cookies from IE, choose File >Import and Export. The Import/Export Wizard will launch. Choose Export Cookies and follow the directions. A single text file containing all your cookies will be created in My Documents, though you can choose a different location for them. To import cookies, launch the Import/Export Wizard, choose Import Cookies, and browse to the location where the cookie file has been stored.
You can't examine and delete your cookies from within Internet Explorer. However, because XP stores each IE cookie as an individual text file, you can read them and delete them just as you would any other text file. Go to C:Documents and SettingsYour NameCookies in Windows Explorer, and you'll see a list of individual cookies in a format like this:
your name@abcnews.com[1].txtAs a general rule, the name of the web site or ad network will be after the @, but not always-sometimes it will merely be a number. Open the file as you would any other text file (in Notepad, WordPad, or another text editor). Usually, there will be a list of numbers and letters inside, though you might find other useful information in there-for example, your username and password for the web site. If you don't want the cookie on your hard disk, simply delete it as you would any other text file.
Netscape Navigator and Mozilla handle cookies differently than Internet Explorer. They store all cookies in a single file, cookies.txt, typically found in C:Documents and Settings<Your Name> Application Data]MozillaProfilesdefault********.slt, where ******** is a random collection of numbers and letters. So, the directory might be C:Documents and SettingsNameMozillaProfilesdefault46yhu2ir.slt. If you've set up different Netscape/Mozilla profiles (Tools >Switch Profile >Manage Profiles >Create Profile), cookies.txt won't be in the default subfolder, but under each profile's name. You can open the file and see each individual cookie. You can't however, delete individual entries from the file by editing this file. Instead, use Netscape's built-in Cookie Manager (at Tools >Cookie Manager >Manage Stored Cookies) to read and delete cookies.
The tools built into XP for managing cookies are reasonable, but for the most flexibility in handling cookies you should get a third-party cookie manager. My favorite (and my editor's favorite) is Cookie Pal, available at https://www.kburra.com. It lets you easily customize which sites you'll allow to put cookies on your PC, and it includes a cookie manager that lets you read and delete cookies. It also lets you accept or reject cookies on a case-by-case basis as you browse the Web. If you use browsers other than IE, you might be out of luck, though. As of this writing, Cookie Pal works only with Versions 3 and 4 of Netscape Navigator and Versions 4, 5, and 6 of Opera. (Mozilla and later Netscape version have similarly good managers built in, as mentioned earlier.)
Online ad networks have the potential to create in-depth, privacy-invading profiles of your web travels and personal interests, because they can place a single cookie on your hard disk that will track you across multiple sites. Normally, sites can't share cookie information with each other, but ad networks have found a way around this, so they can aggregate your behavior from many web sites.
You can fight back by opting out of some of the biggest online ad networks. You'll have them place an opt-out cookie on your hard disk that will tell the various sites not to track what you're doing; this will go a long way toward protecting your privacy.
To opt out of the DoubleClick online advertising network, go to https://www.doubleclick.com/us/corporate/privacy/privacy/ad-cookie/ and click on the 'Ad Cookie Opt-Out' button at the bottom of the page.
To see whether the opt-out worked, if you're an Internet Explorer user, go to your cookies folder, which is typically C:Documents and Settings<Your Name>Cookies. Look for a cookie named your name@doubleclick[1].txt-for example, preston gralla@doubleclick[1].txt. The contents of the cookie should look something like this:
id OPT_OUT doubleclick.net/ 1024 468938752 31583413 3447013104 29418226 *In Netscape Navigator, your cookies.txt file is typically found in C:Documents and Settings<Your Name>Application DataMozillaProfilesdefault********.slt, where ******** is a random collection of numbers and letters. So, the directory might be C:Documents and SettingsNameMozillaProfilesdefault46yhu2ir.slt. Look in the file for an entry that looks like this:
.doubleclick.net TRUE / FALSE 1920499138 id OPT_OUT
You can instead use Netscape's built-in Cookie
Manager to examine the cookie, by choosing Tools ![]() Cookie
Manager >Manage Stored Cookies.
Cookie
Manager >Manage Stored Cookies.
Some other advertising networks let you opt out as well. For details, go to https://www.networkadvertising.org/optout_nonppii.asp and follow the instructions for opting out. To verify that you've successfully opted out of the other ad networks, click on the Verify Cookies menu item on the left part of the page.
[Hack #33]
[Hack #63]
Take the Web with you wherever you go, and put it into an easily searchable database on your PC.
One of the main problems with doing research on the Web is that there's no easy way to save all the information you find and no simple way to read web pages when you're offline. Internet Explorer includes some basic tools for saving web pages and reading through them when you're not connected to the Internet. If you need to save only occasional pages and don't need to do searches through those pages, then these tools will work reasonably well for you. But if you want to store pages in categories and folders and need to do full-text searches, then you'll need a third-party program. This hack shows you how to do both.
To save your current web page to your hard disk so you can read it again in Internet Explorer when you're not connected to the Internet, choose File >Save As. You'll be given several options for how to save it. If you're not planning to edit the HTML of the file, your best bet is to save it as a Web 'Archive, single file' (.mht). That way, you don't clutter up your hard disk with extra folders and files stored in different locations; everything is saved to a single file. Saving it as a 'Web Page, complete' stores the HTML file as well as associated graphics, in a folder structure. Saving it as a 'Web Page, HTML only' saves just the HTML file itself, with no associated graphics and no folder structure. You can also save it as a text file, but if you do, expect to spend time cleaning it up, because it saves all the text on the page, often in an unstructured way. To read the page after you've saved it to your disk, choose File >Open, browse to the directory where you've saved the page, and open it.
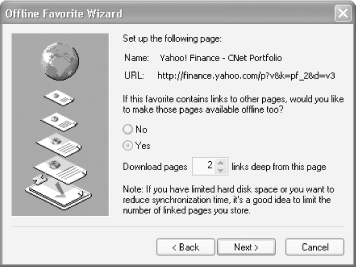
There are times when you want to save not just the page you're on, but also the pages linked off it. To do that, you'll have to save your pages another way. First, save the page to your Favorites list by pressing Ctrl-D or choosing Favorites >Add to Favorites. Then, right-click on the page where it's listed in Favorites and choose Make Available Offline. A wizard will appear. Follow its instructions, and when you get to the screen shown in Figure 4-6, tell it how many links deep you want pages saved. Be very careful when doing this, because even choosing to keep one link level can take up a substantial amount of hard disk space.
When you finish the wizard, you're asked how you want to synchronize the page or pages you've chosen to save to disk. When you synchronize a web page, IE grabs the latest version of the page or pages, and overwrites your existing page or pages. If you want to keep a permanent copy of the page or pages, and don't want them updated, choose 'Only when I choose Synchronize from the Tools menu.' Then, simply don't synchronize the page. If you instead do want to synchronize the page so that a more current version is available on your hard disk, choose 'I would like to create a new schedule,' and follow the instructions for creating a schedule.
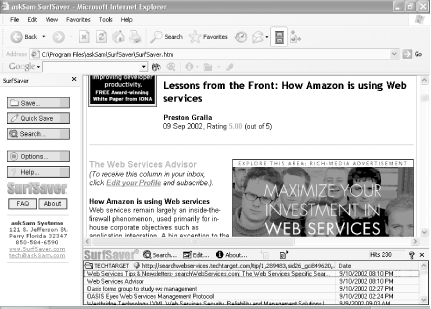
If you need to save many web pages and want to be able to search through them by full-text or keyword searches, you'll have to use a third-party program. My favorite is SurfSaver, available from https://www.surfsaver.com (see Figure 4-7). It integrates directly into Internet Explorer and lets you save pages in separate folders within the program. You can add keywords and notes to each page, and then search by keyword or full text, or browse by folder.
When you visit a web page you want to save locally, right-click on the page, choose SurfSaver Save, and choose which SurfSaver folder you want to save it in. You can save the page with or without graphics. When you want to search, right-click on the page, choose SurfSaver Search, and then search by keyword, through notes, or through the full text on the page to easily find the page and information you want. SurfSaver also integrates directly with the freeform askSam database.
Internet Explorer's default search features are anemic at best. Do better Internet searching by installing a Google Toolbar and other specialized search toolbars and powering up the default search.
Was there ever a Web before Google? Yes, but it was a heck of a lot harder to find anything in it. Internet Explorer's default search feature leaves a lot to be desired, not the least of which is its use of MSN Search instead of Google. But there's a lot you can do to do better Internet searching from your desktop. You can get search toolbars that integrate into your browser, and you can customize the Internet Explorer search feature as well.
The best way to empower Internet searches is by installing special toolbars from two popular search engines, Google and Ask Jeeves. The Google Toolbar is the better of the two, and not only because it's a better search engine. It also has several extra features.
The great thing about the Google Toolbar is, well, that it's Google. It gives you all of Google's functionality without even having to visit the site. To get the Google Toolbar for IE, go to https://toolbar.google.com and follow the installation instructions. It works only with Internet Explorer. Once you install it, you'll be able to search Google without having to visit the search site; just type your search term in the toolbar. In fact, you even get an extra on the toolbar that you don't get on Google itself-the PageRank feature that tells you how popular the current site you're visiting is.
|
The best of the Google Toolbar's best features is that it lets you do a Google search through the site you're currently on, a particularly useful tool if the site doesn't have a search box, or if the search on the site is a poor one. In fact, I rarely use sites' search boxes and prefer to use the Google Toolbar instead. Among other features, the Google Toolbar also lets you find sites related to the one you're currently visiting, and it will translate foreign-language sites into English. The Google Toolbar will also highlight your search terms on the page results if you tell it to.
|
Using the Google Toolbar is simplicity itself: type a search term into it and press Enter. If you want to search the current site instead of the entire Web, click instead on a small button on the toolbar that pictures two pairs of googly eyes on a magnifying glass.
|
If you're concerned about your privacy, you should disable the PageRank option. When you enable this option, the Google Toolbar tracks the page you're on. With it disabled, it doesn't.
|
If you decide to forgo the Google and Ask Jeeves search toolbars, there are still things you can do to power up Internet Explorer's Search Companion, which you get to by pressing Control-E or clicking on the Search button. You'll of course first want to get rid of the cloyingly cute animated dog that normally appears, by choosing Change Preferences when the Search Companion appears and then choosing 'Without an animated screen character.'
But the Search Companion has bigger problems than stray dogs.
It forces you through a step-by-step search, and, worse still, it clutters up
the search area with 'sponsored links' from advertisers. Type in the
name Preston, for example, and
you'll get sponsored links such as 'Hotels near Preston,' 'Buy
Fine Wines and Beer at Libation.com' and '
A better bet is to use what Microsoft calls the Classic Internet Search Companion, which
previous versions of Internet Explorer used. From the Search Companion choose
Change Preferences ![]() 'Change
Internet search behavior' >'with Classic Internet search'.
You'll have to close Internet Explorer and restart it for the changes to take effect.
As you can see in Figure 4-8, it's simpler and allows you to perform more
focused searches, specifically for web pages, addresses, business names, maps,
and to perform a previous search. Click the More button
to search for pictures and definitions of words.
'Change
Internet search behavior' >'with Classic Internet search'.
You'll have to close Internet Explorer and restart it for the changes to take effect.
As you can see in Figure 4-8, it's simpler and allows you to perform more
focused searches, specifically for web pages, addresses, business names, maps,
and to perform a previous search. Click the More button
to search for pictures and definitions of words.
By default, the Internet Explorer uses MSN as its search engine, but after you perform a search, if you don't find what you want, you can send the same query to other search engines by clicking 'Send search to more search engines' and then picking the engine you want to use. You can also change the default search engine by opening the Search Companion, choosing Change Internet Search Behavior, scrolling down the page that appears, and choosing a new default search engine from the list of 13.
WebFerret by Ferretsoft (https://www.ferretsoft.com) is free metasearch software that will send your search to multiple search engines simultaneously and display all the results in a single window, collating the results.
Copernic Agent Basic, a metasearch tool from Copernic (https://www.copernic.com) lets you perform more targeted searches, by sending your search to specialized search engines in a variety of categories when you choose a targeted search.
XP Professional's Group Policy Editor lets you tweak Internet Explorer in countless ways-from changing its logo and background, to changing its title bar text and beyond.
XP Professional owners have a reason to feel good about spending the extra $100 or so they forked over for their version of the operating system: the Group Policy Editor, available only in Professional, can make all kinds of secret tweaks to Internet Explorer. This tool, primarily used for setting network and multiuser policies and rights, can also be used to customize the way XP and Internet Explorer look and work. It makes it easy to customize many different aspects of Internet Explorer's behavior and appearance from one central place, without having to edit the Registry or delve deep into menus, dialog boxes, and options. You can customize how Internet Explorer looks and works for each individual account on the machine, or just for a single account if there is only one.
That means that you'll be able to create customized versions of IE for a variety of different purposes. For example, you can create customized browsers for your children, or for a business if you run or administer a small business.
Run the Group Policy Editor by typing gpedit.msc at a command line or the Run box and pressing Enter. When it opens, go to User ConfigurationWindows SettingsInternet Explorer Maintenance. There are five categories of Internet Explorer settings you can modify:
Browser User Interface
Connection
URLs
Security
Programs
To change individual settings, browse to any of the categories, then from the right pane choose the setting you want to configure-for example, to change the browser title. Double-click on the setting, then fill out the dialog box, such as the one shown in Figure 4-9, which lets you change Internet Explorer's static and animated logos.

There are quite a few settings you can change with the Group Policy Editor. Next, we'll take a look at what the best of each of these categories can do.
As the name implies, this section lets you customize Internet Explorer's interface. This section, as a whole, lets you create your own customized version of Internet Explorer. For example, you can create a version of IE specifically for one of your children-take a digital photo of her and use it as the background for the toolbar, crop a headshot photo of your child and use it as the animated custom logo, and change the browser title to put her name on it. There are three types of tweaks you can make in this section:
Browser Title
This option lets you customize Internet Explorer's titlebar text, though only to a limited degree; you can add your name or company's name to a text string of 'Microsoft Internet Explorer provided by.' For example, you can have the titlebar read 'Microsoft Explorer provided by Preston Gralla.' When you do this, Outlook Express will have the same title as well. Because you need to have that initial text string, this isn't a great hack unless you're a computer manufacturer and want to brand the browser.
Custom Logo
This setting lets you replace Internet Explorer's static and animated logo with logos of your own. Note that to do this, you'll first have to create the logos yourself. It's easier to use the Group Policy Editor to change your logo than to use the Registry.
Browser Toolbar Customizations
You can use your own bitmap as the background to the Internet Explorer toolbar. Additionally, you can delete the existing toolbar buttons and add buttons of your own. You don't have to worry if the bitmap you want to use is not the same size as the toolbar. XP will accommodate it-for example, by tiling a graphic that is smaller than the toolbar so that it appears multiple times.
This section lets you customize Internet Explorer's connection settings, which you would otherwise have to go to several places to set.
Connection Settings
This lets you customize your existing Internet connection settings and import them for another use on the PC. It doesn't have any use if you're the only user of the machine; it's intended to help you set up other accounts' connection settings. If you have a network at home, for example, you could copy the settings from one machine to every other machine on the network.
Automatic Browser Configuration
This is purely an administrator's tool. It lets you automatically change browser configurations on users' machines.
Proxy Settings
This lets you tell Internet Explorer to use proxy servers. You can also set up proxy servers from within Internet Explorer. For more details on setting up proxy servers, see [Hack #46].
User Agent String
This lets you customize the user agent string that is sent to web sites whenever you visit them. The user agent string gives out basic information about your operating system and browser to the web site so that the site can better track usage statistics. Using this setting lets you append a specific text string to your PC's user agent string.
This section is mainly for administrators, so if you don't need administrative tools you can pretty much forgo it. If you are an administrator, it will let you specify IE settings for multiple machines, such as setting a home page for all, specifying a URL they will go to when Help is chosen, and populating their Favorites with those of your choice. If you run a small business, you can use these settings to build a business-specific browser for all of your employees. For example, set the home page to be your company's home page or populate Favorites with Intranet pages or other pages your employees need to access regularly, such as benefits information.
Favorites and Links
This lets you create a Favorites folder and links, or import them. It's primarily an administrator's tool, since it doesn't add much extra functionality to the normal way that you can manage Favorites.
Important URLs
You can specify the starting page, create your own customized Search bar, and create a Help page that will display when someone clicks on Help >Online Support. Again, this is primarily an administrator's tool.
Here's where to set Internet Explorer security settings. You can change these settings from directly within Internet Explorer just as easily as changing them here, unless you need to change the settings for several accounts, in which case here's the place to go.
Security Zones and Content Rating
You can customize both security zones and content ratings, which limit sites with objectionable content from being visited. This is primarily an administrator's tool, since these settings can be edited easily from inside Internet Explorer by choosing Tools >Internet Options >Security and Tools >Internet Options >Content. But it's ideal for parents who have networks at home and want to customize different security settings for their children's computers. You can set a higher level of security for children's computers and a lower level for parents' PCs.
Authenticode Settings
This lets you designate specific credential agencies and software publishers as trustworthy. This is primarily an administrator's tool, since these settings can be edited easily from inside Internet Explorer by choosing Tools >Internet Options >Security and Tools >Internet Options >Content >Certificates.
Once again, this section is mainly for administrators. It lets you change default programs for multiple machines. So, for users who require only a simple email program, you can set the default to be Outlook Express. For other users, you can set it as Outlook or a third-party email program.
Programs
This lets you change the default programs to be used for purposes such as email, HTML editing, and others. This is primarily an administrator's tool, since these settings can be edited easily by choosing Tools >Internet Options >Security and Tools >Internet Options >Programs.
Don't wait any longer for slow file downloads. Use this free program to accelerate them, regardless of your connection speed.
No matter how fast your Internet connection is it's not fast enough. Whether it's a pokey dial-up or a broadband connection, you always have complaints and you always have a greater need for speed.
This is particularly true when you're downloading files, especially large ones. While there may be no way to physically change your connection speed, you can get the free Download Accelerator Plus (DAP) program from SpeedBit (https://www.speedbit.com) to speed up your downloads significantly, whether via FTP or HTTP.
The program accelerates your downloads in two ways. When you start to download a file, DAP does a mirror search of all the servers that carry the same file, identifies the fastest servers closest to you, and then starts downloading from those servers instead of the one you originally chose. It also sets up a multiconnection download, downloading portions of the file from multiple fast servers simultaneously and then reassembling the file when all the pieces are on your PC. This makes the most efficient use of your available bandwidth, because normally there are pauses and hesitations when you download, and if you're downloading with multiple connections there will be fewer of those pauses.
The program also resumes broken downloads; if for some reason your connection is broken, it'll pick up where you left off when you next connect to the Internet. Also useful is the ZIP preview feature that lets you preview the contents of ZIP-compressed files before you download. And it'll schedule downloads for you as well. For example, you can schedule downloads to take place overnight, when you're away from your computer.
DAP is free, but the free version delivers ads inside the program. For $19.95 you can get a version without the ads that also includes a few minor extras, such as the ability to extract individual files from within .zip archives, instead of extracting the whole archive.
Feel like someone is watching you? On the Web, they probably are. Protect your privacy by using anonymous proxy servers.
Whenever you surf the Web, you leave yourself open to being snooped upon by web sites. They can track your online travels, know what operating system and browser you're running, find out your machine name, peer into your clipboard, uncover the last sites you've visited, examine your history list, delve into your cache, examine your IP address and use that to learn basic information about you such as your geographic location, and more. To a great extent, your Internet life is an open book when you visit.
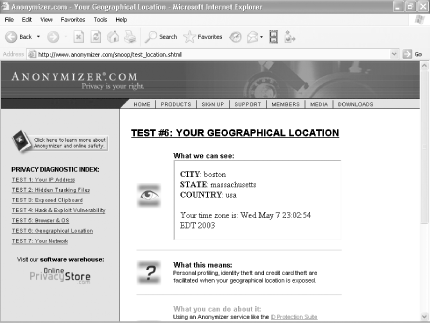
Don't believe me? Head to https://www.anonymizer.com/snoop/test_ip.shtml.
This page, run by the Anonymizer.com web
service, tells you what your IP address and machine name are. And that's just a
start. Click on the links on the left side, such as 'Exposed
Clipboard' and 'Geographical Location.' You'll see just a small
sampling of what web sites can learn about you. Figure 4-10 shows a web site
reporting on my geographic location. It's close enough; I live in
Much of the reason why web sites can find out this information about you is due to the trusting nature of the Internet's infrastructure and is inherent in the open client/server relationship between your web browser and the servers on the sites you visit. But a lot of it also has to do with the ability to match up information from your PC to information in publicly available databases-for example, databases that have information about IP addresses.
The best way to make sure web sites can't gather personal information about you and your computer is to surf anonymously; use an anonymous proxy server to sit between you and the web sites you visit. When you use an anonymous proxy server, your browser doesn't contact a web site directly. Instead, it tells a proxy server which web site you want to visit. The proxy server then contacts the web site, and when you get the web site's page you don't get it directly from the site. Instead, it's delivered to you by the proxy server. In that way, your browser never directly contacts the web server whose site you want to view. The web site sees the IP address of the proxy server, not your PC's IP address. It can't read your cookies, see your history list, or examine your clipboard and cache, because your PC is never in direct contact with it. You're able to surf anonymously, without a trace.
There are two primary ways to use anonymous proxy servers. You can run client software on your PC, which does the work of contacting the server for you, or you can instead visit a web site, which then does the work of contacting the server.
If you don't want to go to the hassle of installing a client-and if you don't want to pay for software-to surf anonymously, go to Anonymizer.com (https://www.anonymizer.com). In the box near the top of the page, type the name of the site to which you want to surf, and you'll head there anonymously. The proxy server will grab the page for you, and you'll get the page from the proxy server. You can also download a free version that runs as a toolbar in Internet Explorer. Surf as you would normally, and you'll visit those web sites directly. When you want to visit a site anonymously, click on a button and the anonymous proxy server will do the work for you.
A fuller version of the program is available on a subscription basis for $29.95 per year or $9.95 for three months. It blocks banner ads, stops pop ups, encrypts the URLs you type so that they can't be read by your ISP or network administrator, and adds a few other features as well. I don't find the extra features worth the money, but if these kinds of things are important to you, go ahead and spend the money. (To learn how to block pop-ups, turn to [Hack #33].)
|
If you prefer to install software, get Steganos Internet Anonym 5 (https://www.steganos.com/en/sia). In addition to anonymous proxy serving, it kills pop ups and manages cookies. You can try it for free, but if you want to keep it you'll have to pay $29.95.
[Hack #34]
[Hack #46]
[Hack #48]
Go to https://www.gilc.org/speech/anonymous/remailer.html to send email anonymously so that it can't be traced to you as the sender. Whistle-blowers might want to use this feature, but others should make sure not to abuse it.
For shareware that cleans out your cached files, destroys your history trail, and uses a variety of other methods to clean all traces of where you've surfed, try SurfSecret Privacy Protector (https://ww.surfsecret.com).
XP Professional includes a free, built-in web server. If you're planning on using it, check out these tips to improve your site's performance, cut down on bandwidth, deliver pages faster, and reduce Page Not Found errors.
If you've wanted to host a web server but don't want to go to the trouble of configuring a separate machine and server, XP Professional has help for you. Windows XP Professional comes with Internet Information Services (IIS) Version 5.1, which lets you host web sites and FTP sites and run a Simple Mail Transfer Protocol (SMTP) service for sending email. (The Home Edition doesn't include any of these capabilities.) It's not something you'll use to build a substantial web site, because it has some significant drawbacks. The web server and FTP server allow only 10 simultaneous connections, for example, and the SMTP server isn't a full-blown mail server; it can only act as a relay.
Still, if you want to host a small web site for friends, family, or only for internal use for a small business, or if you want to build a 'staging server' to test out sites before publicly posting them on a different server, IIS is a good bet.
IS isn't installed by default in XP Professional. To install it, choose Control Panel >Add or Remove Programs >Add/Remove Windows Components and, from the Windows Component Wizard that appears, highlight Internet Information Services (IIS) and click on Details.
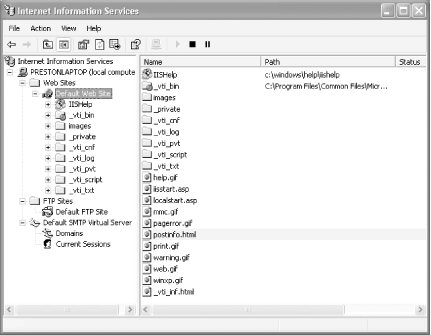
Administer your web site by using the Microsoft Management Console (MMC) IIS snap-in. Choose Control Panel >Administrative Tools and double-click on Internet Information Services. The console tree, shown in Figure 4-11, shows the structure of your web and FTP sites and also gives you control over those sites.
In this hack, I'll assume that you know the basics of building a web site with IIS, so I'll instead clue you in to secrets of IIS.
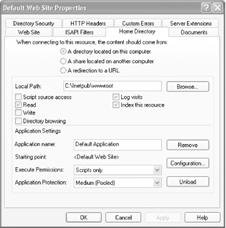
By default, IIS uses the C:Inetpubwwwroot directory for your web site. However, you'll most likely want to change that directory to one that better matches your own PC setup. To change it, launch the MMC snap-in as detailed earlier in this hack, then right-click on Default Web Site and choose the Home Directory tab, shown in Figure 4-12. In the Local Path box, type in or browse to the directory you want to use.
If you want to use a directory on another computer located on the network, select 'A share located on another computer.' The Local Path box changes to Network Directory, and the Browse button changes to a Connect As button. Type in the directory information from the other computer, then click on Connect As to use your logon credentials to use the network share.
This tab also lets you do a redirect of your web site so that when someone visits your web site they'll be redirected to another site. That site doesn't have to be on your network; it can be any location on the Internet. This option is most useful when you move your web site to another URL but want those who use the old URL to be able to access it. To do a redirect, select 'A redirection to a URL.' The screen will change to the screen shown in Figure 4-13.
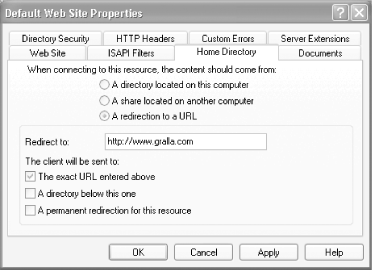
You have three options for your redirect:
The exact URL entered above
This redirects all traffic to the URL you specified.
A directory below this one
This lets you force a redirect of a parent directory to a child directory. For example, if someone were to type www.mysite.com in their browser, and you wanted them to end up at www.mysite.com/pics, you'd choose this option and have the location www.mysite.com/pics in the 'Redirect to' box.
A permanent redirection for this resource
When this option is chosen, a ' Permanent Redirect' message will be sent to the visiting browser. This can be used by some browsers to automatically update their bookmarks or Favorites list with your new site location.
They're the bugaboo of every web site administrator-people who mistype URLs and get the dreaded '404 The page cannot be found' error. For example, if someone wanted to visit https://www.gralla.com/mybio.htm, but instead typed https://www.gralla.com/myboi.htm into their browser, they'd get an error message. And I'd lose a visitor.
Solve the problem with URLSpellCheck for IIS (https://www.port80software.com/products/urlspellcheck/). It redirects misspelled URLs to the right page, so that your visitors don't get error messages. It fixes instances in which an extra character is put into the URL, characters are transposed, a character is missing, or the wrong character is typed. It will also fix instances when the incorrect extension is typed.
|
The program runs as a snap-in to the MMC. Highlight your web site in the MMC, right-click on the Properties button, and click on the URLSpellCheck tab. From there, you'll be able to enable or disable the program.
URLSpellCheck is shareware and free to try, but if you use it for more than 30 days you're expected to pay $49.95.
When you run a web site, three issues top your list of concerns: how to preserve bandwidth, how to reduce the performance load on your PC, and how to make the site load faster for visitors.
Here's a three-for-one solution: use caching properly. When visitors come to your site, have them use cached images such as logos, navigation bars, and similar content from their own PC, rather than hitting your server every time. When you do this, after they retrieve the image for the first time, each subsequent time they need to get the image, it's retrieved from their own PC, rather than your server. Their pages load faster, your PC doesn't have to serve up as much content, and you don't use as much bandwidth.
To make sure your site uses caching, try CacheRight (https://www.port80software.com/products/cacheright/). Like URLSpellCheck, it runs as a snap-in to MMC. To use it, highlight your web site in MMC, right-click on the Properties button, and click on the CachRight tab. From there, you'll be able to enable or disable the program, as well as set options for how the cache should be used. The main option you'll set is expiration policies for the cache-in other words, at what point the visiting browser should check your web site to see whether the content the browser has cached is old and needs to be updated. You set the amount of time, such as a week, and set when that time should start, either the last time the browser visited your site or the last time you modified the cached content. I prefer to use the start time as the last time I modified the cached content; that way, browsers won't unnecessarily try to get content from my site.
CacheRight is shareware and free to try, but if you use it for more than 30 days you're expected to pay $149.95.
The IISFAQ site (https://www.iisfaq.com) is a great source for tips, advice, and downloads related to IIS.
To get the most out of surfing the Web, you need the most updated version of Java. That can be harder to do than you think, but this hack will show you how.
Running a Java applet when you visit a web site should be a no-brainer; click on a link and the application should run. Unfortunately, XP users have found out that isn't always the case. You may visit Java sites only to find that you can't play games, log into interactive stock and weather sites, or do any of the other things Java can be used for.
Unfortunately, there's no single fix for all Java woes. There are many potential causes, ranging from display errors, to running an old version of Java, and more. Here, though, are the primary ways you can fix Java on your machine.
In order to run Java applets, you need a Java Virtual Machine (JVM) installed on your system. Microsoft and Sun have, in the past, had competing JVMs. Applets written for one JVM may or may not work with the other JVM.
To make things more confusing, Microsoft and Sun have been locked in a bitter legal battle about Java which rivals the Jarndyce and Jarndyce court case at the center of Dickens novel Bleak House. To fully explain the Microsoft/Sun fight would take about as many pages as Dickens' 1,000-plus-page novel. The upshot is this, however: because of a court ruling, Microsoft will no longer distribute or support its JVM (which it calls Microsoft VM) after January 200 And the Microsoft VM may or may not be enabled in your version of XP.
So if you're having problems with Java, the first thing to do
is see whether you have a JVM installed and whether you're using the Sun
version, the Microsoft version, or both
versions. To see whether Microsoft VM is enabled, from Internet Explorer choose
Tools ![]() Internet
Options
Internet
Options ![]() Security.
Highlight the Internet Zone, choose Custom Level, then
scroll down until you come to the Microsoft VM section, shown in Figure 4-1
Security.
Highlight the Internet Zone, choose Custom Level, then
scroll down until you come to the Microsoft VM section, shown in Figure 4-1
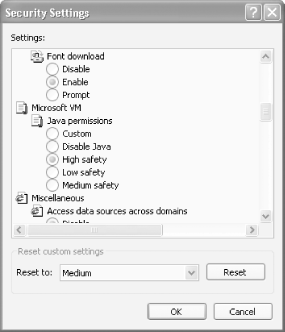
If the Disable Java button is chosen, it means the Microsoft VM is disabled on your system.
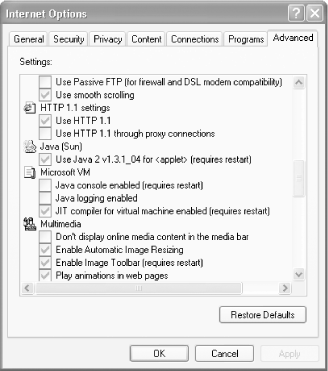
To check whether you have the Sun JVM and whether it's enabled, from Internet Explorer choose Tools >Internet Options >Advanced and scroll down. If you see a Java (Sun) entry with a checkbox next to it, as pictured in Figure 4-15, then the Sun JVM is installed.
If you don't have the Microsoft VM or the Sun JVM installed, the solution is simple: install and enable one of them. Because Microsoft will not be supporting its VM after January 2004, your best bet is to install the Sun JVM from https://www.java.com/en/download/windows_automatic.jsp.
If the Microsoft VM or the Sun JVM show up (as in Figure 4-14 or Figure 4-15, respectively), but they're not enabled, you'll need to enable them. To enable the Microsoft VM, in the screen pictured in Figure 4-14 choose High Safety. That will enable the VM but will take security precautions against rogue Java applets. To enable the Sun JVM, select the checkbox under Java (Sun), as shown in Figure 4-15.
Your problem may be that you have an older JVM or Microsoft VM installed, and you need to update it. Go to https://java.sun.com and check the version number against the version number displayed in Figure 4-15. If your version number is older, you should install a newer JVM. Additionally, if you're using the Microsoft VM, you may instead want to install the Sun JVM in its place, since Microsoft will discontinue support for its VM.
People have reported problems when installing a newer JVM over an older one, so I suggest first uninstalling the old JVM or Microsoft VM and then installing the new one from https://www.java.com/en/download/windows_automatic.jsp. Unfortunately, uninstalling the Sun JVM or Microsoft VM is not a simple process and requires Registry editing as well as manually deleting files. Here's how to do each.
There's good news and bad news about uninstalling an old Sun JVM. The good news is that it might go off without a hitch and take only a single step. The bad news is that you might not be so lucky, and then it'll be time to head to the Registry.
To uninstall an old Sun JVM, choose Control Panel >Add/Remove Programs. Select the Java Runtime Environment entry, click Change/Remove, and follow the uninstallation wizard. The JVM will be-or should be-uninstalled.
Sometimes, however, even after you do that, the Java Runtime Environment entry remains in the Add or Remove Programs screen. Theoretically, this should not cause a problem-because the underlying JVM has been uninstalled-but it's not clear whether in practice it will cause problems. So, you'll be best off to remove the entry in the Add or Remove Programs screen. You'll do it by deleting Registry entries and a folder.
Run the Registry Editor [Hack #68] and go to HKEY_LOCAL_MACHINE/Software/Microsoft/Windows/CurrentVersion/Uninstall. You'll find many keys enclosed in curly brackets, like this: . One of these keys is the Java uninstall Registry entry, and you need to delete it. You won't be able to know which entry to delete by the key name, because the keys aren't descriptive and each are strings of long numbers enclosed in curly brackets. To find which to delete, you need to find the one that has a DisplayName with a String value that starts with Java, such as Java 2 SDK, SE v1.1_02. To find out which key to delete, search for the word Java by pressing Ctrl-F in the Registry, typing the word Java, and then doing a search for it. You'll be brought to the key that needs to be deleted. Before deleting the key, write down its entire name, because you'll need it for the next step. Then you'll delete it.
Next, go to the uninstall folder for Java and delete that folder. Delete C:Program FilesInstallShield Installation Information , where is the value of the registry key you deleted. After you do that, when you restart Add or Remove Programs, the Java entry will be gone.
Uninstalling the Microsoft VM takes a bit of work as well. From the Run box, enter the command RunDll32 advpack.dll,LaunchINFSection java.inf,UnInstall. You'll get a warning box asking if you want to go through with the uninstallation process. Click Yes to continue, and reboot your PC when prompted.
After you reboot, delete these items:
The C:Windowsjava folder
The java.pnf file from the C:Windowsinf folder
The jview.exe and wjview.exe files from the C:Windowssystem32 folder
The Registry subkey HKEY_LOCAL_MACHINESOFTWAREMicrosoftJava VM
The Registry subkey HKEY_LOCAL_MACHINESOFTWAREMicrosoftInternet ExplorerAdvancedOptionsJAVA_VM
That will completely remove the Microsoft VM. You can now install the Sun JVM from https://www.java.com/en/download/windows_automatic.jsp.
Java applets won't run unless you have a minimum color setting of 256 colors. If you don't use that minimum setting, you'll crash when you visit a web page with a Java applet. To change your display settings, right-click on the desktop, choose Properties >Settings, and in the Color Quality drop-down box choose a display setting of at least 256 colors.
If you use at least 256 colors and you still experience problems, the cause may be a buggy video driver. To help find out if this is the cause of the problem, change your current display settings to a lower resolution and color depth than you're currently using-for example, bring it from 1,024 x 768 to 800 x 600, and the colors from Highest (32bit) to 256 colors. If that solves the problem, you may have a display driver with bugs in it. Go to the manufacturer's web site and download a new driver.
|
Politica de confidentialitate | Termeni si conditii de utilizare |

Vizualizari: 993
Importanta: ![]()
Termeni si conditii de utilizare | Contact
© SCRIGROUP 2025 . All rights reserved