| CATEGORII DOCUMENTE |
| Asp | Autocad | C | Dot net | Excel | Fox pro | Html | Java |
| Linux | Mathcad | Photoshop | Php | Sql | Visual studio | Windows | Xml |
BOOT FROM USB
To be able to boot rom a device we need so
called bootsectors.
The simple explanation is this: When the PC starts,
the BIOS will scan the indicated storage devices and look for these
bootsectors. They contain information for the BIOS to be able to start from
this device. Bootsectors can be found on all bootable media (harddisk, floopy
disk, CDRom, etc).
Option 1 - Using a floppy disk formatted in Windows
Before we can make a USB device bootable (specifically refering to USB thumbdrives!), we do need to get our hands on a bootable floppy. In all current Windows versions (including Windows 2000 and XP) we can do that by formatting a floppy disk.
Open the Windows Explorer and right click the A: drive.
Choose 'Format' from the upcoming popup menu.
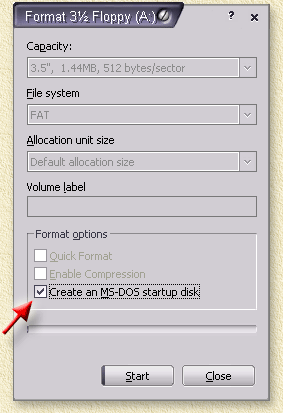
A window appears with some option: Check the
option 'Create an MS-DOS startup disk'.
Verify if Windows is indeed formatting the right drive! Usually it should show
'Format 3 Floppy (A:)'.
Once you're sure about the drive, click the 'Start' button -
Windows will now format the disk and make it bootable.
Windows -
Creating a bootable floppy
After creating this bootable floppy, we will now extract the bootsectors from this floppy using Bart's MKBT.
Open a DOS Window and go to the directory
where you extracted MKBT.
Type mkbt -c a: bootsect.bin as shown below (yellow text).
|
C:WindowsSystem32cmd.exe |
|
D:Downloadsmkbt20>mkbt
-c a: bootsect.bin D:Downloadsmkbt20> |
Note: Here 'a:' represents the drive that holds the newly made bootable floppy!
Once the command prompt returns, you will have a bootsector stored in the file 'bootsect.bin'.
Do not close this DOS window yet, we will need it again in step 3!
Option 2 - Using images of bootable floppies
On the Internet you can find a lot of bootable
disks. Take a look at the BootCD.info website.
You will find plenty of floppy disk images and tools to write these images to
floppy disk.
Most of these disks are specialized, for example direct network access, packed
with handy tools, etc.
Follow the instructions there on how to make a bootable floppy.
One of the best network enabled bootdisks is
'Bart's Network Boot Disk'.
I highly recommend this disk for the advanced user!
Tip: Some .BAT files refer to the A: drive directly - this CAN cause problems during boot!
Step 2: Preparing the Thumbdrive
Format the tumbdrive in the same format you
formatted the floppy disk (which is FAT!).
So if you used the option where we created a bootable floppy in Windows, the
format the thumbdrive using FAT or FAT16.
You can try NTFS or FAT32, but I have to say that both faioled on the
thumbdrives I tried.
Right click the drive letter of the thumbdrive and select the option 'Format'.
Select the proper format (FAT) and click 'Start'.
Step 3: Copy the bootsectors to the ThumbDrive
Thanks to MKBT by Bart (visit his website
for more fun tools!) we can now easily copy the bootsectors onto the USB
thumbdrive.
Download the file either from his website (to get the most recent version, or
to take a look at his other cool tools) or download version 2.0 from our
website (see our downloads
page
!! AGAIN: MAKE SURE YOU SELECT THE
Here 'G:' represents the thumbdrive!
Once the command prompt returns, you will have a bootsector on your thumbdrive.
Now shutdown/restart your PC and go into the BIOS.
Entering the BIOS is commonly done by pressing the '
- Go into the BIOS
- Go to the page that determines the boot order (usually called 'Advanced Setup Boot options', or 'Feature Setup
- Try
all USB drive variants. Start with 'USB ZIP',
then 'USB FDD USB HDD ',
etc. -
To speed up the testing, DISABLE ALL other boot devices. This goes for the 2nd,
3rd etc, but also for so called 'Alternative boot
devices
Depending on the version of your AMI-BIOS (enter using the
'
Go to 'Advanced Setup'.
Set the '1st Boot Device' to 'USB RMD-FDD
Reboot the PC and it now should boot from the Thumbdrive.
Option 2;
Settings I found on a German website (www.chip.de).
On my Shuttle XPC (SN85G4), the Phoenix/Award BIOS:
Go
to 'Advanced BIOS Features'.
Go to the '1st Boot device' and set it to 'USB-ZIP
|
Politica de confidentialitate | Termeni si conditii de utilizare |

Vizualizari: 1255
Importanta: ![]()
Termeni si conditii de utilizare | Contact
© SCRIGROUP 2026 . All rights reserved