| CATEGORII DOCUMENTE |
| Asp | Autocad | C | Dot net | Excel | Fox pro | Html | Java |
| Linux | Mathcad | Photoshop | Php | Sql | Visual studio | Windows | Xml |
Search results are only as accurate as the last time the index was updated. As the content of public folders or mailbox stores changes, the index must be updated to reflect the new content. Index updates can be performed manually or automatically on a schedule.
To work with full-text indexes, you must be at least an Exchange Administrator. To move files as described in this appendix, you must have read and write permissions on the appropriate drives and directories.
Microsoft recommends the following hardware configurations for servers on which you deploy full-text indexes:
Use a mirrored redundant array of independent disks (RAID) configuration. Microsoft recommends using a RAID 0+1 configuration (or RAID 1+0). RAID-5 is not recommended for full-text indexing.
Make sure that the disk containing the index is large enough that it has 15 percent free disk space at all times. Depending on the types of files that you store, the size of your index can range from 10 percent to 30 percent of the size of your database.
Add an additional 256 megabytes (MB) of RAM to the recommended configuration for a computer running Microsoft Exchange Server 2003. Microsoft does not recommend running full-text indexing with less than 512 MB.
Before you configure full-text indexing, verify that your Exchange topology is configured and running correctly. If you change your Exchange organization after you configure full-text indexing, the index could require a full repopulation. In addition, verify the following:
The Simple Mail Transfer Protocol (SMTP) address configuration is stable and functioning. This configuration affects the URL that is used to index objects.
The server language is set correctly. To verify the language, open Control Panel, double-click Regional Options, and then check the language settings for the system. Full-text indexing references the server language that is specified in Control Panel when breaking words and stemming-a process that allows a search for 'travel' to return 'travels,' 'traveled,' and 'traveling.' Full-text indexing works best when the query language of the client computer matches the language of the files that are being indexed. The server language is sometimes used for the query language when the client computer language is unknown, so it is best for the server language to match the language of most of the documents on the server.
All servers are functioning properly, and connectivity throughout the organization is stable. Perform tests to ensure that all servers are configured correctly within the organization.
Use Exchange System Manager to deploy full-text indexing. Deployment involves the following tasks:
Creating a full-text index
Optimizing full-text indexing
Performing a full population
Setting a schedule for incremental populations
Enabling full-text indexing queries
Notifying users
Of these tasks, the most server-intensive is the full population process, which can take from a few minutes for a small database to several days for a large database. However, you can run the population process in the background during business hours without significant impact on system response time for users.
Before you can use full-text indexing, you must create an initial index (catalog) for each mailbox or public folder store that you want to index. This process will create the necessary file structure, which you will modify when you are optimizing the index.
To create an initial full-text index
In Exchange System Manager, right-click the mailbox store or the public folder store that you want to index, and then click Create Full-Text Index.
When a dialog box prompts you to select the location for the index, specify a place for the index on the RAID array.
Use the following steps to optimize full-text indexing on your computer running Exchange 2003. As stated earlier, by distributing frequently accessed files across a RAID array, you can enhance system performance.
There are five major categories of full-text indexing files. By default, these files are installed on the system drive, which typically does not have the input/output (I/O) throughput of the RAID array. Arrange the disk locations of these files (as described in Table F.1) to optimize the performance of full-text indexing. In some cases, this appendix provides separate procedures for moving files in clustered topologies and unclustered topologies.
Catalogs are the main indexes. There is only one catalog for each mailbox store or public folder store in Exchange.
Property store is a database that contains various properties of items indexed in the catalog. There is only one property store per server.
Property store logs are the log files associated with the property store database.
Temporary files are the files that contain temporary information used by the Microsoft Search service.
Gather logs are the log files that contain log information for the indexing service. One set of logs exists for each index.
This section refers to the following tools for moving files:
Pstoreutl, located in Program FilesCommon FilesSystemMSSearchBin.
SetTempPath, located in Program FilesCommon FilesSystemMSSearchBin.
Catutil, located in Program FilesCommon FilesSystemMSSearchBin.
Table F.1 Recommended locations for full-text indexing files
|
File type |
Recommended location |
How to specify the location |
|
Catalog |
RAID array |
Specify a location on the RAID array when you create the catalog using Exchange System Manager. Note |
|
Property store |
RAID array |
Use the Pstoreutl tool. |
|
Property store logs |
RAID array in the same location as the property store |
Use the Pstoreutl tool. |
|
Temporary files |
RAID array Note |
Use the SetTempPath tool. |
|
Gather logs |
Leave in the default location, or move to any location you prefer. |
Assign the location in the StreamLogsDirectory registry key. |
Warning
Incorrectly editing the registry can cause serious problems that
may require you to reinstall your operating system. Problems resulting from
editing the registry incorrectly may not be able to be resolved. Before editing
the registry, back up any valuable data. For information about how to restore
the registry, view the 'Restore the Registry' topic in the Registry
Editor (Regedit.exe) Help or the Regedt32.exe Help.
To optimize full-text indexing
Move the property store and the property store logs.
Move the temporary directory.
Move the index (catalog).
Move the gather logs.
Increase the message size limit.
Set up checkpointing.
The checkpointing feature was provided in Microsoft Exchange 2000 Server Service Pack 2 (SP2) and later to prevent possible indexing problems.
Each of these steps is explained in more detail in the following procedures.
When the first index is created on your server, Exchange creates a new property store database on your Exchange system drive. To improve performance, move the property store database files to your RAID array. You need to move the property store and the property store logs only one time for each server, because all indexes on a server use the same property store.
To move the property store in a non-clustered environment
From a command prompt, use the Pstoreutl tool to move the database to the new drive (see the following example).
Restart the Microsoft Search service.
Example Your Exchange property store database is on drive C and your server name is 01. You want to move the property store to drive D. From a command prompt, run the Pstoreutl tool. Use the -m option to move the database to the specified location and the -l option to change the directory for log files. Enter the following command on the same line; it is shown on separate lines for readability:
pstoreutl.exe ExchangeServer_01 -m
d:exchsrvrExchangeServer_01ExchangeServer_myserver.edb -l
d:exchsrvrExchangeServer_01
To move the property store in a clustered environment
Leave the Microsoft Search service running in Control Panel. Use Cluster Administrator to take the MSSearch resource (the cluster resource for the Microsoft Search service) offline.
Use the Pstoreutl tool to move the database to the new drive.
The Exchange data directories are located on the shared disk that you specified when you created the Exchange virtual server.
Use Cluster Administrator to bring the MSSearch resource online.
By default, the gather and filter temporary files (also known as temp files) are located on the Exchange system drive, which typically does not have the I/O throughput of the RAID array. Use the SetTempPath tool to move the temporary directory to the RAID array. You need to move this directory only one time for each server, because all indexes on a server use the same temporary directory.
To move the Microsoft Search service temporary directory
From a command prompt, run the SetTempPath tool. (For syntax, see the following example.)
Stop and then restart the Microsoft Search service.
Example Enter the following command on the same line; it is shown on separate lines for readability:
cscript 'c:Program FilesCommon FilesSystemMSSearchBinsettemppath.vbs' d:temp
You can view the current location of the temporary directory at any time by running the preceding SetTempPath script with no parameters.
Note
On a cluster, the full-text index temporary directory must be
located on a drive that will not fail over. Make sure that you place the
temporary directory on a local drive, or on a drive on the RAID array or
Storage Area Network that is configured to run only on a designated computer.
The index should be located on the RAID array. If you did not specify this location when you created the index, use the Catutil tool to move it.
To move an index
Pause any active full- or incremental-index population processes.
From a command prompt, run the Catutil tool.
Note
For help using the Catutil tool, go to the command prompt and
type catutil movecat /?.
Important
When you use the Catutil tool, the index moves successfully and
functions correctly, but the index location that is displayed in Exchange
System Manager is not updated. This does not affect the normal operation of
full-text indexing. You cannot correct the display, but you can check the
current location of the index at any time by viewing the following key in the
registry:
HKEY_LOCAL_MACHINESoftwareMicrosoftSearch1.0Indexer<application name><index name>ProjectPath
As mentioned previously, the gather logs are created on the Exchange system drive, which typically does not have the I/O throughput of the RAID array. You can choose to leave the gather logs in the default location, or you can specify a location on a higher-performance drive by editing the StreamLogsDirectory registry key. Be sure that you specify a valid directory, because full-text indexing does not function if you specify an invalid directory. The Microsoft Search service does not need to be running when you edit the registry key. However, if you edit the registry key while the Microsoft Search service is running, you must restart the service after you make the change for the change to take effect.
Warning
Incorrectly editing the registry can cause serious problems that
may require you to reinstall your operating system. Problems resulting from
editing the registry incorrectly may not be able to be resolved. Before editing
the registry, back up any valuable data.
To move the gather logs
Start Registry Editor.
In the Registry Editor, specify the preferred location for gather logs using the following registry key:
HKEY_LOCAL_MACHINESoftwareMicrosoftSearch1.0gather
ExchangeServer_<instance><index name>StreamLogsDirectory
Note
On a cluster, before you change the StreamLogsDirectory
registry key, make sure that the MSSearch resource is online. Also, make sure
that you are editing the correct node by using Cluster Administrator to verify
the node on which the group is running. After you change the registry key, use
Cluster Administrator to restart the MSSearch resource by taking it offline,
and then bringing it back online.
By default, the index includes messages (including attachments) that are 16 MB or less in size. Therefore, messages with large attachments may be excluded from the index and from the search results of users. To avoid performance problems, Microsoft recommends that you increase this limit to the maximum setting of 4000 MB so that larger messages and attachments are indexed.
The Microsoft Search service does not need to be running when you edit the registry key. However, if you edit the registry key while the Microsoft Search service is running, you must stop and restart the service after you make the change for it to take effect.
To increase the message size limit
Start Registry Editor.
In Registry Editor, set the following registry key to 4000 MB:
HKEY_LOCAL_MACHINESoftwareMicrosoftSearch1.0
Gathering ManagerMaxDownloadSize
Note
On a cluster, before you change the MaxDownloadSize
registry key, make sure the MSSearch resource is online. Also, make sure you
are editing the correct node by using Cluster Administrator to verify the node
on which the group is running. After you change the registry key, use Cluster
Administrator to restart the MSSearch resource by taking it offline, and then
bringing it back online.
It is strongly recommended that you use the checkpointing script provided with Microsoft Exchange 2000 Server SP2 to prevent possible indexing problems. If the Microsoft Search service terminates abnormally during an incremental population of the index, some folders and messages may not be indexed properly. (An incremental population is a process that updates an existing index with data that has changed since the previous population.) Checkpointing remedies this problem by maintaining the following backup files in the catalog directory:
Two checkpoint record files: <catalog>.chk1.gthr and <catalog>.chk2.gthr.
Approximately 13 files consisting of the last known complete and uncorrupted set of catalog files stored in a Save subdirectory.
Checkpointing is not turned on by default because it requires a significant amount of additional disk space. The additional file size is approximately 200 bytes for each document in your database. For example, 5,000,000 messages or documents in your database generate checkpointing files totaling 1 gigabyte (GB). The size of these files grows as the number of documents in your database grows. You should ensure that there is sufficient disk space before you run the checkpointing script. It is recommended that at least 15 percent free disk space is available on the disk on which you keep full-text indexing catalogs.
To set up checkpointing
Ensure that there is sufficient disk space. If necessary, increase the size of the volume or move the catalogs to a larger volume.
From a command prompt, run the following script:
<SystemDrive>:Program FilesCommon FilesSystemMSSearchBinEnableCheckPoints.vbs <APPLICATION> [CATALOG]
Parameter Definitions
<APPLICATION>
This is the name of the full-text indexing application. The naming convention for the application is ExchangeServer_<ServerName>. In a stand-alone configuration, <ServerName> is the name of the server. In a clustered environment, <ServerName> is the name of the virtual server.
[CATALOG]
This parameter refers to the name of the full-text indexing catalog. To find the name of the catalog in Exchange System Manager, double-click the Exchange store for which a full-text index was created, and then double-click Full-Text Indexing. The property is labeled 'Index Name' and the value of the property is the name of the catalog.
Usage
To see information about how to use the script, run the script with no parameters.
Specifying just the name of the full-text indexing application will enable checkpointing for the entire application. This means that all full-text indexes created from this point on will inherit the property automatically. If you have existing full-text indexes, you will have to enable checkpointing on them one at a time by specifying the name of the catalog as a parameter to the script.
Specifying both the name of the full-text indexing application and catalog will enable checkpointing for that particular full-text index and no others. This has no effect on future creation of full-text indexes.
Note
The only way to disable checkpointing on a full-text index
(catalog) is to delete it and then re-create it.
Examples
Set up checkpointing on the server TUNIS01 for all new catalogs:
D:Program FilesCommon
FilesSystemMSSearchBin
EnableCheckPoints.vbs ExchangeServer_TUNIS01
Enable checkpointing for an existing catalog on a mailbox store:
D:Program FilesCommon
FilesSystemMSSearchBin
EnableCheckPoints.vbs ExchangeServer_TUNIS01 privE34F12BB
After you create the index, you must run a full population (also called a crawl) to fill the index with data. The resource usage setting for full-text indexing is located on the Full-Text Indexing tab of the server's Properties dialog box. By default, it is set to Low. It is recommended that you use the default setting. A higher setting yields little benefit and could slow down user access to the Exchange server.
With a resource usage setting of Low, the population process runs in the background and can be performed during business hours. Population process threads use idle processing time. User activities receive priority on the system. Because full-text indexing uses only cycles that would otherwise be idle, it should not significantly slow down user access to the server. Expect CPU usage to approach 100 percent as a normal effect of the population process.
Note
If you are experiencing performance issues with the Exchange
server while the Microsoft Search service is performing a full or incremental
population, you can drop the resource usage to Minimum.
By setting the resource usage to Minimum, you further
reduce the amount of resources the Microsoft Search service can use. Therefore,
full or incremental populations take longer to complete, but there will not be
any data loss.
To start a full population
Make sure full-text searches are unavailable during full population. Otherwise, users will assume that they can conduct full-text searches, but their searches will not return the expected results. To make full-text searches unavailable:
a. In Exchange System Manager, right-click the mailbox store or public folder store that you want to index, and then click Properties.
b. Click Full-Text Indexing, and then clear the This index is currently available for searching by clients check box.
In Exchange System Manager, right-click the mailbox store or public folder store that you want to index, and then click Start Full Population.
The initial full population can take a long time. With a typical Exchange Server 2003 configuration, population performance typically ranges from 10 to 20 messages per second. Performance varies based on the hardware configuration, the type and size of messages, and the server resources that are available. As a result, the total time required for a full population can range from a few minutes for a small database, to several days for a large database. The content language of documents on your server also affects the time the population takes. For example, populating an index on a server that contains documents written mostly in East Asian languages can take more than five times longer than for a server containing documents that are written in Western European languages. Folders containing Internet newsfeeds can also significantly lengthen population time if the folders contain messages in uuencode format.
To view the status of the population process
In Exchange System Manager, expand the public folder or mailbox store, and click Full-Text Indexing.
During the initial population, the status is Crawling. You can determine that the population has finished by looking at this status or by looking in Event Viewer for Microsoft Search service messages.
Note
Do not stop a full population while it is in progress. If you
must stop a full population, but intend to rerun it at another time, choose Pause Population instead of Stop
Population.
To pause a full population
In Exchange System Manager, right-click the mailbox store or public folder store that you want to pause.
Click Pause Population.
Determine how often you want to run an incremental population to update the index. Because an incremental population runs in the background the same way a full population does, frequent updates do not significantly affect system response time for users. Although you should schedule incremental population to occur at least once daily, you may want to schedule more frequent updates, because the index is only as current as the last time it was populated. You should also consider the amount of time it takes to complete an incremental population. For example, a typical schedule sets incremental updates at the beginning of each hour. However, if the update lasts more than an hour, the next incremental population begins at the start of the following hour.
The schedule for the incremental population only determines when the population process can begin. It does not place a time limit on the population process. Therefore, it is possible that an incremental population will continue to completion outside of the scheduled time.
Tip
Generally, if the mailbox store or public folder store is
6 GB or smaller, you can perform incremental updates hourly. If the store
is larger than 6 GB, or the server has high memory usage, you may want to
update the index less frequently.
To set the incremental population schedule
In Exchange System Manager, right-click the mailbox or public folder store that you want to index, click Properties, and then click the Full-Text Indexing tab (see Figure F.1).
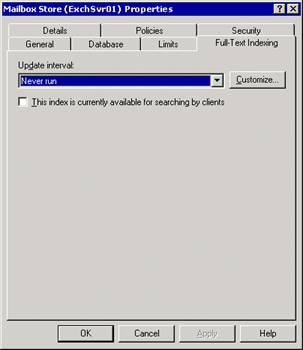
Figure F.1 The Full-Text Indexing tab for a mailbox store
In the Update Interval list, select an interval schedule.
After the initial population and at least one incremental population are complete, enable the use of the index so that users can begin conducting full-text searches against the index.
To enable the use of the index
In Exchange System Manager, right-click the mailbox store or public folder store that you want to enable, and then click Properties.
Click Full-Text Indexing, and then select the This index is currently available for searching by clients check box.
After you have enabled queries (as described earlier), notify users that the indexes are available for searching, and educate them about what they can expect when they run full-text index searches. For example, to notify users, you can send out an e-mail announcement to your users.
Use the following information to help you manage full-text indexing after deployment. Included are guidelines for determining when to repopulate the index to keep the information current.
Checking the Size of the Index
You can check the size of the index file in the following folder:
<driveletter>:ExchsrvrExchangeServer_<servername>Projects<indexname>BuildIndexerCiFiles
Adding Users to an Indexed Server
When you add users to an indexed server, perform an incremental population to add the new mailbox to the index immediately.
Deciding When a New Full Population Is Required
You must fully populate the index in the following cases:
When a word-breaker is changed. (A word-breaker is used by full-text indexing to identify where individual words begin and end in a given text.)
When noise words are changed. For information about changing noise words, see 'Customizing Full-Text Indexing' in the Exchange Server 2003 Software Development Kit (SDK) (https://msdn.microsoft.com/exchange).
When new document format filters are added.
When the schema file is changed.
When the SMTP address of the store changes.
When performing disaster recovery.
During the population process, the index is still available for full-text queries. The index is unavailable for queries only when you must delete an old index, before you re-create it and perform a new full population. This process should be necessary only if the old index is corrupted.
|
Politica de confidentialitate | Termeni si conditii de utilizare |

Vizualizari: 1197
Importanta: ![]()
Termeni si conditii de utilizare | Contact
© SCRIGROUP 2025 . All rights reserved