| CATEGORII DOCUMENTE |
| Asp | Autocad | C | Dot net | Excel | Fox pro | Html | Java |
| Linux | Mathcad | Photoshop | Php | Sql | Visual studio | Windows | Xml |
DOCUMENTE SIMILARE |
||||||
|
||||||
The Component Gallery
When a couple of good friends get together to play any type of one-on-one sport, such as tennis or racquetball, it's inevitable that a number of close shots won't quite make it-like the service return that hits the clay just outside the singles line, or the racquetball volley that just nudges the floor before hitting the front wall. In times like these, as you lay spread-eagled on the court, the one thing you don't want to hear from your opponent is the condescending admonition, "Nice try!" This is, of course, French for "You couldn't hit the ball if I held it in front of you, could you?" The first version of the Visual FoxPro Component Gallery, unfortunately, gets the same review. But before you turn the page, please read through this chapter to find out what the Component Gallery is, and why you should anxiously await the next version.
The developer tools in Visual FoxPro have come a long way since the inception of the Project Manager back in FoxPro 2.0. The PM gave us the ability to group all files in a single project in a command center, and to build executables at the push (or should that be "at the click"?) of a button.
The strength of the Project Manager-the ability to collect all files for a project into a single repository-is, when viewed from the other side, also its major shortcoming. It does not give you the ability to work with a set of components that you use to build multiple projects. In other words, as developers move to the brave new world of component-based software development, they'll need a tool to work with a workbench of components, and the Project Manager can't do this for them.
Enter the Component Gallery, new to Visual FoxPro 6.0.
Just as the Project Manager allows you to organize all components of a project in a single repository, the Component Gallery allows you to organize all of your components according to any number of criteria that you decide upon.
For example, suppose you had a number of class libraries and ActiveX controls that you regularly use in your applications-but you don't use all of them in any single application. With the Component Gallery, you could put all of your base classes, used across many applications, in a single catalog, and draw from that catalog when building a new application. Similarly, you could group your ActiveX controls into several catalogs, organized by function, and be able to easily access the control you wanted.
That's the good news. The bad news is that the interface to the Component Gallery is awkward, confusing, and behaves inconsistently, and the documentation that comes with it is so poor as to be virtually useless. I hope this chapter, in concert with the detailed discussion in Markus Egger's Advanced Object Oriented Programming book, will get you started properly.
A quick tour around the Component Gallery
As with any other tool, you first have to learn how it works by itself before you can apply it in your development work.
Loading the Component Gallery
To load the Component Gallery, select Tools, Component Gallery, and sit back and wait for a moment or two. It's written in VFP, not C, so there's a bit of delay, depending on the resources of the machine you're using and what else you are running at the time.
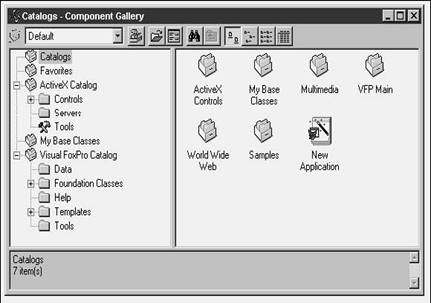
The Component Gallery window has two panes. The left pane is an Explorer-style view, while the right pane shows you the items contained in the node selected in the left pane. You'll also see a toolbar with an icon, a combo box, and a number of buttons. See Figure 17.1.
The leftmost icon (to the left of the combo box that says "Default") represents the selected object in the CG. You can use this icon to create new objects by dragging the icon to a form or (in the case of form classes) to the desktop.
The combo box that currently says "Default" is the View Type combo. (I'll discuss views later.) The buttons, in order from left to right, are:
. . Class Browser: Switches the Component Gallery to the Class Browser. You'll most likely be keeping a lot of classes in the Component Gallery, and this button makes it handy to pop into the Class Browser when a specific class is selected in the Component Gallery.
. . Open: Opens a new catalog. You can choose to get rid of all of the other catalogs (except for the Catalogs and Favorites catalogs) in the left pane, or to add the catalog you've selected to the existing Explorer list.
. . Options: Opens the Component Gallery Options dialog. I'll discuss this one in detail shortly.
. . Find: Allows you to find an item somewhere, anywhere, in the Component Gallery.
. . Up One Level: Moves the focus of the selected item to the next higher level in the Explorer list.
. . Large Icons, Small Icons, List, Details: The last four buttons on the toolbar simply change the display of the items in the right pane of the Component Gallery, just as in Windows Explorer.
What are catalogs?
The basic premise behind the Component Gallery is that of grouping like objects into "catalogs", and the left pane shows this. If none of the items is expanded, you'll initially see only five nodes:
. . Catalogs
. . Favorites
. . ActiveX Catalog
. . My Base Classes
. . Visual FoxPro Catalog
Because it's an Explorer interface, a node with a (+) sign in front of it means that there are levels below it; clicking the (+) sign will expand the tree and display all the items on the next level. Similarly, a node that's been expanded will have a (-) sign in front of it; clicking the (-) sign will close up the view.
Each of these nodes is a catalog, and in a minute I'll explain what's inside them, although you can make an educated guess about a couple of them as you read.
What's in a catalog?
In a word, shortcuts.
Just as the Project Manager contains references to forms, reports, menus, classes, and other pieces of a project, the Component Gallery simply contains references to components. The difference is that the categories in the PM are fixed, but you can group components any ol' way you want. The object itself stays put. If you open the Properties tab of any object in the Component Gallery, you'll see a reference to the object's actual location, wherever it happens to reside.
Thus, it's pretty darn important to remember that popping an item into Favorites-or any other part of the Component Gallery-does not mean that you've moved it. Instead, you've added a link to an existing component. Want proof? (Sure ya do-you're a left-brainer, aren't ya?) Shortly I'll show you how to add components and references to components, and in that section I'll show you that you are also creating links-not moving objects or creating duplicates of existing objects.
What this means to you right now is that you can have multiple references to the same component in different parts of the Component Gallery. For example, you could have a catalog named "Imaging" that contains references to imaging-related components, such as ActiveX controls from third-party vendors, and classes that handle imaging functionality.
You could also have a catalog named "InterGalactic," containing references to each of the components that you have built or that you use for applications for the InterGalactic Company. And this InterGalactic catalog could contain some of those imaging components. You don't have multiple copies of the imaging components; instead, you have one copy of the component and several references to it.
Thus, these nodes are groupings of shortcuts. You can add your own groupings, and you can create subgroups of these as well. In fact, you can even create a grouping of other catalogs. Sorta recursive, if you know what I mean.
Catalogs vs. folders
Just as with classes and class libraries, and files and directories, you can organize items in catalogs in different ways. For example, you could create one catalog and stuff everything into it. Though simple to understand, this solution is less than optimal when it comes to using the contents.
You could also create multiple catalogs, and group like items into the same catalog. For many people, this might be a satisfactory solution. If you need to go further, though, you can do so by using folders within catalogs. A folder in a catalog is just like a directory on your hard disk-it's a means of grouping like items in a more granular way.
For example, if you open the Visual FoxPro Catalog, you'll see five folders, as shown in Figure 17.1.
As another example, you already have a catalog for ActiveX controls. Within that catalog, there are a couple of folders already: one for controls and one for severs. You might delete those and create several other folders, each for a particular type of ActiveX control that you use. You could have all of your imaging controls in one folder, your data-entry controls in a second, and your form-navigation controls in a third-instead of creating three separate catalogs for them. It's entirely up to you.
Later in this chapter I'll discuss how catalogs and folders are stored on disk; this information might help you decide when you want to use catalogs and when to organize items in folders within a single catalog.
The contents of the default catalogs
Before rushing off to create your own widgets, you should see what's already out there.
Catalogs node
You can open the items in the Catalogs node to drill down into other catalogs. Here are the three main groupings:
. . ActiveX controls
. . VFP stuff like foundation classes (the famous "FFC"), Help, Templates, and tools
. . My Base Classes
These are discussed next.
I have some issues with the Catalogs node in the Component Gallery. First, some of the objects in the Catalogs node are also found lower in the tree. I don't understand what utility the duplication serves. Second, the navigation is awkward-you can drill down, but you can't go back up. Finally, the items that are duplicated are named slightly differently, so it's not obvious that they're the same things. As a result, I don't use the Catalogs node.
Favorites node
What would any Microsoft tool be without a place for your favorites? If you've got zillions upon zillions of components, but you commonly use only a few of them, you can plunk them into Favorites for easy access. This is sort of like creating your own custom toolbar that has buttons for Save, Print Preview, Left Align, Right Align, Table Designer, and Run.
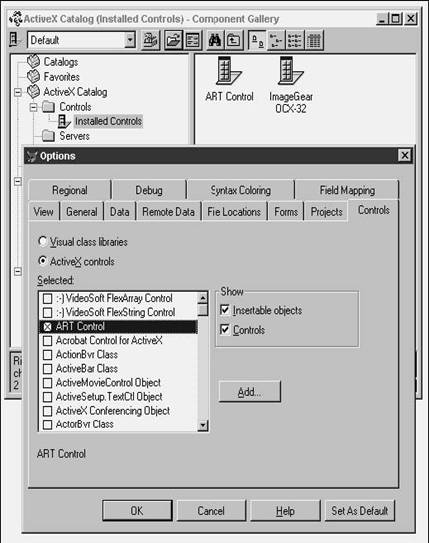
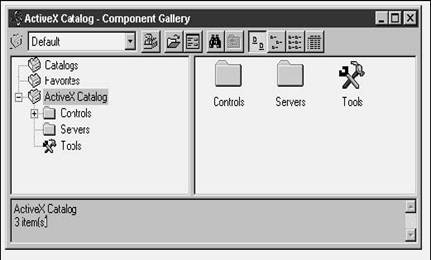
ActiveX Catalog node
The ActiveX Catalog node is a bit confusing at first. It has three folders: one for controls, one for servers, and one for tools. If you drill down into the Controls folder, you'll see an item called "Installed Controls." After clicking on the item, you'll also likely see nothing in the right pane. Don't get depressed, don't go home, just right-click the Installed Controls item and select the Properties menu option. Then select the Folders tab, and notice whether the VFP Registered Controls check box is checked or not.
Then close the Properties dialog, right-click the Installed Controls item again, and select the Refresh Controls menu option. If the VFP Registered Controls check box was checked, the Component Gallery will scan through the list of controls registered on your machine and display only those that are registered with VFP, as shown in Figure 17.2. If the VFP Registered Controls check box was not checked, the Component Gallery will display all ActiveX controls registered on your machine. Because reading the registry is slow, refreshing the list can take some time-on a desktop P500 with 50 or 60 gigabytes of RAM, it might take about five seconds to display all 175 ActiveX controls.
You might be wondering why the Tools folder doesn't have a folder icon, but instead displays a crossed wrench and hammer. It's simply a visual effect-you can change the icon to something different (like "folder.ico") by right-clicking the Tools item, selecting the Properties menu option, and pointing the Picture value in the General tab to the icon file of your choice.
The tools inside the Tools folder include the Automation Manager (the previous version of DCOM), the DCOM Configuration Manager, Remote Automation Connection Manager, and CliReg32, a tool that allows you to register a custom VFP automation server remotely.
My Base Classes node
The My Base Classes node is a bit confusing, too. Aw, heck, it's all confusing, isn't it. You'd think that this might be an empty catalog where you can store references to that nifty set of base classes you've been developing since 1972. In actuality, it's already got goodies in it! The Visual FoxPro Fox Foundation Classes (FFC) have a set of base classes that you can use as your own base classes if you haven't already constructed a set. These base classes are already included in the My Base Classes catalog.
What should you do? I can't tell you what you should do, but here are some possible scenarios from which you can pick. First, you can delete the existing items in My Base Classes and add your own to replace those. Second, you could add your own base classes to the existing set of FFC base classes. This might seem confusing, but the FFC base classes all start with an underscore. Third, you could just create your own Base Classes Catalog, as shown in Figure
17.3. You could rename My Base Classes to something else if it bothered you to have two similarly named catalogs.
Visual FoxPro Catalog node
This has lots of treasures! Let's look.
First, open the node so you can see the five folders below it: Data, Foundation Classes, Help, Templates, and Tools.
Before I get into each of these catalogs . well, first things first. As I mentioned earlier, the icon for ActiveX Catalog has a picture of a hammer and a wrench. But the Tools folder in the Visual FoxPro Catalog doesn't. Why not? Is it a different type of folder? Is there some mysterious functionality? A secret reason? Or could it just be a bug? In any case, if you want them both to be the same, you can right-click the Tools item, select the Properties tab, and change the Picture value in the General tab to a different image. The icon used in the ActiveX Catalog is located (on my machine) at:
c:program filesMicrosoft Visual Studiovfp98gallerygraphicstools.ico
The Data folder contains a database wizard and a table wizard. The Foundation Classes folder expands to another 14 folders, each of which contains one or more classes. See Doug Hennig's articles in FoxTalk, December 1998 and January 1999 (www.pinpub.com/foxtalk), for excellent explanations of many of these classes. Markus Egger also has an 80-page chapter in his book, Advanced Object Oriented Programming with VFP 6.0 (Hentzenwerke Publishing) that covers the FFC in detail.
The Help folder contains documentation for FoxTools (and a Read Me reference that is broken-it points to an .HTM file in the VFP98 directory but should be pointing to the file in the Microsoft Visual Studio directory instead).
The Templates directory expands into three more folders: one each for Applications, Forms, and Reports. Each of these directories contains a series of sample templates that is used by the appropriate wizard.
The Tools directory contains a number of useful tools, such as the Windows Calculator, the Windows Explorer, RegEdit, and, most delightfully, Filer.
Others
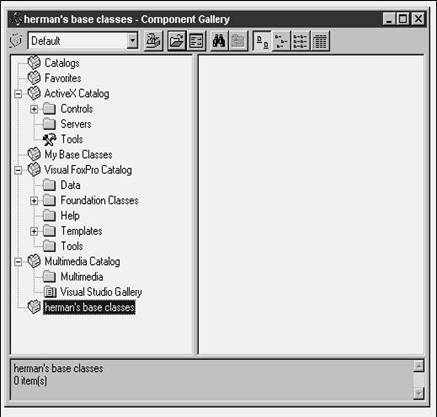
Is that all there is? One of the major (but hidden) improvements to Visual FoxPro 6.0 over 5.0 was a huge assortment of examples and sample code. The Component Gallery is just as rich as other areas in this respect. Several other catalogs are included with VFP but don't show up immediately. Depending on which build of VFP you've installed, as well as what options you've installed, you might also have access to the Multimedia, World Wide Web, and Visual FoxPro Samples catalogs. However, they don't show up by default. I'll show you how to display all catalogs later in this chapter.
Where is the Component Gallery data stored?
As you've probably figured out by now, the Component Gallery is simply a user interface to a data store. All these nodes and lists of components and shortcuts have to be stored somewhere. But where? Various parts are stored in several locations, so hang on while I lead the way through this jungle.
Catalog data
First of all, each catalog is represented by a separate .DBF. When you create a catalog, you are creating a .DBF file, and each time you add a folder or an item to that catalog, the Component Gallery adds a record to that .DBF.
Catalogs that come with VFP are located in the GALLERY directory underneath VFP's home directory, while the .DBFs that you create are stored wherever you put them.
![]() It can be a nuisance to
change over to the VFP home directory, because it's buried deep in the Program
Files directory on the drive where you installed Visual Studio. The HOME()
function will return the full path name where VFP is installed. Thus, the
command:
It can be a nuisance to
change over to the VFP home directory, because it's buried deep in the Program
Files directory on the drive where you installed Visual Studio. The HOME()
function will return the full path name where VFP is installed. Thus, the
command:
cd home()
will change the default directory to C:Program FilesMicrosoft Visual Studiovfp98 or wherever you installed VFP. Similarly,
cd home() + 'gallery'
will change to the Gallery subdirectory, and
use home() + 'browser'
will open the BROWSER.DBF table in the VFP root directory. As a result, you can do:
cd home() + 'gallery"dir
and you'll see the listing of catalog .DBFs shown in Figure 17.4.
But there is another hierarchy of data as well-the list of catalogs. Kind of like metadata for catalogs. The file BROWSER.DBF, located in the VFP root directory, contains records for each catalog.
When you start the Component Gallery, you'll get the nodes in the following table. The table lists the names of the .DBFs.
|
Node |
DBF |
|
Catalogs |
VFPGLRY.DBF |
|
Favorites |
FAVORITES.DBF |
|
ActiveXControls |
ACTIVEX CATALOG.DBF |
|
My Base Classes |
MY_CLASSES_CATALOG.DBF |
|
VFP Catalog |
VFP CATALOG.DBF |
If you inspect the contents of BROWSER.DBF, you'll find the other catalogs that ship with VFP. You can go into BROWSER.DBF and turn them on manually, or you can go into the Catalogs tab of the Component Gallery Options dialog and select the default check box for that catalog.
As I said before, the Catalogs node is recursive; the objects in it are actually just more catalogs: ActiveX controls, Web, Multimedia, and so on. These catalogs are also stored in BROWSER.DBF, and thus also show up in the Catalog tab of the Component Gallery Options dialog. If you check the default check box, they'll show up as main nodes in the left pane of the Component Gallery window. Here are the other catalogs that show up in BROWSER.DBF:
|
Node |
DBF |
|
Multimedia |
MEDIA CATALOG.DBF |
|
Visual FoxPro Samples |
SAMPLES CATALOG.DBF |
|
World Wide Web |
WWW CATALOG.DBF |
In addition, BROWSER.DBF contains fields that store various attributes about catalogs, such as whether or not the catalog is a global catalog, if it should show up in the list of default catalogs in the Component Gallery, and so on. For example, right-click on a catalog node and select the Properties menu option. Each of the values in the Properties dialog is stored in the catalog's record in BROWSER.DBF.
Global settings
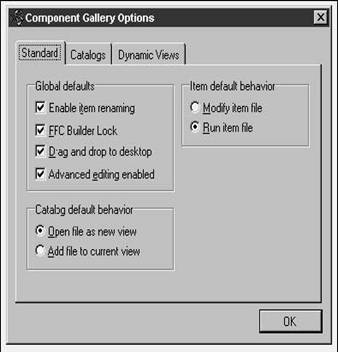
Global settings of the Component Gallery are also stored in BROWSER.DBF. A single record in BROWSER.DBF has an ID of BROWSER instead of FORMINFO. Each of the items in the Standard tab of the Component Gallery Options dialog, such as Enable Item Renaming and Advanced Editing Enabled, are stored in the Properties memo field of the BROWSER record in BROWSER.DBF:
this.lRunFileDefault = .T. this.lAddFileDefault = .F. this.lAutoLabelEdit = .T. this.lAdvancedEditing = .T.this.lFFCBuilderLock = .T. this.lDragDropToDesktop = .T.
How to configure the Component Gallery so data isn't on C
Isn't it a joyous feeling to spend days customizing your environment, only to have Windows go belly-up on you, and make you repeat those steps? If you've been watching carefully, you've seen that all of three items in the Component Gallery have links to objects that are buried deep in the bowels of drive C. For example, one of the base classes that makes up the Fox Foundation Classes is located in:
c:program filesmicrosoft visual studiovfp98ffc_table2.vcx
Kind of sends a chill down your spine, eh? Do you really want to keep all of your catalog data stored on C? Haven't I yelled at you enough each time you wanted to do that? Hell, yes! The answer, of course, would be to move your catalog tables, as well as BROWSER.DBF, to another drive, along with the rest of your data.
However, if you've tried to find out how to point to a different drive, you've probably come up short. The reason: There isn't a specific setting for Component Gallery or BROWSER.DBF settings. Instead, you need to change the location of the Class Browser, BROWSER.APP, in Tools, Options. Then, when the Component Gallery is started up, it will look in the same directory for BROWSER.DBF. You can't simply delete or move BROWSER.DBF, hoping that VFP will get confused and prompt you for the location, because it won't. Instead, Fox will create a new copy of BROWSER.DBF in the same directory in which it finds BROWSER.APP.
Arranging components
So now that you know what comes "out of the box," how do you arrange the content of the box to suit your style?
Navigating around
While it's obvious by now how to maneuver through the left and right panes of the Component Gallery, you might run into unexpected behavior occasionally, so it's worth the time to go over a few special features. One example is when the left pane of the Component Gallery appears to change contents all of a sudden, and there doesn't seem to be any way of going back except for getting out of Visual FoxPro and restarting.
Click the Catalogs node in the left pane, so that the other catalogs are displayed in the right pane. Select one of those catalogs, such as ActiveX Controls, and right-click on it. You'll get a context menu with two menu options: Add Catalog and Open Catalog. Which of these menu options is bold (which in turn drives the behavior you get when you double-click on the catalog icon in question) depends on the setting of the Catalog Default Behavior option group in the Component Gallery Options as shown in Figure 17.5.
If you choose the Open Catalog menu option, all of the other catalogs (except the Catalogs and Favorites nodes) will be removed from the left pane, and the catalog you chose will be displayed along with any catalogs that are marked as Global in the Catalogs tab of the Component Gallery Options. See Figure 17.6 for an example of the ActiveX Catalog as the only catalog in the left pane.
If, on the other hand, you choose the Add Catalog menu option, it will simply be added to the existing list. (If you try to add the same catalog more than once, VFP will ignore you.)
Once you have added a catalog to the left pane, you can remove it by right-clicking the catalog's node in the left pane and selecting the Remove menu option. You will be prompted to confirm your action before the catalog is removed from the list. Note that "Remove" simply removes the catalog from the list-not from your hard disk.
If you are wondering how to get back to the original list in the left pane after you've added and removed catalogs, it's easy. Close the Component Gallery and open it again. If you're wondering how to get back to the original list without closing the Component Gallery, keep wondering. You can't.
Displaying existing catalogs that don't appear by default
As I mentioned earlier, there are a bunch of catalogs that ship with VFP that might not be displayed in the initial list. These include WWW and Samples. You can drill through the Catalogs node if you like, but that might not be satisfactory. This method also doesn't address the fact that your own catalogs won't show up in the Catalogs catalog to begin with.
The Catalogs tab of the Component Gallery Options dialog, as shown in Figure 17.7, allows you to select which catalogs will automatically display in the left pane of the Component Gallery when you start it up. Scroll through the list of catalogs, and notice that the Default check box is checked for the catalogs that you ordinarily see in the Component Gallery when it's opened.
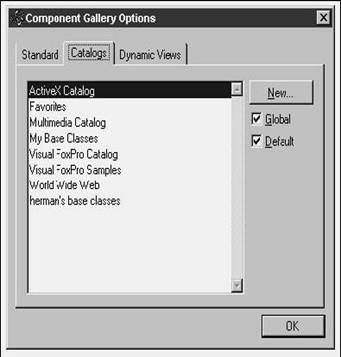
You might be wondering how catalogs appear in the Catalogs tab to begin with. How does VFP know what catalogs are available? I'll explain the details of where all this data is stored in a later section. The short answer is that if you create your own catalog (I'll show you how to do that in the next section), it will automatically be added.
What if you have a catalog in the Catalogs catalog that doesn't show up in the Catalogs tab of the Component Gallery Options dialog? Just right-click the catalog in the right pane when Catalogs is selected in the left pane, and select Add Catalog. The next time you open the Component Gallery Options dialog, that catalog will be in the list in the Catalogs tab.
Creating a new catalog
If you're going to make maximum use of the Component Gallery, you'll want to create your own catalogs. Here's how:
1. 1. Click the Component Gallery Options button to open the Component Gallery Options dialog.
2. 2. Select the Catalogs tab.
3. Click the New button. You will be prompted for the location and name of the .DBF that will hold the catalog.
Note that the default directory for the catalog is the current VFP default directory- which might not be the same as the vfp98gallery directory.
3. 4. Once you enter a name and click Save, four things happen:
. . You'll get a message that states "Catalog xxx successfully created."
. . A new node in the Component Gallery Explorer is created.
. . A .DBF file with the name of the catalog you selected is created.
. . A new record is added to BROWSER.DBF.
Note that your catalog will be displayed in the list box in the Catalogs tab with the full path. The next time you open the Component Gallery Options dialog and select the Catalogs tab, the path will be gone and just the name of the catalog will be displayed.
Adding a new folder to a catalog
You'll also want to add folders to an existing catalog. Here's how:
1. 1. Select a catalog's node in the left pane of the Component Gallery.
2. 2. Right-click in the right pane and select New Item, Folder. You'll see a New Folder node under the node of the catalog you selected.
3. 3. Right-click on the New Folder name and select Rename.
4. 4. Rename the folder to whatever you want.
Adding your own components
You'll want to be able to add your own components-classes, controls, and other things-to an existing catalog. Here's how:
1. 1. Select the folder in which you want a reference to your component.
2. 2. Right-click in an empty space in the right pane.
3. 3. Select New Item.
4. 4. Select the type of component you want to add.
5. 5. The File, Open dialog will appear, with the appropriate type of file selected. The menu options and the associated file types are shown below.
6. 6. Select the file you want to add, and click OK. The component will be added to the right pane with the appropriate icon.
|
Menu option |
File type |
|
ActiveX control |
Application (.EXE/.DLL/.OCX) |
|
Class |
.VCX/.VCT |
|
Datasource |
Table/.DBF |
|
File |
All files |
|
Form |
.SCX/.SCT |
|
Image |
Bitmap, Icon, .GIF, .JPG |
|
Menu |
.MNX/.MNT |
|
Program |
.PRG |
|
Project |
.PJX/.PJT |
|
Report |
.FRX/.FRT |
|
Sample |
VFP Application (.PRG/.APP/.EXE) |
|
Website |
URL |
You will probably want to right-click on your component and add more information, such as a more robust description.
Making a copy of a component in your own catalog
Adding a component to your own catalog really involves no new concepts. First, you'll create your own catalog, as I described above. Then you'll add the component to your catalog. Remember that when you do so, you're simply adding a reference to the component-the component stays where it was.
Views: Finding things in catalogs
You can search one or more catalogs by several criteria. For example, suppose you wanted to find all command buttons or all controls having to do with "images." You can search through your catalogs for a word or expression, such as "Button" or "Imaging," using one or more of many criteria. But that's not all! Once you've found the items you're looking for, you can save the results of that search and refer to the results again and again. The results, unfortunately, are stored in a container called a "view"-perhaps the most overloaded word in Visual FoxPro. Nonetheless, despite this small transgression, views are quite handy.
To create a view, open the Component Gallery Options dialog and select the Dynamic Views tab. Click the New button to open the Edit View dialog, as shown in Figure 17.8.
You can look for a specific word or expression by entering it in the Containing text box, specify which catalog or catalogs to look in with the Look in combo box, and select one or more keywords to search on by entering them in the Keywords text box. (You can also pick predefined keywords with the ellipsis button to the right of the Keywords text box.)
You can select what parts of the catalog metadata you want to search in: Item name, Description, File name, Class name, and Properties description.
Finally, you can choose what type of item-from ActiveX control to Form to Report to Web Site-with the Item types list box.
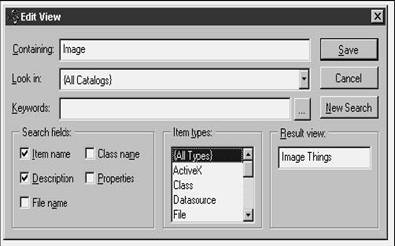
Once you've chosen all of your criteria, you can name the Result view and then click Save. Here comes another confusing part. Once you click Save, you've actually done two things: You've created a view with the name you just entered in the Result view text box, but you've also executed the search.
The first time I tried using this feature, I must have created a dozen views before I realized that I wasn't going to get a list of results, or any feedback whatsoever regarding the search I did. In order to see the results of the search, you have to go back to the Component Gallery window and pick the name of the view, as shown in Figure 17.9.

Using a component in your project
Back when I wrote the VFP 3.0 book, I suggested that a 17-inch monitor was a necessity. I'm now thinking that one of those 35-inch (yes, THIRTY-FIVE-INCH) monitors would be an
appropriate choice. During development, you're going to want your PM open, of course, and space for your Form Designer or Class Designer, and the Code window and the Properties window. And you're going to want your Component Gallery open as well-cuz that's "from whence all good things shall come" from now on.
Instead of drilling down into a class library from the Classes tab in the PM, you'll grab your class from the appropriate node in the Component Gallery. That means, of course, that you'll need it open. How, exactly, do you grab items from the Component Gallery for use in various parts of your project?
Suppose you wanted to include controls and a non-visual class on a form. First, you'd create the form from the appropriate form class by choosing the form class, right-clicking, and selecting the Create Form menu option. Then, with the form visible, open the Component Gallery. (What? You mean you don't already have it opened?) Then, select the item (a class or an ActiveX control, for example) and drag it to your form. An instance of the item will be added to the form. Suppose you want to add a non-visual class to a form. You do it the same way: Find the class in the Component Gallery and drag an instance onto the form. That's all there is to it.
What else? Here are some of the things that the Component Gallery can do for you much easier than if you tried to do them without it:
. . It's easier to add files to a project than by clicking the Add button in the Project Manager. With the Project Manager, you might have to navigate through a lot of directories to find the file you want; and you might not even know which .VCX contains a class you want. With the Component Gallery, you simply find the class or file you want and either drag it to the Project Manager or choose Add to Project from the shortcut menu.
. . It's easier to create forms of the desired class than by changing the Form Template setting in the Forms page of Tools, Options every time you want to use a new class. Simply find the form class you want and either drag it to the Project Manager or choose Add to Project from the shortcut menu. A dialog will pop up, asking if you want to add the class (that is, the .VCX the class is in) to the project, create a new class from the selected class, or create a new form from the class.
. . It's easier to add controls to a form than with the Form Controls toolbar. Unless you're adding a VFP base class to a form (as Arnold would say, "Big mistake"), you have to click the View Classes button in the Form Controls toolbar, navigate to find the .VCX ("what was the name of that .VCX that contained that control I wanted, anyway?"), then figure out which of the seven identical buttons in the toolbar represents the class you want, and finally drag it to the form. With the Component Gallery, you simply find the class you want and either drag it to the form or choose Add to Form from the shortcut menu.
. It's easier to subclass an existing class. As I mentioned earlier, even if a class is selected in the Project Manager, the New Class dialog displayed by clicking the New button doesn't automatically choose that class for the Based On class. With the Component Gallery, you simply find the class you want and either drag it to the
Project Manager or choose Add to Project from the shortcut menu, and then choose the Create New Class option from the dialog that appears.
. . It's easier to test a class. Just like with the Class Browser, you can "run" a class by dragging it to the VFP screen; you can also choose Run from the shortcut menu. In the case of form classes, a form is instantiated from the class and a public variable called oForm<n> contains a reference to it, so you can easily access or change properties or call methods. You can also view or run a sample of a class if one is defined by choosing the appropriate option from the shortcut menu.
Summary
The more I worked with the Component Gallery, the more I liked it-and hated it at the same time. The idea of a centralized source for all of the pieces that you put into an application really appealed to me; indeed, it felt more like a Component "Library" than a "Gallery." I mean, this is great! But at the same time, there are problems. Always problems. First, it's sorta pokey to load-even on a really fast machine with lots of resources. And this is a double problem because of the way that the Component Gallery is loaded. Many developers issue the CLEAR ALL command about once every three minutes-and that closes the Gallery because it's an object in memory. So then you have to open it again, which takes another three minutes, by which time you've forgotten what problem caused you to issue CLEAR ALL in the first place.
Also, there are enough quirks in the interface and feature set that I feel it's too much trouble for a single developer to use unless they're going to make a concerted effort. And the documentation on how to use it is abysmal. (Check out Ken Levy's video on the Component Gallery at www.classx.com for more in-depth info on using it by one of the masters.) On the other hand, however, significant benefits can accrue for a team of developers. Having a single repository of components available to every developer is truly a "killer app," and I know of at least one large team who has successfully used the Component Gallery during the development of a very large application.
I'm looking forward to seeing enhancements and fixes in the Component Gallery for VFP 7.0.
|
Politica de confidentialitate | Termeni si conditii de utilizare |

Vizualizari: 1185
Importanta: ![]()
Termeni si conditii de utilizare | Contact
© SCRIGROUP 2025 . All rights reserved