| CATEGORII DOCUMENTE |
| Asp | Autocad | C | Dot net | Excel | Fox pro | Html | Java |
| Linux | Mathcad | Photoshop | Php | Sql | Visual studio | Windows | Xml |
Testing
As out build is now ready, and most of our new functionality is completed, let's switch roles - let's move from being a Software Developer to being a Tester at AdventureWorks.
Visual Studio Team System supports a wide range of test types, so testing is really a first class part of Visual Studio now.
Let's use a web test to take a closer look at that search functionality that we wrote earlier to ensure our user experience is complete.
A typical user might enter 'bat' as a query string; but what if a malicious user comes across our system?
|
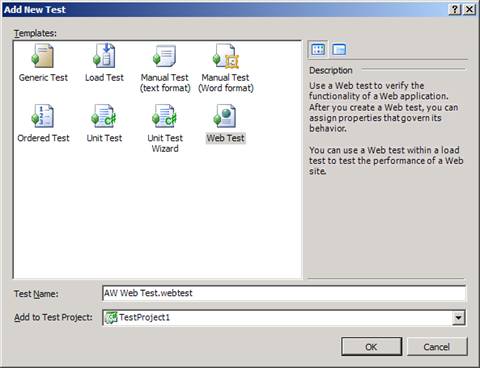
From the main Test window, choose New Test Select Web Test, name it AW Web
Test and click OK
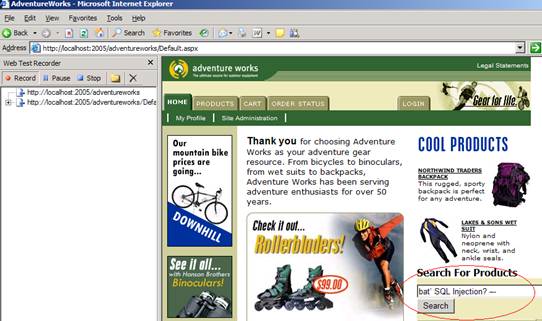
You can see from this Wizard, there are a number of inbuilt tests available. Some of these included are: Generic Tests - the framework to host and execute a non-integrated 3rd party tests, or custom testing scripts and applications Manual Testing - providing a step through document for user experience testing etc Ordered Tests - running a series of tests in a certain order When IE launches, type the URL https://localhost:2005/adventureworks You will see as you type and click that all actions are recorded in the Web Test recorded. We will look later what information is actually captured during this time Enter bat as search item and verify that there are results. Enter bat' SQL Injection? -- (exactly as shown) as the query string and
try again
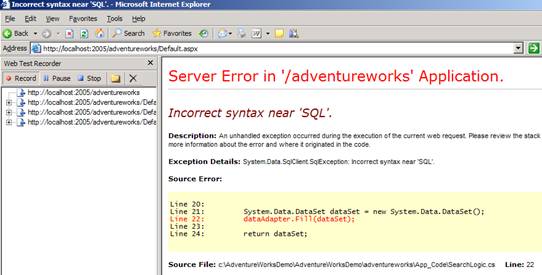
Now you should get an exception
|
|
From the results, we can see that this web application is ripe with SQL Injection vulnerabilities, so hackers can quickly hone in on what tables are vulnerable. Let's see what we can do with the employee salaries table J |
|
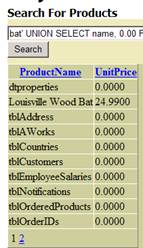
Click back to return to the AdventureWorks home page Enter o bat' UNION SELECT name, 0.00 FROM SYS.TABLES -- o as the search criteria and press Search (the -- are also needed in the statement) Notice the list of tables show in the results now!
|
|
We can easily run my own SQL query and see data that I shouldn't have access to. |
|
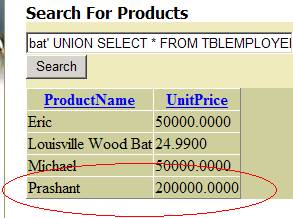
Enter bat' UNION SELECT * FROM TBLEMPLOYEESALARIES -- as the search criteria and press Search Notice that the salaries for Eric, Michael and Prashant are shown
|
|
We can even update data in this database |
|
Enter bat'; UPDATE TBLEMPLOYEESALARIES SET salary = 9000000.00 WHERE NAME = 'Eric' -- as the search criteria and press Search Enter bat' UNION SELECT * FROM TBLEMPLOYEESALARIES -- as the search criteria and press Search to view your changes (you should see that Eric's salary has changed!) |
|
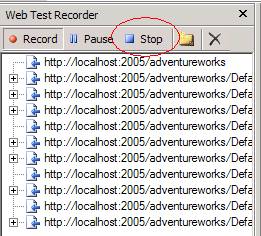
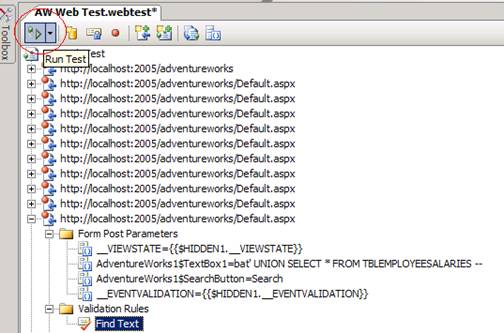
Stop recording the web test by
clicking the Stop button
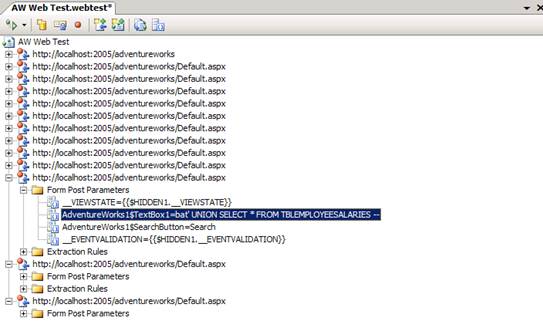
You should now see all you mouse click and activities, expand each one to view the results. |
|
This is obviously a problem with our new feature, so we must not only let our developers know, but we can now also use VSTS to ensure that we can test for this bug in any new builds |
|
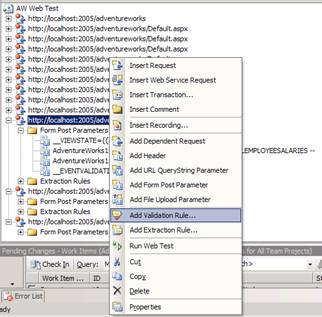
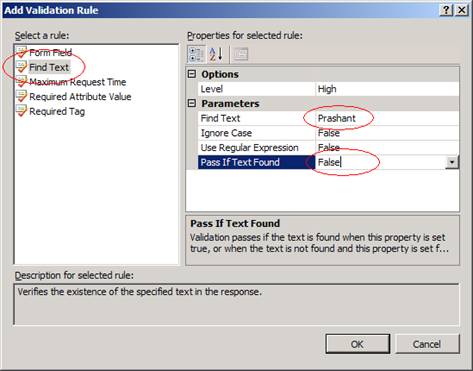
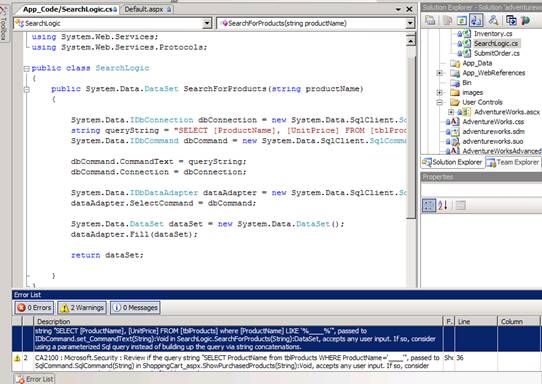
We are about to create a validation rule. Basically we are going to perform a text search on a retuned webpage, looking for a certain word or phrase. In this example we are looking for one of the returns when we execute the SQL Injection error phrase. By adding a test for this, we will know if it has been fixed in future versions. To create a SQL injection error test for this website, you will need to add a validation rule looking for certain text In your web test results, find
the first entry for the search command bat'
This is the recorded step which returned one of the SQL Injection error values Right click the root of this entry and select Add Validation Rule
Click on Find Text and enter in the details as shown. (This would mean
that the SQL Injection test returned the sample salary data and so the test
should fail.)
|
|
Lets run the test and watch is fail. Once it has, we can file a bug directly from the test results |
|
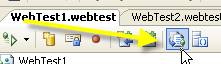
Run the web test again by
clicking the Run Test button
located on the icon toolbar of your web test screen (It looks like a green
arrow, and is next to a database catalog icon)
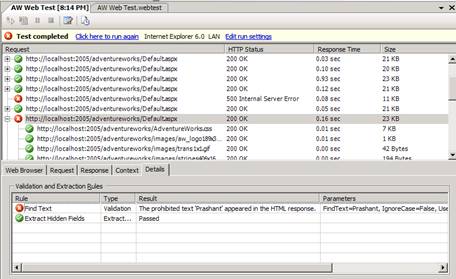
While the test is running you will see each of the screens in real-time. The test should fail, click through each of the results to see what information it captures. You should be able to find the
failed validation rule (as it would have found the name Prashant) in the third entry from the bottom (this should be
shown as a red X), and the failure message is on the details tab as shown
below:
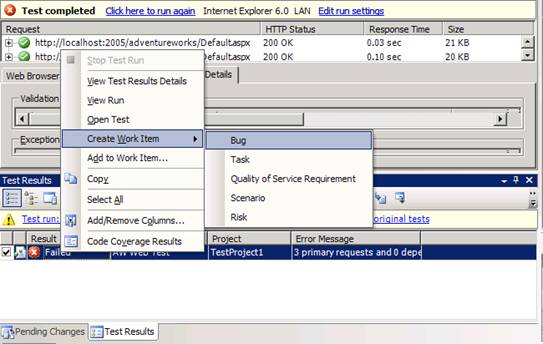
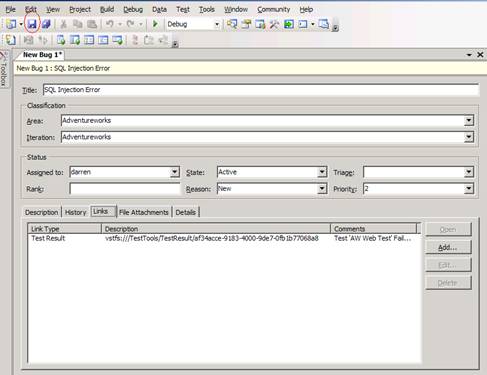
As our test failed, lets create a bug for this Display the Test Results window (Test menu, Windows, Test Results) Right-click on the failed result
in the Test Results window and
choose Create Work Item -> Bug
Click Yes, to publish the test results (to make it available for other people to view the results including the original developers - allows them to repro the bug using the same tools and techniques the tester used), click OK on the next screen Assign the bug to Darren, with Title, SQL Injection Error View the Links tab, and you can see the test had been linked into the work item Click on the Save button to save the new bug
|
|
If we want to do something more advanced with our tests, we can always just generate source code and edit as required |
|
As this test is now complete before we check in, let's export this out to source code. Navigate back to the original test (AW Web Test.webtest in TestProject1) window. In the web test editor, generate source code for the test using the icon button on the web test editor tool bar. Name it AWWebTestCoded (no spaces)
|
|
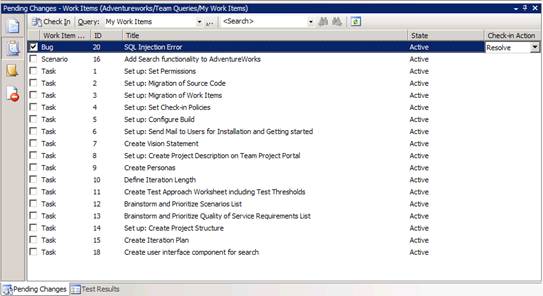
Check in this new web test by
using the Pending Changes (View, Other Windows, Pending Changes)
as shown below.
|
|
VSTS helps developers and testers work together - as a developer, I can easily see what bugs are assigned to me. Better yet, as a developer I can easily reproduce the error that my tester saw because we have access to the same tests. But how can I as a developer ensure these bugs are found before they go to test? Code Analysis! Code analysis is like a grammar checker for your source code; in the next section, we will see how it can flush out potential problems in our source code. Microsoft has learned some really good lessons about security over the years - these lessons are integrated right into Visual Studio Team System. We can build my project with Visual Studio Team System and have all of our source code analyzed for me. Known problems, such as security problems, get flushed out and shown to us. Code analysis is an integrated part of Visual Studio Team System; we just have to enable it for our project. With code analysis enabled, we will rebuild our project. Instead of getting compiler errors (if there are any), we will also get warnings about our source code where common problematic patterns are being recognized. |
|
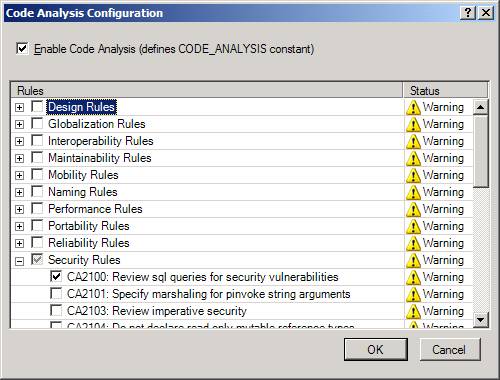
In Solution Explorer, select the https://localhost:2005/adventureworks project. From the main menu, choose the Web Site -> Code Analysis Configuration Check the box marked Enable Code Analysis Now we have Code Analysis enabled, lets configure the rules we want to run. We can save these within the project, which will allow all developers using this project to have the same configuration. Disable all the rules within the window by un-checking all the boxes Open the Security Rules category Select the CA2100: Review SQL Query . security rule
Press OK to close the dialog Choose the Build -> Run Code Analysis On Website menu option In the Error List window (you may have to show it from the View menu) double click on one of the warnings to take you to the source code
|
|
This was a pretty contrived SQL Injection attack; let's not worry so much about how to fix this problem. Instead, let's see how we can catch this problem even earlier in our product cycle. Test lists help us organize our tests; we are going to use this test, as well as our validation test as check-in tests. This allows us to ensure that these tests will have to be executed before our developers can check their code in. |
|
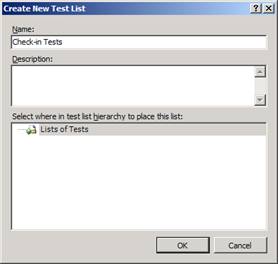
From the main Test menu, choose Create New Test List Name this test list Check-in Tests, click OK
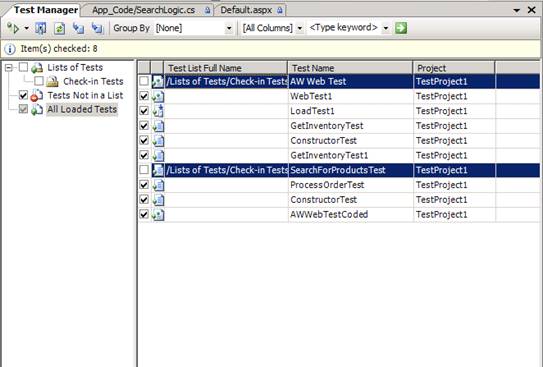
In the resulting window, click on All Loaded Tests (Note: if nothing appears, you may have to close Test Manager and reopen it, Test menu, Windows, Test Manager) Add your web test (AW Web Test) and the SearchForProducts unit test to the
new test list by selecting them and dragging them into the Check-in Tests list
Check everything in as you did before (View, Other Windows, Pending Changes); associate this check-in with the Security Bug (This is important, the next step will not work unless you do this!) |
|
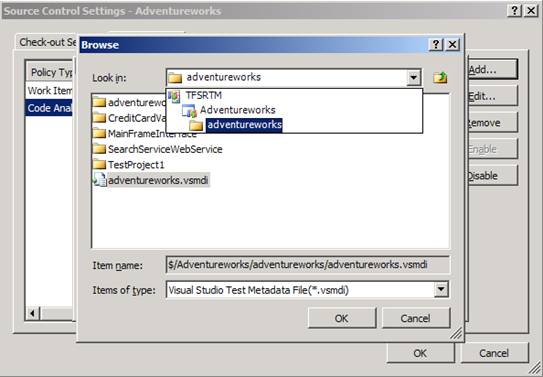
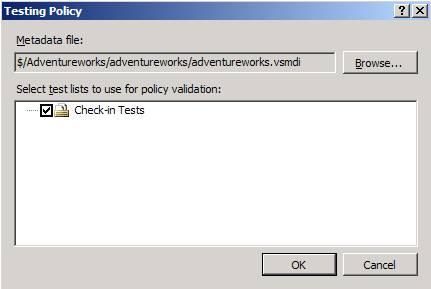
Now we have out test list configured, lets apply it to our check-in policies and also turn on Code Analysis as check-in time to search for SQL Injection errors. Click on the Team Explorer windows (next to Solution Explorer) Highlight AdventureWorks Right click, and select Team Project Settings, and click on Source Control Select the Check-in Policy tab Click the Add button Highlight Code Analysis and Click OK This shows how you can enforce Code Analysis on Check-in As before . Disable all the rules within the window by un-checking all the boxes Open the Security Rules category Select the CA2100: Review SQL Query . security rule Click OK, and click Add once again Highlight Testing Policy and click OK Click the browse button, and double click AdventureWorks, adventureworks, and select adventureworks.vsmdi (as shown below)
Click OK (if you get an error make sure that you checked everything in!) Check the box next to Check in Test on the next screen, click OK to finish
Click OK to exit the source control settings |
|
As our system is now complete, and error free - we know want to test it's functionality in the real world. With this new system, we expect more and more customers, putting higher and higher loads on our current solution. We need to know that both the application, and infrastructure are ready for the challenge. The best way to test this? - Load testing. VSTS provides integrated load testing, to allow developers and testers to test their applications against many different scenarios, including testing labs as part of the build process and even in production. Best of all, all this information can be recorded, tracked and reported using Team Foundation Server |
|
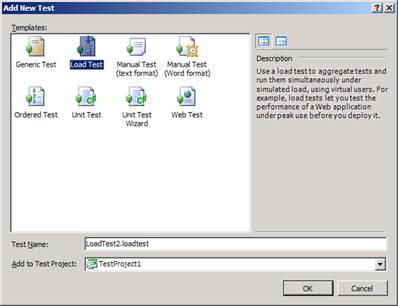
Lets create a new Load Test, using the webtest we created earlier Select Test from the main menu, and click on New Test Select Load Test and click OK
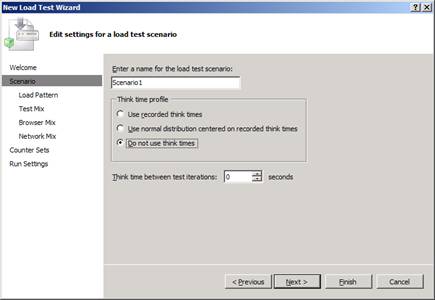
Using the Load Test Wizard, click Next on the first step Do not use any think times on
the next step, leave the default name and click on Next (Think times allow you
to record multiple versions of you web test to make the actual load test more
real world)
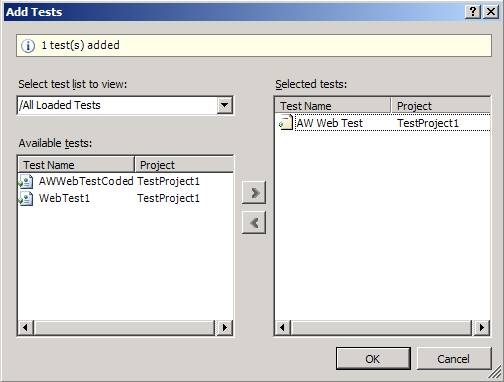
Select Step Load, and click Next (We are planning to increase the user load over time in this test, but can use a constant load if we need to) Click on the Add button, and choose your web test
(AW Web Test) and add it to
Selected Tests, click OK to
continue
Click Next to continue with the next step (as we have only one test, so do not need to determine a test distribution) On the next screen, click Add button four times to show all the browsers the load test can support. Change the distribution by using the scroll bars, click Next when finished
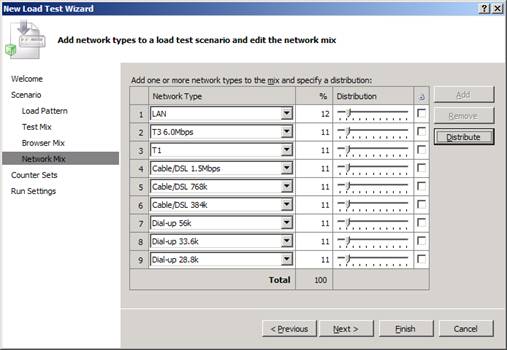
On the next screen, click the Add button eight times to show all
the network types you can use within the load test, click Next when finished
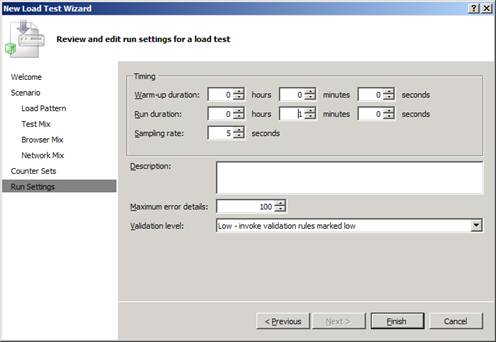
Click the Next button to continue (as we are monitoring the local computer, we do not need to add other machines to monitor. This screen works in partnership with Visual Studio 2005 Load Test Agent, allowing you to control multiple test machines during the test run) Change the Run duration to 1 minute on the next step, and choose
Finish.
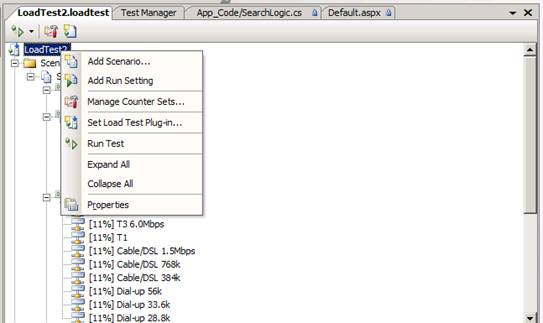
Now we have our test configuration complete, lets kick it off and watch the results real-time Run the Load Test by right-clicking on LoadTest2 and selecting Run
Test (See Below.)
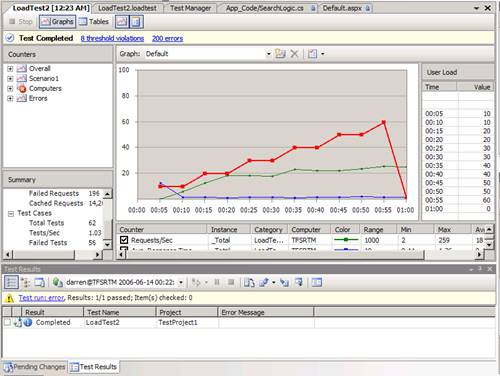
When you see the Pending status in the Test results
window change to In Progress, double click the In progress to view the In Progress to view the test being
executed You can also drag and drop performance counters as the test is being run, or after the test runs to view further information When the test is completed, you will be prompted to save this to TFS, select yes (this will enable all results to be available for reporting and analysis) |
Congratulations!
You have walked through a small scenario of using some of the core features of Visual Studio 2005 Team System to build more reliable, secure and performant code. This lab covers only some of the advanced features that VSTS provides, and for further information please visit https://msdn.microsoft.com/teamsystem.
|
Politica de confidentialitate | Termeni si conditii de utilizare |

Vizualizari: 1093
Importanta: ![]()
Termeni si conditii de utilizare | Contact
© SCRIGROUP 2025 . All rights reserved