| CATEGORII DOCUMENTE |
| Bulgara | Ceha slovaca | Croata | Engleza | Estona | Finlandeza | Franceza |
| Germana | Italiana | Letona | Lituaniana | Maghiara | Olandeza | Poloneza |
| Sarba | Slovena | Spaniola | Suedeza | Turca | Ucraineana |
GETTING STARTED WITH DDREAMSTUDIO 0.80+
Welcome to DDREAMSTUDIO and the world of advanced simfile creation. The best way to make your own dance steps is just to play with this powerful tool for awhile. This Guide may be a good stepping stone, especially if you are a beginner. This Guide is arranged into the following sections:
0. The Basics
A quick tour of the menus and user interface, etc.
I. Syncing Tutorial
Syncing tells the computer (and eventually 'StepMania') all about the timing of the beats.
II. Stepping Tutorial
Stepping tells the computer where the dance steps occur, given the timing of the beats.
III. Playing it with StepMania Tutorial
Now that you're done, let's play the song with StepMania.
0. THE BASICS
Note for StepMania Users: DDREAMSTUDIO's controls are designed with StepMania users in mind. While many controls will feel similar to StepMania, DDREAMSTUDIO also gives you a windows interface. This offers much more power to those who are willing to learn it (and that's why this tutorial was written).
Let's take a look at how DDREAMSTUDIO, StepMania 3.9, and your simfiles work together.
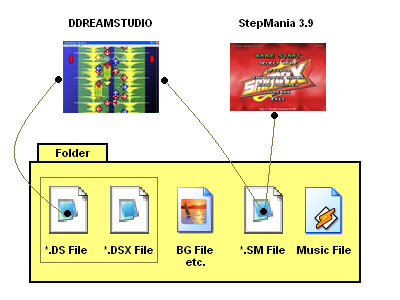
DDREAMSTUDIO and StepMania are standalone programs.
A 'simfile' can be thought of as everything inside the folder.
Inside the folder you can find a Music File (which is the actual music), an SM File (containing code for arrows, etc -- StepMania uses this file), and BG Files, etc., (graphics files for backgrounds, lyric files). Sometimes, you can also find a DWI file (not shown). The DWI File contains code for the same stuff as the SM, but the code looks different from the SM code.
When you use DDREAMSTUDIO, you can get some more files -- a DS File (containing code that is compatible with SM - You can use Notepad and open/dissect this file for your own use), and a DSX File (containing additional code only for DDREAMSTUDIO).
THE DS and DSX FILES MUST STAY TOGETHER. ONE CANNOT SURVIVE WITHOUT THE OTHER.
NOTE:
1) DDREAMSTUDIO will read and write SM files and DS files ONLY (see picture).
2) DDREAMSTUDIO will NOT read a DSX file by itself. NEVER File->Open a DSX File.
3) DDREAMSTUDIO may not work with StepMania 4.0 SM files. SM 4.0 files have a slightly different format and may confuse DDREAMSTUDIO.
4) DDREAMSTUDIO will NOT read/write DWI Files.
5) DDREAMSTUDIO is NOT forgiving of errors made during 'notepad-editing' of simfiles. If you are not a perfect 'notepad-editor,' stick to the SM 3.9 editor or the DDREAMSTUDIO editor.
Moving on, you should have already installed DDREAMSTUDIO (see downloads page). To run DDREAMSTUDIO, you need to open the DDREAMSTUDIO folder (usually 'ds80') and double click on the 'ddreamstudio.exe' file.
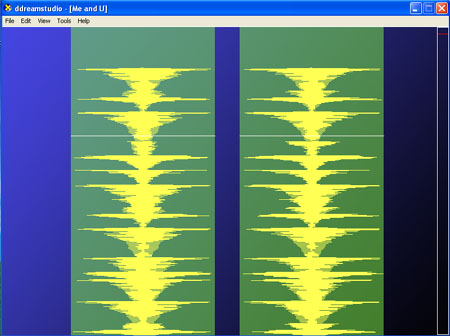
First, you get a blank screen. You will notice a File menu on the top edge. This menu contains most of the commands you will use to make your dance steps. Some of the menu options may have a checkmark next to them, showing you that the option is currently enabled. Just click on the menu option again to toggle the checkmarks. Feel free to explore these menus.
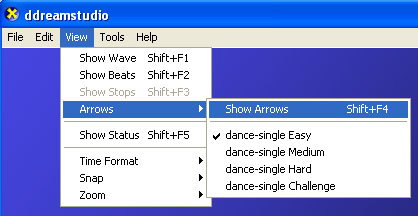
In the View Menu, a checkmark next to the item means it is enabled, no checkmark means it is disabled. Note how 'Show Wave', 'Show Beats' and 'Show Arrows' are disabled because they have no checkmark next to it.
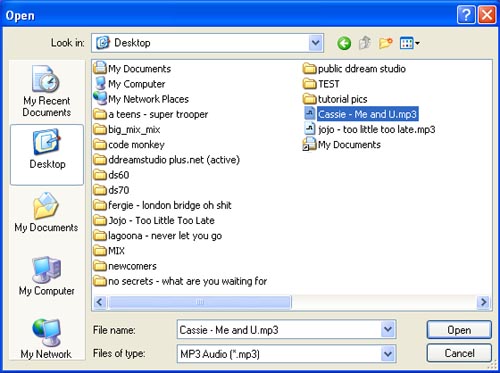
If you have any StepMania simfiles (dance files) on your computer, you can open them in DDREAMSTUDIO for viewing or editing. Go to File->Open, and browse for the *SM file type. *.SM is the file type for StepMania simfiles. You may need to go into the C:Program FilesStepManiaSongsOriginals folder to see your simfiles. Go ahead and open a simfile, and click OK if you get any notification boxes during the opening process. If it crashes, open another simfile. If you don't have any simfiles, you can easily find some, or you can just read on.
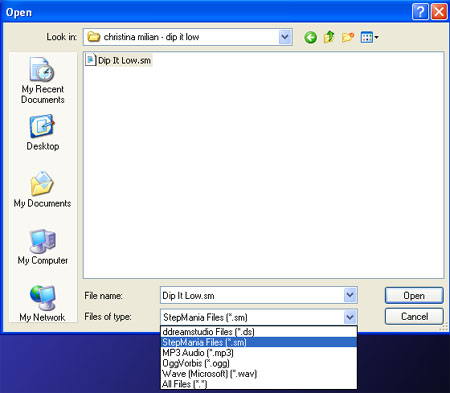
When looking for Stepmania *SM simfiles, Make sure you set the File Type filter as shown!
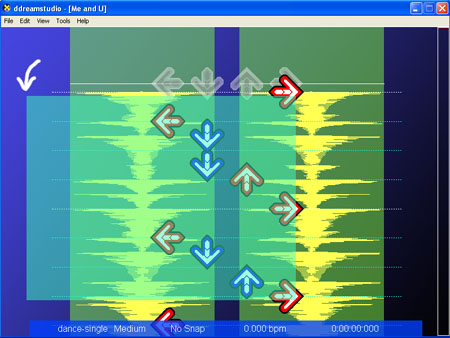
DDREAMSTUDIO manages several layers of data, all of them accessible through the View Menu. The layers are as follows:
The Wave Layer displays the music graphically, to help in music synchronization.
The Beats Layer displays beat markers in a song. We'll cover this in the Syncing Tutorial.
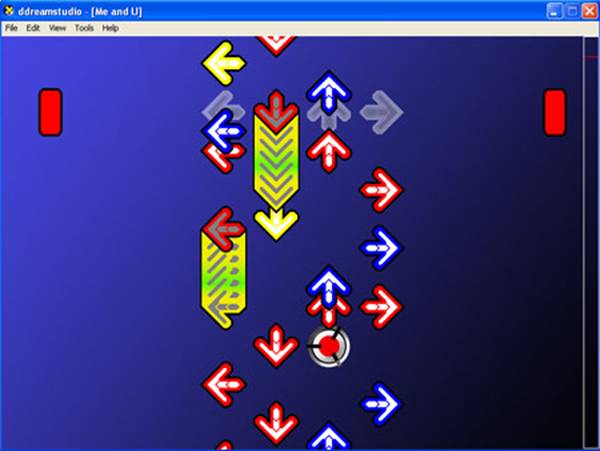
The Arrows Layer displays arrows.
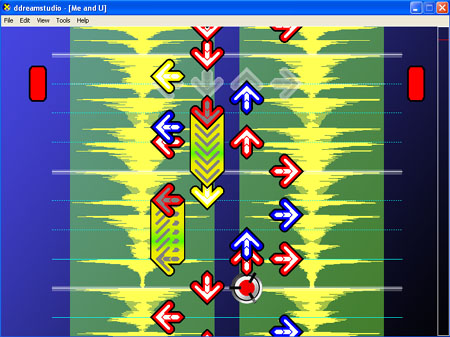
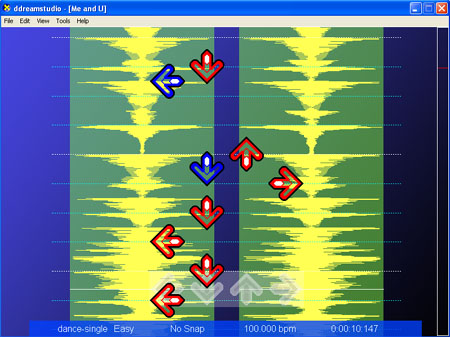
You can enable/disable these layers by going to the View Menu and toggling the checkboxes. Here, the above three layers are all enabled to give you a comprehensive view of the simfile.
By default, you can edit only on one layer at a time. For example, if the Beats and Arrows layers are both enabled, all editing functions are disabled for the beats layer. Consequently, you can freely edit all arrows, but nothing will happen if you try to edit a beat.
Every common command has a shortcut key (e.g., 'save' = Ctrl+S). As you get better, you will be using the menus less and less, because you've memorized the shortcut keys.
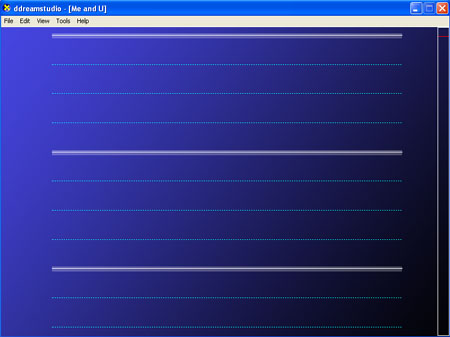
The Status bar shows which dance level you are currently editing (easy/med/hard), as well as the current snap, BPM, and time. The status bar will also show the current volume and playback speed (if you change them), but will fade them away after 5 seconds to save space. The Status bar is shown on the bottom of the screen. The Status bar is also a layer and can be enabled/disabled.
![]()
Status Bar
DDREAMSTUDIO can display the time in three formats:
1) Normal (hr:min:sec:milliseconds)
2) Samples (44,100 audio samples in one second)
3) Beats (whole beat:sub-beat. There are 48 sub-beats within a beat.
48 was chosen because it is the least common
denominator to support all notes from quarter notes all the way to 64th notes.
Therefore, beat 1.500 in Stepmania
is beat
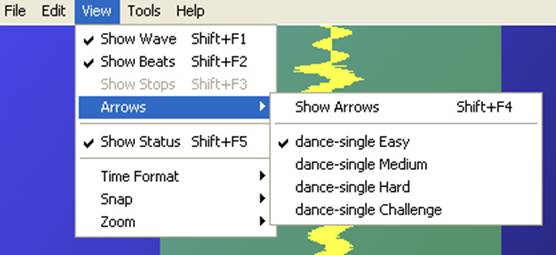
Use the View Menu to view the arrows for Easy, Medium, Hard, and Challenge steps. You can use the shortcut keys too (Ctrl+Shift+Left/Right).
Mouse behavior works similarly to Windows XP. If you click on an item, the item will become highlighted, showing you that it is selected. You can draw a box around several items, and they will be selected.
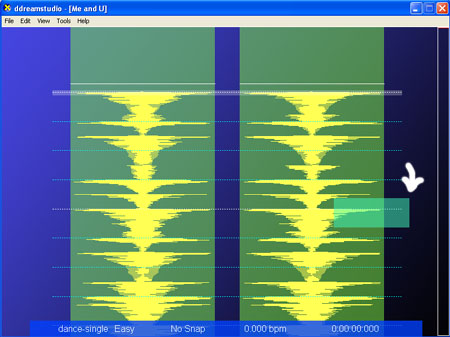
For example, if you draw a box around this beat marker, it will become selected. The best way is by drawing a small box around the beat marker's tip. Start drawing the box where you see the white arrow, as shown. Of course, you should disable the arrow view first.
Another example - if you draw a box around these arrows, they will become selected. You should draw boxes starting from a safe location - away from all the other stuff, as shown (see white arrow).
The Stationary arrows are your home base. If you dont have the arrows enabled, you will see a music cursor (white lines) sitting at the current position of the music. You can click on a different section of the song (on the waveform), away from any other stuff (like other beat markers and arrows) to jump to that section of the song.
If you click and drag the stationary arrows, the stationary arrows will move so that you can see other parts of the song.
You can use the scrollbar (white bordered with a red cursor) on the right hand side of the screen just like a media player. You can also use the scroll wheel of the mouse (see above pic).
That's it for the basics. You should close any simfile you are viewing (File->Close) and move on to the next section, the Syncing Tutorial.
TO MAKE THINGS EASIER
A basic understanding of music theory is desirable. You should know how to apply at least the following:
Measures, Beats, Meter, Tempo, Melody, Rhythm, Notes.
Many places online offer quick music theory tutorials. It may be possible to effectively use DDREAMSTUDIO with no music knowledge, but an instinctive feel for music.
Some experience with audio editing software may reduce the learning curve. As long as you are patient and/or a quick learner, you should be fine.
I. SYNCING TUTORIAL
BEFORE YOU START: Find a song you like. For best playability, the song should be about 2 minutes long. You can always cut down a longer song by using a free sound editor like Goldwave or Audacity. To avoid problems with StepMania, please ensure that the song to be played is stereo, 44.1 Khz 'CD quality' audio. This is a very common sound format. Also, the song must be MP3, WAV, or OGG (also very common sound formats).
If you are a beginner, choose a song that has a strong, steady downbeat to gain experience. 'Techno' songs are a popular and good choice.
STEP 1. Open the song in DDREAMSTUDIO (File->Open or Ctrl+O)
A lot of people don't like this song, but I do :)
STEP 2. Place a beat marker in the song anywhere there is a beat ('B' key or middle mouse button, or Tools->Autofill Beats).
DDREAMSTUDIO uses beat markers to accomplish syncing. You are in control of each and every beat marker in the song. This is one of the powerful features of DDREAMSTUDIO. DDREAMSTUDIO converts the beat markers behind-the-scenes to BPM and Gap. (*)
(*) Note: BPM and Gap are important timing values used in StepMania for syncing music to dance steps. BPM = 'Beats Per Minute'. Gap = 'roughly the amount of time from the start of the song to the first beat'. Gap is also known as 'Offset.'
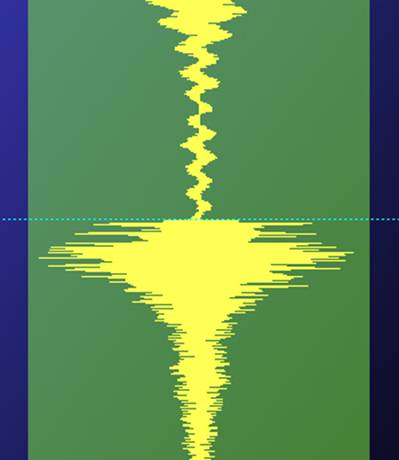
A beat marker is a (usually dotted) line placed on top of the waveform, and the marker looks like this:
A beat marker should be aligned squarely on the beat, like this:
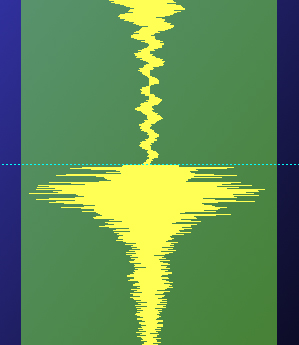
Perfect! Note how the beat marker is exactly aligned to the beat.
The following are examples of poorly placed beat markers, all of which may result in poor syncing:
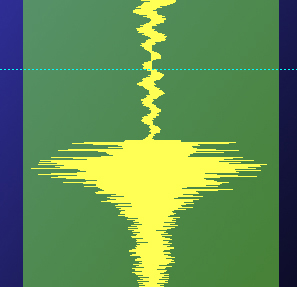
BOO: This marker is placed too early. Note how the beat marker comes before the beat.
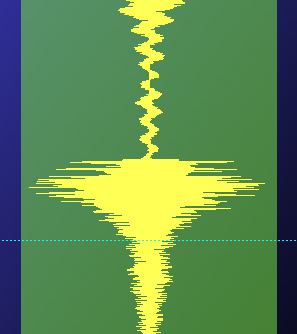
BOO: This marker is placed too late. Note how the beat marker comes after the beat.
To fix these problems, you can zoom, click and drag the beat markers to fine-tune the placement. You can also let DDREAMSTUDIO do most of the beat marker placing for you. See the below tutorial on placing beat markers for more information.
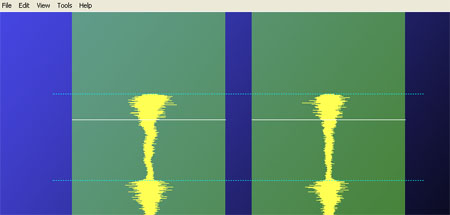
Of course, depending on your song, the beats may look slightly different.
STEP 3. You are now ready to make steps!
SYNCING SONGS BY PLACING BEAT MARKERS
If you have had previous experience with syncing music for dance steps, syncing by beat markers may be a completely alien concept. But, you may soon find that this kind of syncing is superior to many prior methods of syncing.
Two techniques for placing beat markers are explained below. Either one can do the job. You can combine the techniques for an even better result.
METHOD A. Place the first two beats in the song, then use 'Single BPM Mode' to establish the correct Gap and an educated BPM Guess. Autofill the remainder of the beats in the song, and play through the song while nudging inaccurate beats using 'Magic Nudge'.
Estimated manual labor for an average 2-minute song: 1-10 minutes
Estimated success rate after the manual labor is done: 95%
For those who know about BPM, you don't need to have a song with a rock steady BPM to use Method A. This method will work even if the song has slightly wavering BPM's.
METHOD B. Manually placing 'anchor' beat markers in the song, then using the Insertion Mode
In this method, you will place 'anchor' beat markers at regular intervals in the song (e.g., every 2 measures or 8 beats) and then automatically fill in the missing markers between the 'anchors' using the Insertion Mode.
Estimated manual labor for an average 2-minute song: 10-20 minutes
Estimated success rate after the manual labor is done: 99% (*)
Method B is better for every song that won't really work with Method A. Examples include classical music, live recordings, and the 'weird stuff' that people don't normally dance to.
(*) Where's that last 1 percent? Experience. Later, you will find many other ways to get things done. Advanced users use their best judgment and their own combination of Methods A and B (and more) to sync a song 100% of the time.
METHODS A AND B EXPLAINED IN DETAIL
METHOD A.
1. Open the song file (MP3, WAV, or OGG). Make sure the Arrow View is disabled (View->Show Arrows). Make sure that the Wave View is enabled (View->Show Wave). Make sure the Assist Tick for Beats is turned ON. (Tools->Music/Sound->Assist Tick->Enable for Beats or F3). Make sure the Snap is set to 'No Snap' (Left/Right).

A checkmark next to the item means it is enabled, no checkmark means it is disabled. Note how 'Show Arrows' is disabled because it has no checkmark next to it.
2. In the song, place two beat markers (press the 'B' key or middle mouse click) where the first two beats are in the song. Use the Zoom tool (Plus/Minus or Ctrl+Up/Down) to see the beat better. Mouse drag the beat markers to get them exactly where you want them. You need to get these beats as exact as possible.
Note the exact beat placement of the first two beat markers in the song. The first beat marker will be used to auto-calculate an exact Gap, and the second beat marker will be used to estimate the BPM. Don't worry, DDREAMSTUDIO is an interactive graphical editor and will not require you to do any calculations.
3. Fill the beat markers for the rest of the song automatically. Go to the Autofill Dialog (press 'A'). Select the Single BPM Mode. The correct Gap and an estimated BPM is shown.
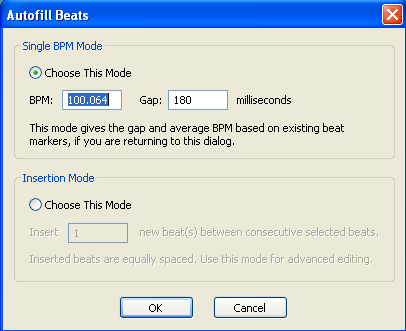
The correct Gap is 180 milliseconds, and the estimated BPM is 100.064 BPM.
Click OK. You should see beat markers automatically placed throughout the whole song, consistent with the Gap/estimated BPM. The Gap should be perfect, but the BPM may need slight tweaking.
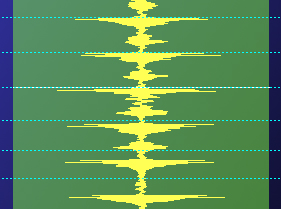
Because you get an estimated BPM (100.064), you'll still need to anticipate that the BPM is not exact yet. You can easily tell if beat markers drift off-sync, signifying an inaccurate BPM. In this example, the off-sync beat markers gradually come earlier than the beats, the unwanted effect becoming more noticeable starting from the white line. Ahh, nothing that a little nudging can't fix.
4. Nudge the Beat Markers (F7/F8 or Alt+F7/F8). Nudging is very subtle but extremely effective at getting the beat markers all in line with the beats.
Note: DDREAMSTUDIO starts nudging based on the beat marker closest to the music cursor.
To make things easier, you can slow down/speed up the song (Ctrl+Alt+Left/Right). You can also zoom in/out for a better view (View->Zoom or Ctrl+Down/Up or Plus/Minus). Finally, you can adjust the volume of the song so you can hear the assist tick better (Ctrl+Alt+Up/Down).
5. After nudging, play through the song once more, making sure that the Beat Assist Tick is ON (F3). Things should be just fine, and little to no further editing/nudging should be needed.
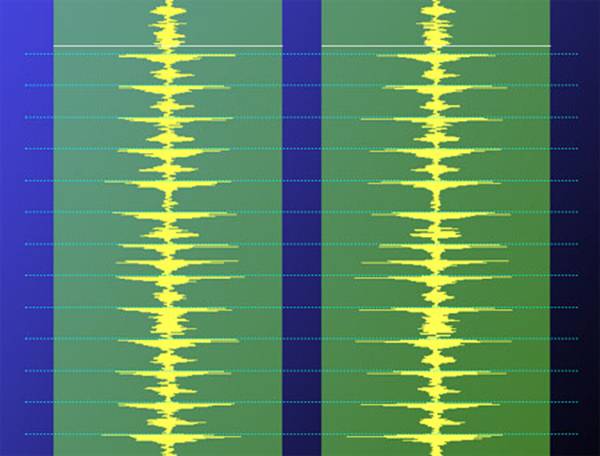
Perfect, all the way through.
METHOD B. Manually placing 'anchor' beat markers in the song, then using the Insertion Mode
The best way to do Method B is to think: 'an anchor beat marker at every two measures, and then auto-filling the stuff in between.'
1. Open the song file (MP3, WAV, or OGG). Make sure the Arrow View is disabled (View->Show Arrows). Make sure that the Wave View is enabled (View->Show Wave). Make sure the Assist Tick for Beats is turned ON. (Tools->Music/Sound->Assist Tick->Enable for Beats or F3). Make sure the Snap is set to 'No Snap' (Left/Right).
A checkmark next to the item means it is enabled, no checkmark means it is disabled. Note how 'Show Arrows' is disabled.
2. Browse the music (spacebar, mouse scroll, PgUp/PgDn). Zoom in/out in the area where you want an 'anchor' beat marker (View->Zoom or Ctrl+Down/Up or Plus/Minus). Don't zoom in/out too much or you may lose sight of the beat itself. You may want to stop the music first (spacebar) before you do any serious zooming.
3. Insert the 'anchor' beat marker ('B' key or middle mouse click). Adjust the 'anchor' beat marker (select and drag the marker up or down until it's just right).
A beat marker was exactly placed here. This is an 'anchor' beat marker.
4. Continue browsing the music to find the location of the next desired 'anchor' beat marker. Every 2 measures or 8 beats is a good interval. The smaller your interval, the more accurate the syncing, but you may gain less for much more work.
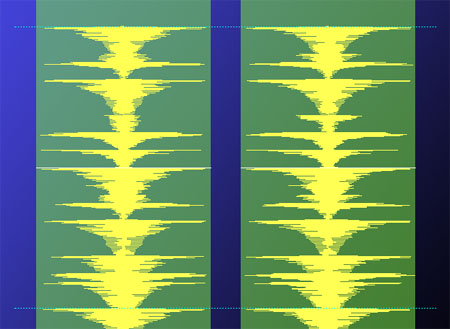
Two anchor beat markers are shown, placed 2 measures, or 8 beats apart
5. Repeat steps 2-5 for all other anchor beat markers until you reach the end of the song. Hint: If you press the 'N' key, DDREAMSTUDIO will guess the location of the next beat and place a marker for you. From here, just drag the beat marker into place.
6. You should now have a full set of anchor beat markers placed throughout the whole song. Lock the 'anchor' beat markers (select All (Ctrl+A), then Insert->Beat Props->Lock). Optionally, you can change the color of the anchor beat markers for better visibility BEFORE locking. A locked marker is considered 'finalized', and cannot be freely edited as long as it remains locked. Locked markers look like solid lines.
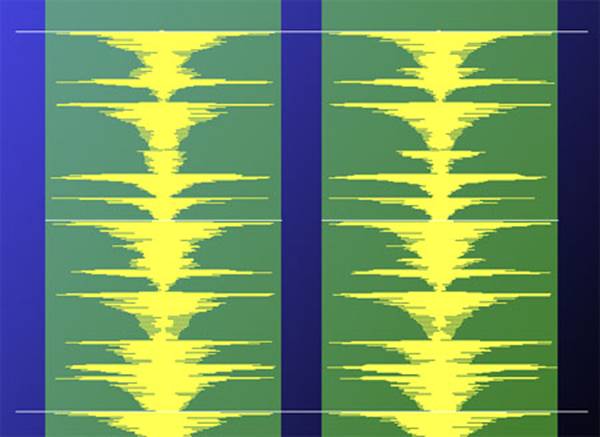
Locked beat markers are solid lines, not dashed lines. The markers were also changed to a white color.
7. Autofill the beat markers in between the anchors. Go to the Autofill dialog (Tools->Autofill, select 'Insertion Mode'), then type '7' into the box. This will insert 7 beat markers in between each anchor marker (standard 4/4 time is assumed, so if your song has another time signature, adjust as necessary).
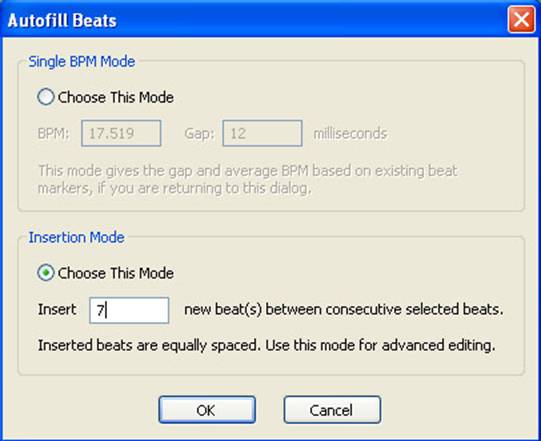
Go to the Autofill Dialog and choose the 'Insertion Mode.'
Note: You only needed to do 1/8th of the work! DDREAMSTUDIO does the rest with the power of Autofill!
Note the anchor beat markers (solid white lines) and the 7 autofilled 'secondary beat markers' (dashed green-blue lines). The music cursor is also visible in this picture.
8. Play through the whole song while listening to the assist tick (F3). The sync should already be really, really good (or perfect). If not, you can go back and tweak any marker you want. If you want to tweak a locked marker, unlock it first. You can select all non-anchored marker (use the Select Tool), delete them, and tweak the anchors some more before you autofill again.
II. STEPPING TUTORIAL
DDREAMSTUDIO's step editor is very similar to the StepMania 3.9 in-game editor. If you are already familiar with the StepMania 3.9 editor, you're pretty much good to go.
Before you begin stepping, have you:
SONG INFORMATION
Go to File->Properties. This dialog will let you name your song, assign the display BPM, and adjust the foot rating ('difficulty level').
PLACING NOTES
Press the number keys 1, 2, 3, 4 on the top of your keyboard to place/toggle delete a Left, Down, Up or Right regular step arrow.
Press and hold the number keys + Up/Down or PgUp/PgDn to place a freeze step. Freeze steps cannot overlap other steps or else the freezes will revert to regular steps.
Press Shift + number keys to place a mine step. Mine steps are good for making a game harder, because if you accidentally step on too many mines, you can lose the game.
If you do any of the above while playing the song, the steps will be recorded in real time.
Press Ctrl+Shift+Left/Right to bring up the editor for a different difficulty level (easy/medium/hard/challenge). To assign a foot rating, go to File->Properties.
It is vital that your steps are fun, especially if you are going to be playing the song with friends on a dance pad. Nothing turns people off more than a good song with bad steps.
You may be spending a lot of time editing the steps until they feel awesome when danced to. You can practice the steps by acting them out while playing the song. Be sure to cater to beginner dancers, as well as advanced players.
MOVING AROUND IN THE SONG
Press Up/Down, PgUp/PgDn, Home, End, or use the scroll wheel of the mouse. There's also a scrollbar on the right side of the screen.
Press Spacebar to Play/Pause the song.
Press W to rewind the song.
Press S to skip to the last-played portion of the song.
Depending on the snap value (see below), the above commands will react differently. For example, if your snap value is set to 4th notes (Red), one mouse wheel scroll will move you up/down one full beat. If your snap value is set to 8th notes (Blue), the mouse scroll will move you half a beat at a time.
SELECTING
There are many ways to select stuff:
Left click on a note to select it.
Hold Ctrl + Left click other notes to select those notes, too.
Draw a box with the mouse to select every note inside the box.
Press Ctrl+Space to set a start marker, then go to a different part of the song, and press Ctrl+Space to set an end marker. Everything between start and end is selected.
You can do the same thing with beat markers, but you will need to disable arrow view (Shift+F4 or View->Show Arrows).
For more information go to the Basics Section of this tutorial.
EDITING
Ctrl+X = Cut
Ctrl+C = Copy
Ctrl+V = Paste
Delete = Delete
Note: you can cut/copy something, and paste it into a different level, or even a different song!
SNAPPING
To change the snap value, press the Left Arrow or Right Arrow.
Musical notes (and dance steps) are written in an exact, orderly fashion. For this reason, you can't just randomly stick a step anywhere in the song without regard to snapping. All dance steps are based on and around the beat markers you have made (see Syncing tutorial).
A Snap value will divide the space between adjacent beat markers into equal and exact parts. Only in these parts can a dance step be placed.
Possible divisions include 16 parts per beat, 8 parts, 4 parts, 2 parts, and 0 parts (i.e., only on the beat). The 16 part provides a very high resolution and you can squeeze 16 notes in the space of one beat (fast dance), but the 0 parts provide less resolution. In musical terms, notes (or steps) placed inside these divisions are called x-th notes (e.g., 8-th notes).
Each kind of division is assigned a particular color for your convenience (red, blue, etc). The arrow steps themselves are also assigned the respective color.
FILE MANAGEMENT
SAVE, SAVE, SAVE! (Ctrl+S)! Also, try keeping your files organized. Keep the song, simfile, any wallpapers, etc. for a particular dance project in the same folder.
DDREAMSTUDIO, by default, saves into the *.DS format. This format is not currently compatible with StepMania. Before you play, save your file in the StepMania Format (File->Save As and choose the SM format).
III. PLAYING IT WITH STEPMANIA TUTORIAL
1. Of course, you've installed StepMania, and you know the folder in which the game was installed (usually C:Program FilesStepMania).
2. Once you saved your project (see 'File Management' in the stepping tutorial above), you are bound to have at least these files:
If you haven't already done so, create a folder (name it well), and throw all of the above files inside the folder.
3. Stepmania songs are stored in a particular sub-folder within StepMania. Usually, it's C:Program FilesStepManiaSongsOriginals. Use Windows Explorer, and go there.
4. Take the folder you made in step 2 (along with all of its contents), and paste it into the StepMania Originals that was just discussed in step 3. Note that your folder should be inside the Originals folder.
5. Run StepMania (e.g., from the Start Menu).
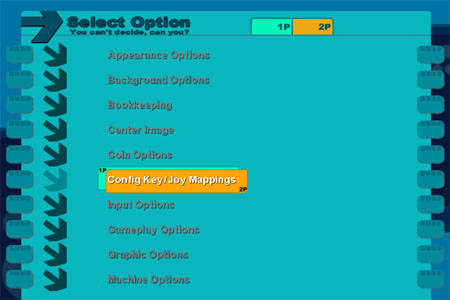
6. Update the StepMania song database---When the game starts, you will see the Main Menu. Go to Options and Press Enter to view the options
At the bottom of the list of options, you will see 'Reload Songs/Courses.' Do it to update the song database.
7. Hit Esc to return to the main menu. From the main menu, choose 'Game Start' to begin playing!

You can easily configure a dance pad for use in StepMania. If you have a PlayStation dance pad, you will need to get an inexpensive USB adapter. Exit the game, plug the adapter into your computer, and follow directions for the USB adapter to get it to work in dance mode (as opposed to joystick mode). Then, restart StepMania and configure the buttons in-game (it's one of the many Options in the Options Menu). Have fun!

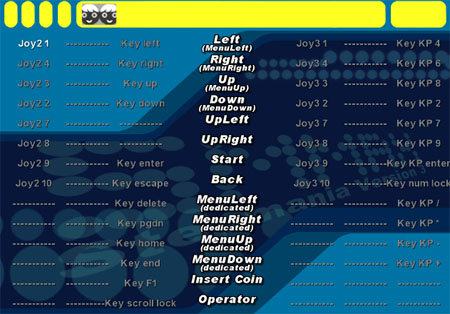
In this example, the dance pad is recognized as Joysticks 2 and 3 (corresponding to players 1 and 2). The USB adapter additionally needs to be set to work in dance mode, though.
|
Politica de confidentialitate | Termeni si conditii de utilizare |

Vizualizari: 3083
Importanta: ![]()
Termeni si conditii de utilizare | Contact
© SCRIGROUP 2026 . All rights reserved