| CATEGORII DOCUMENTE |
| Bulgara | Ceha slovaca | Croata | Engleza | Estona | Finlandeza | Franceza |
| Germana | Italiana | Letona | Lituaniana | Maghiara | Olandeza | Poloneza |
| Sarba | Slovena | Spaniola | Suedeza | Turca | Ucraineana |
Kworld Mpeg TV Station - Intervideo WinDVR
CONTENTS
CHAPTER2 DRIVER INSTALLATION FOR WINDOWS 98SE/2000/ME
2.1 Application Installation for Windows 98SE/2000/ME
2.2 Driver installation of Windows 98SE/2000/ME
CHAPTER3 MPEG TV STATION APPLICTION
3.1 Running the Mpeg TV Station for the first time:
3.2 Utility Interface in TV/AV/SVHS mode for Win98 SE/2000/ME.
4.1 Installation of InterVideo WinDVR..
5.2 Use Ulead Video Studio to make VCD..
CHAPTER6 KWORLD SUPPORTING CENTER
Welcome to the world of Kworld Meg TV Station. With this multimedia product, you can use it as a convenient tool for multiple purposes including video conferencing, video editing, class presentation, or even entertainment.
The powerful WinDVR will allow you to save TV and Video as Mpeg1 & 2 file. And the scheduler can let you preset the recording time of your favorite TV show.
With the Ulead Video Studio, you can edit the captured mpeg file and save the video as VCD format.
Features
Receive TV broadcasts: 125 channel cable/antenna-ready TV tuner |
Receive and capture FM radio: Listen to the FM radio stations! (FM model only) |
External inputs for video capture: AV and S-video inputs for external video resources like cameras and VCRs. |
Video conference, video phone: MS NetMeeting for video conference |
Wireless remote control included: Channels up/down, Volume up / down, Record and Play Video. |
Full motion video capture: Save as AVI and Mpeg 1 & 2 (By the InterVideo WinDVR) |
Still frame video capture: Capture to Image Buffer and save to different resolution and format (BMP, TIF and Jpeg) |
External interface: 75 ohm IEC coaxial input (cable TV), FM radio antenna input, Composite (RCA) input, S-Video (SVHS) input, audio input, and line audio output |
Unpack your Mpeg TV Station and make sure that all items are intact. The following items should be included in your Mpeg TV Station package:
t Kworld Mpeg UBS TV BOX
t Audio cable
t Remote controller (Optional)
t FM Antenna (for FM model only)
t Userts Manual
t CD of installation software
t IBM PC or compatible
t Intel Pentium III 500 MHz CPU or better processor
t Minimum 64 MB memory
t Minimum 100 MB hard disk space available
t Universal Serial Bus (USB) Plug and Play compliant interface for easy, hassle-free installation.
t VGA and with DirectDraw driver supporting 16 bit color or higher
t Microsoft Windows 98SE/2000/ME
t TV antenna or cable from CATV
t Sound card
t Speakers for audio output
t CD-ROM drive
To install the BSB TV BOX into your computer, follow the steps below:
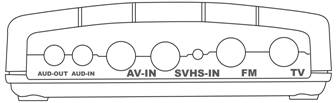
Ø Connect the SVHS output device to SVHS-IN
Ø Connect the camera or video tape recorderts video output to AV-IN.
Ø Connect the video tape recorderts audio output to the AUD-IN.
Ø Connect the TV antenna or cable to the TV-IN connector.
Ø Connect the FM antenna to the FM-IN connector.
Ø Connect the audio cable from line-in of the sound card to the AUD-OUT
Your Mpeg TV Station package comes with complete Windows software utilities. These utilities can be found from the CD-ROM in this package. Prior to installation, it is highly recommended that all application programs should be disabled such as anti-virus software and system monitoring applications.
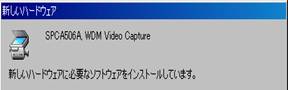
Note that there are two drivers required to be installed for each component.
Ø SPCA506A, WDM Video Capture
Ø SPCA506A, Sunplus USB Camera
Please insert the Installation CD into the CD-ROM driver and the auto run page will pop up automatically.
On the auto run page, please choose tUSB TV BOXt and then click on the tMpeg TV Station/USB Applicationt to start the installation.

After the Application is finish installation, please click tOKt to reboot the Windows.
After the application were installed well, and reboot the PC. Please plug the USB connector of the USB TV BOX to the USB socket of your computer and windows will automatically detect a new USB device that is your USB TV BOX and the add new hardware wizard pops up. Click on next (IF the USB device is not detected by your system, please restart your system and it should be detected. Then you can run the application program.)
Components check - out
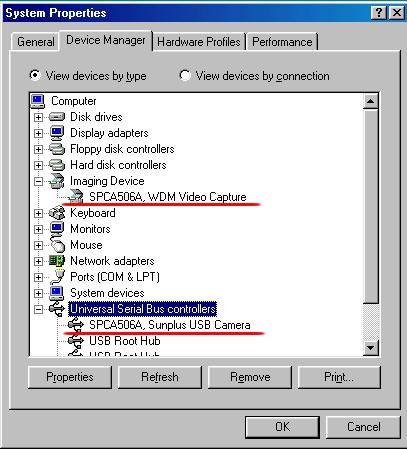
Go to| Start | Setting | Control Panel | System | and double click System icon.
Go to Device Manager to check out if the driver has been installed.
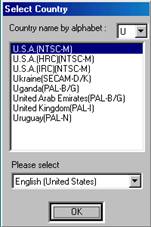
Step1 Please click on the Start->Program->Mpeg TV Station USBTV->tMpeg TV Station USBTVt to run the TV application.
Step2 At the first time running, please choose your country and language as below:
Step3 Please select the TV input and click Scan
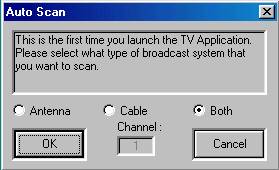
Step4 Then you would see the figure on the left telling you the channel are being
scanned.
Note:
The Step2 and Step 3 are only for the first time. You dontt need to repeat the steps in the future. If you want reset, you can Go to | Start | Program | Mpeg TV Station | then double click tReset Mpeg TV Stationt.
![]() Power: to terminate Mpeg TV-Station application.
Power: to terminate Mpeg TV-Station application.
![]() Minize: to minimize user panel.
Minize: to minimize user panel.
![]() FM
Mode: to switch to FM user panel.
FM
Mode: to switch to FM user panel.
![]() MPEG: to switch mpeg software.
MPEG: to switch mpeg software.
![]() VIDEO SOURCE SELECTION: to switch
Video source.
VIDEO SOURCE SELECTION: to switch
Video source.
![]() Record: Click record button to start motion
video capturing.
Record: Click record button to start motion
video capturing.
![]() Stop: Click this button stop capturing video.
Stop: Click this button stop capturing video.

![]() Playback: Click to
playback the latest recorded file
Playback: Click to
playback the latest recorded file
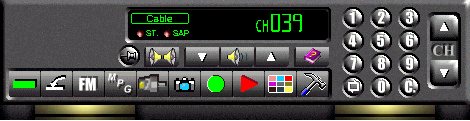
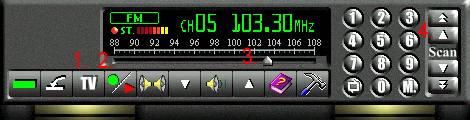
TV Tuner
1.Channel
Select TV channel
2.Fine Tune
As you watch TV, you can use the
Find Tune to do adjustment.
Select Cable or Antenna
4.All Freg Scan
All the channels frequency scan
5.Auto Scan
Click the Auto Scan to seek the channels (If you never scan before)
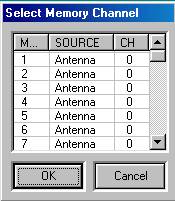 Memory Channels
You can select memory channels
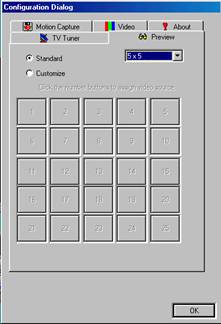 Channel Preview
You can configure your channel preview layout from this dialog box
Select preview standard or customize
Standard -2x2, 3x3, 4x4, and 5x5.
Customize-you can set by your favorite.
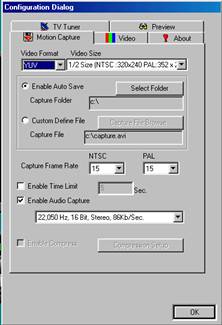 Motion Capture
Video Format:
provides different types of video format and video size.
Capture Folder:
where your motion capture older esides
Capture File:
where your motion capture file resides. Capture Frame Rate:
provides you the selection of frame rate setting.
Enable Time Limit: you can predefine the capture time limitation.
Enable Compress:
Mpeg TV Station provides varies types of video codec you can use while doing motion capturing.
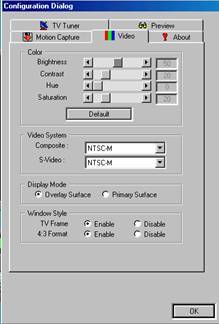 Video
Video
Color:
brightness, contrast, hue and saturation adjustment. Move the pointer of each scroll bars to see the effect.
Video System:
Although the TV tuner on your TV tuner capture card is fixed and you have to set up the TV system right after the first time you launch Mpeg TV Station, you still have the chance to use this product to display the varies standards of video system.
Display Mode:
If your graphic adaptor supports Overlay mode, you can enable Overlay Surface check bottom. Overlay surface support is a must to use CLOSED CAPTION function.
Window Style:
TV Frame: To have a frame to your video window.
4:3 Format: If you enable it, the aspect ratio will be fixed at 4:3.
TV MODE, to switch to TV user panel
Record / Play Audio, to record and play FM audio
FM frequency shift
Frequency scan bottom , you can perform fine tune and channel scan by click on this group of bottoms
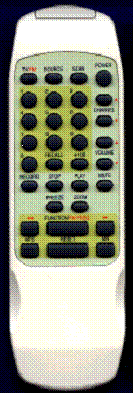 Power Off: Press
this button to terminate the program.
Power Off: Press
this button to terminate the program.
Zoom: Click this button to toggle the Video Window between full size and the previous size.
Numeric Keypad: Select the desired channel directly.
Channel Up/Down: Click this button to go to next/previous channel.
Volume Up/Down: Click this button to increase/decrease the audio volume
TV/FM: Click this button to toggle between TV or FM
Recall: Jump to last selected TV channel.
Source: Select Composite, SVHS, Antenna, and Cable.
Mute: Press this button to mute the sound.
Recode: Click this button to capture video file.
Play: Click this button to playback.
Freeze: Click this button to capture image.
Function: Click this button to channel preview.
Keyboard Buttons Function Descriptions
Keyboard Buttons |
Function Descriptions |
F1 F2 F3 F4 F5 F12 Right Arrow Left Arrow Up Arrow Down Arrow Alt+F4 Numeric Keys |
Pop up this Online Help File TV/FM mode switch Mute/Un-Mute mode switch Capture image flie Minimize Window TV on Window background Volume up Volume down Channel up Channel dowm Power off Used for channel selection |
 4.1 Installation of InterVideo WinDVR
Start Windows and insert the Mpeg TV Station CD disk into the CD-ROM drive. The Kworld Installation Wizard will appear. Please select InterVideo WinDVR install Application
 Install
InterVideo WinDVR Application. You need key in The WinDVRts Serial number (you
can find on your CD package)
Install
InterVideo WinDVR Application. You need key in The WinDVRts Serial number (you
can find on your CD package)
Click on tNextt to continue
This final window on the left would ask you to reboot the system.
Please click tFinisht to reboot your system.
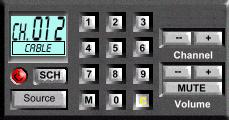
The Kworld Mini-Controller is an assistant to assist WinDVR to do the functions as below:
![]() TV/AV/SVHS video source switch
TV/AV/SVHS video source switch
![]() Scheduler
Scheduler
TV Channel switch
Volume control
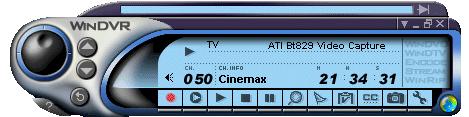
Press the ![]() button. WinDVR starts recording the video
source currently showing in the display window.
button. WinDVR starts recording the video
source currently showing in the display window.
Press the ![]() button to pause, the
button to pause, the ![]() button to stop recording. As you stop a
recording, WinDVR prompts you to name the new recording. Type the name and
press OK.
button to stop recording. As you stop a
recording, WinDVR prompts you to name the new recording. Type the name and
press OK.
Press the Timeshifting ![]() button. If the control panel is not expanded
at the time, the Timeshifting monitoring bar will appear. The Timeshifting
feature allows you to 'hold' live view temporarily, without
interrupting the ongoing recording session. Next you can replay or watch 'live'
video with a delay. Timeshifting gives you absolute control over how you watch
television. You can take a break watching a live show, and pick up where you
left later. At any time, you can also instantly jump back to live view.
button. If the control panel is not expanded
at the time, the Timeshifting monitoring bar will appear. The Timeshifting
feature allows you to 'hold' live view temporarily, without
interrupting the ongoing recording session. Next you can replay or watch 'live'
video with a delay. Timeshifting gives you absolute control over how you watch
television. You can take a break watching a live show, and pick up where you
left later. At any time, you can also instantly jump back to live view.
You can use the capture icon ![]() on the control
panel, or press the 'P' key at any time to capture a BMP file of a
moving or static image
on the control
panel, or press the 'P' key at any time to capture a BMP file of a
moving or static image
![]() Open the online help file.
Open the online help file.
You can use the Mpeg USB TV BOXt s Mini-controller control the WinDVR.
Record Properties
The Record page of the properties sheet allows you to set the recording quality for video and audio.
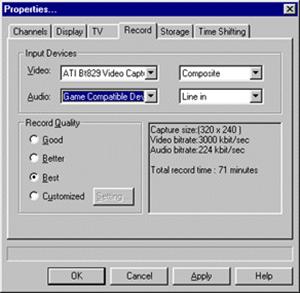 Video tV
Select the video capture/TV tuner card. Next select the video input signal source:
Composite tV
Video signal format that includes the complete visual waveform, including chromatic (color) and luminance (brightness) picture information, as well as control signals.
TV tV
Antenna or Cable TV signal.
S-Video tV
Type of video signal used in a growing number of Hi8, S-VHS, and digital videotape formats. It transmits luminance (brightness) and chrominance (color) portions separately, using multiple wires, avoiding the NTSC encoding process and the resultant loss of picture quality. Also known as Y-C video.
Audio tV
Select the audio hardware device. Next select the audio input signal source:
CD Audio, Microphone, Line In.
7.Recommended system requirements:
Performance: |
Good |
Better |
Best |
Processor: |
Intel Pentium III 500MHZ |
Intel Pentium III 700 MHZ |
Intel Pentium III 866MHZ |
Operating System |
Windows 98SE, Windows2000, Windows Millennium |
||
Input Device: |
TV Tuner (PCI or USB) or display card with TV tuner capabilities Input device must have Windows WDM capture driver support. |
||
Sound: |
Sound card with one line-in jack |
||
Storage: |
7200+rpm hard disk drive recommended If available, turn on DMA mode for hard disk drive (using your systemts setup utility) |
||
Start Windows and insert the Ulead Video Studio CD disk into the CD-ROM drive. The Ulead Video Studio Installation Wizard will appear. Please select Ulead Video Studio SE 4.0 install Application
Then you would see the application program has been generated and just close the window of application program. This final window on the left would ask you to reboot the system.
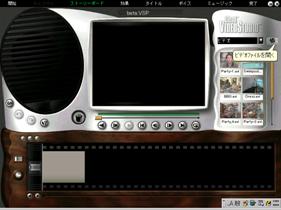
Ulead Video Studio a consumer video editing software that lets users quickly and easily produce their own home videos complete with attractive titles, transitions, and sound. Unlike other software, Ulead Video Studio features an intuitive step-based interface that helps users get started right away.
By following the steps, from Start to finish, you will be creating video masterpieces before you know it. Once done with that, you can then choose to watch the playback from videotape, desktop, or stream it over the Internet.
Please click on the Start->Program->Ulead Video Studio 4.0 SE->t Ulead Video Studio 4.0 SEt to run the TV application.
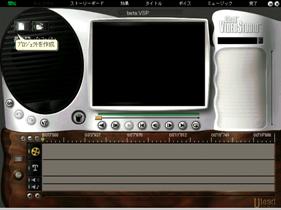
Open the new project, select VCD format, then set the project name.
Load video files
Select Finish
Select Make Movie
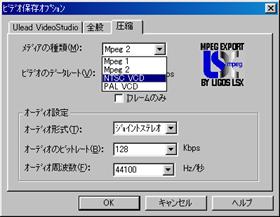
Save as file as .mpg
Select Options
Compression: Select VCD format
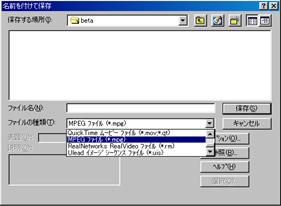
 Then
save the file, and Video Studio will automatically save the VCD format.
Then
save the file, and Video Studio will automatically save the VCD format.
Note:
The Video Studio user, if you want make the VCD, please select the NTSC VCD or PAL VCD format.
NTSC VCD:
Frame size: 352X240
Frame
rate: 29.97 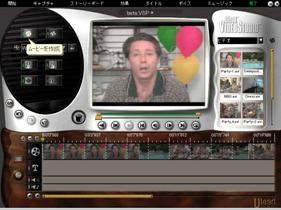 fps
fps
PAL VCD:
Frame size: 352X288
Frame rate: 25fps
You have to use the VCD, which it provided the function for program, then this program will be record by mpeg file under Video Studio, after then it will be sNsdone to VCD
 The
CD-R Software: WinOnCD, Nero-Burning Rom, Easy CD Creator 3.5tC
The
CD-R Software: WinOnCD, Nero-Burning Rom, Easy CD Creator 3.5tC
If you have any question, you can see the online help file.
For more information, please check our Website:
1.Kworld Website: https://www.kworld.com.tw
2.E-mail: service@kworld.com.tw
|
Politica de confidentialitate | Termeni si conditii de utilizare |

Vizualizari: 5025
Importanta: ![]()
Termeni si conditii de utilizare | Contact
© SCRIGROUP 2026 . All rights reserved