| CATEGORII DOCUMENTE |
| Bulgara | Ceha slovaca | Croata | Engleza | Estona | Finlandeza | Franceza |
| Germana | Italiana | Letona | Lituaniana | Maghiara | Olandeza | Poloneza |
| Sarba | Slovena | Spaniola | Suedeza | Turca | Ucraineana |
DOCUMENTE SIMILARE |
||||
|
||||
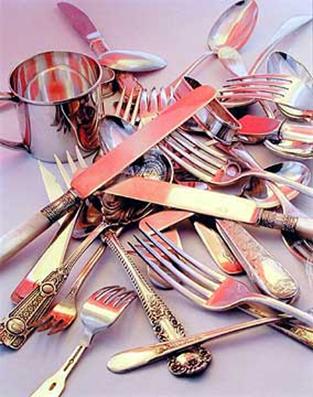
Color photography for amateurs
Short history

 Photography
is extremely popular and it is used for people all around the world, people of
all ages, the most enthusiastic being the photo amateurs. Today the photography
is perhaps the best friend of scientists because it reveals the micro and macro
universe. About 30 years ago this industry has developed a photosensitive
material which regained object in color and detail. The arrival of the color
photography in 1935 didnt force the disappearance of the black and white
photograph because between them there could have been a technical and
esthetical connection. Technical, there is a big difference between the two
photographs: at the black and white photography the screen accepts a standard
light exposure regardless of its qualities. The technical difference between
these two isnt the photographic camera; it is just the photosensitive
material. From an esthetical point of view the black and white photography
reveals an artificial picture, while the color one shows a more natural
perspective.
Photography
is extremely popular and it is used for people all around the world, people of
all ages, the most enthusiastic being the photo amateurs. Today the photography
is perhaps the best friend of scientists because it reveals the micro and macro
universe. About 30 years ago this industry has developed a photosensitive
material which regained object in color and detail. The arrival of the color
photography in 1935 didnt force the disappearance of the black and white
photograph because between them there could have been a technical and
esthetical connection. Technical, there is a big difference between the two
photographs: at the black and white photography the screen accepts a standard
light exposure regardless of its qualities. The technical difference between
these two isnt the photographic camera; it is just the photosensitive
material. From an esthetical point of view the black and white photography
reveals an artificial picture, while the color one shows a more natural
perspective.
From the appearance of the color photography (1935) until our days the industry has accomplished many progresses: the appearance of the color paper, the quality improvement and color restoration and the rise of sensitive materials. The cost of a color film developed in special laboratories, an amateur gives approximately 35-38 slides which cost the same as 30 white and black pictures. The expensive thing in color photography is the special paper, because the process is complicated it requires material and especially time. Anyway with some experience an amateur can reach a medium cost in material and time.
The image appearance
The subjects placement isnt random. It is done after 2 fundamental principles. Unlike the other arts (drawing for example) where the artist can intervene as he desires in his creation, in photography, the photographic camera replies in exact detail everything it sees (quality and flaw at the same time).
a). The image in screen set up
Unlike a picture, the set up of a photo is standard and it is characterized by the rapport of the edges.
The rectangular shape and the edges 2/3-3/4 give an esthetical form and that is why it is very frequently used. The square shape (1/1) is the same on all the edges, and it is harder to work with at the subject picture set up, even thought it is very used in the color photography making.
Recently, there were a lot of exhibitions and magazines with a longer shape, having one side longer than the others. Using good taste, they can find their meaning (panoramic cards, decorative photos etc.).
The placement in a bigger screen, especially of small size subject, without any directive rule is not a simple problem as it seems to be at a first look.
Well present the setting up of the image screen.
Joining the middle of the screen edges we obtain the symmetry axels, and their crossing means the symmetry center of the screen. If we are watching for a few moments this point, well notice we wont see anything except it, larger than the rest of the screen field is, decreases to disappearing.
This is the reason the subject cant be placed in the symmetry centre of the screen: the excess of symmetry decreases the importance of the other components of the image; thats why it known as a lower point of the screen (as an effect). If the subject is just the rosette with the concentric circles of the target, on the contrary, its placement in the symmetry center is the best move!
Dividing each edge of the screen in three equal parts and joining the homogeneous points of the opposite edges, well obtain a grid of the four axles and four points, the important points and axles of the screen. They offer the best placement positions of a main compositional element within the image. Thus, if a tree or a tower, for example, placed in a field landscape is overlapped of the symmetry axles or is in the center of the image it will reduce more the effect, especially if the shape is a square, because the symmetry divides the attention and also the view, which is led toward a half or the other half of the image, tending to avoid just the main element of the subject.
 On the
contrary, placing it on one of the forte axles of the image, the effect
increases because the view is sliding to the subject and remains on it, so we
avoid the symmetry using the lines and the forte points of the screen.
On the
contrary, placing it on one of the forte axles of the image, the effect
increases because the view is sliding to the subject and remains on it, so we
avoid the symmetry using the lines and the forte points of the screen.
This way of doing it is also a natural and a logic way, not only an esthetic one.
Let us suppose you have to take a photo of the balcony scene in Romeo and Juliet. Youll overlap the balcony scene in right superior forte point and Romeo on the left and the character down to the right, using the diagonally of the screen.
The two choices of framing proposed before are not of equal values: the first one (left down-right up) over the ascendant diagonally was a stronger effect than the other one (left up-right down); the descendent diagonally of a frame is called the weak diagonally, unlike the second forte diagonally of the screen.
So, a simple method has an enhancing or an diminishing role for a compositional element of the subject.
How do we do this in photography? Very simple! We overlap the directional element of the screen (forte line or point) on the compositional element we want to turn to good account when we set up the subject. On photo devices with an accessible frosted window we can draw with a pencil the reel of the fort lines.
b). Goldene Schnitt
It was called like this by the Renaissance artists who used it at their operas, for its beautiful and strange effect. If on an AB line we choose a M point for dividing it in a middle and extreme ratio, so the AB and AM ratio is
![]()
![]()
In this case it is said that the AB is divided by the Goldene Schmitt. Doing the same thing, starting from B to A, well obtain the M, the symmetrical of M. dividing all the edges of the screen and joining the obtained division points, we find the forte points and line reel corresponding to the Goldene Schnitt. Nothing remains for us to do except to check the effect by the way explained for the other reel.
Goldene Schnitt gave birth to several studies and philosophical interpretations going to the one that is the formation of Universe and human body structure. Thus, the snail, the ammonite, the turnsole flower develop their helix by this ratio, and the naval divided the human body vertically in two parts by the same ratio.
For dividing the screen using the Goldene Schnitt we use the following procedure:
-each edge is divided in eight equal parts;
-join the points on the opposite edges; corresponding to the third division and the fifth one its obtained the line and points grid.
The segment of 3/8 l 0,375 l in the previous division into three parts is a 1/3 l = 0,331l the forte line is further than the Goldene division ones.
Famous paintings like The last supper by Leonardo da Vinci seemed to be composed by the Goldene Schnitt.
c). The skyline
For avoiding the symmetry, the skyline of a sea or of a field landscape never superposes itself over the horizontal symmetry axe of the frame, so that you will not oblige the eye to look either up or down, in stead of watching both up and down, that means the whole range of the image. It has to be superposed over the forte horizontal line that is the lowest in the frame. In this case, the absence of the details, like clouds in the upper frame from above the horizon, produces a sad effect of emptiness that ruins the image.
 Its
superposition on the forte horizontal line produces the impression that the
details that are down the frame are crushed; an example could be a sea
landscape with a boat in the foreground, at the inferior line of the frame,
which can seam rather overcome by the water from above. If we place some buildings
on the superior forte horizontal line it would give the impression of
instability, because they tend to be driven to the foot of the frame by the
sense of the gravitational equilibrium. Things are the same when an object is
thrown up or when a dancer makes a jump and the picture is taken exactly when
he is at the highest point of the trajectory. The same sense of equilibrium
makes us continue their trajectories up to the foot of the images frame,
suggesting the movement through this gravitational effect.
Its
superposition on the forte horizontal line produces the impression that the
details that are down the frame are crushed; an example could be a sea
landscape with a boat in the foreground, at the inferior line of the frame,
which can seam rather overcome by the water from above. If we place some buildings
on the superior forte horizontal line it would give the impression of
instability, because they tend to be driven to the foot of the frame by the
sense of the gravitational equilibrium. Things are the same when an object is
thrown up or when a dancer makes a jump and the picture is taken exactly when
he is at the highest point of the trajectory. The same sense of equilibrium
makes us continue their trajectories up to the foot of the images frame,
suggesting the movement through this gravitational effect.
The subject or its primary elements are never placed at the edge or in the corner of the images frame. Thus, a car or a runner that moves from left to right will not be placed nearer the right edge of the frame because it would appear empty, since our mind tends to continue the movement of the car, drawing it out of the frame. Besides this, the edge of the frame makes the effect of a wall in which the car in its movement will be crushed.
Placing the car near the left edge of the frame, the wall remains in the back and the car has free rode in front of it.
The natural light, the artificial light and the existent light
Although they do not have great differences from the photometry point of view, these three types of illumination are very different from the point of view of the photographic techniques application.
There is not a general agreement in the delimitation of the three types of illumination. Some people say that the natural light includes only the light that is sent by the sun, the moon or the stares. Others say that this notion includes any normal illumination of a place, like the light in a room, on the street, from a campfire etc. In this way the differences between the natural and the existent light seam to disappear. Nevertheless, the existent light is a different notion, which is more about the photographic conception than about the natural sources of illumination. Because of the sensibility increase of the photosensitive materials and of the objects luminosity, today we can take pictures in any light conditions, no matter how faint. The people that go with the realistic style in the photography do not use any type of supplementary light in these conditions and it is said that they work in the existent light. Therefore the natural light is the light that comes from any normal source in a certain place, including the light of the sun, moon and stars; and taking pictures at the existent light is a style of photography.
For realizing some successful photos, sun position is very important besides taking photos position. There are three situations:
-when the sun is behind the camera, practically lights and shadow games will completely miss. All subject elements will be lightened uniformly and theyll appear simple in photos, the lightening doesnt encourage the emphasize of landscape and space. As a result, photos taken in frontal solar light, in the most of cases are monotones and uninteresting.
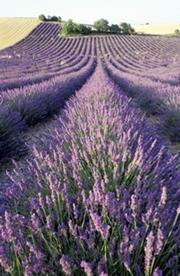
-if the sun position is a lateral one compared to the photographing direction, different lightened areas and the brilliances encourage the appearance of some light games with special plastic effect for the subject. This kind of illumination is successfully used in photographing insects, caterpillars for underlining their beautiful pictures and their hairiness and especially the flower portraits made in the morning dew.
-the most interesting natural lightening form is the one against the visual direction of the camera. In this situation the objects are lightened by the sun from their back. The image is full of own shadows and worn shadows, the lightened parts representing only small areas.
If this kind of illumination is used precautiously it creates the most beautiful and interesting photos, especially from the flower world. Contrary the heavy shadows of the subjects destroy their structure and shape, creating dark and non valuable shadows.
The analyze of the three forms of natural lightening met at the same time of a day reveals that the picture of image depends on the photographing direction related by the incident direction of the solar rays.
The solar light spectrum
 The spectral colors are different because of
their wavelength; the lower is the one of the violet radiation, and the higher
is the one of the red radiation; the passing from a colour to another is not
net, it is made by a series of intermediate colour tones, from which the human
eye discerns a great number (130-160).
The spectral colors are different because of
their wavelength; the lower is the one of the violet radiation, and the higher
is the one of the red radiation; the passing from a colour to another is not
net, it is made by a series of intermediate colour tones, from which the human
eye discerns a great number (130-160).
The colored light, which consists from a fluctuation of only one wavelength, is named monochromatic radiation; it is homogeneous and it can not be decomposed in constituent colours.
It is interesting to observe that the proportion of the extreme light vibrations is red/violet = 1/2 just like the one of the octave in music.
When the combination of the monochromatic spectral radiation is made again it has as a result the initial white light. This is made with the help of some converging lens, through which the obtained spectrum passes.
From the seven colors, red, yellow and blue (the colors of the Romanian flag) are primary colors because they can not be obtained through mixture; they are given as such by the spectrum. The other four colors: violet, indigo, green and orange are binary colors because they can be obtained from the mixture of the primary colors.
The white light can also be obtained through the superposition of only two spectral colors. Because of this, the pairs of colors that can recompose the white light were named complementary colors. These are the pairs:
q red with green-blue,
q orange with blue-greenish,
q yellow with blue,
q green with red-purple,
q blue with yellow,
q violet with yellow-greenish.
Each spectral color is complementary with the mixture of the others.
This way of obtaining the white light by addition of the monochromatic radiations that compose it represents the additive synthesis (which means by addition) of light.
The colors of solid objects have a physical carrier: pigments; usually, they are colours by subtractions as the glass filters. For example, a body appears red because it absorbs every color except the red one that is reflected.
A coloured filter absorbs all the colors except his own, which lets it pass. So, it is transparent for its own color and mat for all the others that will be absorbed.
All the mixtures of the painter are pigmentation colors, by absorption, their mixture submits to the substraction laws. If we mix complementary colours or colour mixtures that contain a certain proportion of the primary colors (red, yellow and blue) we obtain the colour dark grey (almost black) as a substractive mixture (substractive synthesis). The prismatic colors, non-physical (luminous radiation), mixed up, give the white color as an additive mixture (additive synthesis).
The colour, as an absorption phenomenon, respects the
following fundamental principles formulated by
a) a transparent body appears coloured in the complementary colour of the one absorbed and for which it is mat; if the absorption does not take place, the body is colourless;
b) a mat body appears colored in the color that is reflected by it and that is complementary with the one that is absorbed;
c) a body that reflects entirely all the radiations appears mat, of white color;
d) a body that absorbs entirely all the radiations appears mat, of black color.
In the cases of c and d, because a total (white), partial (gray) and null (black) homogeneous reflection takes place, the colors are named non-chromatic colours (uncoloured), unlike the other colours that are chromatics (colored).
Between the two extremes: black and white, an entire variety of grey tones exist, that result from the partial and homogeneous reflection of all radiations.
Means of correcting the luminous flux
Many times, when we take pictures of small bodies in the nature, the light that falls on the subject does not correspond with the requirements because of its great intensity, because of the spots of light etc. In these cases we must intervene through some procedures, so that we can correct them.
When the elements do not have sufficient light and the objects have intense shadow zones of their own or received from another object surrounding, the supplementary illumination can be done with the help of some reflecting blinds made from a plywood sheet of small size 60 x 70 cm, painted in white or covered with aluminum foil.
But, if the quantity of supplementary light received by the object is still insufficient, it will be necessary to use the electronic flash.
There are some situations when the quantity of light fallen on the object is too high and it has to reduced. This can be solved by using the shadowing devices made with different wire frames over which was placed a piece of gauze, tulle or another semitransparent cloth. These devices that are placed in the way of the solar beams attenuate the intensity of the light, producing in the same time a general spreading of illumination that is favorable especially for the details of the subjects with big intervals of brightness.
For reducing the light (even the artificial one) we can also use gray filters that are placed on the focus lens of the camera. However, these have a disadvantage; in some situations they produce a much too big leveling of the light, so that the photography becomes too smooth and the artistic effect is ruined.
In what the artificial light is concerned, there are fewer discussions. The special illumination is in this category; it was conceived and created for the realization of the photographic images. In most of the cases there is electric light from different shaped illumination bodies with a large variety of intensities, including the electronic flash. If at the existent natural light the photographer has to adept the light because he does not have the possibility to modify it after his needs, in the case of the artificial light, the photographer creates, chooses and adepts the light how he wants to, distributing the light and the shadows after his wish, using any type of illumination composition, from the most diffused light to the most powerful contrasts. He becomes the king of the world, the creator of the illumines environs that he thinks is the best.
The intensity and the quality of light
The intensity and the quality of light are very
variable. There are considerable differences between the light at
 The photographer has the possibility of maintaining this environment, to
amplify it or to destroy it. Because of this it is better if he does alone all
the procedures, from taking pictures to the finished image, because he is the
only one that knows if his artistic intentions obtain the form that he wished
for.
The photographer has the possibility of maintaining this environment, to
amplify it or to destroy it. Because of this it is better if he does alone all
the procedures, from taking pictures to the finished image, because he is the
only one that knows if his artistic intentions obtain the form that he wished
for.
What is very important to observe at the intensity of the light is the fact that it is produced in certain conditions and intense shadows. But there, where reflecting blinds surround the subject, the reflected light is much produced and very intense because of the big intensity light. This reflecting light falls in the shadows and illuminates them, contributing to the reducing of the contrasts. Consequently, the effect of the intensity of the light must always be calculated by taking into consideration the environment where the subject is placed.
In fact, at the majority of the static subject or those in slow motion the luminous intensity is not very important, because a lower illumination can be compensated by a longer time of exposure. Because of this it is not necessary such a waste of light for any picture. What is really important it is the care for the quality of the light, for the illumines environment that creates itself through the choosing of light, for the level of contrast that appears in the image, for the right distribution of the luminous sections and of the dark ones on the surface of the shot.
The direction of the light
 The direction of the light is maybe the most important element that
contributes at the illumines environment. Only one example can be given: most
of the light comes from above, from the sun or from lamps that hang from the
middle of the ceiling. Because of this, a photography in which the light comes
from another place than above looks a little strange, unnatural.
The direction of the light is maybe the most important element that
contributes at the illumines environment. Only one example can be given: most
of the light comes from above, from the sun or from lamps that hang from the
middle of the ceiling. Because of this, a photography in which the light comes
from another place than above looks a little strange, unnatural.
For avoiding the unusual aspect, when we work with artificial light we must have in mind this psychological element and look for a luminous diagram that has the primary light direction coming from above, in an angle of approximate 45o in relation with the subject which we are taking pictures to.
The relative position between luminous source (L), the subject (S) and the camera (A) produces particular effects. If the AS direction remains constant, and L moves on a circle with the center in S, then the aspect of the subject suffers substantial changes. In the L1 position, when L is exactly on the AS optic arbor, there are not any shadows, the light is flat, there is not a sharp relief. After a shifting of 45o on the circle, in the L2 position, there is a harmonious distribution between the luminous sections that represent approximately 2/3 and the shadow sections 1/3; the subject has obtained relief. It continues shifting on the circle with 45o and it gets to L3 position that forms an angle of 90o with the optic arbor. The distribution between the luminous sections and the shadow sections are equal, too rigorous symmetrical for it to be liked. From here forward L passes in the back of plan S, right on the AS arbor and starts the range of the contrary light effect (contrejour) that is represented through the reducing of the luminous zone, the increasing of the dark zone and to orientate the shadow of the subject to the A plan. In the L4 position 2/3 of the subject are dark and 1/3 luminous; again a harmonious section is resulted, a sharp relief, pointed out through the subjects shadow that advances in the shot. Comparing the position L2 with L4 we can see that the first produces an impression much more optimistic than the second, which is much somber. In the position L5 the luminous sections disappear; here we have the silhouette effect. On some cases the subject appears surrounded by a luminous hem that underlines the outline and produces a very beautiful graphic effect.
In the open air, at the sunlight, the photographer must shift around the subject so that he can obtain the right environment of angles between the LS and AS axels. If the vertical position between A, L and S is also modified, a great variety of luminance directions can be created and they correspond with all kinds of requirements: technical and esthetical. The photographer will choose from all of them, the luminous environment that will suggest in the most proper way the idea of the image.
The black and white photography
 For taking a picture it is necessary a camera
and a proper photosensitive material. The black and white photography has two
conditional elements: the photography technique itself and the laboratory
processes of the negatives and the print. The elements that condition the
technique aspect of the future images are: arranging the distance with the help
of a telemeter and the exposure of light that falls on the surface of the film
in the moment of the release. When we choose the film we must have in mind the
size of the film (depending on the camera), but also the fact that the black
and white films are different because of the sensibility and the sensitization.
The orthochromatic films are recorded by approximately half of the visible
spectrum radiations (400-550 mμ). However, the panchromatic and the
orthopanchromatic films have an imperfection: the transposition of the colors
is not very rigorous proportionate with the response curve of the human eye.
This can be ameliorated, but with the help of a filter, if the people that want
this kind of change in the photography are not us. In the black and white
photographs an abstract visualization of the subject takes place, because of
the color removal. This passing of the color in a gray shade is exclusively the
action of the photographically emulsion.
For taking a picture it is necessary a camera
and a proper photosensitive material. The black and white photography has two
conditional elements: the photography technique itself and the laboratory
processes of the negatives and the print. The elements that condition the
technique aspect of the future images are: arranging the distance with the help
of a telemeter and the exposure of light that falls on the surface of the film
in the moment of the release. When we choose the film we must have in mind the
size of the film (depending on the camera), but also the fact that the black
and white films are different because of the sensibility and the sensitization.
The orthochromatic films are recorded by approximately half of the visible
spectrum radiations (400-550 mμ). However, the panchromatic and the
orthopanchromatic films have an imperfection: the transposition of the colors
is not very rigorous proportionate with the response curve of the human eye.
This can be ameliorated, but with the help of a filter, if the people that want
this kind of change in the photography are not us. In the black and white
photographs an abstract visualization of the subject takes place, because of
the color removal. This passing of the color in a gray shade is exclusively the
action of the photographically emulsion.
 Once
the camera is released, on the film is recorded a latent picture. The picture
is not visible; the film is not presenting any apparently change. However,
where the light beams have fallen on the silver bromide from the film emulsion,
a weakening of the crystal network Ag-Br is produced, namely a breaking of the
network. By developing, the silver bromide crystals influenced by the light
will turn into silver granules; that means the invisible latent image became
visible, the negative image will appear the black and white negative. The
film processing is the second step and has a great importance because the
method of developing is influencing the granulation and the contrast of the
film. Through developing the producing of the latent image it becomes the
negative, which is due to the action of a certain quantity of light energy on
the photographic emulsion. Beside the quantity of light, the most important
factor in the process of image forming is the quality of light which impress
the photo-sensitive film depending on the its sensitivity.
Once
the camera is released, on the film is recorded a latent picture. The picture
is not visible; the film is not presenting any apparently change. However,
where the light beams have fallen on the silver bromide from the film emulsion,
a weakening of the crystal network Ag-Br is produced, namely a breaking of the
network. By developing, the silver bromide crystals influenced by the light
will turn into silver granules; that means the invisible latent image became
visible, the negative image will appear the black and white negative. The
film processing is the second step and has a great importance because the
method of developing is influencing the granulation and the contrast of the
film. Through developing the producing of the latent image it becomes the
negative, which is due to the action of a certain quantity of light energy on
the photographic emulsion. Beside the quantity of light, the most important
factor in the process of image forming is the quality of light which impress
the photo-sensitive film depending on the its sensitivity.
 Thus,
the energy of the light is quantitatively dosed at the moment of the releasing
of the camera, but the quality of light is acting different on the emulsions
with different sensitization, even if they have the same sensibility. If in the
black and white photography the quantity and the quality of the light are
relatively elastic elements, namely the films have rather large tolerance of
exposure, and their sensitivity can be improved by filters; in case of the
color photography these factors are more rigid.
Thus,
the energy of the light is quantitatively dosed at the moment of the releasing
of the camera, but the quality of light is acting different on the emulsions
with different sensitization, even if they have the same sensibility. If in the
black and white photography the quantity and the quality of the light are
relatively elastic elements, namely the films have rather large tolerance of
exposure, and their sensitivity can be improved by filters; in case of the
color photography these factors are more rigid.
The basic principles of the color photography
At the basis of the modern proceedings of the colour image realization it is the principle of the visible spectrum dividing in three primary colors, which in the making of the film have three photosensitive layers correspondents. At the decomposing of the spectrum two methods can be used. The substractive method, which is an analytic method that decomposes the white light in different colors of the visible spectrum with the help of three filters that correspond to the three primary colors: purple, yellow and green-blue. The additive method, which is a method of synthesis is the opposite of the substractive method, it composes the colours by gathering the radiations.
The sensitive photographic material
 The
black and white film is usually made of a support, a sensitive photographic
stratum and an antihalo stratum, placed either on the back of the film, either
between the support and the emulsion. The basic of the emulsion is the silver
halogenure; by developing you get the silver particles that make the drawing of
the clich. The construction of the colour film is different from two points of
view: first, because a triple image is needed, the film will have three
emulsion stratums, and second, the clichs drawing wont be made of black
silver particles, but of colour pigments. The three stratums are arranged on a
support like in the black and white film situation. The antihalo stratum is
again situated either on the back of the film, either between the support and
the emulsion. In the making of colour films with three stratums there are two
principles referring to producing the colour on the three stratums. The first
one refers to the fact that the film with three emulsion stratums will make the
colour in that stratum. This is the Agfa-color, ORWO-color, Ferania-color,
Geva-color, Ektachrome-color and others procedure. The second principle refers
to the three emulsion stratums films that dont contain the producing of the
colour substance, but have according to the developing process every stratums
needed colorant; this is the Kodachrom procedure. The laboratory processing of
the two kinds of films is completely different. Processing Agfa-color film is
quite simple, and the developing can be made by amateurs as well, without any
special installations or tools required. Processing Kodachrom film is different
because it needs special installations for fastidious work conditions. That
kind of films cant be processed by amateur, but only in special laboratories.
The ORWO film with three stratums its a film that has the capacity of
registrating the photographical objects colours with the help of the three
different stratums. They are applied on a transparent and flexible support.
Each stratum is made of a gelatin emulsion containing a silver halogenure.
Among this, in every
The
black and white film is usually made of a support, a sensitive photographic
stratum and an antihalo stratum, placed either on the back of the film, either
between the support and the emulsion. The basic of the emulsion is the silver
halogenure; by developing you get the silver particles that make the drawing of
the clich. The construction of the colour film is different from two points of
view: first, because a triple image is needed, the film will have three
emulsion stratums, and second, the clichs drawing wont be made of black
silver particles, but of colour pigments. The three stratums are arranged on a
support like in the black and white film situation. The antihalo stratum is
again situated either on the back of the film, either between the support and
the emulsion. In the making of colour films with three stratums there are two
principles referring to producing the colour on the three stratums. The first
one refers to the fact that the film with three emulsion stratums will make the
colour in that stratum. This is the Agfa-color, ORWO-color, Ferania-color,
Geva-color, Ektachrome-color and others procedure. The second principle refers
to the three emulsion stratums films that dont contain the producing of the
colour substance, but have according to the developing process every stratums
needed colorant; this is the Kodachrom procedure. The laboratory processing of
the two kinds of films is completely different. Processing Agfa-color film is
quite simple, and the developing can be made by amateurs as well, without any
special installations or tools required. Processing Kodachrom film is different
because it needs special installations for fastidious work conditions. That
kind of films cant be processed by amateur, but only in special laboratories.
The ORWO film with three stratums its a film that has the capacity of
registrating the photographical objects colours with the help of the three
different stratums. They are applied on a transparent and flexible support.
Each stratum is made of a gelatin emulsion containing a silver halogenure.
Among this, in every 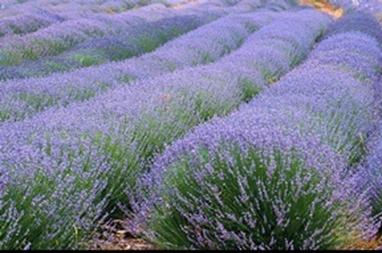 stratum
exists a substance that by developing will give birth to a coloured pigment in
one of the three fundamental colours. The colour photography allows the amateur
photographer to make two kinds of photos: lantern slides for projection, and
colour photographies on the paper. For this, the industry makes several types
of sensitive photographic material, such as: reversible colour films, used for
the direct obtaining of lantern slides without the needing of a copying
process; negative colour films that through developing creates negative clichs
in complementary colours considering the photographical object; colour positive
films that are used for the obtaining of the lantern slides through copying the
negative colour films; colour paper on this are obtained by copying or
enlarging using colour clichs, colour photographies.
stratum
exists a substance that by developing will give birth to a coloured pigment in
one of the three fundamental colours. The colour photography allows the amateur
photographer to make two kinds of photos: lantern slides for projection, and
colour photographies on the paper. For this, the industry makes several types
of sensitive photographic material, such as: reversible colour films, used for
the direct obtaining of lantern slides without the needing of a copying
process; negative colour films that through developing creates negative clichs
in complementary colours considering the photographical object; colour positive
films that are used for the obtaining of the lantern slides through copying the
negative colour films; colour paper on this are obtained by copying or
enlarging using colour clichs, colour photographies.
The colour film
The films for the negative and reversible colours of the photography can be classified by the next criteria: size, type, sensitivity. Most of the producing films deliver the sensitive photographic material in the next sizes: broad film, plane film and narrow film. The colour films are two kinds: negative and reversible. Judging from the quality point of view, the colour films are classified by their sensitivity and not their sensitiveness, because most of the producing firms make only one sensitiveness at the assortment. In most of the situations, the factories produce for the same kind of film negative or reversible two kinds of emulsions: natural light film and artificial light film. Choosing the film by the amateur photographer its a very important operation at colour photographing, so that this will correspond to the technical exactingness. The daylight films will be used for the photographies taken at sunlight or at the light of the illuminating bodies of new type: electronic lightening, fluorescents lamps, lamps with mercury vapors. The artificial light films will be used exclusively at photographies taken at artificial light produced by lamps with incandescence. The most important quality of colour photography is obviously the delivering of the colours as correctly as possible. At a very carefully look at the colour photographies, especially when there are required extremely prcised results, you can see that the colour photography compared with the photographical object has two mistakes: the colours dont have enough brightness and they are not always perfectly naturals.
Types of colour photography


 Colouristic
speaking, the photography must restore the colours as faithfully as possible,
meaning it has to be correctly taken. This correct execution technically
speaking can be made in extremely different light conditions, creating real
colours values, but still unusual for the eye, maybe because of his big
capacity of accepting. Considering the intensity of light and the nature of
light, you can obtain normal colours, bright colours, pasteled colours,
contrasts of colours, wiped colours, and colours of all shades. All is the
creation of light, and the amateur photographer must know how to use the
situations that are offered to him. But for this, he must see, he must discover
through the colour and illuminating conditions prism the future image of the
colour photography. The most used film by the photo-amateur is the one
reversible for daylight (5600 K). For a long time it has been said that
colour photography works better only in the classical illuminating conditions:
strong sun and light from the back, at the most lateral. The modern emulsions
have proved yet that in very variate illuminating conditions there are obtained
very good results.
Colouristic
speaking, the photography must restore the colours as faithfully as possible,
meaning it has to be correctly taken. This correct execution technically
speaking can be made in extremely different light conditions, creating real
colours values, but still unusual for the eye, maybe because of his big
capacity of accepting. Considering the intensity of light and the nature of
light, you can obtain normal colours, bright colours, pasteled colours,
contrasts of colours, wiped colours, and colours of all shades. All is the
creation of light, and the amateur photographer must know how to use the
situations that are offered to him. But for this, he must see, he must discover
through the colour and illuminating conditions prism the future image of the
colour photography. The most used film by the photo-amateur is the one
reversible for daylight (5600 K). For a long time it has been said that
colour photography works better only in the classical illuminating conditions:
strong sun and light from the back, at the most lateral. The modern emulsions
have proved yet that in very variate illuminating conditions there are obtained
very good results.
Observations and practical advices for the laboratory technique
At the colour reversible films the lantern slides obtained faithfully deliver the natural colours if the laboratory process is executed carefully. Its specially recommended using of original substances sets for making the solutions, to observe as exactly as possible the manufacturing schemes, the developing made only in the developing doze with cortex band or with transparent spiral, the washing must be made carefully between operations for the complete removing of the solutions rests, and keeping a strict cleaning of the vessels, of the bottles, of the thermometer, which is very important for avoiding the appearance of the dominants and stamps on the film. While processing the negative colour film its important to respect the conditions prescribed by the producing factory; not respecting them creates damages to the colours that can hardly be taken off through the filtering. The negative colour films can be developed only one for a doze, regardless the size; only ORWO colour film NC 16 of 35 mm which can be developed two at the same time, situated support on a support in the doze, so that they have the anti-halo stratum between the emulsion and the support. Making of the enlargers or the copies on the colour paper is more difficult then in the black and white process, because of the necessity of making the correction filtering and of the more complicated paper processing. For the amateur photographers that want to work colour photographies on paper its recommendable the using of the original substances sets, fresh colour paper, in a guarantee term, processing the paper be done in cuvees and on frames, so that any contact between the emulsion and the hand or any other body be avoided, the correction filtering be executed rationally and not empirically, and in the substractive and the additive filtering to be used original filters. At the positive film must be bended the recommendations made regarding the colour corrections of the colour paper, with the recommendations made for processing the negative films. As well the positive and the negative films are restored only in the doze. Plus, the positive colour films are restored only one in a doze, because the anti-halo stratum is applied behind the support.
The mistakes of the colour photographies
The mistakes that appear on the colour films have as main cause incorrect conditions of taking photos and processing the colour sensitive photographic material. The mistakes that appear on the colour paper appear because of not respecting the work conditions prescribed in the negative positive process at the colour paper produce the appearance of the unnatural colours. Finishing the washing can show on different ways considering the wash. At the paper processing you must have a special care regarding the intermediate washes. A superficial wash goes to impurifying the solutions, impurifying that changes step by step the composition of the washes, with the appearance of colours dominants on the photography.
The colour photography requires the amateur a small effort in learning the technique, a small moment of attention during taking the photo, a little of sacrificed time for processing the material that is of course if he wants to do it alone and to be sure of optimum results. In change he gets the priceless gift of some memories whose colour grows their charm and power of recall. And those amateurs who want to outrun the border of memories in photography can find in the game of colours and in the poetry of shades, new reuses, which will never end and will bring a lot of satisfactions.
Movement delivered in photography
What is the dynamic photography?
In photography, sports, with all his variated and many aspects, introduced more and more the need of delivering as eloquent as possible movement with photographical ways. After delivering the relief in the three dimensions space, using the perspective effect and the game of light and shadow; after delivering the colour through the colour itself (in the colour photography) and through the semitones scale from black to white (in the white and black photography), the delivering of movement through static ways of expression, choosed so that the photography will result as truthful and eloquent as possible, makes the third fundamental issue of photography: the dynamic photography.
The mechanic elements of movement
In the cinematic a chapter in mechanic that studies the movement a body, called body in motion its recognized in movement when his distance to a fixed reference point varies in time. The succession of the M1, M2 Mn positions of the body in motion at the times t1, t2 tn its called trajectory. The slower or faster variation of the body in motion distance at the point of leaving, called origin, depends of the speed that this one uses to move on the trajectory so the trajectory and the speed are the two elements that describe the movement of the body in motion. They are also going to be used for us to deliver photographically the movement, which makes the object of the dynamic photography. In the photography, like in the other plastic arts as well, delivering the movement comes to suggest as clearly and completely as possible that the body in motion is moving. The suggesting is more satisfactory as it makes more obvious the two elements that describe the movement: trajectory and speed.
The static concept

 According
to this concept old enough, if you ask the trajectory, and especially the
body in motion, supposed to look clear, without moving, any obscurity was
considered a mistake, a flaw of the photographical image made. The result was a
stiff image, turned to stone, required a special mental effort for her
reintegration in the reality. Those kind of images were obtained with very
short times of exposure, of 1/300-1/1000
s even 1/2500-1/3000 s order in some situations, that were not accessible
except for the devices endowed with special shutter with curtain that made the
pride of their owners. The only bodies in motion with a vertical climbing
trajectory, like for example the bodies thrown up, which are photographed in
the highest point of the trajectory (apogee) where the speed becomes null were
accessible to the usual devices easier. For example: a ball thrown up, the jump
above an obstacle etc., in which the trajectory is suggested clearly, and the
speed less, or even at all. The thing that suggests the movement in these
situations is the gravity effect, which tells us that a heavy body situated in
the air must fall down in the next moment, in this way obliging us to prolong
in our mind his trajectory until he reaches the earth. Regarding the speed, the
tension of the jumper can give us a clue by herself. There are, of course,
other situations in which the absolute clarity is wanted, and even necessary,
like for example, in the scientific photography.
According
to this concept old enough, if you ask the trajectory, and especially the
body in motion, supposed to look clear, without moving, any obscurity was
considered a mistake, a flaw of the photographical image made. The result was a
stiff image, turned to stone, required a special mental effort for her
reintegration in the reality. Those kind of images were obtained with very
short times of exposure, of 1/300-1/1000
s even 1/2500-1/3000 s order in some situations, that were not accessible
except for the devices endowed with special shutter with curtain that made the
pride of their owners. The only bodies in motion with a vertical climbing
trajectory, like for example the bodies thrown up, which are photographed in
the highest point of the trajectory (apogee) where the speed becomes null were
accessible to the usual devices easier. For example: a ball thrown up, the jump
above an obstacle etc., in which the trajectory is suggested clearly, and the
speed less, or even at all. The thing that suggests the movement in these
situations is the gravity effect, which tells us that a heavy body situated in
the air must fall down in the next moment, in this way obliging us to prolong
in our mind his trajectory until he reaches the earth. Regarding the speed, the
tension of the jumper can give us a clue by herself. There are, of course,
other situations in which the absolute clarity is wanted, and even necessary,
like for example, in the scientific photography.
The dynamic concept
Regarding to this concept, the obscurity accepted willing and conscious, and dozed so that it wont harm to the understanding of the image, suggests the best the two characteristics of movement. The procedure is very simple: as the exposing time is longer, the obscurity is bigger, and reverse. Obtaining the necessary obscurity for the suggestion of light is accomplished in two ways. The first method, clear body in motion-unclear background is made by keeping constant the position of the body in motion in the frame and it is indicated when we are especially interested in the behavior of the body in motion during the movement. At the devices with a curtain shutter (Leika type, Exakta type, etc.) following the body in motion has a disadvantage: if the curtain walks in the same direction with the body in motion, his image will be longer, but if the curtain walks the other direction, the image of the body in motion will be shorter. The second method, unclear body in motion-clear background its made by keeping the device in a fixed position and suggests the best the trajectory and the speed, still, allowing the most artistic accomplishments in the dynamic photography.
The clarity of the image
In reality, a subject isnt clearly delivered because of some causes that transpose the component points into diffuse circle: the diffraction of light around the obstacles, the incomplete correction of the objectives, the granulation of the positive and negative emulsions and the fields depth of the objectives. The border from we can distinguish two of that kind of points its called the separating power of the eye. She has 1/14 mm, so, if the diffusion circles diameter doesnt go across that border, our eye will perceive two distinguished points. By enlarging the negative, this border isnt enough anymore, being available on the negative and on the contact-copy from a 25cm distance. The clarity condition should be of 1/301/50 mm, meaning f/1000f/2500. The obscurity tolerances in private are: 1/30 mm for small size, 0,1 mm for contact-copies after the big sizes, f/2500 for the big sizes, and f/1500 in average for all sizes.
Framing the dynamic picture
 When we
take close range pictures, the photo object lens with short distance
focalization (weitwinkel=wide angle object lens) are very useful, such as f=3.5
cm, for a 24*36 mm format. The format of the image is selected according to the
manner of movement: on height for the vertical movement and on breadth for the
horizontal movement (the movement must occur according to the long lines of the
frame of the image). As the edge of the frame towards which the object lens
moves is an obstacle to its movement we must release when the body of motion is
in the frame of the image, so that we may have enough space in front of it for
following the trajectory, namely when it reaches the closest point of the
frame. This can be also corrected by cutting up by magnifying or copying .We
shall use, as far as we can the most inferior spot for ascendant trajectories
or for the ones parallel with the long line of the frame, and the superior spot
for descendent trajectories or oblique ones, such as a road heading obliquely
towards us, from the upper left to the lower right of the frame. This way we
can also direct the trajectory following the strong lines of the frame.
When we
take close range pictures, the photo object lens with short distance
focalization (weitwinkel=wide angle object lens) are very useful, such as f=3.5
cm, for a 24*36 mm format. The format of the image is selected according to the
manner of movement: on height for the vertical movement and on breadth for the
horizontal movement (the movement must occur according to the long lines of the
frame of the image). As the edge of the frame towards which the object lens
moves is an obstacle to its movement we must release when the body of motion is
in the frame of the image, so that we may have enough space in front of it for
following the trajectory, namely when it reaches the closest point of the
frame. This can be also corrected by cutting up by magnifying or copying .We
shall use, as far as we can the most inferior spot for ascendant trajectories
or for the ones parallel with the long line of the frame, and the superior spot
for descendent trajectories or oblique ones, such as a road heading obliquely
towards us, from the upper left to the lower right of the frame. This way we
can also direct the trajectory following the strong lines of the frame.
The background of the image
The background upon which the movement is projected should not be short on details because they make up the reference point of the movement when we follow the body of motion with the camera. It is this details that point out the suggestive brush features (especially in color photos) of the speed of movement. It is better, for obtaining this effect, to use a uniform background like the ground or vegetation.
The perspective of the image
The perspective may emphasize on the suggestively of rendering the movement in the following manner: the bottom to top (frogs perspective) amplifies the movement, that is why it is recommended for jumps (obstacles, etc.); the top to bottom perspective shortens the trajectory and that is why it is not recommended, and the normal perspective (at the height of the eye) which is appropriate for all movements on the ground taking place before our eyes.
The title of the image should clearly explain the movement especially in the images with conducted dimness where the picture, sometimes unclear, can raise doubts and interpretations. The study of the movement in advance, if possible, helps us to create these principals of focalization even in the negative, so that at magnifying or copying we can easily make the necessary adjustments. Of course, this study in advance is not always possible, and we have to rely ourselves on our experience and presence of mind.
Setting up
 When
the body in motion draws farther in slow speed, on a linear trajectory, we can
achieve precision. It is more complicated when the speed rises and when its
trajectory is perpendicular on our visual axis, especially with the
unpredictable trajectories. To solve our problem, we can use the maximum field
depth of the object lens, by close, infinite focalization. Almost all modern
object lenses have a field-depth ring that spares us the trouble of calculating
if we do the following: stops are graduated on the field-depth ring,
symmetrically to the reference point of the focalization. The ring rotates
together with the object -lens in front of the graduation plate which is placed
circularly and concentrically with the stops. Setting one of the stops on
infinite in the plate its symmetry will show us the minimal distance to get a
clear image. We will also see the distance of focalization, near the plate. If
the minimal distance of focalization doesnt suit us, we repeat the operation
by choosing a new value, inferior to the former. Of course, we must also set
the speed of the shutter according to the chosen stop. This way, we used the
normal depth-field of the object lens. If it is not enough, we set the close,
infinite focalization.
When
the body in motion draws farther in slow speed, on a linear trajectory, we can
achieve precision. It is more complicated when the speed rises and when its
trajectory is perpendicular on our visual axis, especially with the
unpredictable trajectories. To solve our problem, we can use the maximum field
depth of the object lens, by close, infinite focalization. Almost all modern
object lenses have a field-depth ring that spares us the trouble of calculating
if we do the following: stops are graduated on the field-depth ring,
symmetrically to the reference point of the focalization. The ring rotates
together with the object -lens in front of the graduation plate which is placed
circularly and concentrically with the stops. Setting one of the stops on
infinite in the plate its symmetry will show us the minimal distance to get a
clear image. We will also see the distance of focalization, near the plate. If
the minimal distance of focalization doesnt suit us, we repeat the operation
by choosing a new value, inferior to the former. Of course, we must also set
the speed of the shutter according to the chosen stop. This way, we used the
normal depth-field of the object lens. If it is not enough, we set the close,
infinite focalization.
 Photographing from cars in motion
 When we
speak about fix objects, we must take into consideration some rules, typical of
this situation. With the help of the seconds hand of the watch and of the
points of reference of the road we set the speed of the vehicles, while it is
kept constant. We must also give up the subjects in the foreground, we will use
the close, infinite focalization; we must make sure that the shutter of the
camera moves in the opposite way of the movement of the vehicle, not to
lengthen the picture. During the release, the camera must be held free, lax.
With the subjects in movement, we apply
When we
speak about fix objects, we must take into consideration some rules, typical of
this situation. With the help of the seconds hand of the watch and of the
points of reference of the road we set the speed of the vehicles, while it is
kept constant. We must also give up the subjects in the foreground, we will use
the close, infinite focalization; we must make sure that the shutter of the
camera moves in the opposite way of the movement of the vehicle, not to
lengthen the picture. During the release, the camera must be held free, lax.
With the subjects in movement, we apply
Photographing very fast movements
These are phenomena taking place in nature that
surpass our perception, due to much greater speed (the movement of electrons).
The photographical registration of such sudden movement is no longer possible
with common methods because there is no shutter that could allow this
mechanism. The problem of the high frequency photo, also called ultra-fast,
photo is a great concern of the technicians and of the scientists because it
offers a precious instrument of research of some phenomena otherwise unknown,
as they go beyond our perception. This problem is the object of discussion of
international congresses. The first congress of this kind was held in the
The stroboscopic photo
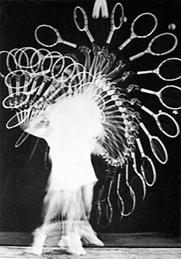
 The
frequency of the photo can be enlarged by stroboscopic devices (in Greek
strobos=reel and scopein=to look) which consisted, mainly, of a disk with a
window which rotates in front of the object lens of a camera. The frequency of
the photo rises with the speed of the rotation of the disk. The mechanism was
created even from 1882 by the Frenchman J.E. Marey, the photo of this kind
being called a stroboscopic photo. In 1851, Talbot (
The
frequency of the photo can be enlarged by stroboscopic devices (in Greek
strobos=reel and scopein=to look) which consisted, mainly, of a disk with a
window which rotates in front of the object lens of a camera. The frequency of
the photo rises with the speed of the rotation of the disk. The mechanism was
created even from 1882 by the Frenchman J.E. Marey, the photo of this kind
being called a stroboscopic photo. In 1851, Talbot (
The stroboscopic devices of enhancing the frequency of the images
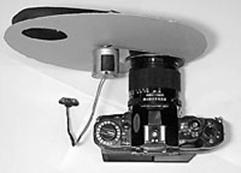
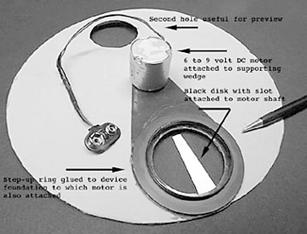
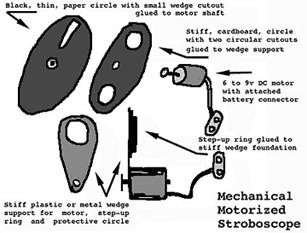 The
best curtain shutters of the classical cameras allow 1/1000-1/2000s display
similar to electronic flashes. Display time, shorter than 1/1000s and
frequencies longer than 100 images/s belong to the field of ultra fast
photography. The optic compensator is a modern stroboscopic device of enhancing
the frequency of the images which reaches a frequency of 8000 images on a 16mm
film. Another type of optic compensator is the one reflection which can reach a
frequency of 500-20000 images/s. The third device is the one with a rotating
mirror, which reaches up to 350000 images/s at 13000 rotations/s of the mirror.
In the Miller device, the real image which forms on the surface of the rotating
mirror is sent to the film with a uses of a series of object lenses. The
cameras based on this principle have reached frequencies of millions of images
per second. The device of the
The
best curtain shutters of the classical cameras allow 1/1000-1/2000s display
similar to electronic flashes. Display time, shorter than 1/1000s and
frequencies longer than 100 images/s belong to the field of ultra fast
photography. The optic compensator is a modern stroboscopic device of enhancing
the frequency of the images which reaches a frequency of 8000 images on a 16mm
film. Another type of optic compensator is the one reflection which can reach a
frequency of 500-20000 images/s. The third device is the one with a rotating
mirror, which reaches up to 350000 images/s at 13000 rotations/s of the mirror.
In the Miller device, the real image which forms on the surface of the rotating
mirror is sent to the film with a uses of a series of object lenses. The
cameras based on this principle have reached frequencies of millions of images
per second. The device of the
The sources of light
 The
body of motion is sufficiently lighted to have its own outline registered on a
piece of film or on sensitive photo paper, fixed at the edge of drum which
rotates with great speed. But if the body of motion is unlighted, it must be
lighted with powerful sources of light, of very short length. For that there
can be used electrical sparkles produced by the discharge of a Leyda container
or an electric capacitor of great capacity with an extremely short
duration-less than a millionth of a second-allowing thus very short expose.
This technique is called photographing with the use of sparks.
The
body of motion is sufficiently lighted to have its own outline registered on a
piece of film or on sensitive photo paper, fixed at the edge of drum which
rotates with great speed. But if the body of motion is unlighted, it must be
lighted with powerful sources of light, of very short length. For that there
can be used electrical sparkles produced by the discharge of a Leyda container
or an electric capacitor of great capacity with an extremely short
duration-less than a millionth of a second-allowing thus very short expose.
This technique is called photographing with the use of sparks.
The shutters
Presently, there are known two kinds of shutters: electronic and electric shutters.
 Electric shutters are
based on light polarisation obtained by natural passing through a polarizer.
Between two polarizer with crossed axes, two phenomena are produced when the
light passes: electro-optic (Kerr) and magneto-optic (Faraday). The first
shutter has a few micro-seconds lighting length and the second are only few
macro-seconds.
Electric shutters are
based on light polarisation obtained by natural passing through a polarizer.
Between two polarizer with crossed axes, two phenomena are produced when the
light passes: electro-optic (Kerr) and magneto-optic (Faraday). The first
shutter has a few micro-seconds lighting length and the second are only few
macro-seconds.
Electronic shutter are based on photon emission produced by some metals constrained on an electric field in vacuum.
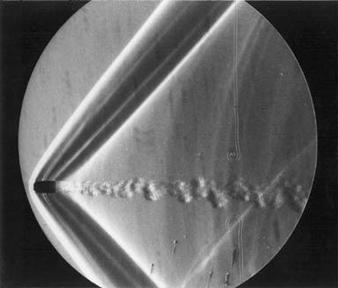
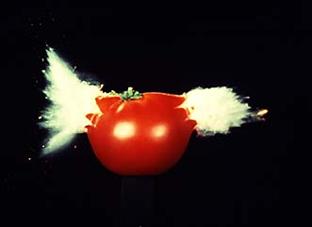
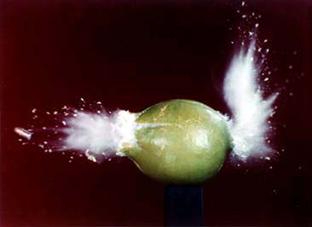
Ballistic photography
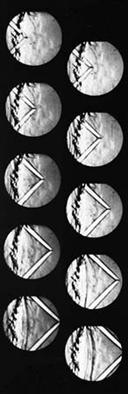
Ballistic photography means the photographing of a mobile in a very fast movement. The notion ballistic applied to photography especially reefers to the recording of small missile image (bullets for example) in their moving on the trajectory.
 Electronic
stroboscopes for scientific purposes are used by the researchers laboratories,
they are very complicated and also expensive, have a maximum precision and they
are used for the movement analyse. They can emit flashes at large intervals and
also at a very fast succession. Their light power is decreased, thats why they
are used at a few decimetres, respective centimetres distance from the subject,
with an ultra fast film.
Electronic
stroboscopes for scientific purposes are used by the researchers laboratories,
they are very complicated and also expensive, have a maximum precision and they
are used for the movement analyse. They can emit flashes at large intervals and
also at a very fast succession. Their light power is decreased, thats why they
are used at a few decimetres, respective centimetres distance from the subject,
with an ultra fast film.
 For photographic and
cinematographic purpose a 2018 flashes/sec frequencies scale is sufficient for
human movie recording and so far objects of common use.
For photographic and
cinematographic purpose a 2018 flashes/sec frequencies scale is sufficient for
human movie recording and so far objects of common use.
 The 4-8 flashes / sec
frequencies make the best results. The length of flashes such a lamp is
1/5000-1/6000 sec so they are not good for amateurs.
The 4-8 flashes / sec
frequencies make the best results. The length of flashes such a lamp is
1/5000-1/6000 sec so they are not good for amateurs.
The paper Studio stroboscope points out the new
appearance of a studio stroboscope, due to the director Zanerdo from
Photo-Electronica company in
Starting from the arco-xenon flash with permanent light of this company, it was added in series a power supply which makes it to action with 2,3,4-12 flashes/sec, for a non limited number as seconds, being used in photographic studios.
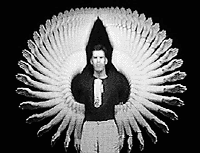
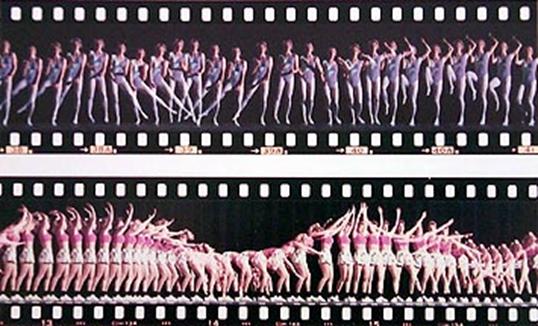
Stroboscopic technique
First stage in the recording of a subject movement is the lightening of the subject.
In many flash stroboscopic syntheses, the mobile parts of the subject will be lightened by many times, but each time in other place, while the fixed part of the subject will be lightened in the same place. After several experiences, the power varies between 10-70 Joules, corresponding of a 30 guide number of the flash, for a colour film of 19 DIN degrees (64 ASA degrees).
The background of the image must be a black one, a very difficult thing to be achieved, ten flash-lamps could transform in light grey, the most black wall or paper, if its distance wasnt taken into consideration. BY NG number it is calculated the critic diagram, necessary for a correct way to record the background, taking into consideration the number of lamps used for having a non corresponding exposure. For doing this, the flash must be placed on a 30-45 degrees angle with the plan where the subject will move. The images frequencies are based on some factors, as subject movement, flash-numbers of the lamps, and the flash length.
 The distance that
shares a presence from other one is not related by the image field sizes, but
it depends on the subject speed or lighting frequencies or on both ones.
The distance that
shares a presence from other one is not related by the image field sizes, but
it depends on the subject speed or lighting frequencies or on both ones.
For realising true stroboscopic images, the movement at the subject must be rhythmic, periodic or repeated. From the movement rhythm point of view, it is possible that only a part of the subject to be in movement, setting al a clear point and better lighting, the mobile parts and having the immobile parts more diffuse and obscure.
Also, only a part of the subject could have a rhythmic movement and the others un untidy one. In this case, the part in a rhythmic movement will be harmonious, the other point being vain.
Last but not least, the subject movement period could not be the same as the stroboscope functioning period.
Practical applications of dynamic photography
 Excepting scientific
purposes, dynamic photography (including the stroboscopic one) has also
practical applications, for example the creating of suggestive images for presenting
and recommending industrial products (advertising photography).
Excepting scientific
purposes, dynamic photography (including the stroboscopic one) has also
practical applications, for example the creating of suggestive images for presenting
and recommending industrial products (advertising photography).
Such of photographies must show first the truth, for being convicted. The movement must be shown in all its faces and must be kept the best moment especially for what we want to suggest, contrary, the image gives the impression of a false one, and the felt insatisfaction reverses on the product. Thats why the launching must be done at the best moment; doing it earlier, the image will give the impression of a false.

Framing and setting up the image
In close range photography framing must be made very carefully. Small objects require very strict framing, because afterwards in the positive process, through cutting up, eliminating the unimportant zones is difficult, the subject taking up the entire picture.
The image perspective is very important for the composition. The numerous possibilities that are available in close range photography referring to angle, light and the position of the subject can be used to give the picture a sensation of harmony and relief. From this point of view it is interesting to know that a geometrically correct perspective, obtained with an object lens with a big focal distance isnt always satisfying. In many cases it is convenient to give up a rigid perspective upon the subjects plan because the optic axle is perpendicular on it, thru a modification of the photographing angle. In some situations we can even decentre the object but in the same time maintaining the parallelism between the images plan and the objects plan.
 We must keep in mind that a correction of perspective
cannot be obtained unless the depth is damaged and vice versa, a better depth
cannot be obtained without damaging the perspective.
We must keep in mind that a correction of perspective
cannot be obtained unless the depth is damaged and vice versa, a better depth
cannot be obtained without damaging the perspective.
After a good perspective is obtained, the necessary depth is acquired and an object lens with an appropriate focal distance has been chosen, we will proceed to the framing itself, respecting the composition rules and our own taste of course. Next we control the light distribution on the whole picture and setting it up on the mat glass of the camera.
Contrary to a wrong opinion, image control on the visor lens isnt the most efficient way to set up the picture, because no matter how fine it is, because of its granulation it always determines diffusion phenomena that prevents a good delimitation of the images most refined details. In consequence it is preferable to replace the ordinary visor lens with a special one. Among the best it is recommended to use the Fressnel micro points and rings lenses or the ones who have a clear area in the center.
If none of the above is accessible, you can use an ordinary visor glass on which in the center area the caulking effect is eliminated by applying a drop of Canada balsam.
The image from the visor lens, in the case of big scales, must be regarded thru a magnifying glass which must enhance the central area and allow a better set up.
Setting up at big scales isnt realized only thru the objective, but also by moving the camera or the subject closer/farther from each other. In these situations the camera is installed on a device that prevents trepidations and maintains the camera in a fixed position from the subject. The ring objective must be set to infinite, a position in which the lenses are close and they confer the objective the maximum qualities concerning the applying of corrections.
The setting up must be made on distinct and well lighted contours, using especially the accents of light and the demarcation lines between the surfaces with different tonalities. As closer as the subject is to the camera, as big the concern to cover him with the clarity zone of the depth must be. In macro photography, depth is a difficult problem when the subject is at a random field depth. In these situations the setting up plan is appropriate at the beginning of the second third of the subject.
The definitive set up, if it is possible due to the poor illumination of the image, must be made with the same diaphragm which will be used when the photo is shot. It is good to know that at the variation of the opening of the diaphragm takes place a slight modification of the focal distance between the limits, which in most cases isnt favorable to big scales.
Depth
The main problem which arises in short range photography and macro photography is depth; because its very low values resulted from increasing circulation are hard obstacles to beat in the case of maximum enhancement rapports.
Practically, field depth is evaluated thru direct observations regarding the image and concerning the distance interval in which all the objects in the picture are reproduced clearly, for a certain setting of the objective. In other words, the bigger the interval in which the objects are reproduced clearly, the bigger the depth.
 What is interesting and worth remembering about depth
is the fact that regarding the setting up plan it is manifested unequally,
being smaller in the front and bigger in the rear. This unequal manifestation
of depth has as a principal action in the case of photographing subjects with
field depth the fixing of clarity in a plan situated at the beginning of the
second third of the subject. Thru a proper diaphragmation, the extension of the
clarity for the first plan is made concomitant with its extension for the
posterior plans.
What is interesting and worth remembering about depth
is the fact that regarding the setting up plan it is manifested unequally,
being smaller in the front and bigger in the rear. This unequal manifestation
of depth has as a principal action in the case of photographing subjects with
field depth the fixing of clarity in a plan situated at the beginning of the
second third of the subject. Thru a proper diaphragmation, the extension of the
clarity for the first plan is made concomitant with its extension for the
posterior plans.
Depth isnt conditioned only by the diaphragm used, but also by these factors:
-the focal distance of the objective; the smaller it is, the bigger the depth and vice versa depth is smaller when we use objectives with big focal distances;
-setting the objective for a certain distance: setting the objective for big distances of photographing favors obtaining photos for a bigger interval of clarity; the smaller the distance from the camera to the subject, the smaller the depth.
1. Calculating
For depth calculation it must be taken into consideration that the diffusion circle diameter varies depending on the increasing the negative will support. This diameter is 0.1 mm for the negatives used in contact copying and decreases to 0.02 mm for the negatives used for extreme increasings.
The depth could be calculated by the following formulas:
p1 = a/(1+nd(a-f)/f²) and p2= a/(1-nd(a-f)/f² where:
a frontal distance;
d diffusion circle diameter;
n - luminosity of the objective lens;
f focal distance of the optic system;
p1 distance between optic plan and anterior limit of the clean field;
p2 distance between optic plan and posterior limit of the clean field;
The dept decreases very much when the enlarging of raports increases. For this, macrophotographies which decrease the enlarging raports 3:1 must have a very small thickness, less than 1 mm, because how the diaphragm would be larger, the depth wont increase.
It must be taken into consideration that in normal objective lens the largest resolution power it will obtain by closing the maximum diaphragm opening with 2-3 values.
Special objective lens, the microphotographic and apochromatic ones present the largest power for separation in very closed to maximum opening diaphragms.
Decreasing the diaphragm opening over these values which give the maximum decreasing efficiency, the clearness of image decreases, due to the diffraction phenomenon. From this point of view it is not possible to establish some general rules over the imposed limits by the diffraction phenomenon.
But we can avoid this thing, if we keep notice of the fact that these limits are influenced by several factors: the increasing of the negatives, the details and sizes of the subjects, the separation power of the used emulsion, the focal distance, the type of the objective lens. For this reason, the checking of the phenomenon must be done separately for each case.
2. The increasing of the depth without diaphragm
When the depth cant be increased by diaphragm, due to the diffraction phenomenon, the increasing of the depth can be obtained with the aid of special built cameras which permit bending the setting up plan and the one of the objective beside the optic axis.
The modifying of the parallelism between the plans leads to an unequal increasing of extension, being bigger for the closer points of the subject and smaller for the farther ones. The setting up plan is not perpendicular on the optic axis so it confounds itself with the plan where there are the main elements of the objective, so it reveals very clear.
 All the setting up operations are made under control
with the aid of the mat window. When the depth increases, the exposure time
decreases due to the non diaphragming.
All the setting up operations are made under control
with the aid of the mat window. When the depth increases, the exposure time
decreases due to the non diaphragming.
If in this situation the depth is not sufficient, the objective lens will be diaphragmed for the obtaining of the desired clearness.
Concluding, the increasing of the depth necessary for the large increasing scales, mustnt be pushed over the limit where the diffraction phenomenon starts. Although, if the depth is too small, there is necessary to use special studio cameras with the possibility for bending the optic plan and the setting up one. Joining the advantages of these devices, with the ones of the microphotographic objectives assures the revealing at the best conditions of the subjects at the large scales of reproducing.
The film
Although many time this kind of subjects could be approached with a medium sensitivity film (21-220 DIN), the experience of those who work in the existent light proved that it is smarter to load the device from the beginning with the most sensitive film. On the one hand, it wins a plus of diaphragm or exposure, by the other hand these films, having a less contrasting gradation could get through the great contrasts met in the most of cases.
Having the camera with a highly sensitive film, the photographer can work freely, not being disturbed by a micronic setting of the clearness or not being limited at only some compulsory light angles or at some speed movement in the background. This freedom in moving always reverses in a favourable way over the artistic quality of the image.
Not all the films possess in the same way a reserve of sensitivity, for permitting the calculation of the exposures on a larger number of DIN. Thats why the must be they must be also checked from this point of view. There will be done tests with different kinds of films, checking precisely the reserve of sensibility at different types of light: day light, incandescent bulb light, neon light, very popular today.
Developing
By taking photographs in difficult conditions, often filled with surprises, the photographer needs to be prepared for anything upon developing. Timed developing is often excluded. Preferably use the controlled developing method at the dark green filter. Besides the regular developer, the photographer will also keep handy a paper developer and, if pessimistic, a powerful alkaline developer containing caustic soda (although the latter will only be needed in cases of serious exposure errors).
If it is already known that the film has been underexposed, it is recommended to start developing with the developer at a higher temperature: 22-23C, thus substantially reducing the developing time.
Due to the often too long developing times, the film will be developed only in the tank, so as not to expose it to oxidation by contact with the air or fogging. Throughout the developing process, one will alternate the agitation of the film with the pause, the rhythm being of approx. 15 seconds of agitation for each minute.
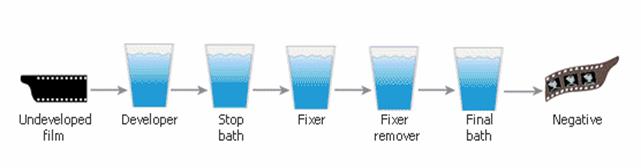 Start developing with the D23 developer. The first
check will be made after 8-10 min. If the developer has started to act,
continue developing in the same developer, by carrying out regular checks until
the film is fully developed.
Start developing with the D23 developer. The first
check will be made after 8-10 min. If the developer has started to act,
continue developing in the same developer, by carrying out regular checks until
the film is fully developed.
The latent image on film becomes visible through a process known as developing the application of certain chemical solutions whereby the film is transformed into a negative. The process by which the negative is turned into a positive image is called printing; the image is called a print. The film is developed by treating with a reducing alkaline chemical solution, known as developing solution o developer. This solution reactivates the process commenced by the action of the light when the film is exposed. The effect is to continue the reducing of haloids silver crystals wherein the metallic silver has already formed, so that the large silver particles might form around the minuscule particles that carry out the latent image.
As the large silver particles start forming, a visible image becomes apparent on film. The silver thickness and density stored in each portion depend on the quantity of light received by such portion during exposure. In order to stop the developers action, the film is immersed into a light acid solution that neutralizes the alkaline developer. After rinsing, the negative image is fixed, the haloids silver crystals residues are removed and the metallic silver particles are stabilized. The chemical solution employed for fixing is usually sodium trisulphate, but ammonium or potassium trisulphate can also be used. This anti-fixing solution is then used to remove any fixing trace on film. The film must be thoroughly rinsed when the fixing residues tend to destroy the negatives in time. In the end, the immersing of the processes film in a rinsing solution contributes to a uniform drying and prevents the forming of water stains and stripes.
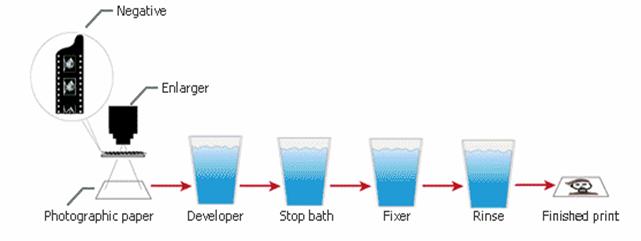 Printing is achieved by any of these two methods:
contact or projection. The contact method is employed when we want prints to be
exactly the same sizes as the negative. They are made by putting the emulsion
part of the negative in contact with the printed material and exposing the two
together to a light source.
Printing is achieved by any of these two methods:
contact or projection. The contact method is employed when we want prints to be
exactly the same sizes as the negative. They are made by putting the emulsion
part of the negative in contact with the printed material and exposing the two
together to a light source.
In the projection printing, the negative is first of all placed in a type of magnifying projector. The light passes from the negative through a lens projecting a magnified or reduced image of the negative on the printed material. The process allows the photographer either to reduce or increase the quantity of light falling on certain portions of the printed material. Known as a trick or as a burnout, these techniques render the final print either brighter or darker on selected portions.
The printed material employed in the process is a type of photographic paper whose composition is similar to that for film developing, but much less sensitive to light. After exposure, the print is developed and fixed through a process quite similar to that employed for film developing. On the finished print, the portions exposed to most light are reproduced as dark tones; the portions reproduced as blocked by negative lighting are reproduced as light tones, while portions exposed to moderate quantities of light are reproduced as intermediary tones.
Color prints and
color negatives are made either by the projection method or by the contact
method. The color transparency prints may be carried out directly by
projection, using the Cibachrome or Type R process, such as R-3 from Kodak or
Type 34 from
Positive color transparencies and color negatives are printed on multi-layer emulsion paper containing color forming agents. Examples could be the Fujichrome Type 34 process and Kodak Ektachrome, which are used for printing from color transparencies; and Ektacolour, Fujicolour and Agfacolour CN Type A, which are used for printing from negatives. These papers are developed in color forming solutions without a reversible process. When carrying out such color prints, exposure errors are minimized by varying the print exposure time. The color balance is controlled by adjustable filters at the end of the magnifying device, in between the light source and the negative.
In the color transfer process for carrying out color prints, a dividing negative is prepared for one of the three colors: red, green and blue. These color dividing negatives are either produced directly from the subject in a single-use device, nowadays a relatively out-fashioned technique, or else indirectly from the color transparency. Negatives are then used to produce embossed positive images on a gelatin sheet known as a matrix. Three positive matrices are produced: one is immersed into yellow paint, another one in fuchsine and the third one in cyan. After absorption, each matrix is printed through a special easel ensuring perfect alignment or framing so as to form a complete color image.
TRICKS AND COLOR IMAGE SPECIFIC EFFECTS

 Any trick obtained on black and white photo-sensitive
materials can also be carried out on color materials. The color enhances the
expressiveness of effects, it adds value to them. However, some tricks consist
of chromatic distortion effects and can only be perceived by color, being
specific to the color image. Such tricks are usually achieved on special photo-sensitive
color materials. However, some can be obtained even on black and white
photographic materials through special treatments, such as toning or chromogene
bleaching.
Any trick obtained on black and white photo-sensitive
materials can also be carried out on color materials. The color enhances the
expressiveness of effects, it adds value to them. However, some tricks consist
of chromatic distortion effects and can only be perceived by color, being
specific to the color image. Such tricks are usually achieved on special photo-sensitive
color materials. However, some can be obtained even on black and white
photographic materials through special treatments, such as toning or chromogene
bleaching.
Successive photography by changing the color filters
The procedure consists of multiple shooting of the subject at various time intervals, with various colored filters. The images obtained through this procedure are characterized by a strong chromatic disequilibrium among the colors of the moving and static objects. Due to this exposure manner, objects in motion are captured in various places and each time in a different color, while static objects are additively impressed in the same film spot. The procedure may be carried out on any type of color film and with any type of colored filters. However, in order to create a shock as poignant as possible, we need to use filters with transmission strips as strict and special as possible. Furthermore, we need to choose a convenient composition wherein the mobile element should have the main role in the frame and a relatively stronger brightness. The triggering moment of the exposure must coincide with the climax of modifying the situation in the frame; it must be anticipated by the photographer. Color strobo-photography may also be considered a particular case of this procedure.
Color strobo-photography
 The process follows the decomposition of the subject
movement into several distinct phases and their recording in various taints of
color, on the same photogram of the negative. Color strobo-photography allows
the carrying out of very interesting effects. Unfortunately, quite a number of
photographers, preoccupied by the solving of the complex technical issues
raised by this procedure, make the mistake of treating the decomposition of
movement from a strictly technical point of view, captivated by the technical
performances of being able to stop the fastest movement. It is often
forgotten that the very keeping of the dynamism sensation and movement
continuity brings an extra expressiveness. Stroboscopic photography generally
requires the solving of certain very complex technical issues, such as exposure
frequency, subject obstruction and elimination systems. Color
strobo-photography as a trick procedure renders things even more complicated, because
it aims at highlighting each moment of movement in another color.
The process follows the decomposition of the subject
movement into several distinct phases and their recording in various taints of
color, on the same photogram of the negative. Color strobo-photography allows
the carrying out of very interesting effects. Unfortunately, quite a number of
photographers, preoccupied by the solving of the complex technical issues
raised by this procedure, make the mistake of treating the decomposition of
movement from a strictly technical point of view, captivated by the technical
performances of being able to stop the fastest movement. It is often
forgotten that the very keeping of the dynamism sensation and movement
continuity brings an extra expressiveness. Stroboscopic photography generally
requires the solving of certain very complex technical issues, such as exposure
frequency, subject obstruction and elimination systems. Color
strobo-photography as a trick procedure renders things even more complicated, because
it aims at highlighting each moment of movement in another color.
Converting the black and white images into conventional colors
Converting the black and white images into conventional color images may be achieved in several ways. There are four distinct technical procedures, on the basis of which the most varied and interesting variants of color tricks can be achieved. Besides the classical procedure of separating and transposing gray tones on color photo-sensitive materials, two original procedures are also described, representing Romanian contributions to the enriching of creation means in photographic art: Deflectography, a procedure designed by eng. Coloman Ondrejcsik and the Color DM procedure, designed by eng. Dumitru Morozan.
Inversing colors
By employing a counter-pattern procedure with color separations of the color images, the original colors can be modified as one wishes, even without introducing any color dominant in the gray tonalities of the image. Three color selections are extracted from the original color image, with the help of three strict color filters, namely indigo, green and red on a special black and white panchromatic material.
Chromatic effects achieved on black and white photographic materials
Various mono and even polychrome effects may be obtained on regular black and white photographic materials with the help of special processing treatments such as toning or chromogene developing.
|
Politica de confidentialitate | Termeni si conditii de utilizare |

Vizualizari: 1916
Importanta: ![]()
Termeni si conditii de utilizare | Contact
© SCRIGROUP 2025 . All rights reserved