| CATEGORII DOCUMENTE |
| Bulgara | Ceha slovaca | Croata | Engleza | Estona | Finlandeza | Franceza |
| Germana | Italiana | Letona | Lituaniana | Maghiara | Olandeza | Poloneza |
| Sarba | Slovena | Spaniola | Suedeza | Turca | Ucraineana |
ObjectARX Wizard 2 Beta 0.60
Installation and usage
Draft Version 1.2
ObjectARX Wizard 2 is a tool which will generate ARX source code for ObjectARX 2. ObjectARX Wizard can be used stand alone or it can be integrated into Microsoft Visual C++ 4.2. It runs only on Windows NT (3.51/4.0) and Windows 95.
Please notice that this version of ObjectARX Wizard is a beta and that not all features of ObjectARX 2 are integrated yet.
If you run ObjectARX Wizard stand alone, it can create a ARX project, but it cant modify it. To be able to modify a ARX project, generated by ObjectARX Wizard, it must be called from within Microsoft Visual C++ 4.2 when the project is loaded.
ObjectARX Wizard will parse some ARX header files, so it must know how to find the ObjectARX libraries and include files. Read the installation instruction how to set this up.
You can run ObjectARX Wizard from every location you want. In the following instruction I assume that it is located in the BIN directory of MSDEV++ 4.2:
D:MSDEVBINOBJARXWZ.EXE
To integrate it in MSDEV, do the following steps:
Start MSDEV and select the 'Customize' entry in the 'Tools' menu.
Select the 'Tools' tab and press the 'Add' button.
Enter the command line for ObjectARX Wizard ('D:MSDEVBINOBJARXWZ.EXE').
You can change the menu text.
Define the arguments for ObjectARX Wizard. To do this enter '$(WkspDir)$(WkspName).mak' in the 'Arguments:' edit control.
Close the customize dialog.
Now MSDEV must be told where it can find the ARX header files and libraries. Therefore select the 'Options' entry from the 'Tools' menu. Choose the 'Directories' tab. If you select 'Show directories for: Include files', you can browse your harddisc to find the ARX include files. Do the same for the ARX libraries ('Show directories for: Library files'). After that you can close the options dialog with 'OK'. Look at the MSDEV manuel (or the MSDEV only help) for more information.
NOTE: MSDEV must be restartet that ObjectARX Wizard will notice the changes.
If you dont specify the include directories in MSDEV and you start ObjectARX Wizard, you will get some dialogs indicating that ObjectARX Wizard cant find some header files. For each header file ObjectARX Wizard cant find you will see one dialog. ObjectARX Wizard will work nevertheless, but you cant use the reactors and you cant create custom entities in this case. If ObjectARX Wizard can find the ARX header files on startup, it will take on slower computers some seconds until you see the first dialog of ObjectARX Wizard, because it must parse some header files.
If you select the 'Tools' menu you should see the new entry for the ObjectARX Wizard. The installation is complete.
After starting ObjectARX Wizard you will see the following dialog:
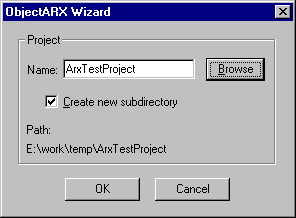
In the 'Name:' edit control you can enter the name of the new ARX project. Click on the 'Browse' button to select the directory where the new project should be generated. Check 'Create new subdirectory' to create a new directory in the directory you have browsed. The new directory will get the same name as the project.
Press 'OK' to continue, 'Cancel' to quit ObjectARX Wizard.
In this dialog you can select the needed header files and libraries:

Press the 'Select Includes' to get a dialog where you must select every class you want use in the project.
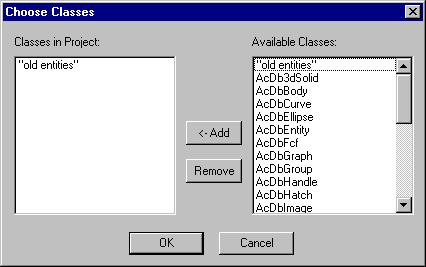
Just select in the right list box the classes you need and press the '<-Add' button to add them to the project. If you want remove classes, select them in the left list box and press the 'Remove' button.
Click on 'OK' to use the selected classes and to return to the 'Select Headerfiles' dialog.
With the check boxes in the 'Select Headerfiles' dialog you can tell ObjectARX Wizard which libraries must be linked to the project.
NOTE: The 'B-Rep' check box is only available when ObjectARX Wizard can find the Brep .lib file. Make shure that the brep lib file is in one of the in MSDEV specified library search paths.
NOTE: If you want use the new RasterImage classes/reactors, you must check 'Raster image'.
Press 'Cancel' to quit ObjectARX Wizard and 'Next->' to continue with the next dialog.
Here you can define your own commands which should be available in AutoCAD:
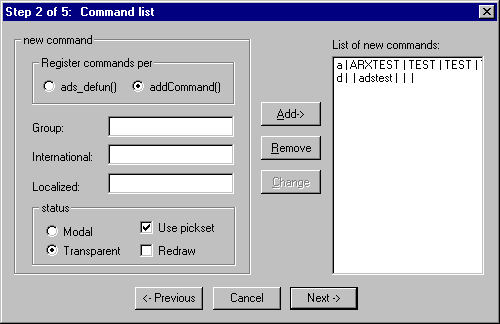
You can choose if you want register your commands with ads_defun() or if you want to use the ARX functions for registering commands.
If you want register commands with ads_defun():
Only the edit control 'International:' is available. Enter the name of the command and click on 'Add->'. You will see the defined commands in the right list box. To remove a command select it in the list box and click on 'Remove'.
If you register commands with the ARX functions:
Enter in the 'Group' field the command group the command belongs to. Enter the international name of the command in 'International:'. In the 'Localized:' control you can enter the localized name of the command. If both international and localized name are the same, you dont must type in a localized name. In the 'status' are you can select some properties how AutoCAD should use the commands. Select a command from the right list box and on 'Remove' to remove a command.
If you want you can mix the kind of registering. You can define commands with ads_defun() and other with addCommand().
When a defined command from the right list box is selected, the 'Change' button is enabled. The controls in the left half of the dialog displays the settings for the selected command. Change something and click on the 'Change' button to store the changes.
NOTE: When changing the settings of a command, you cant enter a new name in the 'International:' edit control. Doing so will disable the 'Change' button.
Press 'Cancel' to quit ObjectARX Wizard, '<-Previous' for the previous and 'Next->' for the next dialog.
In this dialog you can select the messages you want to receive from AutoCAD in your entry point of the ARX application:
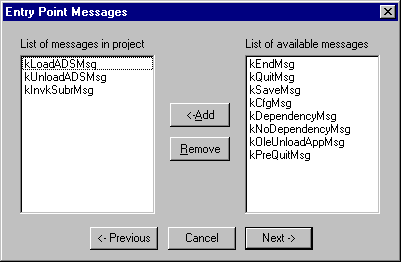
If you have defined some commands which will be registered with ads_defun(), then the left list box will already contain three messages. These message cant be removed from the project.
Select the messages in the right list box you want to use and press the '<-Add' button. The messages you have added to the project can be removed with the 'Remove' button.
Press 'Cancel' to quit ObjectARX Wizard, '<-Previous' for the previous and 'Next->' for the next dialog.
In this dialog you can define reactors:
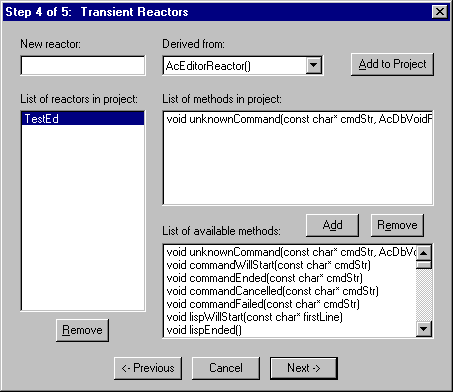
Enter the name of the reactor under 'New reactor:', select the type of the reactor with 'Derived from:'. Press the 'Add to project' button to define the reactor. The name of the reactor will appear in the left list box. Select it to see all available methods for this reactor in the lower right list box ('List of available methods:'). Now you must select the methods you want to use and press the 'Add' button above this list box. The selected methods will be shown in the list box 'List of methods in project'. To remove a method, select it in this list box and press the 'Remove' button under the list box.
To remove a reactor, select it in the left list box and click on the 'Remove' button under this list box.
Press 'Cancel' to quit ObjectARX Wizard, '<-Previous' for the previous and 'Next->' for the next dialog.
NOTE: If you have not added a method to a reactor, a dialog box will appear and warn you that are there no methods defined. ObjectARX Wizard will nevertheless create the source file for this reactor, but it doesnt contain any methods.
With this dialog you can create the template for your own ARX entities/objects:
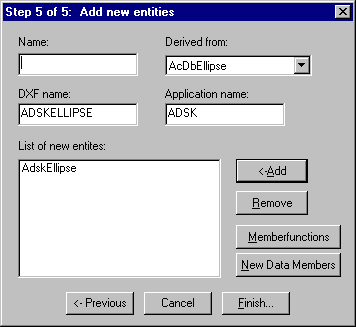
Enter the name of the new entity in 'Name:' and select the entity or object from which you want derive your own entity. In the 'DXF name:' edit control you have to enter the DXF name of the new entity, and in the 'Application name:' edit control you have to enter the application name. Press the '<-Add' button to define the new entity. The name of the entity will appear in the left list box. To remove a entity, select it in the 'List of new entities:' list box and click on the 'Remove' button.
Now you can specify the member functions you want use for the new entity. Press the 'Memberfunctions' button to do so. The 'Memberfunctions' dialog will appear.
If you dont specify any member functions for a entity and you leave this dialog, ObjectARX Wizard will display a dialog and ask you if you want use all available member functions. In this dialog press 'Cancel' to return to the 'Add new entities' dialog to specify the member functions. Press 'OK' to use all available member functions.
Press on 'Cancel' to quit ObjectARX Wizard, on '<-Previous' for the previous dialog and on 'Finish' to finish the settings of your ARX project.
This dialog will be shown when you press the 'Memberfunctions' button in the 'Add new entities' dialog:
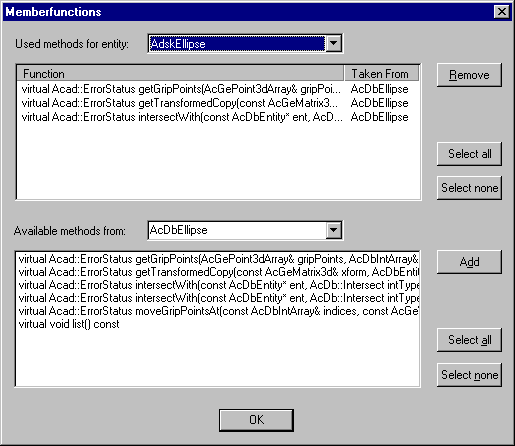
In the top combo box you can select one of the new defined entities. In the top list box you can see the methods you have defined for this new entity. To remove a defined method select it and click on the 'Remove' button.
With the 'Available methods from:' combo box you can choose the base class from which you want override the virtual member functions. To add a member function to your new entity, select the member function and press the 'Add' button. The selected items will be shown in the upper list box.
NOTE: ObjectARX Wizard cant create absolutely new member functions for your new entity/object. It can only define member functions which are available from the base classes of your new entity/object.
Press on 'OK' to return to the 'Add new entities' dialog.
This dialog will be shown when you press the 'New Data Members' button in the 'Add new entities' dialog:
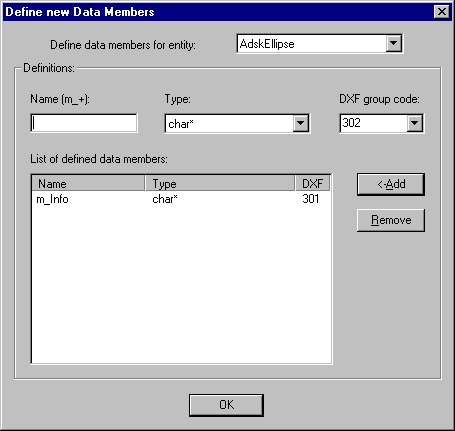
First you must select with 'Define data members for entity' for which new entity you want define the data members. Then enter a name for the data member (the prefix for the data member will always be 'm_'), select the type and select a DXF group code for the data member. To remove a already defined data member select it in the 'List of defined data members:' list box and press the 'Remove' button.
NOTE: The DXF group code you can select depends on the type of your data member, but you are responsible for selecting a useful DXF group code (for example dont select for a char* group code 100, because it is needed for the subclass marker).
Press on 'OK' to return to the 'Add new entities' dialog.
After leaving the 'Add new entities' dialog with 'Finish' you will be ask if you are shure to create the project. If you cancel this dialog, ObjectARX Wizard will quit without generating source code. Click on 'OK' to go on.
Now you will be asked if the ARX application should be unloadable. Choose 'Yes' that AutoCAD will be able to arxunload your application or 'No' if you dont want AutoCAD to unload your application.
After this dialog ObjectARX Wizard generates the source code. A dialog will inform you about the status. If ObjectARX Wizard has finished, you will get a dialog that the project was created.
If you close the last dialog of ObjectARX Wizard and you are using ObjectARX Wizard from MSDEV, than the file open dialog of MSDEV will appear. After some seconds, ObjectARX Wizard will fill out this dialog and MSDEV will open your project.
If you are using ObjectARX Wizard from MSDEV, you are able to change your ObjectARX Wizard generated project with ObjectARX Wizard. To do so, load the project into MSDEV. Then select the ObjectARX Wizard entry from the 'Tools' menu. ObjectARX Wizard will notice that it should modify the current project. It will show the 'Select Headerfiles' dialog. The main dialog (where you can enter the project name) will not be shown.
You can step thru the dialogs and make settings like you are used to do this with a new project.
NOTE: ObjectARX Wizard will create for every project a file called 'cfg.rxw'. If you want to modify a project with ObjectARX Wizard, it will search and read this file. This file contains the definitions made in ObjectARX Wizard. This is the reason why ObjectARX Wizard can create only one project in a directory. If ObjectARX Wizard cant find this file, it will show you a dialog with the message, that the current project is not a ObjectARX Wizard generated project. It asks you if you want to create a new project. If you answers with 'No', ObjectARX Wizard will quit.
ObjectARX Wizard generates some source files. The following is a list of the source files which can be generated (I assume that the project name is 'SAMPLE')
SAMPLE.CPP
SAMPLE.H
SAMPLE.DEF
DBREACT.CPP
DBREACT.H
EDREACT.CPP
EDREACT.H
ENTREACT.CPP
ENTREACT.H
LNKREACT.CPP
LNKREACT.H
OBJREACT.CPP
OBJREACT.H
RASTERREACT.CPP
RASTERREACT.H
TRANSACTREACT.CPP
TRANSACTREACT.H
RESOURCEHELPER.CPP
RESOURCEHELPER.H
README.TXT
ACAD.RX
CFG.RXW
For each new entity which was defined with ObjectARX Wizard, you will get more files:
<ENTITY_NAME>.CPP
<ENTITY_NAME>.H
You can of course modify the source code manually. If you dont plan to modify the created project with ObjectARX Wizard, you can do what you want.
But if you want to be able to modify the project with ObjectARX Wizard, you can change the source code only on certain points, because ObjectARX Wizard writes completely new files if it must change a project (but only the files which are affected by the changes).
You can change the code beetwen the '// TODO:' and '// end..' marker. All what you write between this comments will not be erased by ObjectARX Wizard if the project is modified. All other changes you are doing to the source code will be lost if you modify the project with ObjectARX Wizard.
NOTE: Never remove the comments '// TODO:' and '// end'. ObjectARX Wizard is looking for this marker if he tries to take your manually done changes into a newly written source file.
This file is the main source file. It contains the acrxEntryPoint for your application and the defined message handler. Here you can find your AutoCAD commands.
This is the definition file of your ARX application. Add your own exported functions.
This file will be created if you define a database reactor. It contains the methods you have choosen in ObjectARX Wizard. The methods will do nothing. It is your turn to implement your functions.
There are create and erase functions for the reactor defined (for example create_SampleDbReactor() and erase_SampleDbReactor() if the reactor has the name SampleDbReactor.
This file will be created if you define a editor reactor. It contains the method you have choosen in ObjectARX Wizard. The methods will do nothing. It is your job to implement your functions.
There are create and erase functions like for a database reactor.
This file will be created if you define a linker reactor. It contains the method you have choosen in ObjectARX Wizard. The methods will do nothing. It is your job to implement your functions.
There are create and erase functions like for a database reactor.
This file will be created if you define a transaction reactor. It contains the method you have choosen in ObjectARX Wizard. The methods will do nothing. It is your job to implement your functions.
There are create and erase functions like for a database reactor.
This file will be created if you define a entity reactor. It contains the method you have choosen in ObjectARX Wizard. The methods will do nothing. It is your job to implement your functions.
If you have defined a entity reactor, your main .cpp file (SAMPLE.CPP) will created a instance of this reactor(s) when AutoCAD loads your application. It will delete the instances of this reactor(s) when AutoCAD will unload your application. Look at the function 'initApp(void)' and 'unloadApp(void)' in SAMPLE.CPP.
This file will be created if you define a object reactor. It contains the method you have choosen in ObjectARX Wizard. The methods will do nothing. It is your job to implement your functions.
If you have defined a object reactor, your main .cpp file (SAMPLE.CPP) will created a instance of this reactor(s) when AutoCAD loads your application. It will delete the instances of this reactor(s) when AutoCAD will unload your application. Look at the function 'initApp(void)' and 'unloadApp(void)' in SAMPLE.CPP.
This file will be created if you define a raster image definition reactor. It contains the method you have choosen in ObjectARX Wizard. The methods will do nothing. It is your job to implement your functions.
If you have defined a raster image definition reactor, your main .cpp file (SAMPLE.CPP) will created a instance(s) of this reactor(s) when AutoCAD loads your application. It will delete the instance(s) of this reactor(s) when AutoCAD will unload your application. Look at the function 'initApp(void)' and 'unloadApp(void)' in SAMPLE.CPP.
This file is generated when MFC support is selected. It contains the definition of the class CTemporaryResourceOverride (RESOURCEHELPER.H contains the declaration of this class). This class is used in the InitModule() function in the main .cpp file.
This file contains some hints for this project. There you can find a list of all needed libraries and a short explaination of all created source files.
If you compile and link your application and you want to debug your application with AutoCAD, this file notices AutoCAD that it should load your application (because AutoCAD is looking in the current directory if it can find a ACAD.RX file and load every ARX application specified in it).
This file contains the settings of the project. It is needed when you want modify the project with ObjectARX Wizard. Dont erase this file.
If you have created new entities/objects with ObjectARX Wizard, each new entity will have its own .cpp and .h file. The new entity will contain all methods you have specified in ObjectARX Wizard. Each member function will call the member function from the base object. It is your job to implement the functions in the right way.
ObjectARX Wizard will generate for all defined data members read and set functions.
ObjectARX Wizard
will generate complete dxfOutFields(), dxfInFields(), dwgOutFields() and
dwgInFields() member functions where all your data members will be
'filed' from AutoCAD. If you dont specify any data members, MSDEV
will show a warning when you compile this file, because dxfInFields() contains
in this case only a case() statement with a default statement and no switch()
statements.
ObjectARX Wizard is able to parse some AutoCAD ARX header files. On startup, it will parse the definition of the reactor classes and the methods from AcDbObject and AcDbEntity. If you create a new entity, it will parse the methods from the entity/object you are deriving from. ObjectARX Wizard can do this because it knows in which header files the classes are defined.
If you have your own ARX classes or if Autodesk will deliver other classes, you can tell ObjectARX Wizard which header file will contain the definition for a class. To do this, hold down the SHIFT-Key when starting ObjectARX Wizard. Doing so, you will see the 'Configure ObjectARX Wizard' dialog:
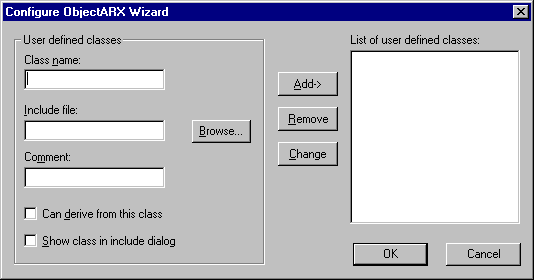
Type in 'Class name:' the name of the new class. Enter at 'Include file:' in which file the class is defined. If you dont know the name of the header file, you can use the 'Browse' button to search it. In the 'Comment:' edit control you can enter a short text which will be shown in the by ObjectARX Wizard generated source code behind the include statements.
With the check boxes you can tell ObjectARX Wizard if it can derive from this class (the class will be shown in the 'Derived from:' list of the 'Add new entities' dialog) and if the class should appear in the 'Choose Classes' dialog (this dialog is available when you select the 'Select includes..' button in the 'Select Headerfiles' dialog).
After you have specified the datas, you can add the class definition with the 'Add->' button. The class will appear in the 'List of user defined classes:' list box. To remove a user defined class, select it in this list box and click on the 'Remove' button.
Press 'Cancel' to quit ObjectARX Wizard without storing the changes, press 'OK' to save the changes.
ObjectARX Wizard will store the settings in the registry.
If you modify a ObjectARX Wizard generated project with ObjectARX Wizard, it can happen that the new settings needs another library to be linked to the project or that a library could be removed from the project. ObjectARX Wizard is not able the change the settings for the .lib files of the project, because MSDEV doesnt notice it when the .mak file is modified outside the editor. Therefore you must take care about the needed .lib files. Read the 'readme.txt' file of the project. In this file you can see what libraries are needed for this project.
If you modify a ObjectARX Wizard generated project with ObjectARX Wizard, it can be that a source can be removed from the project. ObjectARX Wizard cant do this for you because it cant change the .mak file. You have to remove the source file manually. Look at the 'readme.txt' file of the project. There you can find which files are needed for this project.
If you modify a ObjectARX Wizard generated project with ObjectARX Wizard, it can happen that ObjectARX Wizard must add a source file to the project. Normally this works. But if you are using subprojects, ObjectARX Wizard cant guarantee that the source file will be added to the right subproject. Please check where the new file was inserted if you are using subprojects.
ObjectARX Wizard can parse header files, but the parser in ObjectARX Wizard is not as good as a 'real' C++ parser. If a header file contains a syntax ObjectARX Wizard doesnt know, it will fail to parse it. Typically ObjectARX Wizard will hang or crash. ObjectARX Wizard should be able to read the ARX header files delivered with ObjectARX 2. If ObjectARX Wizard should crash on the 'Add new entities' or the 'Memberfunctions' dialog, you are using probably a class which cant be parsed by ObjectARX Wizard.
If you define reactors, please make shure that every reactor has a unique name, because ObjectARX Wizard cant handle different reactors with the same names. This will be fixed in later releases.
If you define new entities/objects, dont give them the name of the project, because ObjectARX Wizard will generate a .cpp file with the name of the project and .cpp files with the name of the new entities. This will be fixed in later releases.
|
Politica de confidentialitate | Termeni si conditii de utilizare |

Vizualizari: 1887
Importanta: ![]()
Termeni si conditii de utilizare | Contact
© SCRIGROUP 2025 . All rights reserved