| CATEGORII DOCUMENTE |
| Bulgara | Ceha slovaca | Croata | Engleza | Estona | Finlandeza | Franceza |
| Germana | Italiana | Letona | Lituaniana | Maghiara | Olandeza | Poloneza |
| Sarba | Slovena | Spaniola | Suedeza | Turca | Ucraineana |
A router initializes by loading the bootstrap, the operating system, and a configuration file. If the router cannot find a configuration file, then it enters setup mode. The router stores, in NVRAM, a backup copy of the new configuration from setup mode.
The goal of the startup routines for Cisco IOS software is to start the router operations. The router must deliver reliable performance in its job of connecting the user networks it was configured to serve. To do this, the startup routines must:
Make sure that the router comes up with all its hardware tested.
Find and load the Cisco IOS software that the router uses for its operating system.
Find and apply the configuration statements about the router, including protocol functions and interface addresses.
When a Cisco router powers up, it performs a power-on self test (POST). During this self test, the router executes diagnostics from ROM on all hardware modules. These diagnostics verify the basic operation of the CPU, memory, and network interface ports. After verifying the hardware functions, the router proceeds with software initialization.
After the power-on self test on the router, the following events occur as the router initializes:
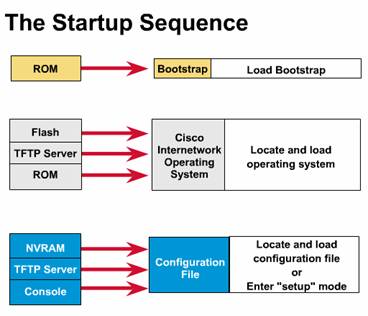 Step 1 -- The
generic bootstrap loader, in ROM, executes on the CPU card. A bootstrap is a
simple, preset operation to load instructions that in turn cause other
instructions to be loaded into memory, or cause entry into other configuration
modes.
Step 1 -- The
generic bootstrap loader, in ROM, executes on the CPU card. A bootstrap is a
simple, preset operation to load instructions that in turn cause other
instructions to be loaded into memory, or cause entry into other configuration
modes.
Step 2 -- The operating system (Cisco IOS) can be found in one of several places. The location is disclosed in the boot field of the configuration register. If the boot field indicates a Flash, or network load, boot system commands in the configuration file indicate the exact location of the image.
Step 3 -- The operating system image is loaded. Then, when it is loaded and operational, the operating system locates the hardware and software components and lists the results on the console terminal.
 Step 4 -- The
configuration file saved in NVRAM is loaded into main memory and executed one
line at a time. These configuration commands start routing processes, supply
addresses for interfaces, set media characteristics, and so on.
Step 4 -- The
configuration file saved in NVRAM is loaded into main memory and executed one
line at a time. These configuration commands start routing processes, supply
addresses for interfaces, set media characteristics, and so on.
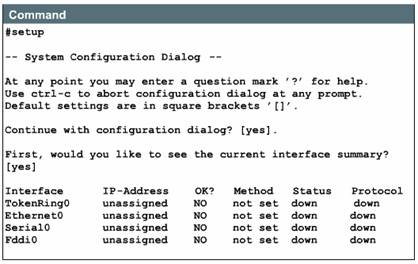
Step 5 -- If no valid configuration file exists in NVRAM, the operating system executes a question-driven initial configuration routine referred to as the system configuration dialog, also called the setup dialog.
Setup is not intended as the mode for entering complex protocol features in the router. You should use setup to bring up a minimal configuration, then use various configuration-mode commands, rather than setup, for most router configuration tasks.
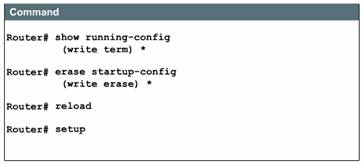
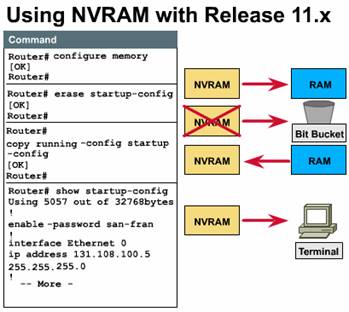
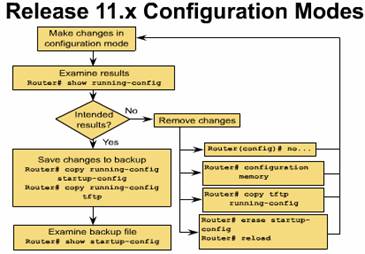
The top two commands in the Figure -- show startup-config and show running-config -- display the backup and active configuration files. The erase startup-config command deletes the backup configuration file in NVRAM. The reload (reboot) command reloads the router, causing it to run through the entire startup process. The last command, setup, is used to enter setup mode from the privileged EXEC prompt.
Note: The commands show config, write term, and write erase, used with Cisco IOS Release 10.3 and earlier, have been replaced with new commands. The old commands continue to perform their normal functions in the current release, but are no longer documented. Support for these commands will cease in a future release.
 One of the
routines for initial configuration is the setup mode. As you've already learned
in this lesson, the main purpose of the setup mode is to bring up, quickly, a
minimal configuration for any router that cannot find its configuration from
some other source.
One of the
routines for initial configuration is the setup mode. As you've already learned
in this lesson, the main purpose of the setup mode is to bring up, quickly, a
minimal configuration for any router that cannot find its configuration from
some other source.
For many of the prompts in the system configuration dialog of the setup command facility, default answers appear in square brackets [ ] following the question. Press the Return key to use these defaults. If the system has been previously configured, the defaults that will appear will be the currently configured values. If you are configuring the system for the first time, the factory defaults will be provided. If there is no factory default, as in the case of passwords, nothing is displayed after the question mark [?]. During the setup process, you can press Control+C at any time to terminate the process and start over. Once setup is terminated, all interfaces will be administratively shutdown.
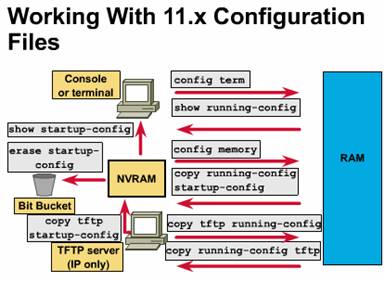
 When you
complete the configuration process in setup mode, the screen will display the
configuration that you have just created. You will then be asked whether you
want to use this configuration. If you enter 'yes', the configuration
will be executed and saved to NVRAM. If you answer 'no', the
configuration will not be saved and the process will begin again.
When you
complete the configuration process in setup mode, the screen will display the
configuration that you have just created. You will then be asked whether you
want to use this configuration. If you enter 'yes', the configuration
will be executed and saved to NVRAM. If you answer 'no', the
configuration will not be saved and the process will begin again.
If a --More-- prompt appears, press the space bar to continue.
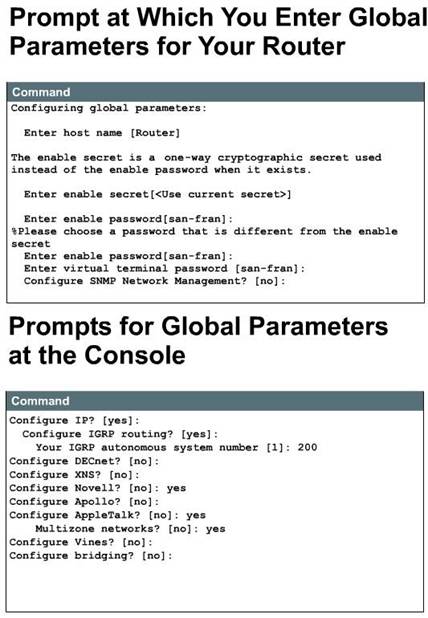
After viewing the current interface summary, a prompt will appear on your monitor, indicating that you are to enter the global parameters for your router. These parameters are the configuration values you select.
A prompt appears on your monitor, as
illustrated in Figure ![]() .
It indicates that you are to enter the global parameters that you set for your
router. These parameters are the configuration values you decided on.
.
It indicates that you are to enter the global parameters that you set for your
router. These parameters are the configuration values you decided on.
The first global parameter allows you to set the router host name. This host name will be part of the Cisco IOS prompts for all configuration modes. At initial configuration, the router name default will be displayed between square brackets as [Router].
Use the next global parameters shown in the graphic to set the various passwords used on the router. You must enter an enable password. When you enter a string of password characters for the prompt, 'Enter enable secret'; the characters are processed by Cisco proprietary encryption. This enhances the security of the password string. Whenever anyone lists the contents of the router configuration file, this enable password appears as a meaningless string of characters.
Setup recommends, but does not require, that the 'enable password' be different from the 'enable secret word'. The 'enable secret word' is a one-way cryptographic secret word that is used instead of the 'enable password' when it exists. The 'enable password' is used when no 'enable secret word' exists. It is also used when using older versions of the IOS. All passwords are case sensitive and can be alphanumeric.
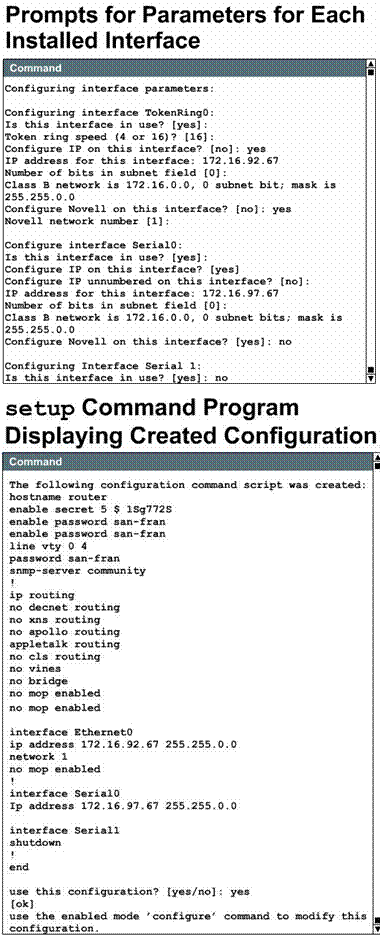
When you are prompted for parameters
for each installed interface, as shown in Figure ![]() ,
use the configuration values that you have selected for your router. Whenever
you answer yes to a prompt, additional questions may appear regarding
the protocol.
,
use the configuration values that you have selected for your router. Whenever
you answer yes to a prompt, additional questions may appear regarding
the protocol.
When you are prompted for parameters for each installed interface, as shown in the Figure, you need to use the configuration values you have determined for your interface to enter the interface parameters at the prompts.
 When you complete the configuration process for all
installed interfaces on your router, the setup command program will
display the configurations that you have created. The setup process will
then ask if you want to use this configuration. If you answer yes, the
configuration will be executed and saved to NVRAM. If you answer no, the
configuration will not be saved, and the process will begin again. There is no
default for this prompt; you must answer either yes or no. After
you have answered yes to the last question, your system will be ready to
use. If you want to modify the configuration you have just established, you
must do the configuration manually.
When you complete the configuration process for all
installed interfaces on your router, the setup command program will
display the configurations that you have created. The setup process will
then ask if you want to use this configuration. If you answer yes, the
configuration will be executed and saved to NVRAM. If you answer no, the
configuration will not be saved, and the process will begin again. There is no
default for this prompt; you must answer either yes or no. After
you have answered yes to the last question, your system will be ready to
use. If you want to modify the configuration you have just established, you
must do the configuration manually.
The script tells you to use the configuration mode to change any commands after setup has been used. The script file generated by setup is additive; you can turn features on with setup, but you cannot turn them off. Also, setup does not support many of the advanced features of the router, or features that require a more complex configuration.
In this section, you will learn how to work with configuration files that can come from the console, NVRAM, or TFTP server. A router uses the following information from the configuration file when it starts up:
Cisco IOS software version
Router identification
Boot file locations
Protocol information
Interface configurations
The configuration file contains commands to customize router operation. The router uses this information when it starts up. If there is no configuration file available, the system configuration dialog setup guides you through the process of creating one.
Router configuration information can be generated by several means. You can use the privileged EXEC configure command to configure from a virtual (remote) terminal, a modem connection, or a console terminal. This allows you to enter changes to an existing configuration at any time. You can also use the privileged EXEC configure command to load a configuration from a network TFTP server, which allows you to maintain and store configuration information at a central site. The following list describes briefly some of the configuration commands:
 configure terminal -- configures
manually from the console terminal
configure terminal -- configures
manually from the console terminal 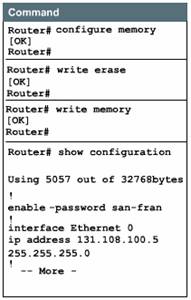
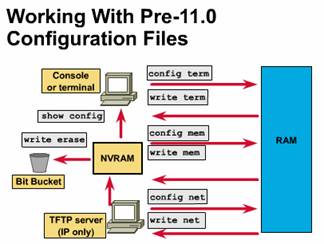 The commands shown in the Figure are used with Cisco IOS, Release 10.3
and earlier. They have been replaced with new commands. The old commands that
have been replaced continue to perform their normal functions in the current
release, but are no longer documented. Support for these commands will cease in
a future release.
The commands shown in the Figure are used with Cisco IOS, Release 10.3
and earlier. They have been replaced with new commands. The old commands that
have been replaced continue to perform their normal functions in the current
release, but are no longer documented. Support for these commands will cease in
a future release.
You
can store a current copy of the configuration on a TFTP server. You use the copy
running-config tftp command, as shown in Figure ![]() ,
to store the current configuration in RAM, on a network TFTP server. To do so,
complete the following tasks:
,
to store the current configuration in RAM, on a network TFTP server. To do so,
complete the following tasks:
You can configure the router by loading the configuration file stored on one of your network servers. To do so, complete the following tasks:
 At the system prompt, enter the name of the
configuration file or accept the default name. The filename convention is
UNIX-based. The default filename is hostname-config for the
host file and network-config for the network
configuration file. In the DOS environment, the server filenames are
limited to eight characters plus a three-character extension (for example,
router.cfg). Confirm the configuration filename and the server
address that the system supplies. Notice in the figure that the router
prompt changes to
At the system prompt, enter the name of the
configuration file or accept the default name. The filename convention is
UNIX-based. The default filename is hostname-config for the
host file and network-config for the network
configuration file. In the DOS environment, the server filenames are
limited to eight characters plus a three-character extension (for example,
router.cfg). Confirm the configuration filename and the server
address that the system supplies. Notice in the figure that the router
prompt changes to 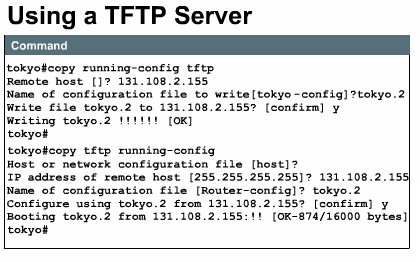 These commands manage the
contents of NVRAM: (see Figure)
These commands manage the
contents of NVRAM: (see Figure)
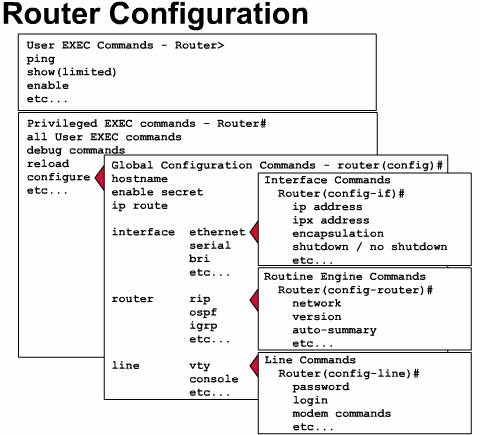
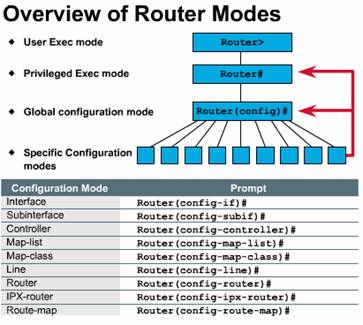 The EXEC mode
interprets the commands you type and carries out the corresponding operations.
You must log into the router before you can enter an EXEC command. There are
two EXEC modes. The EXEC commands available in user mode are a subset of the
EXEC commands available in privileged mode. From privileged mode, you can also
access global configuration mode and specific configuration modes, some of
which are listed here:
The EXEC mode
interprets the commands you type and carries out the corresponding operations.
You must log into the router before you can enter an EXEC command. There are
two EXEC modes. The EXEC commands available in user mode are a subset of the
EXEC commands available in privileged mode. From privileged mode, you can also
access global configuration mode and specific configuration modes, some of
which are listed here:
If you type exit, the router will back out one level, eventually allowing you to log out. In general, typing exit from one of the specific configuration modes will return you to global configuration mode. Pressing Ctrl-Z leaves configuration mode completely and returns the router to privileged EXEC mode.
Global configuration commands
apply to features that affect the system as a whole. You use the privileged
EXEC command configure to enter global configuration mode. When you
enter this command, the EXEC prompts you for the source of the configuration
commands. ![]()
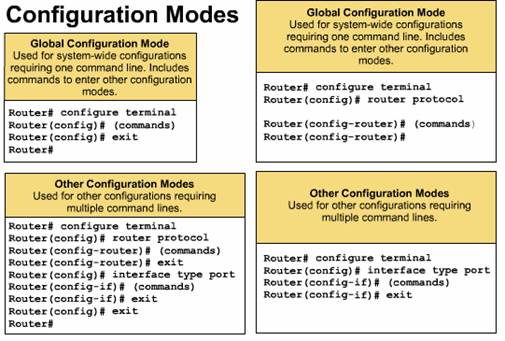 You can then
specify the terminal, NVRAM, or a file stored on a network server as the
source. The default is to type in commands from the terminal console. Pressing
the return key begins this configuration method.
You can then
specify the terminal, NVRAM, or a file stored on a network server as the
source. The default is to type in commands from the terminal console. Pressing
the return key begins this configuration method.
Commands to enable a particular routing or interface function begin with global configuration commands:
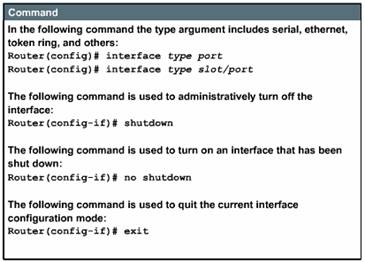 To
configure an interface (indicated by the prompt config-if) you
first enter the global interface type and number command.
To
configure an interface (indicated by the prompt config-if) you
first enter the global interface type and number command. After a routing protocol is enabled by a global command, the router configuration mode prompt Router (config-router)# is displayed as shown in the figure. You type a question mark (?) to list the routing protocol configuration sub-commands.
Because all router interfaces are automatically in the administratively down mode, many features are enabled on a per-interface basis. Interface configuration commands modify the operation of an Ethernet, a Token Ring, or a serial port. In addition, interface subcommands always follow an interface command because the interface command defines the interface type.
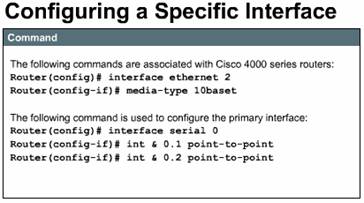 The Figure
shows commands that are examples of how to complete common interface tasks. The
first set of commands is associated with interfaces. On serial links, one side
must provide a clocking signal, a DCE; the other side is a DTE. By default,
Cisco routers are DTE devices, but in some cases they can be used as DCE
devices. If you are using an interface to provide clocking, you must specify a
rate with the clockrate command. The bandwidth command overrides
the default bandwidth that is displayed in the show interfaces command
and is used by some routing protocols such as IGRP.
The Figure
shows commands that are examples of how to complete common interface tasks. The
first set of commands is associated with interfaces. On serial links, one side
must provide a clocking signal, a DCE; the other side is a DTE. By default,
Cisco routers are DTE devices, but in some cases they can be used as DCE
devices. If you are using an interface to provide clocking, you must specify a
rate with the clockrate command. The bandwidth command overrides
the default bandwidth that is displayed in the show interfaces command
and is used by some routing protocols such as IGRP.
The second set of commands is associated with the Cisco 4000 series routers. On the Cisco 4000, there are two connections on the outside of the box for Ethernet interfaces-an attachment unit interface (AUI) connector and a 10BASE-T connector. The default is AUI, so you must specify media-type 10BASE-T if you want to use the other connection.
The Figure shows a way you can:
You can secure your system by using passwords to restrict access. Passwords can be established both on individual lines and in the privileged EXEC mode.
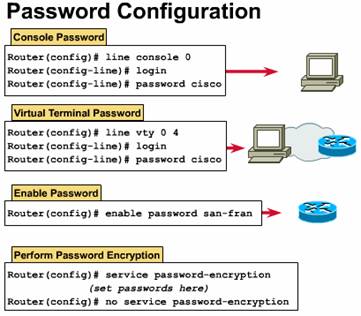 enable
password -- restricts access to
privileged EXEC mode
enable
password -- restricts access to
privileged EXEC mode You can further protect passwords from being displayed by using the service password-encryption command. This encryption algorithm does not match the Data Encryption Standard (DES).
The configuration of network devices determines the network's behavior. To manage device configurations, you need to list and compare configuration files on running devices, store configuration files on network servers for shared access, and perform software installations and upgrades.
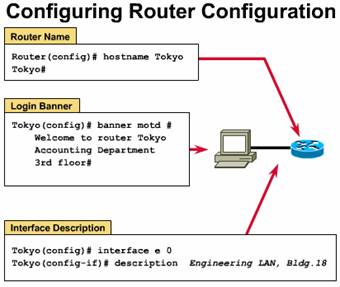 One of your
first basic tasks is to name your router. The name of the router is considered
to be the host name and is the name displayed by the system prompt. If you do
not configure a name, the system default router name will be Router. You can
name the router in global configuration mode. In the example shown in the
Figure, the router name is Tokyo.
One of your
first basic tasks is to name your router. The name of the router is considered
to be the host name and is the name displayed by the system prompt. If you do
not configure a name, the system default router name will be Router. You can
name the router in global configuration mode. In the example shown in the
Figure, the router name is Tokyo.
You can configure a message-of-the-day banner to be displayed on all connected terminals. This banner will be displayed at login and is useful for conveying messages that affect all router users (e.g. impending system shutdowns). To configure this message, use the banner motd command in the global configuration mode.
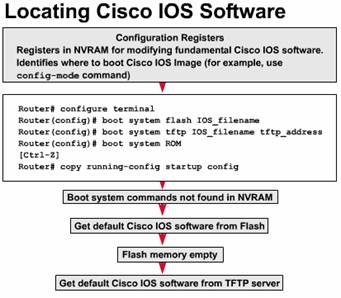 The default
source for Cisco IOS software startup depends on the hardware platform, but
most commonly the router looks to the boot system commands saved in NVRAM.
Cisco IOS software does, however, allow you to use several alternatives. You
can specify other sources for the router to look for software, or the router
can use its own fallback sequence, as necessary, to load the software.
The default
source for Cisco IOS software startup depends on the hardware platform, but
most commonly the router looks to the boot system commands saved in NVRAM.
Cisco IOS software does, however, allow you to use several alternatives. You
can specify other sources for the router to look for software, or the router
can use its own fallback sequence, as necessary, to load the software.
The settings in the configuration register enable the following alternatives:
The order in which the router looks for system bootstrap information depends on the boot field setting in the configuration register. You can change the default configuration register setting with the global configuration-mode command config-register. Use a hexadecimal number as the argument for this command.
In this example, the configuration register is set so that the router will examine the startup file in NVRAM for boot system options. The configuration register is a 16-bit register in NVRAM. The lowest 4 bits of the configuration register (bits 3, 2, 1, and 0) form the boot field.
To change the boot field and leave all other bits set at their original values (initially the config register contains 0x010x), follow these guidelines:
To check the boot field setting, and to verify the config-register command, use the show version command.
The show version command displays information about the Cisco IOS software version that is currently running on the router. This includes the configuration register and the boot field setting (shown on the continuation of this example on the next page).
In the example, the Cisco IOS version and descriptive information is highlighted on the second output line. The screen captured shows an experimental version of Release 11.2. The line
System image file is 'c4500-f-mz', booted via tftp from 171.69.1.129
shows the system image name.
You will learn about Cisco IOS software Release 11.2 image naming conventions later in this lesson. For now, notice the portion of the filename that indicates that this image is for a Cisco 4500 platform.
As it continues to output, the show version command displays information about the type of platform on which the version of Cisco IOS software is currently running. The highlighted text provides the results of the command config-register 0x10f, which is used to enter configuration register values.
Note: You will not see evidence of any config-register setting in output from either the show running-config or show startup-config commands.
The following examples show how you can enter multiple boot system commands to specify the fallback sequence for booting Cisco IOS software. The three examples show boot system entries which specify that a Cisco IOS image will load first from Flash memory, then from a network server, and finally from ROM:
Flash memory --
You can load a system image from electrically erasable programmable read-only
memory (EEPROM). The advantage is that information stored in Flash memory is
not vulnerable to network failures that can occur when loading system images
from TFTP servers. ![]()
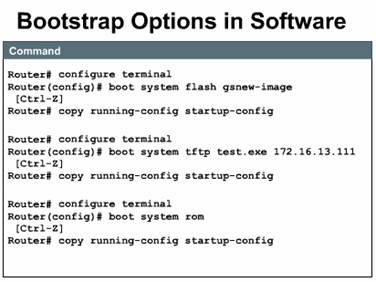 network server
-- In case Flash memory becomes corrupted, you provide for a backup by
specifying that a system image should be loaded from a TFTP server.
network server
-- In case Flash memory becomes corrupted, you provide for a backup by
specifying that a system image should be loaded from a TFTP server. ![]()
ROM -- If Flash memory is corrupted and the network server fails to load the image, booting from ROM is the final bootstrap option in software. However, the system image in ROM will likely be a subset of Cisco IOS software, that lacks the protocols, features, and configurations of full Cisco IOS software. Also, if you have updated the software since you purchased the router, it may be an older version of Cisco IOS software.
 The command
copy running-config startup-config saves the commands in NVRAM. The router will
execute the boot system commands as needed in the order in which they were
originally entered into configuration mode.
The command
copy running-config startup-config saves the commands in NVRAM. The router will
execute the boot system commands as needed in the order in which they were
originally entered into configuration mode.
Production internetworks usually span wide areas and contain multiple routers. These geographically distributed routers need a source or backup location for software images. A TFTP server will allow image and configuration uploads and downloads over the network. The TFTP server can be another router, or it can be a host system. In the Figure, the TFTP server is a workstation that is running UNIX. The TFTP host can be any system that has TFTP software loaded and operating and able to receive files from the TCP/IP network. You will be copying software between the TFTP host and Flash memory in the router. However, before you do this, you must prepare by checking the following preliminary conditions:
These steps will help ensure a successful file copy. If you rush into the file copy, the copy could fail and you will have to begin troubleshooting the cause of the copy failure.
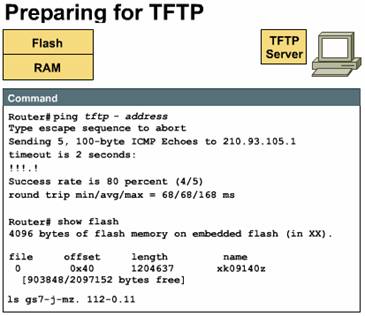
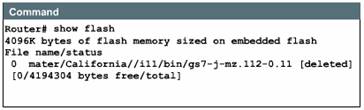 Use the show
flash command to verify that you have sufficient memory on your system for
the Cisco IOS software that you want to load. The example shows the router has
4 MB of Flash memory, all of which is free. Compare this with the length of the
Cisco IOS software image. Sources for this image size may include the software
order document or output from the configuration software application on the
Cisco Connection Online (CCO) World Wide Web site or a command like dir
or ls issued on your TFTP server.
Use the show
flash command to verify that you have sufficient memory on your system for
the Cisco IOS software that you want to load. The example shows the router has
4 MB of Flash memory, all of which is free. Compare this with the length of the
Cisco IOS software image. Sources for this image size may include the software
order document or output from the configuration software application on the
Cisco Connection Online (CCO) World Wide Web site or a command like dir
or ls issued on your TFTP server.
If there is insufficient free memory, you will not be able to copy or load the image, which means that you can either try to obtain a smaller Cisco IOS software image or increase the available memory on the router.
It is a good idea to keep a backup copy of the IOS image file for each router. You will also want to always backup your current IOS before upgrading to a newer version. In this lab you will use a TFTP (Trivial File Transfer Protocol) server to act as a backup storage location for the IOS image.
 Cisco products
have expanded beyond the generic router to include many platforms at many
points on the network product spectrum.
Cisco products
have expanded beyond the generic router to include many platforms at many
points on the network product spectrum.
To optimize how Cisco IOS software operates on these various platforms, Cisco is working to develop many different Cisco IOS software images. These images accommodate the various platforms, available memory resources, and feature set needs customers have for their network devices.
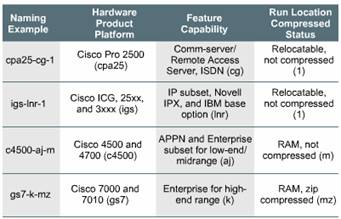
The naming convention for Cisco IOS Release 11.2 contains three parts:
the platform on which the image runs
a letter or series of letters identifies the special capabilities and feature sets supported in the image
 specifics as
to where the image runs and whether it has been zipped or compressed
specifics as
to where the image runs and whether it has been zipped or compressed
The Cisco IOS software naming conventions, name part field meaning, image content, and other details are subject to change. Refer to your sales representative, distribution channel, or CCO for updated details.
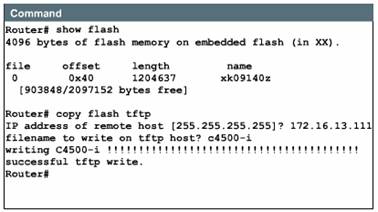
You should copy a system image back to a network server. This copy of the system image can serve as a backup copy and can also be used to verify that the copy in Flash memory is the same as the original disk file.
In the example, an administrator is backing up the current image to the TFTP server. He is using the show flash command to learn the name of the system image file (xk09140z), and the copy flash tftp command to copy the system image to a TFTP server. The files can be renamed during transfer.
One reason for this upload to the server would be to provide a fallback copy of the current image prior to updating the image with a new version. Then, if problems develop with the new version, the administrator can download the back-up image and return to the previous image.
 After you have
a backup copy of the current Cisco IOS software image, you can load a new
image. You download the new image from the TFTP server by using the command copy
tftp flash.
After you have
a backup copy of the current Cisco IOS software image, you can load a new
image. You download the new image from the TFTP server by using the command copy
tftp flash.
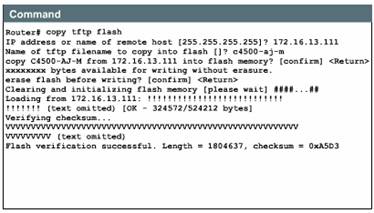
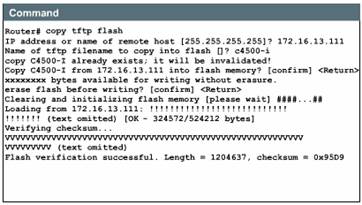
The example shows that this command begins by requesting the IP address of the remote host that will act as the TFTP server. Next, the prompt asks for the file name of the new IOS image. You need to enter the correct filename of the update image as it is named on the TFTP server.
Following an opportunity to confirm your entries, the procedure asks if you are willing to erase Flash memory. This makes room for the new image. Often, there is insufficient Flash memory for more than a single Cisco IOS image.
You have the option of erasing the existing Flash memory before writing onto it. If no free Flash memory space is available, or if the Flash memory has never been written to, the erase routine is usually required before new files can be copied. The system informs you of these conditions and prompts you for a response. Note that the Flash memory is erased at the factory before shipment. Each exclamation point (!) means that one User Datagram Protocol (UDP) segment has successfully transferred. The series of Vs indicates successful checksum verification of a segment.
Use the show flash command to view the file information and to compare its size with that of the original on the server before changing the boot system commands to use the updated image. Following a successful load, the reload command reboots the router using the updated image.
If you need to load the backup Cisco IOS version, use a variation of the copy command, copy tftp flash, which will allow you to download the image that you previously uploaded to the TFTP server. After you enter the copy tftp flash command, the system prompts you for the IP address (or name) of the TFTP server. This can be another router serving ROM or Flash software images. The system then prompts you for the filename of the software image. The example shows sample output from copying a system image, named C4500-I, into Flash memory. If you attempt to copy into Flash memory a file that is already there, a prompt will tell you that a file with the same name already exists. This file will be deleted when you copy the new file into Flash memory. If there is room for both copies in flash, the first copy of the file still resides within Flash memory, but is rendered unusable in favor of the newest version, and will be listed with the [deleted] tag when you use the show flash command.
 If you abort
the copy process, the newer file will be marked [deleted] because the entire
file was not copied and is therefore not valid. In this case, the original file
still resides within Flash memory and is available to the system.
If you abort
the copy process, the newer file will be marked [deleted] because the entire
file was not copied and is therefore not valid. In this case, the original file
still resides within Flash memory and is available to the system.
Just as the router configuration file has different parts to it, the router configuration process also has different parts.
A common procedure that technicians perform on routers is the password recovery procedure. The Figure shows the procedure for both the 1600 and 2500 Series routers. This procedure/series of commands is also a good review of the IOS.
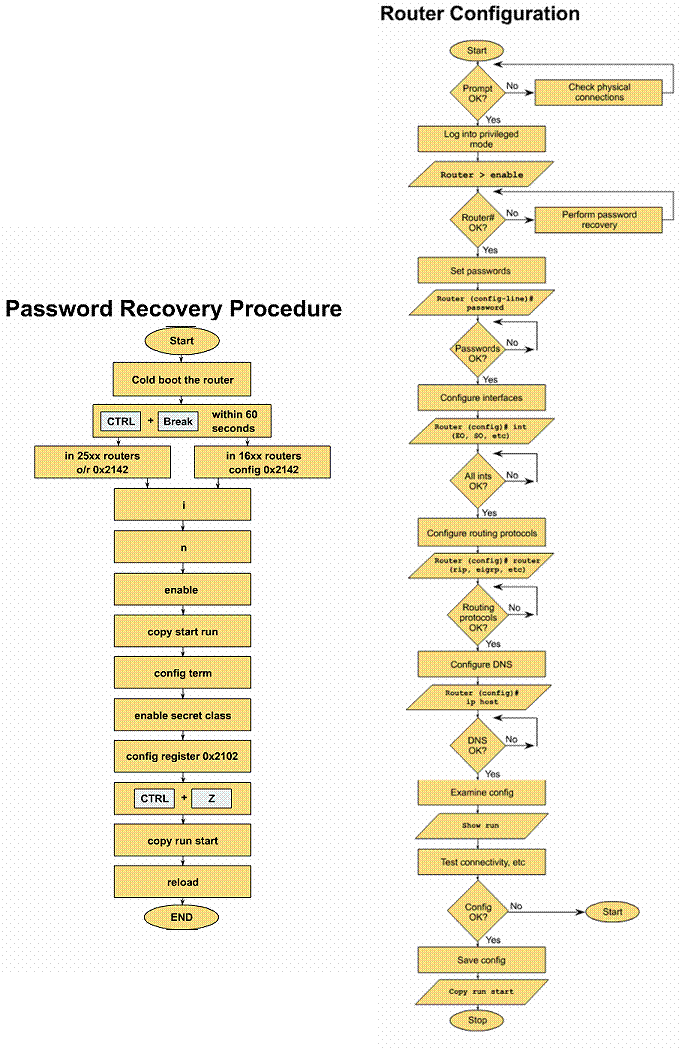

Step 1 - Login to a router.
Explanation: Connect to the router and login. Enter the password cisco if prompted.
Step 2 - Record the configuration register setting.
Task: Enter the command show version (abbreviated show
ver).
Explanation: This displays the current configuration register setting,
along with other information.
1. What is the current configuration register setting?
![]()
Step 3 - Restart the router.
Task: Turn off the router for a short period of time and
turn it back on again.
Explanation: When the router is restarting, the boot up sequence can be
interrupted.
Step 4 - Interrupt the boot up sequence.
Task: Within 60 seconds of turning the router back on,
press and hold the Control key, then press the Break key.
Explanation: A break character is sent to the router, interrupting the boot
up sequence.
Step 5 - Change the configuration register.
Task: Enter the commands to change the configuration
register.
Explanation: The configuration register is changed to tell the router to
ignore the configuration file in NVRAM on the next startup. The
procedure varies depending on the model of router.
A. 2500 series router:
The prompt will be > with no router name. Type o/r 0x42 and press enter (lower case letter o, slash, lower case r, space, zero, lower case x, four, two). Type i and press enter to reload the router. Wait until the router has rebooted. Type n when prompted to enter initial configuration. Press enter to see the router> prompt.
B. 1600 series router:
The prompt will be rommon 1>. Type config and type Y when asked to change the configuration. Type N to all questions except ignore system config info. When you complete responding to the questions, you will be prompted to change the configuration again. Type N, then type reset to reload the router. Wait until the router has rebooted. Type N when prompted to enter initial configuration. Press enter to see the router> prompt.
Step 6 - Enter the privileged EXEC mode.
Task: From user EXEC mode, enter privileged EXEC mode using
the enable command.
Explanation: Enter the enable mode from the user EXEC mode.
2. Why was no password required?
![]()
Step 7 - Examine the configuration the router is using.
Task: Enter the command show running-config (abbreviated:
sh run).
Explanation: Since the configuration registers were set to ignore the
configuration file in step 5, the router has a minimal configuration.
Step 8 - Load the router configuration file.
Task: Type the command copy startup-config running-config
(abbreviated: copy start run).
Explanation: The configuration file is loaded from NVRAM into RAM.
This will allow us to view and/or modify the router passwords.
3. How does your router prompt change?
![]()
Step 9 - Look at passwords.
Task: Enter the command show running-config (abbreviated:
sh run).
Explanation: Passwords that have been encrypted with the enable secret command
show up as a series of letters, numbers and symbols. (e.g.
$1$miYV$i9OOuSBQBde5fzgS3tn8T0). Non-encrypted passwords are in plain text.
4. What passwords do you see?
![]()
Step 10 - Change passwords.
Task: Enter the commands to change the appropriate
passwords.
Explanation: Passwords set using the enable secret command cannot be
decrypted even with third-party software. The only option you have is to change
the password to another value.
Go into global configuration mode by entering the command configure terminal (abbreviated: config t). Enter the command enable secret newpassword. Press and hold the Control key and press Z to exit out of global config mode. Type the command show running-config (abbreviated: sh run).
5. What passwords do you now see?
![]()
6. Has the encrypted password changed from the value in step 9?
![]()
Note: For purposes of this lab, we will not be saving the router configuration with the new password. We need to change the password back to the value class. Enter global config mode by entering the command config t. Enter the command enable secret class, then press Control Z to exit global configuration mode. Save the new configuration by entering the command copy running-config startup-config (abbreviated: copy run start).
Step 11 - Change the configuration register.
Task: Examine the current status of the configuration
register and change it back to its original value.
Explanation: The configuration register is still set to ignore the startup
configuration contained in NVRAM. You need to change it back to its
original value.
Enter the command show version (abbreviated sh ver).
7. What is the value of the configuration register?
![]()
Enter global config mode by typing the command config terminal (abbreviated: config t). Enter the command config-register 0x2102. (Note: use the original value you recorded in step 2). Press Control Z to exit global config mode. Enter the command sh ver to see the new value of the configuration register.
8. What is the new value of
the configuration register?
![]()
Step 12 - Verify new password.
Task:
a. Enter the command reload.
b. Enter Y if prompted to save new configuration, and to proceed with
reload.
Explanation: You need to verify that the new password you created in step 10 works. Enter privileged EXEC mode by entering the command enable (abbreviated: ena). Enter the password class. If you properly set the enable password, you should see the router prompt change. View the status of the configuration register by entering the command show version (abbreviated: sh ver).
9. Has the configuration
register changed back to its original value you recorded in step 2?
![]()
|
Politica de confidentialitate | Termeni si conditii de utilizare |

Vizualizari: 1735
Importanta: ![]()
Termeni si conditii de utilizare | Contact
© SCRIGROUP 2025 . All rights reserved