| CATEGORII DOCUMENTE |
| Asp | Autocad | C | Dot net | Excel | Fox pro | Html | Java |
| Linux | Mathcad | Photoshop | Php | Sql | Visual studio | Windows | Xml |
This topic provides a refresher course in Microsoft Windows 'power moves' used within Manifold. It also discusses the standard Windows nomenclature we use throughout the documentation. Finally, it introduces special Manifold power moves used within Windows.
Very Important: Before starting Manifold, go to the Windows Control Panel Display dialog Effects tab and make sure that the Show window contents while dragging check box is not checked. In Windows XP this option is found in the Control Panel's Appearances and Themes - Display choice under the Appearance tab by pressing the Effects button. Checking this box will greatly slow down the system when displaying complex maps and images because it forces a refresh of the window contents with each minor change in mouse position while dragging the window.
Windows Display Settings
Manifold uses many toolbars, some of which will not fit in the default arrangement in lower resolution display settings such as 800 x 600 or 1024 x 768. Rearrange toolbars into multiple horizontal rows or undock some toolbars when using lower resolution display settings. If you cannot find a particular toolbar button, check to make sure the entire toolbar is visible.
Although it's possible to work effectively with a 1024 x 768 resolution, a monitor and video card combination that can show 1280 x 1024 resolution or higher is recommended. You will be able to work faster and more conveniently if there is plenty of room for work area in addition to toolbars and panes a display resolution.
Windows Explorer Settings
Microsoft Windows Explorer by default uses settings that hide the three-letter extension that is part of most Windows files. For example, a file called readme.txt will be shown by default just as readme and will appear with an icon associated with Notepad.
Since the only way to identify many different GIS data files is by the three-letter extension at the end of the file (such as .shp, .mif, .mdb, etc.), it is a good idea to always display the extension. To do so, in Windows Explorer choose Tools - Folder Options and in the View tab uncheck the Hide file extensions for known file types option. This will cause Windows Explorer to always show the three-letter extension for all files.
Experienced users will also often change the setting in the View menu of Windows Explorer to Details so that they can immediately see the size and date of each file. This setting provides a more efficient view than a window full of large icons. The Details setting is also very handy when seeking the most recent file in a folder, because one can then simply click on the Modified column head to sort files in the folder by date of most recent modification.
Windows Files Copied from CD are Read-only
When copying a file from the Manifold CD to a folder on the hard disk, Windows will create the file on hard disk as a read-only file. To work with these files as one might like in Manifold take a moment to uncheck the read-only attribute. To do this, right click on the file in Windows Explorer, choose Properties and uncheck the Read-only box in the Attributes section. Press OK.
The Active Window
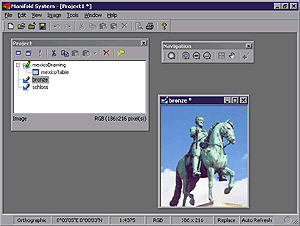
Manifold launches a main window that becomes populated with subsidiary windows as we open projects and components of projects. The illustration above shows the project pane and an image window within the main window as well as a floating toolbar. Toolbars can be floating or 'docked' into position into the frame of the main window.
Windows and undocked toolbars have title bars, the blue colored region at the top with the name of the window or toolbar. Move windows about by clicking on their title bars and dragging.
Only one window at a time is the active window in Microsoft Windows. Clicking into a window or touching it in some way activates it to make it the active window. The active window is also said in some contexts to have the focus. When a window is active its title bar changes to the highlighted color specified for active windows in the Display appearance settings specified in your Windows Control Panel. The active window is always on top of other windows.
Manifold windows are context sensitive. The main menu and toolbar controls will change to support use of whatever window is active. Manifold toolbars and toolbar buttons are designed to preserve commonality of function as much as is possible, so that when the focus changes from a drawing to an image window the selection buttons will retain their appearance. However, their function will change in subtle ways to support the slight differences in selection operations between objects in drawings and pixels in images.
Some applications will use a window's title bar to report information about that window. Manifold does not do this because there is usually more information we like to see than will fit in the title bar. Instead, Manifold uses the main Manifold window's status bar at the bottom of the screen to show information relevant to the active window.
Resizing Windows
Windows may be resized by clicking and dragging on their borders. Clicking and dragging on a window's corner will resize it both vertically and horizontally at once.
![]()
Each window has three small buttons in the upper right hand corner. These are:
|
Minimize |
|
Minimize this window into a floating title bar. |
|
Maximize |
|
Maximize this window to fill the main window. |
|
Close |
|
Close this window. |
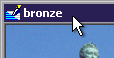
Minimizing a window converts it to a small floating title bar positioned near the bottom of the main window. This is a useful method of getting a window temporarily out of the way when working with many windows at once. Minimized windows may be dragged about by their title bars to a new position.
![]() The restore
button will appear in the minimized window's title bar. Click this button to restore the window to its previous
size.
The restore
button will appear in the minimized window's title bar. Click this button to restore the window to its previous
size.
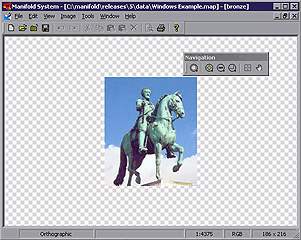
Maximizing a window expands it to fill the main Manifold window. The title bar will be combined with the title bar of the main window. We can also maximize a window by double clicking on the title bar. Note the default checkerboard background of an image window that appears wherever the image has no pixels. See the Layers pane topic for info on the background.

Maximized windows have their restore control buttons just below the window buttons of the main Manifold window.
![]() Click on the restore button to restore the maximized window to its
previous size.
Click on the restore button to restore the maximized window to its
previous size.
When maximizing one window, Microsoft Windows assumes we want all windows to be maximized. Therefore, if we have several windows open and one of them is maximized and then we switch to another window (either by closing the 'top' window or by using the Windows menu to switch to a different window) we will see that all of the other windows are maximized as well.
Full Screen Mode
Choose View - Full Screen or press the F11 key to expand the main Manifold window to full screen mode, using the entire monitor screen and eliminating the title bar and menu bar. If toolbars are hidden using Tools - Customize and a window is maximized the result is a 'full screen' display. Press F11 to get out of full screen mode.
Arranging Windows
The Window menu allows us to arrange windows within the main Manifold window.
|
New Window - Enabled when a component window is activated. Open a new window into that component. |
|
|
|
Close - Close the active window. |
|
Close All - Close all windows. |
|
|
|
Next - Activate the next window in the stack. |
|
|
Previous - Activate the previous window in the stack. |
|
|
Cascade - Arrange windows neatly in front of each other and offset slightly. |
|
|
Tile Horizontally - Arrange windows next to each other left to right and resize so they fill the main window. |
|
|
Tile Vertically - Arrange windows next to each other top to bottom and resize so they fill the main window. |
|
|
Windows - Open a dialog that lists all windows. |
See the Windows Dialog topic for additional info.
Panes
Panes are a type of window that can be left 'always on top' or docked into the left or right edges of the main Manifold window. Panes are used to display information or controls that are always to be kept in view while work goes on in other windows. Panes may be repositioned by dragging their title bar to a new position. Panes may be resized as well.
Manifold has several panes, such as the project pane and the layers pane , that are important parts of the user interface and which are normally left open. Panes can be turned on/off using the View - Panes menu or with keyboard shortcuts like SHIFT-ALT-P (open/close the Project pane).
See the View - Panes topic for a list of panes and to open and close panes. Panes may also be closed by clicking the X box in their caption bars. Familiarity with panes and their use is a mandatory skill within Manifold.
Note: The word 'panes' can also be sub-areas of main windows that might be used to keep some information in view while another part of a window shows a changing display.
Toolbars
Manifold duplicates many menu commands in the form of toolbar buttons. Manifold command buttons all have Tool Tips, which are quick labels that pop open if the mouse cursor lingers on the button. Toolbars may be turned ON and OFF under the Tools - Customize menu. A right mouse click on the main menu bar calls up a shortcut to the Tools - Customize menu.
Individual toolbars may be dragged to different locations on the display. They may be 'docked' into the upper or lower screen edges or left 'floating' in the middle of the display. Move a docked toolbar by dragging the 3D ridge at the left or top of the toolbar. Move a floating toolbar as you would any window, by dragging its title bar. Use a CTRL-drag to drag a toolbar past the normally docked position.
Manifold toolbar buttons are context sensitive and are not enabled unless they can be applied. For example, unless we are working on an image the Select Pixels selection mode button will not be enabled in the Selection toolbar.
![]()
The toolbar above is in its undocked form, with a title bar. In docked form, toolbars do not have a title bar. Toolbars may be undocked by dragging them (using the small 3D ridge at the left side or top of the toolbar) into the main Manifold window pane.
To quickly see which toolbar is which, use Tools - Customize to turn it ON and OFF. As the toolbar turns ON and OFF it will be obvious which it is.
Docking and Undocking
Toolbars and panes can be docked into the main Manifold Window. Because toolbars are very wide but not tall, they can only be docked into the upper or lower edges of the main window. Because panes are normally taller than they are wide, they can be docked only into the left or right edges of the main window. A docked pane will expand in height to fill (or share) the available vertical space at the edge of the main window.
![]()
Toolbars and panes may be docked into the top, bottom, left or right margins of the main Manifold window. Most toolbars are docked by default and most panes are not docked by default.
![]()
To move a docked toolbar, click and drag on the toolbar's move handle. To undock a toolbar, move it into the main work area.
An undocked toolbar may be docked by dragging and dropping it into the desired position in the main window's margins.
When a pane or toolbar is brought near to or on top of a margin using a click and drag, it will automatically dock itself. To override this, use a CTRL click and drag. This will allow you to drag a pane or toolbar over top of a toolbar row or near to a window margin without the pane or toolbar docking itself.
To undock a docked pane, click and drag it from the docked position into the main Manifold window area. Click and drag on the small 3D ridge at the left side of the docked pane to move it.
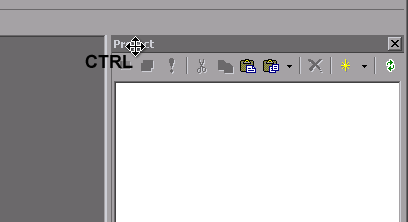
To undock a docked pane and drop it near the margin, use a CTRL click and drag onto the title bar.
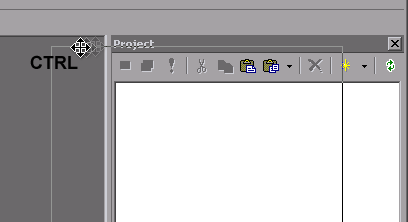
Drag it to a position near the border while holding down the CTRL key. The CTRL tells Manifold not to dock the pane even though it is near the border.

Release the mouse at the desired position of the undocked pane. The illustrations above show a greatly minimized main Manifold window. In real life we would use a reasonably large computer display with high resolution so we can display many controls and panes while leaving room for practically sized working windows.
Panes may also be resized by dragging their horizontal or vertical borders. When panes are docked together, the borders between them may be dragged to resize them relative to each other.
Mouse Moves and Context Menus
A left click or left click and drag of the mouse is normally an 'action' command that does something. A right click is normally an 'information' command that requests information or a choice of options. Whenever we simply say 'click' the mouse, we always mean a left click.
Right clicking into windows or onto parts of windows or other controls will often call up a context menu of available choices. For example, right clicking onto a layer tab in a map window will pop open a context menu of commands that may be applied to that layer. Right clicking onto a column head in a table will pop open a context menu of commands that may be applied to table columns, such Sort Ascending and Sort Descending.
Windows Dialog Controls
The various buttons, edit boxes, menus and other items that appear in a Windows dialog or other window are called controls.

Color wells are squares that provide a color choice. Click into a color well to choose it, for example, in the main Windows color dialog.
![]()
Color wells also occur in toolbars.
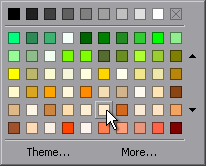
Clicking into a color well in a toolbar will usually call up the Color dialog to enable setting that color. Manifold's toolbar color palettes will provide an array of colors where the first row presents variations of the current color. Choosing More calls up the classic Windows color setting dialog.
![]()
Check boxes are simply on/off controls. Click the box to turn that item on/off. A special type of check box is an option button or radio button, which is a small round control with a dot in the middle. Option buttons are used in groups where only one option button of the group may be checked. [Hence the slang term 'radio button', since just like the channel choice buttons in old car radios pushing one button in pushes all other buttons out.]


Text boxes or Edit boxes allow users to enter or choose data. Edit boxes will often have lists that provide a choice of allowed options, in which case they are known as a List box. Click on the down arrow button to see the list and then click on the choice desired. Some list boxes will have so many choices that they will have a scroll bar that may be used to scroll through the list. Dropdown lists that appear are also known as drop down or pull down menus.
Some edit boxes allow either choosing from a list or they will also accept a value entered by the user by clicking and entering text into the box. Such edit boxes are also known as combo boxes. If we can click into an edit box in Manifold, we know that we are not restricted to only those choices presented in the pull down list.
![]()
Edit boxes are often associated with slider controls in image commands. Moving the slider back and forth will automatically change the value in the edit box. Alternately, we can click into the edit box and enter a number directly.
Once clicked with a mouse to become activated, a slider bar can also be moved left or right using the Left Arrow and Right Arrow keys on the keyboard. This is a very handy method when working interactively with a previewed control. For example, when setting the level of water in a terrain window for waterline effects, we would open the Terrain - Water dialog, check the Preview box, click on the Level slider and then use the left and right arrow keys to move the slider up and down.
![]()
Spin buttons or UpDown controls are small up and down arrows inside some edit boxes. Clicking on the up arrow increases the value in the edit box by a pre-designated amount. Clicking on the down arrow decreases the value in the edit box. Most edit boxes with spin buttons will also allow direct user entry of the value by clicking into the box without using the spin buttons.
Once clicked with a mouse to become activated, the value in an edit box with spin buttons can also be increased or decreased using the Up Arrow and Down Arrow keys on the keyboard.
Note: Manifold's built-in programming environment allows us to create our own dialogs and forms using the above controls and many, many more. See the Form Controls topic for information.
Focus and Keyboard Moves in Dialogs
When working with a Windows dialog, only one control at a time in that dialog will have the focus. The control that has the focus will normally be highlighted with a fine dotted outline or other indication that it has the focus.
![]()
Clicking into an edit box will move the focus to that edit box, which is shown with the cursor in the edit box. Pressing Enter on the keyboard applies the action of that control. For example, in the illustration above the Yes command button has the focus, so if we press Enter on the keyboard it is as if we pressed the Yes button with the mouse.
Clicking the Tab key on the keyboard will move the focus between controls in the dialog using whatever tab order the designer of the dialog specified. Many windows dialogs will start out with the focus on the OK key or other 'yes, do it' key in the dialog. This makes it easy for people to respond to dialogs by simply pressing Enter on the keyboard if they agree with the default settings shown.
The ESC ('escape') key on the keyboard is used to exit or abandon many mouse modes or commands in windows. The ALT- Tab key combination may also be pressed as an equivalent to ESC if some program or information dialog (such as a 'download complete' when downloading files in background) has snatched context away from the Manifold window.
Changing Values
Many Windows dialogs will provide lists of items (files, components, properties, parameters, etc.) with a name or value for each item.
![]()
Clicking on the item will usually highlight it.
![]()
A rapid double click will often open the item (if it may be opened), whereas clicking once to highlight the item, pausing, and then clicking it again will open it for editing. For example, we can rename 'Map2' to 'Globe'.
![]()
We enter the characters 'Globe' and then press Enter. If we wished to abandon the edit we could press the Esc key.
![]()
The above edit sequence may often be accomplished by right clicking on the item and choosing Rename from the context menu that pops open.
Conveniences in Windows Dialogs
Manifold provides a rich set of Windows features in most dialogs. The illustration shows a Windows 2000 dialog.
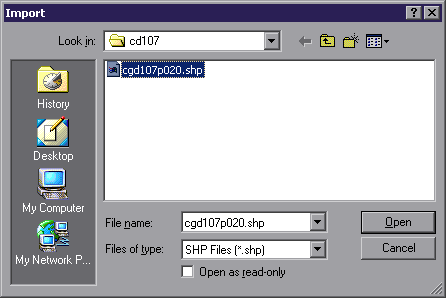
For example, the illustration above shows the File - Import - Drawing dialog set to import SHP files. The four icons in the left-hand pane of the dialog allow convenient jumps to different places in the file system.

The History icon is especially convenient because it provides shortcuts to folders and files previously visited. If we import files from two or three different folders (which could be located on different machines) the History icon lets us jump directly to any one of them.
Most Windows dialogs in Manifold are 'live' Windows Explorer sessions as well. Right click into the pane to call of a list of commands. For example, within the Import dialog seen above we can rename files that are displayed, create new folders, copy and paste files and so on. [In the example above we see an ESRI .shp file. 'Shapefiles' are actually a set of three files that have the same name but ending with a .shp, .dbf and .shx extension. If we are tempted to copy the .shp file seen to have a backup copy we would have to remember to copy the .dbf and .shx files as well. One reason Manifold saves files to a single .map file is to avoid such opportunities for errors].
The Files of type box provides a filter that normally shows only those files ending with the specified extension. This is a useful way of seeing only those files that end with a .shp extension.
The illustration above shows a Windows 2000 dialog. Because Manifold uses the facilities of the host operating system to provide standard dialogs with standard controls, the appearance of dialogs will vary to match prevailing standards in whatever version of Windows is in use. Some features provided by Windows 2000 or XP will not be available in earlier Windows versions.
The Windows Clipboard
Windows operating systems provide a Clipboard, which is a temporary storage location to which almost anything in Windows can be copied. The Clipboard is common to all Windows applications. Expert use of Windows almost always involves the Clipboard.
Whenever something is copied using Edit - Copy or a Copy command in a standard Windows context menu the data that represents that something is copied to temporary system storage within the Clipboard Using Edit - Paste or a Paste command from a context menu will paste whatever is in the Clipboard into the active window.
Applications programs vary in their sophistication and ability to use the Clipboard. Virtually all applications can handle copying of text to the Clipboard and pasting of text from the Clipboard. More sophisticated applications are able to copy more complex data, such as images, and to accept pastes of complex data as well.
Within Manifold we use the Clipboard for a very wide variety of applications. Virtually everything within Manifold is Clipboard-enabled. Use the Clipboard for simple things, such as copying the name of a file from Windows explorer and pasting it into a new name for a project or component. Use the Clipboard for more complex work such as copying geographic objects from one drawing and pasting them into another, or for copying pixels from one image and pasting them into another.
There may be some limitations to the universal use of Copy and Paste caused by incompatibilities between the source and destination. For example, when using Copy to copy multiple layers from a map one can only Paste back into a map.
Copy and Paste As
Manifold uses standard Windows Copy and Paste As to convert components. For example, the way we create a drawing of points from a geocoded table is to Copy the table in the project pane and then Paste As a drawing. See the Copy and Paste As topic for additional information.
Drag and Drop
'Drag and Drop' is Windows jargon for a simple user interface method that's widely used to copy things or to pick items from one window and insert them into another.
To drag and drop an item:
1. Make sure that both the source window and the destination window are open.
2. Click on the source window to make it active. Position the mouse cursor over the desired item.
3. Press down on the left mouse button and hold it down.
4. Without releasing the left mouse button, move the mouse cursor into the destination window. This is the 'drag.'
5. Release the left mouse button. This is the 'drop.'
Drag and drop is used within Manifold in several ways:
Add components to a map by dragging and dropping them from the project pane into the map. If a map window is open and we would like to add another component from the project pane into the map as an additional map layer, we can simply click on the component's name in the project pane and then drag and drop it anywhere in the map window. We don't have to 'drop' it onto the layer tabs. We can drop it anywhere in the map window. This component will then be opened as part of the map as a new layer within the map.
Copy or move controls between forms components. Dragging and dropping a control from one form into another form will copy or move that control.
Copy items between two different instances of Manifold. Launch Manifold once from the Start button and then launch it again. Resize both instances of Manifold so you can see them on screen. Items can now be dragged and dropped between the two different project panes.
Adding components to a print layout by dragging and dropping them from the project pane into the layout.
Hot Scroll
Manifold does not use scroll bars in image, drawing, labels, surface or map windows because such windows are limitless in extent. Instead, Manifold uses hot scroll commands using the ALT keyboard button and right mouse clicks. ALT -right click near the edge of a window to move in that direction. Remember ALT as a mnemonic for the 'A' in 'Arrow keys.'
Using ALT or SHIFT-ALT or CTRL-ALT with either a right click or with keyboard arrow keys has the following effect:
|
ALT- (right click) |
Scroll left, right, up, down or in diagonal directions in direction clicked by mouse. |
|
ALT- (arrow key) |
Scroll left, right, up, down or in diagonal directions in direction of the keyboard arrow key. |
|
SHIFT-ALT- (right click) |
Long scroll. Scroll in greater jumps at each step. |
|
SHIFT-ALT- (arrow key) |
Long scroll. Scroll in greater jumps at each step. |
|
CTRL-ALT- (right click) |
Jump to top / bottom / left / right edge of displayed data. |
Wheel mice are supported in Manifold in cases where scroll bars appear. For example, tables showing horizontal scroll bars will scroll when the wheel is rolled on a wheel mouse.
ALT is also used to extend selections and Clipboard operations within maps to all visible layers (ALT is a mnemonic for 'All').
Interactive Repositioning Methods
If the mouse is not occupied in a command mode, we may interactively reposition layers in maps using the following mouse and keyboard commands. To use these commands, the layer being repositioned must use the same projection as the map. See Repositioning Layers .
|
CTRL dragging |
Pressing the CTRL key while clicking and dragging with the mouse will reposition the layer. The method is similar to using the Grabber tool but whereas the grabber tool pans the view, using CTRL dragging moves the actual layer. |
|
CTRL <arrow key> |
Pressing the CTRL key while pressing one of the keyboard arrow keys will move the layer in that direction. |
|
SHIFT - CTRL <arrow key> |
Pressing both the SHIFT key and the CTRL key while pressing one of the keyboard arrow keys will move the layer in that direction in greater jumps. |
Autoscroll
When the mouse is occupied in mouse motion operations such as selection, editing, painting, and so for we would at times like the window to automatically scroll when the mouse gets near the edge of the window. Manifold will automatically autoscroll as the mouse nears the edge of a window. To turn this off, uncheck the Autoscroll window on edit or selection operations checkbox in Tools - Options - User Interface.
The sensitivity of autoscroll may also be set in Tools - Options - User Interface by specifying how close to the edge of the window the mouse can move before an autoscroll is triggered. The sensitivity is set by specifying the margin in pixels within which an autoscroll occurs.
Additional Mouse Buttons
Manifold component windows (such as a drawing, image or map window) will automatically work with standard commands issued by additional mouse buttons on mice so equipped, such as the IntelliMouse Explorer. For example, the fourth and fifth mouse buttons typically issue Back and Forward commands for views.
Double Click Short Cuts
Double clicking on a component in the Project pane will open the component in its own window.
Double clicking on legends , north arrows and scale bars will open the Properties dialog for those items. Double clicking on a legend, north arrow or scale bar within a print layout will open it for editing in a dialog.
Double clicking on an object in a drawing will launch your Internet browser using the contents of a URL field, if any, in the drawing's table for that object. If there is no URL field or if it is not of type 'URL' or if it is empty the Fields dialog will be popped open.
CTRL-double-clicking on an object in a drawing will launch the Fields dialog.
Keyboard Shortcuts
Learn to use Windows keyboard shortcuts to choose items in dialogs and in panes. Manifold supports the usual Windows 'power moves' to choose items in tables, dialogs and panes. If you are new to Windows, these are essential power moves similar to those used in many applications:
Click on a record handle to select it.
Ctrl-click on a record handle to select it without de-selecting other records. Ctrl-clicking on a selected record handle will de-select it without changing selecting of other records.
Shift-click on a record handle to select it and to also select all the records between it and another selected record. This is often used to select a series of records: click on the top record handle and then Shift-click on the bottom record handle and all the records in between will also be selected.
CTRL-A selects / chooses all items.
CTRL-I Invert Selection.
CTRL-X Cut selected items and copy to the Clipboard.
CTRL-C Copy selected items to the Clipboard.
CTRL-V Paste the contents of the Clipboard into the active window.
CTRL-Z Undo the last command (if undoable).
CTRL-Y Redo the last undone command.
CTRL-S Save. Use this to save projects regularly.
CTRL-N New. Open a new project.
CTRL-O Open. Open a previously created project.
CTRL-P Print.
CTRL-* (Asterisk on the numeric keypad) Zoom an image to the native zoom, with one image pixel equivalent to one screen pixel.
CTRL- + (Plus sign on the numeric keypad) Zoom in.
CTRL- - (Minus sign on the numeric keypad) Zoom out.
Note that the asterisk, plus sign and minus sign on the numeric keyboard are not the 'same' characters from a shortcuts perspective as the equivalent characters on the main keyboard. These shortcuts work only from the numeric keypad.
When used in maps, Clipboard commands operate only on the active layer.
Keyboard Accelerators
Menu and button commands in Windows will often have a keyboard equivalent, which is a single character pressed together with the ALT key. For mnemonic purposes, the character chosen is usually one that occurs in the command caption, ideally the first character in the caption if it is not already in use for another command.
Keyboard accelerator characters are normally underlined to let us know they are available. If they are not underlined due to Windows system option settings, underlining may be turned on by pressing the ALT key once.


In the example above at right, we've pressed the ALT key once to turn on underlining. We can see that the Accept command button has an ALT-e accelerator and the Look Up command button has an ALT-L accelerator. Pressing ALT-L on the keyboard will have the same effect as clicking the Look Up button with the mouse.
Windows can be instructed to automatically show underlines for accelerator keys by checking the Show extra keyboard help in programs box in the Keyboard pane of the Accessibility Options applet in the Windows Control panel.
Hand Positions for Keyboard and Mouse
Intermediate and expert users will often use keyboard shortcuts together with mouse motions. One hand is on the keyboard and one hand on the mouse. Keyboard shortcuts are best arranged for right-handed users.
For editing operations, keep the right hand on the mouse and the left hand on the keyboard. For example, with images the mouse is used to select regions of pixels and to click on different windows or to choose layers. The left hand is used to make CTRL-X, CTRL-C and CTRL-V commands to cut, copy and paste to and from the Clipboard. Touch typists will often do a one-handed CTRL-C with the little finger on the CTRL key and the forefinger on the C or V. A CTRL-Z is immediately at hand if an editing operation needs to be undone.
Navigation also goes faster with this arrangement. Use the CTRL key to hot scroll by CTRL-right-clicking with the mouse into the active window to scroll it in the desired direction. When the mouse is in Zoom mode, the ALT key is used to reverse Zoom from Zoom in to Zoom out.
Keyboard Shortcuts for Panes
In addition to the standard Windows keyboard shortcuts, Manifold provides a set of keyboard shortcuts for opening/closing panes and for importing new components.
|
ALT-SHIFT-(letter) |
Show or hide a pane. Press the keyboard combination at any time to open or close a particular pane. The letter used is usually a mnemonic for the first letter of the name of the pane as shown below. |
|
P |
Project pane. |
|
C |
Control points. |
|
F |
Functions |
|
G |
GPS Console |
|
H |
History |
|
I |
Info |
|
L |
Layers |
|
N |
Notes |
|
S |
Selections |
|
A |
Sampler |
|
T |
Tool Properties |
|
B |
ViewBots |
|
V |
Views |
|
K |
Call Stack (only when the Debugger is available). |
|
R |
Variables (only when the Debugger is available). |
|
E |
Watches (only when the Debugger is available). |
|
W |
World |
ALT-SHIFT keyboard shortcuts are very important for turning panes off and on when working with systems that have small screens. If your screen display area is limited in size it will be inconvenient to open panes and leave them open because they will cover up too much of the active window. ALT-SHIFT shortcuts will allow you to instantly pop open a pane when needed and to make it vanish when it is not needed.
Keyboard Shortcuts to Import Components
|
CTRL-SHIFT-(letter) |
Import a component into the project. The letter used is usually a mnemonic for the first letter of the name of the component as shown below. |
|
C |
Comments |
|
D |
Drawing |
|
I |
Image |
|
Q |
Query |
|
S |
Script |
|
T |
Table |
|
U |
Surface |
Expert users should learn the keyboard shortcuts and use them. They will really boost efficiency.
Keyboard Properties Shortcut
Clicking ALT - ENTER will open up the View - Properties dialog for the active window.
Keyboard Modifiers with Selection Tools
|
ALT |
When making selections in maps, ALT extends selections to all visible layers. |
|
SHIFT |
Shifts selection to 'open' mode. In drawings select all objects any part of which is within the selection cursor. In images (using Select Touch) the SHIFT key will apply the touch select to all pixels like that one touched even if they are not contiguous. In images, a SHIFT modifier selects invisible pixels as well as regular pixels. In tables, a SHIFT click on a record selects the range of records between the record and other selected records. |
|
CTRL |
No matter what selection mode is actually set, forces use of Invert Selection mode for that operation. When used with Select Touch in drawings or tables, for example, a CTRL click is equivalent to toggling the selection status of an object or record. Holding down the CTRL key while using Select Touch with images will select only that pixel that is touched. This is normally used when zoomed far into the image to select / deselect individual pixels. |
ALT Key in Maps
Selection operations in maps work only on the active layer. To extend the action of these operations to all visible layers, press the ALT key. For example, drawing a selection box in a map will only select objects in the active layer. Holding the ALT key while drawing a selection box will select objects from all visible layers. Pressing Delete deletes selected objects in the active layer only. Pressing ALT-Delete deletes selected objects in all visible layers. Think of ALT as a mnemonic for 'All.'
Keyboard Modifiers with Smart Mouse Selection
'Smart mouse' selection occurs when the mouse is not occupied with any command mode. It is a default selection methodology used to pick out an object for editing in drawings. An object chosen for editing is also called the primary selected object.
|
Click |
Equivalent to Select Touch in Replace mode. Click on an object to select it. All other objects are deselected. Clicking into an empty part of the drawing deselects all objects (with confirmation dialog). |
|
CTRL-ALT-Click |
Select an object for editing. Click on an object to select it as the primary selected object. All other objects are deselected. Clicking into an empty part of the drawing deselects all objects. |
|
CTRL |
Invert the selection state of the object without changing the selection state of any other object. Equivalent to Invert mode. |
|
SHIFT |
Select the object if it is not yet selected. Does not change the selection state of other objects. Equivalent to Add mode. |
Keyboard Modifiers with Paint Bucket Tool
|
ALT |
When used with the Paint Bucket , the ALT key causes the tool to ignore the tolerance setting. This is used to flood the paint bucket throughout the selection. |
|
SHIFT |
Pour color into non-contiguous pixels. |
|
CTRL |
Pour color while preserving the intensity level. Uses the Paint Bucket to colorize . |
Keyboard Modifiers with Tracker Tool
|
TAB |
Jump to nearest snap location, if Snap To is on. |
|
SHIFT |
Close tracker line and show computed ellipsoidal area. |
|
CTRL |
Toggle display between native drawing units and real measurement units (metric or English). |
Bookmark and Breakpoint Keyboard Shortcuts
Bookmarks may be set within any text component (comments, queries or scripts) window. Breakpoints may be set within scripts.
|
Bookmarks | |
|
F8 |
Toggle - Set a bookmark if one is not present. Clear a bookmark if one is already set for this line. |
|
SHIFT-CTRL-F8 |
Go to Previous - Go to the previous bookmark. |
|
CTRL-F8 |
Go to Next - Go to the next bookmark. |
|
Breakpoints | |
|
F9 |
Toggle - Cycle the breakpoint at this line between 'no breakpoint', 'breakpoint set' and 'disabled breakpoint.' |
|
SHIFT-CTRL-F9 |
Go to Previous - Go to the previous breakpoint (includes both disabled and enabled breakpoints). |
|
CTRL-F9 |
Go to Next - Go to the next breakpoint (includes both disabled and enabled breakpoints). |
Keyboard Modifiers for Selection in Tables
|
(mouse click) |
Click on any record handle to select the record in accordance with selection mode currently set (Replace, Add, Subtract, Invert or Intersect). Click on a cell to move the focus to that cell. |
|
SHIFT |
SHIFT-click on a record handle to apply the selection to a range of records. |
|
CTRL |
Equivalent to clicking on a record handle when clicking into a cell. CTRL-click on a cell selects the record in accordance with the selection mode currently set. CTRL-SHIFT-click on a cell selects the range of records. |
Keyboard Zoom Commands during Selection and Editing
When making selections or editing objects (such as inserting areas using the Autocomplete feature) we will often want to zoom in or out in the middle of a selection or editing command. Use the + and - keys on the keyboard to do so. Usually the + and - keys in the numeric keypad are used.
|
+ |
'Plus' key: Zoom in at the current tool position. |
|
- |
'Minus' key: Zoom out at the current tool position. |
The current tool position is the position of the mouse at the time the + or - key is pressed. When editing, using these keys allows us to easily zoom into a desired location, make a few precise clicks and then zoom back out and proceed at the usual scale.
Files Copied from CDs will be Read-only
Compact disks (CDs) are read-only media. All of the files on the Manifold CD have read-only Windows attributes. When these are copied to a location on a hard disk, Windows will copy them as read-only files. To make them writable, we must right click on them, choose Properties and then uncheck the Read-only box.
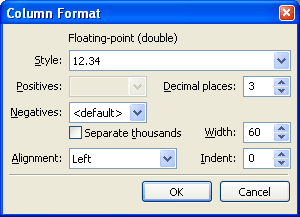
Windows XP
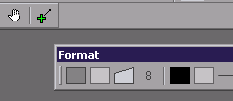
Illustrations in this manual use screen shots based on Windows 2000 and Windows NT. When installed in Windows XP Manifold will automatically configure itself to use Windows XP style for controls, as seen below in a screen shot of the column formatting dialog for table windows.
|
Politica de confidentialitate | Termeni si conditii de utilizare |

Vizualizari: 1662
Importanta: ![]()
Termeni si conditii de utilizare | Contact
© SCRIGROUP 2025 . All rights reserved