| CATEGORII DOCUMENTE |
| Asp | Autocad | C | Dot net | Excel | Fox pro | Html | Java |
| Linux | Mathcad | Photoshop | Php | Sql | Visual studio | Windows | Xml |
The goal of this article is to describe and demonstrate how to build a custom user interface for a custom data flow component in SQL Server 2005 Integration Services. We will follow this process from the design of the user interface functionality through to its use in SSIS designer. Readers should be familiar with Integration Services concepts such as control flow, data flow, and SSIS designer, and with the basic design-time interfaces of data flow components. The code samples in this article use the Visual C# programming language.
There are two user interface elements involved in the configuration of a data flow omponent -SSIS designer, and the component's own editor.
SSIS designer is responsible for managing the lifetime of a data flow component on the diagram surface of the designer. It handles events such as the adding, editing, renaming, and deleting of the diagram shapes that represent components. The designer inherits from the System.ComponentModel.Design.ComponentDesigner class of the .NET Framework, and uses the features of the Visual Studio shell to manage component events. SSIS adds a few enhancements to the default component designer to support the additional requirements of certain types of custom properties in the property grid. The default component designer is not extensible.
The component's editor, or custom user interface, is responsible for managing a single session of editing the component. It usually displays a Windows form and passes information between the form and the component object. Many SSIS components have custom user interfaces to support common configuration scenarios. There is also the Advanced Editor, a generic user interface that can be used in addition to the custom user interface. The Advanced Editor is opened by default when no custom editor is provided. The Advanced Editor has low-level access to all component elements and can be handy for setting rarely-used options on some components; however, it is not so easy to use for defining commonly-used settings of data flow components. A custom user interface greatly increases the usability of a component.
An important step to take before beginning to code the custom user interface for an existing custom data flow component is to link the new user interface to the component that it will be used to edit.
The main class that will be used for editing a data flow component has to meet only one simple requirement: it must implement the IDtsComponentUI interface. Here is the definition of that interface:
|
public interface IDtsComponentUI |
This simple interface has only a few methods:
SSIS Designer needs to know how to associate a data flow component with its user interface. When a component is implemented in managed code, the information on its user interface is contained in the DtsPipelineComponent attribute of the main class that inherits from the PipelineComponent base class. Here is an example of the DtsPipelineComponent attribute that shows the UITypeName property.
|
[DtsPipelineComponent( DisplayName = 'RemoveDuplicatesCS', Description = 'Finds and removes duplicate rows.', IconResource = 'Microsoft.Samples.SqlServer.Dts.RemoveDuplicates.ico', UITypeName = 'Microsoft.Samples.SqlServer.Dts.RemoveDuplicatesUI, RemoveDuplicatesCS, Version=1.0.0.0, Culture=neutral, PublicKeyToken=4383d722ad6993d4', ComponentType = ComponentType.Transform) public class RemoveDuplicates : PipelineComponent |
After providing the UITypeName for a custom user interface, the data flow component needs to be recompiled. SSIS Designer knows how to extract this information from the list of available components and use it to instantiate the appropriate editor for each component.
When the custom data flow component and its custom user interface are complete, a few simple steps are required to make the component available in SSIS designer. These steps assume that Business Intelligence Development Studio is installed on the computer.
When the component is implemented
in managed code, it must be copied into the %ProgramFiles%Microsoft
|
gacutil /i <our_managed_component_assembly_name>.dll. |
After the component and its user interface have been installed by using the preceding instructions, they are almost ready to be used in SSIS Designer. First, they must be added to the Toolbox. To do this, in Business Intelligence Development Studio, right-click on the Toolbox, select Choose Items, select the SSIS Data Flow Items tab, and check the newly-installed component in the list. After closing the dialog box, the component should appear in the Toolbox and can be dropped on the diagram surface. The custom user interface appears when you edit the component, either by double-clicking the component in SSIS Designer, or by right-clicking on the component and selecting Edit. If you did not assign a custom user interface by using the UITypeName property of the DtsPipelineComponent attribute, the Advanced Editor appears as the default editor.
Now that we have covered the steps for associating a custom data flow component with its custom user interface and installing the assemblies, we can focus on the implementation details of a component editor. For this purpose, we will build a custom user interface for the Remove Duplicates sample that is available for installation with SQL Server 2005. The sample is written in C# and can be found in the Integration Services samples folder at <system drive>:Program FilesMicrosoft SQL Server90SamplesIntegration ServicesProgramming SamplesData FlowRemoveDuplicates Component SampleCS.
The Remove Duplicates programming sample is a transformation with asynchronous outputs that splits its input into two outputs. One output contains unique rows, and the other output contains duplicate rows. Thus the transformation expects one input and two outputs. The input columns define the fields that serve as the criteria for comparison, and only those columns are passed through to the output. The output columns corresponding to these input columns are defined by calls to the SetUsageType method.
Let's begin by taking a look at the class that implements the IDtsComponentUI interface.
In this example, we have chosen to implement the interface in an abstract base class named DataFlowComponentUI, because most of this class can be reused for many different data flow components. The only method whose implementation varies for this example is the Edit method, which calls an abstract EditImpl method that needs to be overridden in the derived class. The EditImpl method is responsible for invoking the user interface form.
This main user interface class serves as a bridge between the user interface form, the data flow component itself (represented by the IDtsComponentMetadata90 and IDtsDesigntimeComponent90 object references), and various design-time services (such as the IErrorCollection service).
The first method of the IDtsComponentUI interface that SSIS Designer invokes is the Initialize method.
|
// Called before Edit, New and Delete to pass in the necessary parameters. void IDtsComponentUI.Initialize(Microsoft.SqlServer.Dts.Pipeline.Wrapper.IDTSComponentMetaData90 dtsComponentMetadata, IServiceProvider serviceProvider) |
The implementation of the Initialize method caches the arguments passed in to it, and then attempts to retrieve the IErrorCollectionService from the service provider. If this service cannot be obtained, the designer is in an inconsistent state, and the editing session is terminated by throwing an ApplicationException.
The most important method in this class is the implementation of the Edit method.
|
// Called to invoke the UI. bool IDtsComponentUI.Edit(System.Windows.Forms.IWin32Window parentWindow, Microsoft.SqlServer.Dts.Runtime.Variables variables, Microsoft.SqlServer.Dts.Runtime.Connections connections) catch (Exception ex) |
Before doing anything else, the Edit method caches a reference to the design-time interface (IDtsDesigntimeComponent90) of the data flow component by calling the Instantiate method of the IDtsComponentMetadata90 object. From this point forward, we manipulate the component's metadata (by setting properties and adding and deleting columns, and so forth) by using this design-time instance rather than by modifying the component metadata directly. This approach ensures that the appropriate notifications are propagated through the data flow.
The next step is to determine all available input columns by calling the GetVirtualInput method of the component's single input. This method gathers the list of available columns from all upstream components in the data flow. Because GetVirtualInput collects information about all columns available to the current component, it is expensive to call; therefore, our example calls the method one time and then caches the virtual input for possible reuse.
After getting the list of available input columns, the example caches the collections of variables and connections for the package. These collections are passed in as arguments to the Edit method. Although this example does not use these collections, the abstract base class should make them available.
Finally, this implementation of the Edit method calls the EditImpl abstract method mentioned earlier, which we must override in a derived class that contains the detailed implementation of how to edit the component. The custom user interface does not commit any changes to the metadata of the data flow component until the EditImpl method returns true, which occurs in the example when the user clicks OK on the Windows form on which the component is edited.
The example also uses methods named ClearErrors and ReportErrors in the Edit method. The SSIS data flow engine raises events to inform its clients of errors, warnings, and informational messages. SSIS Designer collects these events, and a custom data flow component can obtain event information by using the IErrorCollectionService reference cached in the Initialize method. The ClearErrors method flushes all accumulated events. The ReportErrors method gathers all the errors and warnings generated by the sample component into a single message and displays that message in a message box.
The remaining methods of the IDtsComponentUI interface (New, Delete and Help) are not implemented in the example component.
The DataFlowComponentUI base class also contains several properties that expose the services cached during the Initialize method, and some helper methods which can be used by derived classes.
The same file (DataFlowComponentUI.cs) contains the definition of the DataFlowElement class. This class is responsible for passing data flow objects such as input and output columns between the custom user interface form and the class (derived from DataFlowComponentUI) that manages the user interface. DataFlowElement contains the name of the object displayed in the user interface and a reference to that object as a tag. It implements ToString and GetHashCode methods so that it can easily be used in certain controls and collections.
The RemoveDuplicatesUI class is derived from the DataFlowComponentUI base class. It manages the changes initiated by the user in the custom editor and translates them into the appropriate interactions with the RemoveDuplicates component.
First let's examine the implementation of the EditImpl method, which invokes the custom editor form.
|
protected override bool EditImpl(System.Windows.Forms.IWin32Window parentControl) else } |
The EditImpl method instantiates the form, calls the HookupEvents method to capture and implement the results of the user's editing actions on the form, and then displays the form. When the user closes the form, the EditImpl returns true if the user clicked OK, or false otherwise.
Before examining the details of the custom editor, let's take a look at the events that we are capturing from the form. This programming approach introduces a level of indirection in communication between the form and the RemoveDuplicatesUI class. This indirection provides several benefits. The form itself does not know anything about the data flow component, so we can easily replace this form with another form that publishes the same events. On the other hand, the same form could serve more than one data flow component, each of which might process its events differently. This communication between modules can also be refined by modifying appropriate EventArgs classes.
The RemoveDuplicatesUI class subscribes to the following events of the custom editor form in the HookupEvents method:
|
private void HookupEvents(RemoveDuplicatesForm form) |
The following code sample shows how handlers for these events are implemented:
|
void form_GetAvailableColumns(object sender, AvailableColumnsArgs args) } catch (Exception ex) |
In the GetAvailableColumns handler function, we iterate through the collection of virtual input columns from the previously cached virtual input and use them to fill the array of SelectedColumns in the SelectedInputOutputColumnsArgs variable. For the sake of simplicity, the example assumes that the available columns have unique names, and skips the processing of duplicate virtual input column names. However unique names may not be the case when more than one upstream component has added output columns to the data flow. These columns may have overlapping names, and the developer can handle those by prefixing the duplicate names with the name of the component that created the columns.
|
void form_GetSelectedInputOutputColumns(object sender, SelectedInputOutputColumnsArgs args) } catch (Exception ex) |
To get selected input and output columns, the example first gets the outputs by using the GetDistinctOrDuplicateOutput method. The sample then iterates through the output column collection of each output to build collections of output columns indexed by LineageID, by using GetOutputColumnsDictionary. The LineageIDs of the columns are stored in a custom property named InputColumnLineageId on each column.
After building the output column collections, the example iterates through the input column collection of the single input, and looks for the corresponding output columns in the collections described in the preceding paragraph, by using the GetMappedOutputColumnElement helper function. This set of three columns-input column. distinct, and duplicate output columns-forms a single item in the array that this method returns to the form.
|
void form_SetInputOutputColumns(object sender, SetInputOutputColumnsArgs args) int lineageId = virtualInputColumn.LineageID; IDTSOutput90 distinctOutput = this.GetDistinctOrDuplicateOutput(true); IDTSOutput90 duplicateOutput = this.GetDistinctOrDuplicateOutput(false); IDTSInputColumn90 inputColumn = this.DesigntimeComponent.SetUsageType(input.ID, this.VirtualInput, lineageId, DTSUsageType.UT_READONLY); args.GeneratedColumns.InputColumn = new DataFlowElement(inputColumn.Name, inputColumn); args.GeneratedColumns.DistinctColumn = this.FindMappedOutputColumnElement(lineageId, distinctOutput); args.GeneratedColumns.DuplicateColumn = this.FindMappedOutputColumnElement(lineageId, duplicateOutput); } catch (Exception ex) |
When the SetInputOutputColumns method is called after the user selects an input column from the list of available columns, the example first gets a reference to the input, then gets a reference to the virtual input column from the tag passed in by the form. The most important piece of this event handler is the call to the SetUsageType method, where we instruct the component that it should use the selected virtual input column to generate corresponding input and output columns. After the code obtains the newly generated input column returned from SetUsageType, it uses the LineageID of the input column to locate the corresponding output columns in the collections of the distinct and duplicate outputs. These newly generated columns are returned to the form to be displayed there.
|
void form_DeleteInputOutputColumns(object sender, SetInputOutputColumnsArgs args) int lineageId = virtualInputColumn.LineageID; this.DesigntimeComponent.SetUsageType(input.ID, this.VirtualInput, lineageId, DTSUsageType.UT_IGNORED); } catch (Exception ex) |
The implementation of the DeleteInputOutputColumns event handler function is similar to the implementation for SetInputOutputColumns. The difference is in the usage type argument of the SetUsageType method, which is set to UT_IGNORED. The component interprets this value as a request to remove input and output columns associated with the given LineageID.
|
void form_ChangeOutputColumnName(object sender, ChangeOutputColumnNameArgs args) outputColumn.Name = args.OutputColumn.Name; } catch (Exception ex) |
The ChangeOutputColumnName event handler function does only one thing, which is to change the name of the referenced output column. The column is passed as the tag of a DataFlowElement. The example casts the object back to its original type, and then assigns a new name, which was also passed in as part of the event arguments.
Now let's look at some of the helper functions used by the event handler functions discussed in the preceding paragraphs:
|
private IDTSOutput90 GetDistinctOrDuplicateOutput(bool isDistinctFlag) } } if (returnOutput != null) else |
The GetDistinctOrDuplicateOutput method returns the output that contains either the distinct or the duplicate rows, based on the value of the isDistinctFlag method argument and the value of the IsDistinctOutput custom property of each output.
|
private DataFlowElement GetMappedOutputColumnElement(int lineageID, Dictionary<int, IDTSOutputColumn90> outputColumnsByLineageID) else |
The GetMappedOutputColumnElement method looks for an output column in the collection that is associated with the LineageID and that was also passed in the method arguments. If the column is found, it is wrapped as a DataFlowElement.
|
private Dictionary<int, IDTSOutputColumn90> GetOutputColumnsDictionary(IDTSOutput90 output) else } } return outputColumnByLineageID; |
The GetOutputColumnsDictionary method builds a hash table of all columns in the referenced output that are indexed by the LineageID stored in the column's InputColumnLineageId custom property.
|
private DataFlowElement FindMappedOutputColumnElement(int targetLineageID, IDTSOutput90 output) } } return retOutputElement; |
The FindMappedOutputColumnElement method iterates through the output column collection of the referenced output and locates the column designated by the provided LineageID in its InputColumnLineageId custom property.
Finally, let's take a look at the class that implements the custom editor form itself. The form contains two grids. The upper grid contains all the available input columns, together with checkboxes to select the columns. The lower grid displays the columns that have been selected. The lower grid also displays the output columns from each of the two outputs that are mapped to each input column. The output column names can be edited in the lower grid.
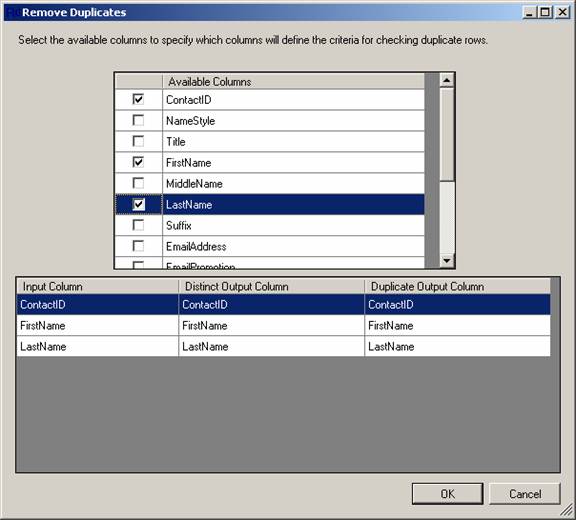
The form overrides the OnLoad method to load available columns and previously selected columns into the appropriate grids:
|
protected override void OnLoad(EventArgs e) finally |
The LoadAvailableColumns method calls the GetAvailableColumns method to get the list of available columns from the component.
The call to the event handler function delegate, GetAvailableColumns, is made asynchronously by using BeginInvoke, so that the call will be executed on a separate thread and eventual callbacks (errors or warnings fired by the data flow threads) will not disturb processing in the user interface. The use of asynchronous calls also minimizes switching between the single threaded apartment (the user interface thread) and the multi-threaded apartment (the data flow threads), because switching can significantly degrade performance. Calls to other event handler functions are processed in the same manner.
|
private void LoadAvailableColumns() } } |
The LoadSelectedColumns method behaves similarly to the LoadAvailableColumns method. It calls the GetSelectedInputOutputColumns method to retrieve the selected columns and populate the selected columns grid.
|
private void LoadSelectedColumns() } } |
The form handles a few additional grid events:
|
// Committing change in the checkbox columns so that CellValueChanged will be triggered immediately. private void dataGridViewAvailableColumns_CurrentCellDirtyStateChanged(object sender, EventArgs e) |
The CurrentCellDirtyStateChanged method is used to commit the changes in the check box cells so that the component can act on those changes immediately.
|
private void dataGridViewAvailableColumns_CellValueChanged(object sender, DataGridViewCellEventArgs e) if (e.ColumnIndex == this.gridColumnCheckbox.Index && e.RowIndex >= 0) else } |
The CellValueChanged method on the available columns grid is used to process changes in the checkbox cells. If a checkbox is selected, the corresponding column is added to the lower grid and the SetInputOutputColumns event is fired to update the component. If a checkbox is deselected, the corresponding column is deleted from the lower grid and the DeleteInputOutputColumns method is called to perform cleanup.
|
private void dataGridViewSelectedColumns_CellEndEdit(object sender, DataGridViewCellEventArgs e) if ((e.ColumnIndex == this.gridcolumnDistinctOutputColumn.Index || e.ColumnIndex == this.gridcolumnDuplicateOutputColumn.Index) && e.RowIndex >= 0) } |
The CellEndEdit method is used to process changes in the cells of the lower grid that contain the names of output columns. This method sends the new value from the cell, together with the tag of the output column, to the RemoveDuplicatesUI class to implement the name change on that column.
The CellValueChanged event handler calls the SetColumns and DeleteColumn functions, which are implemented as follows:
|
private void SetColumns(SetInputOutputColumnsArgs args) } private void DeleteColumns(SetInputOutputColumnsArgs args) } } } |
A few additional helper functions that assist in managing the grid cells are not discussed here.
In this article, we have used the Remove Duplicates programming sample as an example to demonstrate how to build a custom user interface for an Integration Services data flow component. The techniques, the best practices, and even much of the code shown here can be reused in other custom data flow components.
|
Politica de confidentialitate | Termeni si conditii de utilizare |

Vizualizari: 1811
Importanta: ![]()
Termeni si conditii de utilizare | Contact
© SCRIGROUP 2025 . All rights reserved