| CATEGORII DOCUMENTE |
| Asp | Autocad | C | Dot net | Excel | Fox pro | Html | Java |
| Linux | Mathcad | Photoshop | Php | Sql | Visual studio | Windows | Xml |
After deploying Microsoft Exchange Server 2003 in a cluster, proper management of that cluster ensures high availability of your servers that are running Exchange. One important part of managing your Exchange Server clusters is the customization of your cluster configuration, including management of your Exchange Virtual Servers and cluster nodes. For example, you may want to add functionality to the default cluster configuration, such as enabling Internet Message Access Protocol version 4 (IMAP4) or Post Office Protocol version 3 (POP3) access for your users. Other important management tasks include monitoring the performance of Exchange 2003 clusters, troubleshooting problems when they occur, and perhaps rebuilding a server or restoring your databases from backup.
Before you start managing your Exchange cluster, you may want to review what constitutes an Exchange Virtual Server and its associated Exchange resources. You may also want to become more familiar with Cluster Administrator-the primary tool used to configure and manage clusters.
Note
Before performing the cluster administration tasks outlined in
this chapter, you must be familiar with the clustering concepts described in
'Checklist: Preparation for installing a cluster' (https://go.microsoft.com/fwlink/?LinkId=16302)
in the Microsoft Windows ServerT 2003 Enterprise Edition Help and in the Microsoft Windows Server 2003 Resource Kit (https://go.microsoft.com/fwlink/?LinkID=18860).
You should also be familiar with 'Server Clusters' in the book Planning an Exchange Server 2003 Organization and with Chapter 8, 'Deploying Exchange in a Cluster,' in the book Microsoft Exchange Server 2003 Deployment Guide. Both of these books are available from the Exchange Technical Library (www.microsoft.com/exchange/library).
Exchange clusters consist of physical computers (nodes) and logical Exchange Virtual Servers (see Figure 8.1). Exchange Virtual Servers are Microsoft Windows cluster groups with Exchange resources (instances of Exchange services). Exchange Virtual Servers are the basic units of failover for your cluster.
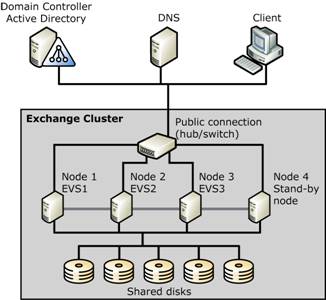
Figure 8.1 Sample Exchange 2003 cluster with four physical nodes and three logical Exchange Virtual Servers
Note
For additional background information about Exchange Virtual
Servers and Exchange resources, see Chapter 5, 'Planning for
Reliability,' in the book Planning a Microsoft
Exchange 2003 Messaging System (www.microsoft.com/exchange/library).
For each Exchange Virtual Server in your cluster, there are associated Exchange resources. Table 8.1 describes each of these cluster resources, including information about when and how each resource is created.
Table 8.1 Cluster resource descriptions
|
Resource |
Description |
When created |
|
IP address |
Manages the Internet Protocol (IP) address resources in a cluster. |
Created manually during initial cluster deployment. |
|
Network name |
Provides an alternate computer name to identify your Exchange cluster. |
Created manually during initial cluster deployment. |
|
Physical disk |
Manages a disk that is on a cluster storage device. |
Created manually during initial cluster deployment. |
|
Exchange System Attendant |
Controls the creation and deletion of all resources in the Exchange Virtual Server. |
Created automatically during initial cluster deployment. |
|
Exchange store |
Provides mailbox and public folder storage for Exchange Server 2003. |
Created automatically after the creation of the Exchange System Attendant resource. |
|
SMTP |
Handles the relay and delivery of e-mail. |
Created automatically after the creation of the Exchange System Attendant resource. |
|
IMAP4 |
Optional component that provides access to e-mail for IMAP4 clients. |
Added manually after initial cluster deployment. |
|
POP3 |
Optional component that provides access to e-mail for POP3 clients. |
Added manually after initial cluster deployment. |
|
HTTP |
Provides access to an Exchange mailbox and public folders through HTTP (for example, using Outlook Web Access). |
Created automatically after the creation of the Exchange System Attendant resource. |
|
Exchange Microsoft Search Instance |
Provides content indexing for the Exchange Virtual Server. |
Created automatically after the creation of the Exchange System Attendant resource. |
|
Message transfer agent (MTA) |
Handles communication with X.400 systems and interoperation with Exchange Server 5.5. There can be only one MTA per cluster. The MTA is created on the first Exchange Virtual Server. All additional Exchange Virtual Servers are dependent on this MTA. |
Created automatically after the creation of the Exchange System Attendant resource. |
|
Routing service |
Builds the link state tables. |
Created automatically after the creation of the Exchange System Attendant resource. |
Figure 8.2 shows the dependency between Exchange 2003 resources. (A resource dependency indicates what other Exchange resources must be brought online before a specific Exchange resource can be brought online.) In the figure, the arrows point to the resource or resources on which a specific resource depends. For example, the arrow from Simple Mail Transfer Protocol (SMTP) points to Exchange System Attendant. Thus, SMTP is dependent on Exchange System Attendant. Similarly, Exchange System Attendant has one arrow that points to the network name and one that points to the physical disk. This means that Exchange System Attendant is dependent on both of these resources.
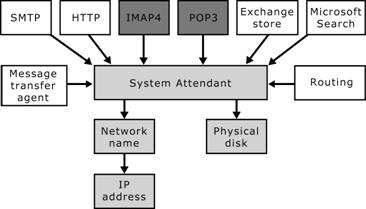
Figure 8.2 Exchange 2003 resources and dependencies
As noted earlier, Exchange Virtual Servers are the basic units of failover for your cluster. However, failover occurs differently in active/passive clusters and active/active clusters.
In an active/passive cluster, such as the 3-active/1-passive cluster shown in Figure 8.3, there are three Exchange Virtual Servers: EVS1, EVS2, and EVS3. This configuration can handle a single node failure at a time and still maintain 100 percent availability after a failure occurs. That is, if Node 3 fails, Node 1 still owns EVS1, Node 2 still owns EVS2, and Node 4 takes ownership of EVS3 with all of the storage groups mounted after the failure. However, if a second node fails while Node 3 is still down, the Exchange Virtual Server associated with the second failed node remains in a failed state because there is no stand-by node available for failover.
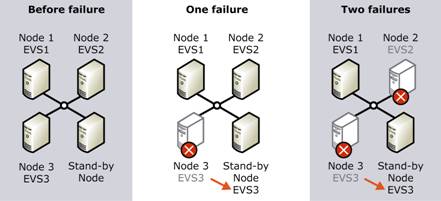
Figure 8.3 Effect of failures on an active/passive cluster
In an active/active cluster (as shown in Figure 8.4), there are only two Exchange Virtual Servers: EVS1 and EVS2. This configuration can handle a single node failure at a time and still maintain 100 percent availability after the failure occurs. That is, if Node 2 fails, Node 1 still owns EVS1, and Node 1 also takes ownership of EVS2 with all of the storage groups mounted after the failover. However, if Node 1 fails while Node 2 is still down, the entire cluster is in a failed state, because no nodes are available for failover.
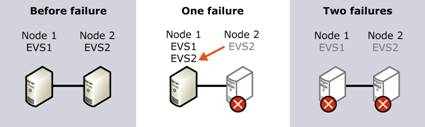
Figure 8.4 Effect of failures on an active/active cluster
As with standard Windows clusters, you perform most of the configuration tasks, as well as the management tasks, associated with Exchange clusters using Cluster Administrator (see Figure 8.5). Cluster Administrator is installed by default on servers that have Cluster Service installed and are running one of the following operating systems: Microsoft Windows Server 2003, Microsoft Windows 2000, or Microsoft Windows NT 4.0 Service Pack 3 (or later).
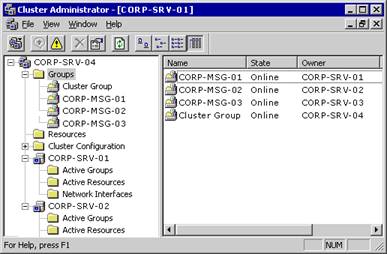
Figure 8.5 Cluster Administrator
You can also use Cluster Administrator to remotely administer a server cluster. Computers that are used to administer a server cluster remotely must be secure and restricted to trusted personnel. For more information, see 'Best practices for securing server clusters' (https://go.microsoft.com/fwlink/?LinkId=18173).
To open Cluster Administrator
On a computer that is running Cluster Administrator, on the Start menu, point to Programs, point to Administrative Tools, and then click Cluster Administrator.
Note
As an alternative to Cluster Administrator, you can administer
clusters from the command line. For information about using the command line to
manage cluster settings, see 'Managing a Server Cluster from the Command
Line' in the Cluster Administrator Help.
When you deploy Exchange Server 2003 in a cluster, you must accept many default settings. For instance, your Exchange cluster consists of Exchange Virtual Servers that are created using the New Group Wizard. However, this wizard does not allow you to configure all of the possible failover options for your Exchange Virtual Servers. Similarly, the New Resource Wizard, which creates an Exchange System Attendant resource for your Exchange Virtual Server, automatically creates the remaining Exchange resources, like the Exchange store and the MTA, using the default settings for each of these additional resources.
Because initial cluster deployment usually involves so many default settings, you may need to customize your cluster configuration settings. This customization is important not only to achieve your cluster objectives, but also to achieve optimal cluster performance. Improper cluster configuration is the source of many of the Exchange-related issues handled by Microsoft Product Support Services. For this reason, carefully follow the recommendations in this chapter to ensure your clusters perform optimally.
Note
If you upgraded your Exchange cluster from Exchange 2000 to
Exchange 2003, you can ignore this section about customizing your cluster
configuration because your configuration settings will not have changed.
There are two levels of settings that you may want to adjust in your Exchange cluster configuration:
Settings for the Exchange Virtual Servers.
Settings for the Exchange resources that are associated with a specific Exchange Virtual Server.
When you create your Exchange Virtual Servers, the default properties that are applied at that time should allow your Exchange cluster to operate adequately. However, you may want to modify these settings to customize your clusters to accommodate your specific Exchange environment.
To change the configuration settings for an Exchange Virtual Server, you use the property settings associated with that Exchange Virtual Server object. These property settings instruct Cluster Service in how to manage your Exchange Virtual Servers.
To access the properties of an Exchange Virtual Server
In Cluster Administrator, in the console tree, right-click the Exchange Virtual Server that you want to configure, and then click Properties.
After you open the Properties dialog box for a specific Exchange Virtual Server, you can use the options on the various tabs to customize the preferred owner, failover, and failback settings.
During the creation of an Exchange Virtual Server, you have the option of defining a list of preferred cluster nodes or preferred owners for that server. Cluster Service uses this list of preferred owners when assigning the Exchange Virtual Server to a node. Cluster Service first tries to assign the Exchange Virtual Server to the first node in the list. If that node is unavailable, Cluster Service tries the next node in the list. If that node is unavailable, Cluster Service continues down the list, until it can assign the Exchange Virtual Server to a node. If Cluster Service cannot find an available node in the preferred owners list, it tries to fail over to the other available nodes in the cluster that have Exchange installed.
By default, you do not have to specify any preferred owners. If you do not specify owners, Cluster Service assigns an Exchange Virtual Server to the next available node that has Exchange installed.
However, it is recommended that you specify preferred owners if you have a cluster that hosts multiple applications. In this scenario, the first nodes in the list should be those nodes whose resources are best able to handle any existing applications on those nodes, and the Exchange Virtual Server for which Cluster Service is trying to find a node.
The preferred owners list is also important if you configure your Exchange Virtual Server to fail back automatically. With automatic failback enabled, an Exchange Virtual Server that is trying to come back online attempts to fail back to the first node in the preferred owners list. Again, this first node should be the node that is best able to accommodate the Exchange Virtual Server. If the Exchange Virtual Server is unable to fail back to any of the nodes in the list, the server will not come online, and the mailboxes on that server will not be available for your users.
When setting the preferred owners for your Exchange Virtual Servers, follow the rules outlined in Table 8.2.
Table 8.2 Rules for setting the preferred owners for an Exchange Virtual Server
|
Setting |
Rule |
|
Specifying a single node as the preferred owner for each Exchange Virtual Server |
You should assign a different node to each server. For example, the 4-node/3 Exchange Virtual Server example, shown earlier in Figure 8.1, could have the following preferred owners: EVS1 to Node 1 EVS2 to Node 2 EVS3 to Node 3 |
|
Specifying a list of nodes as the preferred owners for each Exchange Virtual Server |
You should ensure that the first node that is listed for one Exchange Virtual Server is not listed as the first node for any other Exchange Virtual server. For example, the 4-node/3 Exchange Virtual Server example, shown earlier in Figure 8.1, could have the following preferred owner lists: EVS1 to Node 1, Node 2, and Node 3 EVS2 to Node 2, Node 3, and Node 1 EVS3 to Node 3, Node 1, and Node 2 |
To specify a list of preferred owners
On the General tab (see Figure 8.6) in the Exchange Virtual Server's Properties dialog box, under Preferred owners, click Modify to specify the nodes that are to be preferred owners for this server.
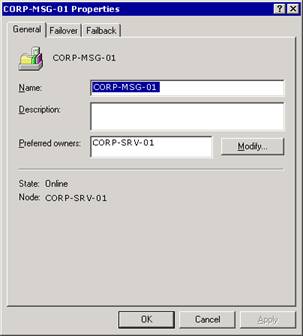
Figure 8.6 The General tab in the Properties dialog box for an Exchange Virtual Server
When configuring how Cluster Service manages failovers, consider the Threshold and Period options on the Failover tab (see Figure 8.7). The Threshold setting determines the number of times that the Exchange Virtual Server can fail over during the failover Period. If the actual number of failovers exceeds the threshold during the failover period, the Exchange Virtual Server may be in a failed state, and Cluster Service will not bring it online. The default and recommended settings for these failover options are to have Exchange fail over 10 times in a 6‑hour period.
To specify the failover options for an Exchange Virtual Server
On the Failover tab (see Figure 8.7) in the Exchange Virtual Server's Properties dialog box, type a value for the Threshold and Period options.

Figure 8.7 Failover tab in the Properties dialog box for an Exchange Virtual Server
The failover options that you set for your Exchange Virtual Servers are only one factor that affects the speed at which an Exchange Server 2003 cluster fails over. In addition to those settings, many other factors can influence failover rates. Table 8.3 lists these additional factors. By understanding these factors, you should be able to configure your Exchange clusters for optimal failover.
Table 8.3 Factors that affect failover performance of Exchange 2003 clusters
|
Factor |
Description |
|
State of the Exchange store |
The state of the Exchange database and logs at the time of startup or shutdown affects failover performance. For example, if Exchange databases were shut down abruptly, there may be a large number of log files to roll through before starting the Exchange databases on the new Exchange Virtual Server. |
|
Number of storage groups and databases on your servers |
In general, the greater the number of Exchange databases on your Exchange Virtual Server, the longer it takes to move resources to the new Exchange Virtual Server. |
|
Number of service connections into the Exchange store |
The Exchange store performs cleanup routines before it releases and allows failover to occur. An unloaded server that takes 100 seconds to fail over takes 120 seconds to fail over when that server has 3,000 simultaneous Microsoft Office Outlook Web Access or Microsoft Outlook connections. |
|
Size of the SMTP queue |
If the SMTP queue size is greater than 1,000 messages, the time to fail over from one cluster node to another can be significant. You can modify this setting by creating and configuring the SMTP Max Handle Threshold registry key value: HKEY_LOCAL_MACHINESystemCurrentControlSetServicesSMTPSVC For more information about creating and configuring this registry key, see the procedure following this table. |
To add the MsgHandleThreshold registry key value
Start Registry Editor.
In the console tree, navigate to the following registry key:
HKEY_LOCAL_MACHINESystemCurrentControlSetServices
SMTPSVC
In the console tree, right-click SMTPSVC, point to New, and then click Key.
For the key name, type Queuing.
Right-click Queuing, point to New, and then click DWORD Value.
In the details pane, type MsgHandleThreshold for the registry key value.
Right-click MsgHandleThreshold and click Modify.
Under Base, click Decimal.
Enter a value based on the following:
To configure your cluster for optimum failover performance, set the value to 1,000.
For optimum run-state performance, set the value to 10,000.
Used in conjunction with the Failover tab, the Failback tab (see Figure 8.8) helps define what happens during a failover. On this tab, you have the option of preventing failback from occurring automatically (the default), or allowing failback to occur automatically.
Preventing Failback If you do not allow an Exchange Virtual Server to fail back, an administrator must intervene and manually move the server back to the original, preferred node.
This may be your preferred setting because it allows you to control when the failback occurs. For example, you may want to select Prevent failback if you want to take time to troubleshoot or run diagnostics on the failed node before allowing the node to take ownership of the Exchange Virtual Server again.
You can also use this setting to minimize downtime for users. For example, consider a scenario where a failover that occurs at 3:00 P.M. causes EVS1 to move from Node 1 to Node 4 (the stand-by node). By preventing failback, you can wait until the end of the work day to manually move EVS1 back to Node 1, and users do not have to experience downtime waiting for the server to come back online after the move.
Allowing Failback By allowing an Exchange Virtual Server to fail back to the preferred node automatically, you can also specify when this failback should happen: either immediately or during a specified time interval. This is the preferred setting if you want to have Cluster Service manage the cluster without any manual administrator intervention.
To specify the failback options for an Exchange Virtual Server
On the Failback tab (see Figure 8.8) in the Exchange Virtual Server's Properties dialog box, select the failback options for the server.
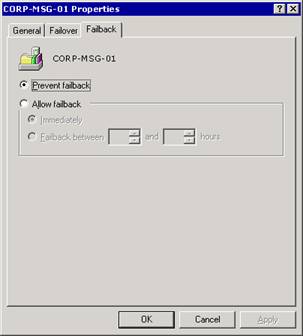
Figure 8.8 Failback tab in the Properties dialog box for an Exchange Virtual Server
Like the configuration settings for your Exchange Virtual Servers, the default configuration settings for the Exchange resources (instances of Exchange services) that are associated with each server should allow your cluster to work adequately. However, there may be specific settings that you want to adjust, based upon your Exchange environment.
For each Exchange Virtual Server, you can see its associated Exchange resources in the details pane of Cluster Administrator (see Figure 8.9). In Figure 8.9, the CORP-MSG-O1 server has all of the default Exchange resources. Because the CORP-MSG-01 server is the first Exchange Virtual Server in this cluster, this server also has an MTA resource.
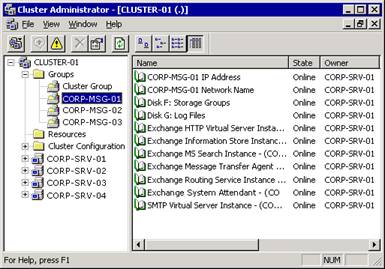
Figure 8.9 Exchange resources for the CORP-MSG-01 Exchange Virtual Server
To change the configuration for an Exchange cluster resource, you use the property settings that are associated with the resource. These property settings instruct Cluster Service in how to manage the resource.
To access the properties of an Exchange cluster resource
In Cluster Administrator, in the console tree, click the Exchange Virtual Server that contains the resource that you want to configure.
In the details pane, right-click the resource that you want to configure, and then click Properties.
After you open the Properties dialog box for a specific Exchange resource, you can use the options on the various tabs to customize resource settings, including possible owners options, resource dependency options, and restart options.
You can specify which nodes are capable of running an Exchange resource. In general, you should specify all nodes in the cluster as possible owners for a resource. This enables failover for that resource.
However, you can specify a single node as a possible owner. Even though having a single node as a possible owner disables failover for the specified Exchange resource, you still may want to specify a single owner if:
The other nodes do not have the ability to handle the resource.
Maintaining performance is more important than keeping the resource available.
You want to control Exchange Virtual Server failover scenarios effectively.
The nodes that you list as possible owners of a resource limit where the Exchange Virtual Server can run. If all of the resources on an Exchange Virtual Server have the same possible owners, the server can run on any of the listed nodes. If one of the resources fails to list a node, the Exchange Virtual Server cannot run on that node, even if all of the remaining resources list the node as a possible owner.
To specify the possible owners for an Exchange resource
On the General tab (see Figure 8.10) in the resource's Properties dialog box, under Possible owners, click Modify, and then specify the nodes that you want to be possible owners for this resource.
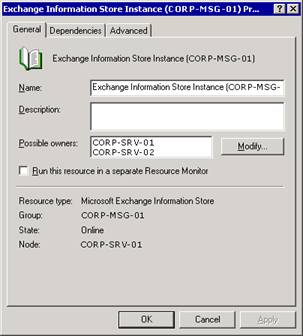
Figure 8.10 General tab in the Properties dialog box for the Exchange Information Store Instance resource
By default, an Exchange resource runs in the same resource monitor as the other Exchange resources that are associated with an Exchange Virtual Server. Although it is not recommended, you may want to change this default setting on the General tab and run an Exchange resource in a separate resource monitor when you troubleshoot this cluster resource. For more information about the preferred ways of troubleshooting cluster resources, search for 'troubleshoot cluster resources' in the Microsoft Product Support Knowledge Base (https://go.microsoft.com/fwlink/?LinkId=18175).
To run an Exchange resource in a separate resource monitor
On the General tab in the resource's Properties dialog box, select Run this resource in a separate Resource Monitor.
Before an Exchange resource can be brought online, there are often other Exchange resources that must be brought online before it. This requirement is called a resource dependency.
The Resource dependencies list on a specific Exchange resource object lists the other resources that must be brought online before this resource can be brought online. Table 8.4 lists the Exchange 2003 cluster resources and their default dependencies.
Note
For a visual representation of these dependencies, see
Figure 8.2 earlier in this chapter.
Table 8.4 Exchange 2003 default resource dependencies
|
Resource |
Default dependency |
|
System Attendant |
Network name resource and shared disk resources |
|
Exchange store |
Exchange System Attendant |
|
SMTP |
Exchange System Attendant |
|
IMAP4 |
Exchange System Attendant |
|
POP3 |
Exchange System Attendant |
|
HTTP |
Exchange System Attendant |
|
Exchange Microsoft Search Instance |
Exchange System Attendant |
|
Resource |
Default dependency |
|
MTA |
Exchange System Attendant |
|
Routing service |
Exchange System Attendant |
Note
Other than to add disk resource dependencies, altering
dependencies is not recommended because it can adversely affect your system.
If you are adding disk resources to an Exchange Virtual Server, you must ensure that the Exchange System Attendant resource is dependent on the new disk resource.
To make the Exchange System Attendant dependent on a new disk resource
On the Dependencies tab (see Figure 8.11), in the Exchange System Attendant Properties dialog box, click Modify.
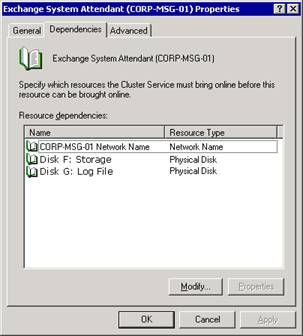
Figure 8.11 Dependencies tab of the Exchange System Attendant Properties dialog box
In the Modify Dependencies dialog box (see Figure 8.12), in the Available resources list, double-click the disk that you want to add, and then click OK.
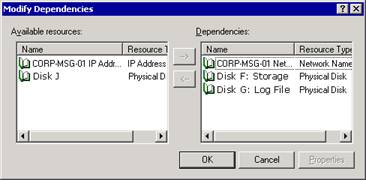
Figure 8.12 Dependencies for the Exchange System Attendant
By default, when a resource experiences a failure, Cluster Service attempts to restart the resource three times before attempting to move the Exchange Virtual Server to another node. It is strongly recommended that you keep this default option because restarting a service may correct a problem that the node is experiencing. Also, restarting a service takes much less time than moving an Exchange Virtual Server to another node.
However, there are additional restart options that you might want to adjust:
How many restarts are allowed before the resource fails You can specify the number of resource failures (Threshold) that can occur in a certain length of time (Period) before the resource causes the associated Exchange Virtual Server to fail over.
Whether a resource failure causes a failover You can specify whether you want a resource failure (as defined by your Threshold and Period settings) to affect the whole group and force Cluster Service to fail over the associated Exchange Virtual Server to a different node. Because it is advisable to have failover occur for all essential resources on your Exchange Virtual Server, you should select the Affect the group check box for those resources. For non-essential resources (for example, POP3) that affect only a few users, you may not want to fail over the server when that resource fails, and you would therefore clear the Affect the group check box for that resource.
To adjust the restart options for an Exchange resource
On the Advanced tab (see Figure 8.13), in the resource's Properties dialog box, select the restart options for the server.
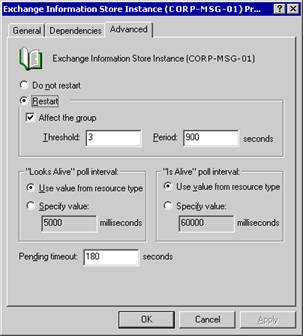
Figure 8.13 Advanced tab for an instance of the Exchange store
Cluster Service polls Exchange resources using a set of Exchange-specific polling intervals that do not need to be changed. Therefore, configuring the polling intervals 'Looks Alive' poll interval and 'Is Alive' poll interval on the Advanced tab in the resource Properties dialog box has no effect on polling intervals.
By default, Cluster Service allows a resource to be in a pending state (online pending or offline pending) for only 180 seconds (3 minutes) before Cluster Service terminates the resource, and the resource enters a failed state. An Exchange 2003 or Windows Server 2003 cluster resource must go offline and come back online during the Pending timeout period. Cluster Service makes an exception to the Pending timeout period for the Microsoft Exchange Information Store instance. Although the Exchange store instance must go offline during that period, the store does not have to come back online within the Pending timeout period. This is because the length of time that the Exchange store takes to restart depends on whether the store shut down properly. If the Exchange store did not shut down properly, the store must roll through log files upon restarting, and the number of log files to be rolled through determines the time it takes to bring the store back online.
Because of the way that the Exchange store writes log files to an Exchange database, the Exchange store for which you might want to increase the Pending timeout period. Increasing the pending time-out period allows the store more time to shut down properly.
To change the length of time that a resource remains pending before failing
On the Advanced tab in the resource's Properties dialog box, type a value (in seconds) for Pending timeout.
Exchange automatically selects the Exchange Virtual Server that is used to connect the protocol resource to the cluster. Exchange makes this selection based upon the information that you enter when you create the various resources:
For an HTTP virtual server instance, Exchange sets the Server Instance option to the Exchange Virtual Server name that you specified in the Group box when creating the Exchange System Attendant resource for that server. For information about creating an Exchange System Attendant resource, see 'Creating an Exchange 2003 System Attendant Resource' in the book Exchange Server 2003 Deployment Guide (www.microsoft.com/exchange/library).
For an IMAP4 or POP3 virtual server instance, Exchange sets the Server Instance option to the Exchange Virtual Server name that you specified in the Group box when you created the IMAP4 or POP3 resource. For information about creating an IMAP4 or POP3 virtual server instance on a cluster, see 'Adding IMAP4 and POP3 Resources' later in this chapter.
To view the Exchange Virtual Server that is used to connect the protocol resource
On the Parameters tab (see Figure 8.14) of the resource's Properties dialog box, look at the Server Instance option.
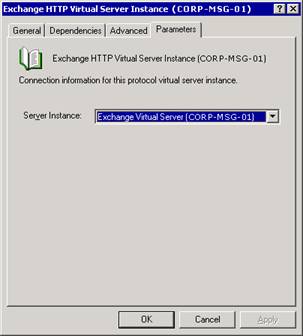
Figure 8.14 Parameters tab of an instance of the Exchange HTTP resource
Note
You should not need to modify the Server
Instance option.
Occasionally, you need to take an Exchange Virtual Server or resource offline. For example, you might need to apply a service pack. In that case, you would bring each Exchange Virtual Server offline, and apply the service pack to the associated node.
You take Exchange Virtual Servers and Exchange resources offline the same way you do with cluster groups and Windows resources. The following procedure describes this standard process.
To take an Exchange Virtual Server or Exchange resource offline
In Cluster Administrator, right-click the Exchange Virtual Server or Exchange resource that you want to take offline, and then click Take Offline.
Important
Taking an Exchange Virtual Server or Exchange resource offline
stops client connectivity to user mailboxes.
Besides being online or offline, Exchange Virtual Servers and Exchange resources can be in other states. Table 8.5 and Table 8.6 list the various states that are possible for Exchange Virtual Servers and Exchange cluster resources, respectively.
Table 8.5 Description of Exchange Virtual Server states
|
Group state |
Description |
|
Failed |
One or more resources in the Exchange Virtual Server cannot be brought online or offline in the allowed time. |
|
Online |
All resources in the Exchange Virtual Server are online. |
|
Offline |
All resources in the Exchange Virtual Server are offline. |
|
Partially Online |
One or more resources in the Exchange Virtual Server are online, and one or more are offline. |
|
Pending |
One or more resources in the Exchange Virtual Server are Online Pending or Offline Pending. |
|
Unknown |
The state of the entire Exchange Virtual Server cannot be determined. |
Table 8.6 Description of Exchange cluster resource states
|
Resource state |
Description |
|
Failed |
The resource cannot be brought online or offline in the allowed time. |
|
Online |
The resource is online. |
|
Offline |
The resource is offline. |
|
Online (Offline) Pending |
The resource is Online Pending or Offline Pending. |
|
Unknown |
The state cannot be determined. |
For improved security, the Windows IMAP4 and POP3 protocol services are no longer enabled by default on servers that are running Windows Server 2003. Similarly, the IMAP4 and POP3 protocol resources are no longer created by default upon creation of an Exchange 2003 virtual server.
If you want to enable either of those protocols, you must do the following:
Enable the Windows IMAP4 or POP3 service on those cluster nodes that will be running the Exchange Virtual Server with the IMAP4 or POP3 resource. To ensure that the service works properly with clustering, you must also configure the service to start manually.
Manually add the respective IMAP4 or POP3 virtual server as a resource to each Exchange Virtual Server on which you want to enable the selected protocol, and then bring the resource online.
The following procedures take you through these steps. For additional information about using IMAP4 and POP3 with Exchange 2003, see Chapter 6, 'Managing Client Access to Exchange.'
To enable a newly created IMAP4 or POP3 resource and configure it to start manually
On the Start menu, point to All Programs, point to Administrative Tools, and then click Services.
In Services, in the console tree, click Services (Local).
In the details pane, right-click Microsoft Exchange IMAP4 or Microsoft Exchange POP3, and then click Properties.
On the General tab, under Startup type, click Manual, and then click Apply.
Under Service status, click Start, and then click OK.
Repeat this procedure on all nodes that will be running the Exchange Virtual Server with IMAP4 or POP3 resources.
To add an IMAP4 or POP3 virtual server as a resource to an Exchange Virtual Server
In Cluster Administrator, right-click the Exchange Virtual Server to which you want to enable IMAP4 or POP3, point to New, and then click Resource.
In the New Resource dialog box, do the following:
a. In Name, type either one of the following names:
If you are adding the IMAP4 resource, type Exchange IMAP4 Virtual Server - (<EVSName>), where EVSName is the name of the selected Exchange Virtual Server.
If you are adding the POP3 resource, type Exchange POP3 Virtual Server - (<EVSName>), where EVSName is the name of the selected Exchange Virtual Server.
b. In the Resource Type drop-down list, click one of the following options:
If you are adding the IMAP4 resource, click Microsoft Exchange IMAP4 Server Instance.
If you are adding the POP3 resource, click Microsoft Exchange POP3 Server Instance.
c. Verify that the Group drop-down list contains the name of the selected Exchange Virtual Server, and then click Next.
In the Possible Owners dialog box (see Figure 8.15), verify that all nodes appear in the Possible owners list, and then click Next.
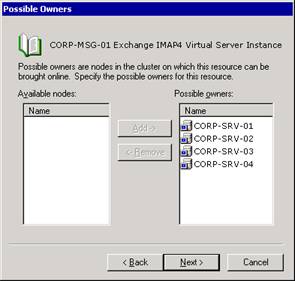
Figure 8.15 Possible Owners dialog box for an IMAP4 Virtual Server Instance
In the Dependencies dialog box, under Available Resources, double-click the <System Attendant Resource Name> to add the System Attendant to the Resource dependencies list, and then click Next.
In the Virtual Server Instance dialog box, in the Server Instance list, select the IMAP4 or POP3 virtual server for the resource, and then click Finish.
In Cluster Administrator, right-click the IMAP4 or POP3 resource, and then click Bring Online.
There are times when you might want to add a node to an existing Exchange cluster. For example, you may decide that you want to upgrade your existing 3-node, 2-active/1-passive configuration to a 4-node, 2-active/2-passive configuration.
To add a node, you must install Exchange 2003 on the node. For information about installing Exchange 2003 on a cluster node, see 'Step 2: Installing Exchange 2003 on Each Node' in the book Exchange Server 2003 Deployment Guide ( www.microsoft.com/exchange/library
After installing Exchange on the new node in the cluster, consider these settings:
Preferred ownership of your Exchange Virtual Servers By default, the new node is not a preferred owner of any Exchange Virtual Server. Therefore, if you want the new node to be listed as a preferred owner you must change the properties on the respective Exchange Virtual Server in Cluster Administrator.
Possible ownership of the Exchange resources in an Exchange Virtual Server By default, the new node that you created is added as a possible owner for all of the resources for the Exchange Virtual Servers in your cluster. If you do not want the new node to be a possible owner for any of the resources in the Exchange Virtual Servers in your cluster, remove that node from the list of possible owners in Cluster Administrator.
You may want to add an Exchange Virtual Server to an Exchange cluster. For example, you may decide that you want to change your 4-node, 2-active/2-passive configuration into a 4-node, 3-active/1-passive configuration. Although you will have one less node available for failover purposes, the advantage of having an additional Exchange Virtual Server is that you can have more users on your Exchange cluster.
The process for adding an Exchange Virtual Server to an existing cluster is the same as that for creating an Exchange Virtual Server when you initially deploy the Exchange cluster. For information about how to create an Exchange Virtual Server during deployment, see 'Step 3: Creating the Exchange Virtual Servers' in the book Exchange Server 2003 Deployment Guide ( www.microsoft.com/exchange/library
While you are performing this procedure, you have the opportunity to configure preferred ownership for the Exchange Virtual Server, as well as possible ownership for the Exchange resources of that Exchange Virtual Server:
Preferred ownership of your Exchange Virtual Servers By default, you do not have to choose a preferred owner when you create a new Exchange Virtual Server. However, if you want to enforce a preferred order in which the Exchange Virtual Server fails over, you can do so. See 'Step 3: Creating the Group to Host the Exchange Virtual Server' in the book Exchange Server 2003 Deployment Guide ( www.microsoft.com/exchange/library
Possible ownership of the Exchange resources in an Exchange Virtual Server When you create an Exchange Virtual Server, the default option is to list all cluster nodes that have Exchange installed as possible owners of the resources. However, you do not have to accept this default setting, and you can customize which nodes can be possible owners for the resources of your new Exchange Virtual Server.
Though it does not happen often, there are times when you may need to remove an Exchange Virtual Server from an Exchange cluster. In particular, you may need to do this if:
You are reconfiguring the cluster from an active/active configuration to an active/passive configuration. That is, you are keeping the same number of nodes in the configuration, but you want one of those nodes to be passive instead of active.
You are planning to remove Exchange 2003 from a cluster. For more information, see 'Removing Exchange 2003 from a Cluster Node' later in this chapter.
Regardless of your reasons for removing an Exchange Virtual Server, you need to consider the requirements shown in Table 8.7 prior to removing that server.
Table 8.7 Requirements for removing an Exchange Virtual Server
|
If the Exchange Virtual Server to be removed |
Then |
|
Owns the message transfer agent (MTA) |
You must remove all other Exchange Virtual Servers prior to removing the Exchange Virtual Server that owns the MTA resource. The first Exchange Virtual Server created in a cluster owns the MTA resource. All other Exchange Virtual Servers in the cluster depend on this resource. Thus, the Exchange Virtual Server that owns the MTA resource cannot be removed first. |
|
Is a routing master of a routing group |
You must make another Exchange Virtual Server the routing master of that group prior to removing the server. |
|
Is the home for the postmaster account |
You must move the postmaster account to another Exchange Virtual Server prior to removing the server. |
|
Is the home for the last public store in a mixed-mode administrative group |
You must move the contents of that public store to a public store on a different Exchange Virtual Server. |
|
Is responsible for running the Recipient Update Service |
You must make another Exchange Virtual Server the owner of the Recipient Update Service. |
|
Is a target bridgehead server for any routing group |
You must designate another server as the bridgehead server prior to removing the Exchange Virtual Server. |
After you have performed any necessary actions listed in Table 8.7 to ensure that the Exchange Virtual Server can be removed, you can then remove that server. The process of removing a single Exchange Virtual Server from a cluster consists of the following five tasks:
Backing up critical data and securing resources hosted by the Exchange Virtual Server.
Note
For information about how to back up Exchange data, see the book Disaster Recovery for Microsoft Exchange 2000 Server (https://go.microsoft.com/fwlink/?LinkID=18350).
Moving all mailboxes and public folder content to another Exchange Virtual Server (as described later in this chapter).
Taking the Exchange System Attendant resource offline (as described later in this chapter).
Removing the Exchange Virtual Server (as described later in this chapter).
Deleting remaining cluster resources (as described later in this chapter).
Important
Deleting components of an Exchange Virtual Server without
removing the entire server can cause interruptions in mail flow. As a result,
it is recommended that you follow all of the steps in the procedure when
removing an Exchange Virtual Server from a cluster.
After backing up data, you must move any mailboxes residing on the Exchange Virtual Server to another server in your Exchange organization. Any mailboxes that are not moved to another server must be deleted. If mailboxes remain on an Exchange Virtual Server, you will not be able to completely delete the Exchange Virtual Server, and the server object remains in the Microsoft Active Directory directory service, even though you succeeded in deleting the Exchange System Attendant resource.
To move mailboxes from one server (source) to another server (target), you use the Exchange Task Wizard. This wizard is available in either Active Directory Users and Computers or Exchange System Manager, as described in the following procedure.
Note
For more information about moving mailboxes, see Chapter 7,
'Managing Mailbox Stores and Public Folder Stores.' For information
about moving a large number of mailboxes, see Microsoft Knowledge Base Article
297393, 'HOWTO: Programmatically Move an Exchange 2000 Mailbox Using
CDOEXM in Visual C++' (https://support.microsoft.com/?kbid=297393).
To move mailboxes from one server to another
In Active Directory Users and Computers, right-click the user object, click Exchange Tasks, and then click Move Mailbox.
-or-
In Exchange System Manager, right-click the mailbox object, click Exchange Tasks, and then click Move Mailbox.
In addition to moving mailboxes, you must move all public folder content from the server prior to removing the server.
To move public folder content from one server to another
In your Internet browser, open the Microsoft Knowledge Base Article 288150, 'XADM: How to Rehome Public Folders in Exchange 2000' (https://support.microsoft.com/?kbid=288150), and follow the instructions.
An Exchange Virtual Server cannot be removed while any of its resources are online. Taking the Exchange System Attendant resource offline takes all of a server's dependent resources offline.
To take the Exchange System Attendant resource offline
In Cluster Administrator, select the Exchange Virtual Server that you want to remove.
In the details pane, right-click System Attendant resource, and then click Take Offline.
In Exchange 2000 Server, you removed an Exchange Virtual Server by deleting the Exchange System Attendant resource. However, this is not how you remove an Exchange Virtual Server in Exchange 2003.
To remove an Exchange Virtual Server in Exchange 2003, you must use the appropriate shortcut menu option in Cluster Administrator. Trying to remove the server by just deleting the Exchange System Attendant resource does not work. If you delete the Exchange System Attendant, you must re-create it, and then properly delete the Exchange Virtual Server, as described in the following procedure.
To remove an Exchange Virtual Server
In Cluster Administrator, in the console tree, select Groups.
In the details pane, right-click the Exchange Virtual Server that you want to remove, and then click Remove Exchange Virtual Server.
In the Microsoft Exchange Cluster Administrator Extension dialog box (see Figure 8.16), click Yes to delete the Exchange Virtual Server and all resources that are either directly or indirectly dependent on the Exchange System Attendant resource.
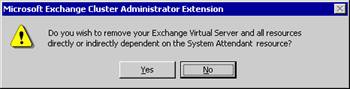
Figure 8.16 Warning when removing an Exchange Virtual Server
Clicking Yes also removes the Exchange Virtual Server information from Active Directory; the physical disk, the IP Address, and Network Name resources remain.
After you delete the Exchange resources of your Exchange Virtual Server, you must manually remove the Windows resources, including the IP Address and Network Name resources.
To delete the remaining resources after removing an Exchange Virtual Server
In Cluster Administrator, select the cluster group that contains the Exchange Virtual Server that you just deleted.
In the details pane, right-click IP Address resource, and then click Take Offline.
Right-click IP Address resource again, and then click Delete.
In the Delete Resources dialog box, click Yes.
This deletes both the IP Address and Network Name resources.
Move the Physical Disk resource by dragging it to another group that is owned by this node.
Delete the cluster group by right-clicking the group in the console tree, and then selecting Delete.
If you have followed all of the procedures for removing an Exchange Virtual Server, you have deleted this server. After deleting this server, if you want this node to be a passive node in your Exchange cluster, ensure that the possible owner and preferred owner settings are correct.
If you want to completely remove the Exchange 2003 installation, see the next section, 'Removing Exchange 2003 from a Cluster Node.'
To remove Exchange 2003 from a cluster node, you must uninstall Exchange 2003 as you would from a stand-alone (non-clustered) server. However, only remove Exchange from those nodes that you no longer want Exchange to use. If you want Exchange 2003 to use the node (for example, as a passive node), do not uninstall Exchange 2003 from the node.
Before removing Exchange from a node, do the following:
Move all Exchange Virtual Servers that the node owns to another node or perform the steps in the previous section 'Removing an Exchange Virtual Server' to remove every Exchange Virtual Server that the node owns.
Move any important cluster resources owned by the node to another node before proceeding. If you do not move these resources, Exchange Setup blocks removal of Exchange 2003 from the node.
To remove Exchange 2003 from a node
In Control Panel, open Add/Remove Programs.
In the Currently Installed Programs list, select Microsoft Exchange 2003.
Click Change/Remove.
In the Welcome dialog box, click Next.
In the Component Selection dialog box, ensure that the action next to Microsoft Exchange 2003 is Remove, and then click Next.
In the Component Summary dialog box, verify your installation selections, and then click Next.
In the Microsoft Exchange 2003 Installation Wizard dialog box (see Figure 8.17), click Yes if you are removing the last node in the cluster, or click No if it is not the last node.
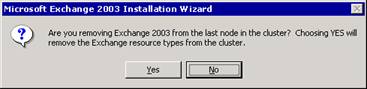
Figure 8.17 Warning when removing Exchange 2003 from a cluster
If you remove Exchange from the last node in the cluster, Exchange Setup removes Exchange cluster resource types from the cluster.
In the Completion dialog box, click Finish.
Migrating an Exchange 2003 cluster node (that is, an Exchange Virtual Server) to a stand-alone server is not supported. If you want to migrate a clustered server to a stand-alone server, you must create a third server, and then move mailboxes to the new server.
Similarly, you cannot migrate a stand-alone Exchange 2003 server to an Exchange cluster node.
Monitoring your Exchange clusters is as important as managing them. By actively monitoring your clusters, you help ensure that your Exchange 2003 clusters perform well. To monitor the performance of the Exchange Virtual Servers in your cluster, use System Monitor. To monitor your Exchange Virtual Servers for errors that may be occurring, use Event Viewer.
Note
For more information about System Monitor and Event Viewer, see
the Windows Server 2003 or Windows 2000 online documentation.
The following sections provide steps for monitoring, improving, and testing the performance of your Exchange 2003 clusters.
Active/passive clusters are the recommended configuration for Exchange 2003 clusters. Monitor active/passive clusters just as you would stand-alone server deployments.
For information about how you can monitor Exchange, see the technical article 'Better Together: Microsoft Operations Manager and Exchange Server 2003' (https://go.microsoft.com/fwlink/?LinkId=18176) and the book Monitoring Exchange 2000 with Microsoft Operations Manager 2000 (https://go.microsoft.com/fwlink/?LinkId=18177).
Exchange 2003 supports active/active clusters with at most two nodes. However, active/active clusters are not a recommended configuration for Exchange 2003 clusters.
If you have an active/active cluster, use a monitoring application (such as System Monitor) to monitor the following:
The number of concurrent connections (users) per node If the number of concurrent users per node exceeds 1,900 for more than 10 minutes, move users off of the node.
The CPU load for each server in the cluster If the CPU load generated from users exceeds 40 percent for more than 10 minutes, move users off of the server.
Note
This CPU load restriction applies only to load increases caused
by users. Increases in CPU load that result from administrative tasks, such as
moving users, are not a problem.
The biggest individual consumer of memory in Exchange 2003 is the Exchange store process (Store.exe). On an active, production Exchange Server 2003 computer, it is not uncommon to notice that the Exchange store process consumes nearly all of the server memory. Like Exchange Server 5.5, the Store.exe process uses a unique cache mechanism called Dynamic Buffer Allocation (DBA). This process self-governs how much memory it uses; that is, DBA balances the amount of memory it uses against the memory usage of other applications that are running on the server. If Exchange is the only application running, DBA allocates more memory to itself.
The memory required by the Exchange store depends upon the number of Exchange databases that you have on a server, the size of those databases, and the number of transactions per each of those databases. Although each server (or cluster node) in Exchange 2003 can handle as many as 20 databases (for a maximum of four storage groups and five databases per storage group), the more databases you have, the more memory the server requires. You can lessen the memory requirements by how you configure additional databases. The first database in a storage group consumes the greatest amount of virtual memory. Thus, wherever possible, fill your storage groups to the maximum number of databases before you create a new storage group. Filling a storage group:
Reduces memory consumption
Reduces disk overhead
However, there are a few disadvantages to filling a storage group with databases before creating another storage group:
Only one backup process can occur in a single storage group at a time. Backing up one database in a storage group halts the online maintenance of all other databases in the storage group.
The ability to configure circular logging (a feature that automatically deletes log files that are older than a specified checkpoint) for a specific set of user's mailboxes is minimized. This is because you enable circular logging for the storage group, not for individual databases. If all of your databases are in a single storage group, circular logging either applies to all of the databases or none of them. If you want to apply circular logging to only a few databases, you need to create a new storage group, add the appropriate databases to the new storage group, and then apply circular logging to the new storage group. For more information about circular logging, see the book Disaster Recovery for Microsoft Exchange 2000 Server (https://go.microsoft.com/fwlink/?LinkId=1714).
The task of monitoring virtual memory is especially important when you are deploying Exchange 2003 clusters. This section reviews important aspects of Exchange 2003, and how it uses memory. This section also describes the specific virtual memory counters that you should monitor closely.
Windows Server 2003 and Windows 2000 implement a virtual memory system based on a flat (linear), 32-bit address space. The 32 bits of address space translate into 4 gigabytes (GB) of virtual memory. On most systems, Windows allocates half of this address space (the lower half of the 4-GB virtual address space from x00000000 through x7FFFFFFF) to processes for its unique private storage and the other half (the upper half, addresses x80000000 through xFFFFFFFF) to its own protected operating system memory usage.
Note
For more information about virtual memory, see the Windows
Server 2003 and Windows 2000 Server online documentation. You can
also find information about virtual memory in the Microsoft Windows Server
resource kits.
It is important to monitor the virtual memory on your Exchange 2003 clusters. It is especially important to monitor the virtual memory counters that are listed in Table 8.8.
Table 8.8 Exchange 2003 virtual memory counters
|
Virtual memory counter |
Description |
|
MSExchangeISVM Largest Block Size |
Displays the size (in bytes) of the largest free block of virtual memory. This counter displays a line that slopes down while virtual memory is consumed. Monitor this counter to ensure that it stays above 32 megabytes (MB). When this counter drops below 32 MB, Exchange 2003 logs a warning (Event ID=9582) in the event log. When this counter drops below 16 MB, Exchange logs an error. |
|
MSExchangeISVM Total 16MB Free Blocks |
Displays the total number of free virtual memory blocks that are greater than or equal to 16 MB. This counter displays a line that may first rise, but then may eventually fall when free memory becomes more fragmented. It starts by displaying a few large blocks of virtual memory and may progress to displaying a greater number of separate, smaller blocks. When these blocks become smaller than 16 MB, the line begins to fall. To predict when the number of 16 MB blocks is likely to drop below 3, monitor the trend on this counter. If the number of blocks drops below 3, restart all of the services on the node. |
|
MSExchangeISVM Total Free Blocks |
Displays the total number of free virtual memory blocks, regardless of size. This counter displays a line that may first rise, but then may eventually fall, when free memory first becomes fragmented into smaller blocks, and then when these blocks are consumed. Use this counter to measure the degree to which available virtual memory is being fragmented. The average block size is the ProcessVirtual BytesSTORE instance divided by MSExchangeISVM Total Free Blocks. |
|
MSExchangeISVM Total Large Free Block Bytes |
Displays the sum, in bytes, of all of the free virtual memory blocks that are greater than or equal to 16 MB. This counter displays a line that slopes down when memory is consumed. |
Important
The task to update the virtual memory performance counters for
the Exchange store does not run until at least one Exchange Virtual Server
starts on the node. Therefore, in active/passive cluster scenarios, all
Exchange-related virtual memory performance counters are zero (0) on a passive
node. These performance counters are zero because the store on the passive node
is either not going to be running or the databases will not be mounted.
As a result, having performance counters set to zero may interfere with your virtual memory performance baseline. Therefore, when monitoring these performance counters, you can expect large, free virtual memory numbers on the passive nodes.
When you monitor the virtual memory counters, the most important counter to monitor is VM Total Large Free Block Bytes, which should always exceed 32 MB. If a node in the cluster drops below 32 MB, fail over the Exchange Virtual Servers, restart all of the services on the node, and then fail back the Exchange Virtual Servers.
The Exchange store logs the following events if the virtual memory for your Exchange 2003 server becomes excessively fragmented:
Warning logged if the largest free block is smaller than 32 MB
EventID=9582
Severity=Warning
Facility=Perfmon
Language=English
The virtual memory necessary to run your Exchange server is fragmented in such
a way that performance may be affected. It is highly recommended that you
restart all Exchange services to correct this issue.
Warning logged if the largest free block is smaller than 16 MB
EventID=9582
Severity=Error
Facility=Perfmon
Language=English
The virtual memory necessary to run your Exchange server is fragmented in such
a way that normal operation may begin to fail. It is highly recommended that
you restart all Exchange services to correct this issue.
After you install Exchange 2003 on your cluster nodes and create your Exchange Virtual Server, you may want to configure Exchange logging. Although it is helpful to enable Exchange logging when you troubleshoot message flow issues, it is not recommended that you enable logging at all times. This is because logging reduces Exchange performance.
Before enabling logging on an Exchange cluster, you should disable MTA monitoring on all servers that do not have MTA installed. Then, you can enable SMTP logging on the selected servers.
By default, an Exchange 2003 server monitors the MTA service. In a cluster environment, MTA runs only on one of the physical nodes (computers). This means that the monitoring process reports that the nodes that are not running MTA are in an error state. This, in turn, can cause problems if Exchange 2003 is installed in a cluster with two or more Exchange Virtual Servers.
To prevent the monitoring process from incorrectly reporting that Exchange Virtual Servers that are not running the MTA service are in an error state, you should disable MTA monitoring on the second Exchange Virtual Server (and if applicable, any other additional Exchange Virtual Servers) of a cluster. You do not need to disable MTA monitoring on the first Exchange Virtual Server of a cluster.
To disable MTA monitoring on an Exchange Virtual Server
In Exchange System Manager, in the console tree, expand Servers, right-click the appropriate Exchange Virtual Server, and then click Properties.
In the <Server Name> Properties dialog box, click the Monitoring tab.
On the Monitoring tab, select Default Microsoft Exchange Services from the list of services, and then click Details.
In the Default Microsoft Exchange Services dialog box, select Microsoft Exchange MTA Stacks, and then click Remove.
Click OK twice.
If you want to gather statistical data about server usage, you can enable logging of the SMTP resource. However, be aware that enabling SMTP logging reduces Exchange performance. Unless you are troubleshooting or in need of statistical data, you should disable logging (the default setting).
When enabled, Internet Information Services (IIS) creates SMTP log files on the system drive of the local computer (for example, C:WinntSystem32Logfiles, where C is the location of your Windows Server 2003 or Windows 2000 installation). To reliably configure SMTP logging in a clustered environment, you need to change the default location of the log files (that is, the local computer) to a folder on a shared disk.
To enable SMTP logging and log the files to a shared disk
In Exchange System Manager, in the console tree, expand Servers, and then expand the server on which you want to enable IIS logging for SMTP.
In the console tree, expand Protocols, and then expand SMTP.
In the console tree, right-click Default SMTP Virtual Server, and then click Properties.
In the Default SMTP Virtual Server Properties dialog box, on the General tab, click Enable logging, and then click Properties.
In the Extended Logging Properties dialog box, on the General Properties tab, in Log file directory, change the SMTP log file location to a folder on a shared disk.
Click OK twice.
Even with thoughtful management and attentive monitoring, it may become necessary to tune the servers in your clusters to maintain high availability. Exchange 2003 requires much less manual tuning than Exchange 2000. In fact, Exchange 2003 performs most necessary tuning automatically.
To capitalize on the tuning features in Exchange 2003, consider making the following tuning changes after the initial installation and configuration of your Exchange cluster:
Remove Exchange 2000 tuning parameters
Configure the /3GB switch
Configure the /Userva and SystemsPages options
If a server in your cluster previously ran Exchange 2000, you may have performed the manual tuning changes that were recommended by previous Exchange documentation. If you have since upgraded that server to run Exchange 2003, that server no longer needs those manual tuning changes, and you should manually remove them from the server. For information about the settings that must be removed, see 'Removing Exchange 2000 Tuning Parameters' in the book Exchange Server 2003 Deployment Guide ( www.microsoft.com/exchange/library
By default, Windows Server 2003 and Windows 2000 Advanced Server allocate 2 GB of virtual address space to user mode processes, such as the Exchange store process (Store.exe). If a server has 1 GB or more of physical memory, set the /3GB switch in the Boot.ini file to increase the virtual address space.
For more information about the /3GB switch, see Microsoft Knowledge Base Article 266096, 'XGEN: Exchange 2000 Requires /3GB Switch with More Than 1 Gigabyte of Physical RAM' ( https://support.microsoft.com/?kbid=266096
Important
The /3GB switch is designed for all editions of Windows
Server 2003 and for Windows 2000 Advanced Server. Do not set the /3GB
switch if you are running Windows 2000 Server.
If the server is running Windows Server 2003, set the SystemPages value to zero, and set the /Userva=3030 parameter in the Boot.ini file. These settings allow for more system page table entries on the server, which is critical for scale-up systems.
If the server is running Windows 2000, set the SystemPages registry key to a value between 24000 and 31000. The location of the SystemPages registry key is as follows:
HKEY_LOCAL_MACHINESYSTEMCurrentControlSetControlSession ManagerMemory ManagementSystemPages
For additional information about the /Userva switch, see Microsoft Knowledge Base Article 810371, 'XADM: Using the /Userva Switch on Windows 2003 Server-Based Exchange Servers' ( https://support.microsoft.com/?kbid=810371
Clustering provides a mechanism for moving resources between cluster nodes when problems occur. When a single server fails, clustering moves Exchange 2003 resources from the failed server to another server in the cluster. This failover allows services to remain available to users.
By maintaining service availability in the case of a failure, clustering gives you time to diagnose and fix the problem. Diagnosing means not only determining whether the failure is related to a single server or the entire cluster, but also whether the failure is easily repaired or requires more complex disaster recovery steps.
An important task in disaster recovery processes for Exchange 2003 clusters is identifying what caused a specific resource to fail. When a failure occurs in an Exchange cluster, you should first determine if the failure is on a single node, which indicates that there are problems with the node's files, or on every node, which indicates that there are problems with the cluster's objects or the shared cluster resources.
To determine the cause of the failure:
Search the Application Log within Event Viewer Begin by looking for MSExchangeCluster events. The event description should help you determine the cause of the problem. For example, Figure 8.18 shows an event description that states that the service for that resource cannot start. Based upon this description, you should focus your troubleshooting on the service startup.
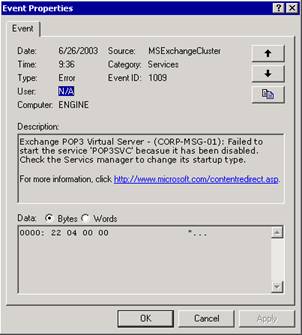
Figure 8.18 MSExchangeCluster event that provides information about the failure
Turn on and configure verbose logging for Cluster Service While server clusters log errors and events to the System Event log, you can achieve advanced troubleshooting by having the Cluster Service perform verbose logging to a text file named Cluster.log. For information about this log and how to enable it, see Microsoft Knowledge Base Article 168801, 'How to Turn On Cluster Logging in Microsoft Cluster Server' ( https://support.microsoft.com/?kbid=168801
Search for resolutions in the Microsoft Knowledge Base ( https://support.microsoft.com/ ) Many cluster-related Knowledge Base articles that are applicable to Exchange 2000 are also applicable to Exchange 2003. For this reason, search the Knowledge Base for cluster information related to Exchange 2000 as well as Exchange 2003.
If you are still unable to determine the cause of the failure, you can perform the repair options listed in 'Repairing Windows 2000' or 'Repairing Exchange 2000' in the book Disaster Recovery for Microsoft Exchange 2000 Server (https://go.microsoft.com/fwlink/?LinkId=1714 ). If repairing the node or entire cluster is unsuccessful, you must consider replacing the node or recovering the node, cluster, or resources (such as the quorum disk resource, or Exchange mailbox and public folder stores).
After diagnosing the failure and trying to repair the failed node or cluster, it is time to perform disaster recovery on your Exchange cluster. This may involve replacing a damaged cluster node, restoring or rebuilding a cluster node from backups, restoring a shared disk resource from backups, or recovering the entire cluster.
Disaster recovery on an Exchange cluster is a complex process that centers around devising appropriate data backup and recovery strategies. As such, it is not possible to cover the entire subject of disaster recovery in this book. You can find detailed conceptual information and step-by-step procedures concerning backing up and restoring Exchange 2003 clusters in 'Backing Up Exchange 2000 Clusters' and 'Restoring Exchange 2000 Clusters' in the book Disaster Recovery for Microsoft Exchange 2000 Server (https://go.microsoft.com/fwlink/?LinkId=1714).
For a brief overview of the detailed disaster recovery steps described in the book Disaster Recovery for Microsoft Exchange 2000 Server, see the following two topics.
Securing the data on your Exchange 2003 clusters requires establishing a proper and thorough backup plan. To back up the important data on the nodes of your Exchange 2003 clusters, you can use Windows 2000 Backup. You can also use third-party backup solutions to meet your backup needs. For information about third-party backup solutions, see the Exchange 2000 Server Third-party Solutions Web site (https://go.microsoft.com/fwlink/?LinkId=5225).
To secure the data in your clusters, you must do the following:
Back up Windows in each cluster node.
Back up the quorum disk resource of each cluster.
Back up all Exchange databases on your shared disk resources.
Maintain informational records about your cluster configuration.
Recovering from disasters that affect the nodes of your Exchange 2003 clusters can be as simple as replacing a node with a stand-by recovery server, or it can be as difficult as rebuilding an entire cluster from the beginning. If you have a proper and thorough backup plan in place, you can recover from almost any disaster that affects your Exchange organization.
You may need to do the following to recover from disasters that affect your Exchange 2003 clusters:
Replace damaged cluster nodes.
Restore or rebuild a cluster node from backups.
Restore shared disk resources.
Restore quorum disk resource.
Restore Exchange databases.
Recover an entire Exchange 2003 cluster.
|
Politica de confidentialitate | Termeni si conditii de utilizare |

Vizualizari: 1103
Importanta: ![]()
Termeni si conditii de utilizare | Contact
© SCRIGROUP 2025 . All rights reserved