| CATEGORII DOCUMENTE |
| Asp | Autocad | C | Dot net | Excel | Fox pro | Html | Java |
| Linux | Mathcad | Photoshop | Php | Sql | Visual studio | Windows | Xml |
You use Windows Explorer every day, probably many times a day, without giving it much thought. You open it, view some files, delete others, drag a few around to different folders, and then you're back on your way.
But there's a lot of ways that Explorer can make your life easier. For example, you can use it to hide files by encrypting them, give yourself more hard disk space by compressing files, and easily find the files you want by using the indexing service and its query language. And there are ways to hack Explorer to make it much easier to use-for example, by customizing its right-click context menu. In this chapter, I'll show you how to do all that and more.
Longtime PC users and former Mac users alike are often shocked when they realize that there's no easy, built-in option to print a list of files in a folder. This hack creates a context-menu right-click option to create such a list, which you can then edit, copy, paste, and-most usefully-print.
How many times have you been browsing through directories in Windows Explorer and wished you could generate a text file or printout listing the files and folders? It seems like such a simple request that it's amazing the option isn't available. You don't believe me? Right-click on a folder and see for yourself if there is an option to list or print the structure. There isn't, but there is a workaround that doesn't require any third-party software. Here's how to create a context menu item [Hack #29] that, when clicked, generates a printable (and editable) text-file listing of the selected directory.
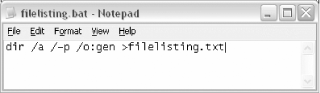
To create the entry in the context menu it's necessary to first create a batch file. A batch file is a text file that contains a sequence of commands for a computer operating system and uses the .bat extension. The format for the .bat file is:
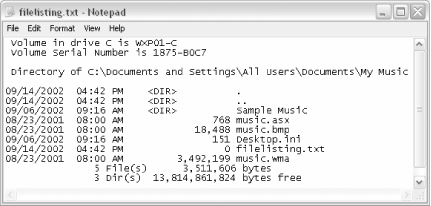
dir /a /-p /o:gen >filelisting.txtThe name of the .txt file can be whatever you like. In this example, I've used filelisting.txt, but it could just as easily be filelist, listoffiles, namedfiles, or even Wally if you enjoy the bizarre in your filenaming schemes. Once you've decided on the filename, create the file in Notepad, as shown in Figure 3-1.
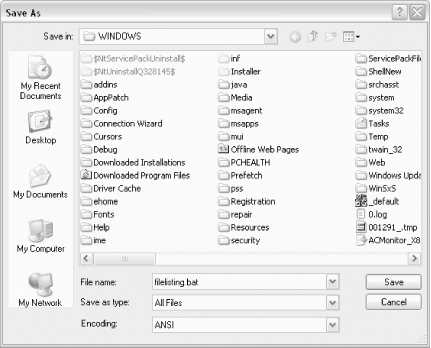
Save the file in your WINDOWS folder as shown in Figure 3-2, making sure to use the .bat extension and not the default .txt extension. It's important to set 'Save as type' to All Files and 'Encoding:' to ANSI.
Now that we have the .bat file created, the next step is to make it functional and easily accessible by integrating it into the context menu that opens when a right click is executed. Open Windows Explorer and choose Tools >Folder Options >File Types tab >Folder >Advanced >New, to open the New Action box shown in Figure 3-
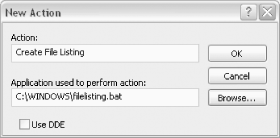
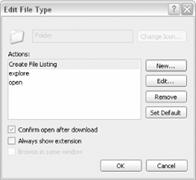
In the Action box, type the name that you want to appear in the context menu. Once again, you have wide latitude in choices; something like Create File Listing will probably be most useful, but you can name yours something more confusing if you like. Browse to the location of the .bat file you created, and select it in the box labeled 'Application used to perform action.' Click OK, and you'll see that Create File Listing (or whatever you chose as an action name) has been added as one of the Actions in the Edit File Type window, as shown in Figure 3-4. Do the standard Windows dance of clicking OK again to close all the open windows.
That's it! Congratulations. You've created a new item on the context menu that's ready to go to work. So, now that's it there, what can you do with it?
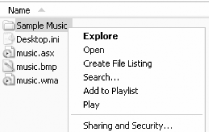
Open up Windows Explorer. Navigate to whatever folder you want to use as the basis for the file list, and right-click to open the context menu. Click on the Create File Listing item (see Figure 3-5), and the list will be generated and displayed at the bottom of the open Notepad window as filelisting.txt. Figure 3-6 shows the file listing generated from the Sample Music folder shown in Figure 3-5. Since it is a text file, it can be fully edited, copied, pasted, printed, and so on for any purpose.
|
If you happen to be a user of Outlook XP, there is another method available for printing directory listings that requires no system modifications. Using the Outlook Bar, you can generate a nicely formatted listing with a few mouse clicks:
Open Microsoft Outlook.
Choose View >Outlook Bar >Other Shortcuts.
The three default selections listed are My Computer, My Documents, and Favorites. Select one and navigate the tree until the directory is displayed in the right pane.
When the display matches what you'd like to print, click the printer icon on the Outlook toolbar.
Create customized Explorer views from the command line, and save your favorite views in desktop shortcuts.
I rarely open Windows Explorer in its default view. Instead, I generally want to open it at a specific location, with a specific set of viewing features-for example, with the Folders bar in the left side on or off.
I launch Windows Explorer from the command line, along with a set of switches for controlling how it opens. I also create desktop shortcuts out of these command-line launches, so that my favorite views are always only a couple of clicks away.
For example, when I want to open Windows Explorer to the C:Power Tools BookHacks subfolder only, with no folders above it, and using the Folders bar, I open the command prompt and issue this command:
explorer /e,/root,c:Power Tools BookHacksWhen I do that, the view pictured in Figure 3-7 appears.
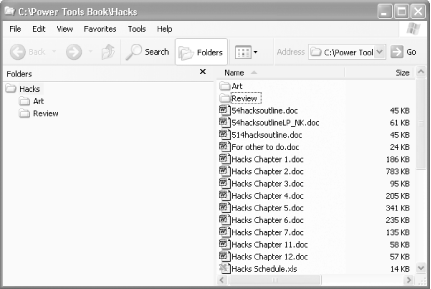
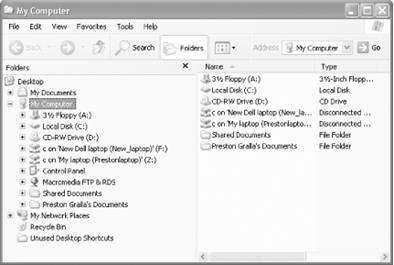
Compare that view with my default view that I get when I launch Windows Explorer the normal way (shown in Figure 3-8). Not only does the Explorer view in Figure 3-7 open to a specific subfolder, but it also shows no folders above it. In contrast, Figure 3-8 shows the entire structure of my hard disk and opens to C:. I use the view in Figure 3-7 when I want to work exclusively on a specific subfolder and want to get to it quickly.
This is just one of the many uses for launching Windows Explorer from the command line with switches; no doubt you'll be able to find other uses for it. You'll be able to use it not only on the command line and with desktop shortcuts, but also if you run scripts and batch programs.
The syntax for running Explorer from the command line with switches is:
explorer [/n] [/e] [,root,object] [[,/select],subobject]You don't have to use switches; you can type explorer by itself, though doing that launches your default Explorer view.
Here is an explanation of how to use the switches and syntax:
/n
Opens Windows Explorer without displaying the Folders bar, the tree structure of the hard drive. Instead, it launches the view shown in Figure 3-9.
/e
Opens Windows Explorer displaying the Folders bar.
/root object
Opens Windows Explorer to a specific object, such as a folder, without displaying the folders above it, as shown in Figure 3-7. You can also use Global Unique Identifiers with this switch, as explained later in this hack.
[[/select] subobject
Opens Windows Explorer to a specific file or folder that is then highlighted or expanded. You can use the subobject switch only without the /select parameter. When you include the /select parameter, the branches are not expanded, the folder is highlighted, and the subobject is highlighted in the right pane.
Typing
command-line shortcuts can quickly give you a case of carpal tunnel syndrome,
so a better idea is to run them as desktop shortcuts. Right-click on the
desktop, choose New ![]() Shortcut,
and in the location box type the Explorer command-line syntax you want to use.
Click Next and give the shortcut a descriptive
name-for example, 'Hacks folder'-and click OK.
Shortcut,
and in the location box type the Explorer command-line syntax you want to use.
Click Next and give the shortcut a descriptive
name-for example, 'Hacks folder'-and click OK.
You might want to open Explorer to certain system folders-for example, to My Network Places. To do so, run explorer from the command line and follow it by a space, two colons, and the Global Unique Identifiers (GUIDs) that identify specific system folders, like this:
explorer :That command opens Windows Explorer to My Network Places.
If you're using switches, similarly put a space and two colons in front of the GUID, like this:
explorer /e, ::You can use GUIDs in desktop shortcuts, batch files, and scripts, as well as at the command line. Table 3-1 lists the GUIDs for various system folders.
Table 3-1. GUIDs for system folders |
|
|
Folder name |
GUID |
|
My Computer | |
|
My Network Places | |
|
Network Connections | |
|
Printers and Faxes | |
|
Recycle Bin | |
|
Scheduled Tasks | |
Supplanted by this most powerful utility, Windows Explorer will no longer draw curses or contribute to increased Macintosh sales.
I'm guessing that you have a Leatherman multitool. No hacker worth his weight in solder would leave home without it. In fact, I'll go further and guess that you have at least two. You probably have a large one that you keep in your glove box and a small one that you carry with you at all times, even to weddings (just in case). If I'm correct-or if you're wondering where to buy such a useful tool-then you will love PowerDesk.
PowerDesk is the multitool of utilities. This beast is no mere Swiss Army Knife. There's no unnecessary toothpick, leather punch, or nail file here; it's a pair of vise grips with four screwdrivers, a strong blade, wire cutters, pliers, an Allen wrench, a corkscrew, and a bottle opener. It's the software that those guys on Junkyard Wars would use if they put down their cutting torch and picked up a computer.
OK, maybe I'm being melodramatic, but PowerDesk really is a useful utility for your computer. PowerDesk combines much of the functionality of Windows Explorer, the old Windows File Manager, WinZip, and a host of other programs. If you find yourself with more than one program open for manipulating files, you probably need PowerDesk. While many of the features of PowerDesk are available in Windows XP, PowerDesk puts them all in one convenient location. PowerDesk also runs on older versions of Windows, which may not have the advanced file-handling features that Windows XP has.
PowerDesk is available from VCOM at https://www.v-com.com/product/pd_ind.html. PowerDesk Pro sells on the VCOM web site for $39.95. You can also download an evaluation version that has fewer features.
When you install PowerDesk on your computer, the installer will ask you if you want to associate ZIP and other archive files with PowerDesk. If you already use a ZIP file manager, such as WinZip, you might not want to allow PowerDesk to handle these types by default. After installing PowerDesk, you should not need to restart your computer.
While PowerDesk is a separate application, it is integrated into Windows Explorer, so you have access to many of its features even when you aren't running it. In Windows Explorer, if you right-click with the mouse you will see a submenu called PowerDesk, where you have access to many of PowerDesk's functions.
When you start PowerDesk, you will be faced with a window that looks similar to the one shown in Figure 3-10. As you click around PowerDesk, most of the things you see should look familiar. Those that aren't so familiar are grouped well, so they are easy to find and understand.
Each of the toolbars that shows up in
PowerDesk is configurable. Use the Options ![]() Customize
Toolbar menu item to modify the toolbars as you wish. The bottom toolbar in Figure
3-10 is called the Launchbar and is similar to the Quick Launch area of the
Windows XP Taskbar. You add programs by dragging icons onto the Launchbar and
dropping them.
Customize
Toolbar menu item to modify the toolbars as you wish. The bottom toolbar in Figure
3-10 is called the Launchbar and is similar to the Quick Launch area of the
Windows XP Taskbar. You add programs by dragging icons onto the Launchbar and
dropping them.
When you restart PowerDesk, you are placed back at the location you were when you left. I find this to be such a simple, yet useful, feature. If you create a shortcut to PowerDesk, you can force it to open at a specific location by putting the name of the directory after the program name in the Target field of the shortcut properties.
PowerDesk has so many features that we could spend an entire chapter of this book describing them, and even then there would be things we'd miss. So, I'm going to give a brief summary of the coolest features and leave the rest as an exercise for the reader:
Most of the features of the Windows Explorer are available from the File and Tools menus. You can open, delete, and rename files. You can map network drives, format diskettes, and empty the trash.
PowerDesk provides Move To and Copy To icons on the main toolbar, context menu, and File menu for moving and copying files to a specific location. You can recreate this functionality [Hack #27] in Windows Explorer without using PowerDesk.
The File Finder feature provides many options for finding files on your computer. You can have PowerDesk search for Microsoft Word documents beginning with the word 'Hack,' modified in the last three days, and containing the word 'wireless.'
PowerDesk has the ability to find
and rename a group of files according to parameters that you define. For
example, let's say you have a bunch of digital photographs from your trip to ![]() Rename.
PowerDesk shows a list of the files to be renamed and gives you a place to
rename the files something like Belize 2003 Vacation.JPG. The first file
will be named Belize 2003 Vacation.JPG, the second file will be named Belize
2003 Vacation (1).JPG, and so on. PowerDesk also has a more powerful
group-rename feature that uses wildcards and pattern matching to find files and
choose their new names.
Rename.
PowerDesk shows a list of the files to be renamed and gives you a place to
rename the files something like Belize 2003 Vacation.JPG. The first file
will be named Belize 2003 Vacation.JPG, the second file will be named Belize
2003 Vacation (1).JPG, and so on. PowerDesk also has a more powerful
group-rename feature that uses wildcards and pattern matching to find files and
choose their new names.
PowerDesk provides a built-in FTP client for transferring files from a remote file server (much like WinFTP). The connection to the remote server appears as if it were just another folder on your computer. PowerDesk FTP can even resume interrupted downloads.
You can convert image files between the numerous available
formats with File ![]() Convert
Picture Format.
Convert
Picture Format.
Security-conscious users will
appreciate the Destroy File feature. This feature not only
deletes a file from the filesystem, but it also wipes the disk drive where the
file existed. Needless to say, using this feature will also prevent you from recovering the file, so don't test it out on
your favorite photo from the
If you are truly security-conscious, do not use the Encrypt/Decrypt feature of PowerDesk. Details on the algorithm they use are not available. In the security world, it's common practice to describe how your cryptography works and rely on the strength of the key to protect the data. PowerDesk does allow you to choose 56-bit DES encryption for your data, but 56-bit encryption is the bare minimum these days. Do you want to trust your financial data to the bare minimum? I didn't think so.
PowerDesk manages ZIP file archives as well as files that are stored using the older UUENCODE format.
For copying files between two locations, use the Dual Pane view. This view displays two independent file browsers side-by-side, so you can easily copy files from one to the other without worrying about other windows getting in your way.
If you find yourself managing the same set of files on two different disks, the Compare Folders feature is a great time saver. Select the folder that you want to compare, and let PowerDesk find the other folder and compare the contents.
I run a network at home, and not all of our computers run Windows XP. PowerDesk provides a level playing field between the different versions of Windows so that I can always be assured that I have the tools I need on every computer I use.
There is so much more to PowerDesk than the few pages in this book. If the things you've read here interest you, download the evaluation version and try it for yourself.
Rename multiple files quickly and easily.
I hate to admit it, but sometimes I'm impatient. Why should I waste my time doing the same thing over and over again? If you've ever had to rename more than one file at a time, you know how foolish it is to have to click, pause, click again, type the new name, hit Enter, and then repeat for each file, just to rename them-especially if there's some sort of pattern to what you're doing. Unix expatriates will find this procedure especially annoying after using powerful wildcards and other Unix pattern-matching syntax. Better File Rename (well worth the $15 shareware registration fee from https://www.publicspace.net/windows/BetterFileRename/) does all you might imagine a file-renaming utility would do and more. It's conveniently accessed via the context menu, a right-click away from any group of selected files.
Figure 3-11 displays some of the options for renaming files based on pattern or placement in the filename (beginning or end of filename). For each pattern or placement option, you get a powerful set of variables and settings to choose from so that you can rename files in all sorts of ways, quickly and easily.
One of the ways to use this utility is to append a prefix to a list of files that all belong to the same project but begin with entirely different filenames (such as a list of figures for a book). It's also especially useful for digital camera owners who don't like the numerical or other automatically generated names for your files. While you might remember that a bunch of pictures with random numbers for filenames are pictures of your daughter, appending her name to each filename in one step with Better File Rename is easier than trying to remember such details or doing the painfully slow click-and-rename dance for each one. You can also change a whole list of filenames from upper- to lowercase, and vice versa. The pattern-replacement and automatic successive-numbering options are especially useful. Impatient control freaks, rejoice!
Got a hard disk filled with many files, and no easy way to find what you want quickly? Use the Indexing Service and its query language to get what you want fast.
Packrats like me (and my editor) have a hard time finding exactly what they want on their hard disk. I have thousands of files there, some dating back close to ten years, that I dutifully copy to a new system every time I upgrade my hardware. After all, who knows when I might need to find the list of books I planned to take out of the library in 1986?
XP's Search Companion is too slow and the kinds of searches it can perform are fairly limited. It can't find files based on properties such as when the file was last printed or the word count of a file, or using a sophisticated search language.
The Indexing Service, first used with the Microsoft Internet Information Services (IIS), is a far more powerful tool. It can perform searches hundreds of times faster and includes an exceedingly sophisticated query language you can use for performing searches. It works by indexing the files on your disk, and then, when you do a search, it queries that index rather than searching through your entire hard disk. The indexes that the service creates are called catalogs.
By default, the Indexing Service is turned off. To activate
it, first run the Search Companion by choosing Start >Search[
>For Files or Folders]. From the Search Companion, choose Change Preferences
![]() With Indexing Service. If the With Indexing Service option
isn't available, and instead you see Without Indexing Service, it means that
the Indexing Service is already turned on.
With Indexing Service. If the With Indexing Service option
isn't available, and instead you see Without Indexing Service, it means that
the Indexing Service is already turned on.
When you activate the Indexing Service, it won't immediately be available. It first has to build an index, which can take a substantial amount of time, depending on the amount of files on your hard disk, and your processor speed. It's best to start the Indexing Service and leave your computer on overnight so that it can complete indexing.
To turn off the Indexing Service from the Search Companion, choose Change Preferences >Without Indexing Service. When you do that, you'll use the normal Search Companion. The index will remain intact; when you do a search, you just won't search through it. You can always turn the index back on when you want.
The Indexing Service's query language is a sophisticated language, letting you search on file properties-such as the author of documents or the number of bytes in a document-and also uses Boolean operators and other search criteria.
The language uses tags to define search criteria. For example, to search for the phrase 'That dog won't hunt,' the query would be:
That dog won't huntThere are two basic ways to search for text in the query language, using either phrase or freetext. A phrase search searches for the exact words in the exact order, like this:
old dog barks backwardsThe search results will include only files whose text includes that exact phrase.
A freetext expression search looks for any words in the phrase and returns files that have any one of the words in the phrase. It works like the Boolean OR operator. So, the query:
old dog barks backwardsreturns many more searches than the phrase query, since it returns results that contain any of the words in the phrase.
The Indexing Service's query language's power is contained in the way it can search not just for text, but also for document properties. The syntax for searching using properties in a query is:
querywhere property name is the name of the property, such as those listed in Table 3-2, and query is the text you're searching for. For example, to search for all documents last edited by Preston Gralla, you would enter:
Preston GrallaQueries can use and ? wildcard characters, as well as Unix-style regular expression queries (for more on regular expressions, see Mastering Regular Expressions from O'Reilly). In order to use these wildcards, you must use the tag, like this:
*.xl?The Indexing Service indexes not just the text of each
document, but also all the summary information associated with each document.
(To see summary information for any document, right-click on it and choose
Properties ![]() Summary.)
In addition to searching for properties in the summary, you can also search for
the properties found in Table 3-2, which lists the most important properties
you can use to search.
Summary.)
In addition to searching for properties in the summary, you can also search for
the properties found in Table 3-2, which lists the most important properties
you can use to search.
Table 3-2. Important properties for searching via the Indexing Service |
|
|
Property |
Description |
| Access |
The last time the document was accessed. |
| All |
All available properties. Works with text queries, but not numeric queries. |
| AllocSize |
The total disk space allocated to the document. |
| Contents |
The contents of the document. |
| Created |
The time the document was created. |
| Directory |
The full directory path in which the document is contained. |
| DocAppName |
The name of the application in which the document was created. |
| DocAuthor |
The author of the document. |
| DocByteCount |
The number of bytes in the document. |
| DocCategory |
The type of document. |
| DocCharCount |
The number of characters in the document. |
| DocComments |
Comments made about the document. |
| DocCompany |
The name of the company for which the document was written. |
| DocCreatedTime |
The time spent editing the document. |
| DocHiddenCount |
The number of hidden slides in a PowerPoint document. |
| DocKeyWords |
The key words in the document. |
| DocLastAuthor |
The name of the person who last edited the document. |
| DocLastPrinted |
The time the document was most recently printed. |
| DocLineCount |
The number of lines contained in the document. |
| DocLastSavedTm |
The time that the document was last saved. |
| DocManager |
The name of the manager of the document's author. |
| DocNoteCount |
The number of pages with notes in a PowerPoint document. |
| DocPageCount |
The number of pages in the document. |
| DocParaCount |
The number of paragraphs in the document. |
| DocPartTitles |
The names of document parts, such as spreadsheet names in an Excel document or slide titles in a PowerPoint slide show. |
| DocRevNumber |
The current version number of document. |
| DocSlideCount |
The number of slides in a PowerPoint document. |
| DocTemplate |
The name of the document's template. |
| DocTitle |
The title of the document. |
| DocWordCount |
The number of words in the document. |
| FileName |
The filename of the document. |
| Path |
The path to the document, including the document filename. |
| ShortFileName |
The 8.3-format name of the document. |
| Size |
The size of the document, in bytes. |
| Write |
The date and time the document was last modified. |
The query language also lets you use a variety of operators and expressions for both text and numbers:
When you're creating a query using text, you can use the EQUALS and CONTAINS operators to narrow your search. Use the EQUALS operator when you want the exact words matched in the exact order, like this:
EQUALS First Draft of Final NovelThis query finds all documents with the title 'First Draft of Final Novel.' The query wouldn't find a document with the title 'Final Draft of First Novel' or 'First Draft of Novel.' The EQUALS operator works like the phrase expression.
Use the CONTAINS operator when you want to find any of the words in the document, in the same way you would use the freetext expression.
Relational operators
Use relational operators when you're searching using numbers:
Equal to
Not equal to
< Less than
<= Less than or equal to
> Greater than
>= Greater than or equal to
Date and time expressions
You can use the following formats when searching using dates and times:
yyyy/mm/dd hh:mm:ssYou can also use date and time expressions in combination with relational operators-for example, to look for files that were created within the last two days:
>-2dTable 3-3 lists the date and time abbreviations you can use.
Table 3- Date and time expressions that work with relational operators |
|||
|
Abbreviation |
Meaning |
Abbreviation |
Meaning |
| Y |
Year |
D |
Day |
| Q |
Quarter |
H |
Hour |
| M |
Month |
N |
Minute |
| W |
Week |
S |
Second |
Boolean operators
The query language also uses the Boolean operators detailed in Table 3-4.
Table 3-4. Boolean operators used by the Indexing Service's query language |
||
|
Boolean Operator |
Long Form |
Short Form |
|
AND |
& |
AND |
|
OR |
OR |
|
|
Unary NOT |
NOT |
|
|
Binary NOT |
&! |
AND NOT |
Use the unary NOT when you're searching using numbers rather than text. For example, to search for all documents that do not have seven PowerPoint slides, use the query:
NOT = 7Use the binary NOT to narrow a search, by combining two properties in a query. For example, to search for all documents with an author of 'Preston Gralla' that are not titled 'Chapter 10 use this query (on one line):
Preston Gralla NOTAlternative verb forms
You can use the double-asterisk wildcard to search for alternative forms of verbs in a document. For example, the query:
run**returns all documents with the word 'ran' or the word 'run.'
If you're doing a search likely to return many results, you'll want the most relevant searches to appear at the top of the results, and the least relevant to appear at the bottom. You can determine the relative importance of each term in your search and have the results weighted by that importance, by using the weight tag. Note that it does not get a closing tag:
queryThe value parameter ranges between and .
If you are searching for the three terms, 'fire,' 'ice,' and 'slush,' and you want to weight 'fire' most heavily, 'ice' second most heavily, and 'slush' least heavily, you can use this syntax (on a single line) in your query:
fire AND ice AND slushYou can force the Indexing Service to ignore more words when you search, or you can have it ignore fewer words, simply by editing a text file. In a text file called noise.eng, usually found in C:WindowsSystem32, you can find the list of words that the Indexing Service ignores. (The extension .eng is for English. Noise filters from other languages can be found as well-for example, noise.deu for German, noise.fra for French, and so on.)
The noise.eng file contains common articles, prepositions, pronouns, conjunctions, various forms of common verbs, and similar words. Open it in Notepad or another text editor, add words that you want it to ignore, and delete files that you don't want it to ignore. Then save the file, and the Indexing Service will follow your new rules.
Protect all the information on your PC from prying eyes, using XP Professional's built-in encryption scheme.
If you have Windows XP Pro, you can use the Encrypting File System (EFS) to encrypt your files so that no one else can read them.
|
EFS lets you encrypt only the files and folders of your choice; you can encrypt a single file or folder, or all of your files and folders. Encrypted files and folders show up in Windows Explorer as green, so you can tell at a glance which have been encrypted. You can work with encrypted files and folders transparently. In other words, after you encrypt them, you open them and close them as you normally would any other file. They're decrypted on the fly as you open them, and then decrypted as you close them. You're the only person who can read or use the files. Encryption is tied to your account name, so even other accounts on the same computer won't be able to read or use them, unless you specifically grant access to certain accounts.
|
EFS does have a few minor limitations you should be aware of:
EFS works only on NTFS volumes. If you have a FAT or FAT32 volume, you'll have to convert it to NTFS if you want to use EFS [Hack #31].
EFS won't work on compressed files. [Hack #31]. You'll have to decompress them if you want to encrypt them. Similarly, if you want to compress an encrypted file, you'll have to decrypt it.
EFS can't compress files in the C:Windows folder or any files marked with the System attribute.
When you work with encrypted files and folders, they seem to behave like any other files on your hard disk. In fact, though, their behavior is somewhat different, and you may notice files you thought were encrypted suddenly become decrypted for no apparent reason. So, before you turn on encryption, you should understand the common actions you can take with encrypted files and folders, and what the results will be. Table 3-5 lists what you need to know.
Table 3-5. How encrypted files and folders behave |
|
|
Action |
Result |
|
Move or copy unencrypted files into an encrypted folder. |
The files are automatically encrypted. |
|
Move or copy encrypted files from an encrypted folder to an unencrypted folder. |
The files remain encrypted. |
|
Move or copy encrypted files from an encrypted folder to a non-NTFS volume. |
The files are decrypted, though you are first given a warning and a chance to cancel the move or copy operation. |
|
Back up files using XP's backup utility. |
The backed-up files and folders remain encrypted. |
|
Rename an encrypted file. |
The file remains encrypted after it is renamed. |
|
Delete an encrypted file. |
The restorable file in the Recycle Bin remains encrypted. |
To encrypt a file or folder, right-click on the
folder or file and choose Properties ![]() General
General
![]() Advanced.
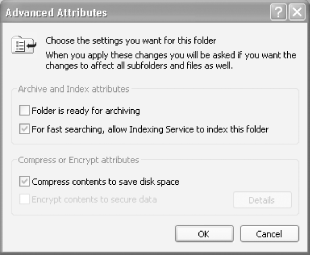
The Advanced Attributes dialog box appears, as shown in Figure 3-12.
Advanced.
The Advanced Attributes dialog box appears, as shown in Figure 3-12.
|
Check the box next to 'Encrypt contents to secure data.' Note that you can't check both this box and the 'Compress contents to save disk space' box. You can either compress the item or encrypt it, but not both.
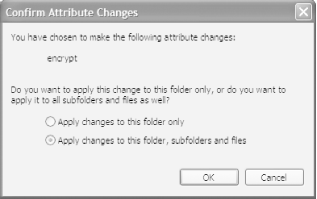
Click OK and then OK again. If you're encrypting a folder, the Confirm Attributes Changes dialog box appears, as shown in Figure 3-1 You have a choice of encrypting the folder only, or encrypting the folder plus all subfolders and all the files in the folder and subfolders. If you encrypt the folder only, none of the files currently in the folder will be encrypted, but any new files you create, move, or copy into the folder will be encrypted.
If you're encrypting a file in an unencrypted folder, the Encryption Warning box will appear, as shown in Figure 3-14. You have the choice of encrypting the file only, or the file and the parent folder. As a general rule, you should encrypt the folder as well as the file, because if you encrypt only the file, you may accidentally decrypt it without realizing it. Some applications save copies of your files and delete the original; in those instances, the files become decrypted simply by editing them. If you encrypt the folder as well, all files added to the folder are encrypted, so the saved file is automatically encrypted. Click OK after you make your choice.

Note that you won't be able to encrypt every file on your system. Files that have the System attribute, as well as files located in C:Windows and its subfolders can't be encrypted.
You decrypt files and folders in the same way that you encrypted them. Right-click on the file or folder, choose Properties >Advanced, clear the check from the box next to 'Encrypt contents to secure data,' and click OK and then OK again.
When you encrypt files, you can still share them with others and let them use them as if they were not encrypted-what XP calls 'transparently.' You'll be able to share them this way only with others users on the same computer or with others on your network. You designate who can use the files and who can't. To allow specified people to use your encrypted files, right-click on an unencrypted file and choose Properties >General >Advanced. The Advanced Attributes dialog box appears. Click Details. The Encryption Details dialog box appears, as shown in Figure 3-15. It lists all the users who are allowed to use the file transparently. Click Add.
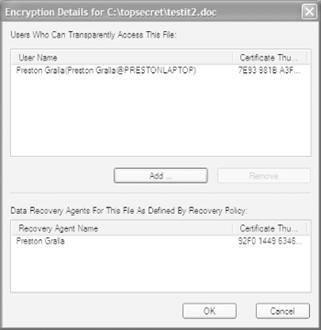
The Select User dialog box appears. Choose the user you want to be able to use your encrypted files, and click OK. Only users who have Encrypting File System certificates on the computer will show up on this list. The easiest way for someone to create a certificate is to encrypt any file; that automatically creates a certificate.
If you prefer the command line to a graphical interface, you can encrypt and decrypt using the cipher.exe command-line tool. To find out the current state of encryption of the directory you're in, type cipher without parameters at a command prompt. cipher tells you the state of the directory. For individual files, it lists a U next to files that are not encrypted, and an E next to those that are encrypted.
When used with parameters, cipher can encrypt and decrypt files and folders, show encryption information, create new encryption keys, and generate a recovery agent key and certificate.
To encrypt or decrypt a folder or file, use the complete path, filename (if you're acting on a file), and any appropriate switches, as outlined in Table 3-6. The /E switch encrypts folders or files, and the /D switch decrypts them. To perform the task on multiple folders or files, separate them with single spaces. For example, to encrypt the Secret and Topsecret folders, issue this command:
cipher /E Secret TopsecretNote that you can use wildcards with the cipher command. Using the command line instead of the graphical interface is particularly useful for performing bulk or batch operations-for example, simultaneously encrypting or decrypting multiple folders or files, or types of files within folders. Let's say, for example, you want to encrypt every .doc file in the Secret and Topsecret folders, but not touch any other files in those folders. You issue this command:
cipher /E /A Secret*.DOC Topsecret*.DOCTable 3-6 lists the most useful command-line switches for cipher. For more help, type cipher /? at the command line.
Table 3-6. Command-line switches for cipher |
|
|
Switch |
What it does |
| /A |
Acts on individual files within folders. |
| /D |
Decrypts the specified folder. |
| /E |
Encrypts the specified folder. |
| /F |
Forces encryption on all specified objects, including those that have already been encrypted. |
| /H |
Displays all files in a folder, including those that have hidden or system attributes. By default, hidden or system attributes are not displayed when using the cipher command. |
| /I |
Continues to perform the specified operation, even if errors are encountered. By default, cipher halts when errors are encountered. |
| /K |
Creates a new file encryption key for the user running cipher. If this option is chosen, all the other options will be ignored. |
| /R |
Generates an EFS recovery agent key and certificate, then writes them to a .pfx file (containing the certificate and a private key) and a .cer file (containing only the certificate). |
| /S |
Performs the operation on the folder and all its subfolders. |
| /U |
Updates the user's file encryption key or recovery agent's key on every encrypted file. |
| /U /N |
Lists every encrypted file and does not update the user's file encryption key or recovery agent's key. |
| /Q |
Lists only basic information about the file or folder. |
| /W |
Wipes data from available, unused disk space on the drive. Normally, when a file is deleted in XP, only the entry in the filesystem table is deleted; the data itself remains untouched until another file overwrites it. This switch deletes all the data in those previously deleted files. It does not harm existing data. |
A grab bag of ways to make better use of Explorer.
There are plenty of small ways you can hack Explorer to make your computing life more productive-for example, by hacking the right-click shortcut menu. Try out these hacks and see.
When you right-click on a file in Explorer, you get a shortcut menu that includes a list of programs with which you can open the file. But the programs that you want to open those files might not always be on the shortcut menu. It's easy to add new programs to that list. Let's say that you want to add a shortcut menu item that allows .gif files to be opened with the freeware graphics viewer IrfanView [Hack #86]. From Windows Explorer, choose Tools >Folder Options >File Types. In the Registered File Types list, select the file type for which you want to add a new shortcut menu item. In our example, we'll choose a GIF file. After this hack, any time you click on a file of this type, you'll get a new choice to open the file with.
Once you've chosen your file type, choose Advanced >New. You'll see the New Action dialog box shown in Figure 3-16.
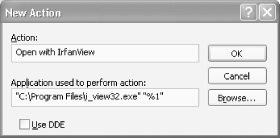
In the Action box, type the text you want to appear on the shortcut menu-for example, Open with IrfanView. In the 'Application used to perform action' box, enter the executable program you want to open the file with, including the full path. Surround it by quotation marks. Then leave a space and type in ' '. The ' ' is a placeholder; it will be used as a substitute for the name of the file on which you right-click. In our instance, the entire string looks like this:
'C:Program Filesi_view32.exe' '%1'Click OK. The change will take place immediately, and the new command will appear on the shortcut menu for the specified file type.
The previous section of this hack showed how to add shortcut menu items on a file-type-by-file-type basis. In other words, it will only be available on the shortcut menu for the one specific file type you specify. But you can also add that shortcut menu item to every type of file, by using a Registry hack. This is useful when you have a program that can open a wide variety of file types, and you don't want to have to go add a shortcut menu item for every one of those file types. I use the IrfanView graphics viewer for many different types of graphics, so I want it to show up on all those types. Although it will also show up on file types that I won't use it with, such as Word files, it's still worth putting it on the menu globally because of all the time I save by not having to add shortcut menu items over and over again for each file type.
Run the Registry Editor [Hack #68] and go to HKEY_CLASSES_ROOT*. Create a new subkey called Shell if it doesn't yet exist. The Shell subkey can control parts of the user interface. Create a new subkey under Shell and name it what your new command will be-for example, OpenWithIrfanView. For the default value of the new subkey, type in the text you want to appear on the shortcut menu-for example, Open with IrfanView. Create a new subkey named Command under the subkey that you just created. This subkey will contain the command string that you want to be executed to open the file. For the default value of the Command subkey, enter the command string you want to be executed when the shortcut menu item is chosen-for example:
'C:Program Filesi_view32.exe' '%1'Exit the Registry. The new shortcut menu item should be available immediately, though you may need to reboot in order for it to take effect.
You can use Windows Explorer to change how XP handles file types; for example, you can choose the default action when the file type is double-clicked upon, the application associated with the file type, the icon for the file type, and whether the extension should be displayed or hidden in Windows Explorer. To perform most of these actions, choose Tools >Folder Options >File Types, choose the file type for which you want to customize an action, then click Advanced. You'll see the screen shown in Figure 3-17.
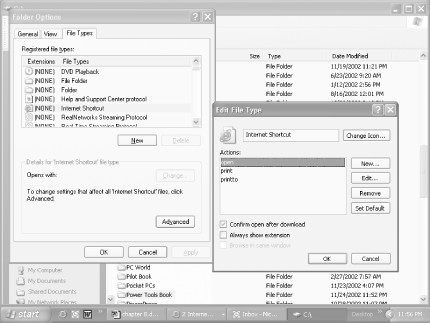
From the Edit File Type dialog box, you can change the icon, edit the action to be taken on the file, and choose whether to display the file type in Windows Explorer. The dialog box is fairly self-explanatory. For example, click Change Icon to change the icon; to edit any action, highlight it and click Edit. If you want to change the application associated with the file, choose Tools >Folder Options >File Types, choose the file type whose association you want to change, click Change, and then choose the application you want to be associated with the file type in the same way as shown in Figure 3-16.
Explorer's menus can get messy at times. But you can use a Registry hack to clean it up a bit by removing two items from the Tools menu: Map Network Drive and Disconnect Network Drive. Run the Registry Editor and go to:
HKEY_CURRENT_USERSoftwareMicrosoftWindowsCurrentVersionPoliciesExplorerCreate the DWORD entry NoNetConnectDisconnect. Give it a value of . Exit the Registry. You might have to reboot in order for the setting to take effect and the items to disappear from the menu. To place the items back on the Explorer menu, edit the value to , or delete the entry.
If you're using the default Windows XP Start Menu view and you're not happy with the way your All Programs menu is organized, you can use Windows Explorer to modify it. The All Programs menu is nothing more than a collection of shortcuts found in two folders: the C:Documents and Settings<Your Account>Start Menu folder (where <Your Account> is your account name), and the C:Documents and SettingsAll UsersStart Menu folder. Items that you want to appear at the very top of the All Programs menu should be put in one of the /Start Menu folders (depending upon whether you want the item to appear only on your All Programs menu, or on all users' All Programs menu.) Items that you want to appear on the lower part of the All Programs menu should be put into the Start MenuPrograms folder, again, depending on whether you want the item to appear only on your All Programs menu, or on all users' All Programs menu.
Make it easier to recognize specific folders and remember their contents, by giving them their own pictures and identifying text.
All folders are not created equal; some are more important than others. Folders I use for writing books and articles, or for storing digital music, for example, are more vital to me than folders that hold tax records from eight years ago.
So I like to give myself visual clues when browsing my computer about what each folder holds and how important it is to me. I have so many folders on my hard disk that I can't always immediately recall the purposes of some of them, so for some I also create balloon text that describes the purpose of the folder when I hover my mouse over the folder.
To force a folder to display a specific icon and to have it display balloon text when you hover your mouse over it, create a Desktop.ini file in that folder. That file contains instructions on which icon to use and balloon text to display.
|
Before creating the file, choose the icon you want to use for the folder. Icons end in an .ico extension. You can also use .bmp bitmap files as icons. Make sure to note the name of the icon or bitmap, including its full path. If you want, create your own icon [Hack #19].
Not all icons are in .ico files, however. Many are part of entire icon libraries in .dll files. For example, you'll find hundreds of icons in the shell32.dll file found in C:WINDOWSSystem32 folder. Each icon in a .dll file is assigned an index number, starting with . To use icons in .dll files, you'll need to know the index number for the specific icon. You won't be able to find out the index number by examining the file manually; instead, you'll need third-party software. Resource Tuner (https://www.heaventools.com) lets you examine the resources of any file and, among other things, will let you browse through the file's icons and show you their index numbers. It's shareware and free to try, but it costs $34.95 if you keep using it.
Figure 3-18 shows Resource Tuner, looking inside Shell32.dll and listing the index number for an icon.

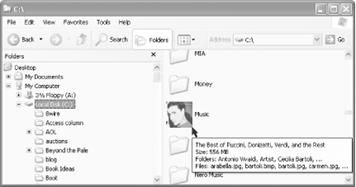
For my Music folder, I'm going to use a .bmp file of cover art of the mezzo-soprano Cecilia Bartoli.
Now it's time to create the Desktop.ini file. Using a text editor like Notepad, create it in the folder you want to customize. I'm going to customize my C:Music folder, so that's where I create it. Here's what my file looks like:
[.ShellClassInfo]The heading, [.ShellClassInfo], is required, so make sure to put that at the top of the file. The IconFile= entry should point to the file you want to use as an icon-and again, it can be an .ico file, a .bmp file, or an icon found in an icon collection, such as in a .dll file. Make sure to include the file's full path. The IconIndex= entry should point to the index number of the icon if the file is in an icon collection. If it's not in an icon collection, use the number . The InfoTip= entry should point to the text you want displayed as balloon text.
After you create the Desktop.ini file, you need to define the folder you want to customize as a system folder, in order for it to be able to display the icon and balloon text. At the command prompt, issue the command attrib +s foldername, where foldername is the name of the folder you're customizing.
You're now done; the icon and balloon text should display. Figure 3-19 shows what mine looks like.
![]()
The context menu is an often underused tool. But with these four additions and edits to the menu, it'll turn into a powerhouse that you'll use every day.
Windows Explorer's right-click context menu is one of the most basic of all XP tools; it provides many shortcuts for whenever you want to take action on a file or a folder. But the right-click menu is missing several basic options, such as choosing a specific folder to which you want to move or copy the file you've highlighted, rather than just cutting or copying the file. And when you install new applications, they have a nasty habit of adding their own options that you'll rarely use in the right-click menu.
The end result: a right-click context menu cluttered with options and lacking several basic useful ones. But you can extend the power of the menu with these four hacks.
I spend a lot of time copying and moving files between folders. More often than not, when I click on a file in Explorer, I want to copy or move it to another folder. That means I spend a good deal of time dragging files around or copying and pasting them.
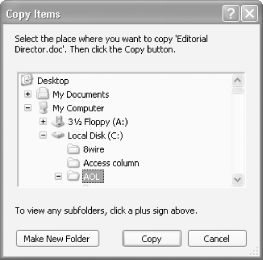
But with a Registry hack, you can save yourself time: you can add Copy To Folder and Move To Folder options to the right-click context menu. When you choose one of the options from the menu, you browse to any place on your hard disk to copy or move the file to, and then send the file there. To add the option, run the Registry Editor [Hack #68] and go to HKEY_CLASSES_ROOTAllFilesystemObjectsshellexContextMenuHandlers. shellex tells you it's a shell extension key that lets you customize the user shell or the interface. Create a new key called Copy To. Set the value to . Create another new key called Move To. Set the value to . Exit the Registry. The changes should take effect immediately. The Copy To Folder and Move To Folder options will appear. When you right-click on a file and choose one of the options, you'll be able to move or copy the file using a dialog box like the one shown in Figure 3-20.
The right-click context menu does have one useful option, Send To, which allows you to send the file to any one of a list of programs or locations-for example, to a drive, program, or folder.
It would be nice to edit that list, adding new locations and
programs and taking away existing ones that you never use. How locations and
programs show up on the menu appears to be somewhat of a mystery, but, in fact,
it's easy to hack. Go to C:Documents and Settings<User Name>SendTo,
where <User Name> is your user name. The folder will be filled
with shortcuts to all the locations you find on your Send To context menu. To
remove an item from the Send To menu, delete the shortcut from the folder. To
add an item to the menu, add a shortcut to the folder by highlighting the
folder, choosing File ![]() New
New ![]() Shortcut,
and following the instructions for creating a shortcut. The new setting will
take effect immediately; you don't have to exit Windows Explorer for it to go
into effect.
Shortcut,
and following the instructions for creating a shortcut. The new setting will
take effect immediately; you don't have to exit Windows Explorer for it to go
into effect.
I began computing in the days of DOS, and I still can't give up the command prompt. When it comes to doing down-and-dirty tasks like mass deleting or renaming of files, nothing beats it. I find myself frequently switching back and forth between Windows Explorer and the command prompt.
Often, when using Windows Explorer, I want to open the command prompt at the folder that's my current location. That takes too many steps: opening a command prompt and then navigating to my current folder. However, there's a quicker way: add an option to the right-click context menu that will open a command prompt at your current folder. For example, if you were to right-click on the C:My Stuff folder, you could then choose to open a command prompt at C:My Stuff.
To add the option, run the Registry Editor [Hack #68], then go to HKEY_LOCAL_MACHINE/Software/Classes/Folder/Shell. Create a new key called Command Prompt. For the default value, enter whatever text you want to appear when you right-click on a folder-for example, Open Command Prompt. Create a new key beneath the Command Prompt key called Command. Set the default value to Cmd.exe /k pushd %L. That value will launch Cmd.exe, which is the XP command prompt. The /k switch puts the prompt into interactive mode. That is, it lets you issue commands from the command prompt; the command prompt isn't being used to issue only a single command and then exit. The pushd command stores the name of the current directory, and %L uses that name to start the command prompt at it. Exit the Registry. The new menu option will show up immediately. Note that it won't appear when you right-click on a file; it shows up only when you right-click on a folder.
|
When you right-click on a file, one of the menu options is Open With, which provides a list of programs for you to open the file with. This list changes according to the type of file you're clicking. Depending on the file type, the lists can get long, because programs frequently add themselves to this list when you install them. Making things worse, there are times when the listed programs aren't applicable. For example, do you really want to open a .bmp bitmap graphics file with Microsoft Word? I think not.
You can clean up the Open With list by using a Registry hack. Run the Registry Editor and go to HKEY_CURRENT_USERSoftwareMicrosoftWindowsCurrentVersionExplorerFileExts. Look for the file extension whose Open With list you want to edit and find its OpenWithList subkey-HKEY_CURRENT_USERSoftwareMicrosoftWindowsCurrentVersionExplorerFileExts.bmpOpenWithList, for example. The subkey will have an alphabetical list of String values. Open each value and examine the value data. It will be the name of one of the programs on the Open With list (Winword.exe, for example). Delete any entry you don't want to appear. Don't delete the value data; delete the String value listing. In other words, if the value data for the a String value is Winword.exe, delete the entire string rather than just the value data. Exit the Registry.
Two ways that road warriors can more easily take files with them when they leave home or the office-and synchronize files back to their desktop PCs when they return.
If you use a laptop on a corporate LAN, you might sometimes store files on the network and forget to bring them home or with you on the road. This frequently happens to people who, like me, are absent-minded on occasion (or more than one occasion-after all, I once left my car keys in the refrigerator).
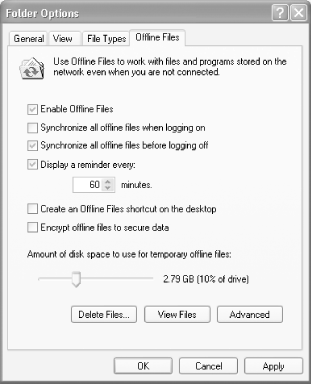
If you have XP Professional, you can use its Offline Files feature to automatically synchronize folders from the LAN to your notebook so that whenever you leave the office the latest version of your files will be available. To enable the use of offline files, choose My Computer >Tools >Folder Options >Offline Files tab (shown in Figure 3-21), and select the checkbox next to Enable Offline Files.
|
As you can see, there are a number of options on this tab for using offline files. Here's what you need to know about each to take best advantage of offline file synchronization:
Synchronize all offline files before logging off
Make sure to choose this option. When you do, the most recent copies of files will automatically be copied to your laptop. If you don't choose this option, you'll get only a partial synchronization, which means that you won't have the latest version of all your files. Also, keep in mind that you have to log off or turn off your PC in order for this option to work. If you only physically disconnect your PC from the network, the files won't be copied.
Synchronize all offline files when logging on
If you choose this option, as soon as you connect back to the network, your files will be synchronized from your laptop back to the LAN. That means you won't be able to use them locally, and you'll have to use them on the LAN. If you don't choose this option, you'll be able to continue using your files locally and can then manually synchronize any folders you want to the LAN.
Display a reminder every
If you've disconnected from the network, this option will automatically flash a balloon message at you, telling you at an interval of your choosing that you've been disconnected. More than anything, this is an annoying option and is useful only if you frequently disconnect from your LAN accidentally.
Create an Offline Files shortcut on the desktop
If you choose this option, XP creates a desktop shortcut to the Offline Files folder it creates when you enable the use of offline files.
Encrypt offline files to secure data
If you're concerned about the security of your files, choose this option. As the name implies, it will encrypt your offline files.
Amount of disk space to use for temporary offline files
When you use offline files, Windows caches files from the LAN onto your hard disk temporarily. This option lets you determine the exact amount of disk space to allocate to those temporary offline files.
After you've set up your laptop to use Offline Files, you next have to choose the specific folders on the server that you want to make available to you offline. Open Windows Explorer, right-click on the network folder, and choose Make Available Offline. If there are subfolders in the folder, you'll be asked whether you want to make those subfolders available as well.
After you do this, when you log off the network, the server copies to your laptop all the folders you've marked. They'll be available to you in the same way as any other folders are, via your applications, Windows Explorer, in My Computer, or My Network Places. Work with them on your laptop, and then, when you next connect to the network, they'll be synchronized to the network folders, depending on the options you've chosen.
If you'd like, rather than synchronize when you log off the network, you can synchronize manually on demand, or you can set up a schedule for automated synchronization. To synchronize on demand manually, in Windows Explorer choose Tools >Synchronize. From the dialog box that appears, select the items in the Logon/Logoff tab that you want to synchronize, and click Synchronize. To set up times to synchronize, use the On Idle and Scheduled tabs.
Offline Files works only if you have XP Professional and if you have a local area network to which both your laptop and desktop connect. But if you need to synchronize files between two computers not on a network-even if you don't have XP Professional-there is still a way to way to synchronize files between computers: use the Briefcase. It's not as easy to use as Offline Files, but it still does the trick. It synchronizes files between your two machines by using removable media such as a CD or Zip drive.
|
To use the Briefcase to transfer files from a laptop to a desktop computer, first format the media you're going to use if it needs to be formatted. With the removable media in the drive, open Windows Explorer, click on the media's disk folder, and choose File >New >Briefcase. If you're going to be using more than one Briefcase at a time, rename the Briefcase with a descriptive name. The Briefcase is a folder, like any other folder on your computer. Open it, and then click Finish to close the dialog box that appears.
Copy into the Briefcase the files you're going to want to transfer to your laptop and keep synchronized between the two computers. You can copy files from different folders. If you've going to add files to the Briefcase over time, or if you expect the files in the Briefcase to grow, make sure to leave enough extra room on the disk. Eject the media from your desktop. (If you get an error message when trying to eject a CD, close Windows Explorer and then eject it.) Place the media in your laptop, and move or copy the Briefcase folder to the laptop's hard disk. Remember to move or copy the entire folder, not the individual files in the folder. Work on the files as you would normally. Add or delete files as well. When it's time to transfer the files back to your PC, copy the Briefcase from your laptop to removable media, and put the removable media in your desktop. Open the Briefcase folder.
To synchronize all the files back to your desktop, choose
Briefcase >Update All and, from the Update Briefcase dialog box (shown in Figure
3-22), click Update. To synchronize individual files, select them, choose
Briefcase ![]() Update
Selection, and click Update.
Update
Selection, and click Update.
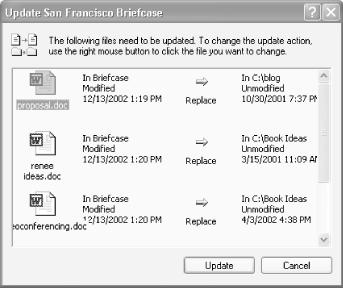
It's a good idea to examine the files in your Briefcase before you synchronize, so that you know the status of each. As you can see in Figure 3-23, you'll see whether each file has been updated and therefore needs to be updated on your current machine, or whether it was unchanged. The Briefcase folder also shows you the file's original location on the computer, as well as other details such as file size.

Right-click on any file in the Briefcase, and choose Properties >Update Status; you'll get updated information about each file. You can also perform the following tasks:
Update
This button updates the file. Only this file, and no others, will update.
Split from Original
This button breaks the link between the Briefcase file and the file in the hard disk. You won't be able to do automatic updates. The file in the hard disk will be listed as an Orphan in the status field in the Explorer view. You can still copy the file, even though the automatic link no longer works.
Find Original
This button opens the folder on your computer that holds the original file.
Backer (https://www.leanware.com/english/leanware.html) is a combination backup/synchronization program that lets you synchronize your laptop data with a desktop PC or server. It also lets you synchronize with a server while you're traveling, transfer files between PCs, and archive old versions of files. It's shareware and free to download, but if you decide to keep using it you're supposed to pay $24.
The quickest and easiest way to give your system more room is to use XP's built-in compression scheme for NTFS disks. Here's how to use it-and how to convert your existing disk to NTFS if it doesn't already use it.
If you need more hard disk space, don't buy another hard disk right away. First, consider using NTFS (NT File System) compression, which can give significantly more hard disk space by compressing all the files on your PC. NTFS's on-the-fly compression capabilities can shrink the size of individual files and folders, or entire drives. When you use it, the files or folders will be compressed when they're on your hard disk to save space, but they will be decompressed automatically when you use them, and then compressed again when stored on your hard disk. This means that, unlike with a compression program such as WinZip (https://www.winzip.com), you don't have to deal with decompressing as well as compressing files. You can also easily turn compression on and off.
Note that NTFS compression isn't available with a FAT32 filesystem, so if you have a FAT32
system you'll first have to convert to NTFS, as explained later in this hack.
If you're not sure which filesystem your volume uses, right-click on your
volume in Explorer, choose Properties ![]() General,
and look for the information next to File System.
General,
and look for the information next to File System.
How much disk space can you save by using NTFS compression? That depends largely on the kinds of files you have on your system. Bit-mapped graphic files are very compressible, so you'll save quite a bit of hard disk space if you have many of them. Document files, such as Word files, are also reasonably compressible, while certain kinds of files, such as PDF (Adobe Acrobat) files, are barely compressible at all.
|
In tests on my own PC, I found that bit-mapped .tif graphic files were compressed by more than 80 percent-a folder full of them shrunk from 295 MB to 57 MB. Word files shrunk by 66 percent-a folder full of them shrunk from 131 KB to 44 KB. PDF files, by way of contrast, hardly compressed at all-a group of them shrunk by just over 6 percent, from 5.59 MB to 5.27 MB.
When you use compression, you may notice a slight drop in system performance. There may be a slight lag when opening or closing files, depending on the speed of your system, because the files have to be decompressed in order for you to open them and compressed when you save them. With newer systems, though, you probably won't notice a lag. On my now-aging 1.8 GHz desktop, for example, I don't see a difference between working with files that have been compressed and working with files that haven't been compressed.
You can use NTFS compression on individual files, folders, and entire disks. To use NTFS compression on a file or folder, right-click on the file or folder in Windows Explorer and choose Properties >General >Advanced. You'll see the screen shown in Figure 3-24.
Check the box next to 'Compress contents to save disk space,' click OK, and click OK again when the Properties dialog box appears.
If you want to compress an entire drive,
right-click on it in Windows Explorer, and choose Properties ![]() General
>'Compress drive to save disk space.' You'll be asked for
confirmation, and then every folder and file on the drive will be compressed,
one after another. Depending on the size of the drive, the procedure can take
several hours. You can continue to use XP while the compression takes place.
During that time, however, you may be prompted to close a file you're working
on, so that XP can compress it.
General
>'Compress drive to save disk space.' You'll be asked for
confirmation, and then every folder and file on the drive will be compressed,
one after another. Depending on the size of the drive, the procedure can take
several hours. You can continue to use XP while the compression takes place.
During that time, however, you may be prompted to close a file you're working
on, so that XP can compress it.
By default, XP visually differentiates between compressed files and decompressed files; compressed files are shown in blue. If for some reason your compressed files aren't blue, and you want them to be, from Windows Explorer, choose Tools >Folder Options >View, scroll down, and select the checkbox next to 'Show encrypted or compressed NTFS files in color.'
|
When you compress files in a folder, they are all, obviously, compressed. But things can get confusing when you mix compressed folders and decompressed folders on a hard disk, or when you have compressed files in decompressed folders and vice versa. What happens, for example, when you move a decompressed file into a compressed folder, or move a compressed file from a compressed folder into a decompressed folder? The possibilities can set your head spinning. Here are the rules that apply when you're mixing compressed and decompressed files and folders:
Files copied into a compressed folder are automatically compressed.
New files created in a compressed folder are automatically compressed.
Files moved into a compressed folder from a separate NTFS volume are automatically compressed.
Files moved into a compressed folder from the same NTFS volume retain their compression settings. So, if the file was compressed, it will remain compressed. If the file was not compressed, it will not be compressed.
If you move a file from a compressed folder to a decompressed folder in the same NTFS volume, the file will remain compressed.
If you move a file from a compressed folder to a decompressed folder on a different NTFS volume, the file will no longer be compressed.
Files copied or moved from a compressed folder on an NTFS volume to a FAT32 volume are decompressed.
Files attached to emails are decompressed.
When you compress a file or folder, it doesn't appear that you're actually saving any disk space; when you view a file listing in Windows Explorer, the size of the compressed files will remain the same as they were before compression. In fact, though, the files have been compressed and space has been saved. Explorer reports on only the decompressed file size, not the compressed file size. To see the compressed size of a file or folder, Right-click on it in Windows Explorer and choose Properties >General. You'll see two listings of the file size, one titled 'Size' and the other titled 'Size on disk'. The 'Size on disk' listing reports on the compressed size of the file, while the 'Size' listing reports on the decompressed size, as shown in Figure 3-25.

Another way to gain extra space on your hard disk is to use XP's built-in ZIP capabilities. ZIP is an industry standard for file compression, and it compresses files much more effectively than NTFS does. In tests, I found that ZIP compression shrunk graphics files twice as effectively as NTFS compression-the resulting ZIP files were half the size of the NTFS-compressed files.
But that doesn't mean you should use ZIP compression all the time; there are times when using NTFS compression is a better bet. When files are ZIPped, for example, they can't be opened in their application by double-clicking on them. You first have to open the ZIP archive, and then double-click on the file. As a general rule, ZIPped files are not as convenient to use and handle as NTFS-compressed files. The exception is that ZIP lets you archive a group of files into a single folder, which you can then send to others via email or on disk.
What does this mean? On a day-to-day basis, NTFS compression is a better bet for files you frequently use. However, there are a number of reasons that to use ZIP files instead:
When you need to send a large file or files to someone via email. You can zip all the files into a single archive, and send that along.
For storing files that you rarely use. You can create ZIP archives to store the files, and then delete the originals.
For gaining the maximum amount of disk space. If hard disk space is at a premium, you'll save much more with ZIP files.
When you want to compress and also encrypt files. You can't encrypt files that have NTFS compression; you can encrypt files that have been ZIPped.
If you decide to use ZIP files, consider getting a copy of WinZip (https://www.winzip.com). It's easier to use than XP's built-in ZIP compression and offers many more features, including several levels of compression, built-in links to email, and much more.
To use XP compression or encryption, you have to use NTFS. But if you instead have a previous filesystem, such as FAT32, you're not left out-you can convert it to NTFS. To convert a volume to NTFS, use XP's convert utility. To convert a volume to NTFS, at a command prompt, type:
convert d: /fs:ntfswhere d: is the volume you want to convert.
You can also use a number of parameters along with the utility:
/v
This runs the utility in verbose mode, which provides information about the volume being converted.
/nosecurity
This sets the security privileges on the converted disk so that its files and folders can be used by anyone.
/x
Use this parameter if you're on a network and want to make sure that another user cannot disrupt the conversion process by trying to access the drive while you're converting it. This parameter dismounts the drive from the network.
If you convert to NTFS, here's a Registry hack for increasing its performance. Whenever you view a directory on an NTFS volume, the filesystem updates the date and time stamp to show the last time the directory has been accessed. If you have a very large NTFS volume, this continual updating process can slow system performance. You can use the Registry to disable automatic updating. Run the Registry Editor [Hack #68] and go to HKEY_LOCAL_MACHINESYSTEMCurrentContolSetControlFilesystem. Look for NtfsDisableLastAccessUpdate. If it's not present, create it as a DWORD. Set the value to .
Command-line junkies always want the command prompt within easy reach. Here's how to put a command prompt directly on your desktop, so it's there whenever you need it.
If you use the command line regularly-for example, to launch Windows Explorer with shortcuts [Hack #22]-you'd like the command line within easy reach. In fact, you'd like it right on your desktop. XP has no built-in way to do that for you.
But there's a great free program called MCL (https://www.mlin.net/MCL.shtml) that runs as a small command line you can put anywhere on your desktop, as shown in Figure 3-26.
Use it as you would use the normal command line, including any normal switches that you use to launch programs.
But MCL does more than just let you enter commands. It includes a number of other goodies that the XP command prompt doesn't, including these:
It keeps a history of your last 100 commands, so you can easily reenter or edit any commands you've already typed.
It includes an AutoComplete function that finishes your commands for you.
It lets you launch URLs directly from the command line. If you type a URL, your default browser will open to that URL.
It can be minimized to the System Notification area.
It can be launched with a hot key. The default is Ctrl-Alt-M.
The program has a few eccentricities you'll have to keep in mind when using it. When executing a DOS command, you have to use the prefix. For example, to copy a file from C:Favorite Files to C:Summer, you'd use this command:
%copy C:Favorite FilesGabecamp.doc C:SummerGabecamp.docTo open to a specific directory in Windows Explorer, precede the command with a $. So to open to C:Program Files, you'd issue the command $C:Program Files.
Command-line fans will also want to get a copy of 4NT (https://www.jpsoft.com). Run it instead of the normal command prompt and get countless new features, such as a command-line editor for modifying and reexecuting previous commands; the ability to copy, delete, and rename groups of files and directories with a single command; a built-in file viewer; the ability to select or include files by a variety of criteria, including date, time, and size; the ability to append descriptions (up to 511 characters) to files; and an exceedingly powerful batch language. It's shareware and free to try, but if you continue to use it, you're expected to pay $69.95.
The free Command Prompt Explorer Bar (https://www.codeproject.com/csharp/CommandBar.asp) lets you open a command-line toolbar from directly within Windows Explorer. It combines the command line with Windows Explorer navigation, so not only can you use the command line, but you can also navigate through your PC using Explorer.
|
Politica de confidentialitate | Termeni si conditii de utilizare |

Vizualizari: 1301
Importanta: ![]()
Termeni si conditii de utilizare | Contact
© SCRIGROUP 2025 . All rights reserved