| CATEGORII DOCUMENTE |
| Asp | Autocad | C | Dot net | Excel | Fox pro | Html | Java |
| Linux | Mathcad | Photoshop | Php | Sql | Visual studio | Windows | Xml |
This chapter explains what recipients and recipient policies are, and how to create and manage recipients. The chapter also includes information about address lists and the Recipient Update Service. Basic concepts about recipients are explained in the beginning of this chapter. The remainder of the chapter focuses on creating and managing recipients, recipient policies, and address lists. This chapter also includes detailed information about a new feature in Microsoft Exchange Server 2003-the query-based distribution list.
Central to any messaging system are the people and resources that receive messages. An individual may receive a message from a coworker, or a public folder may receive a message from a participant in a particular discussion.
Although messages are received by people, the term recipients refers to Microsoft Active Directory directory service objects, not people. Recipients are Active Directory objects that have messaging capabilities. However, the object itself does not receive messages. The messages are not stored in Active Directory. Instead, they can reside in a mailbox on an Exchange server, in a public folder, or in another messaging system.
People access messages that are sent to them by using a client application. Examples of client applications include Microsoft Outlook, Outlook Web Access, and Outlook Mobile Access. Each of these clients receives notification when a new message arrives and receives pointers to the location of the message, so that the message can be opened and read.
The following scenario explains the distinction between the person who receives e-mail messages and Active Directory objects. Carole, a member of the marketing team, has a user account that allows her to type her user name and password to log on to her computer and her company's network. After logging on, she has access to several network resources, one of which is her Exchange mailbox. Carole accesses her mailbox with an e-mail client, Outlook 2002. Outlook queries her Exchange mailbox and presents Carole a list of messages in her Outlook Inbox. When Carole opens one of these messages, Outlook retrieves the contents of the message from the message store on the Exchange server that houses her mailbox.
As shown in Figure 4.1, there is a recipient that is an Active Directory user object named carole. Mail that is addressed to carole is stored in an associated mailbox on an Exchange server. When the proper credentials are sent to the domain controller for user object carole, the contents of the mailbox become available to the e-mail client.

Figure 4.1 Users authenticate to Active Directory and then use mail clients to access the contents of their Exchange mailbox
So, in Exchange, the term recipient refers to an Active Directory object that is mailbox-enabled or mail-enabled. Mailbox-enabled recipients can send, receive, and store messages. Mail-enabled recipients can only receive messages.
Table 4.1 describes the Active Directory objects that can be Exchange recipients.
Table 4.1 Exchange recipient objects
|
Active Directory object |
Type of recipient |
Description |
|
Users |
Mailbox-enabled Mail-enabled |
Users can log on to networks and access domain resources. Users can be added to groups and appear in the global address list (GAL). Mailbox-enabled users can send and receive messages and store messages on their Exchange server. Mail-enabled users can receive messages at an external e-mail address only. They cannot send or store messages on Exchange. |
|
InetOrgPerson |
Mailbox-enabled Mail-enabled |
A user object that has had its properties extended to improve compatibility with directory services that use the InetOrgPerson object. As a recipient, InetOrgPerson has the same characteristics as a user object. To mail-enable or mailbox-enable an InetOrgPerson object, you must have a Microsoft Windows ServerT 2003 domain controller and an Exchange 2003-only environment (no servers running Exchange 2000 Server or Exchange Server version 5.5). Note |
|
Contacts |
Mail-enabled |
Contacts are objects that contain information about people or organizations outside of the Exchange organization. Mail-enabled contacts can receive e-mail messages at an external e-mail address. They can be added to distribution lists and appear in the GAL. Contacts cannot access network resources. |
|
Groups |
Mail-enabled |
A group is an object that can contain users, InetOrgPerson objects, contacts, public folders, and other groups. |
|
Active Directory object |
Type of recipient |
Description |
|
Query-based distribution groups |
Mail-enabled |
Query-based distribution groups are similar to standard distribution groups, except that they use an LDAP query to dynamically build the group membership. The query is run when a message is sent to the query-based distribution group. When you create a query-based distribution group, you select the criteria for the query. |
|
Public folders |
Mail-enabled |
Public folders are repositories for messages and other files that can be accessed by users on the network. |
Note
Although public folders are recipients, they are different from
the other recipient types mentioned here. For more information about public
folders, see Chapter 7, 'Managing Mailbox Stores and Public Folder
Stores.'
To receive letters and packages, a person must have a mailing address to give to senders. This mailing address could be a business address, the physical address of his or her home, or a post office box. Likewise, for a recipient to receive messages in an Exchange mailbox, the recipient must have an e-mail address.
To generate e-mail addresses for each recipient in an organization, you use recipient policies. This section focuses on how recipient policies manage these e-mail addresses, as well as how recipient policies manage mailboxes using the Mailbox Manager.
Note
Recipient policies also establish the mail domain for which
Exchange accepts incoming mail. For more information, see Chapter 5,
'Understanding and Configuring Message Routing and Transport.'
A recipient policy that manages e-mail addresses has the following characteristics:
It applies to a selected group of recipients.
It always contains information about the address types that are to be applied to those recipients.
It is given a priority, so that administrators can control which address is applied as the primary address to a recipient that may appear in more than one policy.
Example Scenario
The Exchange
administrator for Fourth Coffee wants to create three e-mail addresses for
recipients in the organization. The first is for the board of directors, the
second is for the employees of the company who work in
Table 4.2 Policies and their priorities
|
Policy |
Priority |
SMTP address |
|
Board of Directors |
@board.fourthcoffee.com |
|
|
|
@newyork.fourthcoffee.com |
|
|
Default |
lowest |
@fourthcoffee.com |
Table 4.3 shows information for three different users.
Table 4.3 User information for Fourth Coffee personnel
|
Name |
Office |
Board |
|
Jonathan Haas |
|
Yes |
|
Yale Li |
|
No |
|
Britta Simon |
|
No |
The first recipient policy, Board of Directors, runs and finds Jonathan Haas in the list of board members. His address is set to <alias>@board.fourthcoffee.com. The next policy, New York Employees, runs. It finds Jonathan Haas again. However, because a policy with a higher priority has already been applied to him, no action is taken. The policy continues running and finds Yale Li. No previous policy has applied to Yale, and Yale Li's address becomes <alias>@newyork.fourthcoffee.com. Finally, the default policy runs. Because no previous policy has applied to Britta Simon, her address becomes the default address, <alias>@fourthcoffee.com.
You may want to apply more than one address to a group of recipients. In the preceding example, if everyone in the company should receive e-mail messages at <alias>@fourthcoffee.com, that address must be included in all three recipient policies. When you have more than one address in a recipient policy, only one address is considered the primary address per address type. This means that you can only have one primary Simple Mail Transfer Protocol (SMTP) address and one primary X.400 address. You could have 10 SMTP addresses for one recipient, but only one of those can be the primary SMTP address.
The difference between primary and secondary addresses is that the primary address serves as the return e-mail address. When mail is received from a recipient, the primary address determines which address the mail appears to have come from. Recipients can receive mail sent to any of the addresses associated with them. Table 4.4 shows the primary and secondary e-mail addresses of the three people in the scenario.
Table 4.4 Primary and secondary e-mail addresses
|
Name (alias) |
Receive mail sent to |
Send
mail from (primary e-mail |
|
Jonathan Haas (Jon) |
Jon@board.fourthcoffee.com Jon@fourthcoffee.com |
Jon@board.fourthcoffee.com |
|
Yale Li (Yale) |
Yale@newyork.fourthcoffee.com Yale@fourthcoffee.com |
Yale@newyork.fourthcoffee.com |
|
Britta Simon (Britta) |
Britta@fourthcoffee.com |
Britta@fourthcoffee.com |
Notice that Jonathan Haas
is in the
Note
This example scenario shows how recipient policies are applied.
The behavior of recipient policies differs when co-existing with Exchange
Server 5.5.
In addition to generating and assigning addresses to recipients, recipient policies can be used to manage mailboxes using Exchange Mailbox Manager. Mailbox Manager sets age and size limits for messages, and then it finds and processes messages that exceed those limits.
There is no default policy that enforces age or size limits for messages. When you create the first such policy, the default limits of 30 days and 1,024 kilobytes (KB) are applied to every folder in a mailbox. A message must exceed both limits before Mailbox Manager will process it. Under the default settings, a 500-KB message will never be processed, no matter how old it is.
Before Mailbox Manager will run, you must start the mailbox management process on the server object in Exchange System Manager. To start the mailbox management process, you use the Mailbox Management tab of the Properties dialog box for the server object (see Figure 4.2). For more information, see 'Scheduling Mailbox Manager Processes' in Chapter 3, 'Configuring Exchange Server Settings.'
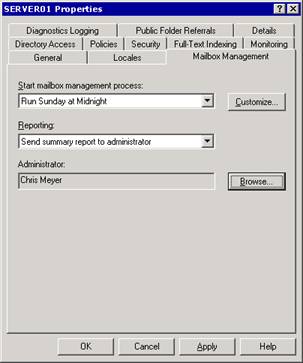
Figure 4.2 Starting the mailbox management process
What happens when Mailbox Manager processes a message depends on the setting that you choose when creating the policy. By default, only a report is generated. No further action is taken. In addition to the default setting, there are three other options for how Mailbox Manager processes messages that exceed the specified limits. Table 4.5 describes all four of these Mailbox Manager options.
Table 4.5 Mailbox Manager options
|
Option |
Description |
|
Generate report only |
No messages are moved or deleted, but an administrator report is generated that indicates which mailboxes contain items that exceed the limits defined by the mailbox recipient policy. |
|
Move to Deleted Items folder |
Messages are moved to the Deleted Items folder in each client mailbox. Messages are handled as if deleted by the client. Users can remove them from the Deleted Items folder if they want to. |
|
Move to System Cleanup folders |
A partial replica of the folder hierarchy of the mailbox is created under a root folder called System Cleanup. Affected messages are moved into the appropriate subfolder of the System Cleanup folder. This feature gives users a way to recover recently deleted items, without losing information about the original folder location of the items. |
|
Delete immediately |
Messages are immediately deleted from client view without being moved to either the Deleted Items or System Cleanup folder. |
You can use the same limits for every folder that the mailbox recipient policy applies to, or set custom limits on a folder-by-folder basis. Each folder must be configured individually if its limits differ from the default limits.
Recipients can either be created manually using Active Directory Users and Computers or programmatically using APIs. This section focuses on manually creating mailbox-enabled and mail-enabled objects, including distribution groups. For information about public folder creation, see Chapter 7, 'Managing Mailbox Stores and Public Folder Stores.' For information about programmatically creating recipients, download the Exchange Software Development Kit (SDK) or view it online from the Exchange developer center (https://msdn.microsoft.com/exchange).
This section focuses on creating mail-enabled objects with the following notes and exceptions:
Public folders are mail-enabled recipients that differ significantly from other recipients. For more information about public folders, see Chapter 7, 'Managing Mailbox Stores and Public Folder Stores.'
InetOrgPerson objects can be mail-enabled only if you have a Windows Server 2003 domain controller and have only Exchange 2003 servers in your organization.
Mail-enabled groups are covered in their own section that follows.
Some Active Directory objects, such as computers and printers, cannot be made into recipients.
To create a new Active Directory object that can be mail-enabled or mailbox-enabled, use Active Directory Users and Computers, as shown in Figure 4.3.
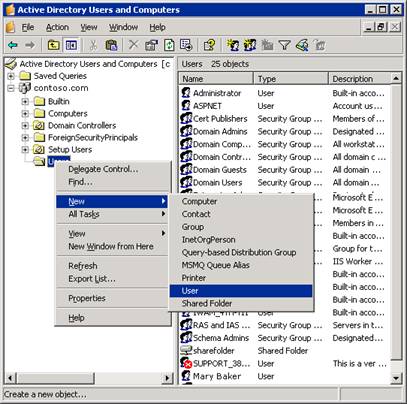
Figure 4.3 Creating a recipient using Active Directory Users and Computers
When you create a recipient object on a network where Exchange is already installed, the recipient will be mailbox-enabled or mail-enabled by default. Clear the Create an Exchange mailbox check box (as shown in Figure 4.4) if you do not want to mail-enable or mailbox-enable the Active Directory object.
Note
To see the options that are specific to Exchange, you must have the
Exchange system tools installed on the computer that is being used to create
users in Active Directory Users and Computers. Users created on computers
without Exchange system tools installed will not have mailboxes created by
default.
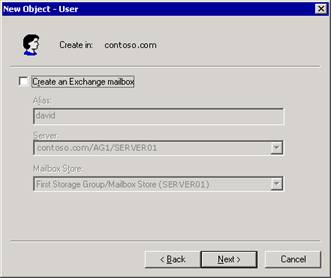
Figure 4.4 Clear the check box for the object not to be a recipient
To make an existing Active Directory object a recipient
In Active Directory Users and Computers, right-click the object, and then select Exchange Tasks.
On the Available Tasks page (see Figure 4.5) in the Exchange Task Wizard, select Create Mailbox or Establish E-mail Address.
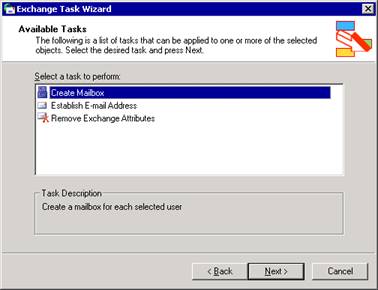
Figure 4.5 Using Exchange Task Wizard to mail-enable or mailbox-enable an existing user object
Note
If Create Mailbox is not available, the
object cannot be mailbox-enabled. However, if Delete Mailbox
is listed instead, the object already has a mailbox associated with it. Each
recipient can have only one Exchange mailbox.
Groups are used to assemble Active Directory objects under one name. This reduces the overhead required to manage users, especially those with similar needs. For example, you may have a network resource, such as a public folder, that everyone on your marketing team needs to access. You could give each individual on the team permissions to that folder, or you could create a security group called 'marketing' and add each member of the marketing team to that group. Then, you can give the group permission to the folder. After a group has been established, you can give that group access to other resources, such as additional public folders, without having to locate every member of the marketing team each time.
There are two main types of groups: security and distribution. Security groups are security principals in Active Directory. This means that security groups can be set in the access control list (ACL) of a resource, such as a network share or public folder. Distribution groups exist for sending e-mail messages to collections of users. In a Microsoft Windows environment without Exchange, there are limited uses for distribution groups. Both security and distribution groups can be mail-enabled. They cannot be mailbox-enabled because they represent a collection of users.
A mail-enabled group represents a collection of recipient objects. Its purpose is to expedite the distribution of messages to multiple e-mail addresses. Create a group as you would any other recipient object. Notice, however, that Create an Exchange e-mail address is not selected by default for groups. To enable the group for mail, select Create an Exchange e-mail address during the process of creating the group (see Figure 4.6).
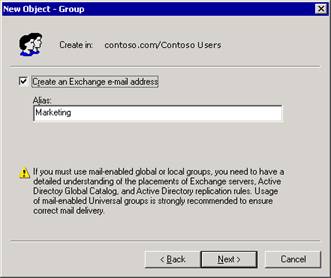
Figure 4.6 Creating a group that is enabled for mail
To enable an existing group for mail
In Active Directory Users and Computers, right-click the group, and then click Exchange tasks.
On the Available Tasks page (see Figure 4.7) in the Exchange Task Wizard, select Establish E-mail Address on Groups.
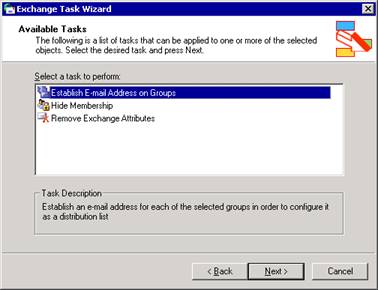
Figure 4.7 Using Exchange Task Wizard to enable an existing group for mail
When mail is sent to a mail-enabled group, the group is first expanded, and then mail is sent to each of the recipients in the group. Unless an expansion server (a server that is responsible for expanding distribution groups) is specified, the group will be expanded on the first Exchange server that handles the message.
Expansion of large groups can tax system resources on an Exchange server. For large distribution groups, you may want to designate a dedicated expansion server to alleviate the workload of the other production servers. Mail sent to large distribution groups will not slow the Exchange servers that your users use to access their mailboxes.
There is a drawback to setting a specific server as the expansion server for a group: If that server is unavailable, no member of the distribution group receives the message. However, if you leave the default setting, Any Server in the Organization, most of the users receive their messages if one server fails. Also, if all members of a distribution group are on well-connected servers, setting a specific expansion server may be unnecessary.
For information about setting specific expansion servers, see 'Managing Recipient Settings' later in this chapter.
To expand distribution lists into individual recipients, Exchange contacts a global catalog server. The global catalog server has a copy of all global and universal groups in its domain and a copy of universal groups from other domains, but it does not have a copy of global groups from other domains. This becomes important in multi-domain environments because if a message is destined for a global distribution group in a domain that is separate from the global catalog server, Exchange cannot expand the distribution group on that message. Because the global catalog server does not have copies of the membership of global groups for domains outside of its own, it does not contain any information about the distribution list. Therefore, the categorizer cannot expand the distribution list. To avoid this problem, you should always use universal distribution groups in multi-domain environments. Use global groups within single domains only.
A query-based distribution group is a new type of distribution group introduced in Exchange 2003. This section explains what a query-based distribution group is, how it works, and how to create one.
A query-based distribution group provides the same functionality as a standard distribution group. However, instead of specifying static user memberships, you can use an LDAP query (for example, 'All full-time employees in my company') to dynamically build membership in a query-based distribution group. This results in much lower administrative costs because of the dynamic nature of the distribution group. However, query-based distribution groups have a higher performance cost for queries whose outcome produces a large number of results. This cost is in terms of server resources, such as high CPU usage and increased memory usage. This increased usage occurs because every time an e-mail message is sent to a query-based distribution group, an LDAP query is executed against Active Directory to determine its membership.
Important
You cannot view the membership of a query-based distribution
group in the GAL because it is dynamically generated each time mail is sent.
Query-based distribution groups work reliably in the following topologies:
Exchange 2003-only environment (no Exchange servers prior to Exchange 2003) running in native mode.
Exchange 2000 Service Pack 3 (SP3) and Exchange 2003 in native mode. If you have Windows 2000 global catalog servers in this scenario, you can modify a registry key on the Exchange 2000 SP3 servers to increase reliability. This modification is covered in the next section.
If you are running versions of Exchange prior to Exchange 2000 SP3 in your environment, query-based distribution groups will not work reliably.
Use the following procedure to configure an Exchange 2000 SP3 server for improved reliability in environments where query-based distribution groups will be expanded with Windows 2000 global catalog servers.
Warning
Incorrectly
editing the registry can cause serious problems that may require you to
reinstall your operating system. Problems resulting from editing the registry
incorrectly may not be able to be resolved. Before editing the registry, back
up any valuable data.
To modify your Exchange 2000 SP3 server
Start Registry Editor.
In Registry Editor, locate the following registry key:
HKEY_LOCAL_MACHINESYSTEMCurrentControlSetServicesSMTPSVC
Parameters
In the details pane, right-click, point to New, and then click DWORD Value.
Type DynamicDLPageSize for the name.
Right-click DynamicDLPageSize, and then click Modify.
Under Base, click Decimal, and then click OK.
In Edit DWORD Value, under Value Data, type .
Note
You need only do this for Exchange 2000 servers that use
Windows 2000 global catalog servers.
When a message is submitted to a query-based distribution group, Exchange handles the message slightly differently from messages destined for other recipients. A query-based distribution group flows through Exchange to the proper recipients as follows:
E-mail messages are submitted through the Exchange store driver or SMTP to the submission queue.
The categorizer, a transport component that is responsible for address resolution, determines that the recipient is a query-based distribution group.
The categorizer sends the LDAP query request to the global catalog server.
The global catalog server runs the query and returns the set of addresses that match the query.
After receiving the complete set of addresses that match the query, the categorizer generates a recipient list containing all of the users. The categorizer must have the complete set of recipients before it can submit the e-mail message to routing. Therefore, if an error occurs during the expansion of the query-based distribution group to its individual recipients, the categorizer must restart the process.
After the categorizer sends the complete, expanded list of recipients to routing, the standard message delivery process continues, and e-mail messages are delivered to the mailboxes of the recipients.
The process differs if a dedicated expansion server is used for query-based distribution groups. In this case, rather than sending a query to the global catalog server for expansion as discussed in Step 3, the e-mail message is first routed to the dedicated expansion server. After the message arrives at the expansion server, the expansion occurs, and the delivery follows the same process as described earlier. The expansion server must be an Exchange 2000 SP3 server or later.
The time that Exchange requires to expand a query-based distribution group and run the query depends on several factors, as follows:
Type of hardware deployed in your organization The categorizer can require up to 2 KB of memory for each recipient. This is a conservative metric that you can use as a baseline. Using this baseline, if you send an e-mail message to a query-based distribution group of 6,000 users (meaning that the query returns 6,000 records), the categorizer requires 12 megabytes (MB) of RAM solely to expand the query-based distribution group. Although this use of memory is temporary, it does occur every time the group is expanded. Similarly, sending an e-mail message to a larger query-based distribution group of 100,000 users, the categorizer requires approximately 200 MB of RAM. The processor speed and amount of available physical memory affects how long it will take to deliver the e-mail messages after the expansion.
Global catalog or expansion server availability affects the expansion and delivery of e-mail messages that users send to query-based distribution groups If all global catalog servers are unavailable, the message is placed in retry mode in the categorizer, which means that the complete expansion restarts after one hour.
The general recommendation is to divide large query-based distribution groups into combinations of standard distribution groups, and assign different expansion servers for each large distribution group. The following options describe three approaches to doing this.
Option 1 Designate an Exchange 2003 server with no mailboxes, such as a public folder replica server or a bridgehead server, as the expansion server for a large query-based distribution group. Because this server has more bandwidth and resources to expand the query-based distribution group, expansion and delivery are more efficient.
Option 2 Create a query-based distribution group for every Exchange server, and limit each query-based distribution group to the mailboxes on that Exchange server. Designating this same server as the expansion server optimizes mail delivery. Then, use aggregate standard distribution groups that contain these query-based distribution groups as members. For example, to create a query-based distribution group for all full-time employees, you could create a query-based distribution group on each server for full-time employees, and name them 'Server1 Full Time' and 'Server2 Full Time.' Then, create a distribution group composed of these server-based groups called 'AllFullTime.'
Note
The distribution group that you use to combine the query-based
distribution groups cannot itself be a query-based distribution group.
Option 3 The following example illustrates a third approach for improved handling of large query-based distribution groups.
You want to create a query-based distribution group called 'All employees' with 100,000 users. Consider dividing the group into the following smaller query-based distribution groups and combining these groups into a single standard distribution group:
'All Temps' 10,000 users
'All Vendors' 5,000 users
'All Full-Time' 65,000 users
'All Interns' 2,000 users
'All Contractors' 18,000 users
In this case 'All Full-Time' would be a large distribution group, so you may want to assign a specific expansion server to it. The other query-based distribution groups can be assigned an expansion server based on how the users are distributed across your Exchange servers. For example, if all of the interns reside on one Exchange server, you may want to designate the same server as the expansion server for 'All Interns.' Overall, this proposed approach will perform much better than a single query-based distribution group with 100,000 recipients.
Use the following guidelines when you create query-based distribution groups:
Use query-based distribution groups in an Exchange 2003-only environment, or a native mode environment with Exchange 2003 and Exchange 2000 in which all Exchange 2000 servers are running Service Pack 3 or later.
Use universal groups in multi-domain environments when you create distribution groups that span domains. Although query-based distribution groups can be added to global distribution groups, domain local groups, and global security groups, and can contain any of these groups, membership in these types of groups is not replicated to global catalog severs in other domains. Universal distribution groups should be used in situations where distribution will span a multi-domain environment.
When you combine query-based distribution groups into an aggregate group, combine them in a universal group. Only universal groups are available on global catalog servers across domains.
When you build query-based distribution groups, include only universal groups if the membership is to be available in all of the domains in a multi-domain environment.
Index the attributes that you use in the query. Indexing greatly improves the performance of the query, and it reduces the time that Exchange requires to expand the distribution group and deliver the e-mail message to the intended recipients. For more information about indexing attributes, see Microsoft Knowledge Base Article , 'How To Add an Attribute to the Global Catalog in Windows 2000' ( https://support.microsoft.com/?kbid=313992
If the filter string contains incorrect formatting or incorrect LDAP syntax, the global catalog server will not run the query. Using Active Directory Users and Computers to create your query can help prevent you from constructing an incorrect query. You can also use the Preview button to view the result of the query. This will confirm the validity and expected results of the query. If you create a query-based distribution group based on an incorrect LDAP query, when a user sends mail to the query-based distribution group, the user receives a non-delivery report (NDR) with the code 5.2.4. If you enable categorizer logging, Exchange logs one of two events with event identifiers of 6024 or 6025.
If the filter string is well-formatted, but produces no results, the sender will not get an NDR. This is the same outcome that occurs if you send to an empty distribution group. As previously stated, use the Preview button in Active Directory Users and Computers to confirm the expected results of your query.
Use Exchange System Manager in a security context where its permissions for reading objects in Active Directory are the same as those of the Exchange server. Exchange System Manager runs in the security context of the user that is currently logged on. If an administrator is running with lower security privileges than the Exchange server, it is possible that the query will show a subset of the actual results in the preview pane. The preview pane will show only those Active Directory objects that the administrator has permissions to read. When mail is sent to the query-based distribution groups, however, the categorizer will run with the Exchange server permissions. Assuming the Exchange server has permissions for all the objects in the query, the query will return the correct results.
There will be issues when a base distinguished name is deleted. Query-based distribution expansion relies on its base distinguished name referring to a valid container in the directory. If the base distinguished name container for a query-based distribution group is deleted, the categorizer cannot run the query, and the sender receives an NDR with the code 5.2.4. If categorizer logging is enabled, an event ID of 6024 or 6025 is logged. For example, you create a sales container within the users container for all sales employees and build a query-based distribution group using the sales container. If you delete the sales container, the query will no longer work.
To create a query-based distribution group, you must use the Exchange 2003 version of Exchange System Manager and Active Directory Users and Computers. You cannot create query-based distribution groups without upgrading your administration console.
Note
It is recommended that you upgrade all of your administrative
consoles to Exchange 2003 before you deploy query-based distribution
groups in your environment.
When creating a query-based distribution group, Active Directory Users and Computers provides a way to format the LDAP query using standard attributes, without requiring specific knowledge of LDAP. For example, you can select all mailboxes under the organizational unit, or even customize the query to select all mailboxes under an organizational unit that exist on a particular server.
After you create a query-based distribution group, you can ensure that your query works the way that you intended it to work by using the preview feature. This feature is useful not only for query validation, but also to determine how long it takes a query to run. Based on this time, you can decide whether or not to divide the query into smaller queries for better performance and faster delivery times.
To create a query-based distribution group
In Active Directory Users and Computers, in the console tree, right-click the container where you want to create the query-based distribution group, point to New, and then click Query-based Distribution Group.
In Query-based Distribution Group name, type a name for the query-based distribution group, and then click Next.
Under Apply filter to recipients in and below, verify that the parent container shown is the one that you want the query-based distribution group to be run against. If this is not the correct container, click Change to select another container.
Note
The query returns only recipients in the selected container and
its child containers. To achieve the results that you want, you may need to
select a parent container or create multiple queries.
Under Filter, select one of the following options:
To filter the query based on a set of predefined criteria, click Include in this query-based distribution group, and then select from the following criteria:
Users with Exchange mailboxes
Users with external e-mail addresses
Groups that are mail-enabled
Contacts with external e-mail addresses
Public folders that are mail-enabled
To create your own criteria for the query, click Customize filter, and then click Customize.
Click Next to see a summary of the query-based distribution group that you are about to create.
Click Finish to create the query-based distribution group.
The new query-based distribution group appears underneath the container that you selected in Step 3.
To verify that a query-based distribution group works correctly
In Active Directory Users and Computers, right-click the query-based distribution group that you just created, and then click Properties.
Select the Preview tab to view the query results, and verify that the correct recipients are included in the distribution group.
Note
The results that are displayed in the preview pane may vary from
the actual results when the query is run, depending on permissions settings.
In Exchange System Manager, you can create query-based distribution groups based on the AND operator. To create distribution groups based on the OR operator using query-based distribution groups, create multiple query-based distribution groups and combine them in a single distribution group.
Consider the following
example, in which you want to create a query-based distribution group that
includes all employees in the marketing department or all employees in the
Create a query-based distribution group for all employees in the marketing department, called Marketing.
Create a query-based distribution group
for all employees in the
Create a distribution group (not a
query-based distribution group, however) and add the query-based distribution
groups, Marketing and
When you add query-based distribution groups as members of a distribution group, you cannot do so in the same way that you add users to a group. You must right-click the group, and then select Add Exchange query-based distribution group. The following procedure describes in detail the process of adding query-based distribution groups as members of a standard distribution group.
To add query-based distribution groups as members of a distribution group
In Active Directory Users and Computers, in the console tree, navigate to the container where the distribution group resides, right-click the distribution list, and then click Add Exchange Query-based Distribution Groups.
In Select Exchange Query-based Distribution Groups, under Enter the object names to select, enter the name of the query-based distribution group that you want to add as a member of this group.
Click Check Names to verify the entry.
Click OK.
Repeat Steps 1 through 4 for each query-based distribution group to be added as a member of this distribution group.
Managing recipients involves assigning e-mail addresses to recipients with recipient policies, and managing settings for recipient objects with Active Directory Users and Computers.
If you have servers running Exchange 5.5 in your Exchange 2003 organization (that is, your organization is in mixed mode), it is still possible to manage recipients using the Exchange 5.5 Administrator Program, and it is recommended that you do so, with the exception of moving mailboxes. When you move mailboxes, use Exchange 2003 System Manager or Active Directory Users and Computers, where Exchange 2003 System Management tools have been installed.
Note
Before you use Active Directory Users and Computers to move
recipients from Exchange 5.5, you must first create a connection agreement
between each Exchange 5.5 site and Active Directory. It is strongly
recommended that all objects in your Exchange 5.5 directory be represented
in Active Directory before you deploy your first Exchange 2003 or
Exchange 2000 server. This greatly reduces the risk of future problems.
For more information about planning connection agreements, see Chapter 4,
'Migrating from Exchange Server 5.5,' in the book Exchange Server 2003 Deployment Guide (https:www.microsoft.com/exchange/library).
Exchange objects in Exchange 2003 are different from the Exchange objects in Exchange 5.5. It is important to understand how these objects have changed. Table 4.6 associates the Exchange objects in Exchange 5.5 with their equivalents in Exchange 2003.
Table 4.6 Terminology differences between Exchange 5.5 and Exchange 2003
|
Exchange 5.5 term |
Exchange 2003 equivalent term |
|
Mailbox |
Mailbox-enabled user When a user is mailbox-enabled, the user has an e-mail address and a corresponding mailbox. Mailbox-enabled users can send, receive, and store e-mail messages within an Exchange organization. |
|
Custom recipient |
Mail-enabled user When a user is mail-enabled, they have an associated e-mail address external to the Exchange organization, but they do not have an associated Exchange mailbox. Mail-enabled users can receive messages at a specified external address, but they cannot store messages on Exchange servers in your organization. -or- Mail-enabled contact A mail-enabled contact does not have a Windows logon account or a mailbox. A contact can represent someone outside of the Exchange organization, such as a customer or a business partner. |
|
Distribution list |
Mail-enabled group E-mail
messages that are sent to a group are routed to the |
When Exchange is installed, a default recipient policy is created that applies SMTP and X.400 addresses to all recipients in your Exchange organization. You can modify the default policy or create new policies. However, you cannot delete the default policy. All recipients in an Exchange organization must have both SMTP and X.400 addresses.
The default policy is always set to the lowest priority. Priority determines the order in which policies are applied to the recipients specified in the policy. Priority 1 represents the first policy to be applied. In mixed mode, where servers running Exchange 2003 or Exchange 2000 coexist with servers running Exchange 5.5, the Site policy has a priority of highest and is the only policy that Exchange applies, regardless of any other policies that you create. You can reorder recipient policies at any time, with the exception of the default policy, which is always set to lowest.
Note
The default policy is special in the sense that every user in the
organization must be stamped with the same proxy address, so that users can
take advantage of features like Outlook Web Access, Outlook Mobile Access, and
Exchange ActiveSync.
To begin the process of creating a recipient policy, right-click the Recipient Policies container in Exchange System Manager, point to New, and then click Recipient Policy (see Figure 4.8).
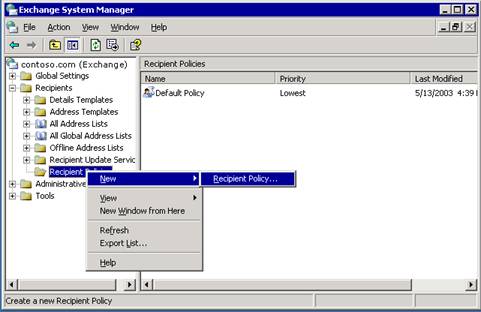
Figure 4.8 Creating a new recipient policy
After you click Recipient Policy, you then begin the process of completing the steps that are outlined in the following checklist and described in the following sections.
Recipient Policy Checklist
|
c |
Select the property sheets (e-mail address or Mailbox Manager settings). |
|
c |
Name the new policy. |
|
c |
Create a filter. |
|
c |
Configure the settings. |
|
c |
Set the priority of the policy. |
|
c |
Apply the policy. |
Select the Property Sheets
The first step in creating a recipient policy is to choose the type of policy to create. A single recipient policy can contain an address policy, a Mailbox Manager policy, or both (see Figure 4.9). Selecting both will add property pages for both address and Mailbox Manager features to one recipient policy.
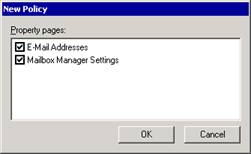
Figure 4.9 Selecting property pages for a new policy
Name the New Policy
After you select the property pages, give the new policy a name. To help you identify the recipients to which the policy applies, give the policy a descriptive name.
Create a Filter
Initially, there are no filter rules applied to the policy (see Figure 4.10). If you do not create a filter, the policy will not be applied to any recipients. To create the filter using an LDAP query, click Modify on the General tab.
Figure 4.10 Policy does not apply to anyone because no filter rules are set
Configure the Settings
To customize the recipient policy, switch to either the E-Mail Addresses (Policy) tab or the Mailbox Manager Settings (Policy) tab in the policy's Properties dialog box. Use the settings on these tabs to configure the recipient policy to meet the needs of the associated recipients. After configuring the settings, click OK to create the policy.
Set the Priority and Apply the Policy
After you create a new recipient policy, the policy and its assigned priority appear in Exchange System Manager. If you want to change the priority of a recipient policy, right-click the policy, select All Tasks, and then move the policy up or down the list of recipient policies shown in Exchange System Manager.
After you create a new recipient policy, you also need to apply the policy by right-clicking the policy in Exchange System Manager, and then clicking Apply Policy Now.
Some recipient settings are configured in Exchange System Manager, so that they are applied to all recipients in an organization or to large groups of recipients. Examples include mailbox size (which can be set on a per-store basis), global send and receive limits, and limits on the maximum number of recipients to which users can send. You can configure exceptions to these settings for individual recipients in Active Directory Users and Computers. For example, you may have a user who needs a larger mailbox, or one who needs to be able to send large messages.
For information about using Exchange System Manager to set message settings for an entire organization, see Chapter 2, 'Managing an Exchange Organization.' For information about setting mailbox size limits on mailbox stores, see Chapter 7, 'Managing Mailbox Stores and Public Folder Stores.'
The following sections explain three of the four Exchange-specific tabs that you see in Active Directory Users and Computers, where Exchange system tools have been installed. The fourth tab, Exchange Features, is discussed in Chapter 6, 'Managing Client Access to Exchange.'
To set individual message settings for mailbox-enabled recipients, start by navigating to the Exchange General tab (see Figure 4.11).
Figure 4.11 Exchange General tab
To navigate to the Exchange General tab
In Active Directory Users and Computers, right-click the object to be modified, and then click Properties.
Click the Exchange General tab.
To maintain system performance and to prevent users from wasting valuable system resources by sending large files through your e-mail infrastructure, message size limits are set at the global level in Exchange System Manager, as explained in Chapter 2, 'Managing an Exchange Organization.' In most cases, e-mail messages for legitimate business purposes can be sent under the threshold set at the global level. Use the Delivery Restrictions dialog box to override the global setting for those users who have special requirements and need to send larger files than the global limit allows.
Tip
Consider setting up users who need to transfer large files with
an FTP account, instead of trying to use your Exchange server as though it were
an FTP server.
In addition to setting message size limits, you can use the Delivery Restrictions dialog box to specify to whom users can send messages and from whom they can receive messages (see Figure 4.12). This is similar to the global setting.
Important
When you make these changes for individuals, you can only set
restrictions that reference other Active Directory objects. Blocking mail from
a specific Internet mail source or IP address must be done at the global level.
Figure 4.12 Delivery Restrictions dialog box
You can further restrict delivery of messages to recipients by selecting the From authenticated users only check box. This prevents anyone who is not authenticated by your Windows network from sending mail to this recipient. Selecting this check box effectively stops all Internet mail to this recipient. After selecting this check box, select how messages will further be restricted by choosing to allow messages from everyone (all authenticated users), only from users in the restricted list at the bottom of the Delivery Restrictions dialog box, or from everyone except users in the restricted list. To add users to the restricted list, use the Add button.
One delivery option is the use of delegates. In many organizations, delegates are given permission to send mail on behalf of someone else. For example, an administrative assistant may send a meeting request on behalf of a manager. You can assign delegates to a mailbox-enabled user in the Delivery Options dialog box.
Another delivery option is address forwarding, wherein mail sent to the user is forwarded to another address in the organization. You can also choose to have copies of the message sent to both the forwarding address and the user's mailbox. In this case, deleting one copy of the message does not delete the other. You may want to use forwarding to protect the identity of the actual recipient, or for administrative assistants who help sort e-mail messages for others.
Recipient limits control the number of recipients to which a user can send a single message. By default, there is no set limit.
Individuals in your organization may need more storage space on their Exchange servers than the threshold for the mailbox store allows. You can set storage limits for individual users in the Storage Limits dialog box. Users can be warned as they approach the limit, subsequently denied the ability to send, and then denied the ability to send and receive mail.
Also, you can override the setting for deleted item retention that is set on the mailbox store. When a user deletes an item, it appears deleted to the user. However, a copy is kept in the user's mailbox store for a specified amount of time, allowing the item to be recovered if it was unintentionally deleted. Some users in your organization may need extra recovery protection, and you can override the setting in the Storage Limits dialog box. If you choose to override the limit set on the mailbox store, you will also have the choice to not permanently delete an item until the store is backed up, adding even greater recovery opportunities for that user.
Navigate to the Exchange Advanced tab to change advanced settings for mailbox-enabled recipients.
To navigate to the Exchange Advanced tab
In Active Directory Users and Computers, right-click the object that you want to modify, and then click Properties.
On the Exchange Advanced tab (see Figure 4.13), select the following options:
In Simple display name, set a display name that will be used by systems that cannot interpret all of the characters in the normal display name.
This situation may occur when more than one language version of Exchange System Manager is used to manage an Exchange organization. For example, the English version of Exchange System Manager cannot display all of the characters in the Kanji character set. Because the simple display name takes ASCII characters only, all versions of Exchange System Manager are able to display the simple display name.
To prevent the recipient from being displayed in address lists, select Hide from Exchange address lists.
To prevent the recipient from sending mail that is marked high priority to an X.400 mail system, select Downgrade high priority mail bound for X.400.
Figure 4.13 Exchange Advanced tab
Using the Custom Attributes button on the Exchange Advanced tab, you can assign up to 15 custom values for a recipient. By default, recipients have attributes such as phone number, office number, or manager. If there is information that you would like to display in the GAL that does not fit in any of the existing attributes, you can create up to 15 other entries. For example, you may want to include an attribute for the divisions or cost centers of your company.
Using the Mailbox Rights button on the Exchange Advanced tab, you can assign rights to the mailbox of a recipient to users or to groups, add users to the list, and then allow or deny them the following rights:
Delete mailbox storage The mailbox from the mailbox store can be deleted. By default, only administrators have permission to do this. Users cannot delete their own mailboxes.
Read permissions The specified user can read the contents of a mailbox.
Change permissions The user can modify or delete items in the mailbox.
Take ownership The user is granted ownership of a mailbox.
Full mailbox access The delegated user has the same access rights as the owner.
Associated external account This option is used when a user's Windows account resides in a different forest than the Exchange mailbox.
Note
Each Exchange mailbox must be associated with an Active Directory
object, such as a user, in the same forest as the mailbox. If the intended user
account resides outside of the forest where Exchange is, Exchange first
associates the mailbox with an account in its same Active Directory forest.
That account is disabled. Then, the mailbox is associated with the external
account.
Special permissions Click Advanced to work more granularly with permissions, including changing inheritance.
You assign these rights on the Mailbox Rights tab in the user's Permissions dialog box (see Figure 4.14).
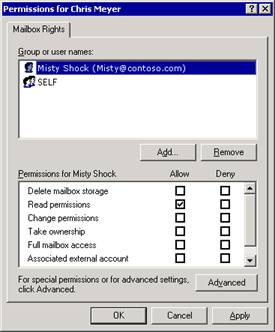
Figure 4.14 Assigning rights to read another user's mailbox
When you need to set individual message settings for mail-enabled recipients, start by navigating to the Exchange General tab for that recipient (see Figure 4.15).
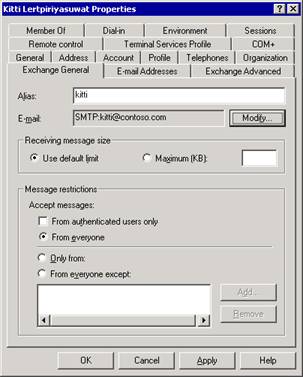
Figure 4.15 Exchange General tab for mail-enabled recipients
The Exchange General tab for mail-enabled recipients is slightly different than that for mailbox-enabled recipients. It has fewer features, omitting those features that apply only to mailbox-enabled users. For more information, see 'Configuring Message Settings for Mailbox-Enabled Recipients' earlier in this chapter.
The Exchange Advanced tab adds one option that is not included for mailbox-enabled users, Use MAPI Rich Text Format (RTF). When you select this option, mail sent to this recipient will be sent using MAPI RTF, overriding the settings configured in Internet Message Formats in Exchange System Manager. Select this option only if you are sure that the recipient can view MAPI-rich text.
Distribution groups are similar to other mail-enabled recipients, but they have the following unique features on the Exchange Advanced tab (see Figure 4.16):
Expansion server Use the Expansion server drop-down list to select the server where the group is expanded. If this is set to any server in the organization, the group is expanded on the first Exchange server in your organization that receives the message. For more information about expansion servers, see 'Expanding Mail-Enabled Groups' earlier in this chapter.
Hide group from Exchange address lists Select this check box to prevent this distribution group from appearing in the GAL or any other address list. You may want to do this for groups that you do not want everyone in the company to know about. For example, you may have a team of auditors who are investigating unethical business practices. You may not want to show that such a group exists.
Send out-of-office messages to originator When someone sends a message to a group, by default, out-of-office messages are not sent to the sender. Select this check box to enable out-of-office replies from group members. For large groups, out-of-office replies may be unnecessary. For example, if the chief security officer of a company sends mail describing new security policies to a group called All Fulltime Employees, out-of-office replies are not needed.
Delivery reports for groups Delivery reports warn about delayed or failed delivery of messages. Choose to send delivery reports to either the owner of the group, the sender of the message, or not at all.
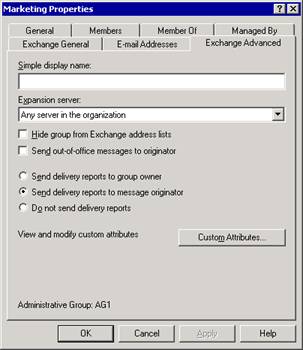
Figure 4.16 Exchange Advanced tab for mail-enabled groups
When users connect to Exchange with a client, such as Outlook 2003, they expect to communicate with other people in the organization easily. Users need to do more than simply compose e-mail messages with their messaging client. Whether they want to send an e-mail message, call a coworker, look up an office number, or schedule a meeting, they need to find information about another recipient quickly. Address lists help you to organize this type of information in a meaningful way.
An address list organizes recipients so that they can be easily found by users who want to contact them.
The most familiar address list is the global address list (GAL). By default, the GAL contains all recipients within an Exchange organization. In other words, any mailbox-enabled or mail-enabled object in an Active Directory forest where Exchange 2003 is installed is listed in the GAL. To look up the e-mail address or phone number of a recipient, the user can use the GAL to locate this information. The GAL is organized by name, rather than e-mail addresses, for ease of use.
Client applications, such as Outlook 2003, display the available address lists that Exchange provides (see Figure 4.17). Users choose from the available address lists when they search for information. Several address lists, such as the GAL, are created by default. Address lists reside in Active Directory, so mobile users who disconnect from the network are also disconnected from these (server-side) address lists. However, offline address lists can be created for use in a disconnected environment. These offline lists can be downloaded to a user's hard drive. Often, to conserve resources, the offline lists are subsets of the information in the actual address lists that reside on your servers.
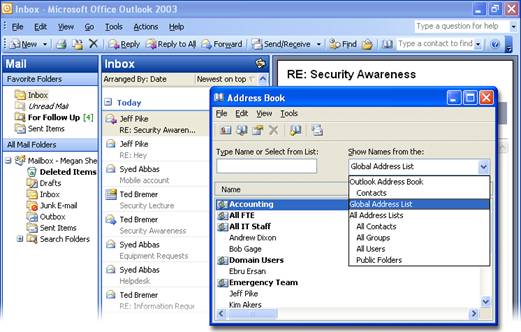
Figure 4.17 Address lists displayed in Outlook 2003
An Exchange organization can contain thousands of recipients. Compiling all of your users, contacts, mail-enabled groups, and other recipients can result in many entries. As an administrator, you can create address lists to help users in your organization find what they are looking for more easily.
For example, consider a company that has two large divisions and one Exchange organization. One division, called Fourth Coffee, imports and sells coffee beans while the other, Contoso, Ltd, underwrites insurance policies. For most day-to-day activities, the workers in the coffee division have little to do with those in the insurance division. To make it easier for people to find each other, you create two new address lists-one for Fourth Coffee and one for Contoso. Users can now choose to use the smaller address lists when looking up people in a certain division, or they can always use the GAL, if they are not sure which division a coworker is part of.
Address lists can be sorted by any attribute that is associated with a recipient. City, title, company, office building, or any other attribute that you can filter recipients with can be the basis for a new address list.
You can also create
subcategories of address lists. For example, you could create an address list
for everyone in
Address lists are created dynamically. When new users are added to your organization, they are automatically added to all of the appropriate address lists. These updates are one of the primary responsibilities of both the Recipient Update Service and Exchange System Attendant.
Address lists can be useful tools for users, but poorly planned address lists can be frustrating. Before you create address lists, make sure that they will make sense to users. Avoid creating so many address lists that users are unsure where to go to find a recipient. If possible, consider surveying users to find out how they would interpret your proposed address lists. Finally, be sure to name your address lists in such a way that when users glance at them, they know immediately whom they can expect to find. When in doubt, have fewer address lists, and remind users that they can find anyone in your organization by using the global address list.
When you are planning
your address lists, consider whether to use subcategories. For example, you may
want address lists for both city and state, with city being a subcategory of
state (see Figure 4.18). Notice that both

Figure 4.18 Address lists with subcategories
To further simplify the user experience and help organize your lists, you may want to create an empty address list. Because no query has been created for an empty address list, it returns no recipients, and serves strictly as a parent container that organizes other lists. In the preceding example, you may create an empty address list called States (see Figure 4.19).
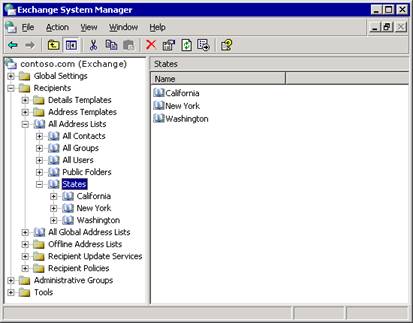
Figure 4.19 Adding an empty address list
To create an address list
In Exchange System Manager, expand the Recipients container.
Expand All Address Lists, right-click the node that the new list belongs in, point to New, and then click Address List.
On the Create Exchange Address List page (see Figure 4.20), name your new address list, and then modify the filter rules appropriately.
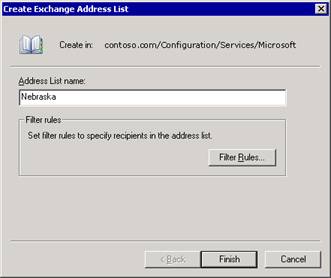
Figure 4.20 Creating an Exchange address list
You can move address lists to create a new hierarchy, using a drag-and-drop operation. As explained in 'Managing Recipient Settings' earlier in this chapter, you can hide recipients from address lists using Active Directory Users and Computers.
MAPI clients such as Outlook 2003 can download offline address lists, so users can compose e-mail messages even when they are disconnected from their Exchange server. For clients to download these address lists, they must first be created on the server.
By default, there is an offline address list called the Default Offline Address List, which contains the global address list. If necessary, you can populate this list with any other address list that you have created. You can also create multiple offline address lists that can be individually associated with each mailbox store in your organization. If the users on your different mailbox stores share something in common, such as all being part of the same division, providing different offline address lists for each mailbox store may make sense.
At any time, you can set any offline address list in your Exchange organization as the default offline address list. This new default list is then associated with all newly created mailbox stores. There can be only one default list at a time in your Exchange organization. If you delete the current default list, Exchange does not automatically assign another list as the default. If you want to use a default list after you delete the existing default list, you must manually designate another offline address list as the default.
To populate the default offline address list
In Exchange System Manager, click the Offline Address Lists container, and then right-click Default Offline Address List.
In the Default Offline Address List Properties dialog box (see Figure 4.21), click Add to add any address list that you have created. You can add as many address lists as you require. Click OK.
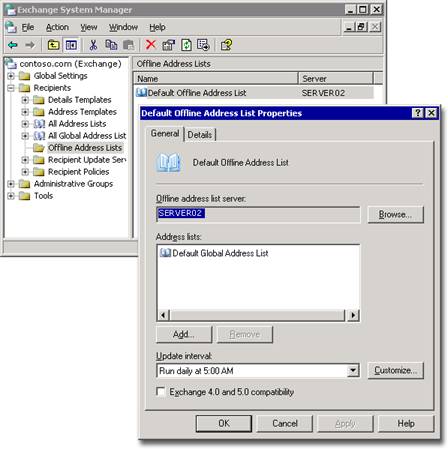
Figure 4.21 Default Offline Address List Properties dialog box
Offline address lists use system public folders to contain the necessary address list information. Their associated public folders are created during the public store maintenance interval, and the content of the public folder is updated according to the Update interval that you specify on the Properties dialog box of each offline address list. The Offline Address List (System) public folders are hidden from users by default.
To see the System public folders
In Exchange System Manager, expand the administrative group, and then expand the folders container.
Right-click the Public Folders container, and then click View System Folders.
In a mixed environment where some users connect to Exchange 2003 or Exchange 2000 servers, and others connect to Exchange 5.5 servers, you need multiple address lists. Those users who connect to Exchange 5.5 need to use the offline address book that is generated by that version of Exchange.
Details templates control the appearance of object properties that are accessed by using address lists in both MS-DOS 16-bit and MAPI 32-bit client applications. When a user opens an address list in Outlook, for example, the properties of a particular object are presented as defined by the details template in the Exchange organization. You can use the default details template shown in Figure 4.22, or you can customize the template to better suit the needs of your users.
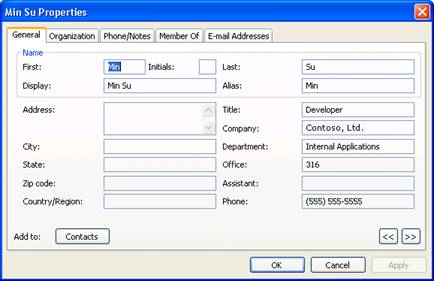
Figure 4.22 Default details template as viewed from Outlook 2003
To customize the details template
In Exchange System Manager, expand the Recipients container, and then select the language for the template that you want to modify.
For example, the English language has been selected in Figure 4.23.
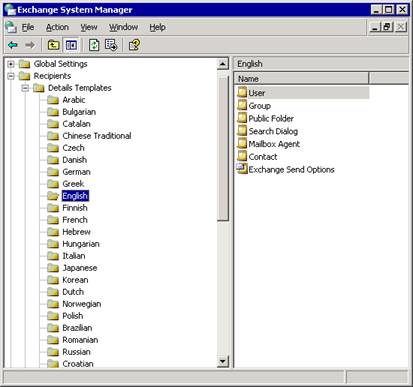
Figure 4.23 Selecting English
The following languages are supported:
Arabic, Basque, Brazilian, Bulgarian, Catalan, Chinese Simplified, Chinese Traditional, Croatian, Czech, Danish, Dutch, German, Greek, English, Estonian, Finnish, French, Hebrew, Hungarian, Italian, Japanese, Korean, Latvian, Lithuanian, Norwegian, Polish, Portuguese, Romanian, Russian, Serbian, Slovak, Slovenian, Spanish, Swedish, Thai, Turkish, and Ukrainian.
Other languages may be supported by the client, but they will not be able to display the Properties pages.
In the list of templates displayed in the right-pane, right-click the template to be changed, and then click Properties.
On the Templates tab, resize fields, add or remove fields, add and remove tabs, and rearrange the order of the fields (see Figure 4.24).

Figure 4.24 Modifying the user details template
To see how the changes you made affect the template, click Test. To revert to the original template, click Original.
Exchange uses the Recipient Update Service primarily to generate and update default and customized address lists, and to process changes made to recipient policies. This service ensures that when new recipient policies or address lists are created, their content is applied to the appropriate recipients in the organization. The Recipient Update Service also applies existing policies to new recipients that are created after the policy or address list has already been established. In this way, information is kept current with minimal administrative overhead.
You must have at least one Recipient Update Service for each domain in your organization, and it must be run from an Exchange 2003 or Exchange 2000 server. For domains that do not have these Exchange servers, the Recipient Update Service must be run from an Exchange server outside of the domain. You can set up more than one Recipient Update Service for a domain, if there are multiple domain controllers. Each Recipient Update Service must read from and write to a unique domain controller.
Note
If you do not have a Recipient Update Service for a domain, you
cannot create recipients in that domain.
In situations where you have high network latency within a
domain, set up the Recipient Update Service at the local sites. For example, if
you have one domain that has sites in
To create a new Recipient Update Service
In Exchange System Manager, expand the Recipients container.
Right-click the Recipient Update Service container, point to New, and then click Recipient Update Service.
The Recipient Update Service Wizard starts and guides you through the creation process. Figure 4.25 shows the final step in the creation process.
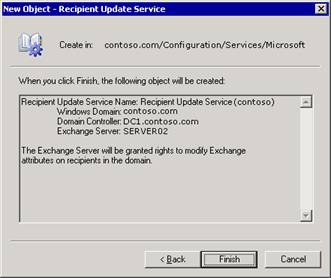
Figure 4.25 The final step in creating a Recipient Update Service
Note
If all of the domain controllers are currently associated with a
Recipient Update Service, you receive an error when you try to create the next
Recipient Update Service. You can have only one Recipient Update Service per
domain controller.
You can choose to have the Recipient Update Service run at customized intervals. By default, the Recipient Update Service is set to Always Run, and when it runs, only necessary changes are made. Changes are necessary when a recipient, recipient policy, or address list is changed or created. Any changes that have occurred since the last time the Recipient Update Service ran are applied.
To change the update interval
Right-click the Recipient Update Service to be modified, click Properties, and then change the Update interval option.
|
Politica de confidentialitate | Termeni si conditii de utilizare |

Vizualizari: 1577
Importanta: ![]()
Termeni si conditii de utilizare | Contact
© SCRIGROUP 2025 . All rights reserved