| CATEGORII DOCUMENTE |
| Asp | Autocad | C | Dot net | Excel | Fox pro | Html | Java |
| Linux | Mathcad | Photoshop | Php | Sql | Visual studio | Windows | Xml |
You probably notice your hardware only when it causes problems. When everything goes according to plan, it's invisible, which is the way we like it.
You can tweak your hardware in a variety of ways to make it run better, and you can use XP's built-in utilities to troubleshoot any problems. In this chapter, we'll look at hacks to help you troubleshoot hardware problems, remap your keyboard, make laptop and LCD screens more readable, and set up a cheap network by connecting two PCs.
The Device Manager is a great hardware troubleshooting tool, but you'll need this hack to make sense of the error messages it relays to you. Here's how to decode the cryptic messages and how to use the messages to solve hardware woes.
If you install and uninstall enough hardware on your system, error messages and system conflicts are a way of life. XP does a far better job than previous versions of Windows at keeping conflicts to a minimum, but on occasion they still pop up.
The first step in resolving these problems is to use XP's
built-in Hardware Troubleshooters. Choose Start ![]() Help and Support >Hardware
>'Fixing a hardware problem' and under 'Fix a problem'
click Hardware Troubleshooter. It's a wizard-style interface, so follow the
prompts.
Help and Support >Hardware
>'Fixing a hardware problem' and under 'Fix a problem'
click Hardware Troubleshooter. It's a wizard-style interface, so follow the
prompts.
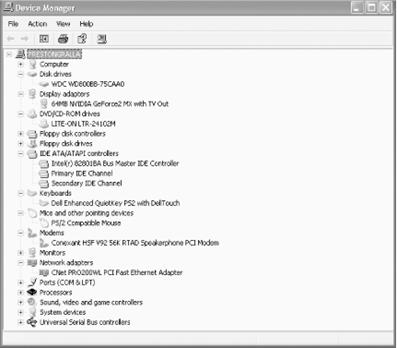
But that won't always solve the conflict. Luckily, XP includes a built-in way to resolve system conflicts by hand: using the Device Manager, XP's best all-around hardware-troubleshooting tool. Run it by typing devmgmt.msc at a command prompt or in the Run box. You'll see a list of all the devices installed on your system, as shown in Figure 12-1.
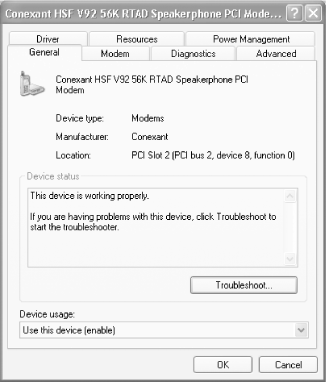
To find information about any device, right-click on it and choose Properties. The device's multitabbed Properties dialog box appears, as shown in Figure 12-2. You'll be able to get comprehensive information about the device from here. You can also do troubleshooting by clicking on the Troubleshoot button.
When you open the Device Manager to the view shown in Figure 12-1, an icon will be displayed next to any device involved in a system conflict. A yellow exclamation point means that the device has a problem or conflict of some sort. A red 'X' means that the device is disabled. A blue 'i' (which stands for information) means that the device's resource configuration has been altered via the Device Manager.
|
Only the yellow and red icons mean that there's a problem of some sort. To find out more details about the problem, double-click on the device that has an icon next to it, and an error message and error code will appear in the 'Device status' section of the General tab shown in Figure 12-2. Those error messages are supposed to help you solve the hardware problem. Unfortunately, though, they're cryptic at best, and, as a general rule, you won't be any closer to resolving the problem after you read them.
However, armed with the right knowledge, you can resolve the problems based on the error message you see. The advice in Table 12-1 (adapted from MS Knowledge Base article 125174) tells you how to use the Device Manager to solve the problem.
Table 12-1. Device Manager error codes, messages, and potential solutions |
||
|
Code |
Error message |
Recommended solution |
|
1 |
This device is not configured correctly. |
Update the drivers by choosing Update Driver from the Driver tab, and follow instructions in the Hardware Update wizard. You can also try removing the device in the Device Manager and running the Add New Hardware wizard from Control Panel. |
|
2 |
The <type> device loader(s) for this device could not load the device driver. |
Update the drivers by choosing Update Driver from the Driver tab, and follow instructions in the Hardware Update wizard. You can also try removing the device in the Device Manager and running the Add New Hardware wizard from Control Panel. |
|
3 |
The driver for this device might be corrupt or your system may be running low on memory or other resources. |
Update the drivers by choosing Update Driver from the Driver
tab, and follow instructions in the Hardware Update wizard. You can also try
removing the device in the Device Manager and running the Add New Hardware
wizard from Control Panel. In addition, check memory and system resources by
right-clicking My Computer, choosing Properties |
|
4 |
This device is not working properly because one of its drivers may be bad, or your Registry may be bad. |
Update the drivers by choosing Update Driver from the Driver tab, and follow instructions in the Hardware Update wizard. You can also try removing the device in the Device Manager and running the Add New Hardware wizard from Control Panel. If neither of these resolves the problem, get a new .inf driver file from the hardware manufacturer. |
|
5 |
The driver for this device requested a resource that Windows does not know how to handle. |
Update the drivers by choosing Update Driver from the Driver tab, and follow instructions in the Hardware Update wizard. You can also try removing the device in the Device Manager and running the Add New Hardware wizard from Control Panel. |
|
6 |
Another device is using the resources this device needs. |
Click on Troubleshoot on the General tab to run the Hardware Troubleshooter. |
|
7 |
The drivers for this device need to be reinstalled. |
Click Reinstall Driver. |
|
8 |
Code 8 has many error messages associated with it. |
Click Update Driver. You can also try removing the device in the Device Manager and running the Add New Hardware wizard from Control Panel. |
|
9 |
Code 9 has several error messages associated with it. |
Try removing the device in the Device Manager and running the Add New Hardware wizard from Control Panel. If that doesn't work, contact the manufacturer for the correct registry settings or updated drivers. You might also need to update your system's BIOS. |
|
10 |
This device either is not present, is not working properly, or does not have all the drivers installed. This code may also have a manufacturer-specific error message associated with it, depending on the device. |
Make sure that the device is physically connected to the computer properly. If that doesn't work, update the driver from the Driver tab. |
|
11 |
Windows stopped responding while attempting to start this device and therefore will never attempt to start this device again. |
Contact the hardware manufacturer for updated drivers. |
|
12 |
This device cannot find enough free <type> resources that it can use. Note: <type> is a resource type, such as IRQ, DMA, Memory, or I/O. |
Click Hardware Troubleshooter and run the troubleshooting wizard. |
|
13 |
This device either is not present, is not working properly, or does not have all the drivers installed. |
Click Detect Hardware. You can also try removing the device in the Device Manager and running the Add New Hardware wizard from Control Panel. |
|
14 |
This device cannot work properly until you restart your computer. |
Restart your computer. |
|
15 |
This device is causing a resource conflict. |
Click Troubleshoot on the General tab of the device, and run the troubleshooting wizard |
|
16 |
Windows cannot identify all the resources this device uses. |
Click the Resources tab and manually enter the settings as detailed by the manufacturer's documentation. |
|
17 |
The driver information file <name> is telling this child device to use a resource that the parent device does not have or recognize. Note: <name> is the .inf file for the device. |
Click Update Driver. You can also try removing the device in the Device Manager, and running the Add New Hardware wizard from Control Panel. |
|
18 |
Reinstall the drivers for this device. |
Click Reinstall Driver. |
|
19 |
Your Registry may be bad. |
Click Check Registry. |
|
20 |
Windows could not load one of the drivers for this device. |
Click Update Driver. |
|
21 |
Windows is removing this device. |
Wait several seconds and then refresh the Device Manager view. If the device appears, restart your computer. |
|
22 |
This device is disabled. |
Click Enable Device. |
|
22 |
This device is not started. |
Click Start Device. |
|
23 |
Several error messages may appear with Code 23. |
Click on Properties or Update Driver, depending on which button appears. |
|
24 |
This device is not present, is not working properly, or does not have all its drivers installed. |
Click Detect Hardware or Update Drivers, depending on which button appears. |
|
25 |
Windows is in the process of setting up this device. |
Restart your computer. |
|
26 |
Windows is in the process of setting up this device. |
Restart your computer. |
|
27 |
Windows can't specify the resources for this device. |
Remove the device in the Device Manager, and run the Add New Hardware wizard from Control Panel. If the device still does not work, get updated drivers or other assistance from the manufacturer. |
|
28 |
The drivers for this device are not installed. |
Click Reinstall Driver. You can also remove the device in the Device Manager and run the Add New Hardware wizard from Control Panel. If the device still does not work, get updated drivers from the manufacturer. |
|
29 |
This device is disabled because the firmware for the device did not give it the required resources. |
Check the device's documentation on how to enable its BIOS. If that doesn't work, enable the device in your computer's CMOS settings. |
|
30 |
This device is using an Interrupt Request (IRQ) resource that is in use by another device and cannot be shared. You must change the conflicting setting or remove the real-mode driver causing the conflict. |
Check Device Manager to see if another device is using the same IRQ and disable it. If you can't find another device using the IRQ, look for drivers loaded in a Config.sys or Autoexec.bat file, and disable them. |
|
31 |
This device is not working properly because Windows cannot load the drivers required for this device. |
Click on Properties. If that doesn't work, remove the device in the Device Manager, and run the Add New Hardware wizard from Control Panel. If the device still does not work, get updated drivers or other assistance from the manufacturer. |
|
32 |
Windows cannot install the drivers for this device because it cannot access the drive or network location that has the setup files on it. |
Restart the computer. |
|
33 |
Windows cannot determine which resources are required for this device. |
Contact the hardware manufacturer and configure or replace the device. Also try starting the troubleshooting wizard by clicking on Troubleshoot on the General tab. |
|
34 |
Windows cannot determine the settings for this device. Consult the documentation that came with this device and use the Resource tab to set the configuration. |
Change the hardware settings by following the manufacturer's instructions and then using the Resources tab to configure the device. Also try starting the troubleshooting wizard by clicking on Troubleshoot on the General tab. |
|
35 |
Your computer's system firmware does not include enough information to configure and use this device properly. To use this device, contact your computer manufacturer to obtain a firmware or BIOS update. |
Run the troubleshooting wizard by clicking on Troubleshoot on the General tab. If that does not work, get a new or updated BIOS from your computer manufacturer. |
|
36 |
This device is requesting a PCI interrupt but is configured for an ISA interrupt (or vice versa). Please use the computer's system setup program to reconfigure the interrupt for this device. |
Check your computer's documentation for how to reconfigure the IRQ settings in the BIOS. Also, try starting the troubleshooting wizard by clicking on Troubleshoot on the General tab. |
|
37 |
Windows cannot initialize the device driver for this hardware. |
Uninstall and then reinstall the driver. Also, try starting the troubleshooting wizard by clicking on Troubleshoot on the General tab. |
|
38 |
Windows cannot load the device driver for this hardware because a previous instance of the device driver is still in memory. |
Restart the computer. Also, try starting the troubleshooting wizard by clicking on Troubleshoot on the General tab. |
|
39 |
Windows cannot load the device driver for this hardware. The driver may be corrupt or missing. |
Uninstall and then reinstall the driver. Also, try starting the troubleshooting wizard by clicking on Troubleshoot on the General tab. |
|
40 |
Windows cannot access this hardware because its service key information in the registry is missing or recorded incorrectly. |
Uninstall and then reinstall the driver. Also, try starting the troubleshooting wizard by clicking on Troubleshoot on the General tab. |
|
41 |
Windows successfully loaded the device driver for this hardware but cannot find the hardware device. |
Uninstall and then reinstall the driver. Also, try starting the troubleshooting wizard by clicking on Troubleshoot on the General tab. If the device is non-Plug-and-Play, you may need to run the Add Hardware wizard. To do that, from the Control Panel, choose Performance and Maintenance -> System -> Hardware -> Add Hardware Wizard. |
|
42 |
Windows cannot load the device driver for this hardware because there is a duplicate device already running in the system. |
Restart the computer. Also, try starting the troubleshooting wizard by clicking on Troubleshoot on the General tab. |
|
43 |
Windows has stopped this device because it has reported problems. |
Check the hardware documentation. Also, try starting the troubleshooting wizard by clicking on Troubleshoot on the General tab. |
|
44 |
An application or service has shut down this hardware device. |
Restart the computer. Also, try starting the troubleshooting wizard by clicking on Troubleshoot on the General tab. |
|
45 |
Currently, this hardware device is not connected to the computer. |
Reconnect the device to the computer. |
|
46 |
Windows cannot gain access to this hardware device because the operating system is in the process of shutting down. |
No fix should be necessary; the device should work properly when you start your computer. |
|
47 |
Windows cannot use this hardware device because it has been prepared for 'safe removal' but it has not been removed from the computer. |
Unplug the device from your computer and then plug it in again. |
|
48 |
The software for this device has been blocked from starting because it is known to have problems with Windows. Contact the hardware vendor for a new driver. |
Get and install a new or updated driver from the hardware manufacturer. |
|
49 |
Windows cannot start new hardware devices because the system hive is too large (exceeds the Registry Size Limit). |
Uninstall any devices you are no longer using. To see devices that are using drivers, but are no longer attached to your computer, see [Hack #96] |
[Hack #96]
Hardware ghosts and other hidden devices can cause system conflicts, and the Device Manager won't report on them. This hack forces the Device Manager to uncover all your hidden hardware so you can resolve any conflicts.
One of the strangest hardware problems you'll encounter in XP are hidden and ghosted hardware devices that are invisible to you but that may cause system conflicts. You won't be able to see them in the Device Manager [Hack #95]. When you use that troubleshooting tool, you won't be able to uncover any problems they may be causing.
There are several types of these hidden and residential gateways:optimizingghosted devices that are hidden by the Device Manager. Non-plug-and-play printers, drivers, and similar devices don't show up. Most newer devices are plug-and-play, so you'll most likely encounter this problem only if you have old hardware attached to your PC. (Plug-and-play devices are automatically recognized and installed in XP.) In this instance, the device is physically present on your PC, but the Device Manager doesn't show you that it's there.
Then there are the so-called nonpresent or ghosted devices-devices that you've removed from your system without doing an uninstall, or whose uninstallation did not work properly. These devices aren't physically present in your system, but XP treats them as if they were and devotes system resources to them. For example, if you physically remove an old network card without doing an uninstall, it may cause IP and other kinds of conflicts, because XP treats it as if it were still in your system.
The Device Manager also may not give you details about USB devices that you only temporarily use and that you frequently attach and remove-for example, MP3 players that you attach to your PC only when you want to add or delete MP3 files from them. Even when these devices aren't present in your system, XP devotes resources to them. If you replace one USB device with another of the same model, it's best to go through the uninstall process rather than just swap them.
And then there are devices that you may have moved from one slot to another. XP may believe that they are actually present in two slots, so it devotes resources for both slots to them.
Displaying these hidden devices can help with troubleshooting. For example, a hidden device could possibly conflict with a nonhidden device. And there may be instances in which you will want to uninstall hidden devices-for example, when you've moved a non-plug-and-play network card from one slot to another and want to uninstall it from one slot.
But to do this kind of troubleshooting you'll need to force the Device Manager to display information about the devices; otherwise, you won't know how to solve the problem.
Forcing the Device Manager to display non-plug-and-play printers, drivers, and similar devices is a simple matter. Run the Device Manager by typing devmgmt.msc at a command prompt and pressing Enter, and then choosing View >Display Hidden Devices, and they will appear.
Displaying ghosted or nonpresent devices takes a little more work. You'll set a system-wide environment variable that forces the Device Manager to display them. First, right-click on My Computer and choose Properties >Advanced >Environment Variables. The Environment Variable dialog box opens. This dialog box let you set system variables for the entire system or for individual users. Environment variables control a variety of XP features, such as the location of your Windows directory and TEMP directories and the filename and location of the command processor that will launch when you run the command prompt.
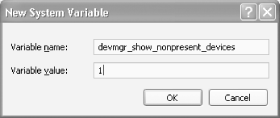
There are two sections in the Environment Variables dialog box: 'User variables' and 'System variables.' To apply the variable to a single user, use the 'User variables' dialog box; to apply the variable to all users, use the 'System variables' dialog box. In this case, you'll want to create the variable system-wide, so click New in the 'System variables' section. The New System Variable dialog box appears. For 'Variable name,' type devmgr_show_nonpresent_devices. Once you've created the name, you need to give it a value. To turn the setting on, type in the 'Variable value' box. You can see the box filled out properly in Figure 12-3. Click OK and then OK again.
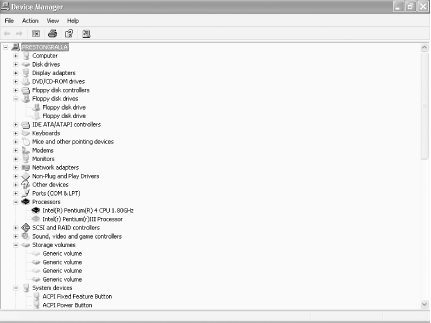
So, now you've set the system variable properly, but the Device Manager won't display ghosted devices yet. You first have to tell it to display them. Run the Device Manager by typing devmgmt.msc at a command prompt or the Run box and pressing Enter. Then, choose View >Display Hidden Devices and the ghosted devices will appear, as shown in Figure 12-4. You should see quite a few devices now, including a lengthy list of non-plug-and-play drivers. Typically, devices that are not currently present on your PC will be shown as gray, rather than the black that connotes present devices. You may also see some devices listed more than once, as shown in Figure 12-4.
Now, use the Device Manager to troubleshoot any of those ghosted devices, as detailed in [Hack #95]. If you find any ghosted devices that you will no longer use on your PC, uninstall them from the Device Manager by right-clicking on the device and choosing Uninstall.
If you want to use the Device Manger only on occasion to show ghosted devices and don't want to add another environment variable to your system, you can add the variable on an instance-by-instance basis-for example, for a single time that you run the Device Manager. At the command prompt, type set devmgr_show_nonpresent_devices=1 and press Enter. You won't get a prompt in response; the command prompt will stay blank. At the same instance of the command prompt, type start devmgmt.msc and press Enter. The Device Manager will launch in a separate window. Now, enable the Device Manager to show ghosted devices in the same way you did previously in this hack.
Keep in mind that you have to run the Device Manager from the same instance of the command prompt in which you typed devmgr_show_nonpresent_devices=1. If you run the Device Manager outside the command prompt, it won't display ghosted devices.
Find out how well your PC performs, peer under the hood to get diagnostic information, and get advice on tuning it, with Sandra.
Do you know how well your PC is really performing? How well do you think it does compares to other systems? And do you have any idea of nitty-gritty information like its memory bank layout, the current video refresh rate, which currently running process consumes the most memory, or which services you can most likely safely disable [Hack #4]?
Better yet-how about using that information to get tips to get your PC to run faster?
My favorite hardware analysis and tune-up program, Sandra (https://www.3bsoftware.com), will do all that and more. Sandra is shareware and free to try for 30 days, but if you use it beyond that you'll have to buy Sandra Pro for $29. Sandra Pro also gives you access to about a half-dozen analysis modules that Sandra doesn't have, such as modules about your network or fonts.
When you first run Sandra, you may well be overwhelmed, because you'll see several dozen icons, each of which runs a different diagnostic and benchmark test when double-clicked upon. For example, run the Memory Bandwidth Benchmark and Sandra returns results similar to the results shown in Figure 12-5, which measure the performance of one of my PCs. As you can see, it measures the speed of your memory and compares it to other memory chipsets. It also shows you the layout of your motherboard's memory bank, including the exact memory configuration in each bank. This is important when you want to add memory. Figure 12-5 shows me that I have two memory banks, each of which has a 128 MB memory chip in it. That means if I want to upgrade I'm going to have to take one of those chips out and essentially throw it away.
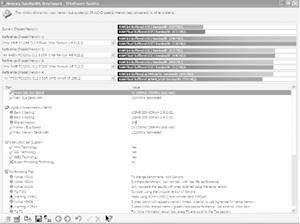
Sandra doesn't just give you diagnostics; it also offers recommendations on how you can fine-tune your PC. In this instance, it notes that my main system and my video system share memory, which reduces performance, and suggests that I install a video card with its own memory, as a way to improve performance.
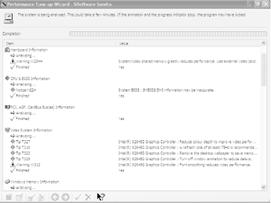
The fastest way to get an overview of your system-as well as to get comprehensive advice on fine-tuning every part of your system, not just one subsystem-is to run the Performance Tune-Up Wizard. It analyzes your entire system and offers tips on tuning up each subcomponent, as shown in Figure 12-6. For my PC, it offered about a dozen tips, including which background services I might want to disable, ways to make my video system perform faster, among other advice.
4.1 See Also
Aida32 (https://www.aida32.hu) is a freeware diagnostic tool that gives you comprehensive information about your system.
Create your own personalized, ultimate keyboard by remapping its keys to the way you want them to work.
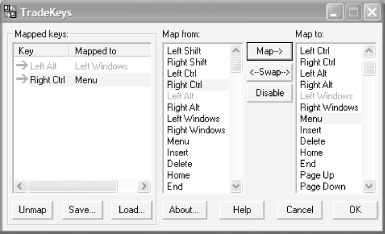
Personal keyboard preferences are idiosyncratic; even a minor matter such as where the Alt or Ctrl keys should be located can inspire fevered debate. So, if you have personal preferences about where keys should be located, you can remap your keyboard to your own tastes using the TradeKeys utility from PC Magazine. It lets you map any key to any other key, including extended keys such as Right Ctrl, Right Alt, and the Windows logo key.
I find the utility particularly useful when I use one of my two laptops. Laptop keyboards are notoriously nonstandard, and I find the layout of my Dell Inspiron particularly maddening. The Windows key, for example, rather than being located on the lower-left part of the keyboard, where Nature intended it to be, is instead hidden away on the upper-right. Similarly, the Menu key, instead of being on the lower-right where all good Menu keys should be found, is also tucked away up on the right. So, I use TradeKeys to remap my Left Alt key to be a Windows key, and my Right Ctrl key to be a Menu key. True, it leaves me with only one Alt key and one Ctrl key, but that's a small price to pay to get the Windows and Menu keys in their proper places.
Remapping the keys is simple, as shown in Figure 12-7. After you run the program, choose the key you want to change from the 'Map from:' area, and then choose the key you want it mapped to from the 'Map to:' area. For example, to remap my Left Alt key to be a Windows key, I chose Left Alt in 'Map from:' and Left Window in 'Map to:' Then, I clicked on 'Map >'. Keep on mapping keys in this way until you're satisfied with your new keyboard; then choose Save . . . . The new mapping will not take effect until you log off and then log back on. On some systems, you'll have to reboot.
You can also create different keyboard layouts and use each depending on how you're using your computer. Some simple games, for example, use letter keys to control motions and actions. If you prefer using other keys, such as the larger Ctrl and Alt keys, for those motions and actions, you can create one keyboard layout for that game and another layout for your normal use. To create a new keyboard layout, first map it, then choose Save. Give it a descriptive name. Create multiple keyboard layouts that way. Then, when you want to use one, call up TradeKeys, choose Load, and choose the layout you want.
TradeKeys is free, but only if you pay an annual fee for access to PC Magazine utilities. You'll have to pay $19.97 for a year, or $14.97 for a year if you're a PC Magazine subscriber. Go to https://www.pcmag.com and click on Downloads to download it and other 'free' utilities.
Stop squinting at your laptop or LCD screen. Make any laptop and LCD screen easy to read.
Many people who use laptops complain that text is particularly difficult to read on LCD screens. Making matters worse is that many laptops are designed to work at very high resolutions (for example, 1400 by 1050 pixels), and at those resolutions the small type is particularly problematic on an LCD. The problem gets increasingly worse, because laptop screens keep getting larger and their resolutions keep increasing. On my 15-inch laptop with 1400-by-1050 pixel resolution, it's almost impossible to read text. Desktop-style LCD screens also have the same problems.
A simple hack will make text easier to read on both laptops and LCD screens; use Microsoft's ClearType technology, built into XP. To enable ClearType, right-click on the Desktop and choose Properties. Select Appearance >Effects. The Effects dialog box appears. Check the box next to 'Use the following method to smooth edges of screen fonts.' Select ClearType from the drop-down box, click OK, then click OK again. You'll notice the difference in how type is displayed.
You can use ClearType on a normal desktop PC monitor as well as a laptop, but I don't recommend it. On a normal monitor, it makes text appear blurry, and people have complained that using it gives them headaches. I've tried it and can vouch for that-headaches quickly ensue.
One problem with ClearType is that XP doesn't offer any apparent way to customize its appearance. However, there is an online tool that lets you fine-tune its appearance so that it's best for you. To tune ClearType, go to https://www.microsoft.com/windowsxp/pro/using/howto/customize/cleartype/tuner. You'll be asked whether you want to install and run the Microsoft Cleartype Tuning Control. Click Yes. From the page that opens, make sure the Turn on ClearType box is checked. There are two versions of the control; depending on your version of XP and whether you have certain XP service packs installed, you might get one or the other. In one of them, from the opening page, you click on Next; in the other, from the opening page, you click on 'Move on to Step 2: Tuning ClearType Settings.' Depending on the version of the control, the next page may display two versions of the same text and ask which looks better (One version is for RGB monitors, and the other version for BGR monitors). Choose the text that looks better and click Next. (One version of the control skips this page entirely, so you may not see it.)
Next, you'll come to a page that displays a block of text in six different ways. Click on the text that looks best and then click on Finish. You're done; you've tuned ClearType.
One thing you need to watch out for is that the text Microsoft displays isn't real text at all; it's a series of graphics that have been made to appear as if they were text. So, the tuner won't necessarily reflect what you'll actually see on your system. To more accurately tune your settings, while you're going through the tuning process, open a Word document in another window and look at the text in the document after you've tried different settings. The text in that window will more accurately show you how the text will appear with various settings.
|
When you enable ClearType, it's available only after you log on. So, the fonts displayed before log on won't benefit from ClearType. You can, however, use a Registry hack to enable Clear Type fonts even before logon. Run the Registry Editor [Hack #68] and go to go to HKEY_USERS.DEFAULTControl PanelDesktop. Open the FontSmoothingType entry and change its value data to . (The default is , which means that font smoothing is enabled, but ClearType isn't. A value of turns off both font smoothing and ClearType.) Exit the Registry Editor and reboot.
You don't need a full-fledged network to connect two PCs using XP. Here's how to create a fast, cheap connection that's great for sharing files and other network needs.
If you are reading this book, which is (as you know) called Windows XP Hacks, then you probably get questions and pleas for help from your friends and family all the time (or you will, now that you've read the book!). You're the 'computer guy' (women can be computer guys too, my female editor tells me) and you have the ability to 'make it better.' If that's a fair assessment of your situation, let's go through a scenario that happens to us hacker-types quite often.
It's
You sit down at the computer and play with it a bit. Sure enough, it's got problems. The CD burner doesn't work, and the floppy drive is shredding disks. How's he going to transfer his file to his work machine? He doesn't have a dial-up account or Internet access, so you can't upload his file somewhere and download it to your computer-or perhaps it's just too big for his 28.8 bps modem to send.
Lucky for you (and for him), he's running Windows XP and so are you. Since you've read this book, you have exactly what you need on hand to save the day. You transfer his files to your laptop, burn a CD of the contents, and yet again save the day. He offers you money, but you refuse, because you'll keep him in mind the next time you need to move your piano.
Before you can be the hero in this story, you need to have the proper tools. You might not have all the parts you need on hand, but you can get them with a quick trip to your computer store. There are three different cables you could use: a null serial cable, a parallel data cable, or a null Ethernet cable. All three cables are shown in Figure 12-8.

A null serial cable is the most universal cable; nearly every computer manufactured in the last 10 years has a serial port. The disadvantage is that serial transfer speeds are slower than parallel or Ethernet speed.
A null serial cable is not a serial modem cable; they look the same, but the connections are different. For this purpose, you want a cable that has female connectors on both ends. Serial cables can have two different connectors on the ends: DB-9 and DB-25. The DB-25 is an older connector that has 25 pins. If a computer has a DB-25 connector, it is probably too old to run Windows XP. I own a serial cable that has a DB-9 and a DB-25 connector on each end but I haven't used the DB-25 connectors for years. If you want to carry a serial cable, it is probably safe to buy one that only has DB-9 connectors.
|
A parallel data cable allows for faster data transfers than a serial cable. A parallel data cable is not the same as a parallel printer cable! What you are looking for has a male DB-25 connector on each end. It is often called a LapLink cable or an FX cable. LapLink and FX were commercial products that performed this function in the past. Since Windows XP has the functionality built-in, all you need is the cable.
A null Ethernet cable is your best bet in terms of speed and ease of use. The advantages are that it works with all modern Windows operating systems and will be the fastest connection you can get. The disadvantages are that older computers may not have an Ethernet card or they may not have TCP/IP installed. You can purchase a null Ethernet card at most computer stores for a few dollars.
|
The null serial cable and the null Ethernet cable can be purchased for three or four dollars each from almost any computer store. The parallel data cable is a little more difficult to find, but it's still a good choice. No matter which of these you choose you will be limited to connecting only two computers.
Connect the computers using the serial or parallel cable. Make certain that you are connecting the same type of ports. Turn both computers on and log in so that both computers are waiting for you.
Decide which of the computers will be the host and which will be the guest. The host computer will be the one that supports the incoming connection. The guest will be the one accessing the remote computer.
On the host computer, open the Network Connections control panel. Click on the link labeled 'Create a new connection.' Click the Next button to get to the screen titled Network Connection Type. Choose the radio button labeled 'Set up an advanced connection' and click Next. On the next screen, choose the radio button labeled 'Connect directly to another computer' and click Next. When asked 'Host or Guest,' choose Host and press Next. You will be asked what device you wish to use to make the connection. If you are using a parallel cable, choose 'Direct Parallel;' if you are using a null serial cable, choose the appropriate Communications Port (the one to which you connected your null serial cable-it should be labeled on your PC, but if not, check the documentation) and press Next. You will then be presented with the dialog box shown in Figure 12-9.

This dialog box asks you which users will have access to the host computer. If you are unsure about the security of the computer, you should choose an appropriate user. If you know the guest computer does not present a security risk, just choose the Guest account and press Next. The computer now has a network connection called Incoming Connections.
You need to know the network name of the host computer. If you do not know it, on
the host computer right-click My Computer ![]() Properties
Properties
![]() Computer
Name. The network name is the name next to the words 'Full Computer Name.'
Computer
Name. The network name is the name next to the words 'Full Computer Name.'
Now it's time to configure the guest computer. Again, go to the Network Connections control panel applet and click the 'Create a new connection' link. Select 'Set up an advanced connection,' click Next, choose 'Connect directly to another computer,' and click Next. This time, when given a choice of 'Host or Guest,' choose the Guest radio button and press the Next button. When asked for the connection name, type the network name of the host computer. If all goes well, you should see the dialog box shown in Figure 12-10. If you do, click the Finish button to close the dialog.

At this point, you have a physical and logical connection between the two computers. Activate the connection by double-clicking its icon on the desktop or in the Network Connections control panel of the guest computer. When the computers recognize each other, you will be asked for the username and password. If you provided guest access on the host computer, you do not need to enter anything; just click the Connect button. If the connection is made, Windows XP will pop up a notification on the taskbar, as shown in Figure 12-11.

At this point, you have a network connection. You can use your Network Neighborhood window to browse or search for the host computer. Shared folders will work the same as if you were on an Ethernet network. If your folders and printers do not have permission for the user on the host computer, they will not have the ability to share files or print.
Keep in mind that this method is a one-way connection. One computer is specifically the host and the other is the guest. Those roles cannot be reversed without creating another connection. If you would like to be able to access the computers without designating one as the host, you will need to use an Ethernet connection.
If you need to connect two computers and you want a fast connection, you need nothing more than the null Ethernet cable described earlier. Both computers need an Ethernet card with correct drivers and the TCP/IP protocol installed. An advantage of the Ethernet option is that it works on all versions of Windows, as well as other brands of computers.
If your computer does not have an Ethernet card, you can purchase one for $30 or so. For most home applications, a 10BaseT Ethernet card is sufficient, though a 10/100 card is not much more expensive and can send 10 times as much data. There are also cards called Gigabit Ethernet, but they are considerably more expensive and very few manufacturers include this type of equipment in their consumer-grade equipment. My favorite Ethernet card is the 3Com 3C905BTX. It's reasonably priced and every operating system knows how to deal with it. The DLink DFE530TX and the SMC 1244TX are also widely recognized and can be found for less than $25. Installing an Ethernet card with the manufacturer's instructions in hand is not difficult, but if you aren't comfortable working with the hardware inside your computer, you should let a technician do the job.
Connect the two computers using the null Ethernet cable. If the drivers are installed on both computers correctly, a green or orange light will appear near the point where you plugged in the cable on each computer. These link lights indicate that there is a physical connection present between the two computers and that the two Ethernet cards recognize each other. If you do not see the lights, it means that the drivers are not installed correctly, the cable is not wired correctly, or the card does not have a link light. The most likely cause is that the drivers are not installed, but I find that about 1 cable in 10 that I purchase is wired incorrectly.
Once you have a physical link established between the two computers, it's time to make the TCP/IP protocol work. Go to the Control Panel folder and open the Network Connections section. (Under Windows 98 and Windows Me, this control panel is called Network.) Search for your connection in its list and double-click it. Then, open the item named Internet Protocol (TCP/IP). (Under Windows 98 and Windows Me, every card and every protocol are listed in the same dialog.) Search for the one that says TCP/IP and has the name of your Ethernet card next to it.
There are many ways to configure a local area network, but the quickest and easiest way to connect two computers using a null Ethernet cable is to set the values, as listed in Table 12-2.
Table 12-2. Suggested TCP/IP setting for null Ethernet connection |
||
|
Computer 1 |
Computer 2 |
|
|
IP Address |
192.168.1.2 |
192.168.1.3 |
|
Subnet Mask |
255.255.255.0 |
255.255.255.0 |
|
Gateway |
192.168.1.1 |
192.168.1.1 |
|
Preferred DNS Server |
Leave blank |
Leave blank |
|
Alternate DNS Server |
Leave blank |
Leave blank |
At this point, the two computers will act is if they were on a larger network with routers and other equipment. You will not be able to access the Internet, but you will be able to share files and printers. The same restrictions apply here that apply to the other cabling options; the usernames on one computer must have appropriate permissions to access files and printers on the other computer.
If you plan to keep your cheap network connected all the time, use the Ethernet option. Ethernet has the advantage of being the fastest of the three cabling methods shown in this hack, and it is widely accepted as the high-speed networking choice. If you choose to add another computer at a later date or get broadband Internet access, the Ethernet option will be the easiest to adapt to the new network configuration.
|
Politica de confidentialitate | Termeni si conditii de utilizare |

Vizualizari: 1336
Importanta: ![]()
Termeni si conditii de utilizare | Contact
© SCRIGROUP 2025 . All rights reserved