| CATEGORII DOCUMENTE |
| Asp | Autocad | C | Dot net | Excel | Fox pro | Html | Java |
| Linux | Mathcad | Photoshop | Php | Sql | Visual studio | Windows | Xml |
![]()
When it comes to hacking XP, no other tool comes close to the Registry. It contains the underlying organization of the entire operating system, and its often-incomprehensible settings hold the key to countless hacks. In simpler days, one could hack Windows without bothering with the Registry; a solid knowledge of things like .ini files would suffice. But no longer. If you want to get hacking, the Registry holds the key-literally, since it's organized by way of keys.
Even if you've edited the Registry before, you'll find a lot in this chapter to help. It teaches not just the mechanics of using the Registry, but also explains its underlying organization. You'll find ways to keep your Registry safe, learn how to back it up, and find downloadable tools to make the most of the Registry. As a bonus, I've thrown in a grab-bag of other great hacks.
The Registry is the single best tool available for hacking XP. Here's an introduction to how it's organized and how to use it.
If you haven't spent much time in the Registry, you can easily be cowed by it. At first glance, it's a maze of apparently incomprehensible settings. In fact, though, there's a method to the madness. The Registry is a hierarchical database of information that defines exactly how your system works, including virtually every part of XP and its applications. Editing the Registry database is often the best way to hack XP. In fact, there are many changes to the operating system that you can make in no other way.
Even if you've never used the Registry directly before, you've changed it without realizing it. Whenever you change a setting using the Control Panel, for example, behind the scenes a Registry change is made that puts that new setting into effect. The menus and dialog boxes you see in XP are often little more than a visual front-end to the Registry.
If you want to optimize XP and master every part of it, you'll have to use the Registry. XP contains so many different settings and customizations that it simply wasn't possible for Microsoft to build a graphical interface for every conceivable possibility. And there are many times when it's easier and you get more options when you edit the Registry rather than using the graphical XP interface. You can use Windows XP without ever editing the Registry-many users do-but advanced users understand its power tool status.
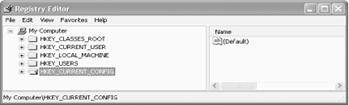
The way to edit the Registry is by using the Registry Editor , also called RegEdit, which is shown in Figure 7-1. To run it, type regedit at the Run box or command line and press Enter.
Before you edit the Registry, though, you should first get a basic understanding of its structure.
|
The Registry has many thousands of settings; in fact, it often has tens of thousands of them. They are organized into five main Registry sections, called Registry hives. Think of each hive as a root directory. Each of the hives has a different purpose. When you start to delve into the Registry, you may notice that many of the settings seem to be exact duplicates of one another-in other words, settings in one hive mirror the settings in another hive. In fact, frequently one set of settings is merely an alias (called a symbolic link) of another, so that when you change those settings in one place, the changes are made in both hives.
|
Following are the five hives and what each does:
This hive contains information about file types, filename extensions, and similar information. It instructs XP how to handle every different file type and controls basic user interface options, such as double-clicking and context menus. This hive also includes class definitions (hence the word 'CLASSES' in its name) of unique objects, such as file types or OLE objects. Frequently, classes associated with file types contain the Shell subkey, which defines actions, such as opening and printing, that can be taken with that file type.
HKEY_CURRENT_USER
This hive contains configuration information about the system setup of the user that is currently logged into XP. It controls the current user's Desktop, as well as XP's specific appearance and behavior for the current user. This hive also manages network connections and connections to devices such as printers, personal preferences such as screen colors, as well as security rights. Also included in this hive are Security Identifiers (SIDs), which uniquely identify users of the PC and which have information about each user's rights, settings, and preferences.
HKEY_LOCAL_MACHINE
This hive contains information about the computer itself, as well as about the operating system. It includes specific details about all hardware, including keyboard, printer ports, storage-the entire hardware setup. In addition, it has information about security, installed software, system startup, drivers, services, and the machine's specific XP configuration.
HKEY_USERS
This hive contains information about every user profile on the system.
HKEY_CURRENT_CONFIG
This hive contains information about the current hardware configuration of the system, in the same way that HKEY_CURRENT_USER contains information about the current user of the system.
Each hive is at the top of the hierarchy, and underneath each hive are keys, which can in turn contain subkeys, and those subkeys can contain subkeys, and so on, organized in folder-like fashion, much like a hard drive.
Keys and subkeys contain a value, which controls a particular setting. For example, this key:
HKEY_CURRENT_USERControl PanelMouseDoubleClickSpeeddetermines the amount of time between mouse clicks that must elapse before Windows won't consider it to be a double-click. To set the amount of time, you change the key's value. In this case, the default value is , measured in milliseconds, and you can edit the Registry to change it to whatever value you want, as shown in Figure 7-2. You can also make the changes using the Mouse Properties dialog box (Start >Control Panel >Printers and Other Hardware >Mouse). When you make changes to that dialog box, the changes are in turn made in the Registry, which ultimately controls the setting. In essence, the dialog box is merely a convenient front-end to the Registry.
A key can contain one or more values. Following are the five primary data types of values in the Registry:
REG_SZ (String value)
This data type is easy to understand and edit because it is made up of plain text and numbers. It is one of the most common data types in the Registry. The value for DoubleClickSpeed, mentioned earlier in this hack, is of this type.
REG_MULTI_SZ (String array value)
This data type contains several strings of plain text and numbers. The Registry Editor will let you edit these values, but it won't let you create them.
REG_EXPAND_SZ (Expanded string value)
This data type contains variables that Windows uses to point to the location of files. For example, to point to the location of the Luna theme file, the expanded string value in the Registry is %SystemRoot%resourcesThemesLuna.theme.
REG_BINARY (Binary values)
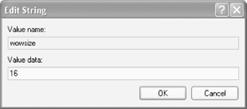
This data type is made up of binary data: 0s and 1s. Figure 7-3 shows a typical example of a binary value. As a general rule, you won't edit binary values-instead you'll edit string values because they're made up of text and numbers, as shown in Figure 7-4.
REG_DWORD (DWORD values)
This data type is represented as a number. Sometimes a turns on the key or turns off the key, though it can use other numbers as well. While you see and edit the value as a number, such as , the Registry itself views the number as a hexadecimal number, 1C8. Figure 7-5 shows a DWORD value being edited.
There's an upside and a downside to using XP's Registry Editor. The upside is that it's relatively simple to use. The downside is that it doesn't offer much functionality beyond basic Registry editing.
|
To run the Registry Editor, type regedit in the Run box or a command prompt and press Enter. If this is the first time you've run the Registry Editor, it will open highlighting the HKEY_CURRENT_USER hive, as shown in Figure 7-6. If you've previously used the Registry Editor, it will open highlighting the last key you edited or the last place you were in the Registry.
You can browse through the Registry with the Registry Editor in the same way you browse through a hard disk using Windows Explorer. Clicking a + sign opens a key to reveal the next level down of the hierarchy. Clicking a - sign closes the key.
The Registry can be several levels deep in keys and subkeys, so navigating it using a mouse can take a substantial amount of time. (Every time you open it, it jumps to the last-used key.) You can use shortcut keys, though, to more easily navigate through the Registry. The right arrow key opens a key to reveal subkeys; the left arrow key closes a key and moves one level up in the key hierarchy. To jump to the next subkey that begins with a specific letter, press that letter on the keyboard.
You use the Registry Editor to edit existing keys and values, create new keys and values, or delete existing keys and values. Sometimes, the changes take effect as soon as you make the change and exit the Registry Editor; other times, you'll have to reboot for them to take effect. Keep in mind that there is no 'Save' button. When you modify a value, it changes right then and there. There is also no Undo button, so make your changes carefully.
If there's a particular key that you want to edit, an even faster way to navigate is to use the Find command from the Edit menu. (You can also use the Find command by pressing Ctrl-F.) To find successive keys with the same value, press the F3 key.
To edit the data associated with a value, double-click on the value in the right pane of the Registry Editor; a box appears that lets you edit the value, as shown in Figure 7-
When you're editing the Registry, it's often hard to tell what key you're editing, because the Registry Editor doesn't highlight that key. Instead, it shows only an open folder icon next to it, but it's easy to miss that icon. Check the status bar at the bottom of the Registry Editor; it should display the key you're editing. If it doesn't, choose View >Status Bar from the Registry Editor menu.
To rename a key, select it and choose Edit >Rename from the menu. You can also right-click on the key and choose Edit >Rename.
Editing the Registry often requires that you add and delete keys and values To add a new key, select the new key's parent key in the left pane. Then, choose Edit >New >Key from the menu. Type in the new key's name. You can also right-click on the new key's parent key and choose Edit >New >Key. To delete a key, select it and press the Delete key.
Very often, you need to add values to a key in order for its changes to take effect. To add a value to a key, select the new key's parent key in the left pane. From the menu, choose Edit >New, and from the submenu, select the type of value you want to create. We've already covered the five types of values you can create; as a reminder, they're detailed in Table 7-1.
To create a new value, type in the name of the new value and press Enter. Press Enter again. The Edit Value dialog box appears, as shown in Figure 7- Enter your data and press Enter.
Table 7-1. Values you'll encounter in the Registry |
|
|
Value name |
Registry data type |
|
String value |
REG_SZ |
|
Binary value |
REG_BINARY |
|
DWORD value |
REG_DWORD |
|
String array value |
REG_MULTI_SZ |
|
Expanded string value |
REG_EXPAND_SZ |
For an excellent collection of Registry hacks, go to the Registry Guide for Windows at https://www.winguides.com/registry. Make sure to sign up for the newsletter that offers Registry advice and hacks.
Nine great hacks that use the Registry to do their magic.
You'll find many dozens of Registry hacks sprinkled throughout this book, but to give you a sense of the breadth of the kinds of hacks that you can accomplish using the Registry, I've put a wide-ranging sample of Registry hacks here as well.
When you shut down Windows, if you have any programs running you'll get a message box warning you that a program is still running. You then have to close the program and tell XP again to shut down. It's a fairly pointless warning-better yet would be if XP automatically killed the programs without issuing the warning. That way, you wouldn't get error messages and wouldn't have to close each individual application before shutting down your computer.
To have XP automatically close programs at shutdown, run the Registry Editor and go to HKEY_CURRENT_USERControl PanelDesktop. Edit the AutoEndTasks key so that is has a value of . If the key doesn't exist, create it as a DWORD value and give it the value of . To disable it, either delete the key, or set the value to .
There may be times when you want to make sure that XP can't be inadvertently shut down. You can use a Registry hack to disable the normal Shut Down. Run the Registry Editor and go to HKEY_CURRENT_USERSoftwareMicrosoftWindowsCurrentVersionPoliciesExplorer. Create a new DWORD value named NoClose with a data value of . Exit the Registry and reboot in order for the change to take effect. You won't be able to shut down Windows in the normal manner from now on; you'll have to run Task Manager by pressing Ctrl-Alt-Delete or right-clicking on the Toolbar, choosing Task Manager, and then using the Task Manager's Shut Down menu to close Windows. If you want to reenable normal shutdowns, delete the NoClose value.
When you install XP or when it comes factory-fresh on a PC, a username and company name are entered as the owner of the system. And that's the way it stays, like it or not. But a Registry hack will let you change both. Run the Registry Editor, go to HKEY_LOCAL_MACHINESOFTWAREMicrosoftWindows NTCurrentVersion, and look for the values RegisteredOwner and RegisteredOrganization. Edit their value data to whatever username and company name you want.
When an application hangs and no longer responds, XP displays a dialog box that prompts you to kill the application or wait a while longer. By default, the dialog box appears after the application hasn't responded for five seconds.
This can cause problems. For example, if a program is doing heavy-duty calculations in the background, it won't respond until the calculation is done, so the operating system will report that the application is hung, even though it isn't. You can use a Registry hack to increase or decrease the amount of time it takes before XP reports that the program has hung.
Run the Registry Editor and go to HKEY_CURRENT_USERControl PanelDesktop. Select the HungAppTimeout entry and edit it to input a new value, in milliseconds. The default is . Exit the Registry. You may need to reboot for the new setting to take effect. Try increasing the number in increments of 1,000 until you find a number that works.
If your hard disk has what XP decides is too little space left on it, the operating system will pop up a warning and recommend that you run Disk Cleanup. But you may be like me and not want a virtual nanny nagging you to clean up your mess. You can turn off the warning with a Registry hack. Run the Registry Editor and go to HKEY_CURRENT_USERSoftwareMicrosoftWindowsCurrentVersionPoliciesExplorer. Create a DWORD value called NoLowDiskSpaceChecks and give it a value of . Exit the Registry and reboot. You can also do this by using TweakUI [Hack #8].
XP uses the C:Program Files directory as the default base directory into which new programs are installed. However, you can change the default installation drive and/or directory by using a Registry hack. Run the Registry Editor and go to HKEY_LOCAL_MACHINESOFTWAREMicrosoftWindowsCurrentVersion. Look for the value named ProgramFilesDir. By default, the value will be C:Program Files. Edit the value to any valid drive or folder; XP will use that new location as the default installation directory for new programs.
Some laptops' processors may not be able to enter their power-saving state, even when they're idle, because USB polling fools the processor into thinking that the laptop is active. Your system polls your USB ports once every millisecond to see whether a device is present. So, even if a device isn't present, it continues that polling. The problem is that some laptop processors won't go into their power-saving state because the constant polling makes it think that the laptop is active.
With a Registry hack, you can increase the polling interval from the default of one millisecond, letting the processor enter its power-saving state. Run the Registry Editor and go to HKEY_LOCAL_MACHINESystemCurrentControlSetControlClass0000. Create the new DWORD value IdleEnable and set the data value to a number between and . This will set the polling interval, in milliseconds. If there are additional subkeys for HKEY_LOCAL_MACHINESystemCurrentControlSetControlClass (such as , , etc.), repeat the procedure and create the IdleEnable DWORD in each of them. Exit the Registry. You may need to reboot for the new setting to go into effect. You also may need to try several different values until you find one that works.
You sometimes may get an error message telling you that you have an overflow in your mouse buffer or keyboard buffer. When that happens, it means the buffer isn't large enough and you need to increase its size. To increase your mouse buffer, run the Registry Editor, go to HKEY_LOCAL_MACHINESYSTEMCurrentControlSetServicesMouclassParameters, and find the MouseDataQueueSize subkey. The default setting is (64 hex). Increase the decimal number to increase the size of the buffer; then exit the Registry and reboot. You may need to try several different settings until you find the right one.
To increase the keyboard buffer, look for the KeyboardDataQueueSize subkey in HKEY_LOCAL_MACHINESYSTEMCurrentControlSetServicesKbdclassParameters. The default setting is (64 hex). Increase the number to increase the size of the buffer; then exit the Registry and reboot. Again, you may need to try several different settings until you find the right one.
![]()
Forgo the dangers and inconvenience of editing the Registry directly. Instead, use plain-text .reg files.
When you're editing the Registry, it's easy to make small errors that cause major repercussions. You may inadvertently edit the wrong key, put in a wrong value, or-given how confusing the Registry is-even make changes without realizing it. The Registry is unforgiving when this happens. It doesn't keep a backup, so you're stuck with the new setting unless you've made backups yourself, as outlined in [Hack #71].
When you edit the Registry directly, you're also apt to make errors if you're making multiple changes, because you have no chance to look at all the changes you're making at once.
There's a way to solve both problems: use .reg files to edit the Registry. These are plain ASCII text files that you can create or read with Notepad or any text editor and that you merge into the Registry to make changes. You can create a .reg file from scratch, or you can export it from a portion of the Registry, edit it with Notepad or another text editor, and then merge it back into the Registry. You'll find that .reg files are particularly useful if you're going to make changes to the Registry of several computers or if you are leery about editing the Registry directly.
You should also consider creating .reg files to copy the parts of the Registry that you're about to edit using the Registry Editor. Then, if you make a mistake with the Registry Editor, you can revert to the previous version of the Registry by merging the .reg file into the Registry. They're also useful if you need to do search-and-replace operations on parts of the Registry, because the Registry Editor doesn't include search-and-replace functionality. You can do the search-and-replace operation in your text editor and then merge the edited file back into the Registry.
To create a .reg file from an existing portion of the Registry, run the Registry Editor, highlight the key or portion of the Registry that you want to export, and choose File-> Export. Choose a name and location for the file. You can export an individual key, a branch of the Registry, a hive, or the entire Registry. Following is an example a .reg file exported from the HKEY_CURRENT_USERControl PanelAccessibility branch:
Windows Registry Editor Version 5.00Edit a .reg file as you would any other text file. As you can see, the first line of the .reg file starts with Windows Registry Editor Version 5.00. Don't change this; Windows XP uses it to confirm that the file does in fact contain Registry information. Previous versions of Windows have a different first line; for Windows 95/98/Me and Windows NT 4, the first line reads either REGEDIT4 or Registry Editor 4.
The names of Registry subkeys are surrounded by brackets, and they include the full pathname to the subkey, such as [HKEY_CURRENT_USERControl PanelAccessibilityKeyboard Response] in our example. Following each subkey are the subkey values and data. Values and data are both surrounded by quotation marks. Here is the full section of a subkey, along with its associated values and data:
[HKEY_LOCAL_MACHINESYSTEMCurrentControlSetServicesMouclass]As you can see, quotes surround data for String values. DWORD values, however, are preceded by dword: and don't have quotes surrounding them. Similarly, binary values are preceded by hex: and don't have quotes surrounding them.
Edit the value and data and save the file. When you've made your changes, import the file back into the Registry by choosing File >Import in the Registry Editor and opening the file. An even easier way to import it is to double-click on the file. XP will ask whether you want to import it; when you answer yes, XP will import it and make the changes to the Registry. This is somewhat counterintuitive and can be confusing; you may at first think that double-clicking on a .reg file will open it for editing. But it won't; it will merge it into the Registry. To open a .reg file, open Notepad or another text editor and then open the .reg file. Alternatively, you can right-click on the .reg file and choose Edit.
|
You can use a .reg file not just to create new keys or values or modify existing ones, but to also delete keys and values. To delete a key with a .reg file, put a minus sign in front of the key name, like this:
HKEY_CURRENT_USERControl PanelAccessibilityKeyboard Response]
When you import the .reg file, that key will be deleted. Keep in mind that you won't be able to delete a key this way unless all of its subkeys have first been deleted, so you'll have to delete them first.
You can also delete a key's value using a .reg file, by putting a minus sign after the equals sign in a .reg file, like this:
'BounceTime'=-When you import this into the Registry, the value will be deleted but the key will still stay intact.
As I mentioned earlier in this hack, when you double-click on a .reg file, the file doesn't open for editing; instead, it gets merged directly into the Registry. This can easily cause serious problems, because you might want to edit the file, and so end up double-clicking on it, the way you normally open files in XP. But the file will end up merging it into the Registry and making Registry changes you didn't want to make.
To solve the problem, you can change the default action so
that a .reg file is opened for editing in Notepad rather than merged
when you double-click on it. In Windows Explorer, choose Tools ![]() Folder
Options
Folder
Options ![]() File
Types to open the File Types dialog box. Highlight the REG entry and click
Advanced. Highlight the Edit action and click Set Default. The Edit action
should turn bold. Click OK.
File
Types to open the File Types dialog box. Highlight the REG entry and click
Advanced. Highlight the Edit action and click Set Default. The Edit action
should turn bold. Click OK.
Notepad is the default editor for editing .reg files, but if you have another text editor you'd rather use you can force that to be the default instead. First, follow the directions from the previous section to open the File Types dialog box and highlight the REG entry's Edit action. Then, click on the Edit button and type in the full path and filename of the text editor you want to use to edit .reg files, followed by -for example:
C:Program FilesTextPad 4TextPad.exe %1Then click OK twice.
|
Avert disaster by backing up the Registry so that you'll always be able to revert to a clean copy.
The Registry is unforgiving; once you make a change to it, that change is permanent. There is no undo function. To get the Registry back to the way you want it, you'll have to reedit it and remember the often arcane and complicated changes that you made-if you can. And, unlike most other Windows applications, the Registry Editor doesn't ask you whether you want to save your changes. Make the change, and it's done. To paraphrase F. Scott Fitzgerald, there are no second acts when you edit the Registry.
Because of this, you should take precautions to keep your Registry safe and ensure that you can restore it to its previous safe settings whenever you want to. The best way to do that is to back up your Registry before you edit it. You should make copies of your Registry not only to protect against accidentally doing damage while you're editing it, but also to ensure that you can restore your system in the event of a system crash.
Here are the best ways to back up your Registry:
System Restore
One
of the simplest ways to back up and restore the Registry is by using System
Restore. System Restore creates a snapshot of your entire system, including the
Registry, and lets you revert your system to that snapshot. To use System
Restore, before editing the Registry choose Start ![]() Control
Panel >Performance and Maintenance >System Restore and then follow the
wizard to create a restore point. If after you edit the Registry you want to
restore it to its preedited state, use the same wizard to do so.
Control
Panel >Performance and Maintenance >System Restore and then follow the
wizard to create a restore point. If after you edit the Registry you want to
restore it to its preedited state, use the same wizard to do so.
Backup utility
You can also use Windows Backup utility to back up and restore the Registry.
|
Run
the Backup utility by choosing Start >All Programs >Accessories >System
Tools >Backup. If you use the Backup Wizard, when you get to the 'What
to Back Up' screen, choose 'Only back up the
If
you don't use the Backup Wizard, click on the Backup tab in the Backup utility,
check the box next to
Registry Editor
You can also use the Registry Editor to back up the Registry. This is probably the easiest way to back up the Registry, but it won't back up two Registry keys: the SAM and Security keys that control password policies, user rights, and related information. Unless you have a complex system with many users, though, these keys are not absolutely vital.
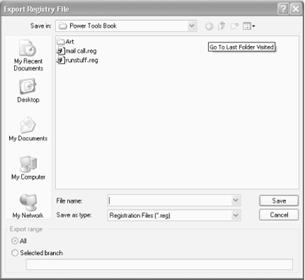
Run the Registry Editor by typing Regedit in the Run box or a command prompt and pressing Enter. Highlight My Computer. If you highlight an individual Registry hive instead, only that hive will be backed up. Next, choose File >Export. The Export Registry File dialog box appears, as shown in Figure 7-8. Give the file a name, choose a location, and save it. For safety's sake, also make backups to another machine and to a CD.
To restore the Registry, run the Registry Editor, choose File >Import, and then import the file.
Protect your Registry and track changes to it made by programs with this downloadable goodie.
An excellent way to keep your Registry safe is with RegSpy, which watches the changes programs make to the Registry, tracks and reports on those changes, and then lets you restore your Registry or use your knowledge about the changes the program makes to fine-tune the way the program runs. One of the program's more useful features is the way it lets you undo changes on a program-by-program basis by building a RollBack script for that program. When you roll back the Registry, you'll roll back only changes made by that one program, not by any others. This is far superior to XP's System Restore, because System Restore makes changes en masse; there's no way to use it to save some changes and delete others.
My favorite RegSpy feature is its SnapShots, which creates files in JavaScript or Visual Basic format and lets you review all the Registry changes and repeat all the Registry changes that took place, step by step. That way, you can get a better understanding of the changes programs make during the installation process, and you can better undo or customize any changes made. It's also a great way to learn more about the Registry; watching the changes made by several different programs gives you insight into its inner workings.
RegSpy is shareware and free to try, but it costs $19.95 if you continue to use it. It's available from https://www.utils32.com/regspy.htm.
RegCleaner and Registry First Aid (shareware from https://www.rosecitysoftware.com), both will clean up your Registry by deleting old and unneeded Registry entries that clog up your system.
Registry Commander is a free utility that gives you a host of features that the Windows Registry Editor leaves out, such as a history list that lets you jump to recently edited keys, the ability to copy and paste entire keys and bookmark keys, and advanced search tools. Get it from https://www.aezay.dk/aezay/regcmd.
Resplendent Registrar is shareware that includes even more tools that the Registry Editor leaves out, such as search-and-replace, a Registry defragmenter to reclaim wasted disk space, an activity monitor that tracks all Registry activity, and a tool that lets you compare the contents of two Registry keys, among other features. Get it from https://www.resplendence.com.
|
Politica de confidentialitate | Termeni si conditii de utilizare |

Vizualizari: 1750
Importanta: ![]()
Termeni si conditii de utilizare | Contact
© SCRIGROUP 2025 . All rights reserved