| CATEGORII DOCUMENTE |
| Asp | Autocad | C | Dot net | Excel | Fox pro | Html | Java |
| Linux | Mathcad | Photoshop | Php | Sql | Visual studio | Windows | Xml |
Your First LAN Application:
Odds and Ends
As with many types of construction, you can break a job down into two parts. The first part takes 90% of your time, and the last 10% of the job takes another 90% of your time. In this chapter, I'll address a number of "fit and finish" details that make the difference between an app that is thrown together and one with the details taken care of.
The trouble with most books that cover a complex product is that they can only really brush the surface of how to perform certain tasks. Once you start developing, you'll run into a thousand questions regarding the tips and tricks to add polish to your application. Although I don't have a thousand pages to cover each of those questions, I will cover a number of common odds and ends that come up over and over.
Adding more functionality to your customer form
Now that I've covered the basics of a typical data-entry form, it's time to address details that will make this user interface actually useful.
The Sort Order combo box
As you're navigating through the records in a form, you'll see that the records are displayed in the order that they've been added to the table. Many times, this isn't the order in which you'll want to see them. I've found it handy to provide a combo box on the form (or the toolbar) that lets the user determine in what order the records will be displayed.
There are two pieces to this function: the first is populating the combo box to begin with, because different forms are undoubtedly going to have different sort-order requirements. The second, then, is physically changing the order of the records once the user has made a choice in the combo box.
This is where you're going to see how multiple objects can work together and pass information back and forth; it's quite a change from the procedural code you're probably used to. There are two objects here-the toolbar and the form-and each has its own responsibilities and knowledge. The toolbar, for example, will be responsible for displaying the available sort orders and responding to a user's change in the sort order to display.
However, because the toolbar is a generic object, it won't know which sort orders are available for a specific form-indeed, not even the form's base class will know that. After all, that information is specific to an actual form. The form should be responsible for actually changing the sort order as well, because the table is bound to the form, not to the form class or the toolbar.
As you work through this, keep in mind that this is still an example. In a real application, you'd most likely keep the available sort orders for a table in a data dictionary, not hard-coded in the form.
Populating the combo box in the toolbar
The basic idea behind populating the toolbar combo box is to store the available sort orders (and their tags) in an array property of the form, and then upon activation of the form, stuff that information into the aItems property of the combo box. Why upon activation? If you've got several forms open, you'll want the toolbar to reflect the sort orders for the active form-not, for example, just the last one that was opened. Thus, as each open form is brought forward (activated), the combo box will be repopulated with new sort orders.
The Activate event of the form class can then handle stuffing sort orders into the toolbar combo box's aItems property. The following code does so by simply iterating through the aSortOrders property of the active form:
hwfrmMaint.activate()
m.lnRows = alen(_screen.activeform.aSortOrders,1)
dime oApp.oToolBar.hwcboSort.aItems[m.lnRows,2]
for m.li = 1 to m.lnRows
oApp.oToolBar.hwcboSort.aItems[m.li,1] =
_screen.activeform.aSortOrders[m.li,1]
oApp.oToolBar.hwcboSort.aItems[m.li,2]
= _screen.activeform.aSortOrders[m.li,2]
next
oApp.oToolBar.hwcboSort.requery()
oApp.oToolBar.hwcboSort.DisplayValue = oApp.oToolBar.hwcboSort.aItems[1,1]
Note that if you use more than one form with the toolbar, the last line will change the order of the table when you switch to another form and then come back to this one. You may want to add extra code to handle this situation if it's important to you.
However, the initialization of which sort orders are actually available still has to be done in each individual maintenance form. Because it has to be done manually, this means it could be forgotten, which is a possibility that has to be trapped. Ideally, the user should never see any evidence of this happening. To make this transparent, I've created a method in the hwfrmMaint class, InitSortOrders(), that should only be used by the developer to populate the form's sort order array, aSortOrders. If they do their job right, the code in InitSortOrders() would look like this:
ORD.InitSortOrders()
dime thisform.aSortOrders[4,2]
thisform.aSortOrders[1,1] = 'Last Name - First Name'
thisform.aSortOrders[1,2] = 'ucnalf'
thisform.aSortOrders[2,1] = 'Company Name'
thisform.aSortOrders[2,2] = 'ucnao'
thisform.aSortOrders[3,1] = 'Country'
thisform.aSortOrders[3,2] = 'uccountry'
thisform.aSortOrders[4,1] = 'Physical Order'
thisform.aSortOrders[4,2] = ''
Then, in the Init() of the form, this method is called. If the programmer did their job, this method will return True, and the Init() will be done. What if the programmer forgot to populate ORD.InitSortOrders()? I added one line of code to the class definition's InitSortOrders():
HwfrmMaint.InitSortOrders()return .f.
Thus, the Init() method populates the array either with a dummy "Physical Order" value or with real values:
HwfrmMaint.Init()
if !empty(thisform.cToolBar)
oApp.ShowAppToolBar( thisform.cToolBar )
if thisform.InitSortOrders()
else
dime thisform.aSortOrders[1,2]
thisform.aSortOrders[1,1] = 'Physical Order'
thisform.aSortOrders[1,2] = ''
endif endif
The Init() fires only once, while the Activate() fires every time the form is brought to the forefront of the application. Thus, the form's array is populated only once, while the toolbar's array gets populated whenever it needs to be.
Changing the order of the records
So far, so good. The form and the toolbar both have the data they need. But users don't care about any of this-they just want to select a sort order in the toolbar's combo box and see the order change in the form. The Anychange() method of the combo box (this is a custom method that is called from both the native Interactive Change and Programmatic Change events, and was described in Chapter 10), just calls a method of the active form:
hwtbrnav.hwcboSort.Anychange()_screen.activeform.ChangeSortOrder()
The active form's ChangeSortOrder() method, then, looks at the DisplayValue in the combo box, gets the associated tag, and changes the order of the table accordingly:
hwfrmMaint.ChangeSortOrder()
�.* find out what they selected
�.* get the actual tag (second column)
�.* set the order to the actual tagm.liElementNumber =
ascan(oApp.oToolbar.hwcboSort.aItems,
oApp.oToolbar.hwcboSort.DisplayValue)
m.lcTag = oApp.oToolbar.hwcboSort.aItems[m.liElementNumber + 1]
set order to (lcTag)
An alternative method would be to pass This.Value to the ChangeSortOrder() method. The BoundColumn of the combo box would have to be set to 2, but then the all of the code in the ChangeSortOrder() is unnecessary, except for the last line that uses that parameter.
You might again be wondering, "Why not just stuff the ChangeSortOrder() code into the toolbar itself?" Just as the other buttons in the toolbar call methods in the form class, so should this one. After all, you might need to override (or create generic hooks into, as described in the previous section in this chapter) a particular form's ChangeSortOrder() code.
Obviously, there's no error trapping here; you might want to check for the existence of the tag before setting order to it willy-nilly. But the purpose here was to show you how to put code in the proper place when you have multiple objects working together. What seems to be a fairly customizable routine has now been made generic; only the data supplying the routine is distinct.
Concepts for child forms
The next task to cover is that of using child forms to add and edit child data and to provide a query interface. Before you start building those data-entry and query forms, you'll need to know some background.
Passing parameters to a form
The first thing you'll want to know is how to pass a parameter to a form. There are actually two pieces: the syntax used when calling the second form and the mechanism inside the second form that accepts the parameter. As you know, the syntax to call form X is:
do form X
If you want to pass a parameter to form X, simply include a "with" clause, like so:
do form X with m.cMyParm
If you want to pass more than one parameter, separate the parameters with commas, like so:
do form X with m.cMyParm1, m.cMyParm2, m.cMyParm3
Then, in form X, you'll need a parameters statement in the Init() method, like so:
*
myform.init()lparameter m.tcMyParm1, m.tcMyParm2
From here, you can manipulate the parameters much like you would in a procedure or function. Many people make the mistake of trying to accept the parameters in the Load() method, because Load() fires before Init(), but the form doesn't actually exist in memory at the beginning of the Load() event, so there's nothing ready to accept. By the time the form's Init() event fires, the form and its controls have been created and are ready for business.
One thing to keep in mind is that the parameters are scoped local to the Init() method- they're not available to the entire form unless you do something special. Typically, that "something special" would be to assign the parameter values to form-level properties, like so:
* myform.init()lparameter m.tcMyParm1, m.tcMyParm2thisform.cMyProperty1 = m.tcMyParm1thisform.cMyProperty2 = m.tcMyParm2
Returning values from a form
The second thing you'll want to know is how to return a value from a child form to the calling form. This, too, involves two pieces and again is not as straightforward as you'd like. First, structure the call to the form to accept a return value as well, like so:
do form X to m.cMyReturnValue
If m.cMyReturnValue doesn't already exist, it will be created for you. Next, add code to the Unload() event of the child form to return a value, like so:
* childform.unload()return m.cValueToReturn
So far, so good. However, you'll spend an hour or two tearing your hair out if you try the following code in your Unload() event:
* childform.unload()return thisform.txtName.value
You can't reference a value of a member of the form, such as the value property of a control, in the Unload()-by the time the return command fires, the form has already begun self-destructing and the controls don't exist anymore. Thus, you'll have to assign the property to a local variable and send that variable back, like so:
*
childform.unload()m.lcTempVariable = thisform.txtName.value
return m.lcTempVariable
Finally, note that a form must be modal to return values in the Unload() event.
Passing object references
Now that you've got that down, you're probably wondering how to return more than one value to the calling form. Since you could simply pass a string of parameters to a child form, you might have already tried to return a series of values, like so:
* childform.unload()m.lcTempVariable1 = thisform.cPropertyValueToReturnm.lcTempVariable2 = thisform.textbox1.valuereturn m.lcTempVariable1, m.lcTempVariable2
Unfortunately, this technique doesn't work, so it's back to the drawing board.
There are several "workarounds" that programmers use to perform this function; I think the cleanest and "most proper" is to simply pass an object reference of the calling form to the child form, and then have the child form actively populate properties as needed. In other words, instead of passing a huge chunk of data back to the calling form, simply have the child manipulate the parent directly.
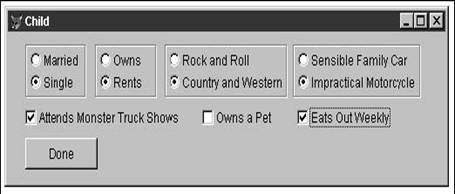
For example, suppose that you have a child form that allows the user to make a number of choices, such as setting attributes in check boxes and option buttons, as shown in Figure 15.1. (The Select Options button in Figure 15.2 opens this form.) The calling form simply needs to display the result of those choices in a concatenated text string, as shown in Figure 15.2.
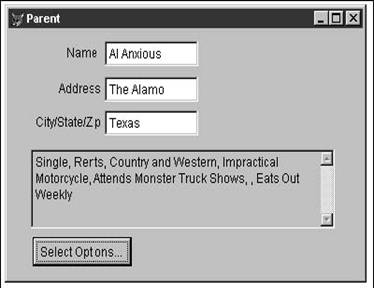
Obviously, the child form can't pass back the selected values of each control to the
![]() parent. And concatenating the string in the
child, while possibly workable for this specific example, isn't necessarily a
valid technique in general. Here's how this is done. (The source code for these
two forms is included with the rest of the CH14D files from the last chapter.)
parent. And concatenating the string in the
child, while possibly workable for this specific example, isn't necessarily a
valid technique in general. Here's how this is done. (The source code for these
two forms is included with the rest of the CH14D files from the last chapter.)
First, the parent form, CALLER.SCX, contains the following properties:
. . cMarriedSingle
. . cOwnsrents
. . cRockCountry
. . cSensibleImpractical
. . lAttends
. . lOwns
. . lEats
The parent form also contains the following call to the child form, CALLERCHILD.SCX, in the Click() event of the Select Options command button:
* SelectOptions.Click()do form callerchild with thisform
This command passes an object reference-a reference to the parent form itself-as a parameter to the child form. Then, the Init() of the child form contains the following code, in order to accept the parameter being passed:
* CallerChild.Init()lpara toCallerthisform.oCallingForm = toCaller
The child form obviously has a property, oCallingForm, that contains the object reference-it's just the name of a variable-and the parameter is stored to this property. Now the child form can reference objects (properties, and even methods!) of the calling form, with syntax like this:
thisform.oCallingForm.cMarriedSingle = 'Some Value'
The entire Click() method of the Done button in the child form assigns the values of the option buttons and the check boxes on the form to their respective properties in the parent form (note that I took the easy way out and didn't name every option group or check box for this example).
* Done.Click()thisform.oCallingForm.cMarriedSingle = thisform.optiongroup1.valuethisform.oCallingForm.cOwnsRents = thisform.optiongroup2.valuethisform.oCallingForm.cRockCountry = thisform.optiongroup3.valuethisform.oCallingForm.cSensibleImpractical = thisform.optiongroup4.valuethisform.oCallingForm.lAttends = thisform.check1.valuethisform.oCallingForm.lOwns = thisform.check2.valuethisform.oCallingForm.lEats = thisform.check3.valuethisform.release
Once you get the hang of this technique, you can go a step further by creating a separate object-a parameter object-onto which you can hang your parameters. Then you can pass an object reference of this parameter object from one form to another.
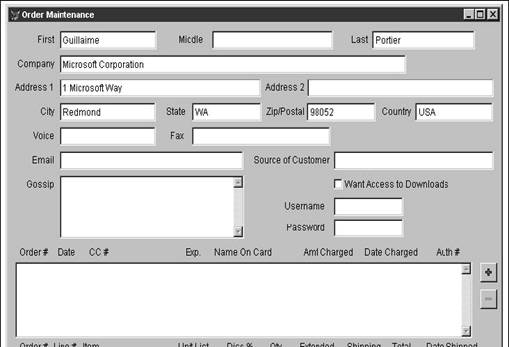
With these tricks in your back pocket, you're now ready to handle a variety of child forms for the Order Maintenance form.
Adding a list box to display child records
Among the many religious wars that programmers fight (Windows vs. Linux? Mac vs. PC? Pessimistic vs. Optimistic locking? Coke vs. Pepsi?) lies the question of whether to use grids for displaying and editing data in child tables.
Jim Booth and Steve Sawyer have dedicated a fair amount of space to this argument in their book, Effective Techniques for Application Development, and I won't repeat them. Instead, I'll ignore the question altogether, and get you prepared for the fight by showing you how to display child records in a list box. Once you're comfortable with this idea, you'll see some shortcomings and you can then decide if you want to graduate to grids.
There are four parts to using a list box for child records. The first is simply the population of the list box: grabbing and formatting all the child records for a particular parent. This has to be done not only during navigation, but also during the addition of new parent records (where there likely won't be any children).
The other three parts have to do with adding more children, deleting children, and editing existing children. These three, obviously, are more easily separated from the rest of the form, because they can be formatted in discrete methods that are called via command buttons or hotkeys. I prefer to use a pair of command buttons for adding and deleting, as shown in Figure 15.3, and call the Edit method by double-clicking on the row to edit. Notice that the image for the Delete button is dimmed-this feature is known as a "visual clue" and indicates that the button is not currently available, because there are no child records to delete.
Populating a childbearing list box
It should probably be obvious to you by now that a separate method is needed to fill the list box with the data from the child records. However, you still might not be sure whether to put this method in the form or in the form class. In this case, the answer is the form itself, because not every maintenance form will have a child list box, and other maintenance forms might have several child list boxes-or even (as this one eventually will) multiple list boxes representing children and grandchildren.
This method will be called each time the form is refreshed: when you move back and forth through the records, when you add a new record, or when you delete a record (and thus have to move to a different parent). It will also be called each time you add, edit, or delete a child record, because the data in the list box again might have changed.
To get started before you start slinging code, add the two command buttons on the side of the list box. I used the hwtbrButton class because the buttons are the right size, and, conceptually, you could see how these two buttons could migrate to a toolbar at some point.
1. 1. Add two command buttons using the hwtbrButton class.
2. 2. Change the names of the buttons to hwtbrButtonOrderAdd and hwtbrButtonDelete.
3. 3. Change the picture properties like so:
hwtbrButtonOrderAdd.Picture:
='add_gr.bmp'
hwtbrButtonOrderAdd.DisabledPicture: ='add_grdis.bmp'
hwtbrButtonOrderDelete.Picture: ='del_gr.bmp'
hwtbrButtonOrderDelete.DisabledPicture: ='del_grdis.bmp'
A subtle point to remember here is that if you select the bitmap by using the ellipsis button in the Properties window, you'll see the full path displayed in the item's entry. However, the .SCX or .VCX only stores a relative path.
You'll also notice that each button has two pictures associated with it. One will be displayed if the button is enabled (because, in the case of Add, you are permitted to add a record, or, in the case of Delete, you can delete certain records in the list box) and the other if the button is disabled. The code I'll show you in a minute will enable and disable the buttons; Visual FoxPro will take care of displaying the proper bitmap according to the Enabled status of the button.
1. 4. Add the table that contains the child data to this form's Data Environment. In this case, it's the ORDERH (Order Header) table.
2. 5. Add a method that will be called to fill the list box, such as FillOrderListbox(). Don't use a generic method name (like "FillList") because sure as shooting, you're going to end up with a second list box on the form if you do.
Here's the code for the FillOrderListbox() method:
*
FillOrderListBox()select '', iNoOrd, dOrd, cNoCC, cExp, cNaCC,
nAmtCharge, dCharged,
cNoAuth ;
from ORDERH
;
where ORDERH.iidCust = thisform.iid ;
into array laOrderH
if _tally = 0
dime thisform.hwlstOrders.aItems[1,9]
thisform.hwlstOrders.aItems[1,1] = '<No Orders>'
thisform.hwlstOrders.aItems[1,2] = 0
thisform.hwlstOrders.aItems[1,3] =
thisform.hwlstOrders.aItems[1,4] = ''
thisform.hwlstOrders.aItems[1,5] = ''
thisform.hwlstOrders.aItems[1,6] = ''
thisform.hwlstOrders.aItems[1,7] = 0.00
thisform.hwlstOrders.aItems[1,8] =
thisform.hwlstOrders.aItems[1,9] = ''
else
* we've got an arraydime thisform.hwlstOrders.aItems[alen(laOrderH,1),9]
for m.li = 1 to alen(laOrderH,1)
thisform.hwlstOrders.aItems[m.li,2]
= laOrderH[m.li,2]
thisform.hwlstOrders.aItems[m.li,3] = laOrderH[m.li,3]
thisform.hwlstOrders.aItems[m.li,4] = laOrderH[m.li,4]
thisform.hwlstOrders.aItems[m.li,5] = laOrderH[m.li,5]
thisform.hwlstOrders.aItems[m.li,6] = laOrderH[m.li,6]
thisform.hwlstOrders.aItems[m.li,7] = laOrderH[m.li,7]
thisform.hwlstOrders.aItems[m.li,8] = laOrderH[m.li,8]
thisform.hwlstOrders.aItems[m.li,9] = laOrderH[m.li,9]
thisform.hwlstOrders.aItems[m.li,1] ;
= right(str(laOrderH[m.li,2]),4) ;
�.+ ' ' + dtoc(laOrderH[m.li,3]) ;
�.+ ' ' + laOrderH[m.li,4] ;
�.+ laOrderH[m.li,5] ;
�.+ laOrderH[m.li,6] ;
�.+ str(laOrderH[m.li,7],10,2) ;
�.+ dtoc(laOrderH[m.li,8]) ;
�.+ laOrderH[m.li,9]
next endif thisform.hwlstOrders.requery()thisform.hwlstOrders.DisplayValue = thisform.hwlstOrders.aItems[1,1]
So far, so good. But as of now, this is just a dumb method-it doesn't get called from anywhere. Time to fix that next. This could be done manually from each place that the form changes data, such as the Add() method, the Next() method, and so on. But what's common to each of these? They're all going to require a refresh of the form's data. So why not just call the method from the form's Refresh() method?
* ORD.refresh()thisform.fillOrderListBox()
In this particular case, it will work nicely. You want to be careful, however, because Refresh() can be a time-consuming process-you don't want to call the form's Refresh() method any old time you want a little bit of the form to be updated.
If you're following along, and you've tried this, you'll see that there's one more missing piece-a very important piece. The SELECT command in the FillOrderListBox() method grabs all of the child records according to a "ORDERH.iidCust = thisform.iid" WHERE clause, and I've not mentioned anything about the "thisform.iid" property yet.
This is a little secret of mine to make my life easier. In my maintenance form class, hwfrmMaint, I create a property called iid, and use it to hold the primary key of the current record. I find it's useful in many respects, and this one-where I want to know the key of the current record in order to find children-is a perfect example. To use it, and to keep things as generic as possible, I create a second property in the hwfrmMaint class that holds the name of the primary key field, cNamePK.
Then, in the Init() of the form (not the form class!), I actually assign the name of the Primary Key to this property, like so:
* ORD.Init()thisform.cNamePK = 'iidCust' dodefault()
Afterwards, of course, I call the parent class method with the DODEFAULT() function. I call DODEFAULT() after I assign the property because I might need the new property value in the parent code. Now, all that's left is to update the property each time the form is refreshed. I do this in the Refresh() method of the form class. Notice how using the cNamePK property of the form class means I can keep my code as generic as possible.
*
HwfrmMaint.refresh()thisform.iid = eval(thisform.cNamePK)
Now that I've got code in the form class's Refresh() method, it means that I have to change the ORD.refresh() method as well:
* ORD.refresh()dodefault()thisform.fillOrderListBox()
This time, I call the parent class method first. There could be generic refresh code that I'd want to execute before I call any custom code, like the FillOrderListBox() method.
One final note regarding navigation: The Add and Delete buttons need to be handled properly. If you're on a parent record without children, the Delete button needs to be dimmed, but it needs to be enabled if you move on to a record that has children (which, clearly, could be deleted). The Add button needs to be disabled during the process of adding a new parent.
I created a form-level method called HandleOrderButtons, and called it at the end of the FillOrderListBox() method. Here's the last few lines of the FillOrderListBox() method:
endif
thisform.hwlstOrders.requery()
thisform.hwlstOrders.DisplayValue = thisform.hwlstOrders.aItems[1,1]
thisform.HandleOrderButtons()
The
HandleOrderButtons() method looks like this:
�.* HandleOrderButtons()
�.* disable the Add button if there isn't a person or company name
�.* (meaning we're probably adding a record)
if empty(thisform.hwtxtFirst.value) ;
and empty(thisform.hwtxtLast.value) ;
and empty(thisform.hwtxtCompany.value)
thisform.hwtbrButtonOrderAdd.enabled = .f. else thisform.hwtbrButtonOrderAdd.enabled = .t. endif
* disable the Delete button if there are no childrenif thisform.hwlstOrders.DisplayValue = '<No Orders>'thisform.hwtbrButtonOrderDelete.enabled = .f. else
thisform.hwtbrButtonOrderDelete.enabled = .t. endif
Once the record has been saved, of course, the Add Orders button will need to be enabled, and that's taken care of when the Save() method calls the form's Refresh() method.
Adding children
The basic strategy behind adding child records, when using a list box to display the children in a form, is to pop open a form to add the child record, and shut down the form after saving the child. Because this type of process is fairly common, and because it has a lot of standard code associated with it, it makes sense to create a class for the child form.
Before that, however, I've changed the hwfrm base form class to have a Done() method, moved the Done button's Click() code to that Done() method, and then called the Done() method from the Done button's Click() method. It's actually more work right now, but it will become useful shortly.
1. 1. Create a form class, hwfrmChild, based on the hwfrm class.
2. 2. Change the following attributes of the hwfrmChild class:
. . Caption: hwfrmChild
. . Window type: 1-modal
(Remember? A form must be modal to return values in its Unload() event.)
3. Add three properties:
. . iid (contains the ID of the current record in the child form)
. . iidParent (contains the ID of the child record's parent)
. . lDidAdd (contains a flag indicating whether the user added a record or canceled out of the child form)
4. Add the following code:
�.* hwfrmchild.init()lpara m.tiidParent
thisform.iidParent = m.tiidParent
�.* Hwfrmchild.Activate()append blank
�.* hwfrmchild.Unload()m.llDidAdd = thisform.lDidAdd
return m.llDidAdd
�.* hwfrmchild.Save()=tableupdate()
thisform.lDidAdd = .t.
thisform.release
�.* hwfrmchild.Done()thisform.lDidAdd = .f.
dodefault()
Some of this already looks familiar-you'll notice how I'm returning the value of the form's lDidAdd property to the parent form via the Unload() event, for example.
5. Drop a Save button on the form and add the following code to its Click() method:
*
Save button click:thisform.save()
You'll notice that this is all generic code. It handles a great deal of the processing so you have to write as little custom code as possible in the actual child form. Now it's time to create a form from this class:
1. 1. Create a form named ORDADD.SCX.
2. 2. Change the following attributes:
. . Name: ORDADD
. . Caption: Order Header Maintenance
1. 3. Add the ORDERH table to the data environment.
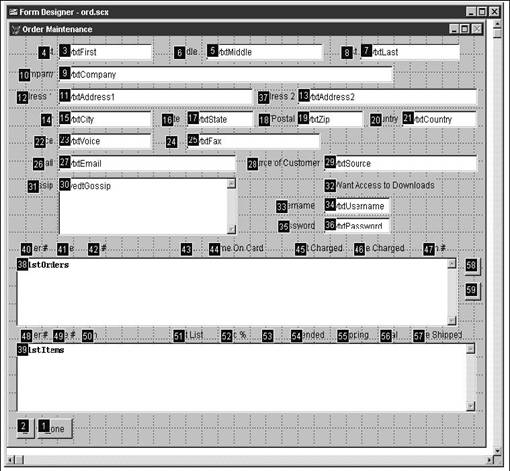
2. 4. Add a few text boxes and labels to the form, using the hwtxt and hwlbl base classes, as shown in Figure 15.4. Ignore the fact that the top two controls, the Parent Key label and the hwtxt1 text box, look different in the figure for the time being. Change the text box control names as shown.
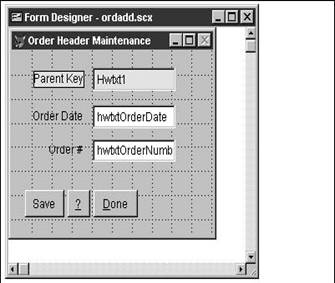
Obviously, a real form would have more controls, but these few serve well enough as an example.
1. 5. Map the text box control sources to the appropriate ORDERH fields (dOrd and iNoOrd).
2. 6. Add the following code:
*
Ordadd.activate()dodefault()
thisform.hwtxt1.value = thisform.iidParent
7. Open the ORDERH table and create a Default Value for the iidorderh primary key field:
olib.incrid('iidorderh')
And that's it! The rest of the code that handles adding and saving data is in the hwfrmChild class!
8. Finally, call the child form from the Order Maintenance form's OrderAdd() method and handle the results:
�.* ORD.OrderAdd()do form ORDADD with thisform.iid to
m.llDidAdd
sele CUST
if m.llDidAdd
�. * need to refresh the form's list box
thisform.FillOrderListBox()
else
* user cancelled out of the addendif
You'll see that the primary key of the current record in the Order Maintenance form (in this case, the ID of the current customer) is passed to the Add Order form to be used as a foreign key in the Order Header record. And the child form returns a logical value depending on whether a record was actually added. This logical flag is then used to determine whether or not the Order Maintenance form's Orders list box needs to be refreshed. This functionality is not absolutely necessary, but it's nice to have and could speed up performance in some cases.
Editing an existing child record
You can edit an existing child record in one of two ways:
. . Pass the ID of the child and then select the data from the table.
. . Pass all of the values from the array.
In either case, you could return whether the record was edited.
Let me give you another idea. You've already got a maintenance form for adding a record. Why not use the same form for editing as well? What would be required to do so?
First, you'd want to be able to handle both adding and editing, and the form would have slightly different behavior depending on which you're doing, so you'd want to pass a flag to the child form that indicates whether you're adding or editing. The code in the form's Init() would look like this:
* HwfrmChild.Init()lpara m.tiidParent, m.tiidChild, m.lAddNotEditthisform.iidParent = m.tiidParent thisform.iid = m.tiidChild thisform.lAddNotEdit = m.lAddNotEdit
Assuming that you're editing from the table (as opposed to array values), you'll also want to pass the ID of the child record to edit. You're not going to need a child ID if you're adding, so perhaps you could pass a parameter with value zero if you're adding a record. You'll want properties for both the AddNotEdit flag and the child ID value.
Next, inside the form, you'd either populate the form with a blank record (through APPEND BLANK) or with live data (by positioning the record pointer in the table to the record being edited). You could do this in the hwfrmChild's Activate() event, like so:
if thisform.lAddNotEdit append blankelse
* code to position record pointer on record to editendif
In both cases, the data for the record (either blank values or values to edit) will be displayed in the controls on the child form. Finally, you'll need to have code in the Order Maintenance form's OrderEdit() method. This will be called from the list box's DblClick() method and would look something like this:
m.liElementNumber = ascan(thisform.hwlstOrders.aItems, ;thisform.hwlstOrders.DisplayValue)if m.liElementNumber = 0 messagebox('Unable to find ' ;
�.+ chr(13) + thisform.hwlstOrders.DisplayValue ;
�.+ chr(13) + ' in the list box.')
else m.liidOrderH = thisform.hwlstOrders.aItems[m.liElementNumber + 1]do form ORDMAINT with thisform.iid, m.liidOrderH, .f.
endif
First, you need to determine which row in the list box is highlighted so that you can tell which row is supposed to be edited. No matter what the occasion, I always test the result of the ASCAN function to make sure a valid element number was returned-if for some reason the Display Value wasn't found in the array (most likely a programming error), it's good to alert the user. Notice that instead of some "Error Occurred" type of message, I took a bit of extra trouble in this message box to explain what happened, and included the specific data as well.
An alternative method to this business of ASCAN is to use the ListIndex property of the list box:
m.liElementNumber = thisform.hwLstOrder.ListIndex
The code in the ELSE segment then determines the primary key for the record to be edited, and calls a dual-purpose ORDMAINT form with the proper parameters as described earlier. The source code for this section includes this code but doesn't include the child form, ORDMAINT.SCX, itself.
Deleting an existing child record
Deleting a record is fairly easy, compared to these other processes. A little bit of housekeeping is needed in order to keep things tidy, but that's all. Here's the code in the ORD.OrderDelete() method, which, of course, is called from the Click() method of the Delete Order command button:
m.liElementNumber = ascan(thisform.hwlstOrders.aItems,thisform.hwlstOrders.DisplayValue)if m.liElementNumber = 0
messagebox('Unable to find ' ;
�. + chr(13) + thisform.hwlstOrders.DisplayValue ;
�.+ chr(13) + ' in the list box.')
else m.llWantToDelete = messagebox('Are you sure you want to delete ' ;
�.+ chr(13) ;
�.+ chr(13) + thisform.hwlstOrders.DisplayValue ;
�.+ chr(13) ;
�.+ chr(13) + 'now?', MB_YESNO+MB_ICONQUESTION +MB_DEFBUTTON2 )
if m.llWantToDelete = IDYES
m.liidOrderH = thisform.hwlstOrders.aItems[m.liElementNumber + 1]
sele ORDERH
delete for ORDERH.iidOrderH = m.liidOrderH
sele CUST
wait
wind nowa 'Deleted'
else
wait wind nowa 'Delete
canceled'
endif endif thisform.FillOrderListBox()
Just as with editing a record, I do a bit of error trapping to make sure that the row is valid. The rest of the code-in the ELSE segment-asks users to confirm that they do, truly, want to delete the row, and then performs the deletion if appropriate. Finally, the method repopulates the list box because the contents have changed.
Odds and ends
Checking for _screen.activeform
In much of the application, I reference "_screen.activeform" when making a call to a method. If you've been following along on your machine, you might have noticed the error message "ACTIVEFORM is not an object" if you've tried to click on a toolbar or run a menu option when windows aren't open or when debug windows are active. These windows participate in the event loop, but they aren't really part of the program. As a result, when the _screen.activeform.next() method is executed, Visual FoxPro either fails trying to find "activeform" or tries to find the Next() method attached to a window that doesn't have one.
The solution is to provide a protective wrapper for each call to a method that belongs to a form. This wrapper will examine the type of the active form, and if it's not "O" (it's not an object), the method won't be allowed to fire. For example, the Click() method of the Next toolbar icon that contains this code:
_screen.activeform.next()
will be changed to
if type('_screen.activeform') = 'O'
_screen.activeform.next()else
wait window 'You can't use this function unless an application form is active'endif
The Next() method is also called in the Record menu. This will require two changes. First, change the Record menu options to a Procedure result; second, enter the same code as is in the corresponding toolbar icon's Click() method:
if type('_screen.activeform') = 'O'
_screen.activeform.next()else
wait window 'You can't use this function ' ;
+ 'unless an application form is active'endif
This will have to be done for all of the navigation and maintenance menu options in the system: Next, Back, Add, Delete, Find, List, Save, and Undo.
Dimming the Record menu pad
You'll notice that the Record menu pad-and its menu options-are all available even when there is no active form. This is a problem because you can select one of the menu options and it will bomb, since there is no active form. It is also less than kind to the user, because the Record menu pad should just be completely disabled when it isn't appropriate. It shouldn't disappear, however, because that might be confusing to the user.
This is a problem with a very simple solution. Just check the value of oApp.nFormInstanceCount (this is the same property used when figuring out whether or not to activate the toolbar) in the Record menu pad's SKIP FOR expression:
1. 1. Modify the IT.MNX menu.
2. 2. Select the Record menu pad.
3. 3. Select the Options checkmark command button.
4. 4. Select the Skip For edit box.
5. 5. Enter the expression:
oApp.nFormInstanceCount < 1
6. Close the dialog, save the menu, and rebuild it.
When you run the app, the Record menu will be dimmed until you open a form.
Setting tab order on a form
You probably have noticed that, on a form, the focus moves from one control to another in the order that they were put on the form. This order is called the "tab order." And the tab order is most likely not the order you want. You can change the tab order through two similar mechanisms; which depends on the choice of the Tab Ordering combo box in the Forms tab of the Tools, Options dialog.
If tab ordering is set to Interactive, you can open a form and then select the View, Tab Order menu command. (The Tab Order menu command isn't displayed if you don't have a form open.) Doing so will display numbered boxes over the upper left corner of each control on the form, as shown in Figure 15.5.
To change the tab order, just hold down the Ctrl key and click the controls in the order in which you'd like focus to move. You can, of course, ignore controls that don't ever get focus, such as labels.
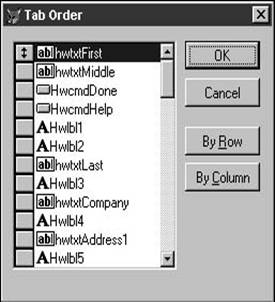
If tab ordering in Tools, Options is set to By List, selecting the View, Tab Order menu command opens the Tab Order dialog as shown in Figure 15.6.
Unless you've got a small number of controls, this mechanism is awkward to use because it holds only a dozen controls and the dialog can't be resized. I prefer to use the Interactive ordering to set the tab order, and then use the Tab Order list to make minute adjustments, such as swapping the order of two controls.
Creating OLIB (ridding MYPROC.APP)
It feels sort of old-fashioned to have a procedure file hanging around in a Visual
![]() FoxPro application, and, indeed, we don't
really need to have one anymore. You can move the functions in a proc file into
methods of a class library. Not only does their functionality remain available
to the application, but doing so provides additional flexibility in the event
that a function needs to be subclassed in the future. (The source code for this
section is in the CH15 directory.) I created a class called LIB and stored it
in a class library called HWLIB62 in the last section. There's only one method
in it right now-the INCRID() routine that is used to generate primary key ID
values. But it's little work to move all of the other functions in MYPROC to
the LIB class.
FoxPro application, and, indeed, we don't
really need to have one anymore. You can move the functions in a proc file into
methods of a class library. Not only does their functionality remain available
to the application, but doing so provides additional flexibility in the event
that a function needs to be subclassed in the future. (The source code for this
section is in the CH15 directory.) I created a class called LIB and stored it
in a class library called HWLIB62 in the last section. There's only one method
in it right now-the INCRID() routine that is used to generate primary key ID
values. But it's little work to move all of the other functions in MYPROC to
the LIB class.
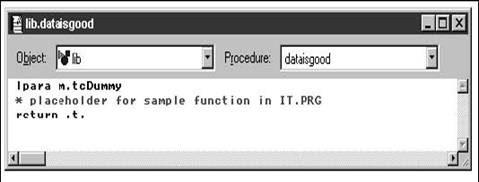
First (assuming you've already got the LIB class in HWLIB62), create methods for each of the functions in MYPROC, and move the code into the library, as shown in Figure 15.7. Next, you'll want to make sure that the oLib object actually exists:
set
classlib to HWAPP62.VCX, HWCTRL62.VCX, HWLIB62.VCX
oEnv = createobject('ENV')
oApp = createobject('APP')
oLib = createobject('LIB')
And, of course, you can get rid of the call to MYPROC in IT.PRG as well. Finally, you'll need to replace calls to the functions in MYPROC with calls to methods in the LIB class. Thus, a call like so:
m.nAmtRAM = GetRAM()
would be replaced by:
m.nAmtRAM = oLib.GetRAM()
Similarly, the call to the UserError routine, UserError, in MYPROC:
on error do UserError
would be replaced by:
on error oLib.UserError()
There is a danger in creating a class library to hold your routines: the increased cohesion between classes. In an ideal world, every object would be its own separate entity, and it could be plugged into anyone else's application, just like interchangeable parts. However, calls to other objects from within objects inextricably tie those two objects together, such that they end up having to always live together.
In a complex application framework, a certain amount of this is probably necessary, and the design and coding requirements to make the objects completely independent become onerous. Nonetheless, one shouldn't rush to create dozens of objects with a multitude of interdependencies. The efficiencies possible in object-oriented programming will disappear into the morass of impossible maintainability.
Field mapping
Remember when you were dropping labels and text boxes onto a data-entry form instead of dragging them from the data environment? It was a bit of a nuisance because you had to manually set the control source of each control, but doing so enabled you to determine which class you used for each control.
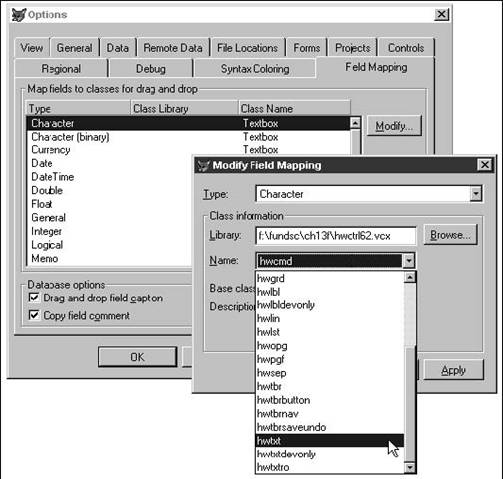
As of version 5, Visual FoxPro allows you to set which of your own classes should be used as the base class for fields you drag onto a form from the data environment. This capability is provided through the Field Mapping tab of the Tools, Options dialog, as shown in Figure 15.8.
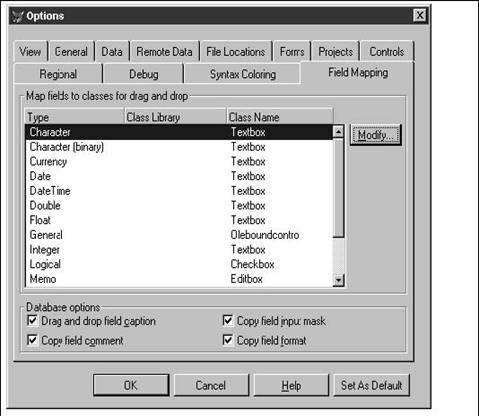
You can choose different classes (in different class libraries, even, if necessary) for each type of data. Select the data type in the Field Mapping list box, click the Modify button, and then select the library and class in that library, as shown in Figure 15.9.
Notice that you can set several options for each data type. You can choose to drag and drop the field name as a label for the control, and also copy the field comment, input mask, and format.
Restoring the toolbar
Users are goofs, of course, and when they notice the little close box in the upper right corner of a toolbar's title bar, they're bound to try to click it. Then what? The problem is that opening another form does not bring the toolbar back-they have to close all the forms and then open them again. Not a killer, but perhaps it's one of those things that could be avoided.
There are several ways to deal with this circumstance. The first way would be to prohibit the user from closing the toolbar in the first place. Workable, but decidedly unfriendly. The second way would be to automatically activate the toolbar if the user opens a form and the toolbar isn't showing.
A third way would be to provide a menu option to allow the user to call the toolbar back when they wanted to. I prefer this third method because it transfers control to the user. Suppose you'd chosen Door Number Two, and then imagine their frustration as they open four or five forms, and after each one, undock and then close the toolbar again and again. "I don't want that toolbar up!"
I'm going to create a menu option to "Recall toolbar," and the only question is where to put it. I suggest that it belongs under the Record menu pad so it's unavailable when no application forms are active. Here's how:
1. Add a separator menu option so that the Recall toolbar menu option isn't jammed up against other menu options:
. . Change the prompt to "-".
. . Change the type to "Bar".
2. Add a "Show toolbar" menu option:
. . Change the prompt to "Show Toolbar"
. . Change the type to "Procedure"
. . Edit the procedure as follows:
if isnull(oApp.oToolbar)
oApp.oToolbar = createobject(_screen.activeform.cToolbar)
oApp.oToolbar.show()
else
wait window nowait "Toolbar is already visible"endif
3. Save and rebuild the menu.
When you open a form and then undock and close the toolbar, the Record, Show Toolbar menu option will activate the toolbar again. If the toolbar is already visible, you'll get a message informing you so.
Here's the logic. First, inside the procedure-when users close the toolbar while a form is open-the oApp.oToolbar reference changes to .NULL. You can see this for yourself if you put the following expression in the Debug window and then open a form:
oApp.oToolbar
The expression in the Debug window evaluates to "(Object)". Close the toolbar (drag it off the top, and then click the close box). The expression now evaluates to .NULL.
Next, put the following expression in the Debug window and close the toolbar again:
isnull(oApp.oToolbar)
You'll see this expression evaluate to .T., because oApp.oToolbar is null.
So the first line in the procedure checks to see if the object reference evaluates to null, and if so, brings it forward again. If the object reference exists, the toolbar is there and the user is so informed.
What about the case where no forms are open, and thus the toolbar won't be around either? Easy! Because the user can't get at the Record menu when there aren't any forms open, this isn't a worry. Of course, you could put a "nFormInstanceCount > 1 expression in the SKIP FOR dialog for the Show Toolbar menu option if you needed to put the Show Toolbar menu option elsewhere in the menu system.
Of course, you don't have to do it this way. The ShowAppToolBar method of the App class contains the following line of code that determines whether or not to activate the toolbar:
if this.nFormInstanceCount = 0
To automatically activate the toolbar each time a form is opened and there is no active toolbar:
if this.nFormInstanceCount = 0 or isnull(oApp.oToolbar)
Choosing between data sets
Because my company does a lot of credit-card charging and book shipping, we use a couple of applications that automate much of that work. Specifically, we use one application to authorize credit-card charges, and another to calculate shipping charges for UPS. Incredibly enough, both of these applications have a huge flaw: they both must be installed on your local C drive, and they bury their database deep in the bowels of the C drive as well. This means that you have to set up your backup procedure to dig a half-dozen interrelated files out of a directory buried six levels deep under "Program Files," and woe be to you if your C drive crashes in the interim.
I've asked both companies why they don't provide the ability to point to a data file located somewhere else, like, duh, on a server that is automatically backed up regularly, and the only answer was, "Well, uh, that would have been too hard."
Don't be like these losers-give the users of your application the ability to move their data set where they want it to be, and, even better, give them the ability to switch between data sets. This latter capability is just as important-many companies like to be able to switch between test and production data during testing, and to use the same application against multiple sets of data, such as for two companies run by the same people.
There's a catch involved in switching data sets when using Visual FoxPro's forms and data environments: The path to the DBC() is hard-coded in the read-only (at design time) Database property of each table in the data environment. If your data is in a different directory than your program, the full path is stored in the Database property. As a result, even if you use the SET PATH To or SET DEFAULT TO commands to change to a different data directory, your forms will still point to the original data set.
The solution I've come up with involves two steps. First, I always create a data directory that contains an empty copy of all databases and tables needed for the application, and I use that data set as the "pure original data set" for all time. Whenever I need to make changes to the data structures, I make changes to that data set, and then propagate the changes to other data sets as needed.
Second, I place the code along the lines of the following in the BeforeOpenTables method of every data environment (kudos to my tech editor, Doug Hennig, for creating the wrapper that grabbed every cursor object in the data environment):
*
* the following code snippet goes into the BeforeOpenTables method of every DE* m.lnEnv = amembers(laEnv, this, 2)for m.lnI = 1 to m.lnEnv
oObject = eval('this.' + laEnv(m.lnI))
if upper(oObject.baseclass) = 'CURSOR'
m.lcDBC = oObject.Database
oObject.Database = fullpath(oApp.cLocCurData + substr(m.lcDBC, rat('',m.lcDBC)), curd())
endif && uppernext m.lnI oApp.lCurrentFormHasMultDataSetsEnabled = .t.
This could be fairly obscure if you're not used to reading code with object references in it, so I'll walk through each line.
The first line determines how many objects are in the data environment (notice the subtle "this" second parameter that refers to the data environment (remember, this code is in the DE!). Then, the code loops through for each object in the DE. If the object is a cursor, the current database location (oApp.cLocCurData) is stuffed into the cursor's Database property.
The last line sets the oApp.lCurrentFormHasMultDataSetsEnabled property to True. This is necessary because this chunk of code must manually be put into each data environment- since the DE can't be subclassed. The global application object, oApp, has this property that is by default set to False. Each data-related form class checks this property, warns the user (hopefully, the developer) that multiple data sets were not enabled, and then shuts down the form.
If this is not done, the user could possibly use the form, not aware that the form is actually pointing to a different data set. It's nearly impossible to find bugs caused by incompatible data that's coming from two different databases in the same application.
Developer-only controls
Remember that pair of controls in the Order Maintenance child form? A label and a text box were different colors-if you opened the form in the source code for that section, you saw that they were both yellow, and that they were created from different classes than the other labels and text boxes on the form.
I'm a dope most of the time, and I've found it necessary to resort to all sorts of tricks to help me along in the day-to-day business of writing apps. One crutch I use over and over is to display data on forms that is of interest to me but that wouldn't be of interest (and, most often, would end up being confusing) to the user. One example is the primary key of a table in a form. I always include a text box on a form that displays the PK for the table, as well as any foreign keys that are also in that table. Having that information is always handy when trying to chase down bugs. Of course, you wouldn't ever want your users to see that data.
As a result, I've created two special classes-one for labels and one for text boxes-that I use to label and display data like this. The classes have yellow backgrounds so I can tell immediately that these fields are for my eyes only. The only trick is this: How do I get these objects to show up when I'm running the app, but not when my users are running the app?
The answer has two parts. First, I always create a "developer-only" flag in my apps that I can turn on and off. In the olden days, I used to use DOS SET commands, but those are more and more inconvenient to use with Windows. Now, I resort to a quick and dirty method: In my application object, I look for a file named "FPDEV.WHIL" in the root directory of the drive where my application is running. If the file is there, then I'm in "developer mode"; if it's not, the app is being run by an ordinary user.
The existence of this file sets the "oApp.cMethod" property to "DEV"; the absence sets the property to "USER". Then, I can simply test for
oApp.cMethdo = 'DEV'
and take the appropriate action. Here's the code in the Init() method of the APP class:
App.Init()if file('FPDEV.WHIL')
this.cMethod = 'DEV' else
this.cMethod = 'USER' endif
Now back to the label and text box that disappear when a user is running the app. I created two classes, hwlblDevOnly and hwtxtDevonly, both based on VFP base classes, and put the following code in their Init() methods:
�.* hwlblDevOnly.Init()
�.* hwtxtDevOnly.Init()if oApp.cMethod = 'DEV'this.backcolor = 65535 && 8454143 = light yellow, 8454016 = light greenelse
this.visible = .f. endif
Now, when a form with either (or both!) of these controls runs, the control is either displayed or made invisible according to the value of the oApp.cMethod property. I get my data the way I want it without annoying or confusing my users.
Of course, you can use oApp.cMethod to drive a whole set of behaviors for your application. The specifics are left to you, the reader, as an exercise.
|
Politica de confidentialitate | Termeni si conditii de utilizare |

Vizualizari: 1523
Importanta: ![]()
Termeni si conditii de utilizare | Contact
© SCRIGROUP 2026 . All rights reserved