| CATEGORII DOCUMENTE |
| Asp | Autocad | C | Dot net | Excel | Fox pro | Html | Java |
| Linux | Mathcad | Photoshop | Php | Sql | Visual studio | Windows | Xml |
Now let's get down to work as an architect.
Keeping track of a SOA is a very challenging task for an architect.
We have to design the initial architecture, account for changes that developers might make, and make sure that are architecture is going to work when we finally deploy our application.
Visual Studio Team System takes the complexity out of this with a visual design surface.
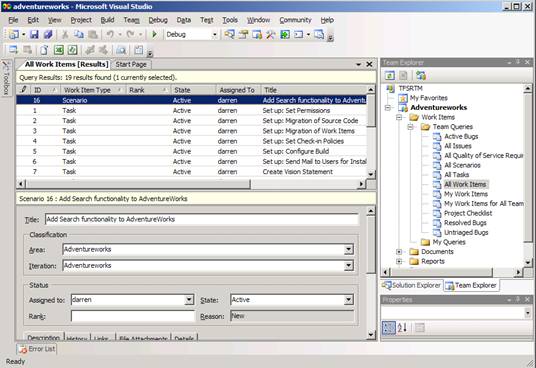
One the first things we can do as an architect is to make sure we are on the same page with the rest of our team; the same work items we created as a project manager in Excel is available in Visual Studio Team System.
By assigning this task to ourselves, the rest of our team knows that we are working on this task, so no effort is wasted.
|
Open Team Explorer Expand AdventureWorks Expand Work Items Expand Team Queries Run the All Work Items query by double clicking it View the work items you
originally created in Excel and Project
|
|
As part of this application is extending our current web application using Web Services, we can easily add a new XML Web Service by simply dragging and dropping in our new modeling environment When we're ready, Visual Studio Team System will generate all of the initial code for me; my development team can concentrate on writing code to support our business. To do this, we are going to reverse engineer our current application into a architectural model |
|
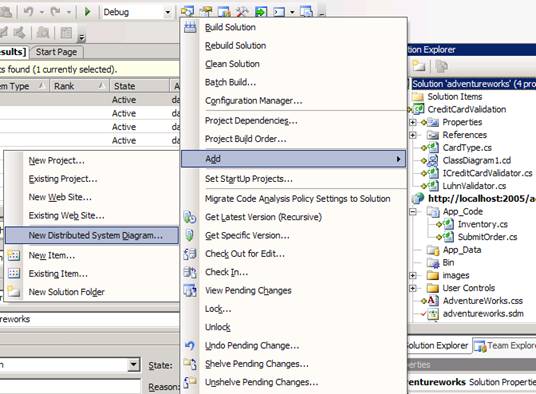
Add a new Application Diagram to the solution by right clicking the top
level solution (AdventureWorks.sln in Solution Explorer) and selecting Add, New Distributed Systems Diagram
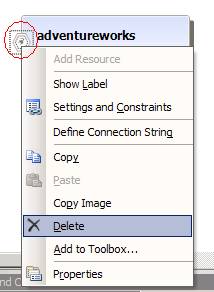
Highlight Application Diagram and hit Add accepting the default name ApplicationDiagram1.ad (if you receive a security warning, click OK) Wait for the designer to visualize Open the web.config file under the https://localhost:2005/AdventureWorks solution and remove the <buildProviders> element completely (i.e. delete <buildProviders><clear /></buildProviders>) - we do this to ensure our new changes can be built successfully. Return to ApplicationDiagram1.ad and remove the end-point (small octagon with a plug icon in the middle) from the AdventureWorks ASP.NET Web Application on the modeling surface, right clicking it and selecting delete (when prompted choose OK)
|
|
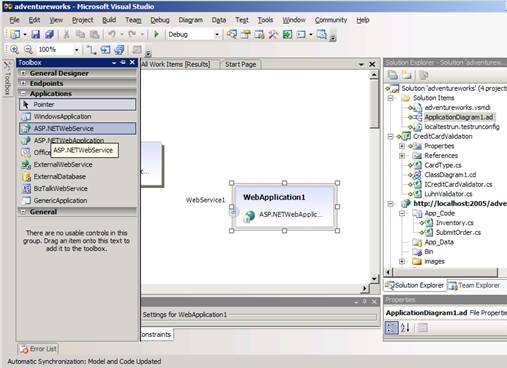
We can now represent our new Web Service to be created also on our model Drag and drop a new ASP.NetWebService onto the design
surface from the toolbox
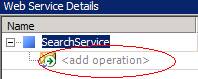
Click on the current Web Service name (WebApplication1) and rename this web service SearchServiceWebService Do the same for the end-point Visual Studio Team System helps us visually design the interface to our XML Web Service. What we are now doing is visually designing the WSDL contract that our service will adhere to. Right Click the end-point, and select Define Operations Add a new operation by clicking
<add operation> and typing SearchForProducts (and Enter)
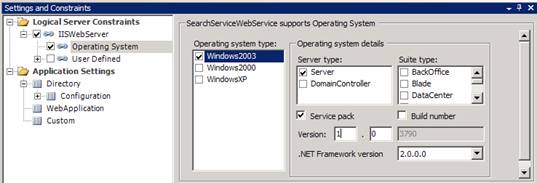
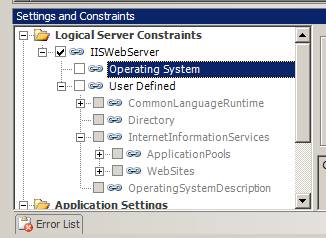
Leave the default settings (For now, we will have the operation return void and take no parameters) Next we will add a constraint for our application as we want to take advantage of some new features in Windows Server 2003 Service Pack 1. This will help us in the testing and validation of our application. Right-click on SearchServiceWebService and choose Settings and Constraints Check the box next to Operating System in the Setting and Constraints dialogue box. Highlight the Operating System Setting, and scroll down until you see Service Pack Check the box marked Service Pack and enter
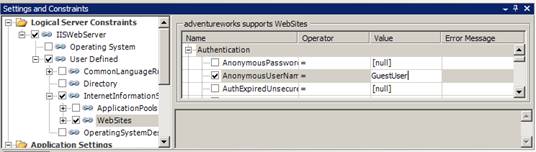
We will also add a constraint to ensure all anonymous traffic use a specific username: Right-click on adventureworks and choose Settings and Constraints Expand the UserDefined list under IISWebServer Expand the InternetInformationServices list Highlight Websites In the RHS table, expand the Authentication list Find the setting for AnonymousUserName - to enable this setting, check the box next to InternetInformationService (back in the LHS list), and also check the box next to Websites Check the box next to AnonymousUserName and click on Value Type in GuestUser and click enter
|
|
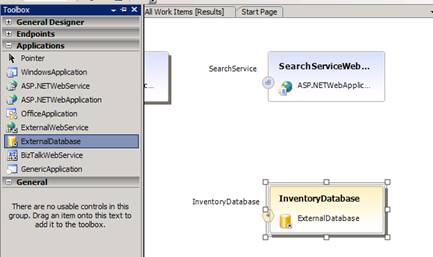
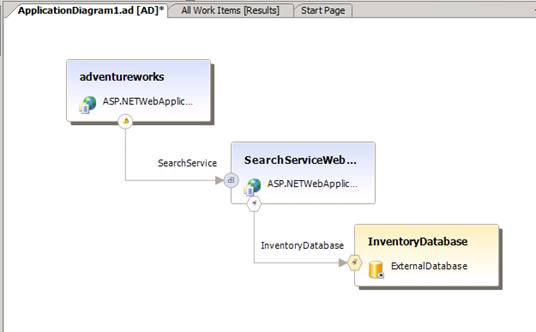
To finalize our architectural diagram, we will now add a reference to the data store Drag and drop a new ExternalDatabase onto the design surface from the toolbox Name this database InventoryDatabase
|
|
Plugging our new XML Web Services into our existing architecture is just a matter of drag, drop and connect. |
|
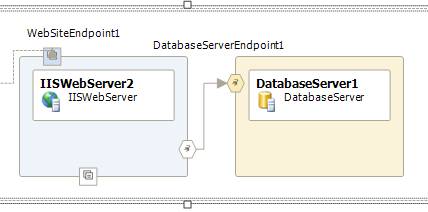
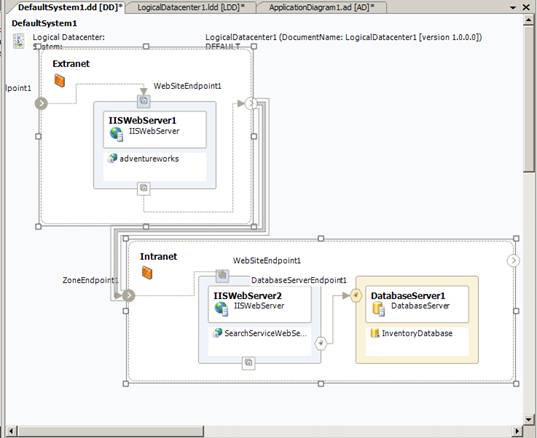
Wire SearchServiceWebService to AdventureWorks by highlighting the SearchService end-point, and holding down ALT, drag your cursor to the AdventureWorks Web Application. Do the same to InventoryDatabase to the SearchService (ensuring you highlight the InventoryDatabase end point and not the SearchService EndPoint) When the Choose Data Source wizard is shown, highlight Microsoft SQL Server and select Continue Enter the server name tfsrtm, and using the drop down menu under Select or enter database name, choose AdventureWorks Click on Test Connection to ensure the connection works, and click OK when the test succeeded box is shown Click on OK to exit the wizard. Your diagram should look something like this:
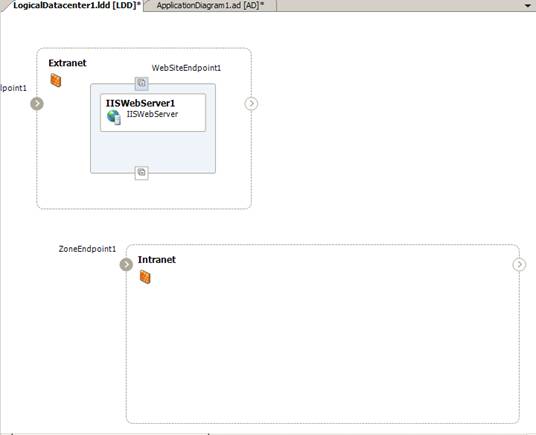
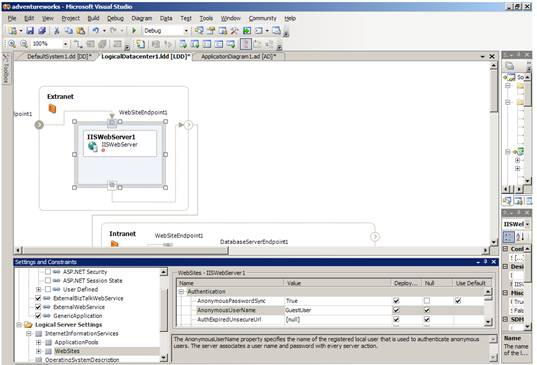
As we now have our Architectural diagram complete, we want to validate this in the end deployment datacenter. We can also model out logical datacenters with Visual Studio 2005 Team Edition for Software Architects. Let's start by creating a logical view of our current datacenter. Add a new Logical Datacenter Diagram to the solution by right clicking the top level solution (AdventureWorks.sln in the Solutions Explorer) and selected Add New Distributed Systems Diagram (similar to the step to add an application diagram previously) Highlight Logical Datacenter Diagram and hit Add accepting the default name LogicalDatacenter2.ldd Zones allow us to define boundaries such as security, settings & constraints, and even what servers you can support! They are a great way to separate different components in our datacenter. In this example, we are planning to create an External Zone and Internal Zone From the Toolbox drag in two Zones and place like the diagram below.
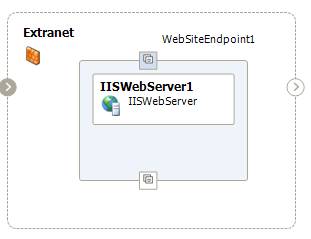
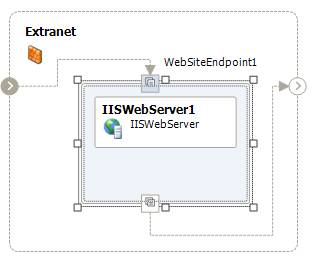
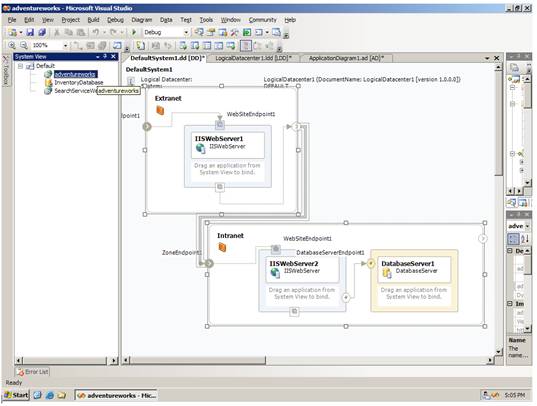
Rename Zone1 to Extranet, and Zone2 to Intranet Now we have our Zones completed, we can drag and drop representatives servers into them. From the toolbox, drag and drop a IISWebServer into the Extranet Zone.
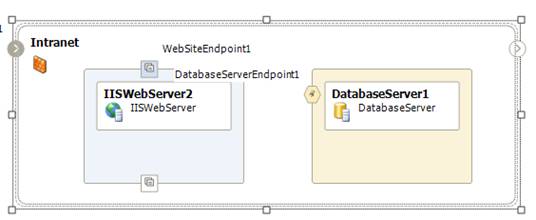
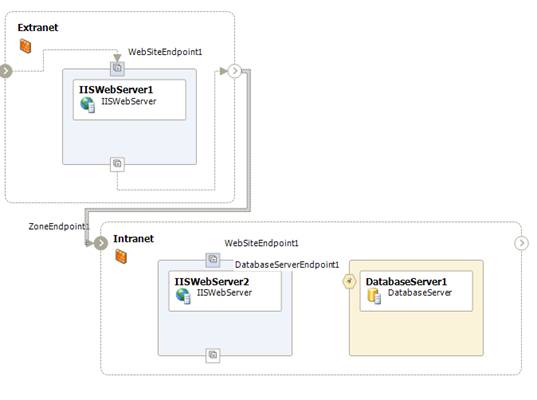
In this example we do not show defining the settings on the servers (as all the servers represent default installations, however like the Settings and Constraints in the Application Diagram, you can also set further settings to match your actual environment. You can even automatically import settings off existing IIS servers in your database! From the toolbox, drag and drop a further IISWebServer and a DatabaseServer into the Intranet Zone (as the diagram shows)
Now we have all our servers represented, we need to wire them together in the way which they appear in our datacenter. We are actually defining communication paths. Holding down the ALT key, click on the ZoneEndpoint1 in the Extranet zone, and trace a line to the WebSiteEndoint1 on the IISWebServer1 contained within the zone. Do the same for the second point (on the bottom of the IISWebServer1) to the outgoing end-point on the RHS of the zone
Holding down the ALT key, click on the outgoing end-point in the extranet zone, and trace a line to the WebSiteEndoint1 on Intranet zone
Holding down the ALT key, click on the ZoneEndpoint1 in the Intranet zone, and trace a line to the WebSiteEndoint1 on the IISWebServer2 contained within the zone.
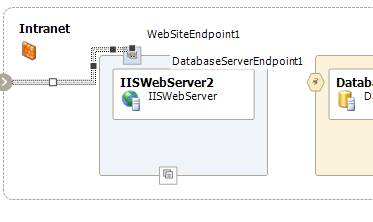
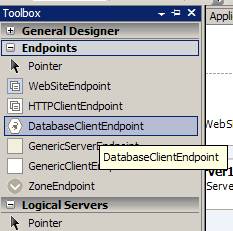
From the toolbox, drag and drop a DatabaseClientEndpoint to the IISWebServer2 within the intranet zone (this is to support database communication protocols, as default endpoints only support web protocols)
Holding down the ALT key, click on the DatabaseClientEndpoint on the IISWebServer2 in the Intranet zone, and trace a line to DatabaseServer1 end-point.
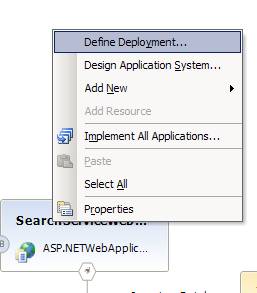
As we have completed the Logical Datacenter Diagram, we can now use both our diagrams to validate our application will deploy and work in the destination environment. To do this, we must define the way we plan to deploy our application - placing the components such as web applications, web services and data catalogues onto their destinations servers Click back to the ApplicationDiagram1.ad Right-click anywhere on the screen and select Define Deployment
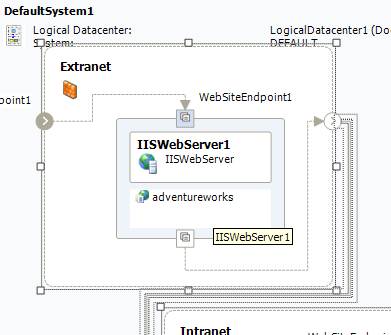
Click ok to choose the default Logical Datacenter diagram In the System View window, select adventureworks
Drag and drop this to IISWebServer1
Drag and hold SearchServiceWebService over IISWebServer1 (see how you get an error stating it cannot be hosted here do to a direct connection with the database) Drag and drop SearchServiceWebService to IISWebServer2 Drag and drop InventoryDatabase to DatabaseServer1 (see also if you hover over IISWebServer2 you cannot drop it here, due to this server not being able to host databases)
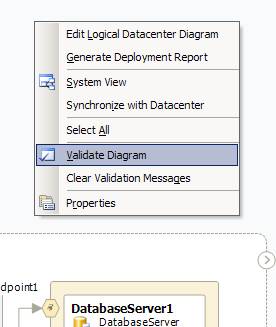
Now the deployment diagram is completed, we can test this for validation. . We are actually validating all our settings and constraints for the application, against the settings and constraints within my datacenter Right click anywhere on the screen (ensure you are still in DefaultSystem1_1.dd) and choose Validate Diagram
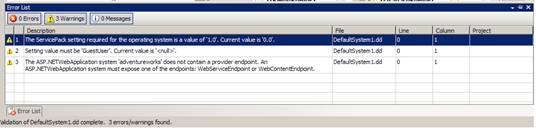
You should see three errors
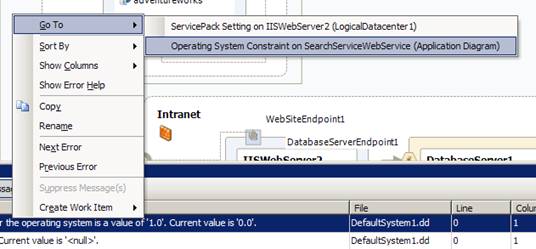
The first one shows the setting you made to ensure the application was hosted on a Windows Server 2003 SP1 Server. The validation shows that currently this server is Window Server 2003 (no service pack) The second one shows the anonymous user setting you created of GuestUser, currently the server IIS setting have no guest user defined. The third shows that no end-point yet exists (we will do that in the next section!) Let's fix the first two of these - at this stage you as a the architect must decided is it easier to re-configure the application, or make changes to the infrastructure. Let's do both Right click the first error (The ServicePack setting required..) Highlight Go To, and select Operating System Constraint on SearchServiceWebService
Remove the application dependency for SP1 (as we will re-architect our application to use Windows Server 2003 only) by deselecting the check mark against the Operating System constraint
Go back to the Error List tab Double click the second error (Setting value must be 'GuestUser') - this will take you to the server settings for IISWebServer1 The actual value in error will already be highlighted in AnonymousUserName Click on the [null] in value and type GuestUser) - You may also notice that in the LogicalDatacenterDiagram, there is a red error icon contained within IISWebServer1 showing the server where the error is contained
Click back to DefaultSystem1_1.dd and re-validate (use the same methods for validations as before) - You should see these 2 errors disappear |
|
As our application diagram is now complete, we can define further settings for the new webservice, and implement. Implementing creates the stub code our developers will use. Click on the SearchServiceWebService, and view the properties (they should be below the Solution Explorer on the RHS of the IDE) Scroll down until you see the Language setting Choose Visual C# as the implementation language by clicking on it and selecting C# from the drop down Under Project Location Type, select HTTP Set the Project to https://localhost:2005/SearchServiceWebService Right click the SearchServiceWebService again and select Implement Application and click OK If you get a dialogue box, select Close |
|
As an architect, I can also stay in sync with my developers because Visual Studio constantly makes sure my design matches the underlying source code. Here is an example, when we defined our web interface; we didn't specify a return value or any parameters. That doesn't make much sense. If I make the change in my source code, you can see that the design is automatically kept up to date. In the SearchServiceWebService project contained within the Solution Explorer, double-click on the SearchService.cs file to bring it up in the code editor. Change the SearchForProducts method to look like: public System.Data.DataSet SearchForProducts(string productName) Switch back to the application
diagram (ApplicationDiagram1.ad)
and right click the SearchService
end-point Expand the SearchForProducts operations and notice that the design is synchronized with your code changes. Click on the main Window menu, and select Close All Documents |
|
Politica de confidentialitate | Termeni si conditii de utilizare |

Vizualizari: 1107
Importanta: ![]()
Termeni si conditii de utilizare | Contact
© SCRIGROUP 2026 . All rights reserved