| CATEGORII DOCUMENTE |
| Asp | Autocad | C | Dot net | Excel | Fox pro | Html | Java |
| Linux | Mathcad | Photoshop | Php | Sql | Visual studio | Windows | Xml |
Now let's switch roles, from being an Architect to a Software Developer at AdventureWorks.
Our job as a developer is to write secure, high quality code; Visual Studio Team System helps us by making testing an integrated part of our daily development.
For those of you with sharp eyes, you'll notice that there is a bug in the code; we'll revisit this and use VSTS to help us find it J
|
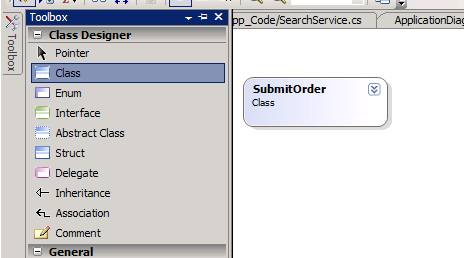
Firstly lets use a new feature in Visual Studio 2005 Professional, the Class Diagram to create a new class and determine further details such as methods and parameters. Find the https://localhost:2005/adventureworks project in Solution Explorer Open this project node and right-click on the App_Code and choose View Class Diagram (ignore any error about not being able to add some classes) When the Class Designer comes up, drag and drop a new class onto it from
the toolbox
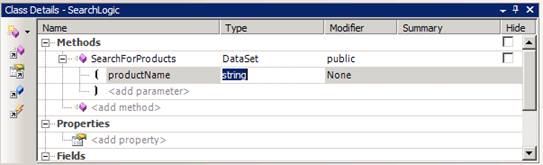
Call the new class SearchLogic and click OK. Right click the new SearchLogic class and select Class Details Add a new method (by clicking <add method> in the class details dialogue box) called SearchForProducts Make the return type System.Data.Dataset Expand out the new method and
add a parameter (<add parameter>)
of type string called productName
Double-click on the SearchLogic class to view its source code Delete the line in the method Throw new System.NotImplementedException(); Where the line used to exist, Right click and select Insert Snippet We are using a snippet here to reduce the amount of hand coding we need to do. Snippets allow us to use repeatable code within our projects. This snippet enables our application to pass parameters to our database search and return the correct results - The core engine behind our new web search addition. Double click Demo Snippets, and select the Search For Products demo snippet If there are 2, select the first one Build the solution (CTRL+Shift+B) |
|
Visual Studio 2005 Team System has the feature to unit test any code I've written right at my finger tips. I can also measure the effectiveness of my tests by looking at code coverage data. |
|
Lets create a unit test to ensure my code works correctly Create a new unit test for SearchForProducts by right clicking anywhere in the code and selecting Create Unit Tests Select OK at the next dialogue box to create the test for this method only In the resulting code, scroll
down until you find the following line: Set the productName parameter to "baseball"
(Include the quotes - this is to test for an actual value in the results
to ensure we are getting valid data returned) so that the line becomes: Remove the following line (as it
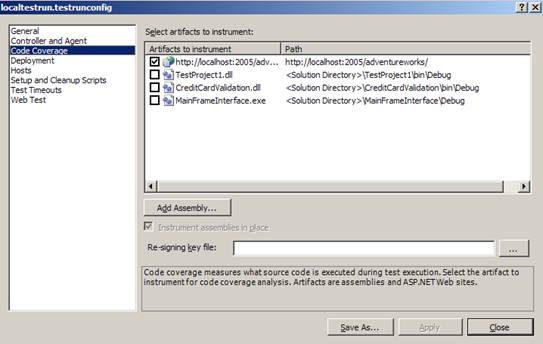
is no longer valid since we are expecting data): After the line Type in the following code (to data drive our unit test) foreach (DataTable tables in actual.Tables) Remove the Assert.Inconclusive and Assert.AreEqual. lines Build the solution (CTRL+SHIFT+B), if you get prompted about write protection, overwrite the file. We are now going to turn Code Coverage on for this new solution. Code Coverage allows us to ensure all critical components of our application are being testing. We must first turn code coverage on for our application In the Solutions Explorer, expand the Solutions Item list Double click localtestrun.testrunconfig Click on Code Coverage in the RHS column Uncheck all boxes in the LHS column (under Artifact to instrument), except https://localhost:2005/adventureworks
Click apply and then close |
|
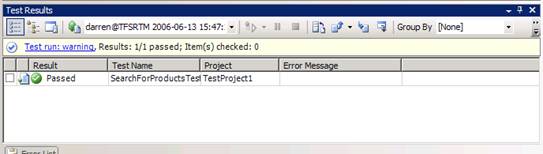
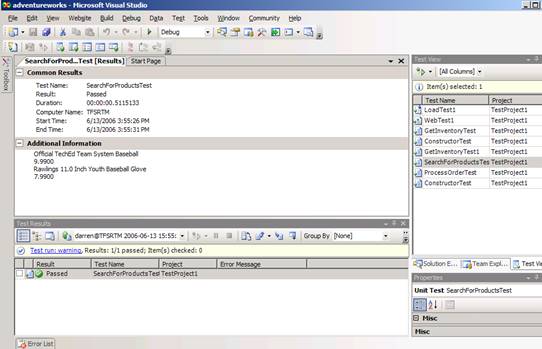
Now we have code coverage configures, let's start our Unit Test and see the results. We will do this via a new window, the Test View Click on the Main Test menu, select Windows and click Test View In the Test View windows (RHS of the IDE as a tab near the Solution Explorer), right click the SearchForProductsTest and choose Run Selection (if you get an error you may have to rebuild the solution) The Test Results Window should
now appear at the bottom of the IDE, with the test run going through the
stages, Pending, In-Progress, and then Passed
Once the test passes, double-click on the results to view details (if it fails with the error "Unable to configure the web site for testing. The process cannot access the file 'C:AdventureWorksDemoAdventureWorksDemoadventureworksweb.config' because it is being used by another process.". Close Visual Studio and reopen the solution.) Notice that there is
some data returned from the unit test which matches the hard-coded baseball
value. This now shows our code is working correctly and returning matching
values from our database
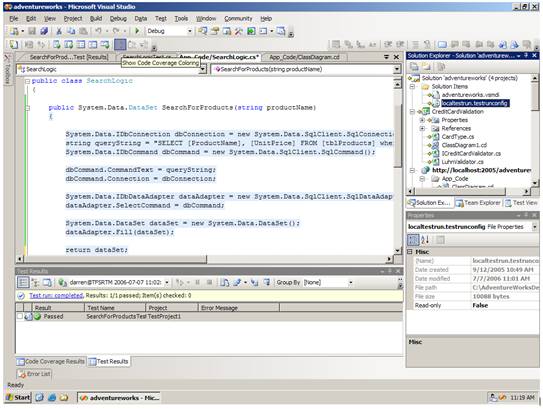
What about the code coverage? Click back to the App_Code/SearchLogic.cs window Click on the Show Code Coverage Coloring button
This shows that all code within you new Class has been covered. Blue shows code covered, tan for partially covered, and Red for not covered (You can change these default colours in the General Options under Fonts and Colors). You may also want to click on the Code Coverage Results button (2 buttons left of the Show Code Coverage Coloring button), to see the actual breakdown of code covegarge percentages (they will be under the App_Code.XXXXX list). Also feel free to view other results here as well |
|
Some of our work is done, so let's check it in. Source control is a tightly integrated part of Visual Studio Team System; let's check in our changes and see this integration in action. |
|
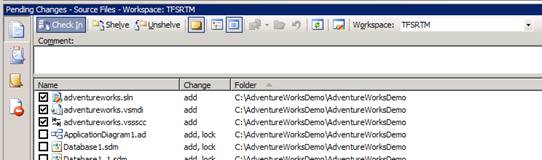
Click on the main View menu, select Other Windows, and click on the Pending Changes. All the files you have modified are shown, ready to be check-in to source control. Click Check In
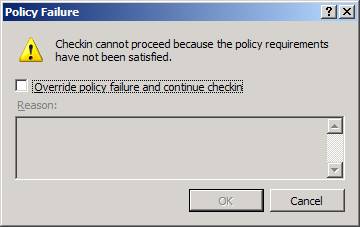
You will see you have a policy violation (which is the policy we implemented as the project manager) - Click Cancel
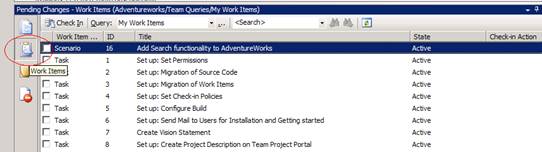
Visual Studio Team System's source control is tightly integrated with check-in policy. When we check-in, we will need to associate this check in with the work item that we started this demonstration with. Select the second icon in the
Pending Changes Window (when you hover over it, it should show "Work Items"
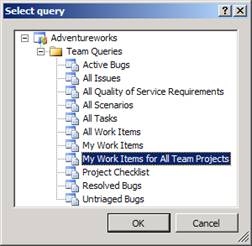
In the drop down Query menu, choose Select Query Select My Work Items for All Team Projects, and click OK
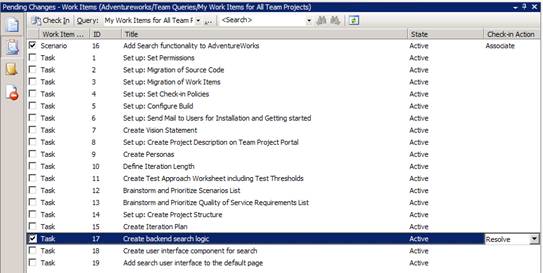
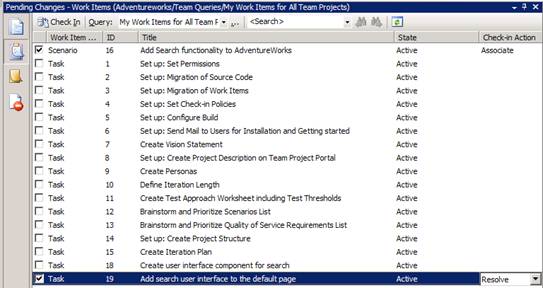
Associate this check in with ID 16 ("Add Search functionality.") requirement and Resolve the ID 17 ("Create backend search logic") task. You screen should look like this:
Now check-in your changes by pressing the Check In button |
|
Our back-end logic is written, so let's wire it into our user interface. ASP.NET 2.0 makes it really easy for me to work with business objects - I can literally just pick the object and methods that I want to use. |
|
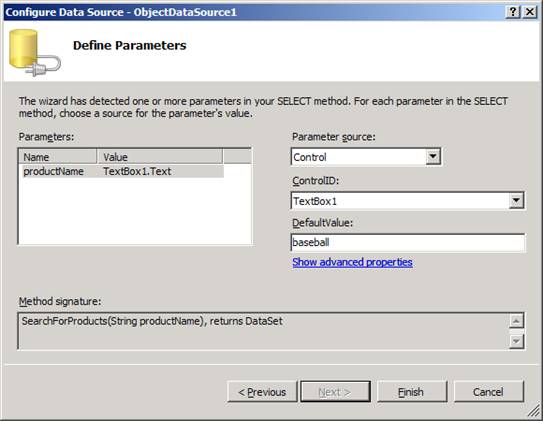
Click back to the Solution Explorer and under the User Controls folder in the https://localhost:2005/AdventureWorks project, right-click on the AdventureWorks.ascx file and choose View Designer The view designer allows me to work more visually with standard and custom controls, dramatically reducing the code needed From the toolbox, drag and drop a new ObjectDataSource onto the control (to the RHS of Column2, in the blank space) Lets configure a datasource object (which will return the results of the method we wrote earlier in a grid) Click on Configure Data Source (from the Smart Tag of the ObjectDataSource) Select the drop down list in the first screen of the wizard and choose SearchLogic, click on next In the drop down menu for choose a method, choose the only value available, and click on next In the drop down for the Parameter Source, choose Control In the newly available ControlID dropdown, choose TextBox1 In the default value, type baseball (We define a default value to ensure it is working during our testing) Click on Finish
Now we have our Data Source configures, lets associate this with our existing grid object Click on the grid (the one with the three columns shown), you should see a small black arrow in a white box on the top RHS of this grid. Click on the Smart Tag at the top right corner (arrow) Select ObjectDataSource1 from the drop down menu Set this data source to use the SearchLogic business object. Save you new user control (CTRL+S) |
|
Let's give our new search functionality a try by implementing the new feature into our existing website |
|
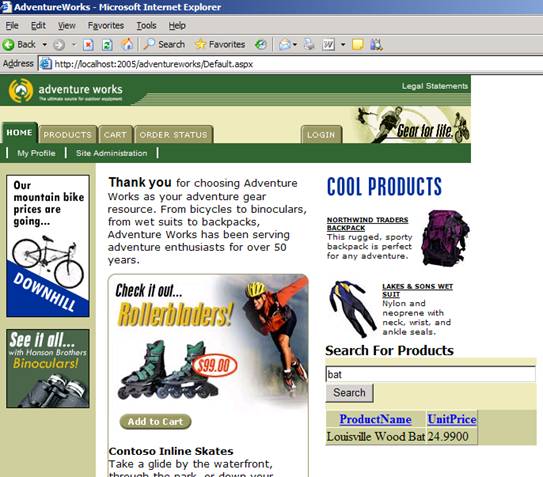
Open the Default.aspx page in the AdventureWorks project in the designer Drag and drop the newly modified user control AdventureWorks.ascx onto the default page in the large blank space under the Wet Suite Press CTRL + F5 to run the application When the application comes up, you should see the new control on the default web page with default results for baseball Search for bat. Your results should
look like this:
Close Internet Explorer |
|
Wow, we have come far now, let's check our work in - we'll also mark a couple of our tasks complete. |
|
Check-in these pending changes as before; Click on the main View menu, select Other Windows, and click on the Pending Changes. Associate this check in with ID 16 ("Add Search functionality.") requirement and Resolve the ID 19 ("Add search user interface to the default
page") task. You screen should look
like this:
|
|
Politica de confidentialitate | Termeni si conditii de utilizare |

Vizualizari: 1082
Importanta: ![]()
Termeni si conditii de utilizare | Contact
© SCRIGROUP 2025 . All rights reserved