| CATEGORII DOCUMENTE |
| Bulgara | Ceha slovaca | Croata | Engleza | Estona | Finlandeza | Franceza |
| Germana | Italiana | Letona | Lituaniana | Maghiara | Olandeza | Poloneza |
| Sarba | Slovena | Spaniola | Suedeza | Turca | Ucraineana |
Insane Map Editing Reference Guide
revision 4.0 by MTF_Dav
Notes:
Changes with version 4.0:
Added info about moving animals and the limits on these.
Included Object Reference
Included Scenario file (.scn) jumbler
Changed description of .scn files to scenario file
Updated description and settings for the sun line in the scenario file
Corrected descriptions of settings in the objects file (mapname.obj)
Files included in this .zip:
Insane Map Editing Reference Version 3.doc (This file)
Map Editing Software.doc (List with links to demos of software I use for editing)
CHKPNTcalc.xls (MS Excel spreadsheet for calculating checkpoint and object placement)
IDFmaker.exe
Textcode.exe
Object Reference complete reference to the object available for use in maps, including descriptions and screenshots.
The checkpoints are laid out as follows in the file name (mapname).chk.
|
Right Pole X |
Right Pole Y |
Left Pole X |
Left Pole Y |
Height |
Type |
Model |
|
Example: |
Example: |
Example: |
Example: |
Example: |
Examples: BANNERS, BANNER1, BANNER2, BANNER3 |
Examples: STRPOLE, CHKPOLE |
On the first line of this file, you will see two numbers. As I look at Algeria.idf, these numbers are 11 and 80. For Ocean.idf, these numbers are 15 and 75. For Ethiopa.idf, they are 24 and 80.
The first number is the checkpoints in the off-road race.
The second number (80) is the remainder of the checkpoints.
In most of the stock maps, there are anywhere from 10-20 off-road race checkpoints, although you can have as few as two to make a functional off-road race. The second number should be 80.
First set of checkpoints:
The second line is always the Starting gate, with model STRPOLE. The rest are all model CHKPOLE, but they are designated with 3 different types BANNER1, BANNER2, and BANNER3.
BANNER3 is the widest checkpoint, it is 5 units wide.
BANNER2 is 4 units wide.
BANNER1 is 3 units wide.
The next several gates after the Starting gate are the checkpoints for the off-road race, up to the first number mentioned above. This number includes the starting gate. So if you have 11, you have a starting gate and 10 additional checkpoints. If you have 15, you have a starting gate plus 14 more checkpoints for the off-road race.
Second set of checkpoints:
In the total of 80, the first 40 checkpoints are used by the Gate Hunt, Pathfinder, Jamboree, and Capture the Flag modes.
The second 40 are used by the Return The Flag mode.
It is a good idea to have the full 80 here, although you could get away with less. Just remember that the first 40 will always be used, if you dont have more than 40, your last checkpoint will be the only RTF flag location the game has to use so youll constantly be returning the same flag from the same place. The reason for having 40 checkpoints here in a game mode that only uses ten at a time is for variety the game picks a random checkpoint off the list for each new flag. In an eight player game, you could have as many as 73 flags taken before there is a winner.
For all these game modes, the checkpoints are picked at random by the game while loading the level. So even if you do a 30 Checkpoint game, there is still some variety.
Placement of the Checkpoints:
The checkpoints are placed based on an X,Y,Z coordinate system. If you open up the texture map for the .idf file you will be able to follow me better. Lets look at an automap for an example. The file that contains the texture map for an automap is automap.pcx. This is a 256 Color, 1024x1024 PCX format graphic. More on painting this later, were looking at it for reference only at this point. Insane uses a 256x256 grid for placement of objects. Thus, one point on this grid equals 4 points on the texture map. X goes left to right, Y goes top to bottom. By multiplying the X,Y coordinates of the checkpoint poles by 4, we can determine exactly where each pole belongs on the map. Reversing that, we can also take a point on the map and calculate the X,Y values for the IDF file. The system allows 6 decimal points for placement, so we can get very accurate here.
You can also use the small maps for each track (smlmapD.pcx, smlmapM.pcx, and smlmapN.pcx) for checkpoint placement (if youve made then already). The results are less accurate but are usually adequate. I have found that it is better to place the off-road race checkpoints using the higher resolution texture map, simply because that is the game mode in which you are following an exact course. It can be done either way.
Width of the checkpoints: Each BANNER3 must be 5 units wide (translated into the 1024x1024 texture map, each BANNER3 is 20 units wide). Keep these numbers in mind when designing roads, hills, etc. and figuring checkpoint placement. The bar going across the poles is centered in-between these two coordinates, so if you place them too far apart, the bar will be suspended in mid air. Likewise if they are too close together, the bar will overlap and stick out past the poles. All the examples I give will be for BANNER3. For BANNER1 and BANNER2, calculate based on their width of 3 and 4, respectively.
RTF Flags are also a standard checkpoint. The position of the flag is in the center between the two checkpoint poles. To place these, simply take the X and Y coordinates of where you want the flag to be, and set the left X 2.5 less than that and the right X 2.5 more than that. For instance, to place a flag at 45,214 the left pole would be 42.5,214 and the right pole would be 47.5,214.
Placing checkpoints on angles: it is simple enough to place a checkpoint if the poles are on the same X or Y axis. However, placement on angles is a bit trickier, but is easily accomplished with a little mathematics.
![]()
![]() 5 units
5 units
![]()
This is easy, both poles are on the same Y axis. This next example shows an angled checkpoint:
![]()
 5 units Y
![]() 30degree
angle
30degree
angle
![]()
X
You can find the distance between the X coordinates by multiplying 5 by the cosine of 30. This gives us 4.43, so we know that the difference between the left and right poles will be 4.43 units. The distance between the Y coordinates will be 5 times the sine of 30, which gives us 2.5. Another common example would be a checkpoint placed on a 45 degree angle, which would have X and Y placed 3.5 units apart. With a little brain work and a scientific calculator, we can accurately place checkpoints at any angle we like.
Setting height: the Insane altitude map uses a scale of 0 to 16 for terrain height. The best way to handle your checkpoint and other object placing may be to calculate the exact coordinates on the altitude map. Perhaps a good terrain editor would allow you to get an exact height; I have not found anything yet. For now though, Ill use the palette in Paint Shop Pro to accomplish a fairly accurate placement.
The following procedure may differ somewhat with different graphics editors:
Open up the (trackname).map file in PSP or Photoshop (Raw, 256x256)
Determine the X,Y coordinates of the object being placed. (This can be left or right CP poles, or an object)
Select the dropper tool (in photoshop, use the color picker). Move the mouse over the height map in PSP. Move the mouse to position X,Y (as shown in the status bar in the lower left hand corner).
For PSP 5.0 -
In the palette toolbar, you will notice that the palette index numbers are
shown as the cursor moves over the various shades of gray. Take the number from the palette index.
For PSP 7.0 A tooltip next to the mouse cursor gives us the palette index.
For Photoshop Make sure the Info window is open, the
palette index numbers will be shown there.
Lets give an example that our index number is 106 (black is 0,0 white is 256,256). Divide 106 by 16 (the total scale of 1nsanes height map) and the result is the correct value for height, 6.625.
Saberon has created a handy spreadsheet, called CHKPNTcalc.xls. This is a Microsoft Excel spreadsheet with with you can enter a single checkpoint pole, the angle at which the second checkpoint pole is in relation to the first one, and the palette index height. The spreadsheet will return the second checkpoint coordinates and the height to place them at. This file is included in the zip with this reference guide.
I usually round this down a tenth of a point or so, just to make sure my object is in contact with the ground. Depending on the roughness of the terrain, you may have to move this down further. Remember with Checkpoints, set the height value to the lower of the two poles, otherwise you will have one pole floating above the ground.
Objects that float in the air, such as bridges, will need to be placed more exactly. You may just have to fool around with this to line the edge of your bridge up exactly with the height of the adjacent terrain.
Objects are listed in the (mapname).obj file. This file is very similar to the checkpoint file but it is easier to place objects because they only have one X,Y value. The first line of the .obj file is a number which is the total number of lines in the object file. I had previously thought this was to set the total number of objects, but as we mapmakers have begun adding comment lines to the file, I have discovered that those comments count toward that line count. The rest of the object file is layed out as follows:
|
Object |
Type |
X |
Y |
Height |
Z Rotation |
X Rotation |
Y Rotation | |
|
LIONFU3 |
t |
There are many different objects, someday well catalog all of them to determine which name goes with each object but it isnt hard to work with a couple and determine what they are.
Type values are either t, r, m, or A. the value t is for trees and shrubs. Markers such as those along the roads are m. r is used for the flags and stakes that show the offroad race course. All the r objects have a value of 129 in the last column. A is all other objects including animated objects and sounds as well as stationary objects such as buildings, Ive used this successfully for all objects though.
The objects are placed similarly to the checkpoints. They each have just one X,Y coordinate, which makes them easier to place. The height value works the same way. These can also be calculated with Saberons CHKPNTcalc.xls. The one difference the objects have is the rotation value. This is on a scale of 0 to 6.28. This is explained in further detail at the end of this section. For now, these approximate values will suffice. Lets look at the chart below:
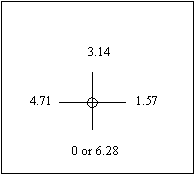
0 and 6.28 are the same value, due south, with 3.14 being due north. Any rotation can thus be programmed in based on this number for rotation. This main rotation is on the Z axis (perpendicular to the terrain).
The last two columns are values for X and Y axis rotation. The objects that use this most are the flag objects between posts that mark the off-road race path. In order to make the objects angle up hills and such a value is put in here for that rotation. Without a picture of a object in a 3d setting it is hard to describe this. The X rotation would be to turn a object side to side. The Y rotation rotates it front to back.
The relationship between degrees and radians is based upon this equation:
360 degrees = 6.28 radians
In actuality, 360 degrees does not equal precisely 6.28 radians - it equals 2 * pi where pi is approximately 3.14159265358979323846.
Here is a diagram showing a number of angles in degrees and their equivalent values in radians:

It must be noted that in 1nsane, 0 degrees points south. Not sure why this is the case, because on a compass, 0 is north and 180 is south.
The formulas for converting between degrees and radians are as follows:
degrees = 57.2958 * radians
and
radians = 0.017453 * degrees
The reason for having both radians and degrees is that the trigonometric functions (sin, cos, etc.) all expect the values supplied to them to be measured in radians
A few notes about height placement:
The Insane objects are not consistent where they are centered. Some objects have the bottom of the object so that you can place it exactly at ground level height. Others, if you place right at ground level, they end up sunken into the surface. You will have to experiment with this until someone comes up with some numbers on each object that we can use for accurate placement.
The altitude map is the (mapname).map file. An idf file also includes a (mapname).raw file, however, the .map file is the one the game uses for the altitude map.
It can be edited in any 3D terrain editor. Ive used Leveller and Traxx. The Leveller demo is great for rough layout only, as it has a texture size limit of 200x200. When you resize this to 256x256 for 1nsane, the ground is quite rough. Its a good idea to either use a soften or blur tool in your graphics editor to smooth this out, or import it into Traxx to do final work. One caution about Traxx is that the terrain appears to be much flatter in the editor than it will appear in the game. Keep this in mind as you edit.
One other note about Leveller. The program will ask for a height scale when importing or creating a new height map. Use a scale of 16.
Heres a quick explanation of each texture file and what its purpose is.
(mapname).pcx This file is a 1024x1024, 256 color PCX file. Its purpose is to provide the base colors for the map. Try not to get too detailed here, the F#.acx files and the layers ground colors will add to the ground texture of the map. I would consider anything over 1MB to be too much. Most of the stock maps are less than 300K. Look at an automap texture to get an idea of the level of detail.
(mapname).grd This file is a 256x256, 256 color grayscale pcx. When you look at it in Paint Shop Pro, it will look completely black but it really uses the first 4 or 5 colors on the palette. The purpose of this file is to tell the game what texture to overlay where on the game map. I have found that to edit this file, it is easiest to edit the palette and change the colors to something more easily distinguishable. For instance, I leave index 0 as black, change index 1 to red, index 2 to blue, index 3 to yellow, index 4 to green. This way I can easily define what section of the map will use what texture.
F0.acx through F4.acx These are the files that actually give the ground its textured look. They are 256x256, 256 color grayscale PCX files. The pattern on these files is what shows up on the ground. A combination of the layer settings in the .scn files and the colors in the .grd file specify what sections of the map are mapped to which F#.acx file. More on this once we get to discussing layers.
The game will not handle any more than these 5 .acx files. You can create your own textures, or just use the ones you like from the stock maps. I have found that the stock maps include almost every texture Id ever want to use, but for those of you who are creative, you can do some pretty interesting things with these files.
Water:
The (mapname).wat file indicates where water is present on the map. This is a 256x256 PCX file. It uses the same 256 color grayscale palette the height map does, and defines water depth using the same palette values. The base value will be black, palette index 0. All areas that have water should be painted in using a palette index of the depth the waters top should be at. This should of course be above ground level or it will not show up on the map. To create a lake, you would choose a color a few indexes on the palette above the area on the height map it is going onto. Remember we are working on a 0 to 16 scale. Then, you paint around the area the water is supposed to be in, going just beyond the edge, so that the water goes all the way to the edge of the lake area.
From hereon I will refer to these as the track scenario files. They contain necessary information about the map and how the game handles them. There will be 3 scenario files, (mapname)D.scn, (mapname)M.scn, and (mapname)N.scn. These are the settings for the track for Daytime, Morning, and Night variations, in that order.
The following is the list of all the settings that I have come across in the scenario files, followed by a brief description. The gray area is the setting, the regular area is the value given to that setting.
name Map My Map This is the long track name that displays in most places in the game, along with the variation (Day, Morning, Night). You dont need the # character in there
shortname MyMap This short name is what will display in the browse list it will use whatever text it can find up until it encounters a space. Keep this under 15 characters so it can be viewed in its entirety on the browse list.
style dataireland This is the base map style. More about styles in a later section.
horizon horizonD.geo 3D model used for a backdrop. More about how to edit the sky texture in a later section.
sun sun.geo 3D model used for sunlight generally this refers to the light model that is the sun in the game. However, the sun.fff file can be edited so that it refers to a different graphic or picture. Take a look at earth.fff from the moon map if you want to figure this out
variation Different for each variation of the map (Day, Morning, Night) but is not consistently a certain number for a certain variation. Make sure these are different for each .scn file or leave them the way they are.
noflare indicates not to use lense flare (for rain maps)
fogdens 0.0005 Fog Density, scale of 0 to 5? with 0 being clear and 5 being zero visibility not certain of scale.
raindens 50 higher value is more dense rain, lower is less dense rain
rainspeed 40 higher value is harder rain, lower is lighter rain
wind 2 0 2 Wind speed and direction. I am guessing a 0 to 6 scale.
waterenv environment mapping for water, 1 is on, 0 is off.
wavecolor wave color. If you notice in each map the body of water has a certain amount of movement. The first number is transparency, scale of 0-255. The next 3 are the wavecolor in RGB.
wavesize Size of the waves, not sure of scale.
clouddense 0 Cloud density. This is a feature for 3D clouds that didnt make it into the final game. Changing this value wont affect the map at all.
startpos 46 43 X,Y coordinates of Free Roam and RTF mode starting point
kingpos 153 26 205 194 201 57 77 100 Four values that indicate the Destruction Zone zones. These are X,Y coordinates and have a Tab between them.
multiplier 1.000000 Leave this as is. Invictus doesnt even remember what its used for. It seems to increase or decrease the intensity of ambient light, not sure what else it affects.
animaldense 1 Used only for automap generation. All animals are placed in the object file and this setting doesnt appear to affect that. You may want to note that when placing animals in the .obj file, there is a limit of 90 total. If you go over that, they will not display.
ambient 90 120 160 ambient light color (RGB)
suncolor 250 200 170 sun Color (RGB)
watercolor 142 91 120 135 Water Color, the first number is transparency, scale of 0-255, the next three are RGB value for color.
fog 86 98 114 Fog Color (RGB)
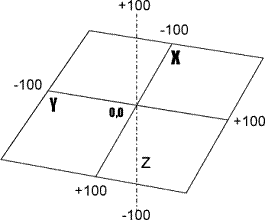
direction Sun/moon direction in 3D relative coordinates. First number is Y, second is Z, third is X. Dont ask me why, thats just how it is. Let me try to explain this in detail.
The chart on the left shows a view of the map, facing north. The X, Y, and Z scales are marked. Ive marked a scale of 0 to 100, it actually can be any scale but I chose this because it gives you enough accuracy and is easy to figure.
The Z axis sets the distance above the horizon that the sun is at. Anything below zero will not be seen, 100 is directly overhead. The X and Y axis can be set to any direction. Normally I will set one axis to +/- 100 and the other is offset to set the sun position left or right of center. For instance, if I set Y at 100 and X at 0 the sun will be due west. If I set X at 100 and Y at 0 the sun will be due north. If I set Y at 100 and X at +100 the sun with be southwest. By varying these settings, the sun can be set to come from any direction and at any angle in the sky.
identifier Generated number for automaps. You do not need to use this or change it.
The following section is used for automaps, so it will be in your base set of files for your custom maps but it is not used so you can delete it if you want to.
chkpoints 6 88 110 193 110 193 166 92 166 92 85 13 85 13 6 88
treetypes GERFA1 GERFA2 GERFA3 GERFA3 GERFA3 GERFA3 GERFA3 GERFA4 GERFA4 GERFA4 GERFA4 GERFA4 GERFA4 GERFA4
planttypes GERBOK1 GERBOK2 GERBOK2 GERBOK2 GERBOK2 GERBOK2 GERBOK2 GERBOK2
Layers. These settings will be explained in detail in the next section.
layers
base 0 0 0 0 125 110 50 130 120 60 145 130 70 0 50 50 50 20 100 130 10 0
road 0 0 0 0 200 170 130 210 160 130 220 170 160 1 50 50 50 20 100 150 13 13
mud 0 0 0 0 105 72 39 125 92 49 135 102 69 2 50 50 50 20 100 180 5 7
spot
grass 0 80 0 70 160 140 50 170 140 60 180 140 70 -1 50 50 50 22 100 160 10 0
spot
stone 20 100 10 100 140 130 115 160 150 130 180 165 140 3 50 50 50 30 80 90 10 2
rock 0 100 40 100 180 156 137 220 176 157 230 190 180 3 50 50 50 30 80 90 10 2
end
eof
It is quite probable that I have missed some additional settings for the .scn files. Please let me know if you have any more settings to add, expound upon, or modify.
Layers
The layers section of the .scn file determines ground surface color, ground texture, skidness, drag, and sounds. A sample layer entry looks like this:
base 0 0 0 0 125 110 50 130 120 60 145 130 70 0 50 50 50 20 100 130 10 0
|
base |
Name of the layer, in this case, base. |
|
The first 4 numbers are for start and end heights, start and end angles. I havent noticed any difference in the surface when modifying these values, it may be an automap function only. |
|
|
First color for the layer (RGB) |
|
|
Second color for the layer (RGB) |
|
|
Third color for the layer (RGB) |
|
|
Specifies which F#.acx texture to use. 0 is for F0.acx, 1 is for F1.acx, and so on. Valid entries are 0, 1, 2, 3 or 4. |
|
|
These are the same for each layer and should not be changed |
|
|
Transparency of the layer, scale of 0-255. Sets the transparency of the detail texture (F#.acx) over the color map (mapname).pcx |
|
|
Skidness adjusts how slippery the layer is |
|
|
Drag adjusts ground drag, higher numbers are slower |
|
|
0 |
Sets sound for layer. Not sure what each value represents. |
Important note: None of these settings have any effect on the map except the one for the F#.acx file. They are used by the map generator and compiled into the (mapname).tty file. Nothing is known about the .tty file format so start off with a automap that has the surface types you want for you map already in place.
Often a map will have six or seven of these layers. You may see a line inbetween layers that says something like spot 70 or spot 90. These can be deleted, they are used in automap creation.
Each line in this section corresponds to a palette index in the (mapname).grd file. The first line corresponds to palette index 000. The second line corresponds to palette index 111. I dont see a limit here, but the .grd file has only 256 colors so youd be limited by that. Practically, youd probably never use near that many anyway.
The real limit here is on the number of F#.acx textures that can be used. Remember you can only use F0 through F4. You can use the same F# texture on multiple layers. You could make all the layers use the same F# if you wanted to.
To date I havent had much luck editing the properties of the layers, other than the F# texture setting.
Styles
The game comes with four distinct styles. They are Africa,
There are three files which make up the maps that display in the lower left hand corner of the screen (and in large view when pressing the Alt key). These files are smlmapD.pcx, smlmapM.pcx, and smlmapN.pcx. The variation is between daytime, morning, and night. The easiest way to create these maps is to make a copy of the (mapname).pcx file, size it down to 256x256, and save it with the correct filename. You may want to add some texture to the map, shadows where there are mountains, water where there are lakes or rivers. Once youve come up with a good looking map, save it as a 256 color .pcx file. To create the Morning Variation, adjust the color tints and add more red. For the night variation, decrease the brightness and contrast until you have a darker version of the map, but still easily seen.
SkyD.pcx, SkyM.pcx, and SkyN.pcx are the three sky graphics for the three time variations. There is a variety of these in the stock maps, look around to find one you like there first. Of course, you can paint your sky however you like. This graphic is the one that can be turned on and off in the game by pressing Ctrl+H.
Even though these are included in the automap, the automap does not actually use them. The map uses a file called HorizonD.fff (HorizonM.fff and HorizonN.fff for morning and night, respectively) for its sky and backdrop. If you open the .fff file in a hex editor, you can see that the path to the sky textures points to a stock map.
In the absence of a .fff editor,
we can change this using a hex editor. Open up the HorizonD.fff file in your hex editor. Find the line that says something like
datamapsethiopiaskyd.pcx. You will
want to change
This is complex but it will work as long as you follow these guidelines.
Other Misc Files:
As more is figured out about these files, I will add to this tutorial. Here is a simple list:
(mapname).ute unknown, not in any automaps I have seen but is contained in some stock maps
(mapname).tty This is the file that actually contains the compiled data from the layer section of the .scn file. There is no way to edit this at this time.
HorizonD.fff, HorizonM.fff, HorizonN.fff Backdrop models for each time variation. These can be edited to use custom sky textures.
Moon.fff, Sun.fff, Sunset.fff Moon is used in nighttime, sun in daytime. Not sure about sunset, shouldnt morning be sunrise?
|
Politica de confidentialitate | Termeni si conditii de utilizare |

Vizualizari: 1860
Importanta: ![]()
Termeni si conditii de utilizare | Contact
© SCRIGROUP 2026 . All rights reserved