| CATEGORII DOCUMENTE |
| Bulgara | Ceha slovaca | Croata | Engleza | Estona | Finlandeza | Franceza |
| Germana | Italiana | Letona | Lituaniana | Maghiara | Olandeza | Poloneza |
| Sarba | Slovena | Spaniola | Suedeza | Turca | Ucraineana |
NVIDIA
GeForce 6 Series
3D GRAPHIC ACCELERATOR
MANUAL
NVIDIA GeForce 6 series Userts Manual
1. NVIDIA GeForce 6 series Features
3. Resolutions and colors supported:
5. Manually installing Windows XP drivers
5.1 Removing old Drivers: (only if you have old NVIDIA drivers)
5.3 How to Change Color Depth and Resolution in Windows XP
5.4 How to Change Refresh Rate in Windows XP
5.5 NVIDIA Utility in Windows System
5.5.1 GeForce 6 series (NVIDIA)
5.5.3 Performance & Quality Setting
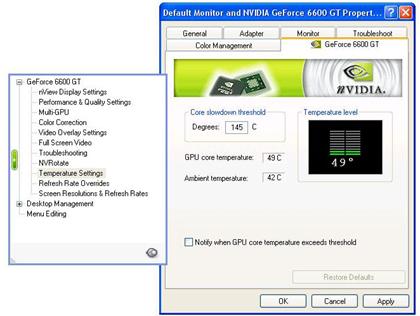
5.5.10 Temperature Settings (optional)
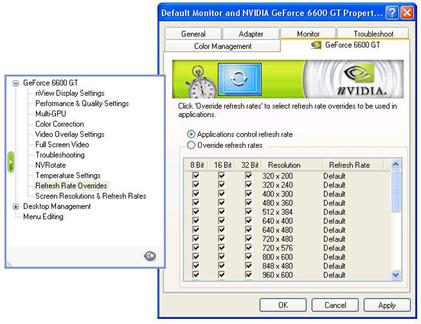
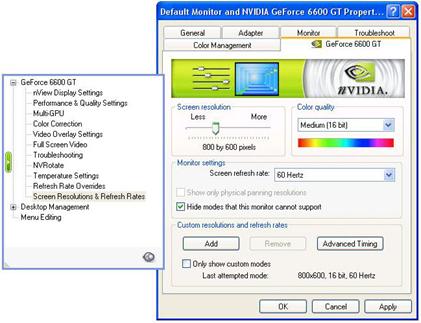
5.5.12 Screen Resolutions & Refresh Rates
6. Manually install Windows 2000 drivers
GeForce 6600GT PCI-E bus/AGP 8x, with 128MB/256MB DDR SDRAM on Board
Graphics core BIT
Pipelines
Fill Rate (billion texels/sec.)
Vertices/sec. (million)
RAMDACs 400MHz
GeForce 6600 PCI-E/AGP 8x bus, with 128MB/256MB DDR SDRAM on Board
Graphics core BIT
Pipelines
Fill Rate (billion texels/sec.)
Vertices/sec. (million)
RAMDACs 400MHz
GeForce 6200 PCI-E bus, with 128MB/256MB DDR SDRAM on Board
Graphics core BIT
Pipelines
Fill Rate (billion texels/sec.)
Vertices/sec. (million)
RAMDACs 400MHz
Microsoft® DirectX® 9.0 Shader Model 3.0 support
Ensures top-notch compatibility and performance for all DirectX® 9 applications, including Shader Model 3.0 titles.
On-chip video processor
Delivers unmatched video performance, features, and quality. (GeForce 6600 series only)
Adaptable programmable video processor
GeForce 6200ts programmable technology adapts to new video encoding formats as they are developed to provide a future-proof video solution. (Feature requires supported video software.) (GeForce 6200 series only)
PCI Express
Designed to run perfectly with the next-generation PCI Express bus architecture. This new bus doubles the bandwidth of AGP 8X delivering over 4 GB/sec. in both upstream and downstream data transfers.
High-speed GDDR3 memory interface
Support for high-speed GDDR3 memory delivers fluid frame rates for even the most advanced games and applications. (GeForce 6600 GT only)
64-bit floating point texture filtering and blending
Based on the OpenEXR technology from Industrial Light & Magic (https://www.openexr.com/), NVIDIAts 64-bit texture implementation sets new standards for image clarity and quality through floating point capabilities in filtering, texturing, and high dynamic-range (HDR) lighting. (GeForce 6600 series only)
NVIDIA® SLI™ multi-GPU ready
Dramatically scales performance by allowing two graphics cards to be run in parallel. (Optional)
Revolutionary superscalar architecture
Delivers up to 8x the shading power of previous generation products for screaming gaming performance.
NVIDIA® CineFX™ 3.0 engine
Powers the next generation of cinematic realism. Full support for Microsoft® DirectX® 9.0 Shader Model 3.0 enables stunning and complex special effects. Next-generation shader architecture delivers faster and smoother gameplay.
NVIDIA® UltraShadow™ II technology
Enhances the performance of bleeding-edge games, like id Softwarets Doom III, that feature complex scenes with multiple light sources and objects. Second-generation technology delivers more than 4x the shadow processing power over the previous generation.
Full-speed 32-bit color precision
Delivers increased image quality with no performance compromise.
NVIDIA® Intellisample™ 3.0 technology
The industryts fastest antialiasing delivers ultra-realistic visuals, with no jagged edges, at lightning-fast speeds. Visual quality is taken to new heights through a new rotated grid sampling pattern. (Note: GeForce 6200 models do not include compression technology)
Full MPEG support
Delivers a stunning video experience through encoding and decoding of analog and digital content. (GeForce 6600 series only)
High-definition MPEG-2 and WMV hardware acceleration
Smoothly playback all MPEG-2 and WMV video with minimal CPU usage so the PC is free to do other work. (Feature requires supported video software.) (GeForce 6200 series only)
Advanced adaptive de-interlacing
Smoothes video and DVD playback on progressive displays.
Video scaling and filtering
High-quality scaling and filtering technology improves video playback quality at any window size, including full-screen HDTV resolutions. (GeForce 6600 series only)
Integrated HDTV encoder
Provides world-class HDTV-out functionality up to and including 1920x1080i resolutions. (GeForce 6600 series only)
Video color correction
Color temperature correction makes actorst faces appear natural, rather than washed out and pale, when playing videos on LCD and CRT displays. Display gamma correction ensures videos are not too dark, overly bright, or washed out regardless of the video format or display. (Feature requires supported video software.) (GeForce 6200 series only)
NVIDIA® ForceWare™ Unified Driver Architecture (UDA)
Delivers rock-solid forward and backward compatibility with software drivers. Simplifies upgrading to a new NVIDIA product or driver because all NVIDIA products work with the same driver software. Includes full support for PCI Express and AGP.
NVIDIA® nView™ multi-display technology
Advanced technology provides the ultimate in viewing flexibility and control for multiple monitors.
NVIDIA® Digital Vibrance Control™ 3.0 technology
Allows the user to adjust color controls digitally to compensate for the lighting conditions of their workspace, in order to achieve accurate, bright colors in all conditions.
OpenGL® 1.5 optimizations and support
Ensures top-notch compatibility and performance for all OpenGL applications.
Dual 400MHz RAMDACs
Blazing-fast RAMDACs support dual QXGA displays with ultra-high, ergonomic refresh rates up to and including 2048x1536@85Hz
Dual single-link DVI support
Able to drive the industryts largest and highest resolution flat-panel displays up to and including 1900x1200. (GeForce 6200 single-link DVI support only)
NVIDIA GeForce 6 series 3D Accelerator card
Drivers CD title
Manual
Accessories
See appendix for accessories detail and connection topology.
Shut down the computer. Turn off the monitor and other attached equipment, then turn off your computer and unplug the power cord.
Remove the cover of the computer as per the ownerts manual
If there is already a graphics card in place, remove using the following guidelines; (i) Detach any cables attached to the current card and remove the screw locking the card in place. (ii) Grasp the edges of the card and pull straight out of the motherboard slot. If the card is stuck, rock from side to side to dislodge it. Remember to keep the screw.
Locate the empty slot in the motherboard and then install the card in the PCI-E X16 / AGP 8X bus slots
Replug the cable into the computer and replace the cover.
GeForce 6 series
|
B.P.P. |
Refresh Rates (Hz) |
|
|
8 |
60/70/72/75/85/100/120/140/144/150/170/200/240 |
|
|
640*480 |
16 |
60/70/72/75/85/100/120/140/144/150/170/200/240 |
|
32 |
60/70/72/75/85/100/120/140/144/150/170/200/240 |
|
|
8 |
60/70/72/75/85/100/120/140/144/170/200/240 |
|
|
800*600 |
16 |
60/70/72/75/85/100/120/140/144/170/200/240 |
|
32 |
60/70/72/75/85/100/120/140/144/170/200/240 |
|
|
8 |
60/70/72/75/85/100/120/140/144/150/170/200/240 |
|
|
1024*768 |
16 |
60/70/72/75/85/100/120/140/144/150/170/200/240 |
|
32 |
60/70/72/75/85/100/120/140/144/150/170/200 |
|
|
8 |
60/70/72/75/85/100/120/140/144/150/170/200 |
|
|
1152*864 |
16 |
60/70/72/75/85/100/120/140/144/150/170/200 |
|
32 |
60/70/72/75/85/100/120/140/150/170 |
|
|
8 |
60/70/72/75/85/100/120/140/144/150/170 |
|
|
1280*960 |
16 |
60/70/72/75/85/100/120/140/144/150/170 |
|
32 |
60/70/72/75/85/100/120/140/150 |
|
|
8 |
60/70/72/75/85/100/120/140/144/150/170 |
|
|
1280*1024 |
16 |
60/70/72/75/85/100/120/140/144/150/170 |
|
32 |
60/70/72/75/85/100/120/140/150 |
|
|
8 |
60/70/72/75/85/100/120/140/144/150 |
|
|
1600*900 |
16 |
60/70/72/75/85/100/120/140/144/150 |
|
32 |
60/70/72/75/85/100/120 |
|
|
8 |
60/70/72/75/85/100/120 |
|
|
1600*1200 |
16 |
60/70/72/75/85/100/120 |
|
32 |
60/70/72/75/85/100 |
|
|
8 |
60/70/72/75/85/100 |
|
|
1920*1080 |
16 |
60/70/72/75/85/100 |
|
32 |
60/70/72/75/85 |
|
|
8 |
60/70/72/75/85/100 |
|
|
1920*1200 |
16 |
60/70/72/75/85/100 |
|
32 |
60/70/72/75/85 |
|
|
8 |
60/70/72/75/85 |
|
|
1920*1440 |
16 |
60/70/72/75/85 |
|
32 |
60/70/72/75/85 |
|
|
8 |
60/70/72/75/85 |
|
|
2048*1536 |
16 |
60/70/72/75/85 |
|
32 |
60/70/72/75/85 |
Different driver version or different windows platform may have different support table.
Supports Windows XP, Windows 2000 System.
Note: If you already have old NVIDIA drivers in your system, please remove before installing new drivers.
4.1 Remove old Drivers: (only if you have old NVIDIA drivers)
From tStartt, tSettingt, select tControl Panelt, double click tAdd or remove driverst. Then from the list, select. tNVIDIA WINDOWS tKt, and click tinstall or removet to remove it. Reboot your system and go on to the next step.
4.2 Put the DRIVERS CD in your CD-ROM
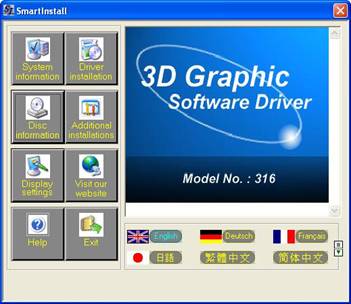
4.3 Click Driver installation
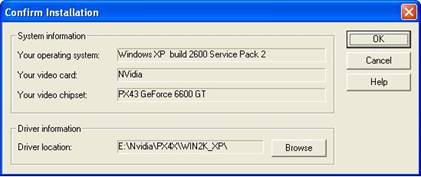
4.4 The screen will show the Confirm Installation window. Select OK
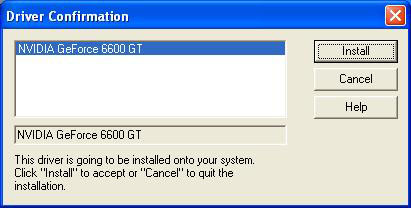
4.5 The Driver Confirmation window appears, select Install.
If the drivers are very new, you may get the following system prompt. Please click tContinue Anywayt and the software will continue to install.
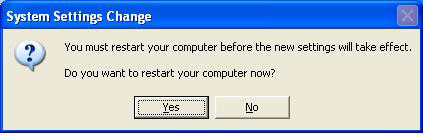
4.6 Then click tYest to restart your computer.
Note: If you already have old NVIDIA drivers in your system, please remove before installing new drivers.
From tStartt, tSettingt, select tControl Panelt, double click tAdd or remove driverst.
Then, from the list, select tNVIDIA WINDOWS tKt, and click tinstall or removet to remove it. Reboot your system and go on next step.
The Windows setup program installs and modifies all of the necessary files. Follow these steps to install the Windows XP drivers.
Insert the DISC (CD Title Driver). Click tEXITt to quit Smart Installation program.
Select Control Panel from Start menu
Select the Display icon
Double-click on the Display icon in the Control Panel folder. You can also click the right mouse button anywhere on the desktop and select the Properties option from the pop-out menu.
Click Settings, and then Advanced
Now at the [Plug And Play Monitor and NVIDIAtK] window
Select Adapter
Standard PCI GraphicstK(or NVIDIA GeForcetK) appears,
Select Properties
From Adapter Properties tK
Select Driver and click Update drivertK
Next the Hardware Update Wizard will appear,
Select Install from a list or specific location (Advanced) tV recommended for saving installation time
Then select Next.
Default setting will select Search for the best driver in these locations
Please check Include this location in the search tV recommended for saving installation time
Select Browse
Next, Browse for Folder appears,
Select E:NVIDIAPX4Xwin2K_XP for PCI-E and E:NVIDIAAG4Xwin2K_XP for AGP 8X.
Note: tE:t->
Then select OK and click Next
If there are no problems, the system will start to install the driver
Next the Completing the Hardware Update Wizard appears
Select Finish
Close the Adapter Properties window
Next at System Settings Change
Select OK, the system will restart automatically.
Make sure that you have installed Windows Driver.
Select Control Panel from Start menu
Select the Display icon
Double-click on the Display icon in the Control Panel folder. You can also click the right mouse button anywhere on the desktop and select the Properties option from the pop-out menu.
Click Settings
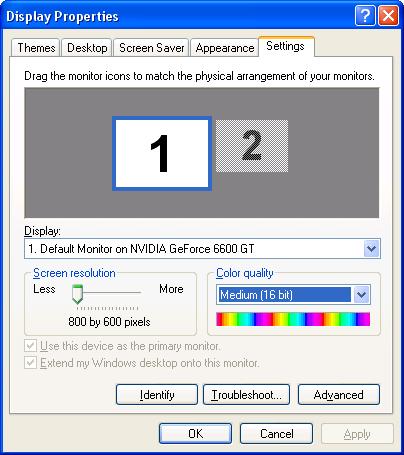
Click on the pull-down arrow from the Color palette area to select color depth or adjust the sliding bar to either Less or More from the Desktop area
Select OK to restart System and new color depth or new resolution will take effect.
Make sure that you have installed windows XP Driver. Click on the Start box in the lower left corner and proceed to Settings, Control Panel
Inside the Control panel group, click on Display icon to open the Display Properties folder and choose Settings click the Advance Settings choose Monitor
Click on the Refresh Rate sub window to change refresh rate
Select OK and new refresh rate takes effect
Refresh Rate default is Optimal.
If you change the Refresh Rate from Optimal to another, you may need to restart Windows System.
Note: If your monitor is not Branded or Plug&Play, you will only see Adapter default and optimal. Please contact your monitor supplier to get right or compatible drivers for your monitor. Otherwise you cantt select the refresh rate you want.

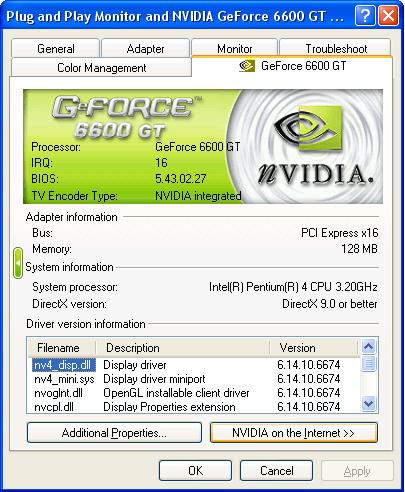
The Display Adapter Information Table tells you the BIOS and Drivers version, NVIDIA Chip model name, IRQ setting and more useful information.
Additional PropertiestK is for advanced user to set OpenGL, Direct3D, Overlay control, Desktop Utilities and 3D antialiasing settings.
NVIDIA on the Internet>> directs you to NVIDIA official web site for more NVIDIA news.
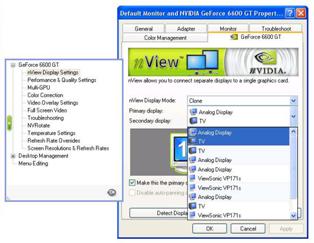
nView has 5 modes : Standard, Clone, Horizontal Span, Vertical Span and Dualview. If the optional connector is connected, you will be able to choose one as Windows default display device. Only if the device is plugged and functional, will you be able to check the selection box. If you plug the connector after windows boots up, click Detect Displays to enable the plugged output device.

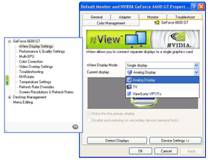
nView disabled, only one monitor will work. Click Current Displays >> , you can select output device tV CRT, TV or HDTV(optional) and Digital Displays.
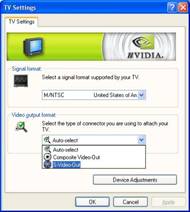
Click Device settings >>, select TV formattK, then select Advanced.. bar to select S-Video, RCA (Composite Video) or Component Y Pr Pb output(only HDTV), default is S-Video Out. It is better choose the right out put device. Do not use Auto select.
Click Signal Format to select your country and TV system tV NTSC or PAL, no SECAM.
Note:
If you connect your TV output to a HDTV device, then you can choose 480P EDTV, 720P HDTV, 1080i HDTV, 480i HDTV or 576P HDTC etc. (Optional)
If you cantt switch from PAL back to NTSC, please set resolution to 640x480 and try again
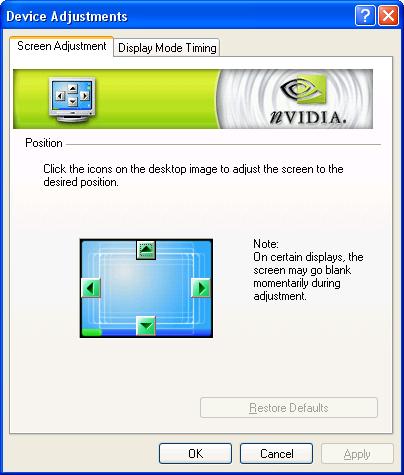
Click Device Settings >>, select Device AdjustmenttK
You can adjust screents position
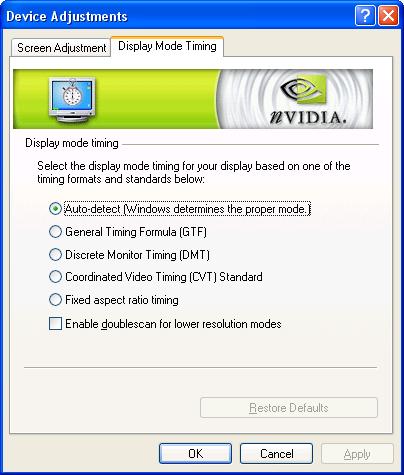
Display Timing allows you to set your computer timing
You need two monitors, one analog monitor (CRT) and one TV or DVI (Optional). All connected well and functional.
Clone mode:
2 monitors show the same picture,Select Clone and Click Apply to activate.
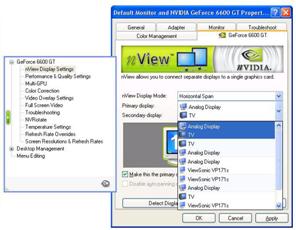
Horizontal span mode:
Picture spans horizontally on 2 monitors.
Select Horizontal span, Click Apply to activate.
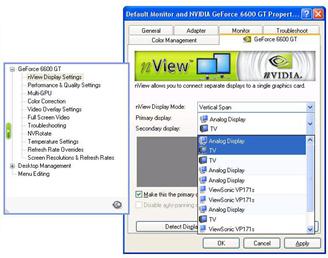
Vertical span mode:
Picture spans vertically on 2 monitors.Select Vertical span, Click Apply to activate.
Dualview:
Picture spans horizontally on 2 monitors. Select Dualview and Click Apply to activate.

Monitor with blue frame is active. Right click on it and the configuration menu will appear. Or you can click Device Settings>> to set all the functions to tStandard modet.
You can select different application
profiles to make your PC runs more smoothly.
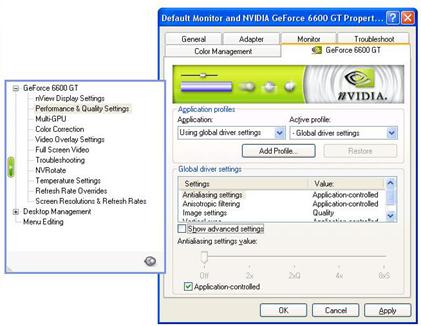
You can add a second graphics card with SLI technology for significant improvement in rendering performance.

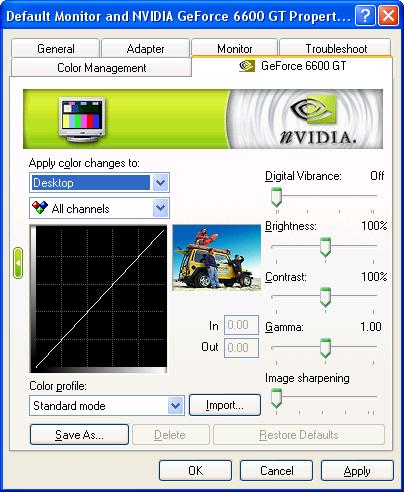
Click Device Settings >>, select Color CorrectiontK. This Window shows NVIDIA Digital Vibrance is functional and you can adjust Digital Vibrance,Brightness, Contrast, Gamma and image sharpening and save it as your favorite setting. If you dontt like your adjustments, you can check Restore defaults to change it back.
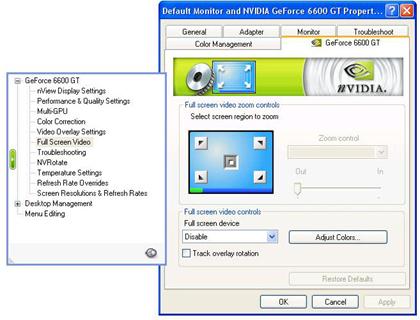
You can adjust the value in tOverlay zoom controlst and tOverlay color controlst.

With different from Overlay control, you can track overlay rotation.
You can check tDisplay the
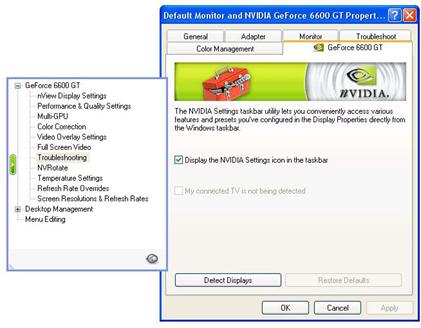
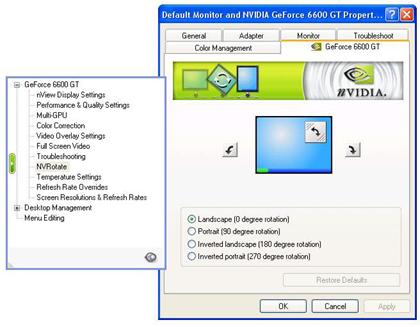
You are provided with versions in Landscape (0 degree rotation), Portrait (90 degree rotation), Inverted Landscape (180 degree rotation) and Inverted Portrait (270 degree rotation). From these, you can select your own preference.
tCore Slowdown Thresholdt allows you to set the temperature in order to protect your chipset. tGPU core temperaturet shows the current temperature with the GPU. tAmbient temperaturet shows the temperature around the VGA card. And you can check tenable Heat Indicator when threshold exceededt to prevent the temperature damage.
You can click tOverride refresh ratest to select refresh rate overrides to be used in Direct3D application.
You can change tscreen resolutiont, tcolor qualityt and tmonitor settingst.
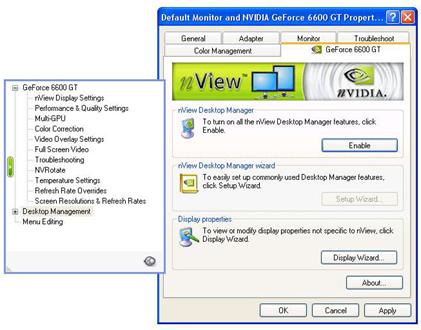
You can enable your nView Desktop Manager or setup nView Desktop Manager wizard or change your display settings.
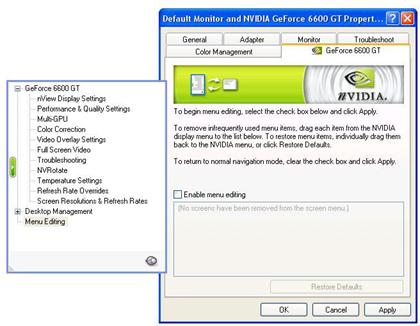 You can check tEnable screen menu editingt to
edit your screen menu.
You can check tEnable screen menu editingt to
edit your screen menu.
6.1 First install drivers under Windows2000
When the system boots up, it will prompt find new device. Suppose the device is VGA, the system will now find the default drivers for you.
If you want to install our drivers along with the GeForce 6 series pack. Please put the drivers CD in your CDROM drive. If the SmartInstall window now appears, please click EXIT button to quit.
Drivers for Windows2000 are located at NVIDIAPX4Xwin2K_XP for PCI-E and NVIDIAAG4Xwin2K_XP for AGP.
If the drivers are very new they may not be certified by Microsoft, if this is the case the system will prompt you that the drivers do not have tdigital signaturet, you can still continue with the installation.
Follow on screen instructions to finish the installation.
6.2 The following steps describe how to update Windows2000 display drivers
Note: If you already have old NVIDIA drivers in your system, please remove before install new drivers.
To remove old Drivers: (only if you have old NVIDIA drivers)
From tStartt, tSettingt, select tControl Panelt, double click tAdd or remove driverst.
Then from the list, select. Find tNVIDIA WINDOWS tKt, and click tinstall or removet to remove it. Reboot your system and go on to the next step.
Place the Disc (CD Title) into
Right click mouse button on Desktop Area, a sub menu window will appear. Please select Properties.
From Display Properties window, please select Settings.
Select Advanced
Select Adapter.
Select Change
Now the update drivers wizard window will appear. Please follow the on screen instruction.
Please specify the drivers location at your CDROM letter: NVIDIA PX4Xwin2K_XP
Select Install and click tYESt when the Installing Driver dialog box appears.
A message appears stating that drivers were successfully installed. Click OK. Another message will appear stating that the driver could not be restarted dynamically. Restart Windows2000 to run the new driver. Click OK.
This device complies with part 15 of the FCC Rules. Operation is subject to the following two conditions.(1)This device may not cause harmful interference. (2)This device must accept any interference received, including interference that may cause undesired operation.
Note: This equipment has been tested and found to comply with the limits for a Class B digital device, pursuant to Part 15 of FCC Rules. These limits are designed to provide reasonable protection against harmful interference in a residential installation. This equipment generates, uses and can radiate radio frequency energy and, if not installed and used in accordance with the instructions, may cause harmful interference in to radiate communications. However, there is no guarantee that interference will not occur in a particular installation. If this equipment does cause harmful interference to radio or television reception, which can be determined by turning the equipment off and on, the user is encouraged to try to correct the interference by one or more of the following measures:
l Reorient or relocate the receiving antenna
l Increase the separation between the equipment and receiver.
l Connect the equipment into an outlet on a circuit different form that to which the receiver in connected.
l Consult the dealer or an experienced radio/TV technician for help.
Notice:
(1) An Unshielded-type power cord is required in order to meet FCC emission limits and also to prevent interference to the nearby radio and television reception. It is essential that only the supplied power cord by used.
(2) Use only shielded cables to connect I/O devices to this equipment.3
(3) Changes or modifications not expressly approved by the party responsible for compliance could void the usets authority to operate the equipment.
This product incorporates
copyright protection technology that is protected by
All brand names and trademarks are the property of their owners.
|
Politica de confidentialitate | Termeni si conditii de utilizare |

Vizualizari: 3673
Importanta: ![]()
Termeni si conditii de utilizare | Contact
© SCRIGROUP 2026 . All rights reserved