| CATEGORII DOCUMENTE |
| Bulgara | Ceha slovaca | Croata | Engleza | Estona | Finlandeza | Franceza |
| Germana | Italiana | Letona | Lituaniana | Maghiara | Olandeza | Poloneza |
| Sarba | Slovena | Spaniola | Suedeza | Turca | Ucraineana |
MixVibes DVS: www.mixvibes.com/dvs/dvs.htm
For more information please visit: www.mixvibes.com

[last updated - 6/7/2004 7:54 AM]
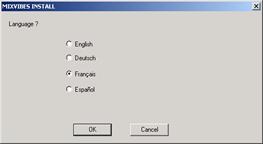
Thank you for choosing our product, MixVibes DVS!
MixVibes DVS (Digital Vinyl System) is very powerful and reliable software that can satisfy the needs of any user, either advanced or hobby DJ, when it comes to mixing and scratching on the computer.
Its unique sound makes this program a very special one. Our engineers have spent a lot of time for developing and testing this software and for you to be provided with the most reliable solution and the most accurate digital vinyl sound. In fact the sound is so accurate that you wont even feel the difference between MixVibes DVS and the existing analog solutions.
a. Operating system: Windows NT, 2000 or XP
b. Processor: Intel Pentium III 1 GHz or equivalent (AMD Athlon, VIA C3 )
c. Memory: 256MB minimum
d. Sound (minimal): one sound card with multi-channel support (5.1 or 7.1) or an external USB card (for example: Maya 44 USB) DirectX or ASIO compatible
e. Sound (recommended): One multi-channel sound card with 2 line inputs or two separate sound cards DirectX or ASIO compatible
For the best result we recommend you to use the ASIO feature of your sound card. This can give you a very low latency and this way you may take full advantage of MixVibes DVS (up to 1ms latency can be used on a good system). Keep in mind that not all the available sound cards on the market are ASIO compliant (usually on-board audio do not have this feature).
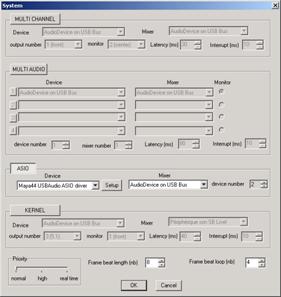
Select your sound card for each audio out-ports. Any modifications on the sound card settings require restart of the program for the changes to take effect.
Press Setup to open the ASIO channels configuration box. If you are not using external mixer choose your Monitor device here (see picture).

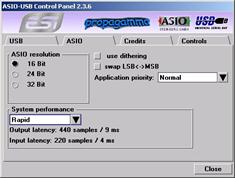
Press Control Panel to change or tweak your sound cards ASIO properties.
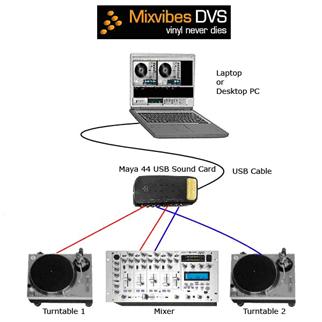
Connecting the turntable to the sound card for MixVibes DVS:
a. Connect the first vinyl turntable to first analog input of the Maya 44 USB sound card.
b. Connect the first audio output of the sound card to the mixer thru one of the CD/Line inputs (the first for example).
c. Connect the second vinyl turntable to second analog input of the Maya 44 USB sound card.
d. Connect the second audio output of the sound card to the mixer thru one of the CD/Line inputs (the second for example).
ATTENTION : The left and right signal must be respected between the turntable and the sound card. If you have inverted the left and right signal then the music files will be played in reverse. In this case, invert the left and right cable.
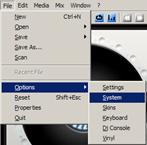
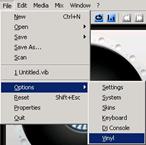
a. Find the menu entry File/Options/Vinyl and click to open the turntable configuration window.
b. Enable the checkbox called Vinyl 1 for the calibration of the first turntable.
c. Select your sound card mode (ASIO mode is recommended)
d. Select your audio input source for the first turntable (the first analog input of the Maya 44 USB sound card for example).
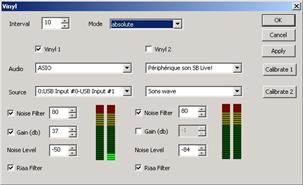
e. Now press the Calibrate 1 button for the first turntable (the left turntable) and follow the instructions on the screen.
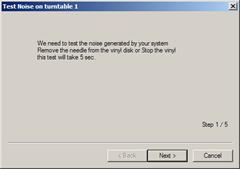
f. MixVibes will calculate the system noise. The first step is to determine the system noise when the turntable needle is not on the disk so please remove the needle from the disk or stop playing and press Next.
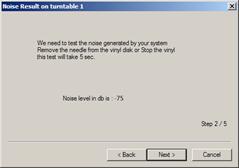
g. In the next step, MixVibes will continue to test the noise generated by the reading of the DVS vinyl. Press Next to continue.
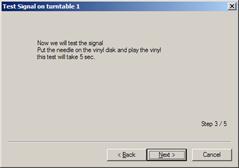
h. Now put your needle on the disk and simply start playing. Press Next to continue.
i. The result is displayed in the next window (Step 4/5). This is the signal/noise ratio of your system. Press Next to continue.
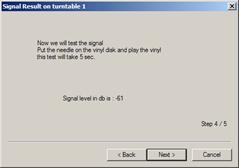
j. MixVibes will use these results for setting the first turntable and will give a short report. If you receive a message that says MixVibes can work with your installation you can press Apply to finish the detection, otherwise, you may have to check your cables or clean the needle (it may be full of dust) and restart the calibration process.
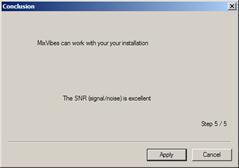
k. Dont forget to press the Apply button before pressing OK for saving the current settings.
Possible problems
In the MixVibes setup procedure you may get an error signal if:
The most commonly encountered are the last two ones but, in any case, the first to be checked is your needle.
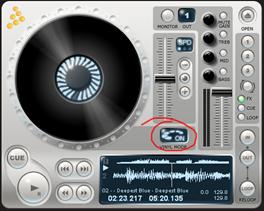
Vinyl mode activation
All you have to do now is to load a media file into one of the channels in MixVibes DVS and activate the vinyl mode in the respective channel.
DONT FORGET: You have to follow these steps (e. to j.) again for the calibration of the second turntable (the right turntable).
MixVibes DVS supports more then one mode when it comes to vinyl control. This provides you with multiple options and gives you the power to accommodate MixVibes to your own needs. All these modes are specially created to use or develop your current mixing technique as you like.
To choose between the available modes of MixVibes DVS just go to File/Options/Vinyl and open the Vinyl configuration tool.

List of modes available for MixVibes DVS:
Details regarding the different modes of MixVibes DVS:
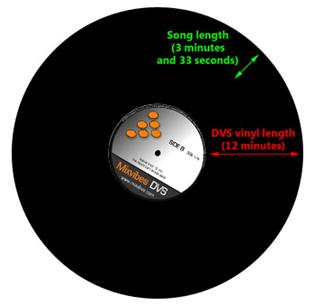
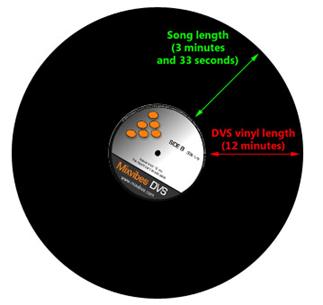
This is the default mode of MixVibes DVS. In this mode the DVS vinyl has its full length of 12 minutes. For example, in a particular case, of a melody which has 3 minutes and 33 seconds the virtual space occupied by the song will be the real time on the vinyl which is only a small part of the entire disk. If you move the needle beyond the song length MixVibes DVS will understand that the song is at the end and it will finish the playback so you can use only the first 3 minutes and 33 seconds of the DVS vinyl for needle drop (changing the playback position).
This mode gives you the possibility to use the entire DVS vinyl for needle drop (changing the playback position). To do this MixVibes will replace the real time of the disk with a relative time which, in fact, is the real length of the song. If your song has, for example, 3 minutes and 33 seconds your MixVibes DVS vinyl will have the same length. If you move your needle to the middle of the disk MixVibes will also move the playback position to the middle of the song and it will ignore the real time of the DVS vinyl (which in this case can be approximated at about 6 minutes).
You can use this mode if you want to scratch and backspin your song and you dont need the needle drop function to change your playback position. You can use any part of the disk, in this case, and it will act as an infinite time length vinyl (MixVibes DVS ignores the timestamps on the disk).
This is the mode which gives you the possibility to use the DVS vinyl as a jog wheel. In this mode the playback is continuous and the playback state is not influenced by the needle position. You can use the turntable as a CD player. The vinyl disk will act as pitch bend.
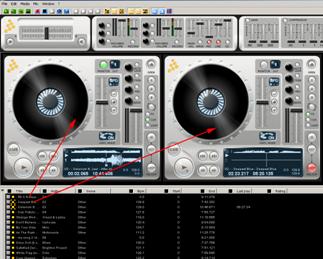
The views are the most important windows in MixVibes DVS and there are 3 views you can use:
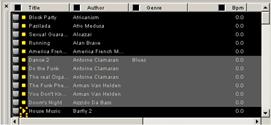
The media-base view displays all the information of all the media files and can include thousands of songs. This view has two display modes:
In the list mode you can select which information to be available for viewing (title, author, genre, BPM, album, duration) by a simple right-click on the media-base.
The media-base can be ordered in many ways: by BPM, by author, by genre
To search for a specific file in the media-base you can use the Find function which is available and appears on the screen if you press CTRL + F.
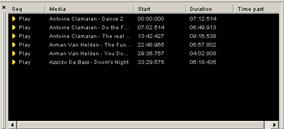
The sequencer window displays all the events of your mix. Multiple events can start at the same time. The events are ordered by the start time. The sequencer also has two display types: list and details. These modes are similar to the media-base display modes (see the above paragraph). See the sequencer file (*.vsq) description for more details later in this document.
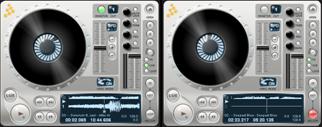
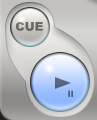
This view contains all the channels in MixVibes and this is the main part of this program. Each channel plays the role of a virtual CD player and has its own output and equalizer. In fact each channel contains all the functions that control the media during playback or in the pause state. Just like on a real CD player, the channel contains functions like CUE, Jog wheel, speed, master tempo, key, loop, beat-loop and others. Beside these functions MixVibes channels can also offer functions like: wave display, 3 band equalizer, pan, user scripts, effects and others.
Each view is dynamic and you can open and close any of them. MixVibes can save the position of each one so in case you close the program they will be restored the next time you open it.
The easiest way to add music into MixVibes is simply Drag and Drop the required files from the Windows Explorer into the Media-base but you can also use the scan function to search your HDD for compatible media files. To do this enter the menu File and select Scan or click on the Toolbar icon.

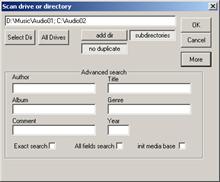
In the Scan dialog box you can enter multiple directories. This way you will be able to add all your media files in only one step.
After adding the desired media files into the Media-base, all you have to do is to select the file you want (you can also use Ctrl + F to search for it) and Drag and Drop it into one of the Mixer channels.
Press the Play button to start the media.
Yet another feature of this software is the ability to use only one sound card for both playback and headphones monitoring without the need of external hardware mixer. For this you need a multi channel (5.1 or 7.1) audio device or two separate sound cards (preferably ASIO compliant).
After setting the audio system (as you have seen in the beginning of this help manual) you can control each output from the Main Volume rack.
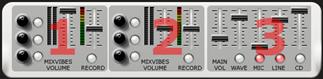
This rack is usually divided into 3 sections:
The MixVibes Volume in the first section on the Main Volume rack is in fact the volume of the speakers output, if youre not using external mixer, or it can be the volume of one (usually first) of the MixVibes mixer channels, if you use external hardware mixer.
The MixVibes Volume in the second part can be used for headphones monitoring volume, if youre not using external mixer, or it can be the volume of one (usually second) of the MixVibes mixer channels, if you use external hardware mixer.
The monitoring function can be activated directly from the channels, and each channel has a button for this feature. You can also switch the output number on the fly for each channel.

The third part of the Main Volume rack contains the other volume controls of the first sound card. This gives you the opportunity to tweak all the other inputs or outputs of your sound card without accessing the Windows Sound Control.
MixVibes offers many interesting and powerful features that can help you and the wave view is one of them.
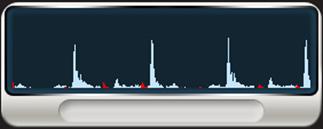
On the channel screen you can also find a complete Peak view of the entire media that can guide you thru your music by showing you in advance what is to come. Every time a media is loaded into one of the channels, MixVibes scans it and generates a Peak file. This file is stored into a separate folder and it will be reread the next time you load the same media into one of the channels.
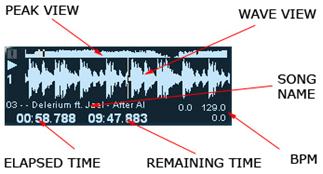
You can adjust the preview length in the Wave view with a simple right-click.
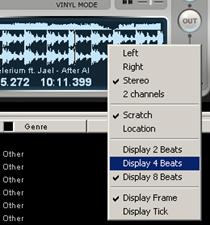
From this menu you can also select the way you see your song channels. MixVibes can display Left (only), Right (only), Stereo (both separate) or 2 channels (both overlapped).
Another simple way to preview your sound is the Auto BPM Window. This window displays the incoming mixed sound.
MixVibes DVS is compatible with the most popular audio formats all over the world. The list of supported media types can be found below:
MixVibes has two proprietary file formats and in these types of files it can store more than enough information that you will actually need for your own use.
The first file format is the media-base information file *.vib which is resembles very much to the Winamp play-list. This file stores the most important information about your media collection. First of all it contains the names and the paths of each of the songs you intend to use in MixVibes. Beside this, it also stores a complete list of details about each song, details which are far more numerous than the number of fields contained by a normal mp3 tag and are not limited to 30 characters.
Here is list of specific information stored in the media-base file (*.vib):
And many more
The second file type managed and generated by MixVibes is the sequencer file (*.vsq). This file contains all the events of your mix and can be used only together with the media-base file in which it was created. This type of file can be saved as a separate one if you want but it is also included in the media-base file (*.vib) when you save it.
Each event stored in this file defines a media and has an associated start time and duration. There are multiple types of events that can be stored: play, pause, cue, pitch change, volume change
For more information please visit: www.mixvibes.com
For on-line support please visit: www.mixvibes.com/forum
MixVibes DVS: www.mixvibes.com/dvs/dvs.htm
E-mail: mailto:support@mixvibes.com
|
Politica de confidentialitate | Termeni si conditii de utilizare |

Vizualizari: 1552
Importanta: ![]()
Termeni si conditii de utilizare | Contact
© SCRIGROUP 2025 . All rights reserved