| CATEGORII DOCUMENTE |
| Bulgara | Ceha slovaca | Croata | Engleza | Estona | Finlandeza | Franceza |
| Germana | Italiana | Letona | Lituaniana | Maghiara | Olandeza | Poloneza |
| Sarba | Slovena | Spaniola | Suedeza | Turca | Ucraineana |
OPL3-SA2/3 Installation for Windows 95
YAMAHA CORPORATION
Semiconductor Division
Introduction
The OPL3-SA2/3 Driver is supplied on a floppy disk or CD-ROM.
Please install Windows 95 driver when use on Windows 95.
Installing the Driver
The OPL3-SA2/3 supports Windows 95 Plug-and-Play. When you start Windows 95, the automatic search option for the Add New Hardware Wizard works as described below.
1. The following dialog box appears. Select 'Driver from disk provided by hardware manufacture' as shown below, then click OK.

note:
As the resource data is that of OPL3-SA3, the dialog box represents as OPL3-SA3. When OPL3-SA2 is mounted, it shows OPL3-SA2 Sound Board.
The following dialog box appears.

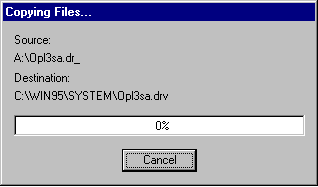
Insert the Driver floppy disk into the disk drive and click OK or identify appropriate directly (WIN95) on the CD-ROM drive.
The drivers are going to be installed into your hard disk drive.
This is for the YAMAHA OPL3-SA2/3 Sound system installation.
The game port joystick driver is detected and installed automatically.
2. The following dialog box appears. Select 'Do not install a driver' as shown below, then click OK.
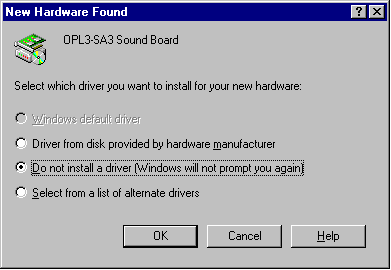
note:
You can use OPL3-SA2/3 COM port for modem interface. In this case, install Windows standard driver or identify Yamaha Windows 95 driver same as above
The following dialog box appears.
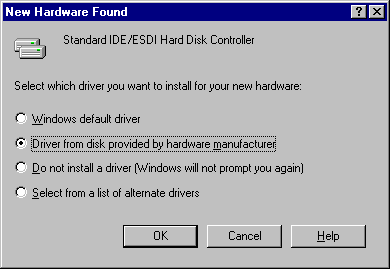
Select 'Driver from disk provide by hardware manufacture' as shown below, then click OK. (Keep putting the Driver floppy disk/CDROM in the disk drive)
note:
This is for standard IDE/ESDI Hard Disk Controller installation. If the board does not support the controller, select 'Do not install a driver'.
3. To make sure that the OPL3-SA2/3 Driver has been installed correctly,
open the System Properties dialog box in the control panel.
ex1. Sound System & Game port Joystick
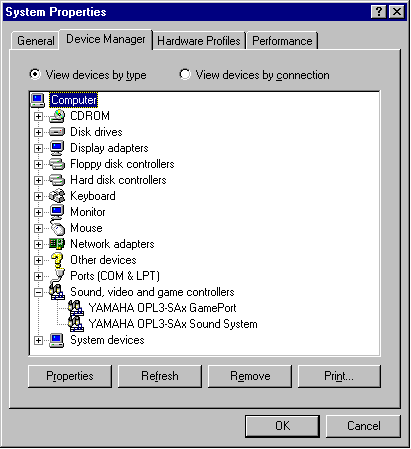
if 'YAMAHA OPL3-SAx GamePort' and 'YAMAHA OPL3-SAx Sound System' appear, the installation is successfully completed.
OPL SoftSynth Control Panel
The Soft Synthesizer supports GM System Level 1 MIDI data. Its volume is adjusted by the Wave volume control. The OPL SoftSynth Control Panel shown below is used to setup the Soft Synthesizer.
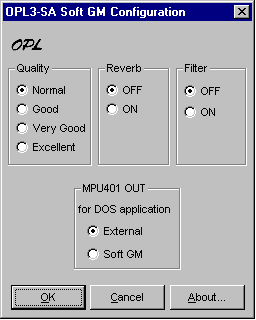
Quality
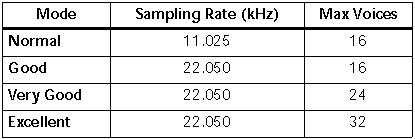
These four options determine the sound quality (i.e., sampling rate) and the number of voices that the SoftSynth can produce simultaneously. Select a mode appropriate for the CPU performance of your computer. If you choose a high quality mode and your computer does not have adequate processing performance, the SoftSynth may not produce sound fluently. In this case, select a lower quality mode.
Reverb
If you choose ON, you can add reverb to the sound of the SoftSynth.
Filter
With the filter ON the SoftSynth sound is more fluent. This, however, requires CPU resources.
MPU401 OUT
These settings allow you to select an External MIDI instrument or the SoftSynth for use with DOS-based games that are played on Window box. The MS-DOS Prompt item in the Main Program Group open an MS-DOS win-dow. Select General MIDI in the game settings to use this function.
Full Duplex
It is possible to record a new Wave file while playing an existing Wave file.
note:
SoftSynth/WaveOut of OPL3-SA2/3 is cooperative mode, you can play Wave data and SoftSynth MIDI simultaneously.
Installing the Application(YSTATION)
and the Configuration Utility(SETUPSA)
If you install
both the Audio Rack application YSTATION and the configuration utility (SETUPSA) for DOS MODE of Win95, please refer to <case1>.
If you install
only the Audio Rack application YSTATION, please refer to <case2>.
If you install
only the configuration utility (SETUPSA) for DOS MODE of Win95, please refer to <case3>.
note:
DOS MODE means the status in which you select shutdown Windows95 in the start menu and Restart the computer in MS-DOS mode.
<case1> Installing the Application(YSTATION)
and the Configuration Utility(SETUPSA)
To install the Audio Rack YSTATIONapplication and configuration utility (SETUPSA) for DOS MODE of Win95:
1.Insert Disk [SA31INST] into your floppy disk drive or select appropriate (APPLI)directory of CD-ROM.
2.Launch the MS-DOS prompt.
3.At the C: DOS prompt, type
A:
then press Enter.
If your floppy disk or CD-ROM drive is the B or E drive, type B: or E: instead of A:, then press Enter. (For installation by CD-ROM, go to the directory APPLI)
4.Type WINSTALL -a, and press Enter.
(Type WINSTCD -a , and press Enter. In the case of installation by CD-ROM)
To use IDE CD-ROM interface of soundcard, add the option -c also as follows.
WINSTALL -a -c
(Type WINSTCD -a -c , and press Enter. In the case of installation by CD-ROM)
5.Follow the on-screen instructions to complete the installation.
note:
If you go to DOS-MODE from Win95, press Start button, select Shut Down, and select Restart the computer in MS-DOS mode?.
Then you can run the configuration utility(SETUPSA).
<case2> Installing the Application
To install the Audio Rack application:
1.Insert Disk [SA31INST] into your floppy disk drive or select appropriate (APPLI) directory of CD-ROM.
2.Launch the MS-DOS prompt.
3.At the C: DOS prompt, type
A:
then press Enter.
If your floppy disk or CD-ROM drive is the B or E drive, type B: or E: instead of A:, then press Enter. (For installation by CD-ROM, go to the directory APPLI)
4.Type WINSTALL, and press Enter.
(Type WINSTCD , and press Enter. In the case of installation by CD-ROM)
5.Follow the on-screen instructions to complete the installation.
<case3> Installing the Configuration Utility(SETUPSA)
To install the configuration utility (SETUPSA) for only DOS MODE of Win95:
1.Insert Disk [SA31INST] into your floppy disk drive or select appropriate directory of CD-ROM.
2.Launch the MS-DOS prompt.
3.At the C: DOS prompt, type
A:
then press Enter.
If your floppy disk or CD-ROM drive is the B/ or E drive, type B: or E: instead of A:, then press Enter. (For installation by CD-ROM, go to the directory APPLI)
4.Type WINSTALL -d, and press Enter.
(Type WINSTCD -d , and press Enter. In the case of installation by CD-ROM)
To use IDE CD-ROM interface of soundcard, add the option -c also as follows.
WINSTALL -d -c
(Type WINSTCD -d -c , and press Enter. In the case of installation by CD-ROM)
5.Follow the on-screen instructions to complete the installation.
note:
If you go to DOS-MODE from Win95, press Start button, select Shut Down, and select Restart the computer in MS-DOS mode?.
Then you can run the configuration utility(SETUPSA).
Using IDE CD-ROM interface in the DOS-MODE
In the DOS-MODE, when using IDE CD-ROM interface of soundcard, Change the parameters of IDE in SETUPSA, because these are OFF as default values. CD-ROM device driver should be bundled in config.sys, and the CD-ROM driver is unique to each manufacture of CD-ROM drive.
ex. : a case of CD-ROM drive made by Mitsumi
In the CONFIG.SYS file, confirm or add the following two descriptions or rewrite :
DEVICE=C:OPL3SASACDROM.SYS /P1E8 /I11 /A3EE
:
:
DEVICE=C:MTMMTMCDAI.SYS /D:MTMIDE01 /P:1F0,14 /P:1E8,11
In the AUTOEXEC.BAT file, confirm or add the following description or rewrite :
C:DOSMSCDEX.EXE /D:MTMIDE01 /S
:
If the CD-ROM drive cannot be recognized in your system, please contact with the manufacture of CD-ROM drive.
Ymersion control supported by OPL3-SA3
Ymersion, on-chip Yamaha 3D sound enhancement, can be controlled by the windows 95 standard volume control.
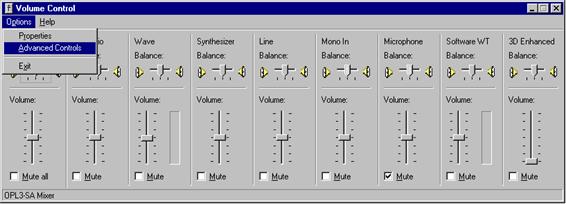
(1) Click 'Options', and select 'Advanced Controls'.

(2) Click left-bottom 'Advanced' control button.
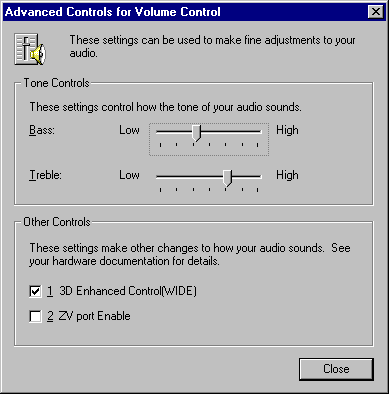
(3) Then the above dialog box appears.
Bass, Treble and 3D Enhanced Control (WIDE) is independently controlled.
Check the button of 3D Enhanced Control to activate 3D enhancement ON (WIDE).
When '3D Enhanced Control (WIDE)' is checked, wide control of 3D Enhancement on the volume control is valid.
note:
Do not check '2 ZV port Enable' while ZV port is not supported.
|
Politica de confidentialitate | Termeni si conditii de utilizare |

Vizualizari: 2603
Importanta: ![]()
Termeni si conditii de utilizare | Contact
© SCRIGROUP 2026 . All rights reserved