| CATEGORII DOCUMENTE |
| Bulgara | Ceha slovaca | Croata | Engleza | Estona | Finlandeza | Franceza |
| Germana | Italiana | Letona | Lituaniana | Maghiara | Olandeza | Poloneza |
| Sarba | Slovena | Spaniola | Suedeza | Turca | Ucraineana |
Create a Drop Down Menu for showing pictures
Introduction
I write this tutorial for the flash beginner who just know the simple and basic features of flash. This is a simple tutorial with basic actionscript attached. You need only basic understanding of programming thought for following this tutorial. I want to let you know that even only having just a basic knowledge of flash, we already can create a good and creative design. It's true that's what flash can be
I will show you how to use drop down menu in showing your favorite pictures. When you click the channel button, it will show a drop down buttons which every button can be clicked to show different pictures. I use the collection of my favorite pictures. You can change it to your own favorite pictures. When you rollout the mouse from the buttons, the drop down menu will hidden out.
In this tutorial, I'm using Flash MX, I'm sure it also work for Flash 5.
First of all, before you start, you have to prepare your favorite pictures. Crop the pictures or adjust the image size which fit into the size of frame you intended to draw.
In this tutorial, I used Adobe Photoshop to edit my favorite pictures. I adjusted the image size to be 340 x 200 pixels.
Create a new movie, 550 x 350 pixels, 12 fps, background color back.
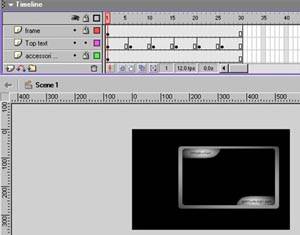
Draw 2 rectangular shapes using rectangular tool to create a frame, and fill with gradient grey color. As accessories of the frame, you can draw other shapes to make the rectangular frame looks more artistic. I draw 2 convex shapes and put it on the left top and right bottom of the frame. I use this accessories to write the title of pictures shown. You can also use these spaces to write the date of pictures or others information regarding to the pictures.
At this step, your stage
and timeline will look like this:
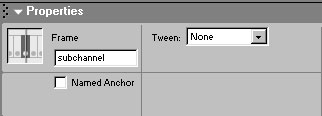
Now we want to create the drop down menu for channelling the picture. Add 3 new layers, named it respectively as: channel, subchannel, and text.
In channel layer at frame 1, create the rectangular shape (100 x 36 pixels) and fill it with gradient blue color. Again, the button size and color is not a fix price! you can change and use whatever you like. Convert the symbol shape (use Insert>Convert to Symbol or press F8) to Button.
In subchannel layer at frame 6, add new keyframe (F6). Open Library (Ctrl + L) and drag the button to the stage. Do this step for others buttons as many as you want to displaying your pictures.
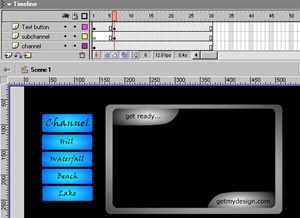
In text layer, put the
consecutive text on each button as follows: Channel, Hill, Waterfall, Beach,
At this step, your timeline and stage will look like this:
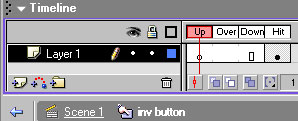
Invisible button is a button which only has a hit state defined, the other states are left blank. This button is used for putting the action to drop down buttons hidden when mouse reach it.
Add a new layer and named it as Invisible Button. Draw 2 rectangular shapes around the drop down button. Select the shape and convert the symbol shape (use Insert>Convert to Symbol or press F8) to Button. Double click the button and press F6 at its hit area to make the button invisible.
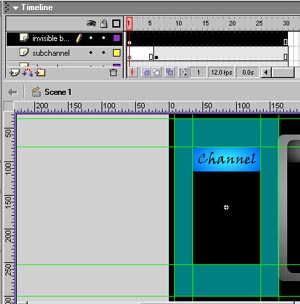
The stage and timeline looks like this:
All the images drawing finish until this step.
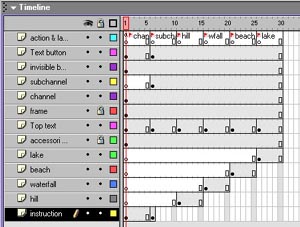
Now we want to put same frame label for this movie. Add a new layer and named it 'Label and action'. At keyframe 1, give the frame label as Channel, as shown below:
Add keyframe (F6) at 6, 11, 16, 21, 26, then put the frame label respectively as : subchannel, hill, wfall, beach, lake. You can use your own frame label which more describe your picture labels.
In timeline, add 4 new layers, name it as : hill, wfall, beach, lake consecutively. These 4 layer must be at the lower position of layer frame in timeline. Import the corresponding pictures to the stage by using File>Import at the corresponding layer and key frame.
For example, in layer hill at keyframe 11,add new keyframe (F6), then click File>Import, select the hill pictures. The hill picture will be displayed on your stage. Move the picture position into the position of frame. At keyframe 15, press F5.
Do the same steps for wfall layer at frame 16-20, layer beach at frame 21-25, and layer lake at frame 26-30.
Overall, your timeline will look like this:
Now.. this time to wrap it up together Yap, we need to put a simple actioscript that drives it all.
In Channel button, add action as follows:
on(release)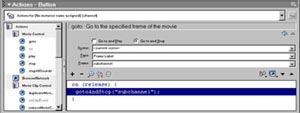
In subchannel layers, at stage, there are 4 buttons left. Each button have to be added actionscript. I will explain it one by one.
For hill button, the actionscripts is:
on(release)For wfall button, the actionscripts is:
on(release)For beach button, the actionscripts is:
on(release)For lake button, the actionscripts is:
on(release)In layer action & label at keyframe 1, add the action:
stop()Summary Thought
This tutorial is only one example idea/ application of using drop down button. You can create and design many other applications from this. You may find a little bit uncomfortable using this method if you plan showing a lot of pictures, which correlated to the number of buttons used. There'll be a lot of work to do Actually, there's another simple way to do this but using more advanced understanding of actionscript, but anyway, it's not my purpose to cover it in this tutorial. There'll be another session to talk about it later.
OK. That's all if you still have any question, don't hesitate to contact me.
Enjoy Flashing
|
Politica de confidentialitate | Termeni si conditii de utilizare |

Vizualizari: 1061
Importanta: ![]()
Termeni si conditii de utilizare | Contact
© SCRIGROUP 2025 . All rights reserved