| CATEGORII DOCUMENTE |
| Asp | Autocad | C | Dot net | Excel | Fox pro | Html | Java |
| Linux | Mathcad | Photoshop | Php | Sql | Visual studio | Windows | Xml |
XP comes with a suite of basic utilities, such as the Clipboard, a disk defragmenter, instant messenger, backup software, and more. For what they do, these utilities work reasonably well. But if you're dedicated to optimizing your computer, reasonably well isn't good enough.
In this chapter, we'll look at hacks that will give you a better Clipboard, do defragmenting and backup better, make Windows Messenger do tricks you never thought possible, and more. There's even advice on universal messaging software.
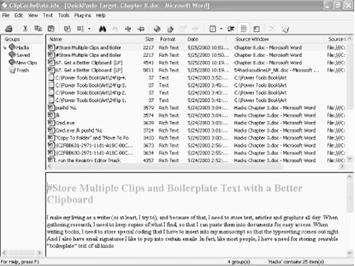
If you need to store clipboard text and images (or 'clips') permanently and call them back whenever you need them, use this XP clipboard enhancer.
I make my living as a writer (or at least, I try to), and because of that I need to store text, articles, and graphics all day. When gathering research, I need to keep copies of what I find, so that I can paste them into documents for easy access. When writing books, I need to store special coding that I have to insert into my manuscript so that the typesetting comes out right. And I also have email signatures I like to pop into certain emails. In fact, like most people, I have a need for storing reusable boilerplate text of all kinds.
I can't use the XP Clipboard to do any of that for me, though. As far as it goes, the Clipboard is fine-a kind of waystation where you can store a single clip at a time before you pop the clip into another application. But it doesn't store more than a single clip at a time, so it isn't suitable for my needs.
Instead of the Clipboard, I use ClipCache Plus (https://www.clipcache.com), which is shareware and free to try, and $19.95 if you decide to keep using it. It captures all clips and lets me organize them into folders and then reuse any clip when I need it, as shown in Figure 8-1. As you can see, it retains all formatting of the original clip. It captures files of any kind-including graphics, spreadsheets, and word processing files, as well as others-and gives you details about all your saved clips, including their date and time of capture, size, format, and application from which they were captured.
|
You don't need to do anything to start storing clips with the program. Just install it and it starts saving them for you automatically. But you'll want to organize your clips into folders (which the program calls groups), by right-clicking on the small book symbol in the Groups pane and choosing New Group. Once you've created a new group, if you want to put new clips into it, right-click on the group and choose Activate Group. From now on, new clips will be saved into the group. That's what I did when I started writing this book; I created a group called Hacks and started collecting my favorite hacks there.
To paste a clip into an application, run ClipCache-either by double-clicking on its icon in the Notification Area, or by pressing the hot-key you've defined for it (for example, Ctrl-Shift-C)-then double-clicking on the clip you want to paste. You can then paste it as you would any other clip, by using Ctrl-V or Shift-Insert. For a quick shortcut, right-click on ClipCache's icon, then clip within a group you want to paste, as shown in Figure 8-2.

There's one more feature that I use all the time and that by itself is worth the price of the program-the ability to clean up text by taking out linebreaks, extra spaces, and indentations. This is particularly useful if you want to clean up email and reuse the text in it, especially if the email is part of a chain in which there are extra spaces and line breaks added and in which the > symbol is used to precede text quoted from a previous email. For example, look at the text at the bottom of the screen in Figure 8-3. It's part of an email I received, and it is full of extra spaces and > symbols because it was quoted from a previous email.
To clean it up, I choose Text >Cleanup Text and tell it to remove email indents and the > symbols. As you can see in Figure 8-4, ClipCache cleans out all extraneous characters and indents.
There's a lot more to this program as well, such as the ability to drag and drop clips between groups, edit clips, merge clips, and more. But for me, the simple ability to organize clips, save them in groups, and clean up emails is its strength.
|
ClipMate (https://www.thornsoft.com) is another excellent clipboard program.
One of the simplest ways to speed up your PC is by defragmenting your hard disk. Here's how to get the most out of XP's built-in defragmenter and a third-party program that should speed up your hard disk even more.
Perhaps the simplest way to speed up your PC is to use a disk defragmenter, which will help you open applications and files more quickly. As you use applications and files, they get spread out in fragments across your hard disk. The next time you go to use them, they take longer to open because your hard disk has to find each of those disparate fragments so they can be assembled when you open the file. A disk defragmenter stores files and applications contiguous to one another so that they can be fetched much more quickly than if they were spread out across your whole disk.
XP includes a built-in defragmentation program (sometimes called a defragger), which you can run by choosing Control Panel >Performance and Maintenance >'Rearrange items on your hard disk to make programs run faster.' But there are ways you can use it more effectively, and there are third-party programs that do a more effective job of defragmentation as well.
One of the biggest improvements of XP's defragger over previous Windows versions is that it can perform a boot defragment, placing all boot files contiguous to one another so that you boot faster. The boot defragment option is usually enabled by default, but there's a possibility that it could be disabled, or enabled improperly. You can make sure it's enabled, using a Registry hack. Run the Registry Editor [Hack #68] and go to HKEY_LOCAL_MACHINESOFTWAREMicrosoftDfrgBootOptimizeFunction. Find the Enable string. If the String value is set to N, change it to Y. If it is Y, leave it as it is, since that means boot defragmentation is enabled. Exit the Registry and reboot. When you next defragment your disk, the boot files will be defragmented.
|
If you prefer the command line to the graphical interface, you can avoid maneuvering through menus and dialog screens to defragment your hard drive. (Using the command line also gives you greater control over the defragmentation process, as you'll see in this hack.) To defragment a hard drive, type defrag C: at a command prompt, where C is the hard drive you want to defragment. When you use the command line, you won't see a visual display of the defragmentation process, and you won't be able to pause it or cancel it.
defrag also does work invisibly in the background to make sure that your programs load more quickly. It's set up so that every three days, when your computer is otherwise idle, it moves program code to the outside of the disk to make programs load more quickly. You can force it to do that manually, without having to do a full defragment, by using the -b switch, like this:
defrag C: -bIt takes only a few minutes for defrag to do this, in contrast with a full defragmentation, which can easily take more than 20 minutes, depending on how defragmented your system is and the speed of your processor.
There are several other command-line switches you can use with the defrag command:
/A
Analyzes the drive you want to defragment and shows you a brief analysis report, summarizing the hard disk size and total fragmentation. It only displays the report, however; it does not defragment the drive.
/V
Analyzes the drive you want to defragment and shows you a comprehensive analysis report, detailing the size of the hard disk, percent of free and used space, total fragmentation, and total number of fragments, among other details. It gives the analysis report, defragments the hard disk, and then gives an analysis of the hard disk after defragmentation.
/F
Forces the drive to be defragmented, even if there isn't a certain minimum amount of space. Normally, you can defragment the drive only if your hard disk has at least 15% space free.
There will be times when the Disk Defragmenter won't defragment your drive, or will defragment it only partially. It won't defragment your drive if you don't have at least 15% of the drive's space free. To solve the problem, as explained previously, type defrag C: /F at the command line, where C is your hard drive.
There are also certain files and areas that the Disk Defragmenter won't defragment: the Recycle Bin, the Windows page file, Bootsect.dos, Safeboot.fs, Saveboot.rsv, Hiberfil.sys, and Memory.dmp. There's not much you can do about it, though it's a good idea to empty the Recycle Bin before defragmenting.
Often, the Disk Defragmenter won't defragment every file on the first pass. Your best bet here is to use brute force: run it again until it defragments the files it missed the first time around. Also, keep in mind that the Disk Defragmenter won't defragment any files that are currently in use, so make sure to close all programs; if there are files that won't defragment, it might be because they're being used by an open program. Sometimes, programs may seem to be shut down, but in fact may be running in a kind of phantom mode. For example, Outlook sometimes stays running even after you've shut it down. To make sure your programs are completely shut down before running the Disk Defragmenter, run the Task Manager by pressing Ctrl-Alt-Delete or right-clicking on the Taskbar and choosing Task Manager. Check both the Applications and Processes tabs to see if any programs, like Word for Windows (Winword.exe) or Outlook (Outlook.exe), are still running. These two programs sometimes continue running even after you've shut them down.
For most purposes, XP's Disk Defragmenter works fine. But if you're a system administrator who needs to defragment multiple machines or defragment servers, you'll be better off with a better defragmenter. Even single users of XP might want a better disk defragmenter for purposes such as easy scheduling of defragmenting and the ability to defragment files that XP's defragmenter can't handle. Two of the best XP defragmenters are available as try-before-you-buy software:
Diskeeper
This defragmenter can automatically defragment a disk on bootup, allows you to remotely schedule boot-time defragmentation on multiple machines, will let system administrators create different defragmentation schedules for different groups of machines, will defragment disks that have little free disk space, and makes it easy to deploy on multiple machines. Get it at https://www.execsoft.com. It's free to download and try, but you'll have to pay if you decide to keep it. For an individual home users it's $29.95; for a single corporate user it's $44.95; and there are license packs available for multiple users. There's also a free version available, called Diskeeper Lite Freeware, which allows you to defragment only one volume at a time and doesn't allow scheduling.
PerfectDisk2000
Like Diskeeper, this defragmenter allows administrators to schedule defragmentation of machines across a network, and it can defragment disks with little free hard disk space. It can defragment files that XP's built-in defragmenter can't, such as the Windows page file. It also offers boot-time defragmentation. You can get it at https://www.raxco.com. It's free to download and try, but it is $44 per workstation should you decide to keep it. Figure 8-5 shows the options for using PerfectDisk2000.
Don't be blindsided by disk crashes and other disasters. Here's how to have a backup ready at any time for any reason.
I used to use 3.5 inch diskettes for backup; to back up to disks today would take me approximately 98,000 diskettes. While we don't use diskettes for major backup procedures anymore, a lot of the thinking that goes into a backup is still pretty ancient.
I don't believe any users actually set out on a given day to destroy a functional operating system, but you know as well as I do that it happens. A little tweak here, a Registry edit there, a power surge or perhaps a badly behaved application that trashes the computer. We've all been there and when it happens I can almost guarantee you that if you listen closely you'll hear something approximating, 'Darn. I meant to ,' where the blank is whatever backup task you have been putting off.
In addition to making yourself do the backup, there are a few steps I recommend to make your backup procedure easier, more convenient, and more effective.
I recommend separating the operating system and programs from the data when it's backed up. All three components-operating systems, programs, and data-have become huge over the years. In most cases, lumping them into a single, large backup is a waste of time, especially for home users.
Before you actually back up anything you need to ask yourself some questions:
How will the backup be saved? Many of today's computers come with devices that are suitable for backups; CD-R and CD-RW drives, tape drives, removable cartridge drives, and even a second hard drive can be used to store backups. With the exception of the second hard drive, any of those mentioned can be removed from the site where the system is located, and even the hard drive can be relocated by using specialty cradles that allow it to be plugged in and removed easily. There are a number of web-based hosting services that can be used for offsite storage for a monthly subscription fee. Business users normally back up to a company server, either local or remote, and the IS department takes over from that point.
The best system is one you think you'll actually use, so that you'll have the backup.
Where will the backup be stored once it's created? If fire, flood, or theft should strike where the system is located, the backup should be available from another location to restore the system and data files. Unfortunately, safe storage of the backup can be hard to get on-site. If you don't use an off-site service, consider storing your backups in one of the small fireproof chests that can be purchased at most department or office supply stores.
What files should be backed up? At one time, it was accepted, if not almost reasonable, to back up everything on a system at one time. But the amounts of data and the size of applications make that procedure very outdated. Here are three categories of data:
System files
There is no need for the average user to back up operating system files. What is important is to protect the original media (i.e., the Windows XP CD and all of your program installation discs). Windows XP comes with System Restore, which backs up all of your system files automatically, or you can create a restore point whenever you prefer. System Restore is specifically designed to act in concert with the operating system to restore it in case of a system problem.
If you don't like or trust System Restore, a number of programs are available that image the system and allow you to reinstall it in a fraction of the normal time. Ghost by Symantec is one of the popular choices (https://www.symantec.com).
Archive files
These are files acquired through any number of methods, either downloaded or created by you, that don't change once they have been created. Image and audio files are good examples in this category. They are looked at and listened to for enjoyment, but as a rule they seldom if ever receive any modification once they have been added to your system. Don't back these up more than once.
Current data files
More than anything else on your system, these are the files you most want backed up and protected on a regular basis. The list of included files will vary by user, but a few examples are text documents, spreadsheets, financial records, databases, email, Internet favorites, personal information managers (PIMs), web site projects, and any other type of data you create and work with or modify on a regular basis.
If the thought of losing one day's work makes the hair on the back of your neck stand upright, then you'd better have a tightly structured backup plan and ensure that it's adhered to without fail. If you have a computer full of spam and Freecell stats, it doesn't make much difference when, or even if, you back up.
How you organize your system can make backup a relatively painless process. Structuring the system so your data files are organized in one area facilitates pointing the backup program to one area rather than having to gather files from widespread locations. In Windows XP, the My Documents folder is an excellent choice for this purpose. Many programs default to saving created files in this location, including Office XP.
Many power users don't use My Documents because of its corny name; however, some of us have realized that it's a nice shortcut to have (along with My Pictures); because the applications default to these locations, you have less chance of spreading your documents and photos around the computer trying to find your chosen folder. If you don't like the name, change it [Hack #12]. Or, if you'd rather use your own organization structure but want to designate one of your folders as 'My Documents,' you can do that too [[Hack #8]].
Whatever location you choose, the important point is to use it for all the data you create and work with or modify on a regular basis that will be a part of the backup.
While it isn't absolutely essential to have a utility specifically designed for backing up a computer system, it can make life easier. Both Windows XP Home and Professional come with what Microsoft calls the Backup and Restore Utility, better known as NTBackup. Unfortunately for XP Home users, Backup and Restore is not installed by default, nor is it as fully functional as the version installed by default in XP Professional. Supposedly, the reason it's not installed by default in XP Home is because XP Home does not support Automated System Recovery (ASR), which is a part of Backup and Restore. This in no way prevents you from making a full backup in Home Edition, but it does limit the recovery or restore options. Bottom line: if you have XP Professional, you're ready to go. If you have XP Home, follow these directions to install the Backup Utility manually:
Insert the Windows installation CD
into your CD drive and navigate to [
Double-click the Ntbackup.msi file to start the wizard that installs the Backup Utility.
When the wizard is complete, click Finish.
|
The 'Restore' CD A few years ago, I wouldn't even have had to add this sidebar, but a trend I heartily dislike has been gaining a foothold in the computer industry. That trend is the supplying of 'restore CDs' by PC manufacturers. These useless little circles of plastic are used to restore a PC to factory specifications. 'Factory specifications' means that the CD basically wipes your system clean and reinstalls XP and, along with it, all the other garbage (commercial sweetheart deals) that PC manufacturers use to pump up their coffers while depriving you of an unadulterated copy of a Windows XP installation CD. Unfortunately, if you fall into this group, you'll need to buy your own third-party backup program. Or, if you feel comfortable doing so, borrow a real Windows CD from a friend and install the Backup Utility on your system. The Backup Utility is something you should have received with your own copy of Windows to begin with. OK, kicking my soapbox back under the desk and moving on. |
Here are a few things every hacker should know about NTBackup.
This really should go under the 'you've got to be kidding me' category, but NTBackup does not allow you to back up directly to a CD-R or CD-RW drive. Allegedly the best, most stable, and advanced operating system Microsoft has offered, XP, has no CD burner support in backup. The solution is to back up to an alternative drive and then copy it to CD. There are many alternative backup programs available that do support direct backups to CD-R and CD-RW. Microsoft says their decision is by design. I say it's from a lack of design. Considering how popular CD-Rs and CD-RWs have become as backup media-and how inexpensive they are-this lack of design presents a major problem for most people.
However, there is a way to store your backups on CDs (or DVDs, if you're in the early adopter wave and already have a DVD burner). First, back up as you would normally, and then copy the resulting file to a CD-R or CD-RW. If you have to restore a backup from the CD-R or CD-RW, you'll be able to do that directly; you won't have to first copy the file to another medium.
One problem you'll run across is that your backup might be larger than the 650 MB or 700 MB that CDs hold. To solve the problem, create two or more backup sets, each smaller than 650 or 700 MB (depending on your CD's capacity) separating data from programs or operating system files as suggested earlier will help you do this, and then copy each resulting set individually to a different CD.
When a backup is created the data is not saved in the same way you see it in the backup window where you select the files and folders. A backup is a single file that has to be broken apart during the restore process. To do so, it's necessary to use the same program that created the backup file to restore it to your system. Normally this is not a problem, except in one special circumstance. Restore will want to return your data to the location it occupied during the original backup. For example, if you backed up data from D: and no longer have a drive D: when you want to restore, the process will fail.
The Windows XP Home Edition does not support Automated System Recovery. I've been told this is why NTBackup is not installed by default in Home, but if that's the case, why include the item on the Home CD in the value-added directory? Whatever the reason, it's something you need to be aware of, in spite of the option for ASR that appears in NTBackup when installed on a XP Home machine. XP Professional users are good to go with ASR.
XP's built-in backup program leaves a lot to be desired. But there are downloadable try-before-you-buy backup programs that offer you more features. Two of the best are Backup Plus and NTI Deluxe Backup Plus! Now.
Backup Plus
One of the strengths of this program is its simplicity, particularly when restoring backups. Even though the program stores its backup file with a .bac extension, in fact, the backup files are .zip files. So, if you want to restore files or folders, you only need to rename the backup file so that it has a .zip extension and then open the file with an unzipping program, such as the one built into Windows, or WinZip. Once you open the file, you can unzip it as you would any normal .zip file. The program also lets you schedule backups and, unlike XP's backup program, will back up to any kind of media, including CD-Rs and CR-RWs. Backup Plus is try-before-you-buy software. You can download it from https://www.backupplus.net and try it for free; if you decide to keep it, you should pay $39.95.
NTI Deluxe Backup Plus! Now
This is one of the more powerful and flexible backup programs you can find. It can back up to any media (including DVD-Rs), includes password protection for backup jobs, can span media and drives when backing up, and lets you make a complete image of your hard disk so that you can restore your entire system. NTI Deluxe Backup Plus! Now is try-before-you-buy software. You can download it from https://www.ntius.com and try it for free; if you decide to keep it, you must pay $79.99.
Virtual desktops allow you to stretch your screen real estate well beyond its normal size, as well as to organize different views of your workspace.
At any point during the day, I might be writing software, listening to music, purchasing computer equipment, messing with my GPS and software, playing computer games with my son, or working with my editor. Sometimes, I'm doing all those things at once. It's a wonder that I can keep all the windows organized. Fortunately, I don't have to do all the organizing myself.
Virtual Desktop Manager (VDM) gives me a way to organize the work I'm doing, using up to four switchable desktops. VDM is part of the unsupported PowerToys collection from Microsoft that includes TweakUI [Hack #8].
Download VDM from https://www.microsoft.com/windowsxp/pro/downloads/powertoys.asp
and install it on your machine. Once you have installed VDM, you will not
notice anything new. You have to activate its toolbar before you
can begin using it. To activate VDM, right-click on the
taskbar at the bottom of the screen and select the Toolbars ![]() Desktop
Manager, as shown in Figure 8-6.
Desktop
Manager, as shown in Figure 8-6.
After you activate VDM, you will notice a new toolbar on the taskbar at the bottom of the screen, as shown in Figure 8-7. To switch between desktops, press one of the numbered blue buttons. At first, the desktops will appear the same, because you haven't done anything in them to make them unique.
![]()
Click button 1 and then launch your web browser. Next, click button 2 and then open your email program. Next, click button 3 and then open the My Computer icon. Now, click the green button with an icon of a window on it. Your screen should look something like Figure 8- Click on one of the four images of the desktop to switch to that virtual desktop.
Without changing a single option, VDM is a very useful addition to Windows XP. But if you don't twiddle with it, you can't really call yourself a hacker, now can you? If you right-click on any of the buttons on the VDM toolbar, as shown in Figure 8-9, you will be able to configure VDM to suit your needs.
Your desktop has a background image that you can set as you wish. When you purchased your computer or installed Windows XP, the background image was a grassy hill with a blue sky. Since VDM provides you with four separate desktops, you can customize each with a different background image. If you choose the Configure Desktop Images item from the toolbar's menu, you will see the dialog box shown in Figure 8-10.
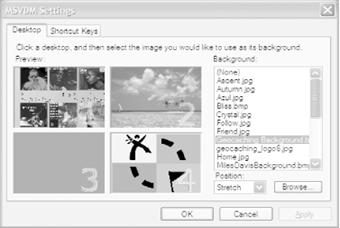
To change the background for one of the virtual desktops, specify which desktop area you want to change on the left side of the window. Then, locate a file from the list on the left. The list of images comes from both C:WINDOWSWebWallpaper and C:Documents and Settings<Your Name>My DocumentsMy Pictures. If you want to use a picture not in the list, click the Browse button and locate the file. However, you might find that VDM changes your original background picture to a solid color when you first run it. Just change it back to your preferred background.
Look at Figure 8-10; notice that desktop 3 is shown in gray. This is how VDM informs you that you have no background image set for the desktop. When you switch to that desktop, the background will be whatever color you have selected in your display properties.
In addition to pressing the numbered buttons, you can use keyboard shortcuts to switch between the desktops. Hold down the Windows key (if your keyboard has one; if it doesn't, you can change the key assignments, as explained next) and the number keys 1 through 4 to switch to the appropriate desktop. To switch to the VDM preview screen, hold down the Windows key and press V. To change the key assignments that switch between the desktops, choose Configure Shortcut Keys from the toolbar menu and use the dialog box shown in Figure 8-11.
|
Look at Figure 8-8 again. Notice that each of the separate desktops has taskbar buttons for every program that is running. VDM does this so you can move running programs between the desktops. I prefer each desktop to have taskbar buttons for programs that run on that desktop. To do this, right-click on VDM on the taskbar and uncheck the menu item named Shared Desktops.
If you would rather rely on keyboard shortcuts and reclaim space on the taskbar, right-click on VDM and uncheck the Show Quick Switch Buttons menu item.
The least useful bit about VDM is the fact that it actually wastes valuable space to tell you that it's there. If you uncheck the item named Show Title, the letters MSVDM will disappear from the toolbar.
Several things to keep in mind that when using VDM:
If you choose a background image using the Settings dialog, the VDM settings will override the background image settings in the Display Properties dialog (your previous image won't be selected any more; you'll have to reselect it).
If you use background images, the act of switching between desktops will be noticeably slower.
Shortcuts and icons on the desktop will show up on all virtual desktops.
If you have programs that float above all other windows on the screen (such as a program with an 'Always On Top' option), they will show up on all desktops.
Windows Media Player using the MiniPlayer skin is one of those programs that float above everything else. If you turn on the Windows Media Player toolbar and then minimize the player, a smaller version of the player appears on the taskbar and it is available to all desktops.
Another popular product is the shareware application Cool Desk. It costs $24.95 and supports up to nine separate desktops. You can download Cool Desk at https://www.shelltoys.com/virtual_desktop/index.html.
Also try Desks At Will. It costs $22.50 and also supports up to nine separate desktops. You can download Desks At Will at https://www.idyle.com.
One of the more interesting desktop managers is Vern. Vern is free to download, but the author asks users who enjoy it to contribute. You can download Vern from https://www.oneguycoding.com/vern/.
Capture any XP screen or portion of a screen and control the file format and output using these screen-capture tips.
Capturing good screenshots in XP takes a bit of work. If all you want to do is capture a screen for later reference, and don't care about the file format of the capture, and don't need to capture the cursor or only part of the screen, you can use XP's built-in capture capabilities. But if you need to create documentation, are a professional writer, an artist, or are a student preparing a term paper and need to get great-looking screenshots, you'll have to use a third-party program.
These screen-capture tips will help you capture just about anything you want, using built-in or third-party tools.
XP comes with a built-in capability for capturing screenshots, though it's about as basic as screenshot capture gets. To capture an entire screen, press the Print Scrn button. To capture only the active screen, press Alt-Print Scrn.
Pressing those keys captures the screen to the Clipboard [Hack #73], but you'll have to paste the screen into a graphics program in order to save it. Use your favorite graphics program, such as Paint Shop Pro [Hack #86], or use XP's built-in Paint program by choosing Start >All Programs >Accessories >Paint. Paste in the graphic, and then choose a format for saving it.
If you have Microsoft Office, a better bet than Paint is pasting the screen into Microsoft Photo Editor (Start >Programs >Microsoft Office Tools >Microsoft Photo Editor). (Microsoft Photo Editor doesn't come with all versions of Office, or might not be installed by default, so it might not be available on yours.) It offers more control over file formats when you save the screenshot. For example, you'll be able to decide on the amount of compression to use on JPEG files, and you can choose among several graphics color depths and palettes. When you save a file, after you choose the format, click on the More button, and you'll get options for saving in that file format, as shown Figure 8-12. Of course, a graphics program like Paint Shop Pro offers even more options.
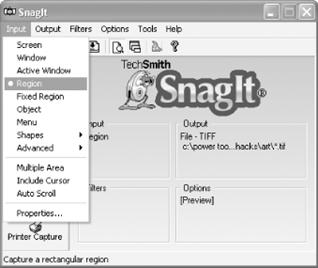
XP's built-in capture tool, while effective, has several drawbacks. It won't capture the cursor or portions of the screen, for example. To do that and more, get the ultimate screen capture tool, SnagIt from TechSmith (https://www.snagit.com). It's shareware and free to try, but it costs $39.95 if you decide to keep it. In addition to letting you capture the cursor and any portion of a screen, it will capture an entire scrollable area-such as a scrolling web page-gives you a wide variety of options for customizing file formats, and it will capture a screen and send it to the printer or a web page.
First, choose what you want to capture-the entire screen, the active window, a portion of the window and so on. Also, configure whether to capture the cursor. Figure 8-13 shows you the SnagIt menu options for capturing a screen.
Next, set up the screen you want to capture and press SnagIt's hot key for screen capture. (The default is Ctrl-Shift-P, but you can change it.) If you've chosen to capture an area of the screen, you'll be able to define it using SnagIt's capture tools. If you've chosen the option of capturing a screen that scrolls, click on the scroll bar of the screen. Once you have the area you want, you get a preview of the screen, as shown in Figure 8-14. You can zoom in and out on any area of the screen to make sure it's what you want. When you decide the screen is what you want, click Finish, select a file format, name, and location, and you're done. To customize your graphics format-for example, to choose JPEG compression or change the color depth-click on the Options button that appears when you save a file, and make your choice.
If you want to capture onscreen actions such as mouse movements, menu choices, and anything else you do on your PC, use the free CamStudio (https://www.atomixbuttons.com/vsc/), which will record all your actions and save it as a video file in either Windows .avi video format or Flash .swf format.
Share a common whiteboard where you can collaborate on work in real-time over the Internet, and get alerts delivered to your desktop with Microsoft's instant messaging tool.
Windows Messenger can do far more than merely let you chat with other people. Hidden inside it are powerful collaboration tools for working with others over the Internet, as well as the ability to get automated alerts delivered to your desktop.
|
One of Windows Messenger's more useful
features is its ability to deliver to you a variety of alerts called .NET
alerts-messages, reports, or
bulletins, such as weather reports, stock quotes, breaking news, and traffic
reports. I'm a news junkie, and, where I live in
First, sign up for alerts by clicking on the Alerts tab (the one that looks like a bell). If for some reason Messenger doesn't show you any tabs, choose Tools >Show Tabs >Microsoft .NET Alerts. You'll be prompted to sign up for an Alert provider, as shown in Figure 8-15.
Next, you'll be sent to a web page where you can choose from a variety of alerts. Choose the alert you want, and fill out the form. The form for each alert is different and requires different information and different steps. In my instance, I signed up for MSNBC News to get its breaking news, and Weather.com alerts for the weather. I'm an eBay fan, so I signed up for alerts that will track auctions I'm interested in. And, like any long-suffering Bostonian with a taste for the tragic, I'm a Red Sox fan, so I also sign up for ESPN.com.
When you're done adding alerts, use the navigation on the web page to go to your My Alerts page, shown in Figure 8-16. From here you can edit, manage, add and delete alerts.
Alerts will now be delivered to you on the
schedule that you chose. They'll appear as a small window near the Notification
area, as shown in Figure 8-17. As you can see, it's another lovely day in
If you want to read all your recent alerts, click on the Alerts tab. You'll be able to view them by date or alert provider.
Chat windows are fine for simple communication, but when you're working with others at long distance, very often you need more collaboration than that. In particular, you might want to share drawings, images, and text. You can do that using the whiteboard, a tool that lets you collaborate in real time over the Internet or a network with other Windows Messenger users. It's a drawing program, similar to Microsoft Paint, that allows you to share drawings, diagrams, images, and text. The same whiteboard appears on the systems of both participants, and each person can draw, annotate, and mark up the whiteboard in any way they want. The other participant sees the markup, in real time, and can in turn mark it up as well.
To start a whiteboard with someone, double-click on their contact name and click on the Start Whiteboard link on the right side of the Messenger conversation screen. An invitation goes out to the contact, and, if he agrees, a small Sharing Session windows appears, as shown in Figure 8-1
Click on the Whiteboard button, and the whiteboard appears. You can both now use the markup tools. They're largely self-explanatory and work like Windows Paint or another graphics program. You can see the whiteboard in action in Figure 8-19. Make sure, though, to use the remote pointer, a small hand that you can drag around the screen that helps you better highlight what you're currently working on together. If you look closely at Figure 8-19, you can see it.
The buttons along the lower right of the screen let you create new pages and navigate among those pages. When you create a new page and navigate among pages, the other participant comes along with you to those pages. Additionally, there are four buttons in the left part of the whiteboard that serve special purposes:
When you click this button, it locks the whiteboard and prevents anyone else from making changes to it. To unlock the contents, click the button again.
Unsynchronize
When you click this button, you can jump to another page or create another page, and you'll do that privately; for the purposes of creating and navigating among pages, you're not synchronized with the other participant. When you click on the button again, other participants' whiteboards will switch to the page you're viewing.
Select Window
Click on this button, and then the next window you click on anywhere in XP or any application will automatically be pasted into the whiteboard.
Select Area
Click on this button, and you'll be able to select an area anywhere in XP or an XP application and paste it into the whiteboard.
When you're done using the whiteboard, click on the Close button in the Sharing Session window. You'll be given the option of saving the whiteboard. If you save it, it will be saved in its own proprietary format (as an .nmw file). To view that whiteboard again, double-click on it in Windows Explorer.
The whiteboard is useful for basic collaboration, but an even more powerful tool is Messenger's application sharing. It allows two people to work in the same application on the same document. Whatever is on your screen appears on the other person's screen, and the two of you can work on the document together. I've found it to be ideal for collaborating on spreadsheets-it's easy to share 'what-if' scenarios this way.
To start a whiteboard with someone, double-click on the contact name and click on the Start Whiteboard link on the right side of the Messenger conversation screen. An invitation goes out to the contact, and, if he agrees, a small Sharing Session windows appears, as shown previously in Figure 8-1 Once he agrees, click on App Sharing, and you'll be able to choose which file and application to share, as shown in Figure 8-20. You can share only programs and files that are already open on your PC.
Click on one or more programs and click Share; the applications open in a window on the other person's computer. You have full control over the application; they can only watch what you do. In that sense, it's not full collaboration. If you want the other person to also be able to control the document, click on the Allow Control button; they will be able to work on the application and document after they request your permission. Only one person at a time can control the document; you can pass control over it back and forth.
It's the Esperanto of the Instant Messaging world; Trillian lets you communicate with all the major messaging programs.
I live, therefore I message. That's the credo of not just teenagers everywhere, but also for people like me. I use instant messaging to keep in touch with editors, friends, and other authors, as well as readers of my books. And I frequently use it along with conference calls; while the larger group is speaking over the phone, I instant-message others in the phone conference to get background information and make occasionally less-than-flattering remarks about speakers who revel in the sounds of their own voices.
But as all instant message users know, there's a big drawback to instant messaging: the major instant messenger programs, including Windows Messenger, can't communicate with one another. That's a bit like being able to make phone calls only to people who use the same brand of telephone as yours, but given the economics and ego that drives the instant messaging industry, that shows no sign of changing any time soon.
However, there's a great workaround, and it's free. The universal instant messaging program Trillian will let you communicate with users of with ICQ, Windows Messenger, Yahoo! Messenger, and AOL Instant Messenger as well as the old Internet chat standby IRC. You don't need to install any of those programs; just run Trillian (https://www.ceruleanstudios.com), shown in Figure 8-21.
After you install Trillian, enter your usernames and passwords from your other instant messengers. When you do that, Trillian automatically uses those contact lists, so you don't need to reenter them. To enter a new contact from inside Trillian, choose the Add Contact button, tell Trillian which program your contact uses, and then fill in the contact information. Because instant messaging programs store your contacts on their servers, rather than locally on your PC, when you add contacts like this, these new contacts will not only be available in Trillian, but also when you use your instant messaging program.
If you have accounts on more than one instant messaging program, Trillian signs you into all of them when you log in, so you get a single sign-in and are then available everywhere.
Trillian lets you use some, but not all of the features of each individual instant messenger program. For example, you'll be able to send files as you can with instant messengers. But you can't, for example, use the Windows Messenger whiteboard or application sharing.
One problem with instant messaging with any program is the way that it leaves you open to the world: anyone who wants to contact you can, including increasingly aggressive messaging spammers. Each individual program gives you controls over who can contact you and how you want to be contacted, and Trillian also lets you customize your privacy for each of the programs. Right-click on the big Trillian icon near the bottom of the Trillian screen and choose Preferences. Then, scroll to the bottom of the list to where it says Chatting Services. You'll find ways to customize your privacy, which differ according to the service's capabilities, as shown in Figure 8-22.
Trillian is skinnable, so you can easily change its appearance. To choose a new skin, select Skins in the Preferences screen shown in Figure 8-22, and choose either Launch Skin Chooser to choose from any skins already on your system, or Get More Skins to choose from skins online.
Trillian is one of the
few programs that takes advantage of XP's transparency
capabilities [Hack #18]. To make Trillian transparent,
right-click anywhere in the program and choose Advanced Options ![]() Transparency.
You can then choose a transparency of anywhere from 10% to 90%, where 10% is
the least transparent, and 90% is the most transparent. I'd suggest using 10%;
any more than that and it becomes very difficult to see the program or chat
with it.
Transparency.
You can then choose a transparency of anywhere from 10% to 90%, where 10% is
the least transparent, and 90% is the most transparent. I'd suggest using 10%;
any more than that and it becomes very difficult to see the program or chat
with it.
There are two versions, one of which is free, and the other, called Trillian Pro, costs $25. The Pro version includes a plug-in system that allows third-party developers to create plug-ins that you can download for free. For example, there are plug-ins for delivering the weather and news, checking your POP3 email accounts, integrating with WinAmp MP3 software, and more. The Pro version has other features as well, such as the ability to videoconference using the Yahoo! portion of Trillian.
Gaim (https://gaim.sourceforge.net) is another universal instant messenger. Earlier versions tended to crash unexpectedly on XP, but more recent versions are more stable. It's not as handsome-looking as Trillian, and it doesn't take advantage of as many of the built-in features as each of the instant messengers in the same way that Trillian does. But it's open source and runs on many other platforms, not just Windows.
|
Politica de confidentialitate | Termeni si conditii de utilizare |

Vizualizari: 990
Importanta: ![]()
Termeni si conditii de utilizare | Contact
© SCRIGROUP 2025 . All rights reserved