| CATEGORII DOCUMENTE |
| Asp | Autocad | C | Dot net | Excel | Fox pro | Html | Java |
| Linux | Mathcad | Photoshop | Php | Sql | Visual studio | Windows | Xml |
![]()
The Windows XP makeover was the biggest change Microsoft made to the Windows interface since it moved from Windows 3.1 to Windows 95. Rounded-edge windows, large, cartoon-like icons, and a completely redesigned Control Panel are just a few of the most obvious changes. It's not merely the way XP looks that has been changed, but how it works as well. It's based on a more stable kernel and finally gets rid of its DOS-based heritage.
But let's face it: XP's interface isn't perfect. As shipped, its cartoonish user-friendliness may help newbies, but it can frustrate power users. XP's graphical user interface (GUI) need not be one-size-fits-all, though. Under the hood, there are countless changes you can make to the way it looks and functions. In this chapter, you'll learn how to hack your way to a better GUI-one that reflects your own preferences, not the market-driven designs of Microsoft engineers.
Want to bend XP's interface to your will without getting your hands into the Registry or having to excavate through menus three levels deep? Then get this supremely useful freebie from Microsoft and create your own customized version of XP.
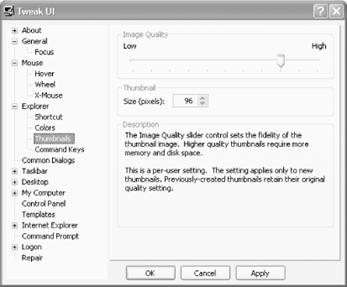
There are countless ways to customize XP's interface, including Registry hacks and menus and options hidden four layers deep. But if you're the kind of person who lives in the express lane, juices up on double espressos, and wants to hack away at the interface fast, then you need TweakUI (Download it for free from Microsoft at https://www.microsoft.com/windowsxp/pro/downloads/powertoys.asp. It's part of a suite of free, unsupported utilities from Microsoft called XP PowerToys, but it's far and away the best one.) It lets you tweak not only the interface, as the title suggests, but also many other system settings, such as how Internet Explorer's search works, whether to automate your logon upon system startup, and whether to enable CD autoplay so that the CD immediately starts up whenever you pop it into your drive. In this hack, you'll learn how to use it and apply that knowledge to create a speedy, stripped-down version of XP. Figure 2-1 shows TweakUI in action, customizing the display of thumbnail pictures in Windows Explorer.
I don't have room to show you all the ways you can hack the user interface with TweakUI, but here are some of the highlights:
The General section lets you control XP's animated effects, fades, and shadowing. Also worthwhile in that section is 'Show Windows version on desktop.' Check the option and it displays, in the lower-right portion of your screen, your exact version of XP-for example, 'Windows XP Home Edition Build 2600.xpsp021108-1929(Service Pack 1),' as shown in Figure 2- I find it useful for knowing whether I need to add XP Service Packs, or for providing the information to tech support if I have an operating system problem that needs to be solved. You'll have to log off or restart your PC before it will display your version.
![]()
|
Hide Desktop icons that apparently can't be deleted from the Desktop, such as the Internet Explorer, Microsoft Outlook, My Computer, My Documents, My Network Places, and the Recycle Bin. To do this, go to the Desktop section and uncheck the boxes next to the icon you want to vanish. You won't have to log off for the changes to take effect. (You can force the Registry to do the same thing: see [Hack #13].)
In the Explorer section, customize the Taskbar and Desktop by enabling or disabling balloon tips and determining which programs will be allowed to show up on the Frequently Used Programs list, among other customizations.
Customize how Windows Explorer looks and functions by controlling the quality of image thumbnails; changing the way that shortcuts look; determining whether to include Help, Recent Documents, and Logoff on the Start menu; and many similar options.
There's a lot more as well-to find it all, download it and try it all out.
While it may be fun to use TweakUI to fiddle with the UI, its real power becomes apparent when you use it to create your own customized XP interfaces. For example, you may be the type who is concerned about only one thing when you use your PC: pure functionality. You want to get your work done fast, and you don't want to be bothered by the extra frou-frous that XP throws in your way and that slow down your system. Here's how to create a speedy, stripped-down interface using TweakUI:
Turn off animations, fades, and similar features
Animations and fades are pretty, but they require system resources and slow down your system. You can turn off a wide variety of these animations and fades from the General section of TweakUI. Uncheck the boxes next to all of them, such as Enable menu animation, Enable menu selection fading, Enable tooltip animation, and the many others listed there.
Speed up right-click menu displays, hovers, and other mouse actions
If you want menus to appear with absolutely no delay when you right-click on an object or icon, go to the Mouse section and move the Menu speed slider all the way to the left. Test how fast the menus will display by right-clicking on the test icon. From this section, you can also increase your mouse sensitivity so that it responds more quickly to your clicks and drags. In the Mouse sensitivity section, decrease the numbers next to Double-Click and Drag, and see the results by double-clicking the test icon.
The Mouse section also lets you change the mouse's sensitivity to 'hovering'-for example, displaying a tool tip when you hover your mouse over an icon. To speed up the hover display, highlight Hover underneath the Mouse section, then decrease the numbers next to Hover sensitivity and Hover time. Test out your settings using the test icon.
Decrease the image quality of thumbnails in Windows Explorer
Windows Explorer uses up RAM when it displays thumbnails, which can slow down your system, because the RAM could instead be used for your applications or the operating system itself. Use TweakUI to give thumbnails the minimum amount of RAM only. Go to the ExplorerThumbnails section and in the Image Quality area, move the slider all the way to the left, to the lowest setting for image quality. Decrease the thumbnail size, in pixels.
|
Delete unnecessary desktop icons
Desktop icons take up RAM, and clutter your interface, so you want as few of them as possible on your desktop if you want a stripped-down version of XP. You can delete most desktop icons, but some of them such as Outlook and Internet Explorer apparently can't be deleted. However, TweakUI lets you delete them. Go to the Desktop section and uncheck the boxes next to the icons that you want off the Desktop, as shown in Figure 2-3. (You can force the Registry to do the same thing-see [Hack #13].)
Hide Control Panel applets
The Control Panel is filled with applets that you will rarely, if ever, use, and they clutter up the interface, making it more difficult to find the applets you do want to use. To hide applets, go to the Control Panel section and uncheck the boxes next to the applets that you want to hide. (You can force the Registry to do the same thing-see [Hack #9]. That hack also shows you how you can run the applets, even after you've removed their icons.)
Clean up the right-click 'New' menu
When you right-click on the desktop and choose New, you can automatically create a new document by choosing from a submenu. That submenu may offer many choices of which document types to create, depending on the applications you have installed on your PC, and how those applications handle their installation process. In many instances, those choices may be little more than clutter, because you may rarely need to create new documents of certain types. Strip down that submenu to the essentials, so that it has only those document types that you frequently create. Choose Templates, and uncheck the boxes next to the document types you rarely create. For example, most people rarely use the Briefcase [Hack #30], but that is one of your choices, so remove that unless you regularly move files using it. (For a hack on how to add power to the right-click context menu in Explorer, see [Hack #29].
Enable autologon
If you're the primary person who uses your PC, you can enable autologon so that you're logged in automatically when the system starts and don't have to log on manually each time. Choose Autologon from the Logon section, check the box next to 'Log on automatically at system startup,' and make sure that your username, domain, and password are correct.
Whether you're a fan of the new Control Panel or not, there's a lot you can do to make it more palatable-like hiding applets you never use, re-categorizing the ones you do use, and displaying all applets in a simple-to-use cascading menu.
When I first started using XP, one of the things that annoyed me most was its new Control Panel. Yes, the big new icons for running applets are certainly pretty, but the Control Panel's several-layer organization forces you to click far too many times in order to get to the applet that you want. And its clutter of applets that I rarely if ever use make it even more difficult and confusing.
My first reaction was to click on the Switch to Classic View button, to do away with the new design, but the Classic View has its problems as well: its long, alphabetized list of thumbnails is just as difficult to navigate as the new Control Panel.
The solution? Start by cleaning up the Control Panel, hiding applets that you rarely if ever use. Note that when you hide the applets, you can still use them; you just won't see their icons in the Control Panel.
In this hack, you'll not only find out ways that you can control the Control Panel-you'll also see how you can apply that knowledge to create different customized Control Panels.
To hide unused applets using the Registry, run the Registry Editor [Hack #68] and go to HKEY_LOCAL_MACHINESOFTWAREMicrosoftWindowsCurrentVersionControl Paneldon't load.
The key, as its name implies, determines which Control Panel applet icons are not loaded into the Control Panel. You'll still be able to run those applets from the command line after you hide them (as explained later in this hack); you just won't be able to see their icons in the Control Panel.
To hide an applet, create a new String value whose name is the filename of the applet that you want to hide. For example, to hide the Mouse Control dialog box, the String value would be main.cpl. See Table 2-1 for a list of Control Panel applets and their filenames.
Table 2-1. Control Panel applets and their filenames |
|
|
Applet |
Filename |
|
System Properties |
sysdm.cpl |
|
Display Properties |
desk.cpl |
|
Network Connections |
ncpa.cpl |
|
Accessibility Options |
access.cpl |
|
Add or remove programs |
appwiz.cpl |
|
Add Hardware Wizard |
hdwwiz.cpl |
|
Internet Properties |
Inetcpl.cpl |
|
Region and Language Options |
intl.cpl |
|
Game Controllers |
joy.cpl |
|
Mouse Properties |
main.cpl |
|
Sound and Audio Devices |
mmsys.cpl |
|
User Accounts |
nusrmgr.cpl |
|
ODBC Data Source Administrator |
odbccp3cpl |
|
Power Options Properties |
Powercfg.cpl |
|
Phone and Modem Options |
telephon.cpl |
|
Time and Date Properties |
timedate.cpl |
|
Speech Properties |
sapi.cpl |
Create separate String values for each applet you want to hide, then exit the Registry. The applets will vanish from the Control Panel. To make hidden applets appear again, delete its string value from this same registry key.
If you have XP Professional, you don't need to get your hands dirty with the Registry to hide unused applets; you can instead use XP Professional's exceedingly useful Group Policy Editor to accomplish the same task. The Group Policy Editor is primarily used for setting network and multiuser policies and rights, but it can also be used to customize the way that XP looks and works. (For example, to use it to hack away at the Start Menu and Taskbar, see [Hack #10].) Run the Group Policy Editor by typing gpedit.msc at the Run prompt or command line.
Once you've run it, go to User ConfigurationAdministrative TemplatesControl Panel, the section that handles the Control Panel. As you can see when you get there, you can do a lot more than hide the Control Panel's unused applets in this section of the Group Policy Editor; you can also control many other aspects of how the Control Panel looks and functions.
Now right-click on 'Show only specified Control Panel applets,' and choose Properties. You'll see the screen pictured in Figure 2-3.
Get ready for a bit of counterintuitive selecting. To disable Control Panel applets, you must choose the Enabled radio button, because you're enabling the feature to show only certain Control Panel applets. Strange, but true.
When you do this, you'll hide all applets in the Control Panel, which is a bit draconian. If you don't want to see any applets at all for some odd reason, you're now done; just click OK. But you'll most likely want to show some applets, so to add them, click the Show button. The Show Contents screen appears. Click Add, and you're ready to list all the Control Panel applets that you want to appear. For each item that you want to appear, type in its Control Panel filename, which you can find in Table 2-1. For example, if you want the Date and Time dialog box to appear, type in timedate.cpl.
You can also use TweakUI [Hack #8] to hide Control Panel applets.
When you've listed all the Control Panel applets that you want to appear, click OK and exit the Group Policy Editor. Only the applets that you've chosen to display will now appear in the Control Panel.
This technique is most useful when you're hiding most applets
in the Control Panel and want to display only a few. There's another way to use
the Group Policy Editor to hide applets, and it's better suited for when you
want to hide only a few applets. In User
ConfigurationAdministrative TemplatesControl Panel, double-click on 'Hide
specified Control Panel applets' and choose Enabled. After you click on
Enabled, choose Show ![]() Add and
type in its Control Panel filename (which you can find in Table 2-1) for each
applet that you want to hide. Click OK on each dialog box that appears. When
you exit the Group Policy Editor, the specified applets will no longer appear
in the Control Panel.
Add and
type in its Control Panel filename (which you can find in Table 2-1) for each
applet that you want to hide. Click OK on each dialog box that appears. When
you exit the Group Policy Editor, the specified applets will no longer appear
in the Control Panel.
To customize other aspects of how the Control Panel works, follow the same instructions as outlined previously-right-clicking on the item you want to change, choosing Properties, and then picking your options.
How to Run Hidden AppletsHiding applets cleans up the Control Panel, but leaves you with another problem-what to do if you need to run an applet whose icon you've hidden? It's simple to do. At the Run box or command line, type in the name of the applet you want to run-such as Inetcpl.cpl for the Internet Properties applets and press Enter. See Table 2-1 for a list of filenames. |
Hiding applets goes only partway toward cleaning up the Control Panel. You can also recategorize applets and put them in any category you want. For example, by default, the Mouse Properties applet can be found in the Printers and Other Hardware category, but if you'd prefer that it instead be found in Accessibility Options, you can move it there.
To put any applet into any category you want, you need two pieces of information: the filename of the applet (for example, main.cpl for the Mouse Properties dialog box), and the Registry value for each Control Panel category (for example, 0x00000007 for Accessibility Options.) For filenames of each applet, see Table 2-1. For the Registry value for each Control Panel category, see Table 2- With these two pieces of information in hand, you can recategorize any or all Control Panel applets.
Table 2- Control Panel categories and their Registry value data |
|
|
Control panel category |
Value data |
|
Accessibility Options | 0x00000007 (7) |
|
Add or Remove Programs | 0x00000008 (8) |
|
Appearance and Themes | 0x00000001 (1) |
|
Date, Time, Language and Regional Options | 0x00000006 (6) |
|
Network and Internet Connections | 0x00000003 (3) |
|
Other Control Panel Options | 0x00000000 (0) |
|
Performance and Maintenance | 0x00000005 (5) |
|
Printers and Other Hardware | 0x00000002 (2) |
|
Sounds, Speech, and Audio Devices | 0x00000004 (4) |
|
User Accounts | 0x00000009 (9) |
|
No category | 0xffffffff |
To recategorize a Control Panel applet, run the Registry Editor [Hack #68] and go to HKEY_LOCAL_MACHINESOFTWAREMicrosoftWindowsCurrentVersionControl PanelExtended Properties The key is the container that holds all Control Panel categories. (Remember that it's safest to back up your Registry first [Hack #71].
Now find the Registry key of the applet that you want to recategorize. The filename of the applet will appear on the end of the key; for example, %SystemRoot%system32main.cpl is the Mouse Properties dialog box. Turn to trusty Table 2-1 for a list of other filenames for Control Panel applets.
Change the key's DWORD value to the value of the Control Panel category into which you want the applet to appear, as detailed in Table 2- For example, if you want the applet to appear in the Performance and Maintenance category, give it a value of . The value will then be displayed in the Registry as 0x00000005(5).
When you're done, exit the Registry. The applet will now appear in the new category.
If you're a 'just the facts ma'am' type, then you'll want to bypass the Control Panel altogether. Rather than clicking on effete icons, you can instead force XP to display Control Panel applets in a cascading menu when you choose Control Panel from the Start button, as shown in Figure 2-4.
To force the Control Panel to display as a cascading menu, right-click on the Taskbar and choose Properties >Start Menu. Click the Customize button and choose the Advanced tab. In the Control Panel heading, choose 'Display as a menu.' Press OK twice.
Armed with all this Control Panel hackery, you can build customized Control Panels. For example, you can build a Control Panel for computer newbies, which would hide the more technical applets and categories. Hide the applets in the Network and Internet Connections category, the Performance and Maintenance category, and the Sounds, Speech, and Audio Devices category-that way, newbies can't get into trouble by making changes that will affect the system in unexpected ways.
For system administrators, group all system-type applets into a single category, such as Network and Internet Connections. You'd probably want to keep all the existing applets there, but also add the Administrative Tools, Scheduled Tasks, and System applets to it, as well as the Printers and Faxes applet. (If the administrator has to handle other hardware, such as scanners, add the Scanners and Cameras applet as well.)
For those who like to hack their systems and want instant, stripped-down access to customization tools, take all the applets that are now in Network and Internet Connections, and all those in Performance and Maintenance, and group them into the Appearance and Themes category. Then force the Control Panel to display as a cascading menu, and all of the hackery-type applets will be available instantly, because the Appearance and Themes category is at the top of the cascading menu and all the relevant applets will be
available directly from it.
XP Professional's Group Policy Editor gives you instant access to changing more than three dozen interface settings. Here's how to use it to create your own personalized Start Menu and Taskbar.
XP Professional's Group Policy Editor does more than just customize the Control Panel [Hack #9]; it gives you control over many aspects of XP's interface as well-in particular, the Start Menu and Taskbar. In fact, it gives you quick access to over three dozen separate settings for them.
Run the Group Policy Editor by typing gpedit.msc at the Run prompt or command line. Go to User ConfigurationAdministrative TemplatesStart Menu and Taskbar. As you can see in Figure 2-5, the right pane displays all the settings you can change. If you click on the Extended tab at the bottom of the screen, you'll be shown a description of the setting that you've highlighted, along with an explanation of each of the options. Settings you can customize include showing the My Pictures icon, the Run menu, and the My Music icon on the Start Menu; locking the Taskbar so that it can't be customized; and many others. To change a setting, double-click on it and choose the options from the menu it displays, as outlined in [Hack #9].
There's not room in this hack to go into detail about each of the settings you can change, so I'll tell you about some of my favorites. I've never been a big fan of My Documents, My Pictures, and My Music. In fact, I never use those folders, so there's no point having them on the Start Menu. The settings in the Group Policy Editor let you get rid of them.
If you share your PC with other people, the Group Policy Editor is a great way to make sure that no one can change the Start Menu and Taskbar except you. So when you have the Start Menu and Taskbar working the way you like, they'll stay that way until you want to change them. Enable 'Prevent changes to Taskbar and Start Menu Settings,' and no one will be able to change their settings except you. Select 'Remove Drag-and-drop context menus on the Start Menu,' and no one except you will be able to remove or reorder items on the Start Menu. You can even stop anyone else from shutting down Windows by selecting 'Remove and prevent access to the Shut Down command.' (Of course, they can still shut down your PC the old-fashioned way: using the power switch.)
Among the many entries here are a lot of pointless ones, by the way. You can remove the Log Off entry on the Start Menu, for example, which certainly isn't high on my list of must-haves. But who knows, you may want to do that or any of the many other changes the Group Policy Editor allows. Go in there yourself and muck around; you'll find plenty to change.
TweakUI [Hack #8] can be used to hack the Taskbar to a limited degree. Go to its Taskbar section, and you can disable or enable balloon tips, and enable or disable warnings when you're low on disk space. Underneath the Taskbar section, you'll find a Grouping subsection that controls how Taskbar 'grouping' works. When you run too many programs with too many files open, all can't fit individually on the Taskbar. So, XP groups files from the same application with each other. For example, if you have four Word files open, it shows only a single icon for Word on the Taskbar, with the number 4 inside it. Click on the icon, and a list of all four files pops up. You can then choose which to open. TweakUI lets you control how that grouping works; you can decide whether to first group applications with the most windows, or instead first group applications that you use the least. You can also choose to group all applications with two or more windows open, three or more windows open, and so on.
Make this infrequently used tool useful. Ban programs from the Most Frequently Used Programs List, change the number of programs on the list, or do away with it altogether to make more room for the Pinned Programs List.
Windows keeps track of programs you use frequently and puts them on the Most Frequently Used Programs List, which appears on the new Windows XP-style Start Menu (not the Classic-style Start Menu) between the Pinned Items List at the top and the All Programs link at the bottom. The Most Frequently Used Programs List is a quick way to access programs you use often. But the rules for when programs appear on that list and disappear from the list are murky at best, and there appears to be no logic to what programs appear there.
There is some hidden logic, however. XP bans a variety of programs from the list. If any of the following words or phrases are included in the program's shortcut name, the program will be excluded from the list: Documentation, Help, Install, More Info, Readme, Read me, Read First, Setup, Support, What's New.
Additionally, the following executables are excluded from the list: Setup.exe, Install.exe, Isuninst.exe, Unwise.exe, Unwise3exe, St5unst.exe, Rundll3exe, Explorer.exe, Icwconn1.exe, Inoculan.exe, Mobsync.exe, Navwnt.exe, Realmon.exe, and Sndvol3exe.
There may be other programs you'd like to ban from the list, not just those that XP bans by default. Just because you use a program a time or two doesn't mean that you want it in on the Start Menu's Most Frequently Used Programs List. You can ban programs from the list using a Registry hack.
Run the Registry Editor [Hack #68] and go to HKEY_CLASSES_ROOTApplications. Underneath this key, you'll find a series of subkeys, each of which represents an application. The primary purpose of these subkeys, as you'll see later in this hack, is to determine whether the program appears on the Open With dialog box that appears whenever you try to open an unknown file type. But you can also add a value to any of the subkeys which will ban programs from appearing on the Most Frequently Used Programs List.
Look for a subkey that is the executable name of the application that you want to ban from the list-for example, visio.exe for the Visio business illustration program. Once you find the application's subkey, create a new String value for that subkey, named NoStartPage. Leave the value blank. Exit the Registry. You may have to reboot in order for the setting to take effect and the program to be banned from the list.
While you're rooting around in HKEY_CLASSES_ROOTApplications, you may want to hack the Open With dialog box (shown in Figure 2-6) that appears whenever you try to open an unknown file type. Each application's subkey in HKEY_CLASSES_ROOTApplications controls whether that particular application will show up on the dialog box.
If you want to ban a particular program from the Open With dialog box, look for the application's subkey underneath HKEY_CLASSES_ROOTApplications, add a String value named NoOpenWith, and leave the value blank.
If you don't want to muck around in the Registry, you can ban programs from the Most Frequently Used Programs list using TweakUI. (To learn how to download, use and run TweakUI [Hack #8]. Run TweakUI, and choose Taskbar >XP Start Menu. You'll see the screen shown in Figure 2-7, with a list of programs and checks next to most or all of them.
Each program with a check next to it will be allowed to appear on the Most Frequently Used Programs List. To stop a program from appearing on the list, uncheck the box and click OK.
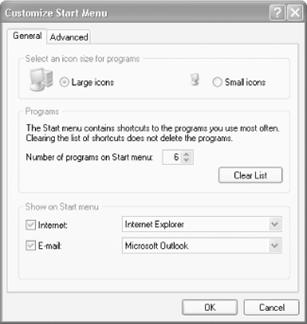
By default, the Most
Frequently Used Programs List has room for six programs, but you can change
that default and have more or fewer programs appear. Right-click on the Start
button and choose Properties ![]() Customize
>General. The Customize Start Menu dialog box, shown in Figure 2-8, appears.
To customize the number of programs to include on the list, edit the
'Number of programs on Start menu' box. You can choose any number
between 0 and 30. Be aware, though, that depending on your screen resolution
and whether you're using large or small icons, the entire list might not appear
if you choose a large number. No matter how high your resolution is, for
example, don't expect there to be room for 30 programs.
Customize
>General. The Customize Start Menu dialog box, shown in Figure 2-8, appears.
To customize the number of programs to include on the list, edit the
'Number of programs on Start menu' box. You can choose any number
between 0 and 30. Be aware, though, that depending on your screen resolution
and whether you're using large or small icons, the entire list might not appear
if you choose a large number. No matter how high your resolution is, for
example, don't expect there to be room for 30 programs.
The Pinned Programs List, just above the Most Frequently Used Programs List on the XP-style Start Menu, gives you instant access to any program you want. You, rather than the operating system, decide what programs go there. To add a program to it, drag the program's icon or filename to the Start Menu, and when the menu pops up, drag it to the spot on the list where you want it to appear.
This list makes a lot more sense than the Most Frequently Used Programs list: after all, you know better than XP what programs you want within easy reach. So, do what I do: kill the Most Frequently Used Programs List as a way to make more room for the Pinned Programs List. When you kill the Most Frequently Used Programs List, there will be a big blank space between the Pinned Programs List and the All Programs button. Drag programs to fill that space; the shortcuts will stay there until you delete them.
You can kill the Most Frequently Used Programs List with a Registry hack. Run the Registry Editor [Hack #68] and go to HKEY_CURRENT_USERSoftwareMicrosoftWindowsCurrentVersionPoliciesExplorer. Create a new DWORD called NoStartMenuMFUprogramsList and give it a value of . You'll have to reboot or log off and back on for the setting to take effect. When it does, the nice big blank space will be left for you to fill with pinned programs.
To create the perfect XP interface, you want to be able to give every desktop icon and system object the name and icon of your choice. Here's how to do it-even to objects that appear to be unchangeable.
Interface hackers (myself included) are a details-oriented bunch. We want to be able to control every part of the interface so that it reflects our personality. That means being able to choose our own icons for desktop items and system objects, give new names to system objects, and create our own balloon tips-for example, adding a balloon tip to the Recycle Bin saying 'Take Out the Trash!'
But it's not as simple as you might think. Microsoft has a way of protecting its own. For example, it won't let you change the text and balloon tips associated with a variety of system objects, such as the Recycle Bin, Outlook, Internet Explorer, My Computer, and My Network Places.
You can normally change both the name and the balloon text (text that appears when you hover your mouse over the icon) of all the icons on your desktop, but you can't change these. Normally, to change the name and balloon text of an icon, you first right-click on the icon and choose Properties. To change the name of the icon, you choose the General tab and, in the box at the top, type in the name that you want to appear beneath the icon.
Then, to change the balloon text, you click on the Shortcut tab and in the Comment box type in the text that you want to appear. When you're ready to make the change, click OK. The icon name and balloon text should now be changed.
But when you try to do this for system objects such as Outlook, Internet Explorer, My Computer, and Network Neighborhood, it won't work. The proper options don't appear when you right-click on them and choose Properties.
There are ways, however, to change them in any way that you want, so that you can create your own personalized XP interface.
The Registry is your best tool for personalizing XP. It will let you change both the text and balloon tip associated with system objects. First, you need to know the object's class ID (CLSID), which uniquely identifies each system object. Table 2-3 lists the CLSIDs for common desktop objects.
Table 2-3. CLSIDs for desktop objects |
|
|
Desktop object |
CLSID |
|
My Computer | |
|
Recycle Bin | |
|
Microsoft Outlook | |
|
Internet Explorer | |
|
The Internet | |
|
My Network Places | |
|
Briefcase | |
|
Dial-Up Networking | |
Armed with the proper CLSID, it's easy to change the name and balloon text of system objects. First, use Table 2-3 to find the CLSID for the object whose name or balloon text you want to change. Then run the Registry Editor [Hack #68] and go to HKEY_CLASSES_ROOTCLSID, a key that lets you change characteristics of system objects, and highlight the CLSID whose name or balloon text you want to change. For example, for My Computer, highlight the subkey HKEY_CLASSES_ROOTCLSID. Keep in mind that HKEY_CLASSES_ROOTCLSID has many CLSIDs listed under it, so it might take you a while to find the proper subkey.
Once you find the right subkey, if you want to edit the name of the object, open the Default value and type in the text that you want to appear underneath the object. If you want to edit the balloon text for the object, open the InfoTip value and type in the text that you want to appear as balloon text. Once you're done, exit the Registry and reboot.
You may also be able to force the changes to take effect without rebooting. After you exit the Registry, go to your Desktop and press F5 to refresh the screen. The new names and balloon tips might now appear.
You can hack objects besides names and balloon with this method. You can also change the desktop icons of system objects that appear to have unchangeable icons.
First, using Table 2-3, find the CLSID for the object whose icon you want to change. Then run the Registry Editor, go to HKEY_CLASSES_ROOTCLSID, and look for the CLSID subkey from Table 2-3 for the object whose icon you want to change. Open the subkey and then the DefaultIcon subkey under that. For example, to change the icon for My Computer, open the subkey HKEY_CLASSES_ROOTCLSIDDefaultIcon. Change the Default value to the path of the icon that you want displayed. Exit the Registry. You may have to reboot in order for the new settings to take effect.
|
To create your own customized XP interface, you need to be able to remove certain desktop icons. A Registry hack lets you remove any you want, including those apparently protected by XP.
Creating the perfect, customized XP interface doesn't only mean changing icons; it also means removing them. For example, many power users look down their nose at America Online, and yet, on many systems, that icon can't be removed easily.
America Online isn't the only icon protected this way; many others are as well. Which desktop icons are protected on your system will depend on your exact version of XP (for example, SP-1) and the manufacturer of your PC. The Recycle Bin is protected on all versions, but the America Online icon is protected on some systems, and not on others.
To customize XP to your liking, you'll want to be able to delete these protected icons. To do so, you'll need a Registry hack. Run the Registry Editor [Hack #68] and go to HKEY_LOCAL_MACHINESOFTWAREMicrosoftWindowsCurrentVersionExplorerDesktopNameSpace. Here's where you'll find various special desktop icons. They're not listed by name, but instead by CLSID-for example, for the Recycle Bin. Table 2-3 in [Hack #12] lists CLSIDs of common desktop objects, so use it to find the CLSID of the icon you want to delete.
To remove an icon from the desktop, simply delete the key of the icon-for example, for the Recycle Bin. Then exit the Registry, go to your Desktop, and press F5 to refresh the screen. The Recycle Bin icon should now be gone.
|
Some CLSIDs in HKEY_LOCAL_MACHINESOFTWAREMicrosoftWindowsCurrentVersionExplorerDesktopNameSpace can be deleted from the desktop without having to go through this procedure, but when you try to delete them they may give you a special warning message. For example, when you try to delete Microsoft Outlook from the Desktop, you get the warning message 'The Outlook Desktop icon provides special functionality and we recommend that you do not remove it.' If you'd like, you can edit that message to display whatever you want. In the CLSID's subkey-for example, for Microsoft Outlook-you'll find the value Removal Message. Edit this value to whatever text you want, and your warning message will appear whenever someone tries to delete the icon.
Keep in mind that when you remove desktop icons you're removing only icons, not the underlying feature or program. So, the Recycle Bin still works even if you remove its icon. To open the Recycle Bin, go to C:RECYCLER and open the folder inside it. To restore an item that's been deleted, right-click on it and choose Properties >Restore. Delete items as you would any other item.
|
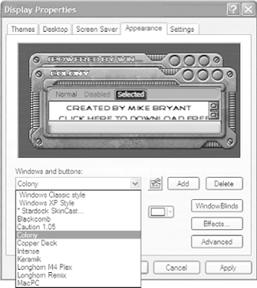
Customize the way XP looks and sounds, and dress it up with themes from the best sites on the Internet.
Themes control just about every part of the way XP looks and sounds, including its background wallpaper, colors, icons, cursors, sounds, fonts, screen saver, and the visual style of its windows and buttons. By default, your computer uses the basic Windows XP theme, which some people refer to as Luna because it was called that during XP's development. You can apply countless themes to XP, though it only ships with two: the basic Windows XP theme and the Windows Classic theme-a more stolid-looking theme, based on older versions of Windows, that uses rectangular windows and solid colors.
To change between themes, right-click on the desktop and choose Properties >Themes. Choose the theme you want to use from the drop-down list, as shown in Figure 2-9. Click on OK, and the theme will be applied.
Note that if you choose 'More themes online' from the drop-down list, you won't actually be able to get more themes online, so choosing that option is a bit of a bait-and-switch. When you choose it, you'll be sent to a web page suggesting that you buy Microsoft Plus! for Windows XP. There's no need to buy it if you're looking to use more themes, though. Instead, you can make your own and get thousands more online from non-Microsoft sites.
If you're like me (and most other people), you won't be happy with the basic themes that come with XP. What good is an operating system, after all, if you can't bend it, twist it, and make it your own?
There's no single, central place you can go to make themes in XP. Instead, you'll have to customize each part of XP individually and then roll it all up into a single theme. Once your system is using all the elements of your theme, save the theme with the following instructions.
Start off by right-clicking on the desktop, choosing Properties, and then customizing your desktop using the following tabs:
Desktop
Lets you customize the desktop background and color, as well as which system icons should appear on your desktop.
Screen Saver
Lets you choose a screen saver and control its functions and features. It also adjusts power controls for your monitor.
Appearance
Lets you customize the colors, style, and font size for windows, toolbars and buttons. It also controls effects, such as whether to use fade effects, whether to show shadows under menus, how to smooth the edges of screen fonts, and similar effects.
Settings
Lets you choose your screen resolution, color quality, and to choose advanced features such as the screen refresh rate.
Next, customize your
mouse pointers by typing main.cpl in the Start ![]() Run
box and pressing Enter. The Mouse Properties dialog box will appear, allowing
you to choose a preset pointer scheme or select individual pointers you want as
part of your theme.
Run
box and pressing Enter. The Mouse Properties dialog box will appear, allowing
you to choose a preset pointer scheme or select individual pointers you want as
part of your theme.
To choose system sounds for your theme, type mmsys.cpl from the Run box and press Enter. The Sounds and Audio Devices properties dialog box will appear. Click on the Sounds tab and choose a preset sounds scheme or select individual sounds for different system and program events.
When you're finished customizing, go back to the Themes tab of the Display Properties dialog box, choose Save As, and save the theme to either My Documents or to C:WindowsResourcesThemes. You can now use the theme as you can any other.
This has been a rather roundabout way of creating your own themes. And face it, few of us (including myself) are visual artists or sound artists. So, even better than rolling your own themes is going online and choosing from thousands you can download for free from many Internet sites. Some people make themes and post them as a hobby, many companies create themes as a way to market products, and movies and TV shows frequently create themes as a way to get free publicity.
Or course, there are many themes you can find online that may violate copyright laws; people create themes using characters, sounds, and people from popular entertainment and then post them online for others to use. The entertainment companies' lawyers will tell you the themes are illegal; on the other hand, others say that the themes fall under the fair use provisions of the copyright laws. Who's right? I don't know, and at this point, I'm not even sure that the courts do. As to which themes you can download and use, let your conscience be your guide.
A few popular theme sites are https://www.themeworld.com, https://www.topthemes.com, and https://www.themexp.org, and the themes section of the download site https://www.tucows.com. In addition, many general software download sites include theme sections. Movie studios are good places to find themes, as are web sites created for movies.
Depending on the theme that you download, you may have to install it differently, so check with the site from which you download, or check within the download itself. As a general rule, though, to use a theme that you download, install it into the C:WindowsResourcesThemes folder. Typically, a file with the extension .theme will be installed into that directory, and all the associated art, sound, icon, wallpaper, and cursor files will be installed into a subfolder of C:WindowsResourcesThemes. Once you've installed the new theme, choose it as outlined previously in this hack.
My hard disk is too full of themes to list them all, but I'll give you some of my current and all-time favorites that I found online. I favor several Wallace & Gromit themes from the https://www.topthemes.com site. (If you haven't come across them before, Wallace & Gromit are hilariously understated claymation animations from the Oscar-winning animator Nick Park.)
I must say, though, that, being an opera fan, my favorite theme of all time is the one I found on https://www.themeworld.com, based on Verdi's opera Don Carlo. There's nothing like starting up your computer in the morning and being greeted by the sweeping sounds of one of the most dramatic operas of all time. I can almost see the Grand Inquisitor making his way onstage, preparing to burn an idolater or two at the stake. Figure 2-10 shows the wallpaper from the theme, which was chosen to match the mood of the opera. Other elements include the Startup sound taken from the orchestral prelude of the opera's last act, the Shutdown sound from the last seconds of the opera, and many other sounds and icons.

Style-XP, shareware from TFT Soft LLC at https://www.tgtsoft.com manages your themes, lets you automatically rotate them on a schedule, and lets you easily customize them, among other features.
Control freaks, rejoice. With the powerful WindowBlinds utility, you no longer need to suffer with plain, common GUI elements such as the standard toolbars and scrollbars. You can modify and skin Windows to your heart's content.
In the years immediately following World War
II, Bill Levitt realized that GIs needed homes. He planned and built a
community outside
The Windows XP user interface is a 'cookie cutter' experience. Frequently, users don't bother to replace the Bliss (green field and blue sky) background, and it's even more rare for someone to change the Windows XP standard menu or colors. Fortunately, you don't have to settle for the same desktop as the guy in the next office. One way you can customize your Windows XP experience is to use themes [Hack #14]. An even better way is to use a software package called WindowBlinds to 'skin' (customize many aspects together) the user interface.
WindowBlinds is created by a company called Stardock and can be downloaded from their web site at https://www.stardock.com. It is sold by itself (for $19.95) or as part of a larger package called Object Desktop (for $49.95). There is also a free trial available from their web site.
|
After you install WindowBlinds, you will not notice any immediate changes. Activate the software via Control Panel >Display Properties >Appearance tab.
WindowBlinds makes several changes to the Appearance settings, as shown in Figure 2-11. The Add button allows you to search for and add skins to the 'Windows and buttons' popup and the Delete button removes skins from the popup. The small icon button to the right of the 'Windows and buttons' drop-down box leads you the Skin Studio web site (discussed a little later in this hack).
Choose a skin from the 'Windows and buttons' drop-down list. If a skin has more than one 'subdesign,' you can choose those from this dialog as well. A subdesign of a skin might be the same thing in different colors; a skin might look good in brown, green, and blue, so the author could include all three subdesigns in the package.
WindowBlinds includes a number of skins when the software is installed. One of the more interesting skins is called Colony. The Colony skin shows some of the abilities of WindowBlinds. Choose Colony from the popup and press the Apply button. Notice the textured areas around the window borders, the customized menu bars, and the smooth buttons on the taskbar. These are things that make WindowBlinds more useful than Windows XP themes and manually changing each aspect of the interface yourself.
Press the button labeled WindowBlinds when you have a skin selected for the WindowBlinds Advanced Configuration screen (shown in Figure 2-12). From this screen, you can modify almost any part of the user interface that WindowBlinds modifies.
By clicking on 'Basic Settings,' you can allow the skin to change the standard window buttons, the taskbar and toolbar buttons, as well as menu borders, progress bar controls, and the status bar-or any subset of these options (perhaps you want your own window buttons, for example). You can also allow the skin to change the background and have custom sounds. If, for some reason, you don't want to allow the skin to override any part of the user interface, you can change it from this screen. When you are satisfied with the changes you have made, click 'Apply changes' on the left of the screen.
Some skins look nice on the desktop but might not look so hot when viewed in another program. For example, some skins do not handle fonts correctly, which might interfere with word processing. WindowBlinds includes the ability to change its behavior for individual programs by clicking on the 'Per Application' item on the left side of the screen. From this screen, you can add programs to the list and modify their behavior individually.
The most popular programs today allow users to customize Windows. Around this notion, users have created independent web sites to share their ideas and their creations. One such web site is WinCustomize, at https://www.wincustomize.com.
The WinCustomize web site is free. If you find a skin that you like, you need only click on the Download link to download it to your computer. However, if you want to access some of the advanced features, you must register with the web site. There is no cost to register, but there are different levels of access, depending on your level of participation or willingness to pay. There is an advantage to registering with the web site; you are given better search tools, which is useful, considering that there are over 2,000 custom skins available for download!
WinCustomize is associated with Stardock, the makers of WindowBlinds and Object Desktop, and therefore it has the most skins for their software. If you aren't finding what you want, you might look at some of these other web sites:
https://www.lotsofskins.com
https://www.skinbase.org
https://www.velocityart.com
https://www.deskmod.com
https://www.deviantart.com
Each of these sites sports different features, but they all provide skins for various programs. The DeviantArt web site is unique in that it is more interested in digital art as an art form rather than simply pushing skins out the door. Some of the artwork on the site may not be suitable for everyone, but if you are interested in the digital medium, then this would be a good site to investigate.
If you can't find a skin that suits your tastes, you can create your own skin for WindowBlinds. Not only can you create a skin from scratch, you can also modify existing skins as you wish using SkinStudio. SkinStudio can be downloaded from the Stardock web site for free, but you are reminded that you should register the software.
Creating a skin from scratch is not a simple project. As with most facets of our life, practice in the art of making skins makes perfect. There are many elements of the Windows user interface that can be modified, and you will need good tools and advanced skills to make your own skin look correct. Instead of jumping into this at the deep end, let's learn from those who have perfected the art, by modifying an existing skin.
One of my favorite WindowBlinds skins is called Liquid2, which emulates the Macintosh OS X user interface (I'm a closet Mac user). One of the aspects of Liquid that I do not like is that the start button has the word 'Liquid' on it. I would prefer something a little more familiar, like the word 'Start.'
I used Photoshop to create the image in Figure 2-13. The Start button template consists of five separate subimages in the same file, each subimage being 57x23 pixels. The first subimage is the normal image, the next is when the button is pressed, followed by the disabled image, the focused image, and the default image. Once I am happy with the button, I need to save it somewhere I can access it. Since it is going to be part of the Liquid skin, I save the file as C:Program FilesStardockObject DesktopWindowBlindsLiquid2StartButtonNew.bmp.
![]()
Now that we have a suitable image, it's time to use SkinStudio
to modify the skin. Bring up the skin browser (File ![]() Edit).
The skin browser looks different than the standard file browser. Click on the
box next to WindowBlinds Skins, locate the skin named Liquid2, and press the
Edit button.
Edit).
The skin browser looks different than the standard file browser. Click on the
box next to WindowBlinds Skins, locate the skin named Liquid2, and press the
Edit button.
Figure 2-14 shows the edit window for the Liquid2 skin. The box in the top left is for exploring the many different elements in the user interface. The box in the top middle is for previewing the skin. The box in the top right is for modifying individual attributes of the user interface. The box in the lower left gives you help and allows you to zoom in on portions of the screen. In the lower right is another editor for individual attributes.
To replace the Start button, click on the box next to Desktop in the Explorer box, then click on Taskbar and finally Start Button, as shown in Figure 2-14. In the lower right, click on the popup next to the words Adjusted Image. Inside the list should be our new Start button named StartButtonNew.bmp. After you choose the new button, click the XP Taskbar button in the Preview area.
Once you are happy with the modified skin, press the Save button on the toolbar (the third button from the left). Saving a skin does not make it active. To make the skin active, press the Apply button on the toolbar (the seventh button from the left). The new Start button should now show up on the taskbar. If you press the button, the darker colored image should appear as long as the mouse button is pressed.
SkinStudio is a very complicated program with many settings that you can modify. The official documentation is rather limited, but there is an excellent tutorial that covers SkinStudio at https://www.aleksyandr.com/tutorial.htm.
Use Registry hacks to make a grab-bag of great interface changes.
Hidden in the mazes of the Registry are countless ways to hack XP's interface. Here are some of my favorites.
The System Tray, also called the Notification Area, is the small area on the far-right side of the Taskbar, in which utilities and programs that run in the background, such as antivirus software, show their icons.
I don't find it a particularly intelligent use of screen real estate, so I'd prefer not to see the icons there. To hide them, run the Registry Editor [Hack #68] and go to KEY_CURRENT_USER/Software/Microsoft/Windows/CurrentVersion/Policies/Explorer. Among other things, this key controls the display of objects throughout XP. Create a new DWORD called NoTrayItemsDisplay. Assign it a value of . (A value of will keep the icons displayed.) Exit the Registry and reboot.
While you're at the HKEY_CURRENT_USER/Software/Microsoft/Windows/CurrentVersion/Policies/Explorer key, you can also delete the My Recent Documents icon on the Start menu. Create a new DWORD called NoRecentDocsMenu. Assign it a value of . (A value of will keep the icon displayed.) Exit the Registry and reboot.
You might like to display some icons in the notification area but hide others. If so, you can hide icons on a case-by-case basis. You'll do it by delving through menus, though, not by hacking the Registry. Right-click on the Taskbar and choose Properties Taskbar. The Taskbar and Start Menu Properties dialog box appears. This dialog box, as the name implies, lets you control how the Taskbar and Start Menu look and function.
In the Notification area of the dialog box, check the box next to 'Hide inactive icons,' then click Customize. The Customize Notifications dialog box appears, as shown in Figure 2-15.
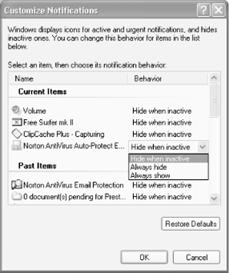
Click on the program's listing in the Behavior column, and choose from the drop-down menu to hide the icon when the program is inactive, always hide it, or never hide it. Click OK twice. Your changes will take immediate effect.
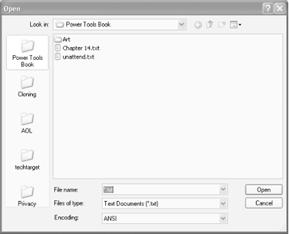
When you use certain Windows applications (such as Notepad) to open a file, on the left side of the Open dialog box are a group of icons and folders (such as My Documents, My Recent Documents, Desktop, My Computer, and My Network) to which you can navigate to open files.
Good idea, bad implementation. Do you really keep documents in My Computer? Unlikely, at best. It would be much more helpful if you could list only those folders that you use, and if you could choose to put any folder there, not just ones XP decides you need.
In fact, you can do it, with a Registry hack. It'll let you put just the folders of your choosing on the left side of the Open dialog box. Note that when you do this, it will affect XP applications such as Notepad and Paint that use the Open and Save common dialog boxes. However, it won't affect Microsoft Office applications and other applications that don't use the common dialog boxes.
|
Run the Registry Editor and go to HKEY_CURRENT_USERSoftwareMicrosoftWindowsCurrentVersionPoliciescomdlg3 This is the key that determines how common dialog boxes are handled. You're going to create a subkey that will create a customized location for the folders, and then give that subkey a series of values, each of which will define a folder location.
To start, create a new subkey underneath HKEY_CURRENT_USERSoftwareMicrosoftWindowsCurrentVersionPoliciescomdlg32 called Placesbar, and create a String value for it named Place0. Give Place0 a value of the topmost folder that you want to appear on the Open dialog box-e.g., C:Projects.
Next, create another String value for Placesbar called Place1. Give it a value of the second folder that you want to appear on the Open dialog box. You can put up to five icons on the Open dialog box, so create new String values up to Place4 and give them values as outlined in the previous steps. When you're done, exit the Registry. You won't have to reboot for the changes to take effect. Figure 2-16 shows an example of an Open dialog box customized this way.
If you want no folders to appear in common open dialog boxes, you can do that as well. In HKEY_CURRENT_USERSoftwareMicrosoftWindowsCurrentVersionPoliciescomdlg32 create a new DWORD value called NoPlacesBar and give it a value of . Exit the Registry. If you want the folders back, either delete NoPlacesBar or give it a value of .
To me, system beeps that my PC makes when it encounters certain system errors are like balloon tips-gnat-like annoyances that I can do without. So I turn them off using a Registry hack. Run the Registry Editor, go to HKEY_CURRENT_USERControl PanelSound, and find the Beep and ExtendedSounds String values. Set each value to No. Exit the Registry and reboot. The beeps will no longer sound.
This one isn't a Registry hack, but I couldn't resist putting it in here since it's one of the more useful ways to customize the interface. The Windows XP graphic for your user account on the Start Menu may not be to your taste, and your choice of other graphics to display there isn't particularly inspiring, either. After all, not everyone wants to be pictured as a rubber ducky, a snowflake, or a pair of horses.
But you're not limited to XP-supplied pictures for your user account: you can use any picture in .gif, .jpg, .png, or .bmp format. In this hack, I'll show you how to use your own picture.
To change your User Account picture to any one that you want, from Control Panel choose User Accounts, then pick the account you want to change and choose 'Change my picture' >'Browse for more pictures.' Navigate to the picture you want to use and click on OK. Figure 2-17 shows the screen you'll use to change your picture; it also shows the customized User Account picture I use during the winter holiday season.
If you have a digital camera or scanner attached to your PC, a button will show up on the screen shown in Figure 2-17 that lets you take a picture with the camera, or scan a picture with the scanner, and then immediately use that picture for your user account.
For those interested in saving keystrokes, there's a quicker way to get to the screen letting you customize your picture. From the Windows XP-style Start menu, click on your picture, and the screen appears.
Think you can't uninstall Windows Messenger, WordPad and similar components? Think again. This hack shows you how.
Windows has always had a problem with uninstalling software, and it's particularly poor at uninstalling its own utilities, such as WordPad or Windows Messenger. Uninstalling these utilities can free up hard disk space if your hard disk is starting to fill up. And if you never use Windows Messenger, you most likely will want to uninstall it, because the program frequently launches itself automatically even after you've shut it down repeatedly, kind of like Dracula returning from the dead. It won't bother you any longer if you uninstall it.
To remove XP utilities and components, you normally choose Control Panel Add or Remove Programs >Add/Remove Windows Components to get to the Windows Component Wizard, shown in Figure 2-18. To uninstall a utility or component, just follow the wizard's instructions.
Ah, but there's a catch. A number of Windows utilities and components-notably Windows Messenger and WordPad-don't show in the Windows Component Wizard, so there's no apparent way to uninstall them. But you can, in fact, remove these components. XP has a Setup Information file that controls what appears in the Windows Component Wizard. If you edit this file, you can force these components to appear in the Wizard, and you can then remove them as you would any others.
To start, use Notepad or another text editor to open the Setup Information file, sysoc.inf, which is generally found in the C:WINDOWSINF folder. For safety's sake, make a backup of the file before editing it, so you can revert to it if you need to. You should also set up a System Restore point before making the changes. To set up a System Restore point, choose Control Panel Performance and Maintenance System Restore and then follow the instructions.
|
When you open the file, look for the line describing the program you want to uninstall. Lines in the file have the format:
program=program.dll,OcEntry,program.inf,,numeralPrograms that are uninstallable all have the word hide (or HIDE) embedded in the string. When this word is included in the string, the program won't show up in the Windows Component Wizard. The Pinball game entry, which doesn't show up in the wizard, looks like this:
Pinball=ocgen.dll,OcEntry,pinball.inf,HIDE,7To force it to show up in the wizard, remove the word hide from the entry that refers to the component that you want to remove. For example, if you want to remove Pinball, edit its entry to this:
Pinball=ocgen.dll,OcEntry,pinball.inf,,7Save the sysoc.inf file, then run the Windows Component Wizard. The component will now show up in the wizard. Remove it as you would any other component.
Keep in mind that not all of the entries in sysoc.inf are as easy to understand as Pinball and WordPad. For example, if you want to remove Windows Messenger, look for the entry that starts with the text msmsgs. If you want to remove the Accessibility Wizard, look for the entry for AccessOpt. Table 2-4 lists the 'uninstallable' programs their entries in the sysoc.inf file.
Table 2-4. 'Uninstallable' programs and their sysoc.inf entries |
|
|
Entry |
What entry refers to |
| AccessOpt |
Accessibility Wizard |
| MultiM |
Multimedia components, including Media Player, Volume Control, and Sound Recorder |
| CommApps |
Communications components, including Chat, Hyperterminal, and Phone Dialer |
| AutoUpdate |
Windows Automatic Update |
| TerminalServer |
Terminal Server |
| dtc |
Distributed Transaction Coordinator |
| dom |
COM+ |
| WBEM |
Windows Management Instrumentation |
| Pinball |
Pinball game |
| MSWordPad |
WordPad |
| msmsgs |
Windows Messenger |
You may run into a few gotchas when trying to remove 'uninstallable' components. On some systems, you simply won't be able to remove Windows Messenger, because Windows Messenger won't show up on the Windows Component Wizard even after you edit the sysoc.inf file. And some components, such as Terminal Server, will show up in the wizard if you edit the sysoc.inf file, but the wizard still won't let you uninstall them.
You can use this same technique in reverse to hide components you don't want to be uninstalled accidentally. Simply put the word HIDE in the proper place in the entry that you don't want to show up in the Windows Component Wizard. For example, if you want to hide the uninstall entry for the fax utility, edit its entry by changing:
Fax=fxsocm.dll,FaxOcmSetupProc,fxsocm.inf,,7to:
Fax=fxsocm.dll,FaxOcmSetupProc,fxsocm.inf,HIDE,7Make any XP window transparent and control the amount of transparency for each.
One of the cooler new interface features of XP is the ability to use transparent or semitransparent windows, in which the background can show through the current window. But there's a problem with that feature: very few programs take advantage of transparency, and there is no way built into XP for you to make windows transparent. So, to a great extent, the feature is worthless.
However, a number of downloadable programs tap into that XP capability and let you make any window transparent. My favorite is Glass2K (https://www.chime.tv/products/glass2k.shtml), because it's small, it's simple, and above all, it's free. It doesn't muck around with your system by making Registry changes or installing .dlls. It's just run an executable file, and with it you can make any window transparent. When it's running, go to the window you want to make transparent, and press Ctrl-Shift and a number from 0 to 9. 9 makes the window the least transparent, 1 makes it the most transparent, and 0 sets it so that it's solid, with no transparency. You can also right-click on a window, and select the degree of transparency from the program's pop-up menu. The window will keep that degree of transparency as long as you run the program and keep the transparency setting. Figure 2-19 shows the results of making windows transparent with the program.
Trans-XP is another downloadable that lets you make windows transparent. It's shareware, and is free to try, but costs $14.95 if you decide to keep it. It's available from https://www.totalidea.com.
|
Another similar program is Actual Transparent Windows. It's also shareware and is free to try, but it costs $19.95 if you decide to keep it. It's available from https://www.actualtools.com.
|
There's one drawback to using transparent windows: it takes up processing power and RAM, so it may slow down your system. The fewer transparent windows you create, the less processing and RAM are used, so handle transparent windows with care.
Don't settle for the icons and cursors that Microsoft built for you. Roll your own with downloadable software
If you're not happy with the cursors and icons that XP ships with, don't despair. You can easily make your own with Microangelo, from https://www.microangelo.us. It's shareware and free to try, but if you continue using it, you're supposed to pay $54.95. You can create animated icons or regular icons-in both the standard 32-pixel and large 48-pixel sizes-and a variety of cursors as well. Use paint-type tools and build your icons and cursors on a grid, as shown in Figure 2-20. A preview is available, so you can see the effects of what you do as you work.
What I find most useful about the program is that you can import existing cursors, icons, or other graphics, edit them, and then save the edited version. I'm no great artist, so I find editing existing graphics much easier than creating ones from scratch. The fine art of pixel placement in tiny icon images can be trickier than expected.
For a big selection of cursors, get CursorXP Free from https://www.windowblinds.net, the same company that makes the interface-customizing program WindowBlinds [Hack #15]. CursorXP Free is free, as the name implies. Install it, and a new CursorXP tab is added to the Mouse Properties dialog box, shown in Figure 2-21.

The Mouse Properties dialog box lets you choose from a variety of new cursors that ship with the program. By clicking on the Options/Configure button at the bottom of the dialog box you can also customize how each cursor works and looks. (The button toggles between Options and Configure, depending on whether you click on the Configure button at the top of the dialog box.) You can also import cursors that you've created with Microangelo or another program.
If you want a more powerful version of the program that includes special effects-the ability to colorize cursors, add trail effects, and more-you can try CursorXP Plus from the same site. The Plus version costs $10 to register.
If you want to create cursors from scratch, your best bet is Axialis AX-Cursors (https://www.axialis.com). It's shareware and free to try, but it costs $14 if you decide to keep using it. In addition to drawing tools, it lets you convert any existing graphic into a cursor. It also lets you do a screen capture and convert what you've captured to a cursor, and it includes an exceptionally wide range of cursor-editing tools. To give you a sense of its power, I'll create a cursor from scratch and make it larger than normal. If you have a parent with poor eyesight, you can make custom cursors that he can easily see.
Since I'm not artistically inclined, I'm not going to use the program's drawing tools. Instead, I'm going to search the Internet for a graphic that I'll start with, then have AX-Cursors automatically turn it into a cursor. Then I'll resize it to be very large.
A rocket is a good shape for a cursor, so I search for a drawing of one by doing a Google image search by going to https://www.google.com, clicking on images, and then searching for the word rocket. Rather than a photograph, I find a bold-looking drawing of a rocket, with a limited number of colors; that will make the best cursor. Figure 2-22 show the results of the search. I'm going to use the rocket in the lower-right portion of the screen as a starting point.
I save the graphic to my hard disk by clicking on it to see the full-size graphic, then right-clicking on the large image, choosing Save As, and saving it to my disk. AX-Cursors can import graphics only in a handful of format: .bmp, .jpg, .dib, and rle. In this case, I have a .gif file. So, before importing it, I convert it to a .jpg file [Hack #86].
Now I run AX-Cursors. I want to create a large cursor, so I first set the cursor size by choosing Draw >New Image Format. I have the option of saving it as an icon of 32 x 32, 48 x 48, 64 x 64, or 72 x 7 I choose the largest size and the 256-color option.
Next I choose Draw >Import Bitmap, and choose the rocket image that I've just saved. The program lets me crop the image so that I can just import part of it, but in this instance I want the whole thing, so I don't crop it. I can also set the cursor's transparency. In this instance, because the cursor is going to be for someone with eyesight problems, I choose no transparency. After I'm done, the picture is converted into a cursor that I can edit, as shown in Figure 2-23. Notice that you're given tools to edit the cursor in the middle of the screen. In the right side of the screen, you can see a picture of the original graphic.
The cursor looks good to me, so I save it by choosing File >Save. It's now ready to be used. So I exit the program, choose Control Panel >Printers and Other Hardware >Mouse >Pointers >Browse and choose the icon I've just created. It's done; you can see it in action in Figure 2-24.
![]()
For a collection of more than 7,000 free icons you can download and use, go to https://www.iconarchive.com. Also see https://www.iconbazaar.com for a collection of free icons.
For a collection of free cursors to download and use, go to https://www.1freecursors.com. Note that some cursor and icon sites use a lot of pop-up ads. To get rid of them, see [Hack #33].
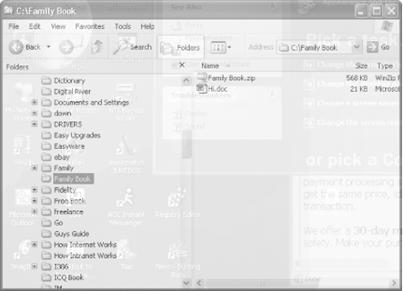
Don't like those cute XP graphics? Here's how to make Windows XP look more like Windows 2000.
Sometimes, no matter how much you tweak, you still don't like what you see. After sampling the hacks in this chapter, I decided that I didn't care for the cartoon-like graphical look of Windows XP (see Figure 2-25).
Since XP is so customizable, it only took a few seconds to make my start menu and desktop look like the old standby Windows 2000.
First, let's change that cluttered XP start menu (see Figure 2-26) to a classic Start menu.
Right click anywhere on the taskbar at the bottom of the screen and select Properties from the popup menu. Go to the top of the window and select the Start Menu tab. Click the button for Classic Start menu. While you're in this tab you also have the option of customizing the Classic Start menu. Choose Customize to add or remove programs from your start menu, enable options such as drag and drop, or display Favorites. Hit OK and your start menu will now look like the one shown in Figure 2-27, just like Windows 2000.

Now that you've cleaned up the Start menu, it's time to change the look of your desktop. Though it's not a necessary step to making your desktop look like Windows 2000, your notification area (the lower right-hand corner near the clock) will be a lot neater if you go back to the Taskbar tab, and uncheck Hide inactive icons. Windows 2000 doesn't have the graphical features of XP, so hiding the icons before switching over is a good idea.
Right click anywhere on the desktop and choose Properties from the popup menu. Select the Themes tab and under Themes, scroll down to Windows Classic. Hit OK and your desktop will now look like the one shown in Figure 2-28.
Your desktop now has the icons, the window setup, the Start menu, and the general look and feel of Windows 2000.
|
Politica de confidentialitate | Termeni si conditii de utilizare |

Vizualizari: 1034
Importanta: ![]()
Termeni si conditii de utilizare | Contact
© SCRIGROUP 2025 . All rights reserved