| CATEGORII DOCUMENTE |
| Asp | Autocad | C | Dot net | Excel | Fox pro | Html | Java |
| Linux | Mathcad | Photoshop | Php | Sql | Visual studio | Windows | Xml |
Adding HTML Help toYour Applications
Online help has become pretty much a given these days. The previous version of Windows Help, WinHelp, was tough to implement and not that useful. The new version, HTML Help, is wonderful. In this chapter, I'll show you how to use HTML Help Workshop and how to incorporate an HTML Help file with your application.
I make no bones about it. I like HTML Help. A lot of people have made fun of me for it, but I think it's one of the nicest features in Visual FoxPro 6.0-the ability to include a .CHM file with your application. And even better than me liking it, users like it a lot, too!
I was about 80% done with a sizable (14 MB .EXE) VFP 6.0 application, named TWISTOR, when we started addressing the issue of help. This app had been a rewrite (and major upgrade) of an old FoxPro DOS system. My customer had just assumed that they'd do the same for help as they did last time-hold a few training classes and include a printed manual. Unfortunately, this system was so much larger and more complex that a training class wasn't going to be sufficient, and the complete manual would have ended up being 500 pages.
I suggested online help, but they scoffed because their experience with online help was less than positive. Then I showed them what an HTML Help system could look like. They oohed and aahed. Then I showed them the search and index capabilities. They were sold. The most telling comment of the meeting was, "I would even use this help system myself!" When I was done building their online help file, we had 293 help topics covering more than 500 pages, yet it was always available to anyone using the system, it was much more flexible than a manual, and it could be updated quickly and easily.
In this chapter, I'm going to show you how to be a hero with your users by providing a kick-ass help system based on HTML Help.
What is HTML Help?
I'm tempted to respond to this question with a tart, "HTML Help is wonderful, that's what it is!" answer, but I've decided to let you come to this conclusion yourself.
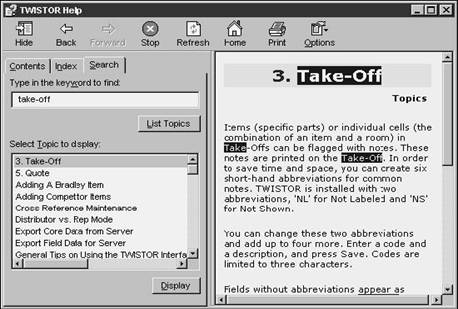
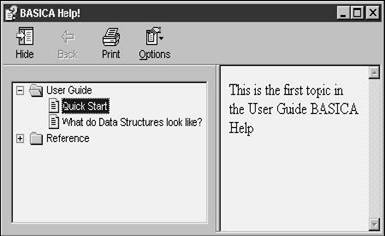
The easiest way to explain HTML Help is to show you an example of it. If you call up the help file for the application I just mentioned, you'd see a screen as shown in Figure 25.1. While VFP (and Visual Studio) help is also an HTML Help file, it is rendered by a Microsoft custom engine that we don't have access to. The special engine includes the menu bar and some other capabilities. Thus, to show you what you can ship to your customers, I'll demonstrate through an application of mine.
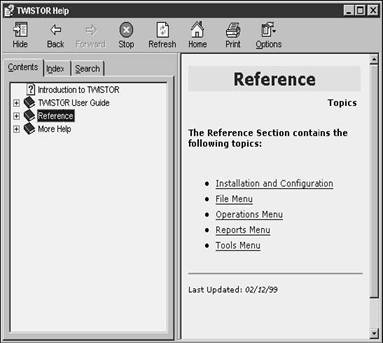
As you can see, I've divided this help file into an introduction and three sections. The Introduction is the "executive summary" that you'd typically put in a proposal or specification; for me, it's just a one- or two-page document. It goes to the level that you'd explain at a cocktail party if someone asked you (with real interest), "So what does TWISTOR do, anyway?"
The User Guide is the "How To" section of the manual and is subdivided into a number of functional areas. Each area then has one or more topics. Each of these topics contains step-by-step instructions and an explanation of the context of the instructions for a specific function.
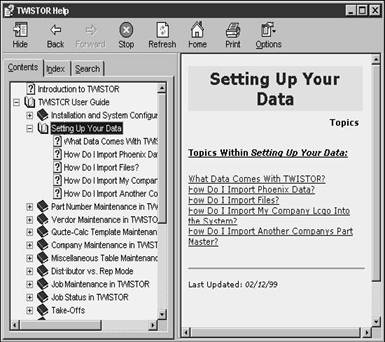
In Figure 25.2, I've expanded the User Guide section to show each of the functional areas, such as Installation and System Configuration, Setting Up Your Data, Part Number Maintenance, and so on.
Under the functional area of Setting Up Your Data, there are specific topics, including an explanation of the data that initially ships with TWISTOR, and then a series of instructions for moving data from other systems into TWISTOR.
The left pane contains a TreeView control that operates like other Explorer interfaces you've worked with. Each section that has a (+) or (-) sign can be expanded or contracted to drill down through a hierarchy of sections, subsections, and topics. Although I've displayed just two levels, you can go deeper-indeed, you are more likely to start confusing users with a plentitude of levels than you are to run into some limit.
If this were all that HTML Help did, it'd be pretty swell. I really like the hierarchical organization that allows you to drill down as need be. It's easy to go through a manual and get lost trying to remember which heading or subheading you're following unless the graphics people were blatant about heading styles: "THIS IS A LEVEL ONE HEADING" and "this is a level two heading." Because you can expand multiple levels at will, you can get a bird's-eye view a lot quicker.
Furthermore, having a topic page in the right pane tends to keep the discussion condensed-if it gets too long, it's hard to read in a single-topic page, and thus cries out for being broken up.
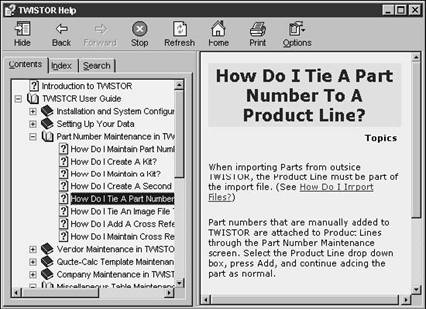
But there's more than just a hierarchical view of your help file. The grayscale images in this book don't display hyperlinks well, so it's a bit hard to see, but each of the topics in the right pane of the Setting Up Your Data topic in Figure 25.2 is actually a hyperlink to each topic. And, of course, you can embed hyperlinks in text as well, as shown in Figure 25.3.
Index and Search tabs
It's often not enough just to drop a big help file on your users' desks. You want to give them the ability to find stuff easily. The Index and Search tabs allow you to do so without a lot of effort on your part.
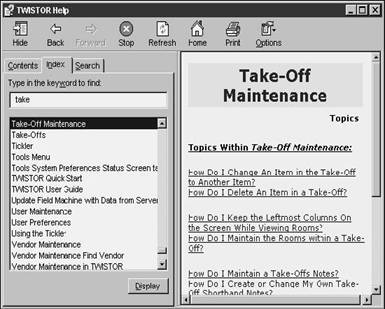
You can create a list of index entries that point to specific topics. The user then enters part of a keyword in the text box above the index entries list box. Entries matching the keyword will be displayed in the list box and the user can select the appropriate topic, as shown in Figure
25.4.
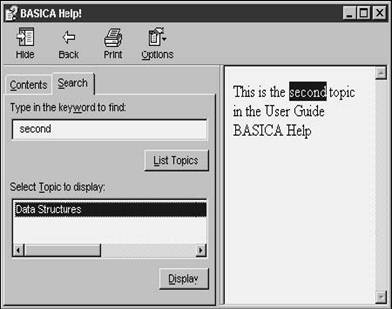
You can also let the user perform a full-text search of the help file by using the Search tab. Similar to the Index tab, the user will enter a keyword in the text box, click the List Topics button, and a list of topics containing the keyword will appear in the list box below. Selecting an entry in the list box will display the topic in the right-hand pane, as shown in Figure 25.5.
So that's what the user sees. What's underneath? What does the plumbing look like?
An HTML Help file consists of a single binary file on disk with a .CHM (pronounced "chum" by 'softies and "chim" by the rest of us) extension. In order to run it, the HTML Help rendering engine (HH.EXE) and some ancillary components must be installed on the machine your application is running on. In a minute I'll discuss what's entailed in including these files in your application in order to ship it.
To create a .CHM file, you use a tool called HTML Help Workshop. You add a series of HTML files (yes, like those on the Web) to it, much like you add files to the Project Manager in Visual FoxPro, organize them into levels and sublevels, set a bunch of options, create an index, mark search keywords, and compile the results into a .CHM file.
Creating an HTML Help file using HTML Help Workshop
HTML Help Workshop (HHW) is a Microsoft tool that comes with Visual Studio and is available for download from the Web. HHW is updated fairly regularly, so if you don't want to wait for the latest Visual Studio Service Pack, or if you just want to work with HHW by itself, you should pop up to the Web and grab the latest version.
Where is HTML Help Workshop?
I was going to try to show you where to go, but, of course, the download site has changed twice since I last downloaded an update, and I can't find it as I'm doing this chapter. Your best bet is to hit msdn.microsoft.com and click on the Downloads link. You'll probably have to log on, or sign up, or plug in, or something.
Eventually, I hope, you'll find a file called HTMLHELP121.EXE or something similar, and install it. The version I'm running right now is 1.2 (4.73.8302.0), whatever that means- I've heard that 1.3 might be out soon.
Before you create your Help project
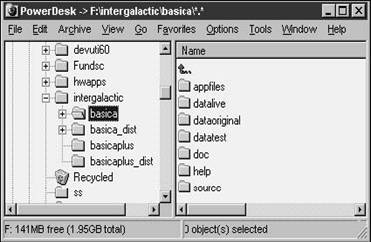
Before you run the HTML Help Workshop program itself, you'll want to prepare a couple of things. The first is a directory where your help project will live. I'd recommend a Help directory under the application directory-on the same level as your Documentation directory as described in Chapter 16. See Figure 25.6.
After you've set up your directory, you'll also want to gather all the files to be used in your HTML Help file. These files must be HTML files, and there are about a thousand different ways you can create them. I've always written the help file in Microsoft Word, and then created HTML files from within Word. Depending on which version of Word you're using, you'll have varying degrees of success with this.
I've found that Word 97 is much friendlier than Word 2000 because it just goes ahead and creates an HTML file and extracts any images it needs into files named IMAGE1, IMAGE2, and so on. Word 2000 tries to be clever, creating an HTML file and a pair of subdirectories, one containing image files that were extracted from the Word document, and another that contains a bunch of XML pointers. Unfortunately, I think there are still some bugs in this Word 2000 process-we continue to have problems converting chapters in our books to HTML files that can be successfully read by HTML Help Workshop. Of course, it might be a bug in HTML Help Workshop that can't handle the new Word 2000 files-hard to say at this time.
But eventually you'll have a series of HTML files (and associated image files). Pop those into your Help directory for your application, or wherever you want to work with them, and continue on.
Creating your HTML Help project
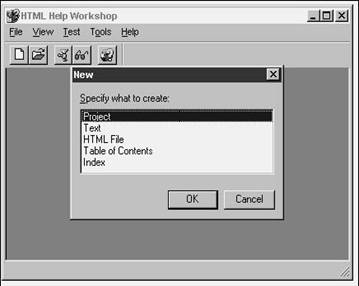
Finally, now, you can run the HTML Help Workshop program-off the Start menu unless you've already gotten ahead of class and created a desktop shortcut. Select the File, New menu option. You can choose several different types of files to create, but first you'll want to pick a Project, as shown in Figure 25.7.
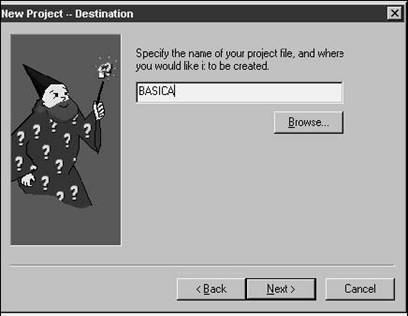
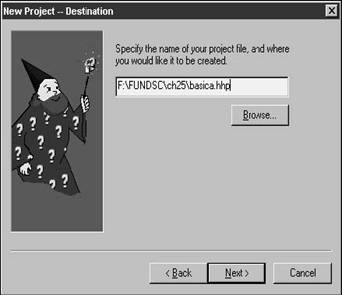
You'll then be asked to name your HTML Help project and identify where it's supposed to be created, as shown in Figure 25.8. This is a fairly lame interface, because it doesn't use standard controls to ask you to perform the task. If you just click the Next button, you'll end up creating an HTML Help project in the Program FilesHTML Help Workshop directory on drive C or wherever you installed it. You don't really want to do this, do you? Instead, you should point to the Help directory under your project directory.
Instead, click the Browse button to open the File, Open dialog, and navigate to the desired directory. Then enter the name you want to use for your project file (yes, even though the dialog says "Open") and click OK. The path and project file name will be filled in for you in the wizard, as shown in Figure 25.9.
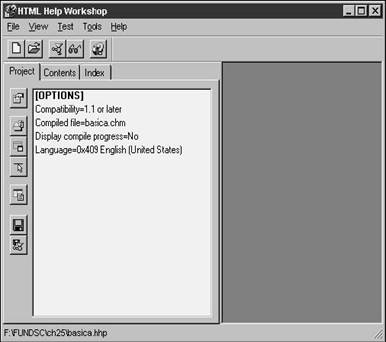
You'll be asked a few more questions-which you can ignore for the time being-and after you click the Finish button, you'll get an empty project as shown in Figure 25.10.
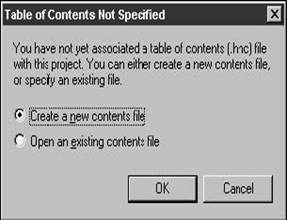
Now that you've got a project, you're going to want to start organizing the hierarchy of topics. Click the Contents tab.
You'll be warned that you don't have a Table of Contents file yet, as shown in Figure
25.11. Select "Create a new contents file" and click OK. You'll then be asked for the name of the Table of Contents file (with an .HHC extension). I
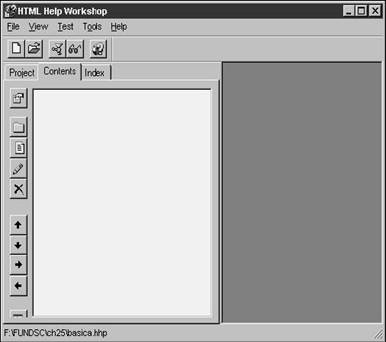
always accept the default "Table of Contents.HHC" name. You'll then see the empty Contents tab, as shown in Figure 25.12.
You'll want to first add sections and levels, and then add topics to those sections and levels. I'm going to build a simple help file with two sections, add a sublevel to the first section, and then add two topics to the sublevel.
Create levels for your help file
There are 11 buttons down the left side of the Contents tab (including one that is partially hidden and another that is completely hidden) in Figure 25.12. These are, in order:
. . Contents properties
. . Insert a heading
. . Insert a page
. . Edit selection
. . Delete selection
. . Move selection up
. . Move selection down
. . Move selection right
. . Move selection left
. . View HTML source
. . Save file
It should be obvious what these do, now that you know their names.
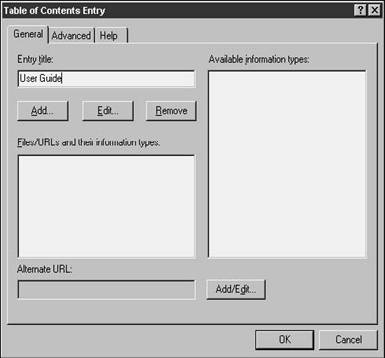
To create levels for your help file, you should first add headers for each section. In this example, the two headers are User Guide and Reference Guide. Click the Insert a heading button to open the Table of Contents Entry dialog as shown in Figure 25.13.
You might be wondering why the button says "Insert a heading" but the title
![]() bar of the dialog says "Table of Contents Entry."
You'll find inconsistencies like this throughout the HTML Help Workshop tool.
While wonderfully powerful and generally easy to use, HHW is a very immature
product, and has a lot of "fit and finish" issues that still need to be fixed.
bar of the dialog says "Table of Contents Entry."
You'll find inconsistencies like this throughout the HTML Help Workshop tool.
While wonderfully powerful and generally easy to use, HHW is a very immature
product, and has a lot of "fit and finish" issues that still need to be fixed.
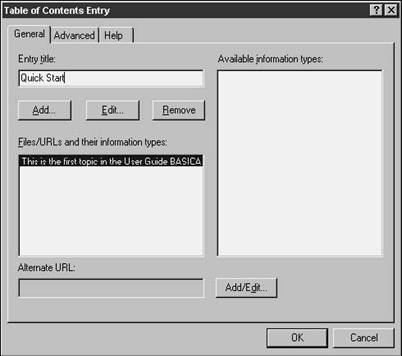
This dialog is sort of confusing, because it can do a lot of things. For example, if you want to have an HTML page associated with the User Guide section heading, you can click the Add button to grab an existing HTML page on disk.
Right now, though, I'm going to take the easy way out and just enter a new entry title, as shown in Figure 25.13, and then click OK.
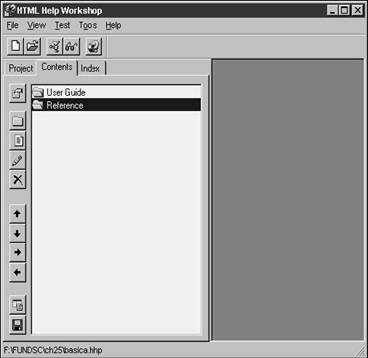
Repeating these steps for a Reference section heading produces a Table of Contents tab that looks like Figure 25.14.
Next, it's time to add topics.
Add topics underneath a section heading
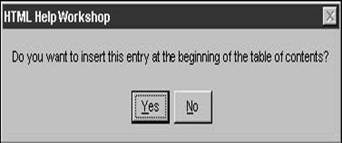
Select the User Guide section heading, and click the Insert a page heading button. You will be asked whether you want to add this entry at the beginning of the Table of Contents, as shown in Figure 25.15. If you answer yes, the page you add will be placed in the Table of Contents above the User Guide section heading. This is how I created the Introduction title page for the TWISTOR help file shown in Figure 25.1.
Answer No, and the Table of Contents Entry dialog in Figure 25.13 will appear again. This time, however, it's time to add a real page-not just a section heading. In fact, if you just type an entry title and then try to click OK, you'll be warned that you must associate a file or a URL with the entry.
The next couple of steps get tricky. You'll click the Add button immediately below the Entry title text box, and the Path or URL dialog will appear as shown in Figure 25.16.

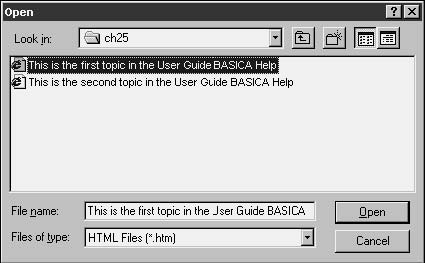
You can manually enter a file or URL in the text box at the bottom of the dialog, or click the Browse button to open yet another Open dialog as shown in Figure 25.17. Tired of cascading dialogs yet?
Select the file you want, click the Open button, and then click the OK button to get back to the Table of Contents Entry dialog. You'll want to type an Entry title if you haven't already, as shown in Figure 25.18, and then click OK. I named this entry "Quick Start."
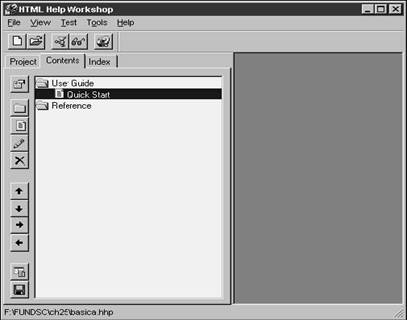
When you close the Table of Contents Entry dialog, you'll see your page added to the Contents tab. You can use the four arrow buttons to adjust the position of the page if it landed in the wrong place, or if you want to move it somewhere else. See Figure 25.19.
You can have a grand time adding and rearranging section headings and topic pages. Save your work every so often, as you would in any other tool. Once you're done, you can build your .CHM file to see what it looks like, or you can add index and search capabilities.
Setting .CHM file options and building the .CHM file
Building your .CHM file is fairly trivial, but you'll probably want to set a few options first. You can set some options from the Project tab and others from the Table of Contents tab.
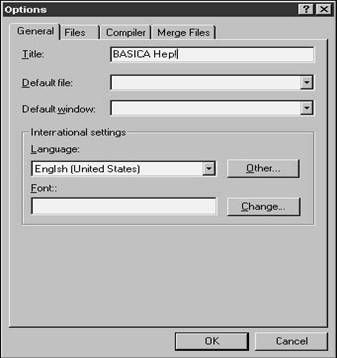
The first option to set is the string that is displayed in the title bar of your .CHM file. Select the Project tab and click the Options button to open the Options dialog as shown in Figure
25.20. Type the title in the Title text box.
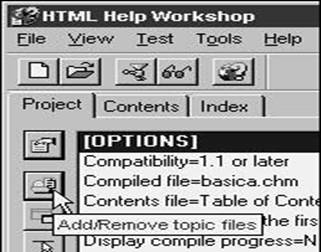
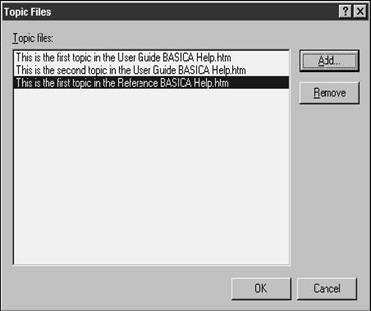
The next option to set is the default page-the topic page that displays when the .CHM file is first opened. To do this, you'll first need to add the topic file to the help project, just as you do with VFP projects. To do so, select the Project tab and click the Add/Remove topic files button (the second from the top) as shown in Figure 25.21.
You'll get the Topic Files dialog as shown in Figure 25.22. Click the Add button to add one or more topic files to the list, and then click OK. Why add more than one? I'll explain in the section on indexing.
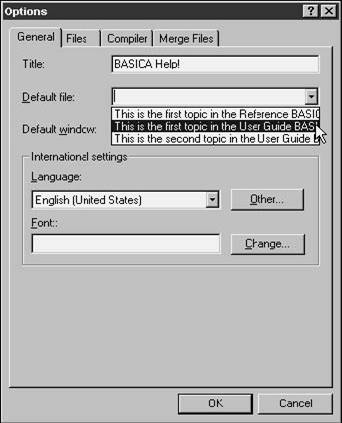
Once you've added the topic files to the project, the Default file combo box in the General tab of the Options dialog will be populated with those files. Select the topic file you want as your default file, as shown in Figure 25.23.
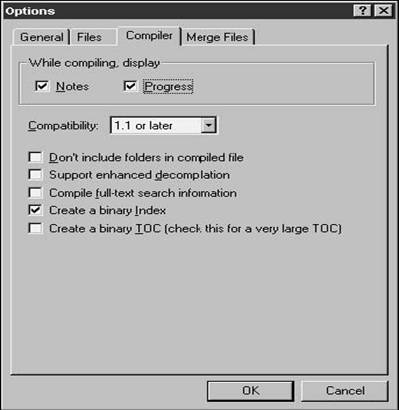
Another option you might want to select right away is on the Compiler tab of the Options dialog. Select the Progress check box in the "While compiling, display" box as shown in Figure 25.24 so that you can see what's happening. In a small project, you won't really notice or care, but in a project with 100 or more files, you might end up waiting for a while, and you'll want to know that the compilation is running-not locked up.
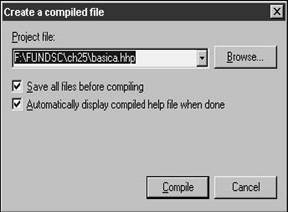
When you're done selecting options, click the Compile button (there are several of them- including one on the top toolbar and another on the bottom of the list of buttons down the left side of the Project tab). You'll be greeted with the dialog shown in Figure 25.25.
In the build I'm using, checking the Automatically display compiled help file check box has no effect-I still have to run the .CHM file manually by double-clicking it in Windows Explorer. Nonetheless, doing so produces the simple .CHM file as shown in Figure 25.26. A lot easier than the rigmarole necessary for WinHelp.
But you want more, right? Always more. What about those fancy Index and Search tabs?
Add index and search capability
Adding search capability is trivial, actually. Look back to Figure 25.24 and notice the Compile full-text search information check box about halfway down the dialog. Checking this box and recompiling will automatically provide a Search tab as shown in Figure 25.27.
Adding an index is considerably more complex, comparatively.
First, you need to create an index file with keywords mapped to specific topic pages. Then you have to add the index file to the help project. Third, you need to recompile your help project.
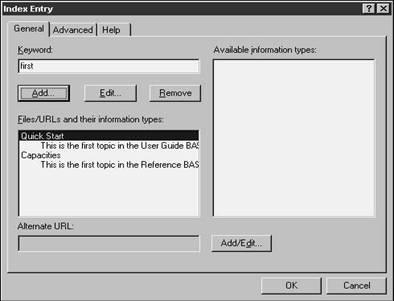
Suppose you wanted to create keywords for "first" and "second," and map the first User Guide and Reference pages to the "first" keyword, and the second User Guide page to the "second" keyword.
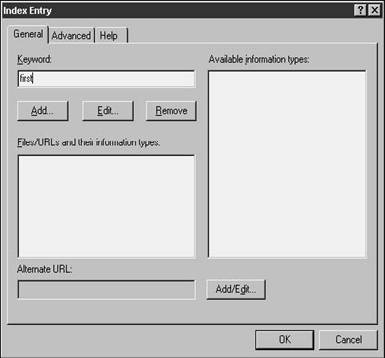
First, select the Index tab in the HHW. Next, click the Add a keyword button (the one with the key) to open the Index Entry dialog, as shown in Figure 25.28. Add the keyword you want, such as "first."
Next, click the Add button to open our old friend, the Path or URL dialog, as shown in Figure 25.29. You'll notice a couple of odd things in this dialog. First, you don't see file names in the HTML titles list box-instead, there are phrases of some sort. Where did these come from?
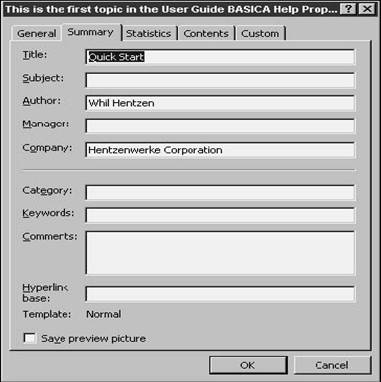
When you create a Word document, you can edit the properties for the document by selecting the File, Properties menu option. When you do so, you get the dialog shown in Figure
25.30.
The title of the Word document gets translated to the HTML file's <title> tag. If you didn't do so, you could manually edit the HTML file and replace the <title> tag yourself, but that would be a pain, because if you changed the Word file and then resaved to HTML, you'd lose your change to the <title> tag, right?
This <title> tag in the HTML file is where HHW gets the descriptions in the HTML titles list box. This has nothing to do with the Table of Contents entries, so I usually make the title the same name as the Word document file-it's easier to identify the file later on.
The second question you might have relates to the two "Data Structures" entries in the HTML titles list box. There are a couple of reasons you might run into this. The first is that you copied a Word document, and forgot to change the title of the copy. This happens to me all the time. You can determine which title belongs to which document by looking at the File or URL text box while the HTML title is highlighted.
The other thing that might have happened is that you added a HTML file to the project, and then removed it later for one reason or another. HHW is not very good about cleaning up after itself when you delete files-and here's one example. I added a file (which had a title of "Data Structures") and then deleted it. Unfortunately, the file list still thinks it's there, so it displays two copies. I hope this will be fixed in a future version, because it means that mistakes on your part when you delete files can be very confusing.
Let's suppose, however, that we can overlook this minor transgression. You can add more than one topic to a keyword, ending up with an Index Entry dialog like in Figure 25.31.

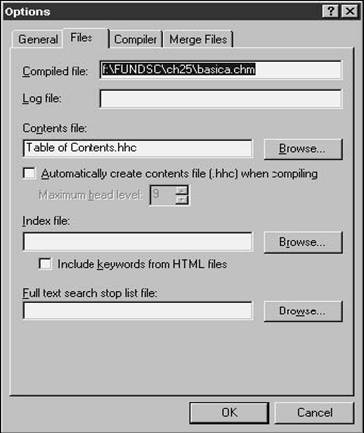
Continue to add keywords to your index list until you're done, and ready to compile again. However, you still need to tell HHW to use that index information. Pop over to the Files tab of the Options dialog as shown in Figure 25.32, select the Index file (it's got an .HHK extension, and I always keep mine named "Index"), and check the Include keywords from HTML files check box. Then save and compile away!
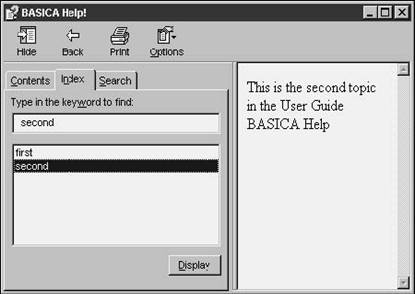
When you compile and run your .CHM file, you'll get an Index tab in between the Contents and Search tabs, as shown in Figure 25.33.
Now that you're acquainted with the basic HTML Help mechanism, you'll
![]() probably want to play around with it a bit. If you
get serious about building HTML Help for your applications, you'll probably
want to use a third-party tool- I would recommend Rick Strahl's HTML Help
Builder, described in Chapter 16. Go back and check it out right now! There's
an excellent tutorial for HTML Help Builder by Doug Hennig in the December 1999
issue of FoxTalk (www.pinpub.com/foxtalk).
probably want to play around with it a bit. If you
get serious about building HTML Help for your applications, you'll probably
want to use a third-party tool- I would recommend Rick Strahl's HTML Help
Builder, described in Chapter 16. Go back and check it out right now! There's
an excellent tutorial for HTML Help Builder by Doug Hennig in the December 1999
issue of FoxTalk (www.pinpub.com/foxtalk).
Including a .CHM file with your VFP application
There are three things you might want to do. The first is to have your VFP application call your .CHM file. Sounds reasonable, doesn't it? The next thing you're probably going to want is context-sensitive help-so when a user clicks "Help" while a form is open, a help topic for that form is displayed. And the third thing is to include your .CHM file and the HTML Help rendering engine with your distribution files.
Calling a .CHM file from your VFP application
This is pretty easy-see for yourself by simply grabbing the .CHM file for this book (F.CHM) and putting it in your VFP path. Then, in the Command window, issue the commands:
set help to F.CHMhelp
and the Fundamentals HTML Help file will appear. These two commands are all you need in your application as well. After you include them in, say, your startup or top-level program, pressing F1 or selecting the Help menu option (assuming, of course, that your Help menu option runs the HELP command) will bring up the HTML online help and display the default topic page.
Creating and calling context-sensitive help topics
The next thing you're going to want to do is include context-sensitive help in your application. In other words, clicking on a Help button somewhere on a form will bring up a help topic specific to that form instead of the default topic page in your .CHM file.
There are three steps to this process:
1. Identify your help file, as I showed in the previous section:
set help to F.CHM
2. Call a specific topic in the .CHM file from the form. First, I put a Help button on every form in my application (via the Form class, of course). Next, I have a Help() method on that form (also courtesy of the Form class). The Click() method in the Help button calls the Help() method:
click()
thisform.help()
The Help() method-in the Form class-contains the following code:
set
topic to alltrim(thisform.caption)
help
set topic to
Thus, when the user clicks the Help button, the help topic is set to the caption and then the .CHM file is opened.
3. Make sure there's something to call-this is the most time-consuming and detail-oriented part. When you create a help topic for a specific form, you need to make sure that the caption for the form (for example, "Vendor Maintenance") matches the Entry title in the Table of Contents Entry dialog in the Contents tab of HHW for the topic page. Yes, it's just that easy. No fancy ID values or separate context ID mapping files like you had to do in the olden days-just make sure your Entry title matches the caption!
I always have someone else run through the whole application, testing every Help button to make sure I haven't misspelled something or another.
Distributing HTML Help and your .CHM file with your VFP application
Distributing your .CHM file is no big deal-just include it as part of the files in your application. I put the help file in the APPFILES directory because it should be available to the application regardless of which data set is being used.
You'll also have to make sure that the HTML Help rendering engine is included with your distribution files, which can be a real pain. The easiest way is to have your users separately install Internet Explorer 4.1 or better-this has been the best way I've found to make sure that the correct versions of all rendering engine files are present. Of course, there are a lot of people who don't want to do this, so you can also check the HTML Help check box in the Visual FoxPro Setup Wizard, and as of Service Pack 3, I think it's working, but I've had trouble with it before and haven't tested it in SP3.
|
Politica de confidentialitate | Termeni si conditii de utilizare |

Vizualizari: 2195
Importanta: ![]()
Termeni si conditii de utilizare | Contact
© SCRIGROUP 2025 . All rights reserved