| CATEGORII DOCUMENTE |
| Asp | Autocad | C | Dot net | Excel | Fox pro | Html | Java |
| Linux | Mathcad | Photoshop | Php | Sql | Visual studio | Windows | Xml |
Building Menus
Well-designed Windows applications use a menu to provide access to the functions of the system. These menus take one of two forms: the new-style "toolbar" menu, used by 2000-era tools such as Office 2000, and the traditional menu bar/menu pad style, used by Visual Studio's tools. Visual FoxPro's Menu Designer allows you to create these traditional menus easily and quickly. While the Menu Designer and its resulting menu components are two of the only VFP components that still aren't object-oriented, you can hook into them with third-party tools to provide additional functionality that accomplishes many of the same things. The Menu Designer also can be used to build shortcut, or context, menus.
The string of words across the top of the application's window, directly under the title bar, is the application's menu. The entire line of words is called the menu, each word is called a menu pad, and each pad can launch a process, open a dialog, or expand into a drop-down menu. This drop-down menu can contain one or more menu bars (or "menu commands" or "menu options" according to which day of the week it is in Redmond), which themselves can either run programs or forms or expand into more drop-down menus.
Both menu pads and menu bars can be assigned hot keys, can be dimmed or completely removed to make them unavailable at selected times, and can have the default font changed.
Driving an application with a menu
Much of my work over the last couple years has involved converting or replacing FoxPro 2.x applications, either in DOS or Windows, with newer, more robust systems written in VFP 6. I still find a remarkable number of applications that never used the Menu Builder in 2.x. Often, the developer instead used a mainframe, terminal-style, light-bar menu, where a list of choices was displayed in a single column in the center of the screen, and the user was required to press a letter or move a cursor key up and down through the column of choices. Other times, the main interface mimicked Access's switchboard paradigm, with a series of command buttons launching into various functions. Don't get me wrong; if the application works for the user, then I'm all for it. The only fault I find with these is that the developer didn't take advantage of the available tools to make the application operate in as modern a fashion as possible.
In the fall of 1998, when Visual Studio 6 was released, the current state of the art in user interface dictated the use of a toolbar where each button actually contains a text label, and launches either a program or a form, or opens a drop-down menu. Visual Studio is a little behind the times, but not enough to be noticeable to the majority of users. The Menu Designer available to build menus doesn't provide the toolbar mechanism, but the results can be very similar.
Current practice dictates a series of text prompts across the top of the screen, starting with "File," continuing with "Edit," and ending with "Tools," "Window," and "Help." Other menu pads can be included in between these standard pads, as required by the application.
Database applications have somewhat different requirements than many other Windows applications, and I've adopted a couple of variations to this general practice.
First, the "File" menu often becomes "Forms," and drops down into a series of menu options that open data-entry and query forms. With other software applications like word processors and spreadsheets, the user is quite cognizant of the file structure behind their work- each letter, memo, financial statement, or budget is represented on disk by a specific file. With databases, however, the file structures behind an order-entry form or a customer call record are usually not obvious: multiple tables, lookup files, and so on. Thus, it's easier for the user if you map the menu options to forms that the user thinks of, and ignore the actual tables used behind the scenes.
I also usually insert one more pad, called "Operations" (or, sometimes, "Processes") in between Edit and Tools. The drop-down menu for this pad contains options for various operations or processes that the user runs unattended, such as end-of-month postings, file conversions, version upgrades, and import and export processes.
While you're certainly welcome to add more menu pads, you might want to restrict the number of menu pads and menu options underneath each pad so that the variety of choices doesn't become overwhelming to the user. Office 2000 is attempting to do this by hiding little-used menu options, and displaying them once the user's usage of the program has demonstrated that they use the menu command.
Using the Menu Designer to create a menu
Follow these steps to create a menu:
1. Open the File menu and select New, Menu, New File. Then select New in the Project Manager, or type:
create menu XXX
where XXX is the name of the menu to create.
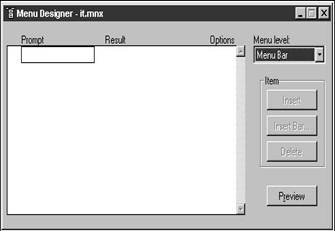
2. The Menu Designer dialog appears. See Figure 7.1.
This dialog is used to create the names of each pad and assign the action that executing that pad will perform. You can create drop-down menus by selecting the Submenu choice under the Result column in the Menu Designer. The Menu menu pad appears whenever the Menu Designer is the active window.
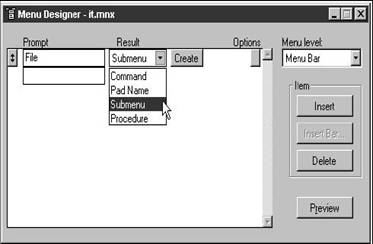
2. 3. Type the text of the menu pad under the column labeled "Prompt." As you type, options for the menu will be displayed in the rest of the row.
3. 4. Once you are done typing the menu pad text, either click or tab to the Result column. You can choose between Command, Pad Name or Bar #, Procedure, or Submenu. See Figure 7.2. Each of these choices is described in detail in the next section of this chapter.
4. 5. Once you have selected a result (and, optionally, completed the required information for the result), click or tab to the Options column. Selecting the Option command button will display a Prompt Options dialog, from which you can control various aspects of the menu pad. These aspects include a keyboard shortcut, a Visual FoxPro condition that controls when the menu choice can be accessed, and the message that displays in the status bar when the pad is selected.
5. 6. Click or tab to the next row of the menu and repeat steps 3-5 for each menu pad and drop-down menu.
6. 7. At any time during the construction of your menu, you can examine what the final result will look like by clicking the Preview command button or opening the Menu menu and selecting Preview. The existing menu will be replaced by the menu you've built in the Menu Designer. You can make choices from the menu-commands are displayed in the Preview dialog, drop-down menus appear under their pads, and messages display in the status bar.
7. 8. During the construction of your menu, and when you are finished designing it (and probably several times during its construction), you'll want to save it. Open the File menu and click Save to do so. You'll see the name of your menu displayed in the Menu Designer's title bar, with an extension of .MNX. Note that a corresponding file with an extension of .MNT is also produced; these files are discussed in more detail below.
8. 9. Once you have completed the structure of your menu, you need to generate the actual menu program. (A behind-the-scenes look at what happens during the menu-generation process appears later in this chapter.) If you just want to create the menu, open the Menu menu and select Generate. (You will be prompted to save the menu if you haven't already.) When you're building projects, the menu-generation process comes along for the ride-you don't have to do it separately. The Generate Menu dialog appears and prompts you for an output file name. For the time being, accept the default menu name and click the Generate command button.
A thermometer bar will display and the menu program will be generated. Depending on the complexity of the menu you've constructed and the type of machine you are using, the generation process can take as little as a couple of seconds or as long as the better part of a minute.
A menu program by itself isn't very interesting. Trying to execute it like any
![]() other program
will produce unsatisfactory results-the current menu will be replaced by your
menu, but executing a choice will not result in any action being performed.
Furthermore, you will be stuck without any apparent method to return to the
Visual FoxPro menu. See the "Tips and tricks" section later in this chapter.
other program
will produce unsatisfactory results-the current menu will be replaced by your
menu, but executing a choice will not result in any action being performed.
Furthermore, you will be stuck without any apparent method to return to the
Visual FoxPro menu. See the "Tips and tricks" section later in this chapter.
Up close with the Menu Designer
The Menu Designer dialog
The Menu Designer is where most of the action happens as you create and modify menus. It consists of three parts: the list box containing the menu options, the Menu Level drop-down box, and the Item command button group.
The list box enables you to add, edit, and reorder menu options. To add a new menu option, move the cursor to the blank text box in the Prompt column and begin typing a prompt.
The square command button to the left of the Prompt column (it contains a double-headed arrow when it has focus) is the mover bar for the main menu or submenu displayed. To change the order in which menu options appear, drag the mover bar (the rest of the row will follow) to the desired position. The row will displace the existing row and all rows below it will be moved down one row.
If you put a bar on the wrong pad by mistake, you're in for a bit of bad luck-there's no "move pad" function. You'll have to delete it from the errant pad and re-create it under the pad where you actually want it.
The Prompt column enables you to create menu text, assign access keys, and create dividing lines between groups of menu bars in drop-down menus.
The text typed into the Prompt text box will display as the menu text. The underlined letter in many menu options is called the access key. Holding down the Alt key and then pressing the underlined letter executes a menu pad access key. A menu bar access key is executed by opening the drop-down menu and then pressing the underlined letter. You can create an access key by preceding the letter of the menu text you want to use as the access key with a < character combination. If you do not specify an access key, the first letter of the menu name will be used. A dividing line is the horizontal bar that separates two menu bars in a drop-down menu and is used to visually group sets of menu options for easier reference by the user. You can create a dividing line by typing - in the Prompt column of an otherwise blank menu option.
The Result drop-down list box (see Figure 7.2 again) allows you to select the action that will occur when the menu option is executed by the user.
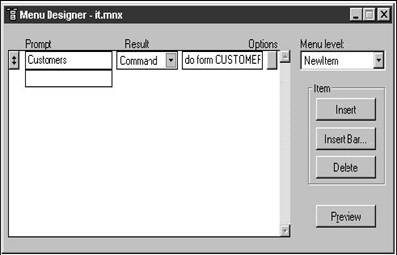
Use the Command option when a single Visual FoxPro command should be executed as a result of the user selecting the pad, as shown in Figure 7.3. Enter the command to be executed in the text box between the Result and Options columns. You can also issue a call to a function with the Command result.
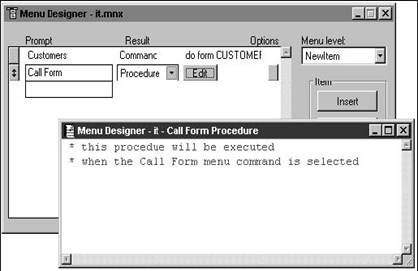
Use the Procedure option when more than one Visual FoxPro command should be executed as a result of the user selecting the pad. After selecting the Procedure Result, a Create command button appears in the next column. Clicking it will open a text-editing window in which the commands can be entered, as shown in Figure 7.4. If you're going to use the same procedure (a set of commands) in more than one menu option, you should consider using a command to call the procedure. Doing so will facilitate changes-you can make changes to only one procedure instead of searching for each menu option that uses the same set of commands. Once a procedure is created, the command button text changes to Edit.
Use the Submenu option when a drop-down menu should be displayed as a result of the user selecting the pad. After selecting the Submenu Result, a Create command button appears in the next column. Clicking it will change the appearance of the menu dialog-a new set of rows for the menu bars in the drop-down menu will be displayed-and the name of the menu pad that deploys this drop-down menu will appear in the Menu Level drop-down. Create submenus in the same way you created the main menu. Once a submenu is created, the command button text changes to Edit.
Technically, you can have a menu pad immediately launch a function, but that style is very much out of style. As a result, the Result column for all menu pads should contain Submenus.
The fourth choice in the Result drop-down varies between Pad Name and Bar #, depending on whether you are creating a main menu or a submenu. Both are used to identify the menu pad or bar that is created by the menu-generation process. If you do not provide a pad name or bar number, Visual FoxPro will create one for you. You would use Pad Name or Bar # if you needed to reference a pad name or bar number in a program. You should not reference the pad names and bar numbers that Visual FoxPro creates because they change during each generation. Because you can also assign a Pad Name or Bar # to a menu option by using a Command, Procedure, or Submenu Result type (through the Options command button), this is rarely used.
The Menu Level drop-down allows you to move between the main menu list box and the various submenu list boxes.
The Item command button group allows you to insert a menu option at the location of the cursor or delete the current menu option. Note that you will not be asked to confirm the deletion of a menu option when deleting it.
The Options command button allows you to assign keyboard shortcuts to menu options, create conditions to dim and enable menu options, display menu-option-specific messages in the status bar, and assign pad names for the menu option. The Options command button in the Menu Designer will contain a checkmark if any of the options are filled in.
A keyboard shortcut (also known as a hotkey) is the key combination displayed in some menu bars next to the menu name, as shown in Figure 7.5. It is executed by pressing the designated key combination. The difference between an access key and a keyboard shortcut is that the keyboard shortcut can be executed without having the drop-down menu open. You can create a keyboard shortcut through the Options dialog's Shortcut check box as shown in Figure
7.6.
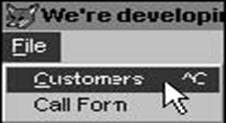
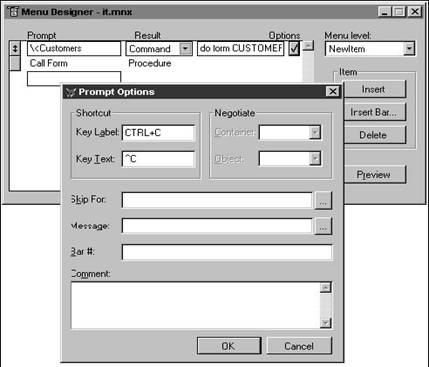
The Key Label is the key combination that will execute the keyboard shortcut, while the Key Text is the actual word or phrase that will appear next to the menu bar in the drop-down menu. A typical use for Key Text is to abbreviate the key combination (for example, ^R instead of CTRL+R). Note that you can assign a keyboard shortcut to a menu pad but the Key Text will not be visible.
The Negotiate options allow you to define the location of user-defined menu titles in your application when a user edits an OLE object visually. These options are available only for menu pads.
A Skip For condition is used to control the access to a menu option. For example, in the Visual FoxPro menu, all of the menu bars in the Edit drop-down menu are dimmed if the cursor is not in a text-editing region. Once you click in a text-editing region and highlight a portion of text, the Cut and Copy menu options are enabled. If there is text on the text clipboard, the Paste menu bar is also enabled; otherwise it is dimmed. You might choose to provide visual clues to the users of your application by dimming and enabling menu options according to whether or not they should be available at the current time. You can use a Visual FoxPro expression in the condition to be evaluated as the program runs, so you can turn menu options on and off as desired.
You can specify a message to be displayed in the status bar when the menu option is highlighted. The button beside the Message text box brings up the Expression Builder, through which you can type a text phrase or enter an expression. If you use an expression, it will be evaluated during runtime and must evaluate to a character expression. This capability provides the ability to dynamically change the message according to various conditions-for example, you might use different messages according to the skill level of the user.
Finally, you can attach a comment to a prompt. This comment doesn't show anywhere in the user interface-it's merely a place for you to scribble a couple of notes if you've done something unusual, or if you want to document the functionality for the developer who's going to take over the maintenance of this application from you.
The Menu menu
The Menu menu pad appears in the Visual FoxPro menu when the Menu Designer is the active window. This menu contains options to create a Quick Menu, to insert and delete options in the Menu Designer list box, to generate the menu program, and to preview the menu. The Insert, Delete, and Preview options are identical to the corresponding command buttons in the Menu Designer. The Generate function was briefly described earlier and is described in depth in the next section.
The Quick Menu option allows you to create a menu fully populated with the same menu pads and bars as in the standard Visual FoxPro menu. This is a useful tool for creating menus that can be examined to determine how Visual FoxPro's menus are put together as well as to create menus that contain menu pads and menu options that call native VFP functions, such as Edit and Help commands. The Quick Menu option is not available once you've created a menu that contains at least one pad.
The View menu
The View drop-down menu contains two additional menu bars when the Menu Designer is the active window. The General Options menu bar allows you to specify positions of the menu you are creating, and to create code that will execute before and after the menu is run, while the Menu Options menu bar allows you to attach a procedure to a specific drop-down menu.
General Options dialog
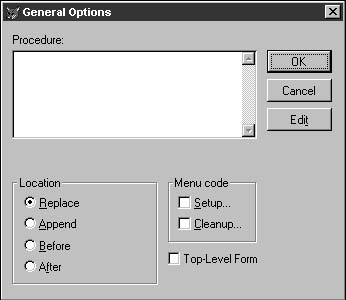
Many applications require the ability to be modified as the program is being executed. Menu options can be enabled or disabled depending on what function the user is executing, or they can even be added afresh or completely removed from the menu. The General Options dialog box (see Figure 7.7) allows you to write code that will make those modifications based on conditions you specify.
The Menu Designer is actually just a "front end" for creating a menu program. As with any program, you can provide multiple paths for the program to follow depending on conditions your program evaluates or choices that the user makes.
Setup code runs before the menu itself runs. A typical menu (take a look at the generated .MPR below to follow along more closely) consists of one or more DEFINE PAD commands that create the menu pads, DEFINE POPUP commands that create the drop-down menu, and DEFINE BAR commands that create the bars for the various drop-down menus. In addition, the menu program contains a number of ON SELECTION PAD and ON SELECTION BAR commands that execute actions when a menu pad or bar is selected. Setup code often contains initialization variables that are used in the various DEFINE and ON SELECTION commands. For instance, if you're using an expression in a message, the expression might be created or modified in the menu's Setup code.
Cleanup code runs after all menu commands are executed. Typically, Cleanup code contains code that needs to run after the menu is created as well as procedures executed from more than one menu option.
In addition to Setup and Cleanup code, you can create a procedure that runs directly from the menu program.
* ********************************************************* * *
�.* * 99.09.09 MENU1.MPR 21:26:53 * * * ********************************************************* * *
�.* * Whil Hentzen * *
�.* * Copyright (C) 1999 Hentzenwerke Corporation
�.* *
�.* * Description:
* * This PROGRAM was automatically generated BY GENMENU.* * * *********************************************************
* ********************************************************* * *
�.* * Setup Code
* *
* *********************************************************
*
wait wind 'We are in the SETUP code snippet'
* ********************************************************* * *
* * Menu
Definition
* *
* *********************************************************
*
SET SYSMENU TO
SET SYSMENU AUTOMATIC
DEFINE PAD _r0219yeqc OF _MSYSMENU PROMPT 'My 1st menu option' COLOR SCHEME 3 ;KEY ALT+M, ''DEFINE PAD _r0219yeqs OF _MSYSMENU PROMPT 'My 2nd menu option' COLOR SCHEME 3 ;KEY ALT+M, ''ON PAD _r0219yeqc OF _MSYSMENU ACTIVATE POPUP my1stmenuo
DEFINE
POPUP my1stmenuo MARGIN RELATIVE SHADOW COLOR SCHEME 4
DEFINE BAR 1 OF my1stmenuo PROMPT 'menu 1'
DEFINE BAR 2 OF my1stmenuo PROMPT 'menu 2'
ON SELECTION BAR 1 OF my1stmenuo wait wind '1'
ON SELECTION BAR 2 OF my1stmenuo wait wind '2'
ON
SELECTION MENU _MSYSMENU wait wind 'We are in the General Options
Procedure snippet'
*
*********************************************************
* *
* * Cleanup Code & Procedures
* *
* *********************************************************
*
wait wind 'We are in the CLEANUP code snippet'
Accessing the Setup, Cleanup, and Procedure code from the General Options dialog is a little confusing at first because the interface is sort of stupid. When you bring up the General Options dialog (remember, the Menu Designer has to be the active window), the text-editing region is for the menu-level procedure. If the editing region isn't large enough, you can click the Edit button to open a full screen-editing window. However, doing so will not enable you to access the editing window-you need to click the OK button first to close the General Options dialog. This interface functionality has confused FoxPro programmers since the release of FoxPro 2.0, and you need to use the tool a few times to get used to it.
To access the Setup and Cleanup code snippets of the menu, select the appropriate check box in the General Options dialog. See Figure 7.8. Similarly, a text-editing window is brought forward, but you need to click OK to close the General Options dialog.
Note that while the text-editing window for one snippet is open, you can bring forward the General Options dialog and open the text-editing window for another snippet. But you'll need to close the General Options dialog in order to access the text-editing window, of course.
The Location option group in the General Options dialog allows you to determine how and where the menu is created. The Replace option will remove the existing menu and replace it with the menu being created. The Append option will add the menu being created to the end of the existing menu. The Before and After options allow you to place the menu being created at a specific location relative to the existing menu. The pop-up menu that appears when selecting Before or After will show the current menu pads so that you can specify where the new menu pads will be placed.
And that Top-Level Form check box . well, here's what this is for. Most Visual FoxPro applications use a desktop (or "parent" form) that hosts the rest of the application-including all of the forms in the app. You can create "top-level forms" in Visual FoxPro that act as SDI (single document interface) applications. These forms work at the same level as other Windows applications-at the same level as a regular VFP application with a desktop-and appear in the Windows taskbar.
You might want your top-level form to have a menu-but because the top-level form doesn't have a desktop that would hold the menu, the menu has to be attached to the form itself. This check box is used to create a menu that can be attached to such a top-level form.
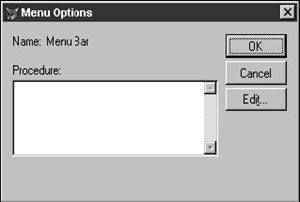
Menu Options dialog
Attaching a procedure to a specific drop-down menu uses the same type of interface as in the General Options dialog. First, use the Menu Designer to select the drop-down menu to which you want to attach code. Then open the View menu and select Menu Options to open the Menu Options dialog, as shown in Figure 7.9. If the procedure code is short, you can type it directly in the text-editing box. Otherwise, click the Edit button to open a text-editing window. Again, you must click OK to close the Menu Options dialog.
The Menu-generation process
When you use the Menu Designer to create a menu, you are actually placing records that contain information about the specific menu options into a table. As a result, you can think of the Menu Designer as a "data entry screen" that places specialized records into a table for you. The table has an extension of .MNX, and its related memo file (information such as commands and procedures is actually stored in memo fields) has an extension of .MNT. When you are done with the Menu Designer and want to generate the menu program, use the Menu, Generate menu option. Selecting Generate runs a Visual FoxPro program called GENMENU. This program opens the .MNX table and processes the data in the various fields, finally creating a text file with an .MPR extension. This .MPR file is just a Visual FoxPro program (a .PRG-type file), albeit with a different extension. To run the menu, issue this command:
do XXX.MPR
Visual FoxPro compiles the .MPR file into an .MPX file, just as a .PRG is compiled into an .FXP. Note that you must include the .MPR extension or Visual FoxPro will by default look for a .PRG file.
You can set a number of options when generating a menu. After selecting Generate, you'll be presented with the Generate dialog. Clicking the Options button will open the Generate Options dialog. You can choose where the generated code should be stored-with the menu's .MNX/.MNT files, with the project, or in another location.
Tips and tricks
To
remove a keyboard shortcut from a menu option, press the Enter or Backspace
key. Pressing the Delete key will result in
Never modify the generated .MPR file. The .MPR is re-created each time you generate a menu, so if you make changes to the .MPR file, they will be lost when you regenerate. Alternatively, you would lose the capability to continue using the Menu Designer and would have to make all future changes to the .MPR, which subverts the intent of the Menu Designer in the first place.
It's confusing to understand when each of the code snippets-Setup code, Cleanup code, general procedures, and procedures attached to specific menu bars-is executed. Try placing a simple command or function call in each location generating the menu. Then examine the .MPR to see where each piece of code is placed, and run the menu to see when each piece of code is executed. I typically use a "wait window 'This is my setup code' " type of command that allows me to pause at each step during the execution of the program.
A tip my technical editor suggested was to minimize the windows of each of your procedures, and leave them open (but minimized) when you close the menu. When you next open your menu, all of the procedure windows will be opened the way you left them, so it's easy to spin through the windows to see where you placed code.
Many applications use some components of the standard Visual FoxPro menu, including pads for File, Edit, and Help, and at least a few of the menu bars under these pads, such as File, Exit; Edit, Cut; Edit, Copy; and Edit, Paste. As a result, the fastest way to create a new menu is to make a copy of an existing one and then delete undesired options instead of trying to create one from scratch. Additionally, if your applications have a lot of common functionality, you could create a "base menu" from which you can add selected options as necessary. Oftentimes, you'll use the same functions in some of the menu items across multiple applications. For example, many applications have a Tools menu pad under which functions such as System Preferences, User Maintenance, and Database Maintenance are found. Not only could the menu options be included, but the code or function calls for these functions should be part of this base menu.
Early in the creation of an application, you usually know what menu pads and options you're going to use. You can create them and then provide a "dead end" command so that when you (or the user) select one, the system doesn't crash. The following command can be cut and pasted into every menu option and then replaced with the real command when available.
wait wind 'The ' + prompt() + ' option is under construction. Hit any key'
Note that the PROMPT() function automatically interprets which menu bar has been selected and includes its text as part of the Wait Window prompt.
Good menu design includes several components. First, it's accepted practice to use a set of three dots (called an ellipsis) at the end of a menu bar's name to indicate that the menu option will open a dialog. Furthermore, the use of an exclamation mark following the menu pad's name indicates that there is not a drop-down menu associated with this menu pad, although this style has gone the way of leisure suits and hot pants. These visual clues help users to figure out "what will happen when they select this" instead of making them guess.
Notice that Visual FoxPro automatically places an arrow at the end of a menu bar to indicate that another drop-down menu will be displayed upon the selection of a menu option with an attached submenu.
In complex systems, you might want or need to use a series of main menus. The main application would have one menu system, and the selection of any menu pad would then remove that main menu and replace it with another menu system, complete with multiple menu pads and associated drop-down menus.
You can use the PUSH MENU and POP MENU commands to place the active menu in memory and then run another menu temporarily. PUSH MENU places the active menu onto a "stack" in memory, and POP MENU pulls the most recently pushed menu out of memory and makes it active again. Note that the number of menus that you can PUSH depends on the amount of available memory.
When you're working with menus, it's easy to lock up the system by running a menu that doesn't contain a mechanism to return to the original menu. For example, suppose you're in the middle of creating a menu and you run it. However, the menu doesn't have an Exit option, and suddenly you have no way of returning to the Visual FoxPro menu or executing functions- except for exiting FoxPro and loading it again. Typing the command:
set sysmenu to default
will restore your menu to the default menu configuration. It's important to note that while the standard Visual FoxPro menu (File, Edit, View, Format, etc.) is originally the default menu, you can change the default with this command:
set sysmenu save
Doing so will prevent you from returning to Visual FoxPro's standard menu without exiting, so be careful when defining menus this way. You can return to the standard System Menu via SET SYSMENU NOSAVE followed by SET SYSMENU TO DEFAULT.
The Visual FoxPro menu is mostly a carryover from earlier versions of FoxPro, but it is still a powerful tool; with some tinkering, you'll find that you can usually bend it to your will.
Adding flexibility to the Visual FoxPro Menu Designer
While the Visual FoxPro Menu Designer, despite its age, provides you with a fair amount of flexibility, it has its limitations. A public domain utility, GENMENUX, written by Andrew Ross MacNeill, provides additional flexibility to the capabilities of the Menu Designer:
. . Control default menu positioning, colors, and actions without manually changing the .MPR file.
. . Remove menu pads and bars based on logical conditions instead of simply disabling them using SKIP FOR.
. . Automatically add hotkeys to menu pads.
. . Call menu "drivers" at various points in the menu-generation process.
. . Define menu templates that contain standard menu objects that can be inserted at any time into an existing menu.
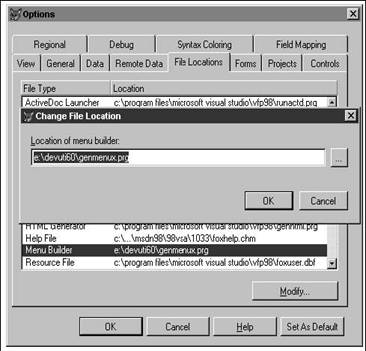
GENMENUX is not a replacement for GENMENU. Rather, it is a Visual FoxPro program that acts as a "pre-processor" and a "post-processor" for Visual FoxPro's original GENMENU program. To use it, place GENMENUX.PRG in a directory where Visual FoxPro can find it, or where you point to it in the File Locations tab of the Tools, Options dialog. Some developers place GENMENUX.PRG in the root directory of VFP; I put it in a directory of developer utilities, as shown in Figure 7.10.
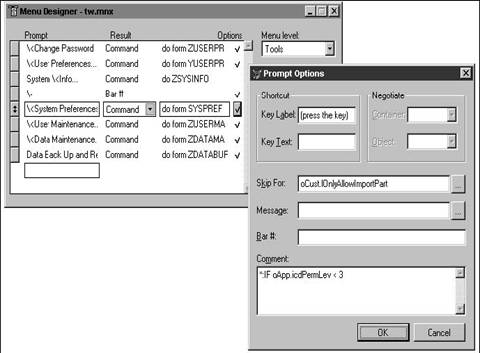
You can also assign the location of GENMENUX to the _GENMENU system variable. I discuss these types of variables in Chapter 14. After pointing VFP to GENMENUX, your next step is to add GENMENUX directives to the menu through the Menu Designer. These directives take the form of comments like so:
*:IF upper(oApp.cUserName) = 'HERMAN'
The asterisk/colon combination is an indicator to GENMENUX that this comment is a GENMENUX directive and not just a silly string of characters that someone mistakenly typed into the Comment field of the Prompt Options dialog. See Figure 7.11.
When Visual FoxPro then generates a menu, GENMENUX will be called instead of GENMENU. It makes a copy of the .MNX menu table file and manipulates the copy. This manipulation might involve changing the order of some records, changing the contents of other records, and otherwise altering the file in ways that you can't do with the Visual FoxPro Menu Designer. When finished with its manipulations, GENMENUX then calls GENMENU, which does the usual menu generation, albeit with the modified copy.
How does GENMENUX know what manipulations to make, and when? The Comment field in the .MNX file contains the GENMENUX directives that act as flags that tell GENMENUX to do some special processing. The *:IF directive is a flag that indicates that this menu option should be removed (not disabled, but completely removed) from the menu if the condition following the IF statement is false. GENMENUX actually modifies the .MPR file. In this case, the following code was added to the .MPR file:
IF NOT (upper(m.gcUserName) = 'HERMAN')RELEASE BAR 6 OF Tools ENDIF
When this program-the menu is just a program, right?-executes, the contents of the global memory variable, m.gcUserName, are compared to the string "HERMAN" and if they're not equal, the sixth menu bar of the Tools menu is removed.
This capability, obviously, is quite powerful: the ability to modify the menu by interpreting the menu program on the fly as it's executed. Space doesn't permit a listing of all the GENMENUX directives-or even a fuller
![]() explanation of all of the things you can do
with it. But a copy of GENMENUX, together with documentation of more than 75
directives, is included with the source code downloads for this book at
www.hentzenwerke.com.
explanation of all of the things you can do
with it. But a copy of GENMENUX, together with documentation of more than 75
directives, is included with the source code downloads for this book at
www.hentzenwerke.com.
Creating context menus
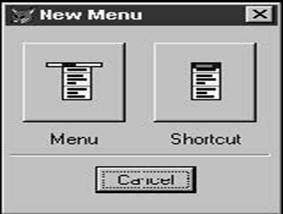
A context menu (also known as a shortcut menu) is the drop-down menu you see when you right-click in various areas of the IDE. You can add context menus to your own application. To create a context menu, issue the CREATE MENU command and click the Shortcut menu button that displays in the resulting dialog, as shown in Figure 7.12.
The Shortcut Designer will appear as shown in Figure 7.13. It works just like the Menu Designer except that you don't create menu pads across the top of the window. Create the menu options just as you did when you worked with the Menu Designer. You can even create drop-down menus, although you should tread carefully because, by definition, a context menu should have just a few menu options that are relevant to the specific context it's used in.
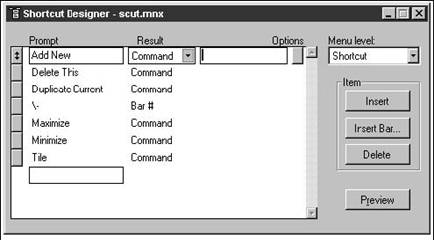
Add commands, function calls, or procedures as you would in the Menu Designer. When you're done with the menu options, open the Menu menu and select Generate to create the context menu .MPR file.
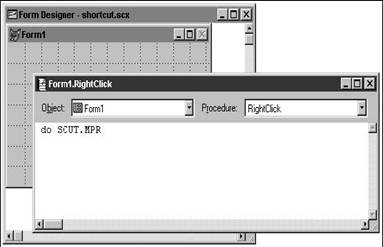
The final step is to attach the context menu to the location where it will be called. In this example, I've called the SCUT.MPR program from the right-click method of a form by entering the following code into the right-click method, as shown in Figure 7.14:
do SCUT.MPR
I could have just as easily attached the shortcut method to a specific control on the form, of course. Finally, running the form and right-clicking anywhere on the form opens the context menu, as shown in Figure 7.15.
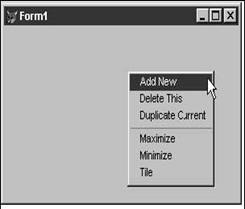
Before I go on, I want to mention one thing that you'll want to come back to after you've gone through Chapter 13. Unlike regular menus, you will likely be calling methods of the object that invoked the shortcut menu. In other words, you won't be running stand-alone programs from the "Add New" or "Duplicate Current" menu bars in this shortcut menu. Instead, you'll be calling methods that belong to Form1.
The methods belong in the Form (actually, the class that the form was created from) because they're a behavior you want this type of form to have. (As I said, this will make more sense after you've gone through Chapter 13 a couple of times.) As a result, you'll want to use commands for these menu options that look like:
oFormObject.AddNew()
where AddNew is a method in the form class that was used to create Form1. You'll need to pass a reference to the form, however, to the menu, so you'll actually use syntax like:
do SCUT.MPR with THIS
where "THIS" is referring to the form itself. (The command "do SCUT." is in the form, right?) Yeah, a little ethereal right now, but like I said, come back to this.
If you're not comfortable with the forms and methods I've discussed here, you might want to revisit this section after you've covered Chapter 8, "Building Forms."
So why isn't the Menu Designer OOP-ified?
One of the biggest complaints of VFP developers is that its menu designer isn't object oriented. One of the two big changes between FoxPro 2.x and VFP 3.0 was the introduction of object orientation into the Form Designer. The change was big enough that it was easy to forgive omissions elsewhere in the product. Surely they would be corrected in future releases. When
5.0 was released, the big news was new developer tools (and, some say, the lack of 16-bit and Macintosh versions). Version 6.0 was released and there still isn't an object-oriented menu. It's obvious that this particular mechanism is not in the plans.
Why not, and what should you do about it?
First of all, Visual FoxPro is a Microsoft tool,
and, as such, is subject to Microsoft's vision of application development. They
have stated incessantly over the past few years that application development is
moving from monolithic, single-purpose applications to component-based systems
that sport flexible and varied user interfaces. Visual FoxPro's role in this
vision is that of a middle tier, and, as such, doesn't have a heavy-duty
requirement for broad interface tools like menus. For those of you that still
build LAN-based applications, the current menu building tools should be good
enough for you to get by. At least that's the word coming from
So what should you do about it? If you're bothered enough, you could create your own object-oriented menu tool, use one in a third-party commercial tool like Visual FoxExpress, or find a freeware or shareware version such as at Cornerstone Software's site (www.cornerstone.co.nz). Myself? My users are more worried about the forms and reports in their applications, not whether or not they can customize the various buttons on the menu bar. I'd suggest you spend your time worrying about something important-like why the "operating system suitable for mission-critical applications all over the world" still GPFs if you look at it wrong.
|
Politica de confidentialitate | Termeni si conditii de utilizare |

Vizualizari: 1563
Importanta: ![]()
Termeni si conditii de utilizare | Contact
© SCRIGROUP 2025 . All rights reserved