| CATEGORII DOCUMENTE |
| Asp | Autocad | C | Dot net | Excel | Fox pro | Html | Java |
| Linux | Mathcad | Photoshop | Php | Sql | Visual studio | Windows | Xml |
Building a LAN Application
So now you've got a menu. You can run that menu and select the various menu options, and generally nothing happens-unless, of course, you find one that generates an error. This is technically sound but functionally uninteresting. What you'd like to do is "hang some forms" on your menu. In other words, the first thing a user is liable to want to do is open a form and enter some data. In this chapter, I'm going to show you how to add forms to your menu (using your own base classes, of course) and build a set of common methods that you can reuse instead of having to recode them for each form.
In the olden days (remember them? about six months ago?), you'd create a menu option for a screen (you called them "screens" in those simpler times), create the screen-consisting of data elements and some controls such as Next/Previous and Add/Save buttons-and you'd be all done.
With Visual FoxPro, you're going to do things a little differently. Your ultimate goal is to have the ability to open multiple forms on the screen, and have users be able to move between them as they desire. In fact, you're even going to give them the ability-in selected situations- to open multiple copies of the same form. And you're going to provide a common toolbar for all of these forms. This toolbar will have buttons for each of the options that we used to have on a specific form: Next, Previous, Add, and so on. As a result, the toolbar becomes part of the application; it's no longer part of a single form. Furthermore, because you're going to make our forms friendly to those "rodentially challenged" folk (as people who don't like mice refer to themselves), you'll have a Record menu with its corresponding keyboard shortcuts.
To handle all of this, you're going to need to build some application-wide functionality (to handle the toolbar and menu options) as well as a generic engine to handle all of the goings-on that will be required for multiple forms. If you've looked at Tastrade, you've seen that this is all built in, and that you can fill up many a sheet of paper-and go through the better part of a bottle of aspirin-trying to map the relationships between the programs, classes, and forms. It's not impossible; there's just an awful lot to comprehend. And remember, you're trying to learn a whole new set of tools at the same time you're working on the syntax and concepts.
This chapter is going to create an application foundation that will handle your menus,
![]() toolbars, and form opening and closings. But
because there is so much to this topic, and
toolbars, and form opening and closings. But
because there is so much to this topic, and
the pieces are so intertwined, I'm going to take it a step at a time, like I did with menus a few pages ago. If you're the type who has to poke around with code while you're reading, you're going to like this chapter a lot. The source code that accompanies this chapter consists of a number of .ZIP files, each of which contains all of the code explained here, up to a certain step. They each start with "CH13" so it will be easy to follow along.
First, you're going to build a simple form using those base classes of forms and controls, and use some "old-fashioned" navigation controls-Next, Previous, Add, and Delete-placed right on the form. The purpose of this form is to show you how to build a "real" data-entry form with your own classes instead of Visual FoxPro base classes. You'll also put some simple code in the navigation buttons to get you acquainted with that mechanism. Remember how I said that many developers are going to bag the "object-oriented" stuff and just create forms and controls from VFP's base classes? I'm going to show you the benefits immediately, so you learn the right way from the start. By the time you're done with this step, you'll have created a project, built the main program and menu, added the environment and application classes from the last chapter, and added your form to the menu.
The second step will be to add the same navigation functionality to the menu that already exists with the controls on the form. In other words, your users will be able to use these forms both via the controls on the form as well as via menu shortcuts. When you're done, you'll have a functional application: You'll be able to open multiple copies of the same form from the menu, and use both the menu and command buttons to navigate.
Next you'll create and include a toolbar with your application. You'll learn how to create the toolbar, and find out how to launch it automatically when the form is opened. And you'll also learn how to make the toolbar control the form's navigation functions. As soon as you're done, however, you'll run into several problems, and you'll then fix them. You'll get rid of the command buttons on the form (they're still there, sadly enough), and properly synchronize the toolbar and menu option functions. You'll also build an instance handler-a mechanism that keeps track of which forms are open and how many times they've been opened-and add the form's name to the Window menu.
The fourth step will allow you to solve some of those data issues you've started worrying about. Up to this point, all you've done is simply read values out of the table and display them on the form. And in some cases-such as with primary keys and lookups-you're going to want to display something other than raw data from the table. You'll also create generic methods for adding, deleting, and saving data. Then I'll show you how to make those generic routines extensible by providing hooks that you can use for custom code in specific instances.
Then it will be time to add more user functionality to the form. I'll show you how to add controls to handle child records as well as how to call child forms for both querying and for adding new records.
The final step in this chapter will be to tie up some loose ends. During the previous steps, I've intentionally left some rough edges, and here I'll show you how to clean those up and integrate the components a bit more tightly.
At this point, you'll have the rough beginnings of an application foundation that you can use to build your own applications. It won't be finished (since when are we ever done with an application?) but you'll understand how it was built. Then it will be time to create a couple of other "real-world" forms, and those are next.
More on the sample application
Let me discuss the actual forms you'll be creating, so that you understand where you're heading. I've added a small DBC and some corresponding tables to it that represent the core data in this example. The first table is CUST, and, logically, contains a record for every customer in the system. The second table, ORDERH, contains a record for every order in the system. The third table, ORDERD, contains a record for every detail record in an order.
I'll be using two forms as samples: one for invoices and one for orders. In both cases, of course, I'll have customers attached to the form as well. The top half of each form will contain the customer info. The bottom half will contain information about orders and order details.
Two other tables will be used in this example: ITKEY, which contains the last primary key used for every table in the application, and ITLOOK, which is a generic lookup table. Obviously, ITKEY is needed when new records are added to CUST, ORDERH, and ORDERD so that those records can get new primary keys. I'll get to ITLOOK later in this chapter.
One other note and then I'll get started. Remember that long-winded explanation about setting up directories so that each subdirectory held various components? And have you noticed that, so far, I've completely ignored that advice and just slammed everything into one directory? And that I'm continuing to do so? Well, the reason is that while you're learning the basics, there simply aren't that many files to deal with. Furthermore, the mechanism to handle multiple-directory setup is complex enough that it will just get in the way.
Finally, during the development of these examples, you'll be making a number of changes to your base classes, so you will need separate copies for each set of examples. Instead of putting each version into the same common directory and then using some hairy naming convention to find them, I'm just going to put them in with the custom code for the example in question. That's why you see copies of the class libraries in every directory.
Types of forms
Before I get into the business of building forms, it would be a good idea to discuss the types of forms you might want to build. In general, you can think of a form as any visual mechanism used by the user to handle data, issue instructions to the system, or respond to a message that the system issued. The data-handling forms can be further categorized into simple maintenance forms that address one table (and possibly some lookups), parent-child forms (often depicting a one-to-many relationship on the form), complex data-entry forms that have complex relationships between the various tables (and that rely on business rules for the definition of those relationships), and query-style forms that are used primarily to extract data instead of maintain it.
In this application, you'll find at least one of most of these form types. The INVOICE form is a simple maintenance form, while the ORDER form is a parent-child form. The INVENTORY form is an example of a query-style form.
And of course, we're going to have other types of forms, such as those for user logins, system management, and various alerts and warning messages.
Just like menus, you could create forms using the Form Designer and then grab controls from the Form Controls Toolbar, and that's likely what many are going to do. They're not going to see the benefit of subclassing those controls-only the extra work involved in creating and using them to create their forms. However, six months or a year down the road, they're going to have a number of applications put together, all using the base controls, and they'll be chin-deep in a maintenance nightmare. And then their customer or boss is going to tell them that all of the magazines and books say how easy it is to change an application because of Visual FoxPro's object-oriented capabilities
So start off on the right foot right away, and build your own base classes for forms and controls. By the time you're done with this chapter, you should be completely sold on the benefits of using Visual FoxPro's object model.
Setting the stage: creating your class libraries
As you remember from the last chapter, a class is a set of one or more records that describes either a visual object, such as a form or a control, or a non-visual object, such as a set of methods and properties. A class can live in its own table, or it can coexist with other classes in the same table. This table is called a class library, regardless of how many classes are in it.
You're going to create one class library that will contain both form classes and control
classes. In the first version of this book, I had two separate class libraries-one for
forms and one for controls. I never used one without the other, so I decided to put everything into one library, called HWCTRL. (Actually, it's called HWCTRL62.VCX, so that I don't accidentally confuse it with a development version of a class library on my machine.) This library will contain the definitions for your own base classes. These classes include a form subclassed from Visual FoxPro's base form and controls subclassed from Visual FoxPro's base classes. You'll use the form class (hwfrm) to create several types of forms-one for simple maintenance (hwfrm), another for parent child forms (hwfrmPC), and so on. Similarly, you'll create control classes (hwtxt, for example) and use them to create additional types of controls- one for read-only fields (hwtxtRO) and another for fields that should be displayed only if a developer is running the form (hwtxtDev).
Some people organize these classes somewhat differently. As you saw, my text box class, hwtxt, is subclassed directly from Visual FoxPro's base class, but I use it for normal data entry. If I need specialized versions of it, I subclass hwtxt into hwtxtRO (read-only) and hwtxtDev (developer-visible).
Other developers would never use hwtxt directly. Instead, they'd use hwtxt strictly as an abstract class. Hwtxt would spawn three classes instead of two: hwtxtEdit for a data-entry text box, as well as hwtxtRO and hwtxtDev.
The important thing to remember is that you've got a two-level hierarchy here. hwFrm comes from Visual FoxPro's base class, while hwfrmMaint and hwfrmPC are both subclassed from hwfrm. You'll use hwfrmMaint and hwfrmPC to create the actual forms for your applications. Then, if you decide you've done something stupid, you can go back to one of your subclassed forms, make a change to the class, and have that change ripple through the class hierarchy.
Creating HWCTRL62.VCX, your control class library
If you're getting sick of the "step by step" spoon feeding we're going through as we build these classes, please bear with me. I'd rather err on the side of conservatism and repeat steps that you don't need, instead of breezing by something to the tune of "And you just build a rocket ship, and then you can" Meanwhile, you'd be saying, "Whoa, let's take that 'Build a rocket ship' step a bit more slowly."
Create your controls class library
Issue the CREATE CLASS command or select the File, New, Class menu option.
The New Class dialog appears. Enter the following information as shown in Figure 13.1:
Class Name: hwcmd
Based On: select CommandButton
Store In: HWCTRL62.VCX
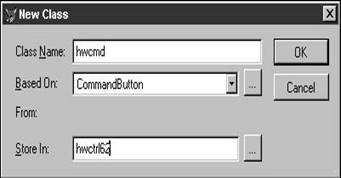
Note that "hwcmd" will be a record in the HWCTRL62.VCX table. In OOP terms, hwcmd is a class contained in the HWCTRL62 class library. You don't have to include the .VCX extension, but I did it here to make it clear what was getting stored in what.
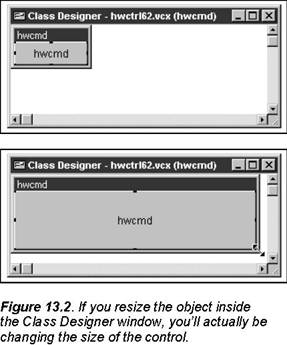
The Class Designer appears with a command button in it.
A couple of things are worthy of mention here. First, the window inside the Class Designer (not the Class Designer window itself) that contains the command button is just big enough to hold the command button. A lot of people don't like this, and their first move is to resize the window, as shown in the two images in Figure 13.2. When they do so, however, the command button also resizes. In other words, the size of the window in the Class Designer defines the size of the control. Second, now that I've told you that you can't resize the window inside the Class Designer, it's only fair to note that you can resize the Class Designer window itself to be significantly smaller if you need more screen real estate.
Make changes to the control as you desire.
Remember, this control (a command button in the current example) will be the one from which all future controls are created-both controls on forms as well as future subclasses of buttons. If you want the Click() method of all your command buttons to move the cursor position to the beginning of the text in the text box, you change this control's Click() method, and all command buttons you create from this one will automatically inherit that behavior.
Because this is your first shot with the various controls, the list below this set of instructions describes each control whose subclasses we're going to modify. The rest will be subclassed but left alone.
In this example with the command button, change the caption to "hwcmd" and the size to 23 pixels high and 72 pixels wide. Why? I personally like this particular size as a default size, and I typically change the caption for each of my subclassed controls so if I accidentally put a Visual FoxPro control on a form, I'll see the caption "Caption" (instead of the caption "hwcmd") and it clues me in that I wasn't thinking straight.
When you're done, select the File, Save menu option.
Select an icon for this class from the Form Control toolbar.
As you may remember, in order to use your own controls, you need to register the library. Once you've done so, the Form Control toolbar displays all of the controls in that library in place of Visual FoxPro's controls. Visual FoxPro will automatically assign an icon based on the base class you selected in the New Class dialog. If you want your own icon instead, here's how to select the icon image:
Select the Class, Class Info menu option. (The Class Designer window must be active for the Class menu pad to be available.)
Select the name of the file that contains the icon to be displayed in the Form Control toolbar, and place it in the Toolbar Icon text box.
You can also enter a description for this class. If you are creating a number of similar classes, you might find that this description comes in very handy later.
Click OK.
If you need to change properties, use the Class Designer:
Issue the command MODIFY CLASS.
Highlight the name of the desired class library (.VCX) in the list box on the left side of the dialog box. The classes in that class library will appear in the list box on the right side of the dialog box as shown in Figure 13.3.
Select the desired class. The Class Designer appears.
Make changes to the properties as needed and save them when finished.

If you need to rename or delete classes, use the Class Browser:
Open the Class Browser.
Use the Remove or Rename icons as required.
If you're following along on the computer, you can create your own classes as you desire-you might want to use the suggestions for classes in Chapter 10.
Register the library
When you click the View Classes button (the one with the books) in the Form Controls toolbar, you'll see a list of all registered classes, as shown in Figure 13.4.
In order to add HWCTRL62.VCX to that list, you need to register it with Visual FoxPro using the Tools, Options dialog. Follow these steps:
Select the Tools, Options menu option.
Select the Controls tab.
Click the Add command button to add HWCTRL62.VCX to the Selected list box.
Click the Set as Default command button to keep this class library registered between sessions of Visual FoxPro.
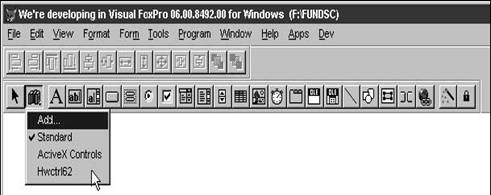
When you select the View Classes icon in the Form Controls toolbar, your newly registered class library will show up in the list and you can select it to populate the toolbar with your own subclassed controls.
If you want to just add a class for the current session of Visual FoxPro, you can simply select the Add menu option from the Form Controls' View Classes button, and then select the desired class library from the Open dialog that appears.
Creating your form classes
You had to create your controls first because you're going to use a couple of them when creating your form base classes.
Create your form base class
Issue the CREATE CLASS command or select the File, New, Class menu option.
The New Class dialog appears. Enter the following information:
Class Name: hwfrm
Based On: select Form
Store In: HWCTRL62.VCX
Note that "hwfrm" will be a record in the HWCTRL62.VCX table. Again, in OOP terminology, "hwfrm" is a class contained in the HWCTRL62 class library.
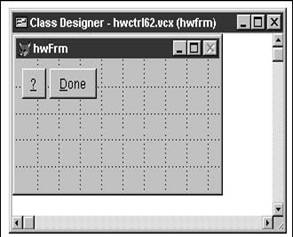
The Class Designer appears with a gray form in it. Make the following change:
Caption: hwfrm
Add two command buttons as shown in Figure 13.5. I always have a Help button and a Done button on my forms, so I put them right here. For the rare form that doesn't need these buttons, it's easy enough to turn their Visible property to False.
In the Click() method of the Done command button, add the following code:
thisform.release()
Change the AutoCenter property of the form class to True and change the caption of the form to "hwFrm" so that you can easily identify which class this form was created from.
Save your class, and you're done.
Here's where the difference between the hierarchy of your control classes and form classes lies. The form you've just created is your base form, from which all future forms will be created. You'll create a maintenance form, a parent/child form, and so on-all using this class, hwfrm, as the source. Then, if you decide you need to change any properties of your forms, you can do so here. You still get to do many variations on a theme by subclassing hwfrm.
Create your maintenance form class
1. Issue the CREATE CLASS command or select the File, New, Class menu option.
2. The New Class dialog appears. Enter the following information:
. Class Name: hwfrmMaint
. Based On: hwfrm
. Store In: HWCTRL62.VCX
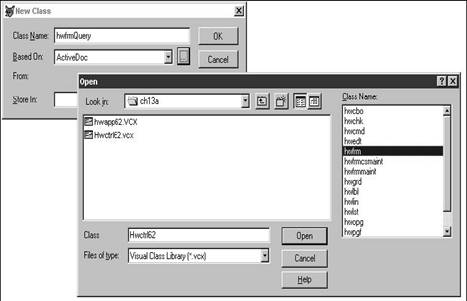
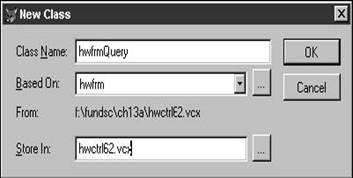
Stuck yet? I tried for months trying to figure out how to enter my own class name in the Based On drop-down list box. Well, maybe not months, but it sure was aggravating. It's one of those "little tricks" that isn't immediately obvious, but once you've learned the trick, you're more than willing to show someone else. Click the ellipsis (the three dots) command button to bring forward a list of available class libraries, and select "hwfrm" from the HWCTRL62 class library. In Figure 13.6, I'm creating another form class, hwfrmQuery, also based on the hwfrm class.
The Class Designer appears with a gray form that has a caption property of "hwfrm". You'll notice your Help and Done command buttons as well.
The class "hwfrmMaint" is the start of your base form for standard data entry and maintenance. You'll add some controls to the form and then place code in the various methods attached to this form. This collection of controls and methods will become your default maintenance form, which I'll refer to during the rest of the chapter.
Change the caption of the form to "hwFrmMaint".
Add command buttons and a combo box to the form class so that it looks like Figure 13.8.

Be sure to add command buttons from the HWCTRL62 controls toolbar, not Visual FoxPro's Form Controls toolbar. You'll be able to tell immediately because the buttons will have "hwcmd" as their caption!
Notice that the Delete command button doesn't have a hotkey-you don't want to make it too easy for a user to hit the Delete key by accident. Align the command buttons using the controls in the Layout toolbar and Format menu. The Align Left Edge toolbar button will do what you think it will do. Most likely, however, the buttons will still have uneven spacing between them. Use the Format, Vertical Spacing, Make Equal menu option to make the spacing the same between each control.
Visual FoxPro will use the space between the first two buttons as the default space. Note that the toolbar buttons and the menu options are not enabled until you have selected a group of objects on the form.
You'll notice that the command buttons have names (not captions) of "hwcmd1", "hwcmd2", and so on. Rename each of the command buttons with better names, like so: "hwcmdBack", "hwcmdNext", "hwcmdAdd", and so on.
Add the following code to the appropriate methods:
hwcmdBack.click()
if
!bof()
skip -1
_screen.activeform.refresh()
endif
hwcmdNext.click()
if
!eof()
skip
if eof()
skip
-1
endif
_screen.activeform.refresh()
endif
hwcmdFind.click
()
messagebox('You have pressed the Find command button')
hwcmdList.click()
messagebox('You have pressed the List command button')
hwcmdAdd.click()
messagebox('You have pressed the Add command button')
hwcmdDelete.click()
messagebox('You have pressed the Delete command button')
hwcmdSave.click()
=tableupdate()
_screen.activeform.refresh()
hwcmdUndo.click()
=tablerevert()
_screen.activeform.refresh()
Note that you don't have to add code to the Done button because the code was already put into its Click() method in the hwFrm class.
Set the form template class
Now that you've got a maintenance form class, you can use it to create real live data-entry forms. Remember Chapter 8 on the Form Designer? You'll need to set the form template class in the Options dialog box:
Select the Tools, Options menu option.
Select the Form tab.
Select the HWCTRL62 class library and the hwfrmMaint class as the Form Template Class (in the bottom half of the Forms tab) as shown in Figure 13.9.
Click OK. Don't Save As Default unless you want to continue using this class across sessions of Visual FoxPro.

Creating a real form from your base class
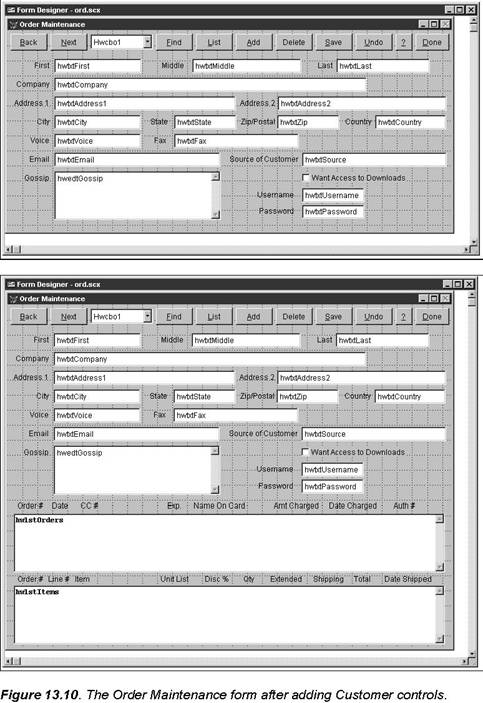
Now it's time to cook! You've got a form class and a number of control classes. The first operation to try is to create a simple maintenance form-one that allows you to maintain customers and their orders-as shown in the bottom of Figure 13.10. However, I'm not going to have you do the whole form at once. For the time being, you'll just do the part that has to do with a customer, as shown in the top of Figure 13.10. Later in this chapter, you'll add the orders and line-items sections of the form.
Create the ORDERS maintenance form
Create a new form by using the CREATE FORM ORD command (or select the File, New, Form menu option.) The actual name on disk will be "ORD".
The Form Designer appears with the caption ORD.SCX in the window's title bar.
Note that you already have a form with a bunch of controls on it. Not bad for one command, eh?
Change the caption of the form to "Order Maintenance."
Change the name of the form to "ORD."
Create a data environment for the form.
The data environment describes the tables, indexes, and relations that are available to support this form. When you run the form, the data environment is automatically opened, and the tables and relations can populate the form's controls.
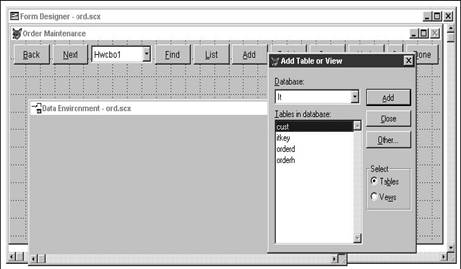
Select Data Environment from the Form Designer's shortcut menu or select the View, Data Environment menu option.
Select the Add Table menu option from the data environment's shortcut menu or the Data Environment menu pad.
Select the CUST table as shown in Figure 13.11.
Add fields to the form from the data environment.
You can (but don't do it right now!) drag fields from the data environment
![]() to the form
and the appropriate controls will be created on the form-text boxes for most
data types, edit boxes for memo fields, and check boxes for logical fields.
These controls will automatically be tied to their respective fields in the
data environment. The ControlSource property of a control specifies which field
in a table will be used to supply data values to that control. However, the
controls that you drag onto the form are created straight from Visual FoxPro's
base classes unless you map field types to your own classes. I'll discuss how
to do this later in this chapter. So for the time being, I'll ask you to put
fields and labels on the form the hard way. You'll create controls from the
Form Control toolbar that contains your custom controls, and use the data
environment to visually remind yourself as to which fields you're working on.
to the form
and the appropriate controls will be created on the form-text boxes for most
data types, edit boxes for memo fields, and check boxes for logical fields.
These controls will automatically be tied to their respective fields in the
data environment. The ControlSource property of a control specifies which field
in a table will be used to supply data values to that control. However, the
controls that you drag onto the form are created straight from Visual FoxPro's
base classes unless you map field types to your own classes. I'll discuss how
to do this later in this chapter. So for the time being, I'll ask you to put
fields and labels on the form the hard way. You'll create controls from the
Form Control toolbar that contains your custom controls, and use the data
environment to visually remind yourself as to which fields you're working on.
Add the text boxes, labels, check boxes, and edit boxes to the ORD form as shown in the top half of Figure 13.10. Notice that the controls automatically inherit the physical attributes of your own subclassed controls.
Change the properties of each control to reflect the control source for that control. If you have the Data Environment window open at the same time, you can visually inspect the list of fields to remind you which field ties to which control.
You can change the same property of a series of controls easily by selecting a
control with the Object drop-down list box, changing the value of the property in
the list box, and then using the Object drop-down list box to select the next
control. The same property will be highlighted in the list box for the new control,
and you can immediately start typing. When you are selecting a ControlSource
property, the combo box contains the fields from the data environment.
You can also select a control, select the Control Source row in the Properties
Window, and double-click. As you move from one control to the next, the next
field in the data environment's table will be displayed.
Change the following properties of the form:
BufferMode: 1-Pessimistic
DataSession: 2-Private
Save the form. Name the file ORD if you haven't already given it a name.
Run the form by right-clicking on it and selecting the Run menu command.
If you've followed all the instructions, you will be able to move from control to control, edit data in existing records, and either save or undo your changes. Clicking the Find, List, Add, and Delete command buttons will display the appropriate message.
Yes, it's just that easy
What's happening behind the scenes
When you run the form, the form knows that there is a data environment attached to it (it's now a property of the form). It opens the tables in the data environment and sets any relations that are defined. When you close the form, the tables in the data environment are automatically closed as well. You can verify that this is going on by opening the Data Session window and changing the contents of the Current Session drop-down list box.
When you click one of the command buttons, you are executing the code in the Click method of that button. As you move between buttons, that much seems obvious. However, the constant calls to the _screen.activeform.refresh() method might not be as intuitive. First, the Refresh method moves data from the table to the form's controls. If you don't call the Refresh method, clicking the Next or Previous command button will move the record point to a new record, but the form will continue to display the old data. Comment out the Refresh line in one of the methods and watch the record number change in the status bar while the form's display stays the same.
Second, what's the deal with this "_screen.activeform" syntax? Why not just use the name of the form? The reason is because this code is contained in a form class-and so it could be called by a form named anything. Because you need to reference the current object (the current form), but you don't know the current object's name, this roundabout method references the current form's Refresh method.
Inheritance at work!
If you look carefully, you'll see that the two screen shots in Figure 13.10 show that I didn't follow my own advice earlier about renaming the controls in the hwfrmMaint class. You'll see that the combo box still has the default name, "hwcbo1", instead of the name I should have given it-hwcboSort. This is not a problem, though. I just closed ORD.SCX, opened the hwfrmMaint class, and named the controls on the form properly. (You can't have a form that relies on a class-or subclass of a class-open when you want to open the class.) Then, when I reopened ORD.SCX again, the controls in this specific form also had the correct names. This is inheritance at work.
Of course, I didn't have to name the Help and Done buttons in the hwfrmMaint class, and, in fact, I couldn't even if I wanted to. The Name property for these two command buttons is dimmed and italicized in the hwfrmMaint class because the buttons are part of the class.
You can experiment yourself. Try changing properties of the controls in the class, or adding more code to the buttons-and then run the Order Maintenance form again to see the properties and behavior inherited by the form.
Thinking about more application modifications
This is so slick! The first few times I did this, I was so excited-I didn't even know what I would use all this power for, but I knew it was going to be good for something. And you might be feeling a little cocky now, too. But wait! I'd like to point out a few, er, problems with this.
You see, I bet what you'd really like is one of those fancy toolbars instead of clunky buttons on the form itself. So what's the big deal? Just create a toolbar, copy the code that was in the Click methods of the command button into the Click methods of the various toolbar buttons, and you're all set, right?
Not right! First, do you really want to duplicate that code? Whenever I hear the word "copy", the hair on the back of my neck stands on end. It doesn't sound very productive to me-and if you're going to have a toolbar, you're going to want it for all your forms. And that means that different forms will probably do different things. In other words, the Save method or the Next method will need to perform different actions according to which form you're on.
So where does the code go? Well, to make a long story short, the code does not get attached to the toolbar icon. The toolbar icon is just a mechanism to fire a method-it does not contain the method itself. But think for a minute. That means that the command button shouldn't have contained the method either. It should have contained a mechanism to fire the method, which is sitting somewhere else. And that means that you could even use a menu option as the mechanism to fire the method. This is getting good, isn't it?
So again I ask, where
does the code go? What you should have is a call to some sort of magical
"next()" method in the menu option, the toolbar, or the command button-but not
the code for the Next() method itself.
Let's try this again
|
Politica de confidentialitate | Termeni si conditii de utilizare |

Vizualizari: 1371
Importanta: ![]()
Termeni si conditii de utilizare | Contact
© SCRIGROUP 2025 . All rights reserved