| CATEGORII DOCUMENTE |
| Asp | Autocad | C | Dot net | Excel | Fox pro | Html | Java |
| Linux | Mathcad | Photoshop | Php | Sql | Visual studio | Windows | Xml |
Building Forms
The form is where the action is. Most applications need to interact with a user at some point in time, and the form is usually where they do it. In this chapter, I'll discuss the VFP Form Designer, how to create and run simple forms, and how to place and use basic controls. In subsequent chapters, I'll discuss each control in depth and then use both forms and controls to introduce Visual FoxPro's implementation of object-oriented programming. But first, let's build some forms.
The Form Designer is Visual FoxPro's tool for creating an application's user interface, and is the replacement for the Screen Builder in FoxPro 2.x and earlier. Forms are used for data-entry screens, dialog boxes, and so on. As with the other tools in Visual FoxPro, you can take a number of routes to create forms, including the Form Wizard, Quick Form, and creating a form from scratch. In addition, Visual FoxPro's object-oriented paradigm greatly expands the scope of the Form Designer's capabilities and how you go about creating forms. Nowhere in the product is object orientation more evident than when you're creating forms.
However, in this chapter, I'm going to almost completely ignore object-oriented programming, instead just focusing on the Form Designer and its related tools. There are two reasons for doing this. First, forms are a lot to bite off, and I think that trying to learn the new tools as well as the concepts of object-oriented programming is too much to handle in one sitting. There are many windows, dialogs, toolbars, and menu options that you'll use during the form-building process, and you'll want some practice just to get comfortable with where everything is.
Second, the hallmark of object-oriented programming is planning-many in our industry estimate that the planning and design phase of an application that takes full advantage of object orientation should run nearly 70% of the total development time-a far cry from the 10 to 20 percent usually spent now. However, it's likely that you live in the real world, and that means that your management or customers are going to want to see you writing code, not doing "all that other stuff." Too often we hear the line "I'll find out what the users need when I get back from my trip next week but you should start programming now." As a result, you're going to have to deliver-and you can-now. It's not an optimal process, to be sure, but it's practical. While you're learning the tools, you can be planning on how to migrate to object orientation. Most experts (and anyone who has delivered a couple of applications) will tell you that you can expect to throw out your first few attempts at designing classes. By developing skills with the tools first, you'll be able to reduce the number of attempts that you throw out because you won't have to rework your classes to handle technical mistakes-just design issues.
The big picture
Previous versions of FoxPro, as well as other "screen painting tools," came with a set of controls, such as data elements, radio buttons, and push buttons that you placed on a screen. Once you did so, that control was there to stay. If you needed to modify it, you did so directly. If you placed the same type of control on a number of screens and then decided that some aspect of that control needed to be changed, you had to change every copy of that control individually.
Visual FoxPro takes this mechanism and expands it in a number of different ways. First, it comes with an expanded set of controls that you can place on forms-including OLE objects, timers, and page frames (also known as tabbed controls). Next, instead of just placing controls on a form directly, you can create "copies" of the controls, customize those copies, and then place "copies" of the customized copies on your forms. For instance, if you wanted all your command buttons to be bright purple with an Ice Age font, you could make a custom command button with those properties and then use that as your "master" to create command buttons for each new form.
Yes, you could do this in earlier versions, but the capability wasn't native to the product and required some workarounds. To introduce a bit of object-oriented terminology (I'll go into more depth in the next chapter), this capability is called inheritance: the new controls inherit properties from the master. Visual FoxPro's set of controls is the base class of controls, while the groups of customized controls you create as well as the copies of those customized controls are subclasses.
Furthermore, and this is the cool part, the copy of your customized object that you've placed on a form isn't really an actual copy-it's a reference to your customized object. (You can actually go into the form definition and, roughly, see that there is a reference to the file name of the master control.)
This is significantly different from how Visual Basic works, where you can create a definition of an object and then use that definition to create
"copies" of it, say, to place on forms. The difference is that the copy on the Visual Basic form has no link back to its definition-all of the information in the definition is copied directly to the copy. If you change the definition, nothing happens to the copy on the form. In other words, there's no inheritance.
The effect is that if you change the original customized object, each of the controls that reference that object automatically change! So if you decide that purple command buttons aren't such a good idea after all, you can change the color of your master purple button to red, and all of the purple buttons on each form will automatically change to red. You won't have to make the changes to each individual purple button. Again, the actual command button on the form inherits the color property from your custom class.
Before I get too far past this brief example, I want to mention one thing. I've
used an example of a purple button with one font and a red button with a different font to demonstrate the concepts behind VFP's object-oriented behavior. However, in practice, you typically wouldn't use object orientation to inherit physical attributes like size and color. Instead, your goal should be to inherit behaviors and operational mechanisms. More on this in Chapter 10.
And this capability wasn't available in earlier versions of FoxPro at all. The mind boggles at the power this provides, doesn't it? And once the mind is done boggling, we realize that we've got to learn two things: how to use the Form Designer with all of its functions and controls and features; and then how to design these custom controls and how the referencing capabilities work. The above explanation is a brief summary of object orientation in Visual FoxPro-the subject is far more complex than what I've alluded to here-but even by opening the door a crack, you can see that this would be too much for one chapter, so I'm going to break it into several pieces.
In this chapter, I'm going to address the Form Designer-how to use it to create forms, place controls on the forms, and how to write code to "make things happen." But this chapter assumes that you're only going to copy objects from the set of master objects that VFP provides. And it's important to understand that this is NOT the way you're going to do development in "real life"-but then, you only used training wheels while you were learning to ride. Once you're comfortable with the tools used to build forms, we'll look at creating these customized objects and how to use them "for real." I can't stress this enough: In this chapter, you'll become familiar with the interface of the Form Designer, learn where code is, how to run forms, what the different controls are, and so on. There's a lot to learn here, so I'm not going to clutter up your brain any more than necessary. Once you've mastered the Form Designer, we'll talk about using the object-oriented capabilities of Visual FoxPro.
Terminology and tools
Forms can be simple affairs with a few buttons and perhaps a bit of text, or they can be hideously complex with several forms tied together in a "form set" and containing, collectively, dozens (or hundreds!) of controls that have any number of permutations and rules governing what happens in any given event. Before we create a form, let's go over the various pieces and tools that we're going to deal with.
The first thing to stress is that a control is any object-not just those that "do things" such as command buttons. Text boxes (where you type data), and edit boxes (where you type in data for memo fields) are also considered controls, as are option buttons, spinners, and so on.
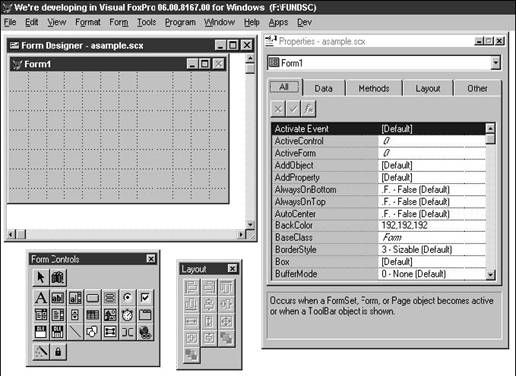
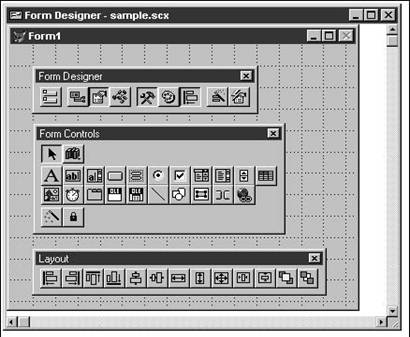
Next, when designing forms, you're actually going to use several tools, as shown in Figure
8.1. The Form Designer is a visual design tool, much like the screen painting surfaces of other currently popular fourth-generation languages. The Form Controls toolbar provides a palette of controls, such as text boxes, command buttons, and check boxes, from which you can select controls for your form. The Properties window allows you to view and modify the attributes of the form and each control on the form. The Layout toolbar provides a number of shortcuts for manipulating objects on the form.
The form acts as a "container" that holds additional objects, or controls. Each control that you place on a form (or "in a form," if you wish) has attributes that describe and define it. These include properties, such as Size and Color, and events, such as Click and GotFocus. Controls might share some attributes but not others-both a command button and a text label have a Click event, since you can click on both of them, but a command button has a Cancel property (which specifies whether the button is the Cancel button) and a text label does not. A control's properties have values, such as .T. for FontBold or 128,128,128 for ForeColor. Properties are grouped into three categories: Data, Layout, and a catchall category, Other. You can attach code to the events that belong to a control. This code would be executed when the event happens. This code is referred to as a method. A method is a set of commands to be executed when an event is fired: "Do these commands when the user clicks on this control." It's simply a function or a procedure.
Referring to forms, controls, and properties requires new syntax, and additional functions and keywords. In brief, you'll refer to each of these objects using a naming convention that begins with the object closest to the top of the containership hierarchy and then moves down to each contained object. For instance, to refer to the foreground color property of a command button named cmdDone in a form named frmLookUp while inside a form, you'd use the following type of syntax:
frmLookUp.cmdDone.ForeColor
It's often useful to be able to use generic code to refer to the form, and you can do so with the THISFORM keyword (which is similar to the ME keyword in other languages). Thus, you could use this alternative:
thisform.cmdDone.ForeColor
This would prevent you from having to know the name of the current form. And if you're referencing whichever form happens to be active, from anywhere in the application, you could use the _SCREEN.ACTIVEFORM keywords, so your command would look like this:
_screen.activeform.cmdDone.ForeColor
Running methods similarly requires new syntax as well as additional functions and keywords. For example, to call the Refresh method of a form from somewhere else in the form, your command would look like this:
thisform.refresh()
We'll delve into the hows and whys later; for now, follow along with each example to see how to reference various objects.
Creating and running a form
The first form you're going to build will simply introduce you to the process of creating a form and running it. There are a number of significant differences between Visual FoxPro and earlier versions, and I'll cover many of them immediately. Follow these steps:
1. Create a blank form by opening the File menu and selecting New, Form, New File. Or type:
create form XXX
where XXX is the name of the new form. Doing so creates a pair of files named XXX.SCX and XXX.SCT. These are a .DBF and matching .FPT file that hold the information for the screen. Each record in the table represents an object in the form.
The Form Designer window will appear. You'll notice that the Form Designer contains a smaller window named Form1. Several other windows and toolbars may appear automatically.
2. Open the other tools so they're available during form design.
. . Open the Form Control and Layout toolbars if they didn't automatically appear. Use the View, Toolbars menu option.
. . Dock the toolbars to the top of the screen for the time being. You might decide to change their position later, but as you're getting used to having a multitude of windows on the screen, this will keep a couple of them out of the way.
. . Open the Properties window if it's not visible. You can do this by right-clicking on the new form and selecting Properties, or by selecting the View, Properties menu option (the Form Designer must be the active window).
. . You'll notice that the Object combo box in the top of the Properties window shows that the current object being displayed is the object Form1. The properties shown in the list box portion of the Properties window are all specific to the form. As you add controls to the form, you can use the Object combo box to switch between various objects associated with the form, thus being able to view and modify the properties that apply to each object.
. . Open the Code window if it's not visible. You can do this by right-clicking on the new form and selecting Code, or by selecting the View, Code menu option (again, the Form Designer must be the active window). At this point, you now have all the tools you'll need for designing a form. And you'll now see why a 17-inch monitor at 800 x 600 or better resolution is highly recommended.
3. Modify the form itself.
. . Select the Properties window and change the title for the form by selecting the Caption property and typing in a new caption, such as "My Hello World Form" in the Property entry box under the tabs. Press Enter to save the new value.
. . Change the color of the form's background by selecting BackColor and clicking the ellipsis button next to the Property entry box, and then selecting an appropriate color, such as hot pink. As soon as you click OK in the Color Palette window, the form will change to reflect the new color you've selected.
4. Add a label control to the form.
. . Place a label in the form by selecting the Label icon in the Form Controls toolbar and then clicking in the form. A crosshair will appear as you are dragging, and the label will appear once you let go of the mouse button. Notice that the contents of the Properties window have changed so the current object is the label you just created.
. . Change the caption of the label by selecting the Caption property, as you did with the Form Caption. Again, press Enter to have the change take effect. You might also need to widen the label so that the entire caption appears. To do so, you can either change the label's AutoSize property to True, in which case the label will be resized to the needed width (but no wider), or you can drag one of the sizing handles (the eight black boxes on the corners and sides of the label).
5. Add a "Hello World!" command button to the form.
. . Place a command button in the form by selecting the Command Button icon in the Form Controls toolbar and clicking and dragging in the form to size the button. Once you are done, the button will appear with the caption Command1, and the Properties window will change to show the properties of the command button.
. . Change the Caption of the command button to "Say Hello" in the same way you changed the form and label captions.
. . Create a method that will display a "Hello World" message when the Command1 (Say Hello) button is clicked. Select the Code window, select the Command1 button from the Object combo box, and then select the Click event from the Procedure combo box. Then, type the following code in the edit region of the code window:
messagebox('Hello World!', 48, 'Just Testing')
(For those of you who have used the MessageBox function in earlier versions of FoxPro, you no longer need to "set library to FOXTOOLS" before using MessageBox!)
6. Add a Done command button to the form.
. . Place a second command button in the form. Note that this button will appear with the caption Command2, and the Properties window Object combo box now contains entries for the form, label, and both command buttons. Change the Caption to "Done."
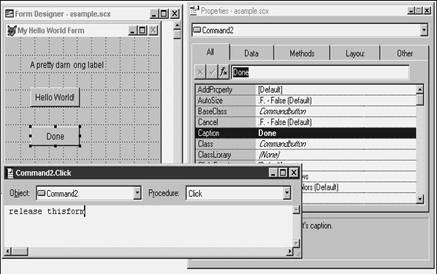
. . Place a method that will terminate the form in the Click event of the Done command button by selecting the Code window, selecting Command2 from the Object combo box and typing the following code in the edit region of the code window (see Figure 8.2):
release thisform
(We'll discuss the new language and syntax later.)
7. Run the form.
. . You can run this form in one of about a thousand different ways. You can (1) click the Run (exclamation) icon in the standard toolbar, (2) right-click on the form and select the Run menu option, (3) select the Form, Run Form menu option, or (4) if you've already given the form a name and saved it, select the Program, Do menu option, and then select the form name from the dialog.
. . You'll be prompted to save (or resave) the form and the code for Command1 and Command2.
. . The form will appear. You can click the Say Hello button, move the form around, resize it, and so on. When you're finished playing with it, click the Done command button to get rid of it.
Users of earlier versions of FoxPro will notice that there is no intermediate "generate" process. In essence, Visual FoxPro runs the .SCX "as is" instead of running the .SCX data file through a generate program to create a .PRG-like file. The object code actually executed is stored in the .SCX along with the rest of the data elements.
Changing form properties through user input
Now that you understand how to build and run a simple form and how to access the various controls and tools you need to use to do so, let's create a form that accepts user input and does something with it. This form will take the value that you enter into a text box, and change the caption of a button to that string. Then it will allow you to add, subtract, multiply, and divide two numbers that you enter on the form, as shown in Figure 8.3.
1. Create a blank form.
. Change the following properties:
Caption:
User Input Sample
Name: UserInput
. . Save the form with the file name "UserInput."
. . Resize the form by dragging the corners so that it takes up about a quarter of the screen. If you enlarge the Form Designer window, you'll see a white rectangle that represents the maximum size of a form that can be designed. (The size of this rectangle is determined by an option in the Forms tab of the Tools, Options dialog.) Once you've got the form approximately sized, use the Height and Width properties to specify its exact size.
. . You can turn the Grid Lines on or off with the View, Grid Lines menu option; enable or disable the Snap To Grid functionality with the Format, Snap To Grid menu option; and enable or disable the position display in the right side of the Status Bar with the View, Show Position menu option. If you want Grid Lines on, you can control the spacing of the lines with the Format, Grid Scale menu option. The unit of measure used by each of these is controlled by the Scale Units combo box in the Forms tab of the Tools, Options dialog; by default, it's Pixels.
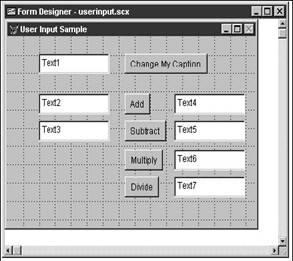
2. Place seven text boxes and five command buttons on the form as shown in Figure 8.3. Set their properties as follows:
command1
AutoSize: .t. - True
Caption: Change My Caption
command2
AutoSize: .t. - True
Caption: Add
command3
AutoSize: .t. - True
Caption: Subtract
command4
AutoSize: .t. - True
Caption: Multiply
command5
AutoSize: .t. - True
Caption: Divide
3. Enter the following code into the Click event of each command button. (You can double-click the button and select the Click event from the Procedure drop-down menu.)
command1.click()
this.caption = thisform.text1.value
command2.click()
thisform.text4.value = thisform.text2.value + thisform.text3.value
command3.click()
thisform.text5.value = thisform.text2.value - thisform.text3.value
command4.click()
thisform.text6.value = thisform.text2.value * thisform.text3.value
command5.click()
thisform.text7.value = thisform.text2.value / thisform.text3.value
4. Enter the following code into the Init event of the form. (You can double-click on the form itself and select the Init event from the Procedure drop-down menu.)
thisform.text2.value
= 0
thisform.text3.value = 0
5. Run the form.
. . Enter a text string into the text1 text box, and click the command button to its right. The caption of the command button will change to display the string.
. . Enter two numbers in the bottom two text boxes on the left (text2 and text3), and click the various command buttons to their right. You'll see the results display in the text boxes next to the command buttons. Note that you'll be prohibited from entering non-numeric values. Furthermore, if you enter a zero in the bottom text box and then try to divide, you'll get a value of "*****" in the corresponding text box.
. . The code entered in the Init event defines the contents of the two text boxes as numeric-if this code hadn't been included, Visual FoxPro would have interpreted an entry of "2" as a string instead of a number, and would have had the greatest difficulty in multiplying or dividing the two values.
6. Modify the form while it's running.
You'll notice that while the form is running, the Command window appears again. This means the form is running, but you can issue interactive commands as well. Try entering the following commands in the Command window to see how they affect the form. Note that the third command will terminate the form and you'll have to run the form again! You can waste the better part of an afternoon playing with the various properties, setting them to different values, turning buttons on and off, and so on. I know I have.
_screen.activeform.command1.visible
= .f.
_screen.activeform.command1.visible = .t.
_screen.activeform.release()
_screen.activeform.text1.height = 80
7. Close the form by clicking the Close box in the upper right side of the title bar or select the Close menu command from the Control menu (click on the icon in the upper left side of the title bar).
Calling methods from objects on the form
You can now make changes to the form's controls from within the form. You've already done this when you've changed the caption of a command button or calculated a new value to be displayed in a text box. But you also have access to the events and methods of a form, and its controls as well. It's probably a good idea to make clear, again, the distinction between a method and an event, and the example I'll present here will emphasize the difference.
An event is an action that automatically happens. For example, when you click a command button, the Click event is fired automatically. Or, when you tab into a text box, the GotFocus event fires. You don't have to do anything for either of these events to occur. A method, on the other hand, is a procedure-a subroutine of code that you write. You create a procedure of your own, place the method code into that procedure, and then explicitly call that method, or you can attach your own method code to an existing event. I'll show you how to do both.
You'll put several simple controls on a form, then add code to several of the existing events-both of the form and of the controls you've added-and then add your own procedures and call them.
1. Create a blank form.
. Change the following properties:
Caption:
Call Methods
Name: CallMethods
. Save the form with the file name "CallMethods".
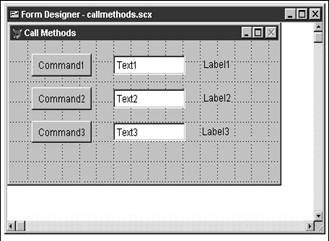
1. 2. Place three command buttons, three text boxes, and three labels on the form as shown in Figure 8.4.
2. 3. Enter the following code into following form events:
Load():
messagebox('Form Load')
Init():
messagebox('Form Init')
Show():
messagebox('Form Show')
Activate():
messagebox('Form Activate')
4. Enter the following code into the following events of each control:
command1.click():
messagebox('Command1 click')
thisform.YourCustomMethod()
command2.click():
messagebox('Command2 click')
thisform.command1.click()
command3.click():
messagebox('Command3 click')
text1.GotFocus():
thisform.label1.caption = 'Text1 got focus'
text1.LostFocus():
thisform.label1.caption = 'Text1 has now lost focus'
text2.GotFocus():
thisform.label2.caption = 'Text2 got focus'
text2.LostFocus():
thisform.label2.caption = 'Text2 has now lost focus'
text3.GotFocus():
thisform.label3.caption = 'Text3 got focus'
text3.LostFocus():
thisform.label3.caption = 'Text3 has now lost focus'
5. Create a brand new method of your own, called YourCustomMethod.
. . Open the Form menu and select NewMethod.
. . Enter "YourCustomMethod" in the Name text box. (Note that whether you use uppercase, lowercase, or "camel" case is irrelevant because VFP will convert the name to lowercase automatically. I just used camel case because it's easier to read in the book.)
. . Click the Add button.
. . Click the Close button (because the New Method dialog stays open after you add a method).
. . Find the YourCustomMethod method in the Methods tab of the Properties window. It's at the very bottom of the list. Note that all custom properties and methods are located after all of the native Visual FoxPro properties and methods.
. . Open the method, and add the following code:
messagebox('Called from YourCustomMethod')
6. Run the form.
. . You'll notice that you'll get four message boxes, in the order of Load, Init, Show, and Activate, before the form actually displays. Once the form displays, you can select another window, such as the Command window. When you select the form again, the Activate message box will display again, because the Activate event is firing when you make the form active.
. . Tab through the form, and watch each of the labels change as you move into and out of each text box.
. . Finally, click each command button. You'll get two message boxes when you click Command1: one when the Click event fires (and thus displays the message box in response to the command), and one that indicates YourCustomMethod has been called from the Click event.
Clicking the second command button will display three message boxes: one for the Command2 Click event, and then the two that were also fired when the Command1 Click method was called. It's important to note that you're simply executing the code in the Command1 Click method-but you are not actually firing the Click event itself.
If you're tempted to brush over this concept, don't! A number of things happen when you click a command button, and one of them is the Click event firing. Another is that if the command button didn't have focus before you clicked it, it gets focus when you click it. You can prove this by putting the following code in Command1's GotFocus event:
messagebox('Command1 GOT focus')
When you run the form, you'll get the four message boxes for Load, Init, Show, and Activate. Then you'll get a fifth message box because the first control on the form- Command1-then gets focus, and the message box is displayed.
If you click on, say, Command3, just to move focus away from the action, and then you click Command2, you'll get three message boxes: one for Command2's Click event, and then the two that are called from Command1's Click event. Note that even though Command1's Click event was fired, the GotFocus event for Command1 was not-because calling Command1's Click event is not the same as clicking the button itself.
Integrating forms and data
Now that you're comfortable building a form (you have spent a few afternoons goofing around with this stuff, haven't you?), manipulating properties, and getting data from the user, it's time to look at getting a form to talk with data. In this example, I'm going to build a simple form that will navigate through a table. If you've used previous versions of FoxPro, you'll notice that SCATTER and GATHER are no longer part of the technique.
1. Create a blank form.
. Change the following properties:
Caption:
People
Name: People
. Save the form with the file name "People".
1. 2. Do NOT put labels or text boxes on the form yet!
2. 3. Put two command buttons on the form.
. Change the following properties:
Command1:
Caption: Next
Name: cmdNext
Command2:
Caption: Previous
Name: cmd Previous
. Add the following code to the methods:
cmdNext.click():
skip
thisform.refresh()
cmdPrevious.click():
skip -1
thisform.refresh()
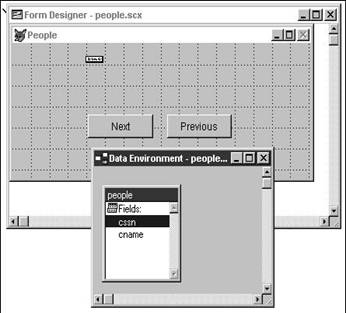
4. Attach data to this form by adding a data environment.
. . Right-click on the form and select the DataEnvironment menu command.
. . The Open dialog will appear, asking you to select a table or database. Select the PEOPLE table. A People window will appear in the Data Environment window. The Add Table or View dialog will still be displayed, so click the Close button.
5. Add data-bound controls to the form from the data environment.
. . Click one of the fields in the People window in the Data Environment window, and drag it to the form, as shown in Figure 8.5. When you drop the field on the form, a text box and a related label will be added to the form. The label's caption
. . If you then examine the text box, you'll see that several properties have been automatically set as a result of dragging the field from the data environment to the form. For example, the ControlSource has been set to the table.fieldname value, the MaxLength property has been set to conform with the length of the field in the table, and the text box has been named in accordance with the standard naming conventions described in online help, such as txtcSSN if you dragged the cSSN field.
will be the name of the field in the table, and the text box will be sized approximately to the size of the field.
6. Run the form.
. . Click the Run button.
. . Clicking the Next and Previous buttons will move the record pointer through the table one record at a time. If you go too far in either direction, you'll get an appropriate error, because there isn't any error trapping in the simple code in the two command buttons' Click events.
. Now try changing the contents of some of the fields. Type in a new value and then move on to the next record. Moving back to the original record shows that the change was indeed written to the table. A number of questions immediately crop up. The first one concerns the fact that we never wrote a single line of code to handle opening the database or PEOPLE table. This is all handled behind the scenes via the Data Environment. The second question that many of you Xbasers
are asking is, "How are you getting data from the table to the form, and how are you getting the changes back to the table?" The answer is simply that each control is bound directly to the field in the table-much like you could do with direct editing in FoxPro 2.x.
. . Visual FoxPro contains a new mechanism, buffering, for moving data between forms and tables if you don't want to use direct editing. I'll discuss the ramifications of data buffering in detail in the next section of the book, including multi-user concerns and handling contention.
7. Try running a second copy of the form.
. . After running the form once, click in the Command window and issue the command DO FORM PEOPLE. If you've been playing around while I was looking somewhere else, you might have accidentally already run a second copy of the form. It might not have been obvious, because the second copy will reside on the same space as the first. If that's the case, drag one copy of the form away so that you can see both.
�.. As you navigate between records in one form, nothing will happen in the second form. However, it's simply because the display has not changed. Try this:
. . Move to the first record of the first copy of the form, and then press Next, so that you're on record number 2.
. . Click on the second form, note which record you're on, and then press Next. You won't go to the record following the one that you had been looking at- instead, you'll move to record number 3. Both forms are simply different windows looking at the same record pointer in the same table.
Rather disappointing-almost thought we were going to be able to play some handy tricks, eh? Ha! All is not lost.
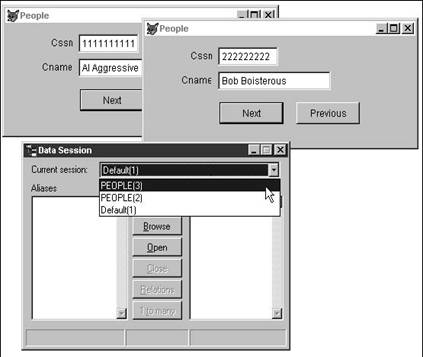
8. Create private data sessions.
. . Close the forms, close the PEOPLE table, open the PEOPLE form in design mode, and change the form's DataSession property to 2 - Private Data Session.
. . Run two or more copies of the form. To run more than one copy, either issue the command DO FORM PEOPLE or click the Run button to get one copy up and running. Then, while that form is active, notice that the Command window displays again. Click in the Command window and issue the command DO FORM PEOPLE a second time. A second instance of the form appears on top of the first one. Move it to another location on the screen. You can now move between forms just as you would with any other two windows on the screen. Navigate through both copies of the form. As you switch between the forms, notice that you truly have two unique views on the table, much as when you have two users on different computers using the same application-both can do their own work, even on the same table, without colliding with each other.
. . In other words, you can think of this "private data session" property as having two copies of the same form-each running by itself. Each copy of the form has its own "copy" of the table that it is working with-much like several users on a network.
. . If you open the Window menu, you'll see two instances of the PEOPLE form, and if you open the Data Session window, you'll see two instances of the PEOPLE form available for switching between, as shown in Figure 8.6. The second and third names are the names of each data session, just as you can USE a table AGAIN with a different alias.
Up close with the Form Designer
There are several components in VFP that you'll use when designing forms. Here, I'll walk you through each component individually.
Form Designer
The Form Designer consists of two windows. The larger one-the Form Designer window- displays the entire available screen. In other words, if you're working with a 640 x 480 screen, you can move around in the Form Designer window and see the entire surface. The available surface and the area beyond are distinguished by different colors. The smaller window shows you the size of the form you are creating. You can't create a form larger than the screen size that is set in the Forms page of the Tools, Options dialog. When you create a formset (two or more forms that work in concert), all of the forms in the formset will appear in the Form Designer window. It is possible to have a formset where all of the windows will not fit nicely on the screen-one will have to overlap the other. However, even with a formset, no individual form can be larger than the screen.
Right-clicking in the Form Designer window will open a context menu with the following choices:
|
Run Form |
Runs the form. If you have checked the "Prompt to save changes before running form" check box in the Forms tab of the Tools, |
|
|
Options dialog, you will be prompted to save any changes. If the |
|
|
check box was not checked, the form will automatically be saved before it is run. |
|
Paste |
Pastes to the form a copy of whatever is on the clipboard as |
|
|
appropriate. |
|
Data Environment |
Opens the Data Environment window. |
|
Properties |
Opens the Properties window. |
|
Builder |
Runs the currently registered Form Builder. See Chapter 20 for |
|
|
more about Builders. |
|
Code |
Opens the Code window for the form. |
Right-clicking an object on a form will bring up a shortcut menu with the following menu options:
|
Undo |
Cancels the most recent action, such as resizing or moving the |
|
|
|
object, or changing a property. |
|
|
Cut |
Deletes the selected object or objects and places them on the |
|
|
|
clipboard. |
|
|
Copy |
Copies the selected object or objects to the clipboard. |
|
|
Edit |
If the selected object contains other objects (like a PageFrame |
|
|
|
containing multiple pages), enables the objects inside the selected |
|
|
|
object for selection themselves. |
|
|
Properties |
Opens the Properties window. |
|
|
Builder |
Opens the builder for the selected object. Note that if more than one |
|
|
|
object is selected, the builder will apply to all of the objects if |
|
|
|
possible. |
|
|
Code |
Brings forward the Code window for the current object. |
Properties window
The Properties window allows you to view and edit the properties and methods attached to any object in the Form Designer, including the formset, each form, containers, and controls.
The Object combo box at the very top of the window allows you to select an object in the Form Designer, and the Page Frame below it will then display the properties and methods for that object. The objects in the combo box are listed in hierarchical order: The formset, if any, will be listed first, then the first form, any container objects in that form, then control objects, and so on for each additional form. Within a hierarchy, the objects are listed in the order that you created them.
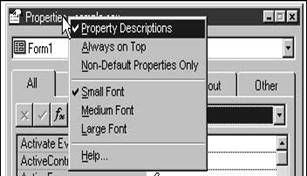
Right-clicking on the title bar of the Properties window displays a context menu that allows you to set a variety of properties for the Properties window. See Figure 8.7. Each of the first three menu commands can be selected (or deselected) simply by clicking them. Checking Property Descriptions will cause a read-only edit box to display at the bottom of the Properties window-I always leave this on unless I'm really cramped for room on the screen.
Checking Always on Top will cause the Properties window to float on top of other windows, even when it doesn't have focus. This can be handy to avoid losing the Properties window underneath a dozen other windows, but if you're short on screen space, it can also be annoying because you'll be constantly moving it around as you're trying to work with whatever's underneath. Remember that you can always tell which window is active because its title bar will be a different color than the rest of the windows on the desktop.
Checking Non-Default Properties Only will display only those properties that have been changed from their default values, and methods that have code added to them. I typically keep the Properties window open and sized to fit the entire height of the screen, so I can see as many properties as possible at a glance. This option, then, is terrifically handy when you are working with a series of objects that each have hundreds of PEMs (Properties, Events, and Methods) and you only want to change a couple of properties of each, and you don't have the screen space to keep the Properties window open all the way.
The second group of menu commands works in concert-much like an option button group. The selection you make determines the size of the font used in the list box that displays all of the properties and methods, but it doesn't change the font of the Object combo box, the tabs of the page frame below the Object combo box, or the text box or combo box that displays the value of the currently selected property.
In addition to seeing a PEM's Property Description displayed for the highlighted PEM, you can select the Help menu command or press F1 to display the help topic for that PEM.
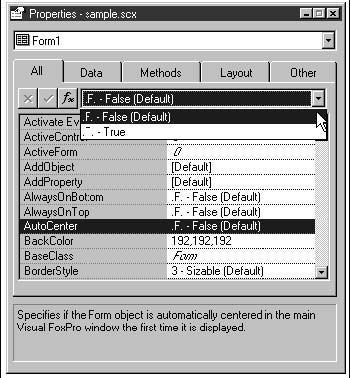
Underneath the Object combo box is a five-tab page frame, as shown in Figure 8.8. The first tab, All, displays all PEMs for the currently selected control. The next four display just a subset of PEMs-the Data tab displays those properties that have to do with data binding of an object to its data source; Methods displays a list of all events and methods for the object; Layout displays those properties affecting the physical appearance of the object; and Other displays the remaining properties. Naturally, different objects have different properties, events, and methods, and so some of these tabs might be empty or sparsely populated.
The set of controls immediately underneath the tabs is called the Property Settings box; it contains four controls that allow you to change the value of the currently selected property.
The list box below the Property Settings box displays a list of the properties or methods according to which tab is selected. You can navigate through this list box to select a specific property with which to work.
The type of control on the far right of the Property Settings box varies according to the type of property that is highlighted in the list box. Some properties can have free-form text values, such as the caption of a form, and so the control is simply a text box. Other properties have predetermined values, so the control is a combo box with the allowable choices already provided. For example, the Enabled property can be set to True or False. Still other properties can have a large number of choices, such as the foreground or background color. The control for these is a combination of a text box and a command button, called a dialog button, which allows you to open a dialog to select the property's value from a dialog box.
When a method is highlighted, the controls in the Property Settings box are disabled.
The command buttons on the left side of the Property Settings box are, from left to right, Cancel, Accept, and Expression Builder. Once you have entered a value for a property, click Accept to confirm the value, or click Cancel (or Escape) to abandon your change and revert to the previous value. The Expression Builder button opens the Expression Builder so you can create a complex expression.
The list box of properties is extremely robust and contains a lot of hidden functionality.
Properties that are read-only at design time are displayed in italics. Properties that you have changed are displayed in bold.
You can place your cursor between the two columns and resize the columns to see either a long property name, or the value of a property that extends past the edge of the second column. If that's not enough, of course, you can widen the Properties window itself.
Pressing Ctrl+Alt plus the first letter of a property name will move the highlight down to the first property that begins with that letter. Subsequently pressing that letter (while holding down the Ctrl+Alt key combination) will move down one property at a time.
You can double-click a logical property to change the value from True to False or vice-versa, and on a multi-valued property to cycle from one value to the second to the third and so on. You can also double-click on a color-related property to bring up the Color dialog.
Right-clicking a property in the list box will bring up a context menu whose options vary according to the type of property. Clicking Reset to Default will change the property back to its original value. This is different than simply manually changing the property back to its default value. Here's why. Like earlier versions of Fox, Visual FoxPro forms are stored on disk as tables-if you created a form named SAMPLE, you could look at the table by using the commands:
use SAMPLE.SCX browse
One of the fields in this table is a memo field that contains the values for each property that was manually changed. Thus, if you changed the Caption and Enabled properties, the Properties memo field of SAMPLE.SCX would contain the following information:
Caption = 'My Test Form'Enabled = .F.
If you then changed the Enabled property back to True by double-clicking it, the property would be bold, indicating a manual change, and the contents of the Properties memo field of SAMPLE.SCX would look like this:
Caption = 'My Test Form'Enabled = .T.
If, on the other hand, you just Reset to Default the Enabled property, the contents of the Properties memo field would look like this:
Caption = 'My Test Form'
The Zoom menu command on the context menu will display a small editing window that's easier to use for editing long expressions than the limited area in the text box. The Expression Builder menu command will open the Expression Builder, of course.
Code window
The Code window is used to create and edit methods for an object's events. It consists of two combo boxes and a text-editing window. The Object combo box allows you to move between the various objects in the form (or formset), and the Procedure combo box allows you to move between the various methods of a specific object.
Given the number of objects that a form could contain, as well as the number of events and methods that each object has, you might be wondering how you're going to remember which objects and methods contain code.
First of all, every method that contains code is displayed in bold, with a value of User Procedure in the Properties window. Second, when you open the Procedure combo box in the Code window, those methods that have code will be displayed in bold-and they will be moved to the top of the list. Even better, however, is the functionality of the PageUp and PageDown keys. With both combo boxes closed, press either key. The code window will automatically jump to the next combination of object and procedure that contains custom code. As a result, you can easily navigate from one procedure to the next that contains code.
Right-clicking on the Code window will not bring up a context menu.
Form Designer toolbar
The Form Designer toolbar acts as a launching pad for quickly getting at various Form Designer tools. It contains the following buttons, from left to right (see Figure 8.9):
|
Set Tab Order |
Changes the form to Set Tab Order mode. |
|
Data Environment |
Opens the Data Environment window. |
|
Properties window |
Opens the Properties window. |
|
Code window |
Opens the Code window. |
|
Form Controls toolbar |
Opens the Form Controls toolbar. |
|
Color Palette toolbar |
Opens the Color Palette toolbar. |
|
Layout toolbar |
Opens the Layout toolbar. |
|
Form Builder |
Allows you to select tables, create forms, and apply styles of fields, |
|
|
including elegant, contemporary, or professional. |
|
Auto Format |
A builder that allows you to select from one of three default formats |
|
|
for specific properties of all of the objects on the selected form, including borders, colors, fonts, layout, and 3-D effect. |
I personally don't ever have the Form Designer toolbar up, because I usually keep open the tools that it launches instead.
Form Controls toolbar
The Form Controls toolbar, as shown in Figure 8.10, is used to place controls onto a form.
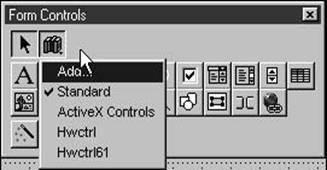
The first button on the top row, Select Objects, is used simply to deselect another button that has been depressed. The second button, View Classes, has a small arrow in the lower right corner. This signifies that clicking the button will open a menu. This menu allows you to choose which set of controls will be shown on the Form Controls toolbar. By default, the standard Visual FoxPro classes are displayed. You can change this to display selected ActiveX controls, or one or your own set of control classes as desired.
The middle two rows of buttons are for each native Visual FoxPro control. I'll discuss each of these at length in Chapter 9, so I'll skip over them now. The last row's buttons are the Builder Lock and the Button Lock. Clicking the Builder Lock will cause the builder for a specific control to be invoked once you place the control on a form, instead of placing the control on the form and then calling the builder from the control's context menu. You'll need to click the Builder Lock again to turn this functionality off.
When you click a control's toolbar button, it stays depressed until you place the control on a form, and then it automatically pops out again. This can be annoying if you want to drop several copies of the same control on a form. The Button Lock will keep the button for a control pressed in after the control has been dropped on a form. This is really handy-it allows you to place several of the same type of control on a form simply by dropping them one after another on the form, instead of having to click the control's toolbar button, drop it on the form, click the toolbar button again, and so on. When you are done dropping controls on a form, click the Button Lock again.
Layout toolbar
The Layout toolbar is used to manipulate controls on a form or a report, and contains the following buttons, from left to right (see Figure 8.9):
|
Align Left/Right/Top/Bottom Sides |
The first four buttons will align all selected controls to the named position. In other words, if you put a bunch of text boxes on your form, select all of them and then press Align Left Sides, they'll all be left-justified to the left edge of the left-most control. If you hold down the Ctrl key while clicking on the button, they'll all be left-justified to the left edge of the right-most control. |
|
Align Vertical/ |
Similar to the first four, these two buttons will align all selected controls along an imaginary vertical horizontal axis. I can never keep vertical or horizontal straight, so it's handy to have the picture on these buttons. |
|
Make Same Width/Height |
These buttons will resize all selected controls to the same width or height of the control with the largest dimension. Similar to the Align Left/Right/Top/Bottom buttons, holding down the Ctrl key while pressing this button will resize all selected controls to the smallest dimension. |
|
Make Same Size |
This button will resize all selected controls to the same size as the largest control in the selection. Holding down the Ctrl key at the same time will resize all selected controls to the same size as the smallest control in the bunch. |
|
Center Horizontally/ Vertically |
These buttons will center a control or group of controls within the confines of the form they're contained in. Note that if a group of controls is selected, the entire group will be treated as one object. |
|
Bring to Front/ Send to Back |
When you place a control on a form, it's as if you're placing a transparent overlay on the form. When you place a second control on the form, think of it as being placed on a second transparent overlay. If those two controls are on top of each other, it's possible for the first control to be obscured by the second one that's "on top" of it. You might want the first one on top of the second one. These two buttons allow you to rearrange the "order" of the "overlays" by pulling the selected control up to the top, or pushing it down to the bottom. |
I keep the Layout toolbar open all the time, because I'm forever changing the visual appearance of the form, and thus want to change the way the controls are aligned.
Menus
When the Form Designer window or Properties window is on top, the following menus change to include the following menu options. Not all menu options are available at all times. For example, when the Code window is on top, the View and Format menus change back to display normal text-editing menu options because you'll be doing text editing.
View menu
The View menu contains the following additional menu options when the Form Designer window is active:
|
Tab Order |
Allows you to change the order in which focus moves from control to |
|
|
control. Tab Order is covered in more detail later in this chapter. |
|
Data Environment |
Opens the Data Environment window. |
|
Properties |
Opens the Properties window. |
|
Code |
Opens the Code window. |
|
Form Controls Toolbar |
Displays the Form Controls toolbar. |
|
Layout Toolbar |
Displays the Layout toolbar. |
|
Color Palette Toolbar |
Displays the Color Palette toolbar. |
|
Grid Lines |
Makes grid lines on the form either visible or invisible. This overrides the setting of the Grid Lines check box in the Forms tab of |
|
|
the Tools, Options dialog. The distance between grid lines on a form |
|
|
is controlled by the Horizontal spacing (pixels) and Vertical spacing (pixels) settings in the Forms tab of the Tools, Options dialog. You |
|
|
should leave this on unless you've got perfect vision out of all seven eyes and thus can line up controls without any aid whatsoever. |
|
Show Position |
Displays or hides the location and size of the current control in the |
|
|
right side of the Status Bar. This overrides the setting of the Show Position check box in the Forms tab of the Tools, Options dialog. |
|
|
You should also leave this on, again, unless you have the perfect |
|
|
vision mentioned above. You think I'm joking? You might not be able to tell, or care, if a couple of your controls are out of sync with |
|
|
each other. But there are humans-lots of them, actually-who can discern this type of aberration, and it will ruin their day, much like |
|
|
the princess and the pea. |
Format menu
The Format menu has a number of choices you can use to simultaneously manipulate multiple objects on a form; it also has many additional functions.
|
Align |
Includes the same choices as the Layout toolbar: Align to Left/Right/Top/Bottom, Vertical/Horizontal Centers, and Center |
|
|
Vertically/Horizontally. |
|
Size |
Includes a couple of new choices as well as some from the Layout |
|
|
toolbar. Fit will resize a control to the length of its caption-useful particularly for option buttons and check boxes. Grid will snap a |
|
|
control to the nearest grid lines. Tallest/Shortest/Widest/Narrowest |
|
|
work as they do on the Layout toolbar. |
|
Horizontal/Vertical Spacing |
Allows you to make the space between selected controls the same as the first two controls on the top or to the left, or to increase or decrease the space a pixel at a time. |
|
Bring to Front/Send to Back |
Performs the same functions as their counterparts on the Layout toolbar. |
Allows you to determine whether or not controls that are placed on a form will be snapped to the grid on the form. The setting of the Snap to Grid check box in the Forms tab of the Tools, Options dialog determines the way this menu option is initially set. Whether or not you should leave this on is a topic hotly debated late at night at those programmer conferences-some people like it on, because you can nudge objects one pixel at a time using the keyboard arrows, while others are just control freaks (is that a great pun, or what?), and want to do it all themselves.
Snap to Grid
Allows you to set the distance, in pixels, between grid lines on a form. The settings of the Horizontal/Vertical spacing (pixels) spinners in the Forms tab of the Tools, Options dialog determines the way this menu option is initially set. A lot of developers set this to a 5x5 or 6x6 grid for more granular divisions on the form.
Set Grid Scale
Form Menu
The Form menu allows you to manipulate the form and its objects. It contains the following options:
|
New Property |
Allows you to create a new property for the form. (Before you go looking for this same function-and New Method, to boot-for a |
|
|
control, I'll stop you here. It's only available for forms and classes.) |
|
New Method |
Allows you to create a new method for the form. |
|
Edit Property/Method |
Allows you to modify and delete (using the Edit Property/Method dialog) a property or method you created using one of the first two menu options. See Chapter 10 for more information about user-created properties and methods. |
|
Include File |
Specifies an include file for the form. Include files are covered later |
|
|
in this chapter. |
|
Create Formset |
Creates a formset object. This is required before adding additional |
|
|
forms. |
|
Remove Formset |
Deletes the formset object (available only when there is a single |
|
|
form in the formset). |
|
Add New Form |
Creates an additional form within a formset. |
|
Remove Form |
Deletes a form from a formset. |
|
Quick Form |
Opens the Form Wizard. |
|
Run Form |
Runs the form after prompting you to save any changes. |
Tab order
Tab order is the order in which the controls receive focus as the user is tabbing through the form. This is one of those features that's nearly an afterthought to a developer, but of critical importance to a user, because it can significantly help or hamper productivity. The native tab order of a form is the order in which the controls are placed on the form; it has nothing to do with their physical position on the form.
Using the Tab Ordering combo box in the Forms tab of the Tools, Options dialog, you can choose between two methods for rearranging tab order after placing controls on a form.
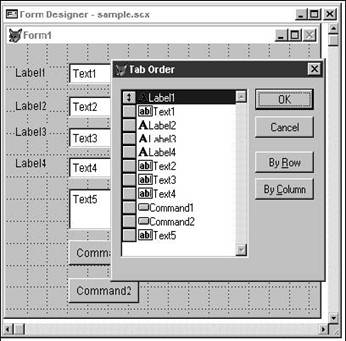
If you select Interactive from the Tab Ordering combo, then when the Form Designer window is active and you select the View, Tab Order menu option, you'll be able to click each control in the order you want them to receive focus. See Figure 8.11. Note that every control, whether or not you might actually enter data in it, will participate in the Interactive Tab Ordering process.
In Figure 8.11, a numbered label is attached to every control on the form, reflecting the current tab order. To change it, start clicking on the numbered labels in the desired tab order. You can ignore all of the labels and any other controls that won't participate, but be careful-if you make a mistake, it's difficult to recover and you'll probably find yourself starting all over again. This can be a daunting proposition if you've got 50 or 60 controls on a form, so it's a good thing there's a second way: By List.

If you select By List from the Tab Ordering combo, you'll be able to use a different mechanism when selecting the View, Tab Order menu option. The dialog that appears, as shown in Figure 8.12, presents a couple of ways to redefine the tab order. If you click the By Row or By Column buttons, all of the controls on the form will be ordered according to their physical position on the form.
The controls are all listed in the list box in the Tab Order dialog, and you can use the mover bars to the left of each control to position each control precisely in the tab-ordering scheme.
You might find it handy to click the By Row button first, to get a rough pass at the order, and then use the mover bars to fine-tune any adjustments as needed.
Include files
In Chapter 2, I showed you how to define a constant using the #DEFINE and #UNDEF keywords; these are handy if you use them in a program file. If, however, you want to use constants in a form, you'll run into trouble, because a constant is available only within the event or method in which it's used, and that's not going to be very helpful because you'll probably want to have the constant available throughout the form.
You can create a separate text file, called a header file, that contains all of your #DEFINE statements, as shown in the following code. Then you specify this header file as a form's include file, and the constants will be available throughout the form. To do so, open the Form menu and select Include File, and use the Include File dialog to select the header file you want to add to your form. Note that include files traditionally have an extension of .H (for "header").
It might be inconvenient to specify the same include file for form after form after form. You can define a default header file in the Forms tab of the Tools, Options dialog. This default will be overridden by any choice you make in the Include File dialog. You can also use the _INCLUDE system variable in a config file-this is covered in Chapter 16.
*-- General *--ZOrder Method #DEFINE ZORDER_BRINGTOFRONT 0 #DEFINE ZORDER_SENDTOBACK 1
*-- TYPE() tags#DEFINE T_CHARACTER 'C' #DEFINE T_NUMERIC 'N' #DEFINE T_DOUBLE 'B' #DEFINE T_DATE 'D' #DEFINE T_DATETIME 'T'
Referencing objects
A key skill in using the Form Designer is being able to manipulate the various objects associated with a form. The hierarchy is rather straightforward, but the syntax takes a little getting used to.
Referencing objects by their full names
Just like referencing a specific file on a hard disk, the complete name for an object consists of a fully qualified string of the names of its container hierarchy. For example, imagine a control in a specific page of a page frame in a form within a formset. The fully qualified name for the control must include the formset, form, page frame, page, and, finally, control name. To reference a property of a control, separate the names of the objects in the hierarchy by periods, starting with the largest object and continuing until you reach the control. For example, the value of the Caption property of the Done command button in the Enter Name form that is part of the Search formset would be determined by the expression:
frsEnterName.frmSearch.cmdDone.Caption
You can use this expression in several ways. You can use it to determine the value of the property, or you can assign a value to the property. This bit of code does both:
if frsEnterName.frmSearch.cmdDone.Caption = 'Label'
frsEnterName.frmSearch.cmdDone.Caption = 'Done'endif
A form is called a "container" because it can "contain" other controls. Thus, your naming scheme goes from the outermost container to the innermost. A form isn't the only type of container, however. Formsets are containers, of course, because they contain one or more forms. Other examples are page frames, option button groups, grids, and command button groups. Suppose you had a button on page 2 of a page frame. You would reference the caption like so:
frmMyForm.pgfMyPageFrame.pagTwo.cmdMyButton.Caption
If you had an option button group on page 3 of that page frame, you'd reference the caption of the fourth option button in the group like so:
frmMyForm.pgfMyPageFrame.pagThree.opgMyGroup.opbButtonFour.Caption
There are three variations of this syntax. The first allows you to reference an object when you know its full name, as I've just covered. The second allows you do so when you know the hierarchy, but not specifically which form the object is in. And the third allows you to reference an object when you don't even know the hierarchy, but you do know where the object is in relation to another object.
Referencing objects by their container
I just mentioned that you might need to reference an object but might not know which form it's contained in. How in the world could that happen?
Sometimes you might need to reference a control in the form, but might not know which form you're in, just as you might need to reference a file in the WINNT directory, but not know whether WINNT is on drive C, D, or R. You can start from the "root" of the current drive, such as WINNTSYSTEM32MyFile.txt, and you can start from the "root" of the current form, like so:
thisform.cmdPost.caption
The term "thisform" allows you to refer to a form when you are in the form, but don't know its name. The term "this" allows you to refer to any object without knowing its name. Now, why would you be working with something when you didn't know its name?
Here's an example. First, it seems obvious that you're going to have to know something's name in order to change something about it. Suppose you've got a form with a Save command button. You're going to want to disable the Save command button until the user has made a change-providing a visual clue to the user as to the state of the system. In this case, the Enabled property will start out as .F., and when the user makes the change, you're going to want to change the Enabled property of the button from .F. to .T. Once the user has made a change, you'll change the property back to .F.
Thus, you'll need to know the name of the command button. Depending on where this change is being made-on the form level, the formset level, or another level in the hierarchy- you might need to reference the command button's parent-a page frame, a form, or a formset-and other objects in the hierarchy as well.
Now go a step further. Suppose (since I haven't gotten into the object-oriented capabilities of Visual FoxPro yet) you use a generic routine throughout your applications that checks for whether or not the user made changes. The routine then changes the Enabled property of the command button as needed. However, because you're using this same routine on multiple forms, you don't necessarily know the name of the form. Thus you can't correctly address the command button with a generic routine, because the full name of the object will change. However, you do know the name of the object-the command button-relative to the form, regardless of which form you're on. How? By using the "thisform." construct!
Indirect object references
But it gets better, folks! You can use relative addressing to refer to objects, just as you can reference a file in another directory on the same level by using relative pathing (..otherdirsamefile.xxx) instead of spelling out the whole file name. The "parent" keyword references the object that an object is sitting on. Thus, the syntax:
this.parent.cmdPost.Caption
refers to the caption on the command button "cmdPost" that's on the same parent object as whatever this command is in-without knowing what the parent object is! This means that you could create a reusable group of objects and they could reference each other without knowing what form they were in-or even if they were in a form, a formset, or perhaps on a page in a page frame.
Another tricky point of syntax is accessing the value of a control. If you've used earlier versions of FoxPro, you're used to using the name of an object as its value, so the following syntax would seem to make sense:
_screen.activeform.txtColor1 = 128_screen.activeform.txtColor2 = 0_screen.activeform.txtColor3 = 255
However, the value of a control-in this case, a text box on the form-is just another property of the control, as is the color or the caption. The property is named Value and you reference it like so:
_screen.activeform.txtColor1.Value = 128_screen.activeform.txtColor2.Value = 0_screen.activeform.txtColor3.Value = 255
Tips and tricks
Oftentimes you will want to reference an object without knowing its explicit name. For example, during some event, you will want to address the active object on the active form, but you won't know which object-indeed, even which form-is active. Or you might want to address a specific property of the current object, but you're using a common method that will be applied to multiple instances of the object, so you won't know the name for this specific object. How do you handle these situations?
Referencing generic objects
Visual FoxPro has a set of properties and keywords that make it easier to reference an object in the hierarchy without knowing its name. The fundamental object in an application is the application's screen, which has the name _screen. One or more formsets and forms might be within the screen at any one time. A formset can be referenced by the ThisFormSet keyword anywhere within the formset. A formset can contain one or more forms, and a screen can contain a form as well. The current form is referenced by the ThisForm keyword from within the form and by ActiveForm elsewhere. Controls within a form are referenced by the This keyword from within the control and by ActiveControl elsewhere.
To try this, run a formset such as TWO_SRCH. Then, place the following expressions in the Debug window and manipulate the formset by clicking on each form and tabbing through the various controls.
_Screen.ActiveForm && shows '(object)'_Screen.ActiveForm.Caption && shows 'Search for Someone' _Screen.ActiveForm.ActiveControl && shows '(object)'_Screen.ActiveForm.ActiveControl.Caption && shows 'Done'
The first example might be a little confusing. When you run a form, you are creating an instance of the form object, and this expression shows that the form has indeed been instantiated. When you close the form, the expression's value goes away, indicating that the object is no longer instantiated. Think of this as a variable that goes out of scope when you return from a subroutine.
Names and captions
Note particularly that an object's caption is not the same as the object's name! You must reference an object by name or by reference, not by caption.
Use the Name property for controls to define names that make sense to you. These names are displayed in the Object combo boxes in the Properties and Code windows. The naming convention used in this book follows the recommended industry-standard guidelines.
To use the value of a variable as a caption, define the variable outside the form and then:
�.* this is in a PRG file that calls the formm.cXX = 'My New Caption'
�.* this is the caption property of a control in the form=m.cXX in the caption property
Code windows
You can open multiple Code windows instead of flipping through the various objects in one Code window via the combo boxes. However, once you do so, you won't be able to access the code of a method that's already opened in another Code window, either by selecting it in the Object or Procedure combo box, or through the Find dialog. That method's name will appear dimmed in all other Code windows as a visual clue that it's already open.
You can double-click the name of a method in the Properties window to automatically open the Code window. Note that doing so will open up a second instance of the Code window!
Layout
Get used to keeping the Layout toolbar open when using the Form Designer. And don't forget that there are additional layout menu options under the Format menu option in the main menu. I find the Vertical Spacing, Make Equal menu option to be especially handy.
The number of controls selected in the Form Designer window determine which menu options and layout icons are enabled in the Layout toolbar.
The positions of the various windows are stored in the FOXUSER resource file. If you keep the resource file turned off, you'll have to constantly rearrange your windows.
You can cut and paste controls and sets of controls from one form to another. Remember to adjust the properties of the controls as necessary-for example, you'll likely want to change the ControlSource for a text box.
|
Politica de confidentialitate | Termeni si conditii de utilizare |

Vizualizari: 1126
Importanta: ![]()
Termeni si conditii de utilizare | Contact
© SCRIGROUP 2025 . All rights reserved