| CATEGORII DOCUMENTE |
| Bulgara | Ceha slovaca | Croata | Engleza | Estona | Finlandeza | Franceza |
| Germana | Italiana | Letona | Lituaniana | Maghiara | Olandeza | Poloneza |
| Sarba | Slovena | Spaniola | Suedeza | Turca | Ucraineana |
 Access Project
Requirements
To use this demonstration version of the Access Project Security Manager you need the following:
Microsoft Access 2000
MSDE or SQL Server 7
Files Contained in the Demo Version
The demonstration version of the Access Project Security Manager contains the following files:
APSMDemo.ade The front end sample application
APSMDemo.mdf The back end database for MSDE users
APSMDemoBackup A backup of the back end database for SQL Server users
APSM Reviewers Guide.doc Word document containing a reviewers guide
APSM Demo Instructions.doc This document
Installation Instructions for MSDE Users
Place the front end (APSMDemo.ade) and back end (APSMDemo.mdf) files in a folder on your hard drive. Assuming you used the folder (c:APSM), start Access 2000, and open the file APSMDemo.ade. You will see a splash screen and then a demo screen as shown in the following figures.
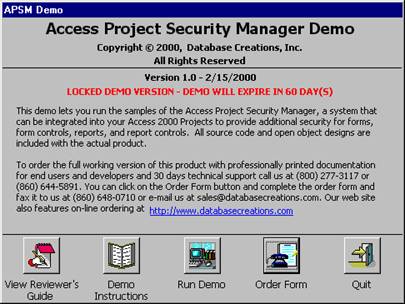
At this point you can press the View Reviewers Guide, Demo Instructions, or Order Form buttons. To start the demo, press the Run Demo button. If this is the first time you have run the demo, you will need to establish a connection to the MSDE database.
From the File menu choose Connection. You will get the following dialog box.
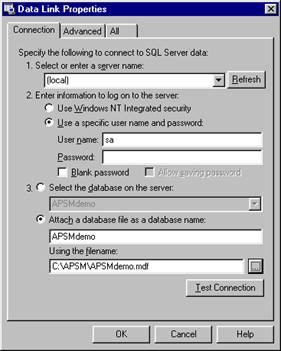
Enter the information as shown in the figure and press Test Connection. You should see the message Test Connection succeeded. You are now ready to start the demo. Go to the section in this document titled Running the Demo.
Installation Instructions for SQL Server Users
You will first need to restore the backup file (APSMDemoBackup) to your SQL Server. This is done by running the SQL Server Enterprise Manager. Restoring this database should create a database called APSMDemo. With this loaded and SQL Server running, you can now load and start the front end application.
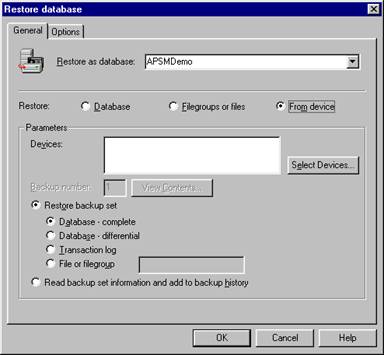
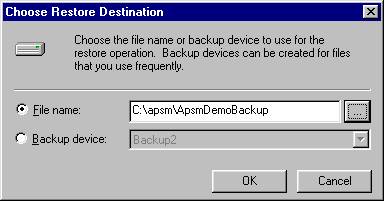
To restore the APSMDemoBackup, open the SQL Server Enterprise Manager, choose the item Databases in the left window, press the right mouse key and select All Tasks -> Restore Database. You will get the Restore database dialog as shown in the following figure. Enter the information as shown in the following figure and then press the Select Devices button.
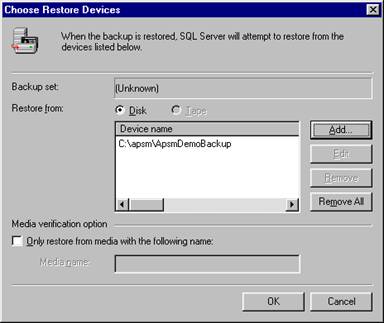
With the Choose Restore Devices dialog open, press Add and enter the information as shown in the following figure. Replace the location c:APSM with the appropriate directory if you installed the files in a different location.
Press the OK button and you should have the following figure displayed.
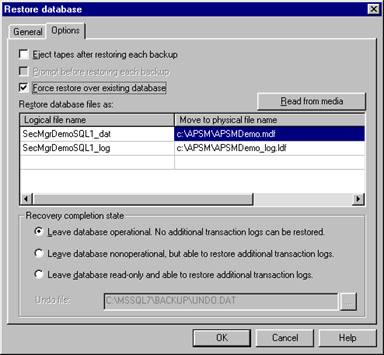
Now press the OK button and you will be back to the Restore database dialog box. Press the Options tab and check the Force restore over existing database checkbox. You are now ready to restore the backup and create the database. Press the OK button.
You will get the message that the restore was completed successfully. You can now close the SQL Server Enterprise Manager and start Access 2000.
Assuming you put the front end (APSMDemo.ade) in the folder (c:APSM), start Access 2000, and open the file APSMDemo.ade. You will see a splash screen and then a demo screen as shown in the following figures.

At this point you can press the View Reviewers Guide, Demo Instructions, or Order Form buttons. To start the demo, press the Run Demo button. If this is the first time you have run the demo, you will need to establish a connection to the SQL Server database.
From the File menu choose Connection. You will get the following dialog box.
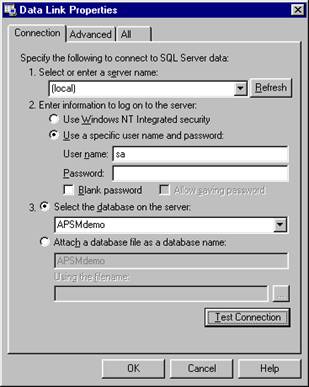
Enter the information as shown in the figure using the name of the server or (local) if you are using the desktop version of SQL Server. Press Test Connection. You should see the message Test Connection succeeded. You are now ready to start the demo. Go to the section in this document titled Running the Demo.
Running the Demo
A good place to start is to read the Reviewers Guide if you have not already done so. This will get you familiar with the overall functionality of the APSM.
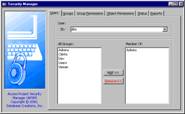
Even though there are several forms in the demo, there is only one form that you need to run the APSM. This form is dbc_SecurityManager. The forms that start with the prefix apsm are administrative forms for the demo only. The forms and other objects that start with the prefix sample are only used as examples for the demo. The form dbc_SecPermissions is not necessary for the APSM to work. This form is only used to display the permissions available for the various objects. This form is useful from a developer standpoint.
Open the dbc_SecurityManager form and experiment with the various options. There is some sample data loaded based on the sample tables, forms, and reports. You can open the sample forms and reports as different users to see how the APSM works. Printing the security reports from the Security Manager will give you a list of users, groups, and permissions. Try opening a form or report that has security. Depending on the user id, the form or report may open or you may be denied permission to open it. If you can open it, you may be restricted as to what you can do or see.
You can create new groups, create new users, and assign permissions.
The demo version is the full version of the product except the file is an ADE file rather than an ADP file. This makes the demo version only usable for the demo. In the full version, you have access to the design of all the objects so you can make customized changes if you want as well as export the objects to your application.
|
Politica de confidentialitate | Termeni si conditii de utilizare |

Vizualizari: 1349
Importanta: ![]()
Termeni si conditii de utilizare | Contact
© SCRIGROUP 2026 . All rights reserved