| CATEGORII DOCUMENTE |
| Bulgara | Ceha slovaca | Croata | Engleza | Estona | Finlandeza | Franceza |
| Germana | Italiana | Letona | Lituaniana | Maghiara | Olandeza | Poloneza |
| Sarba | Slovena | Spaniola | Suedeza | Turca | Ucraineana |
ColorCross80 Software Manual
Content
1. Software system composing
2. ColorCross80 software introduction
3. Edit Cross Animation software introduction
4. How to edit a complete program file (*.blst)
5. How to edit an animation(*.cani)
6. How to edit and display a text message
7. How to make CROSS in the correct communicating status
8. How to set up the USB wireless transmitter and how to use it
9. How to set up CROSS auto brightness function
10. How to set up CROSS auto Open/Close function
11. About CROSS display ID Code
1. Software system composing
ColorCross80 software system composing as below:
tCrossEdit_clr.exe The main program of software system, is to set the Cross Display parameters, edit program and send data to Cross Display.
tCrossEdit.ini The parameters configuration file, is to save parameter configuration of the software system.
tAnimation The file in which the edited *.cani animations and *.blst program files are saved.
tNewAnimation The file in which new animation editing software is saved.
tRF_USB_driver The file in which the driver for USB wireless transmitter is saved(for Win98/2000/XP).
2. ColorCross80 software introduction
t Main tools buttons introduction

t The first button is tNew Play Projectt, to create new program file, which will be composed by *.Cani animations and the corresponding display parameters(for example: the parameters to display temperature, time and date, to repeat animations, etc.)
t The second button is tOpen Play Projectt, to open the existing program files.
t The third button is tSave Play Projectt, to save the edited program files.
t The fourth button is tCOM Settingt, to set the COM port, Baud rate and LED
address of the CROSS. Attention: these parameters must be set according to CROSS display,
otherwise communication will fail between CROSS and software. Usually the Baud
rate should be t

tThe fifth button is tSendingt, click it to send the ready program files to CROSS display, and user will see sending progress in the tShow data sending progresst area.
t The sixth button is tSync Timet, click it to synchronize CROSS time with your PC.
t The seventh button is tSet Brightt, to set auto brightness at predetermined time. The setting specification will be found in Part 7.
t The eighth button is tOpen/Closet, to set up auto tOpen/Closet CROSS. The setting specification will be found in Part 8.
tProgram files list shows the pointed animations and animation display setting area(to display temperature or time or datet, and to set the loop time of animations):


3. Edit Cross Animation software introduction
Edit Cross Animation software is the tool to create or re-program an animation. By this software, user can transform the existing *.gif animations into *.cani animations; user can create and draw a new *.cani file and insert word messages in this animation.

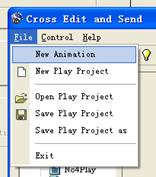
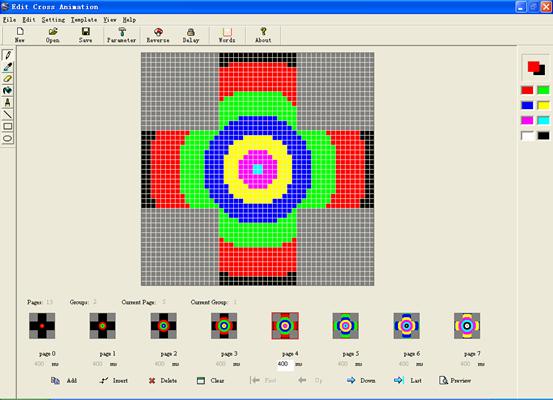
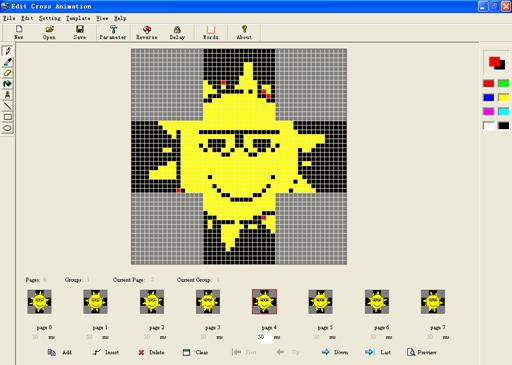
Click tNew Animationt to enter tEdit Cross Animationt software as below:


4. How to edit a complete program file (*.blst)
Program file is composed by animation files, and is programmed by ColorCross80. Before edit the program file, user should prepare the animation files.
tPrepare animation filess
t Click tAnimationt![]() ,
animations in memory will be listed.
,
animations in memory will be listed.
t If an animation exists in tAnimationt, it will be automatically loaded and listed in animation memory when open the ColorCross80:

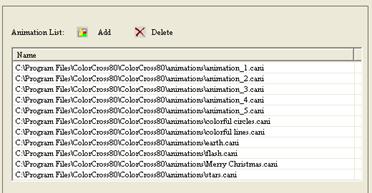
t If an animation doesntt exist in the tAnimationt, it can be added into the
memory by![]() .
.
t User can double-click the *.cani in list to preview the animation.
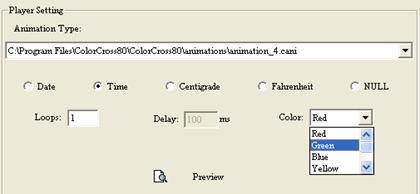
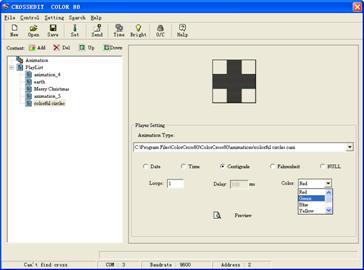
tEdit a program file
t A program file contains several *.cani animations and display setting(to display the temperature, time, date, etc.) for these *.cani:


Click![]() to create a new program file, select
to create a new program file, select![]() and click
and click![]() to add new program file tNO*Playt and select the *.cani animations (click
to add new program file tNO*Playt and select the *.cani animations (click![]() button
to delete file).
button
to delete file).
t After add the play lists, open the program page set up window to set *.cani of every program page and other parameters by clicking any tNO* Playt.
t Select one of the *.cani:

t Input the animation loops time![]()
t Select to display temperature, time or date, choose the display color.
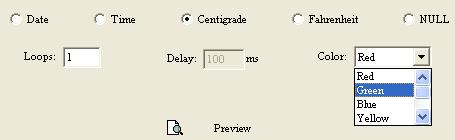
Select tNULLt to not display date, time, centigrade or Fahrenheit.
t After finish editing the program file,
click![]() to see the animation preview (not include the preview of temperature, time and
date).
to see the animation preview (not include the preview of temperature, time and
date).
t When all the tNO* Playt are edited, a complete program file (*.blst) is finished. Itts better to save the finished program file in tAnimationt.
5. How to edit an animation(*.cani)
An animation file(*.cani) is programmed by tEdit Cross Animationt, there is 2 ways to program it:
A. Get animation from existing *.gif format flash:
tPrepare the *.gif flash in your PC(there are numerous GIF files on the internet).
tClick tOpent and find the GIF flash from your PC.
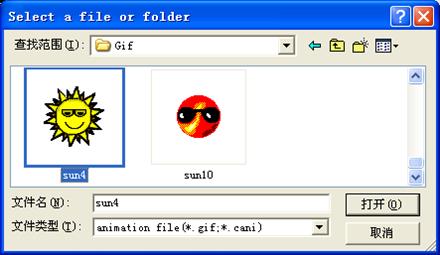
tOpen it and see tGet Animation From Video Filet as below:
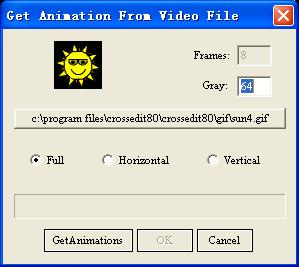
tThere are 3 options:
Full: display the GIF on full screen of the CROSS.
Horizontal: compress to display horizontally and centrally.
Vertical: compress to display vertically and centrally.
Preview of these options can be shown for userts reference.
tClick to transform the GIF, click tOKt when progress shows finishing and exit.
tUser will see all pages of the transformed animation in tEdit Cross Animationt(user can set delay time of all the pages and preview the animation).
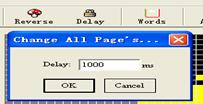
tUser can input the delay time(unit: millisecond) under each page, or set delay time of all pages via tDelayt button:
![]()
t Before modify a page, user must select the page. When frame of the page becomes red, user can modify or redraw graphics via the drawing tools in the left column and the drawing colors in right column.
t The software contains tools as below to edit one of the pages;
![]() select
select![]() to reverse the display
colors.
to reverse the display
colors.
t Save the animation in your PC under file tAnimationt after finish editing.
B. By using tEdit Cross Animationt.
User needs to create a new animation and draw the graphics on each page:
t Enter into tNew Cross Animationt, click tNewt to create a new *.cani.
t Use the drawing tools and drawing colors to draw graphics on the dot matrix page.
t The software contains tools as below to edit one of the pages:
![]() select
select![]() to reverse the display
colors.
to reverse the display
colors.
t Save the animation in your PC under file tAnimationt after finish editing.
6. How to edit and display a text message
The software must convert the text message into (*.cani) to display ituser can edit text messages in same software tEdit Cross Animationt.
t Enter into tEdit Cross Animationt
t Click tNewt to create a new (*.cani)
t If the text message needs to display with animation background, user can transform an existing (*.cani) or *.gif file.
t Click![]() and input words as
illustrated following:
and input words as
illustrated following:


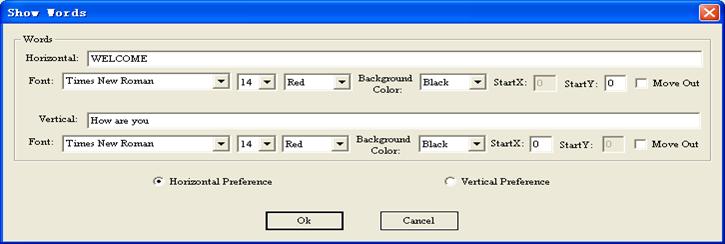
t Select
the font set and size of words, choose the desirable background color, and select![]() to move out the words.
to move out the words.
t Adjust
display position of the words by setting![]() .
.
t When words scroll in horizontal and vertical at same time, user needs to choose horizontal preferred or vertical preferred:
t After all the above are finished, click tOKt to get *.cani files of the words; itts better to set the delay time t200mst.
t Save the *.cani file to tAnimationt.
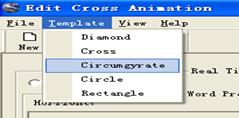
t There are 5 existing *cani files in menu tTemplatet, user can select one of them as the background animation for the words:
7. How to make CROSS in the correct communicating status
To get a correct communication for the CROSS, user must keep in mind the below 4 tips:
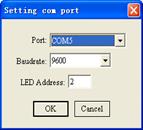
t The COM port of software must be correctly set.
t The Baud rate of software must be set exactly same as the inside device of CROSS.
t LED address of software must be set exactly same as the inside device of CROSS.
t The Baud rate of software and the inside device of CROSS must be 9600, if use wireless transmitter.
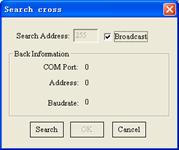
When running the software, it will automatically search CROSS and get Baud rate, COM port and LED address:
|

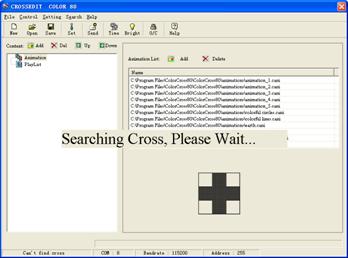
These communication parameters will be shown at bottom of the software. User can also get them by using tSearcht and tCrosst in main menu as below:
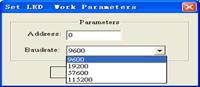
Attention: when use wire communication, user can modify the Baud rate and LED address of CROSS by entering into tCross Parametert under the main menu tControlt as following:
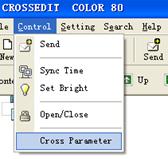

Select a Baud rate and LED address user needs and click tSett to confirm.
Attention:
1, If the setting is successfully sent, CROSS will display messages from the first program file.
2, User must use wire communication to modify the communication setting.
If the wire communication is correct, user can modify the communication mode to wireless as following:
tSelect the Baud rate 9600:
tOpen the control box of CROSS, take off the connection of wire communication and insert connection of wireless communication into control card.
tSet the COM port, Baud rate and LED address
of the CROSS. 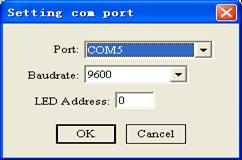
tUser can send messages under the wireless communication (specification will be found in Part 8).
tUsually wireless transmitting speed is 5 to 10 times slower than wire communication.
If the wireless transmitting is correct, user can modify the communication mode to wire communication as following:
tOpen the control box of CROSS, take off the connection of wireless transmitter and insert connection of wire communication into control card.
tSet the COM port, Baud rate and LED address of the CROSS(set the parameters for wireless as before ):

tModify the Baud rate to 115200(if the wire is too long, it can be 57600:
tAfter above setting, user can send messages under the wire communication mode.
8. How to set up the USB wireless transmitter & how to use it
USB wireless transmitter specifications:
t Transmitting
distance
t Frequency 433 MHz, ISM frequency
t 8 channel
t Interface speed: 9600bps
t Channel
speed: 19200bps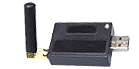
t USB interface: it supplies power and transfers data, user can connect it to PC or laptop USB.
USB driver of the CROSS is under file tRF_USB_drivert, which supports Win98/2000/XP.
User can install the driver by running cn_f_37.exe directly.
User can also use Windows auto set up this driver.
After installing the driver, user can find in Windows tDevice Managert the new device as below:

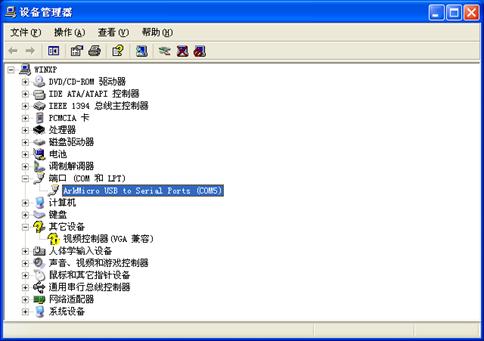
Remember the serial port number (COM5), and select it in the windows of tCOM Settingt, which is found in main menu of tCrossEditt.
9. How to set up CROSS auto brightness function
tSet brightt is to set the brightness level of the CROSS, which can be found in the main menu tControlt of tCrossEditt:
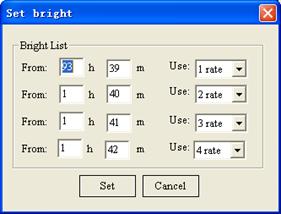
The software contains 4 levels of brightness setting: brightness of CROSS becomes higher from1rate to 4 rate, which means 4 rate is the brightest level.
Generally speaking, itts better to use 1 rate in the night, 4 rate from noon to the afternoon, 2 rate or 3 rate in the morning and evening.
1. Brightness Setting
t When it is set FROM 93
H
t User can refer to below setting for reference:
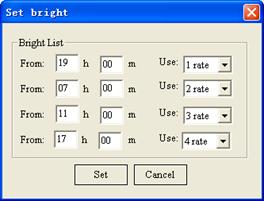
t Explanation of the above setting:
From 19:00 to 07:00, use 1 rate brightness.
From 07:00 to 11:00, use 2 rate
From 11:00 to 17:00, use 4 rate
From 17:00 to 19:00, use 3 rate.
t Click tSett button to send the setting to CROSS, then brightness of the CROSS will be adjusted according to this timetable every day.
10. How to set up CROSS auto Open/Close function
tOpen/Closet is to turn on/off the CROSS automatically at predetermined time.
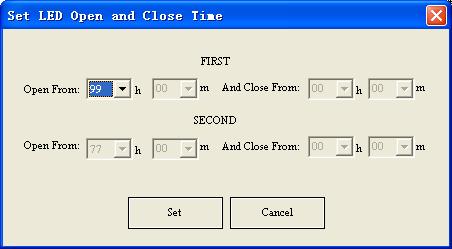
t When the setting is as above picture, the CROSS will work all day long.
t User can set the CROSS to work and close at 2 predetermined times.
t Click tSett to confirm the setting.
Attention:
It is strongly suggested not to use this function, as it only cuts off the power supply for LEDs, the rest device still work. Too often or long time use this function will impact the lifespan of CROSS, it is strongly suggested to turn off the power when not use CROSS.
11. About CROSS display ID Code
To avoid incorrectly receiving between 2 neighbour CROSSES in data sending, the system will define the ID code of CROSS. Only when the LED address of tCrossEditt is same as CROSS, new data can be received by the CROSS.
LED address of tCrossEditt can be defined by using tSett tool:
|
Politica de confidentialitate | Termeni si conditii de utilizare |

Vizualizari: 3239
Importanta: ![]()
Termeni si conditii de utilizare | Contact
© SCRIGROUP 2025 . All rights reserved