| CATEGORII DOCUMENTE |
| Bulgara | Ceha slovaca | Croata | Engleza | Estona | Finlandeza | Franceza |
| Germana | Italiana | Letona | Lituaniana | Maghiara | Olandeza | Poloneza |
| Sarba | Slovena | Spaniola | Suedeza | Turca | Ucraineana |
Parys Technografx Ltd
PTvncWM5 Manual
PTeSVNC (for the PC)
Installing 1
VNCviewer 3
Installing 4
Connecting 5
Button Setup 6
Options 7
Connection Settings 9
NetStats 11
Keyboard 12
Keypad 13
Zoom 14
Magnify 15
File Transfer 16
Encodings/Settings 19
Support ... 21
Installing PTeSVNC
Installing PTeSVNC
(You can connect PTvncWM5 to other versions of VNC instead, enabling you to use PTvncWM5 with OSX or Linux etc.)
PTeSVNC is Parys Technografx VNC server and client software for the PC.
The installer file is SetUpPTeSVNC.exe.
To install PTeSVNC on your PC you need to run SetUpPTeSVNC.exe, the installer will install PTeSVNC to a destination of your choice.
Once installed, in order to connect to your Pocket PC you must have PTvncWM5 installed on your Pocket PC, run the PTeSVNC WinVNC server program with a valid TCP/IP connection (eg. WiFi, Bluetooth or via the Internet) available from your Pocket PC to your PC and then run PTvncWM5 on your Pocket PC.
PTvncWM5 is compatible with versions of RealVNC, TightVNC, UltraVNC, eSVNC, OSXvnc etc.
Note that when you first run WinVNC on your PC you should supply a suitable password to allow client software (such as PTvncWM5) to connect to your PC.
On some systems you may need to go into the advanced options in WinVNC and enable loopback connections in order to connect to PTvncWM5 (try this if youre sure youre using the correct password but PTvncWM5 returns 'authentication failed' when trying to connect).
If connecting to RealVNC or TightVNC (or other VNC servers without compatible server scaling) then you must select the Scaling off option on the password screen in PTvncWM5. Also if connecting to versions of RealVNC then the Tight and maybe other encodings will be ignored by the VNC server and RAW used instead so you should change the encoding type to say Hextile by going to the Connection Settings on the hostname entry screen in PTvncWM5 (by tapping F1).
If you decide to use UltraVNC instead of PTeSVNC then when making changes to the connection settings from within PTvncWM5 you should select Reconnect or 'New connection' to apply changes as 'Apply changes' will not work correctly.
If you wish to
use UDP ports other than 5900 to 5909 you will have to use a VNC server other
than PTeSVNC - e.g. UltraVNC.
WinVNC
WinVNC is VNC server software for the PC. It allows compatible VNC client software to connect to, view (and control) your PC when it is running.
When you first run WinVNC you need to supply a password that will be required from any VNC client software trying to connect to your machine.
The configuration menu that appears when you first run the program (below) can also be accessed any time WinVNC is running by either right-clicking on the WinVNC icon on your taskbar and selecting Properties, or by selecting Programs : PTeSVNC : Server : WinVNC User Settings from your Start menu.
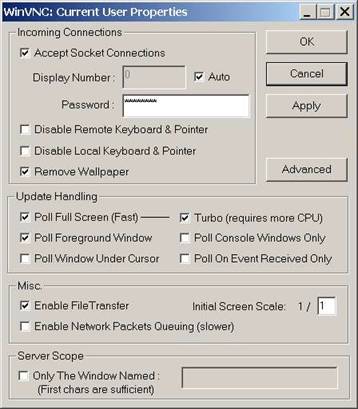
The important things to note are that you can set WinVNC to allow a client to connect and view your PC but without having remote control of your PCs mouse and keyboard, you may also disable the PCs own mouse and keyboard allowing ONLY remote control. The remove wallpaper option will do exactly that when any connection is made, this makes transfer much faster when the PCs desktop is in view. The Update Handling settings shown are the ones I would recommend except that its worth enabling Poll Console Windows Only for many uses as most Windows software will still be viewed on the remote machine.
Note that you may also disable File Transfer.
On some systems you may need to enable loopback in the Advanced section to connect to PTvcWM5. Another feature in the Advanced section allows you to enable logging of activity this could be useful if you have problems.
To close WinVNC when its running right-click on the WinVNC icon on your taskbar and select close from the menu (you can also change the settings this way).
You may set up WinVNC as a service, if you do so WinVNC will be running each time you boot up your PC. To set WinVNC as a service go to Programs : PTeSVNC : Server : Install WinVNC Service from your Start menu (the remove service is here also). Reboot your PC after installation and then set the WinVNC password/ports etc.
In the advanced options there is an option to lock your PC when a client disconnects.
If a PC is locked then you will only be able to reconnect if WinVNC is running as a service, you cannot connect to a machine that is waiting for initial logon after a cold boot. Note also that a Control-Alt-Delete key combination sent from the client program will only affect the PC if WinVNC is installed as a service.
VNCviewer
The VNCviewer provided with PTeSVNC is the VNCviewer from eSVNC 112r2.
VNCviewer is VNC client software for the PC that allows a remote PC to connect/control another PC running the PTeSVNC WinVNC server.
As with PTvncWM5 you can control your connection settings from the options in VNCviewer:
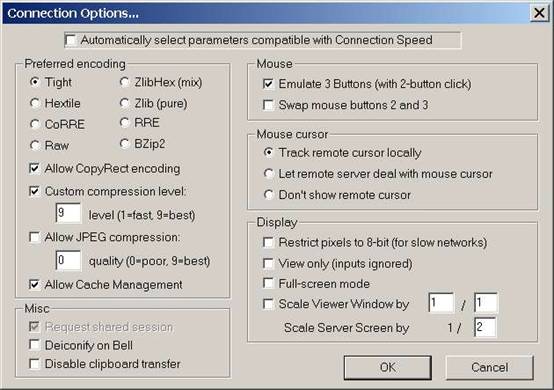
Note that in order to configure your settings manually you must first disable Automatically select parameters compatible with Connection Speed as above.
See the section about PTvncWM5 for more help regarding the connection settings.
Note also that in the VNCviewer once you have made changes you may need to select Request screen refresh from the menu for changes to become apparent
Installing PTvncWM5
PTvncWM5 is Parys Technografx VNC client software for the Windows PPC Phones and Windows PPCs. The Windows installer file is InstallPTvncWM5.exe.
To install PTvncWM5 to your Pocket PC you need to connect your Pocket PC to your PC via ActiveSync and then run InstallPTvncWM5.exe on your PC.
If you are unable to do this as you only have an OSX or Linux system etc. then simply copy the PTvncWM5 CAB file from the original PTvncWM5 zip file (or CD) into WindowsStart Menu on your PPC then run the CAB file on your PPC to install PTvncWM5.
After retrieving information from your Pocket PC the installer will allow you the option of installing to the default download location (Program Files in your normal Pocket PC memory) or to select an alternative location e.g. a storage card or other directory.
Simply follow the instructions on PC and PPC to install.
Once installed, in order to connect to your PC you must have PTeSVNC (or other VNC software) installed on your PC, have the VNC server program (e.g. WinVNC) running and ready to accept connections, and of course a valid UDP/TCP connection available from your Pocket PC to your PC.
Note that to connect over Bluetooth or over USB then Activesync must be running over the connection for the VNC connection to be made - this is not required over GPRS/CDMA or WiFi.
NB. PTvncWM5 will now connect successfully to versions of eSVNC, PTeSVNC or UltraVNC AND RealVNC and TightVNC. Note that for VNC servers that do not have server scaling (eg. RealVNC or TightVNC) then you must use the joypad to select Scaling Off on the password entry screen in PTvncWM5 (see next page).
Also if connecting to WinVNC servers that do not support the Tight encoding then for optimum performance you should change the encoding type to one supported by your VNC server (say Hextile) by going to the Connection Settings on the hostname entry screen in PTvncWM5 (by tapping F1 see next page).
If you decide to use UltraVNC instead of PTeSVNC then when making changes to the connection settings from within PTvncWM5 you must select 'New connection' or Reconnect to apply changes as 'Apply changes' will not work correctly.
To uninstall PTvncWM5 from your Pocket PC the best way is to re-run the installer program on your PC, select no when asked if you wish to install then select PTvncWM5 from the list of installed software and select remove.
Connecting PTvncWM5 to PTeSVNC
First of all a server (eg. WinVNC from PTeSVNC) needs to be installed and running on your PC (see pages 1 and 2) and you must have a valid TCP/IP connection from your PC to your Pocket PC (this could be WiFi, Bluetooth or a remote Internet connection).
Secondly you need to know either the network name of the server PC or its IP address and the password that was given to the VNC server to allow connection.
Now you can run PTvncWM5, select remote or local, enter the host (server) name or IP address and then the password to connect to the VNC server.
NB. The default port used is 5900, specifying a port number from 0 to 9 will use a port from 5900 to 5909, specifying a port number 10+ will use that exact port number and for remote connection the port used must be available through your router/firewall.
Once connected you will view some or all of your PCs screen on your Pocket PC and (optionally in the VNC server) have control over the PCs mouse and keyboard from your Pocket PC plus (optionally) be able to transfer files between PC and PPC.
Entering the host (server) name/IP (and optional port)
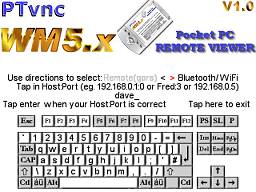
When you run PTvncWM5 you will be presented with a screen to enter the host name or IP address eg. dave or 192.168.0.1 (if you wish you can specify a display/port as well eg. dave:1 or 192.168.0.1:80). To type in the text tap your stylus on the graphical keyboard (see page 12) or use your hardware keyboard if available.
Use the joypad directions to choose local or remote connection (irrelevant without phone hardware). It should be noted that if you opt for a Bluetooth/WiFi connection then any current open connection to GPRS or CDMA (e.g. from when browsing or downloading) will be disconnected.
You can tap Tab if you wish to choose a previously saved connection.
 You can tap F1 to set the initial
connection options, note that some options are not supported by some VNC
servers (see page 9 for more info). In the initial connection
options you can choose to rotate the display to any 90 degree
orientation.
You can tap F1 to set the initial
connection options, note that some options are not supported by some VNC
servers (see page 9 for more info). In the initial connection
options you can choose to rotate the display to any 90 degree
orientation.
When youve entered the host (:port) the password entry screen will appear for you to give the appropriate password (see above right).
If (as in the example) a host name is used rather than an IP address then the IP address found for the given name is displayed on the password screen (this gives you some idea whether your router located the correct machine or not).
On the password entry screen you can use the joypad directions to choose whether to use server scaling or not.
Note that some versions of WinVNC (eg. RealVNC or TightVNC) do not support server-scaling and to connect to these you must choose the Scaling off option.
Again simply tap in text on the graphical keyboard to enter the password.
After entering the password if you are running PTvncWM5 for the first time then you will enter the button definition screen.
As prompted simply press the OS control buttons you wish to use for left mouse button, right mouse button, PTvncWM5 options and as the quick exit.
Users of the some PPCs note that you should press the Home button when prompted for the button to use as quick exit and this button will actually be used to send enter keypresses to the server rather than being used for quick exit to exit the program youll have to use the options menu instead, if no other button reacts then press joypad centre.
All users note that file transfer mode must be exited before you can quit the program.
When viewing the Options, pressing the Options button a second time will bring up the Connection Settings menu. When viewing the Connection Settings or the Netstats pressing the Options button will remove the menu.
Once the buttons are defined (or straight after entering the password) the following screen will appear:

After a few seconds connection should be made and your PCs screen appear on your Pocket PC. If it takes longer than a minute or so for this to happen using Bluetooth or WiFi, or longer than 2 or 3 minutes using GPRS or CDMA then tap the stylus on Tap here to cancel to go back and make sure you got the host(:port) and password correct.
If youre sure you have the host(:port) and password correct and have repeated the procedure two or three times without success, then exit PTvncWM5 and re-run it to try again. Obviously when wanting a remote connection on a PPC phone via GPRS or CDMA you must have GPRS or CDMA available with a (preferably decent) signal.
Please note that VNC servers from some versions of VNC are not compatible with PTvncWM5 so if you have tried everything suggested in this help file (see the support section at the end) and are still unable to connect then try using a different VNC server (such as PTeSVNC or UltraVNC) instead of the version you are currently using.
For example PTvncWM5 definitely works with UltraVNC v1.0.0 rc11d, RealVNC 3.3.7 and TightVNC 1.2.9 as well as the included version of PTeSVNC.
The Options menu
When you press the Options button the screen below will appear:
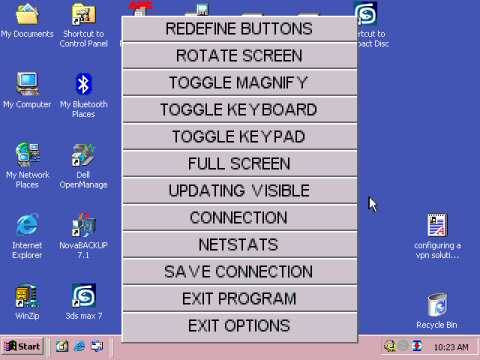
To select an option tap it once and it will be highlighted in red as below:
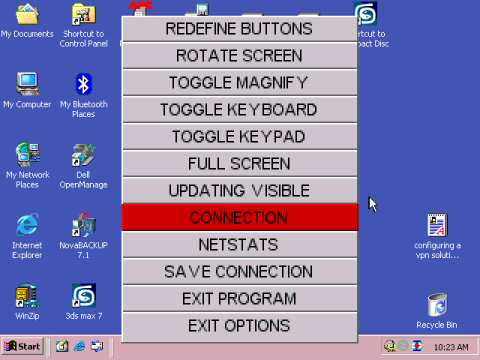
Tap the option a second time to execute the option.
Redefine buttons allows you to do exactly that.
Rotate screen does as it says (for left/right handed users and to switch between portrait and landscape).
Toggle Magnify toggles the optional magnifying glass at the mouse position. See page 15 for more details.
Toggle Keyboard toggles Keyboard mode on and off. See page 12 for more details.
Toggle Keypad toggles the Keypad on and off. See page 13 for more details.
Full-screen/No-Zoom/Zoom lets you set the viewing mode. See page 14 for more details.
Updating All/Visible allows you to choose whether changes to areas of your PC screen not currently in view are updated immediately or not. When using Updating Visible such changes will only be updated in the visible area, this can save a lot of bandwidth. Note however that when scrolling around using Updating Visible there may be a slight delay before the view is updated.
Connection takes you to the Connection Settings. See page 9 for more details.
Netstats displays your connection statistics. See page 11 for more details.
Save Connection allows you to save the current connection (hostname and all settings) with a chosen name for ease of future connection. You could call the connection Work:Bluetooth or Home:GPRS etc. These connections can be recalled from the hostname entry screen by pressing Tab next time you are making a new connection.
Exit program, well, exits the program.
Exit Options simply removes the Options menu.
Its worth noting that if the Options menu is displayed then pressing the Options button will take you directly to the Connection Settings menu.
Connection Settings
The Connections menu (below left) will appear when you tap F1 from the hostname entry screen, the full Connection Settings menu (below right) will appear when connected when you either select Connection from the Options menu or press the Options button while the Options menu is displayed:
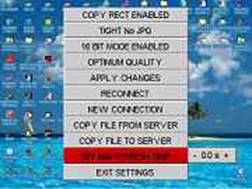
Use the same method to select/change options as for the Options menu i.e. tap once to select and again to apply.
The first option allows you to enable or disable the Copy Rect feature of the transfer encodings, selecting this option will toggle between Copy Rect Enabled and Copy Rect Disabled. (So far I have found no reason to disable this)
The second option (Tight above) is the main transfer encoding method. Selecting it will rotate between:
Tight (+JPG option), Zlib, Zlib Hextile, Hextile, CoRRE, RRE and Raw (See page 19)
Note that only Hextile, CoRRE, RRE and RAW are supported by versions of RealVNC and in this case choosing the other options means WinVNC will use RAW encoding so its best to set the encoding to Hextile if you wish to connect to RealVNC remotely (eg. GPRS) or to RRE if connecting locally via WiFi or Bluetooth (See page 19).
The third option allows you to toggle between 8 bit RGB and 16 bit RGB transfer. 8 bit is up to twice as fast but 16 bit provides much better colours. (See page 19). Note that for the Tight JPG options JPG is only used when using 16 bit transfer.
The fourth option allows you to choose between Optimum Speed, Optimum Quality or High Quality. Optimum speed can be up to 4 times faster than Optimum Quality but Optimum Quality is more legible. High Quality is more legible still but costly in terms of speed and bandwidth (See page 19)
In the initial connection settings menu (from the hostname screen) you can choose to rotate the display to any 90 degree orientation (when connected you can rotate the display from the main options menu).
If selecting the connection options from the hostname entry screen then simply exit the menu when the settings are as you require.
NOTE THAT FROM THE FULL CONNECTION SETTINGS MENU CHANGES TO THE ABOVE SETTINGS WILL ONLY BE APPLIED AFTER YOU SELECT APPLY CHANGES, RECONNECT OR NEW CONNECTION.
Apply Changes simply applies changes you have made to the settings without disconnecting from the current host.
Reconnect actually disconnects then reconnects to the current host. This option is mainly in case you get a hung connection.
New Connection disconnects from the current host and lets you select a new host to connect to, you can of course connect to the same host again.
If you use UltraVNC instead of PTeSVNC then when making changes to the connection settings you must select 'New connection' or Reconnect to apply changes as 'Apply changes' will not work correctly.
Copy File from Server will enter file transfer to copy a file from the server to the Pocket PC. (See page 16)
Copy File To Server will enter file transfer to copy a file from the Pocket PC to the server. (See page 16)
Set Min Refresh Time allows you to force delayed updates from the server ie. tells PTvncWM5 to request screen updates from the server less often. Changing the seconds to values >0 will cause screen updates from the server to be requested at a maximum one update every x seconds hence reducing the GPRS or CDMA bandwidth usage. Simply tap on the + or - to change the refresh value. If using local WiFi or Bluetooth this setting should be kept at zero.
Exit Settings turns off the Connection Settings menu (as does pressing the Options button).
Netstats
When you select Netstats from the Options menu, a screen like the one below will appear:
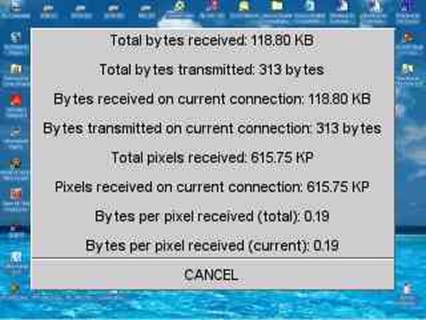
This information is mainly a guide for those of you who are paying per byte downloaded it does not necessarily give the exact bandwidth use but gives you a reasonable idea.
Note that the Total values are those from when you ran the program, no matter how many different connections you have made.
The values for bytes received (RX) and bytes transmitted (TX) include the amounts used for file transfer, however the bytes received figure used internally to calculate the Bytes per pixel does not include bytes received during file transfer hence the Bytes per pixel values give an accurate indication of how good your current Connection Settings are at saving bandwidth (tight or zlib seem the best encodings by far from this point of view).
Its worth noting that when a WinVNC server does not support your current encoding selection then it will switch to sending in RAW format you can check for this by looking at the Current BPP, if this value is 1 when in 8-bit mode or 2 when in 16-bit mode then the server is sending raw data and (assuming youre not using RAW anyway) you need to change the selected encoding for optimum performance.
To remove the Netstats just tap twice, or press the Options button.
Keyboard mode
You do not need to enter Keyboard mode to use your hardware keyboard.
When Keyboard mode is enabled you will see a display as below:
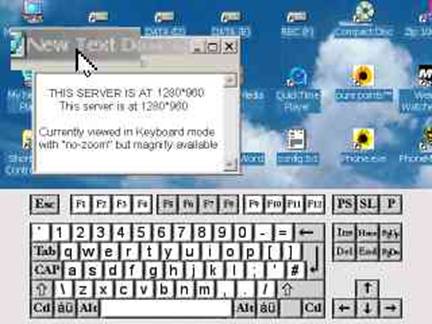
To send key presses to your PC tap the appropriate keys on the virtual keyboard.
Note that if you have a hardware keyboard it will work independently of the graphical keyboard (e.g. shift on the hardware keyboard will not be applied to the graphical keyboard and vice-versa) and will transmit key presses to the server without you having to enter keyboard display mode.
Note that joypad centre is also used as the enter (return) key (Home on some PPCs).
The layouts change appropriately when the virtual keyboard Shift, Caps lock or Accents are active. Note that the keys like shift, alt and control etc. stay pressed when you press them until you press them a second time.
Keypad mode
The keypad is available when not in keyboard mode.
It provides a convenient way of sending the available key presses to the server, ie. Escape, 0 to 9, ., - and Return.
Just tap the appropriate key on the keypad to send a press to the server.
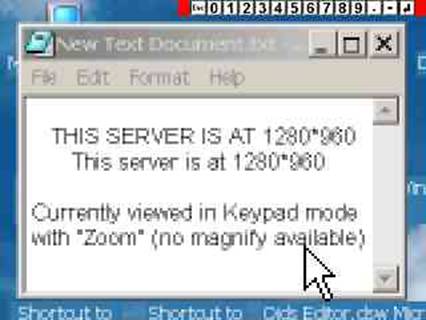
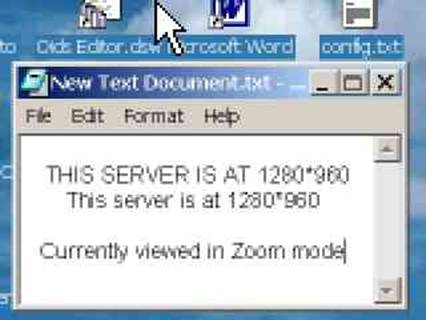
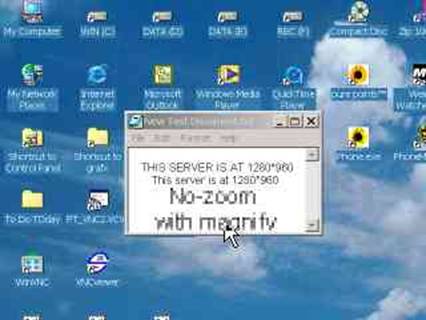
Zoom mode
You can view your PC screen in Full-screen mode or with No-Zoom (1st below) or with Zoom (2nd below) depending on the current screen transfer size. Note that Zoom zooms out when the screen transfer size is above a given size. In both No-Zoom and Zoom modes when less than 80% of the server screen width/height is visible on the PPC a small full-screen view of the server screen will appear in the bottom-right hand corner of the PPC screen. You can tap on this window to move quickly to anywhere on your server screen and you can tap/hold/drag the small window around your PPC screen e.g. if you need to see the bottom-right of your server screen.

Magnify
When enabled the area under the current stylus location is displayed in magnified form, as below:
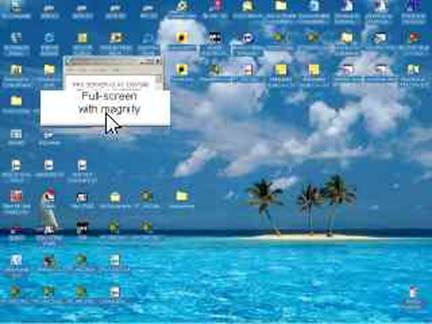
If no buttons are pressed and the stylus is not moved the area will remain magnified for 5 seconds.
File Transfer
From the Connection menu you can opt to copy a file to or from the server.
Transferring a file is basically the same in either direction.
If you select Copy file from server then you will first see a screen like this:

As you can see it will show the available drives on your PC. To choose a drive simply tap the appropriate line once to highlight it, again to select it and you will then view a directory of the drive:
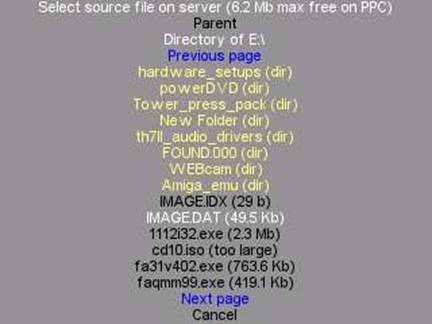
You can now browse to find the file you are looking for also tap once to highlight an option, again to select it.
Selecting a folder (in yellow) will take you to that folders directory, selecting a file will take you to the next stage of file transfer.
As you can see you can go back to parent and possibly to next page and previous page.
Once youve selected a file youll now be able to browse for a destination:
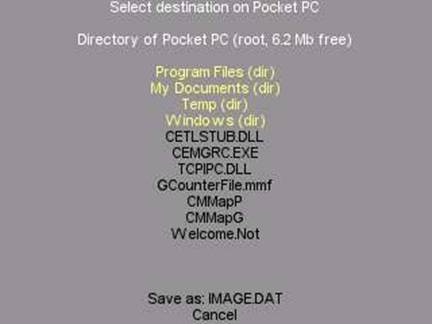
Browse in the same way until you have the required target, dont worry if you wish to edit the destination filename, you can do that at the next stage.
Tap on the Save as line to proceed to the filename edit stage:
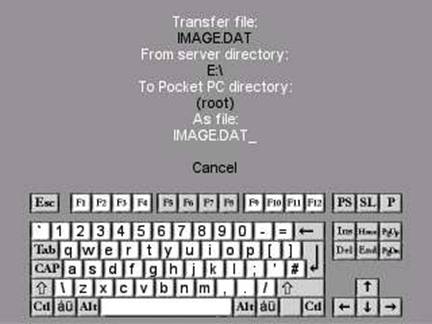
Use the keyboard to edit the filename (see page 12), then tap enter (return).
If a file of the selected name & location exists already, you will get the following:
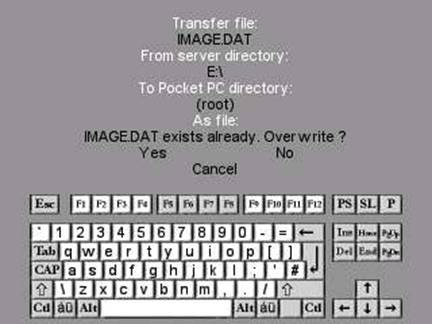
Tap Yes to overwrite the file, No to change the name.
When you have entered the destination filename, file transfer will begin:
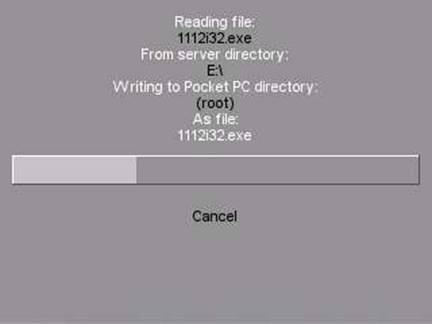
During file transfer you can abort by tapping on Cancel.
When transfer is complete simply tap on Continue.
Encodings/Settings
To reduce the bandwidth used, i.e. to reduce the amount of, and time taken for, data transfer, PTvncWM5 has several encoding options available.
In the order of appearance these are:
Tight(+JPG), Zlib, Zlib Hextile, Hextile, CoRRE, RRE and Raw.
The best option in terms of bandwidth is Tight and the worst is Raw, however the best option in terms of server (PC) overhead is Raw and the worst is Tight so its down to your requirements as to which option is best for you (actually we found Tight and Zlib to be almost equivalent except when in 16-bit mode the higher JPG compression options in Tight reduce bandwidth noticeably). If connecting to versions of RealVNC then Tight, Zlib and Zlib Hextile encodings are not supported (ie. the server will use RAW format) so the optimum option when considering bandwidth is Hextile in this case.
Also to reduce bandwidth usage you can opt for using 8-bit RGB mode, which will result in some colour banding whereas the colours should look pretty much correct in 16-bit RGB mode. For those of you requiring low bandwidth usage 8-bit is probably the best option as generally speaking it doesnt reduce the legibility of text but requires up to 50% less data transfer, however 16-bit using Tight + JPG low quality uses roughly the same bandwidth as 8-bit Tight and may be preferable.
Further PTvncWM5 also allows you to set the amount of server scaling (resizing of the screen) to be used before data transfer (with compatible WinVNC servers):
Optimum speed will request server reduction to the SMALLEST size >= 320*240 (or 240*320).
Optimum quality will request server reduction to the LARGEST size <= 640*512 (or 512*640).
Highest quality will request server reduction to the LARGEST size <=1600*1200 (or 1200*1600).
This results in the following scaling and screen transfer sizes:
PC resolution Optimum Speed Optimum Quality Highest Quality
640*480 (2) 320*240 (1) 640*480 (1) 640*480
800*600 (2) 400*300 (2) 400*300 (1) 800*600
1024*768 (3) 341*259 (2) 512*384 (1) 1024*768
1280*960 (4) 320*240 (2) 640*480 (1) 1280*960
1280*1024 (4) 320*256 (2) 640*512 (1) 1280*1024
1600*1200 (5) 320*240 (3) 533*400 (1) 1600*1200
When viewing in full-screen mode the PC screen is resampled to 640*480 (or 320*240 if no VGA) on the PPC after transfer, in no-zoom mode the pixels are displayed at the transfer size and in Zoom mode they are displayed at transfer size*2 when using server-scaling or /2 when not using server-sacaling. Magnify magnifies the pixels *2 when available.
Note that the screen buffer in PTvncWM5 is 1600*1200 pixels (eg. 1600*1200 or 1200*1600) so when the WinVNC server does not support server scaling server screens larger than this cannot be handled by PTvncWM5 (eg. 2048*1536) if using server-scaling then the server screen size does not present this problem.
Whether it be for legibility, speed of transfer, bandwidth reduction, or overhead on the PC it is best to have your PC in a resolution of 640*480 pixels with the PTvncWM5 settings optimised for speed.
If you require one of the larger resolutions on your PC and are having trouble reading the text on your Pocket PC one option is to change your PC settings to use large fonts, either the PC standard option of 125% or a custom font size larger than this.
Note also that you will find the colour scheme used on your PC will have a direct bearing on the legibility of the PC text on your Pocket PC some colour combinations resample far better than others.
On some systems you may need to 'enable loopback' in the advanced options of the WinVNC server (a symptom requiring this is 'authentication failed' in PTvncWM5).
If your PCs network uses a router and you wish to connect to a WinVNC server remotely then you must ensure that the appropriate UDP port (5900 to 5909 or other) is being routed to the local IP address of the PC running WinVNC and that the router firewall is allowing data transfer through that port. This means UDP but in actual fact some firewalls seem to require that you also allow TCP over the port.
On the PC itself you need to ensure that any software firewall is also allowing data transfer through the appropriate port (5900 to 5909 or other).
If your PC is not on a local LAN then you may need to enable the Microsoft Loopback Adapter:
https://support.microsoft.com/default.aspx?scid=kb;en-us;839013
https://support.microsoft.com/?kbid=236869
https://support.microsoft.com/default.aspx?scid=kb;en-us;842561
At the time of writing you can check your PC is open for connection remotely when running WinVNC (if using a port 5900-5909) by going here:
https://www.gotomyvnc.com/
Alternatively (at the time of writing) you can get your remote IP address here:
https://www.whatismyip.com/
or here:
https://www.showmyip.com/
In rare cases your PCs Internet Service Provider may be blocking UDP ports, if you think everything is set up correctly on the VNC server end using a port 5900 to 5909 and gotomyvnc reports no connections open then contact your ISP (for the PC).
Some mobile ISPs definitely block UDP ports, so if your PC is open but you cant get PTvncWM5 to connect remotely then check with your PPC phones ISP:
e.g. T-Mobile (US) apparently restrict the ports available and one available is port 80 so in this case you would need a WinVNC server that allows selection of port 80 for connection (e.g. UltraVNC) and to specify port 80 as the connection port in the hostname entry in PTvncWM5).
Remember if connecting locally (e.g. via Bluetooth) rather than remotely then you must use the local IP address of your PC (or the PCs network name) and not the remote IP address also note that Bluetooth or USB connection only work using Activesync.
If you require technical support for PTvncWM5 go to:
https://www.parystec.demon.co.uk/pt_vnc_WM5.htm
for the latest info, FAQs etc.
or E-mail support@parystec.demon.co.uk
PTvncGPRS is available for older PPC2002 devices.
PTvncS and PTvncSWM5 are available for the Windows Smartphones.
|
Politica de confidentialitate | Termeni si conditii de utilizare |

Vizualizari: 1732
Importanta: ![]()
Termeni si conditii de utilizare | Contact
© SCRIGROUP 2026 . All rights reserved