| CATEGORII DOCUMENTE |
| Bulgara | Ceha slovaca | Croata | Engleza | Estona | Finlandeza | Franceza |
| Germana | Italiana | Letona | Lituaniana | Maghiara | Olandeza | Poloneza |
| Sarba | Slovena | Spaniola | Suedeza | Turca | Ucraineana |
EPROM Burn Tool Guideline
Version 1.03.00
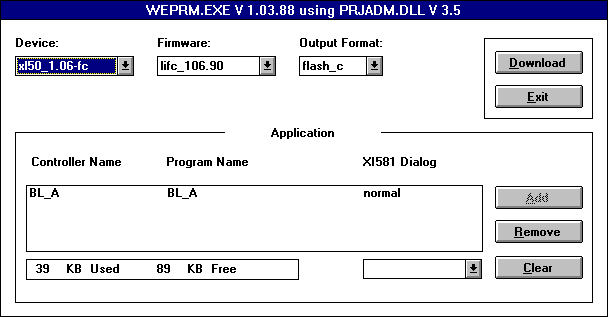
Table of Contents
1. General 2
2. File Structure of EPROM Burn Tool 2
3. Explanation of List Boxes and Buttons 2
4. Installation Setup 3
5. Procedure 3
5.1 Process A: Generate File for EPROM Burner 4
5.2 Process B: Generate the Files for Firmware Download with XBS/XI584 1.4.1 7
6. Tips & Tricks 8
7. EPROM Burner (general) 9
8. Appendix: ERPOM Burner BYTEK 135H Multiprogrammer 9
The EPROM Burn Tool is used to burn EPROMs for the EXCEL 5000 family controllers XL20/XL50/XL80/XL100 XL500 and XL 600. Additional the communication devices/sub modules XD 505A, XD 508, XDM 506, XM 100A and XPC 500 board are supported as well.
The EPROM burn tool generates prinzipally 2 tpyes of Files
A) Files to be used for an EPROM Burner
B) Files to be used for Firmware Download with XBS/XI584 - Version 1.4.1 and higher.
The user must not take care about Memory offset and the link of the files this is handled by the EPROM Tool.
It can be used Low cost EPROM Burner because the offset from 80000H is changed to offset 00000H and the generated files are loaded into the EPROM Programmer without additional offset and overhead. That means the EPROM Programmer must be equipped with 512 Kbyte RAM only.
|
Structure |
Explanation |
|
EPROM |
This path will automatically be generated when a file for an EPROM burner is generated. The file for the EPROM burner is located in this sub-directory then. |
|
ADLFILES |
This path is available after set-up. All OS Upgrade discettes for controllers contain .adl files which are automatically copied into this sub-directory. |
|
FLASH |
This path will automatically be generated when download file was generated. The loadable sections will be located in this sub-directory |
|
FIRMWARE |
This path is available after set-up. All OS Upgrade discettes for controllers contain firmware files which are automatically copied into this sub-directory |
|
DOC |
This path contains all WinWord documentation needed as operating instructions. |
|
TEMP |
This is a sub-directory for temporary generated files. You do not have to take care about. |
|
List Boxes |
Explanation |
|
Device |
The DEVICE list shows all different target firmware versions (different structures) available with this EPROM burn tool. If you receive an OS uprade disk with new firmware, store the firmware files under firmware - see table above - to see them under this list box. |
|
Firmware |
This List Box shows all available firmware versions (different version numbers of the previously selected firmware structures). |
|
Output Format |
This field shows 5 different formats: flash_b :not used yet. flash_c :Use this for generating Firmware Download Files msc86hex :Intel Hex File for EPROM Burner binary10 :Formatted Binary File for EPROM Burner binary16 :Unformatted Binary File for EPROM Burner |
|
.adl-Files |
In case you added an application, you select here the appropriate .adl File (Operating Sequence file) for your application. If nothing is selected, the standard .adl coming with the CARE files is used. |
|
COM |
Here you can select the serial interface number (connection PC to ERPOM burner) |
|
Baudrate |
Here you can select the baudrate for the download to the ERPOM Burner |
|
Paritiy |
This shows how you have to set-up your EPROM Burner (for information only). |
NOTE: COM, Baudrate and Parity only appear, if the EPROM Burn Tool is not started out of CARE.
|
Buttons |
Explanation |
|
Download |
Pressing this button generates the previously selected files. a) Either the files for Firmware Download b) or the files for an EPROM Burner |
|
Exit |
Exit closed the ERPOM burn tool program |
|
Add |
With this button you can add an application to your firmware (to link both together) |
|
Remove |
With remove, you can remove a previously selected application from this window again (inverse action of pressing add). |
|
Clear |
With clear, you remove all selected application from this window at once. |
|
Load |
With load you download the selected firmware / firmware+application into the RAM of the EPROM burner. |
|
Cancel |
With cancel, you leave the menu and go to the previous one. |
|
OK |
With this button you confirm an selection or entry. |
|
Copy |
not used |
|
Delete |
not used |
Procedure for installation:
1. Insert diskette in drive A:
2. Start file Setup.EXE from windows
3. Wait until Setup succeeded displayed
The following procedure will guide you through - using the EPROM Burn Tool.
After installation, you will find a window with the name EPROM Burn Tool.
In this window, you find an icon (burning EPROM).
Double-click on this icon !
You receive the following mask:
Now follow the Steps:
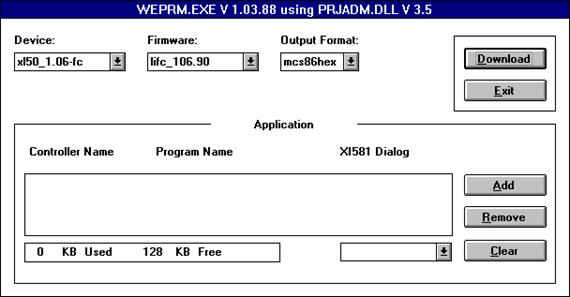
Select the target device
(target firmware group):
Click
on the scroll button next to the list box Device.
Select the target version
number of this target device (target firmware within the previously selected
group):
Click
on the scroll button next to the list box: Firmware.
Select the right Output format
(See also table Explanation of List Boxes)
Click
on the scroll button next the the list box: Ouput Format.
The following process is now
split into 2 different handlings, depending on wether you want
A) to generate a File for the EPROM Burner or
B) a File for Firmware Download with XBS/XI584 Version 1.4.1 and higher.
Follow
now the process A or B, respectively !
Add an application to the
selected Firmware:
Press
the ADD Button ! Your receive the following screen:
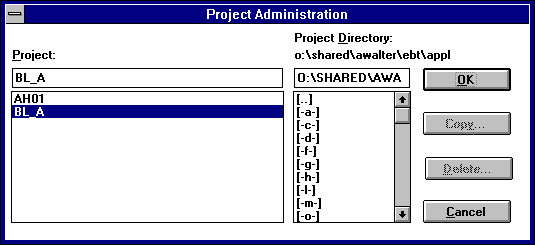
The Application
Selection is done in 2 steps:
Step 1: Select now the correct project first (Screen above):
Click
at the project name and the OK-button afterwards.
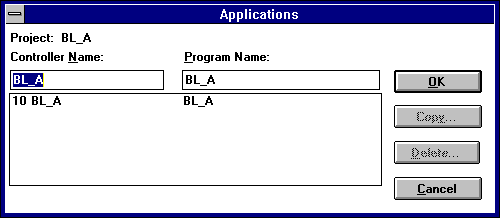
Step 2: Select now the correct
application within that project (that means the correct controller):
Click
at the controller name and the OK-button afterwards.
Now you are back in the first
screen and you see the selected application in the application field.
The next action is to generate a file for the EPORM burner:
Click
on the button DOWNLOAD to generate the ERPOM File.
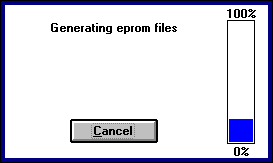
The EPROM files are generated now (You see the above picture active).
After this action was complete,
you receive the following screen. The next action is to select the right EPROM
or Flash EPROM you want to burn the generated file in.
Select
the ERPOM / Flash ERPOM which you want to burn now.
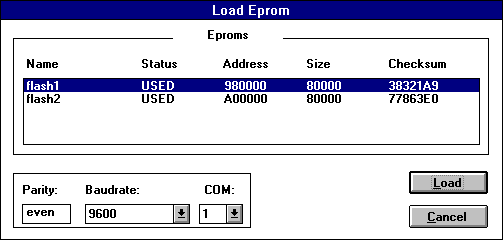
Click
on the corresponding line item.
Now check the Baudrate, COM-Port and Parity before you download.
If the Baudrate and COM Port Number does not fit, change it accordingly.
Having set all those parameters, the next action is to download the selected
file into the RAM of the ERPOM Burner:
Press
the LOAD button now.
After the question, if the ERPOM burner is ready to load, which you
have to confirm, the download starts with the following window:
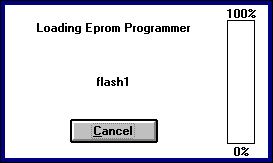
Your will see at the 100% level when the program download to the ERPOM burner
is complete.
Add an application to the selected Firmware:
Press
the ADD Button ! Your receive the following screen:
The Application Selection is done in 2 steps:
Step 1: Select now the correct project first (Screen above):
Click
at the project name and the OK-button afterwards.
Step 2: Select now the correct application within that project (that
means the correct controller):
Click
at the controller name and the OK-button afterwards.
Now you are back in the first screen and you see the selected
application in the application field.
The next action is to generate the files for Firmware Download:
Click
on the button DOWNLOAD to generate the Download Files.
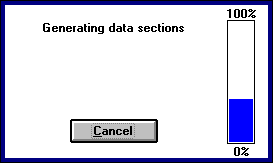
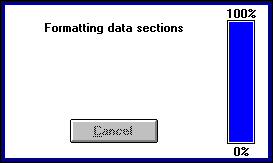
First the data sections are generated and afterwards the download files (You
see the above pictures active).
After this action was complete, you receive the following screen.

After this screen is shown, press o.k. and your are done. The firmware download
files are now stored in the sub-directory FLASH.
For firmware download, use the XBS or XI584 versions 1.4.1 or higher and select
from there the download files in the directory FLASH or the Eprom Burn Tool.
The following tips & tricks should help to avoid mistakes. All known troubles and most asked questions are commented here.
It is very useful to always make a back-up of all generated Files
with EBT as the EBT tool overwrites all files when used the 2nd time.
The applications you select must not be write-protected. Otherwise the firmware generated will not run in the controller !
Offset: The Offset for all files generated with the EPROM Burn tool is 0.
Manual: For all other handlings, please refer to the manual of your EPROM Burner.
As
one example the ERPOM Burner BYTEC 135 H is explained in the next section.
The application, firmware and the ADL-file will be linked together to one file by the EPROM-Burning Tool. This file is generated into the INTEL MSC 86 format and Binary format which will be stored in the same directory as the EPROM-Burning Tool is installed. The same file format must be selected for the INTEL MSC 86 format or Binary 10/16 format on the EPROM Programmer and EPROM Burn Tool as well.
Before you start the EPROM-Burning Tool please check the serial interface number which will be used (Com1 ,2,3, or Com4).
Note: This example is based on the EPROM Burn Tool version 1.03.00
Procedure:
Step:
01 Power up the programmer.
02 Put empty EPROM into the socket
03 Press DEVICE key.
04 Press scroll-keys until display shows 'EPROM TECHNOLOGY'.
05 Press EXECUTE.
06 Press scroll-keys until display shows '24-32 PIN (E)EPROM's'.
07 Press EXECUTE.
08 Select manufacturer with scroll-keys .
(Select
type NEC,AMD or
09 Press EXECUTE.
10 Select device type with scroll-keys number (4001).
11 Press EXECUTE.
12 Press EDIT
13 Select Fill RAM Block
14 Press ENTER
15 Enter DATA Byte=FF
The Burner fills the RAM with FF
16
17 Press scroll-keys until display shows 'RS-232 SERIAL PORT SETUP'.
18 Press EXECUTE.
19 Select baud rate (4800/9600/19200) EXECUTE
Parity check = even EXECUTE
21 Data bits = 8 EXECUTE
22 Stop bits = 1 EXECUTE
23 Handshake = none EXECUTE
24 Duplex = half EXECUTE
25 SER. REC. LEN = 10 -> EXECUTE
26
27 Press scroll-keys until display shows 'RS-232 SERIAL PORT DOWNLOAD DATA'
28 Press scroll keys until display shows offset.
29 Type in Offset = 000000.
30 Press EXECUTE
31 Start now the ERPOM burn tool following the already described
sequence.
Follow
the seqeuence BEFORE you pressed LOAD.
The
following descriptions assumes you selected binary format !
32 Press scroll-keys on EPROM programer until display shows 'INTEL MCS-86 HEX' or Binary10/16 format. Select one of the format
33 Press EXECUTE.
34 Type in 'RAM BEG ADDR = 000000
35 Press scroll keys until display shows offset.
36 Type in Offset = 000000.
37 The size as displayed on the screen of the Eprom Burn tool (Code Size )must be entered into the field Block size of the EPROM burner
Note:
If the entered block size of the EPROM Burner is not the same as the size displayed on the screen the checksum of the EPROM Burner and EPROM Burn Tool will be different.
(do not press EXECUTE)
38 Press button LOAD on EPROM Burn Tool.
39 EPROM Tool asks EPROM Programmer OK?
40 Press EXECUTE on the EPROM burner BYTEK.
41 Press button Yes
The tool displays Eprom Programmer Loading
Wait at the EPROM burner BYTEK for I/O FUNCTION DONE NO ERRORS EXECUTE
Note:The serial driver from Windows for
Workgroups 3.11 sends
an additional character after
the file transfer.
This can result in an error
message of the EPROM burner.
The EPROM is correct, if the
checksum delivered by the
EPROM Burn Tool is the same as
the checksum of the
EPROM.
Copy the COMM.DRV driver from
disk 1 into the SYSTEM
subdirectory of your WINDOWS
installation in order to avoid
this error message.
43 Press PROG
44 Press EXECUTE
45 Display shows 'PROGRAM DONE'
46 Remove EPROM
47 Finish
|
Politica de confidentialitate | Termeni si conditii de utilizare |

Vizualizari: 2047
Importanta: ![]()
Termeni si conditii de utilizare | Contact
© SCRIGROUP 2025 . All rights reserved